
Seeed Studio sent me two nice little boards that can be used for IoT development: WRTNode and LinkIt ONE. Today, I’ll show pictures of WRTNode and accessories, and go through the “starting guide“, and will test LinkIt ONE board a few days later.
WRTnode Unboxing
I’ve received WRTnode by Fedex, and the board is stored in a plastic box.
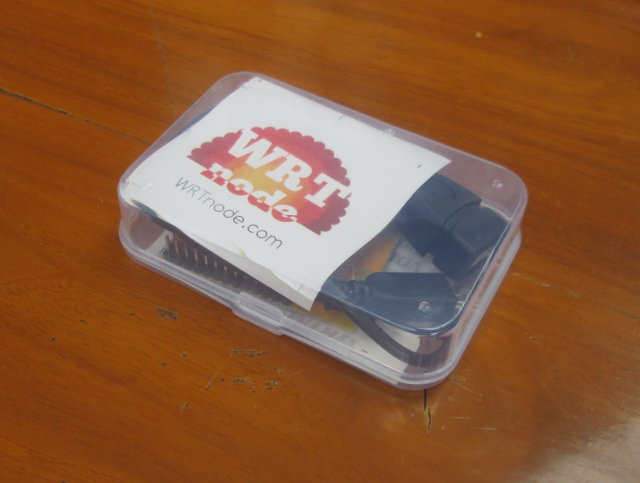
Inside the box, you’ll find the board, a “special” USB used to power the board and as an OTG adapter, a piece of paper with useful links (Wiki), and some WRTnode stickers.

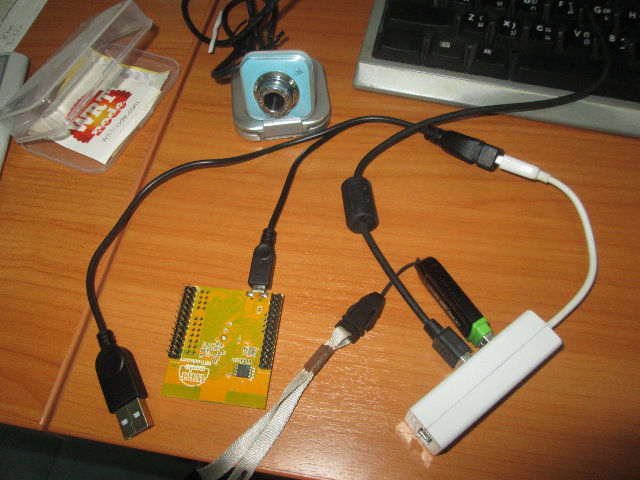
Any micro USB to USB cable can be used to power the board, but this cable is useless to connect USB devices such as flash drives, webcams (OpenCV is supported), Bluetooth dongles, and so on. You could even connect a USB hub to connect multiple USB devices as shown below.
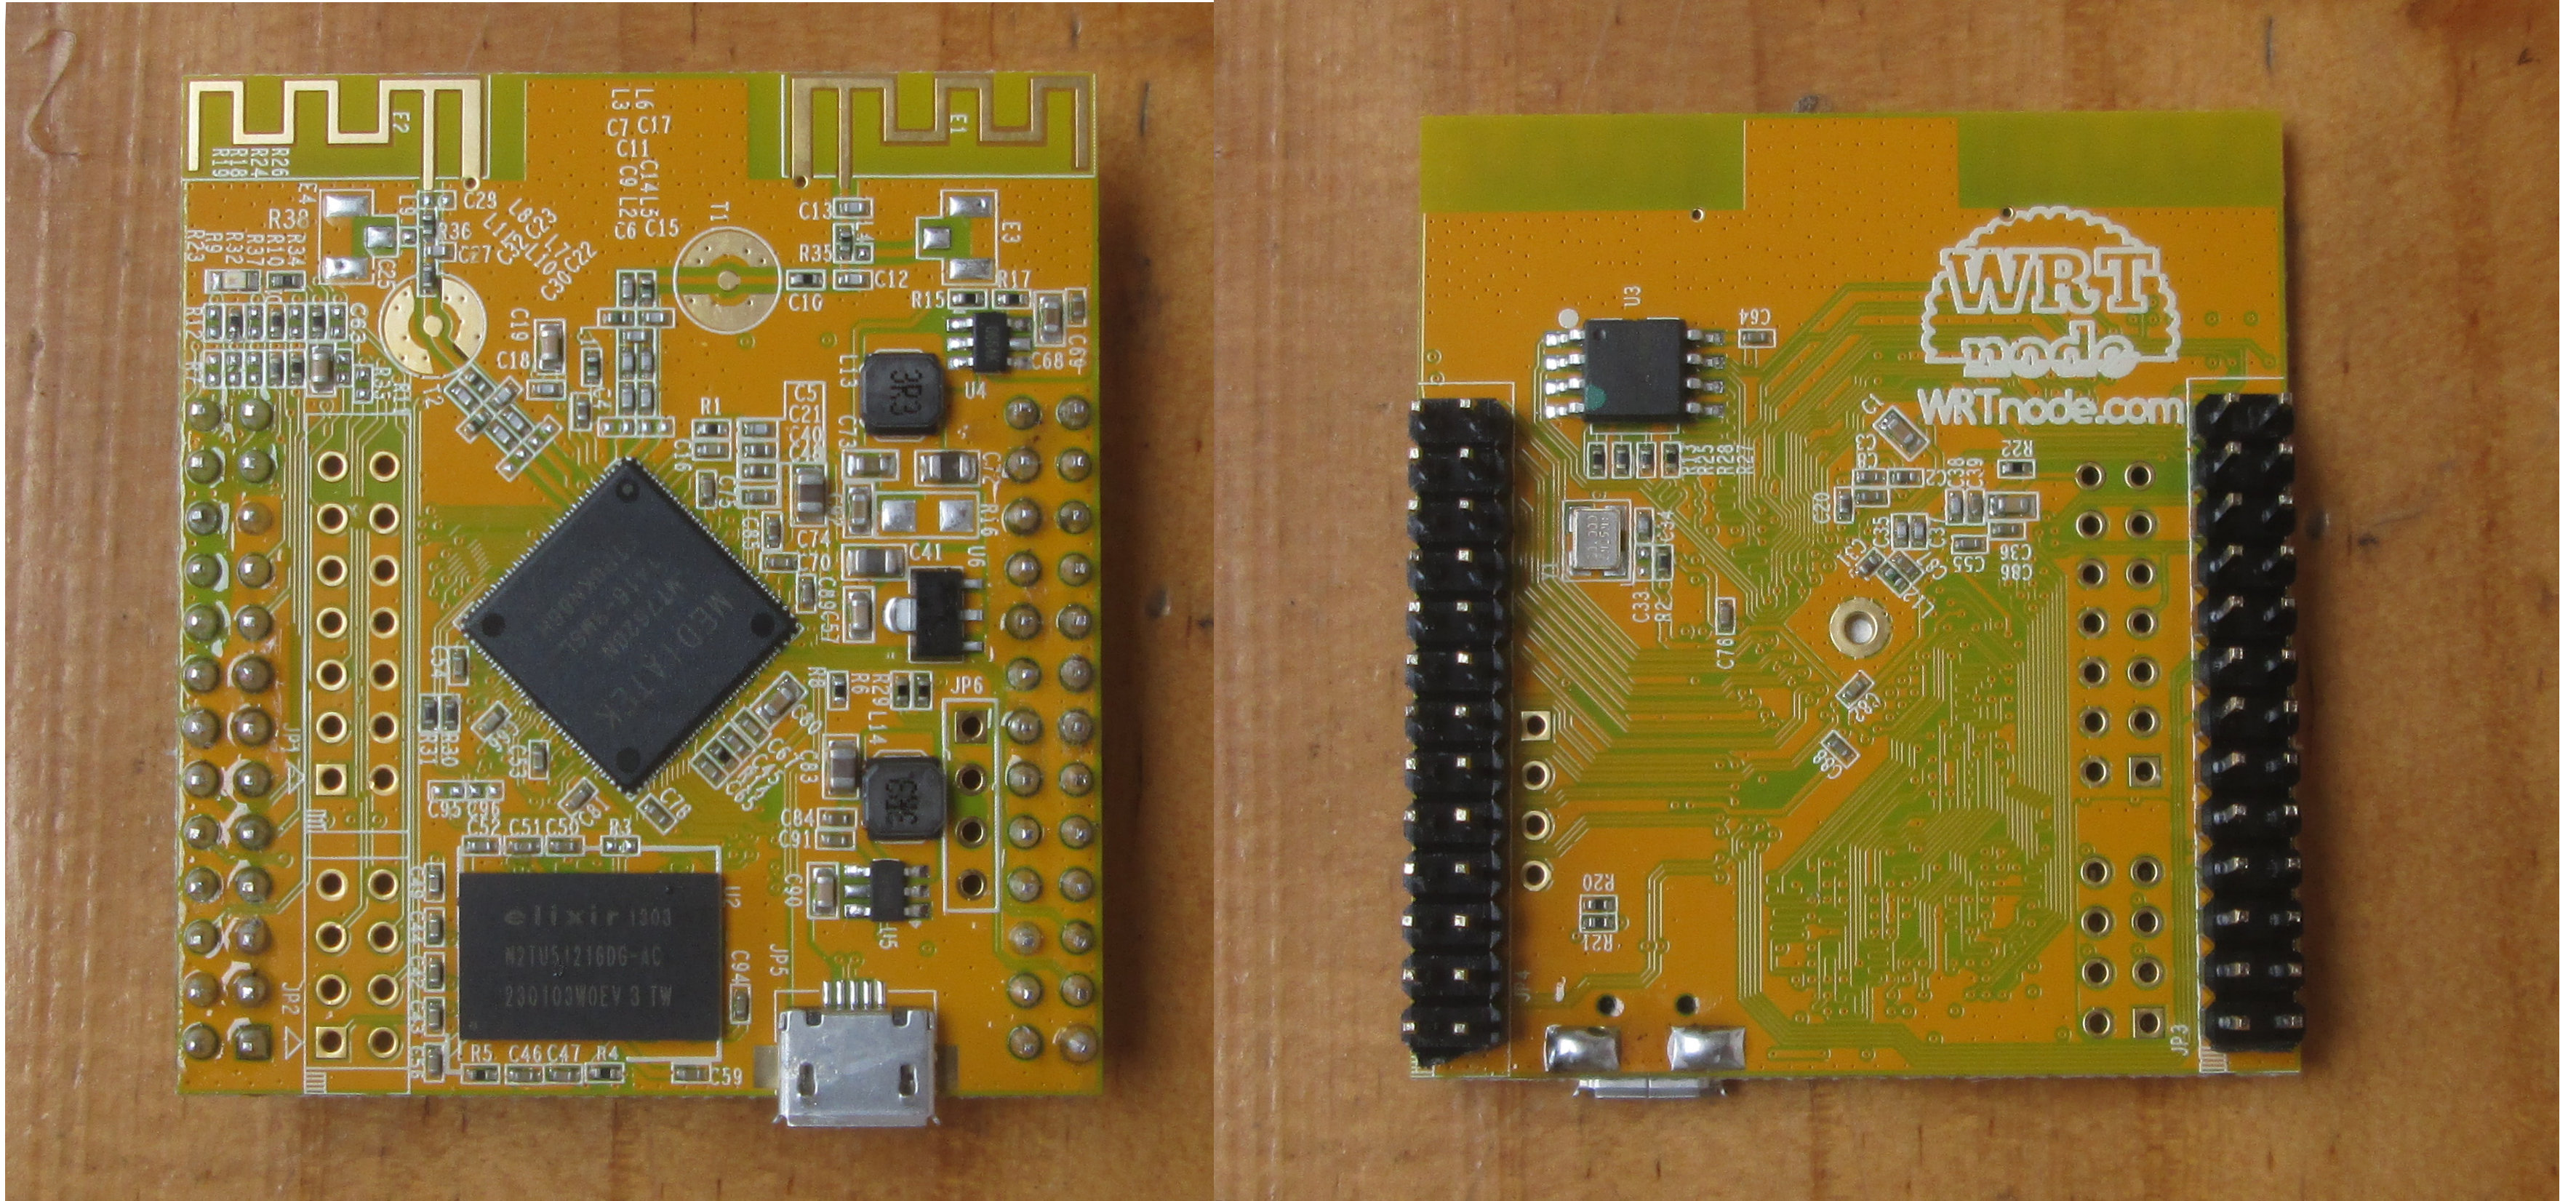
I’ve also taken a picture of both sides of the board shown the antenna on-board antennas, Mediatek MT7620n WiSoC, Elixir N2TU51216DG-AC DDR2 chip (64MB @ 400 MHz), the 16 MB SPI flash, as well as the headers for connecting various peripherals via I2C, SPI, UART, USB, etc…
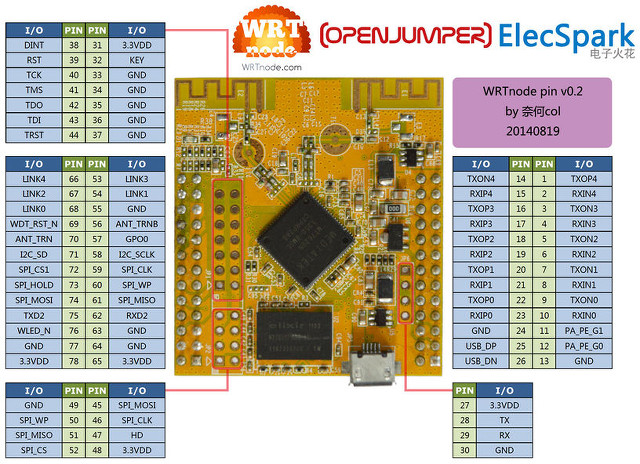
You can also add Ethernet easily by making your own Ethernet cable using T568B wiring standard. I’m not 100% sure it’s safe though, as there are usually some extra components for Ethernet. I’ve included the board pinout chart for your reference.
WRTnode Quick Start Guide
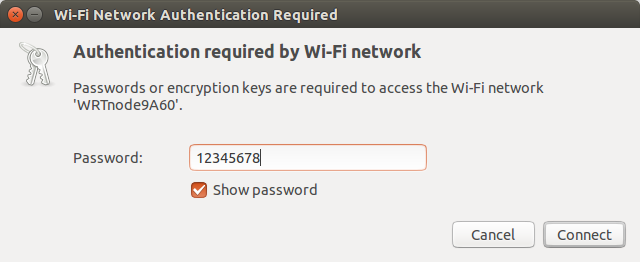
To start the board simply connect the USB cable to a power adapter or a USB port on your computer. After about 10 seconds, you should see a blue LED lit up, and shortly after, you should see WRTnodeXXXX ESSID, where XXXX are the last 4 digit of the board MAC address. Connect it with your computer, and input the password: 12345678.
 Normally the board will resolve as several URL, but at first none of them worked.
|
1 2 3 4 5 6 |
$ ping i.wrtno.de ping: unknown host i.wrtno.de $ ping openwrt.lan ping: unknown host openwrt.lan $ ping wrtnode.lan ping: unknown host wrtnode.lan |
But you can check the route to see which subnet is used by your Wi-Fi connection:
|
1 2 3 4 5 6 |
$ route Kernel IP routing table Destination Gateway Genmask Flags Metric Ref Use Iface default 192.168.0.1 0.0.0.0 UG 0 0 0 eth0 192.168.0.0 * 255.255.255.0 U 1 0 0 eth0 192.168.8.0 * 255.255.255.0 U 9 0 0 wlan0 |
I could finally ping the board with:
|
1 2 3 4 5 |
$ ping 192.168.8.1 PING 192.168.8.1 (192.168.8.1) 56(84) bytes of data. 64 bytes from 192.168.8.1: icmp_seq=1 ttl=64 time=12.4 ms 64 bytes from 192.168.8.1: icmp_seq=2 ttl=64 time=2.37 ms 64 bytes from 192.168.8.1: icmp_seq=3 ttl=64 time=12.1 ms |
Interestingly, ping openwrt.lan, and the other two URL also work afterwards, so maybe I was a little to impatient during my testing…
The first time you need to connect to the board via telnet in order to set the root password:
|
1 |
$ telnet 192.168.8.1 |
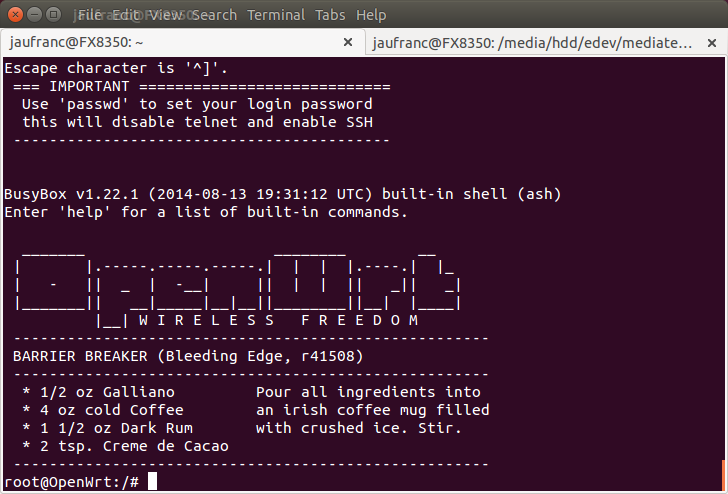
Now change the root password using passwd as you would do in any other Linux machine, and exit the connection, in order to connect via SSH instead:
|
1 2 3 4 5 6 7 8 9 |
$ ssh root@192.168.8.1 The authenticity of host '192.168.8.1 (192.168.8.1)' can't be established. RSA key fingerprint is bc:00:71:ac:b1:56:e7:7b:c7:7a:9b:6a:59:8e:da:82. Are you sure you want to continue connecting (yes/no)? yes Warning: Permanently added '192.168.8.1' (RSA) to the list of known hosts. BusyBox v1.22.1 (2014-08-13 19:31:12 UTC) built-in shell (ash) ..... root@OpenWrt:~# |
At this point, you’ve got another Wi-Fi access point on your network, but it’s not connected to Internet, so let’s start by locating the Wi-Fi routers with aps command:
|
1 2 3 4 5 6 7 8 |
root@OpenWrt:~# aps WRTnode AP scaner. Begin scaning APs, pls wait... Finished. APs available are... ra0 get_site_survey: Ch SSID BSSID Security Siganl(%)W-Mode ExtCH NT WPS DPID 1 CNX-TRANSLATION 94:0c:6d:e6:5b:10 WPA1PSKWPA2PSK/TKIPAES 100 11b/g/n ABOVE In YES |
I only have one ESSID here, but this will list all ESSID in your environment. With that data, you can configure WRTnode to connect to your Wi-Fi router using vw command (vi wireless?):
|
1 2 3 4 5 6 7 8 9 10 11 12 13 14 15 16 17 18 19 20 21 |
root@OpenWrt:~# vw config wifi-device 'ra0' option type 'ralink' option mode '9' <strong>option channel '1'</strong> option txpower '100' option ht '20+40' option country 'US' option disabled '0' config wifi-iface option device 'ra0' option network 'lan' option mode 'ap' option encryption 'psk2' option key '12345678' option ApCliEnable '1' <strong>option ApCliSsid 'CNX-TRANSLATION' option ApCliAuthMode 'WPA2PSK' option ApCliEncrypType 'AES' option ApCliPassWord 'router_password'</strong> option ssid 'WRTnode9A60' |
You need to change the lines in bold above using the data from aps. The first line is the Channel (Ch) , and the four lines in the wifi-iface section are pretty much self-explanatory. Save the file with Esc + “:wq”.
aps and vw do not report security features in the same way. Here’s the conversion table in case you don’t use WPA2PSK/AES:
|
1 2 3 4 5 6 7 8 9 |
aps:Security vw:ApCliAuthMode/ApCliEncrypType ========================================================= WPA1PSKWPA2PSK/TKIPAES WPA2PSK/AES WPA2PSK/AES WPA2PSK/AES WPA2PSK/TKIP WPA2PSK/TKIP WPAPSK/TKIPAES WPAPSK/TKIP WPAPSK/AES WPAPSK/AES WPAPSK/TKIP WPAPSK/TKIP WEP WEP/WEP |
Finally, restart the network:
|
1 |
root@OpenWrt:~# nr |
and verify WRTnode got an IP address from the Wi-Fi router using DHCP:
|
1 2 3 4 5 6 7 8 9 |
root@OpenWrt:~# ia apcli0 Link encap:Ethernet HWaddr 66:51:7E:32:9A:60 inet addr:192.168.0.105 Bcast:192.168.0.255 Mask:255.255.255.0 inet6 addr: fe80::6451:7eff:fe32:9a60/64 Scope:Link UP BROADCAST RUNNING MULTICAST MTU:1500 Metric:1 RX packets:0 errors:0 dropped:0 overruns:0 frame:0 TX packets:0 errors:0 dropped:0 overruns:0 carrier:0 collisions:0 txqueuelen:1000 RX bytes:0 (0.0 B) TX bytes:0 (0.0 B) |
Good 192.168.0.105 is an IP adress from local network. Let’s also check we can ping a site on the Internet:
|
1 2 3 4 5 6 7 8 9 |
root@OpenWrt:~# ping cnx-software.com PING cnx-software.com (104.28.18.95): 56 data bytes 64 bytes from 104.28.18.95: seq=0 ttl=53 time=81.999 ms 64 bytes from 104.28.18.95: seq=1 ttl=53 time=87.759 ms 64 bytes from 104.28.18.95: seq=2 ttl=53 time=81.381 ms ^C --- cnx-software.com ping statistics --- 3 packets transmitted, 3 packets received, 0% packet loss round-trip min/avg/max = 81.381/83.713/87.759 ms |
All good!
Once I had a problem connecting to my Wi-Fi router, and it turned out my router was configured to automatically select the channel, and it had switched to Channel 4. Running vw again to change the configuration with “option channel ‘4’” made the connection work again. There’s probably an option in OpenWRT to automatically detect the channel, but I haven’t investigated.
You can also install packages for okpg. I tried to install luci, but it was pre-installed, so I added openvpn support instead:
|
1 2 3 4 5 6 7 8 9 10 11 12 13 |
root@OpenWrt:~# opkg update Downloading http://d.wrtnode.com/packages/Packages.gz. Updated list of available packages in /var/opkg-lists/barrier_breaker. root@OpenWrt:~# opkg install luci Package luci (svn-r10457-1) installed in root is up to date. root@OpenWrt:~# opkg install openvpn-easy-rsa Installing openvpn-easy-rsa (2013-01-30-2) to root... Downloading http://d.wrtnode.com/packages/openvpn-easy-rsa_2013-01-30-2_ramips_24kec.ipk. Installing openssl-util (1.0.1h-1) to root... Downloading http://d.wrtnode.com/packages/openssl-util_1.0.1h-1_ramips_24kec.ipk. Configuring openssl-util. Configuring openvpn-easy-rsa. root@OpenWrt:~# |
That’s it the quick start guide is completed.
I’ve also run some command to show memory and storage usage:
|
1 2 3 4 5 6 7 8 9 10 11 12 13 14 |
root@OpenWrt:~# df -h Filesystem Size Used Available Use% Mounted on rootfs 7.3M 348.0K 7.0M 5% / /dev/root 7.5M 7.5M 0 100% /rom tmpfs 30.2M 80.0K 30.1M 0% /tmp /dev/mtdblock5 7.3M 348.0K 7.0M 5% /overlay overlayfs:/overlay 7.3M 348.0K 7.0M 5% / tmpfs 512.0K 0 512.0K 0% /dev root@OpenWrt:~# free -m total used free shared buffers Mem: 61852 29084 32768 0 3536 -/+ buffers: 25548 36304 Swap: 0 0 0 |
Out of the 16Mb SPI flash, only 7.3M available are available for OpenWRT, the rest is probably used by the bootloader. There’s nearly 64MB RAM available, and 29MB free.
If you are interested in the board, you can purchase it from Seeed Studio ($25), which provided the board for this review, but it’s also available on other shops such as DFRobot or Eleduino for the same price, although shipping fees may vary. To go beyond this Quick Start Guide, visit WRTnode WiKi to access the source code, schematics, and various documentation including tutorials.

Jean-Luc started CNX Software in 2010 as a part-time endeavor, before quitting his job as a software engineering manager, and starting to write daily news, and reviews full time later in 2011.
Support CNX Software! Donate via cryptocurrencies, become a Patron on Patreon, or purchase goods on Amazon or Aliexpress


With regards to the Ethernet, there are usually 2 external components needed: a phyceiver and a transformer (also referred to as magnetics) The MT7620n already has phys built-in, so all that is needed is the transformer as it is required by the Ethernet specification. However, since the transformer provides isolation and there’s supposed to be one on either side of the link, it is usually safe (albeit wrong according to spec) to assume that the other side is isolated and the link will work with just cable – especially for short runs. Personally, I’d try and get one of those… Read more »