CNXSoft: This is a guest post by Cesanta
If you walked into any Hardware hackathon over the last year, you would see they are about innovation and bringing new ideas to this world and most of them are centered around the connected devices nowadays. However, just walk the floor, talk to the teams and you can quickly see an elephant in the room. The Hackathons are about connected devices, but with the ‘recommended’ and frequently sponsored hardware distributed to the teams such as Intel Galileo, Raspberry Pi, etc…. developers may struggle for a long time to even connect it to the cloud!
Not to mention the innovation is usually hindered by a tedious environment setup which takes hours, things to learn about the specific hardware and how it can be programmed using low level languages. So many teams spent most of the time fighting with those issues and oftentimes still do not have their prototype ready and connected by the end of hackathon.
This situation can be improved by using ESP8266 boards with Mongoose OS and SeeedStudio Grove Sensors. The solution brings the following benefits:
- Low price:
- ESP8266 development board is $4-15 depending on the board;
- Seeed Studio Sensors are priced $3 to $15 each, but you can also save by purchase them as a part of Grove Starter Kit for $39.
- The solution is solderless & plug and play – so anyone can actually use it fast.
- With Mongoose OS the firmware logic can be coded within few minutes using JavaScript code
- The data can be pushed to any cloud or public MQTT server such as Mosquitto, HiveMQ, AWS IoT, etc…
Let’s jump into the action and get ESP8266 & Seeed Light Sensor up and running with Mongoose OS in a few minutes. This example below shows how to get the hardware (sensor) data and send it to the cloud.
- Get your ESP8266 (e.g. NodeMCU) and Seeedstudio Light Sensor and Button ready.
- Download and install mOS tool for Mongoose OS. This works in Linux, Mac OS X, or Windows operating systems
- Connect the hardware
- Power the Grove base shield: connect GND and VCC pins to the NodeMCU GND and VCC pins
- Connect light sensor to slot 7 on the Grove base shield
- Connect slot 7 to the ADC pin on the NodeMCU board
- Connect NodeMCU board to your computer
- Program the board to retrieve the light sensor data and send it to the cloud (HiveMQ in this example)
- Start mos tool, switch to the prototyping mode, edit init.js file
12345678load('api_mqtt.js');load('api_grove.js');Grove.Button.attach(5, function() {let value = Grove.LightSensor.get(0);print('Light: ', value);MQTT.pub(‘my/topic’, JSON.stringify({light: value}));}); - Click ‘Save and reboot device”
- Start mos tool, switch to the prototyping mode, edit init.js file
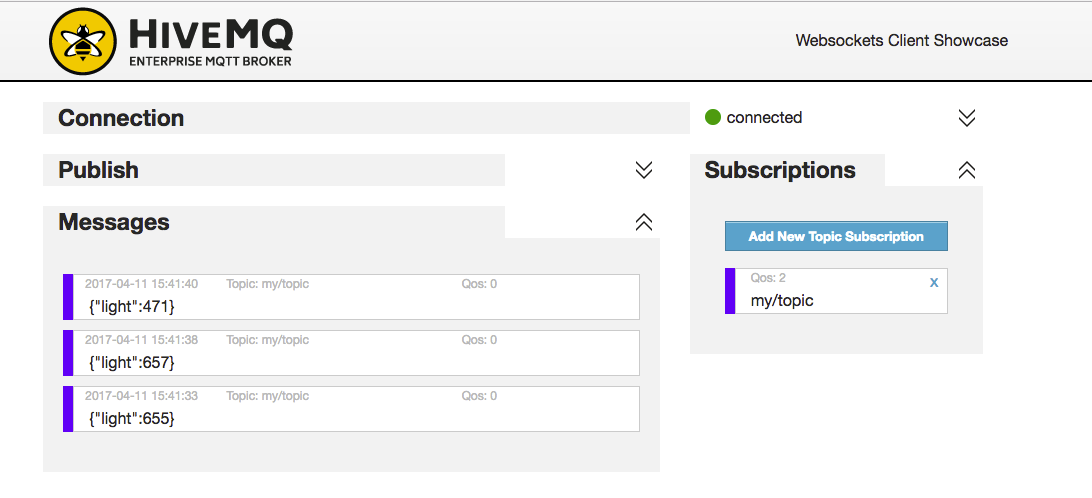
- Go to http://www.hivemq.com/demos/websocket-client/, connect and subscribe to the topic “my/topic”
- Press a button and see how light sensor reading is sent to the MQTT server

Now you can see how easy it was! Want to play with other Seedstudio sensors from Grove Kits? Check video tutorials for button, motion sensor, moisture sensor, UV sensor, relay, buzzer, etc… including the one below with the light sensor.

Jean-Luc started CNX Software in 2010 as a part-time endeavor, before quitting his job as a software engineering manager, and starting to write daily news, and reviews full time later in 2011.
Support CNX Software! Donate via cryptocurrencies, become a Patron on Patreon, or purchase goods on Amazon or Aliexpress


Interesting…How is the memory footprint on ESP8266 with the basic 1MB flash?
Will it let FW like ESPurna and ESP Easy run on top? How about OTA updates with just 1 MB flash? Any optimizations here?
@Athar
Mongoose OS is also a firmware, so you can’t run it alongside ESPurna or ESPeasy.
@Jean-Luc Aufranc (CNXSoft)
Ok, as suspected. The terms FW and OS become fuzzy at times, but it would be nice to have some Mongoose v ESPurna v ESP Easy comparisons- that would be real learning.
It is quite easy to do MQTT publish & subscribe with Mongoose OS. Check this video for step by step example with HiveMQ https://youtu.be/8dvpeonjmC0
Low cost ESPs with grove connectors I have used:
https://www.itead.cc/sonoff-dev.html (onboard usb-serial)
https://www.seeedstudio.com/Wio-Link-p-2604.html (onboard usb-serial)
https://www.seeedstudio.com/Wio-Node-p-2637.html (usb power only, only 2 connectors)
These all come with non-standard firmware, but are easily updated.