
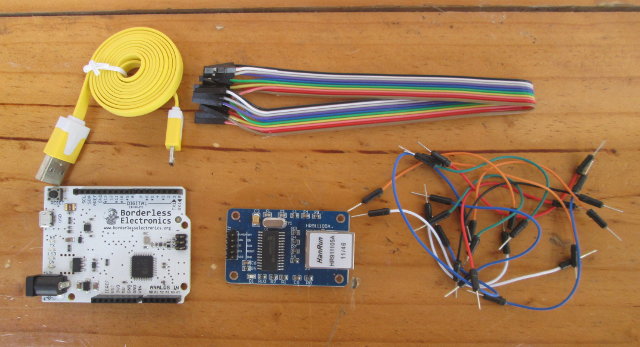
If you have an embedded project that requires some GPIOs, and Ethernet connectivity, you now have a few choices of low cost low boards such as the Raspberry Pi with Broadcom ARM11 SoC for $35 + shipping, Texas Instruments Connected LaunchPad with an ARM Cortex M4 MCU for $20 including shipping, and today I’ve given a try at a solution to run an HTTP server with an Arduino Leonardo clone connected to ENC28J60 Ethernet module that together cost about $15 including shipping. This Ethernet module has been around for a while and is well supported, I just never took the time to give it a try before.
I’ve purchased ENC28J60 module on eBay for $3.46 and connected it via SPI to an Arduino Leonardo clone I acquired as part of a kit via Indiegogo for $12. The kit is not available for purchase outside the crowdfunding campaign, but you can also find Arduino Leonardo clones with a micro USB cable for just under $10 in Aliexpress. Besides the two boards, you’ll need a micro USB cable and a few prototyping cables.
I’ve mostly followed the instructions provided on Nathan Hein’s blog who used an Arduino Uno instead of an Arduino Leonardo.
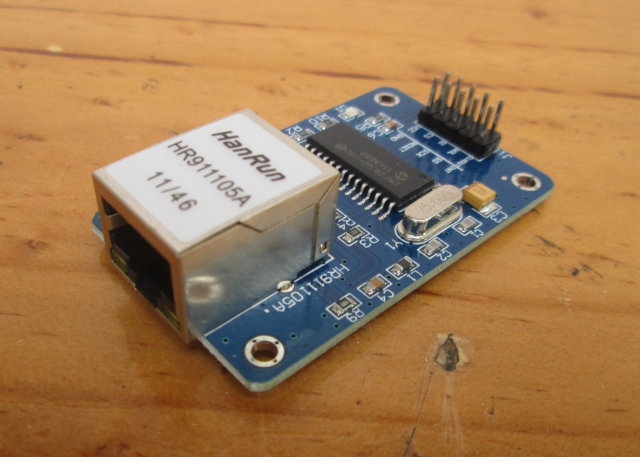
Connecting ENC28J60 to Arduino
There are 6 out of 10 pins that need to be connected on ENC’s header. I’ve used the following connection table between the two boards. pinout diagram
| EtherCard | Arduino Leonardo |
|---|---|
| VCC | 3.3V |
| GND | GND |
| SCK | SCK – Pin 9 on ICSP header |
| SO | MISO – Pin 11 on ICSP header |
| SI | MOSI – Pin 10 on ICSP header |
| CS | Pin 8 |
The pin numbers on the ICSP header are based on this pin diagram.
Optionally you can also mount the Ethernet module on top or below your Arduino board thanks to the module’s Arduino compatible mounting holes.
Running a Web server in Arduino
Now that we’re done with the connection, it’s time to load a sketch to try it out. You’ll find to run Arduino IDE 1.0.x in Windows, Linux or Mac OS X. I’m using Arduino IDE 1.0.5 in Ubuntu 14.04.
You’ll need to install a library that supports ENC28J60, and there are several, but EtherCard appears to be the most used.
Here’s what I had to to do install it:
- Download EtherCard library
- Uncompress ethercard-master.zip, and rename ethercard-master directory to ethercard or the Arduino IDE will refuse to import the library with the following error: “Library names must contain basic letters and numbers. (ASCII only and no spaces, and it cannot start with a number)“
- In the Arduino IDE, select Sketch->Add file and select the ethercard directory
- You should now see Ethercard in the list of library, contributed section via Sketch->Import Library.
The library comes with 19 samples, that you can access via File->Examples->Ethercard in the Arduino IDE.
Let’s try backSoon sample which should act as a web server and display a “service unavailable” web page. This is the complete source code for this sample:
|
1 2 3 4 5 6 7 8 9 10 11 12 13 14 15 16 17 18 19 20 21 22 23 24 25 26 27 28 29 30 31 32 33 34 35 36 37 38 39 40 41 42 43 44 45 46 47 48 49 50 51 52 53 54 55 56 57 58 59 60 61 62 63 |
// Present a "Will be back soon web page", as stand-in webserver. // 2011-01-30 <jc@wippler.nl> http://opensource.org/licenses/mit-license.php #include <EtherCard.h> #define STATIC 0; // set to 1 to disable DHCP (adjust myip/gwip values below) #if STATIC // ethernet interface ip address static byte myip[] = { 192,168,1,200 }; // gateway ip address static byte gwip[] = { 192,168,1,1 }; #endif // ethernet mac address - must be unique on your network static byte mymac[] = { 0x74,0x69,0x69,0x2D,0x30,0x31 }; byte Ethernet::buffer[500]; // tcp/ip send and receive buffer const char page[] PROGMEM = "HTTP/1.0 503 Service Unavailable\r\n" "Content-Type: text/html\r\n" "Retry-After: 600\r\n" "\r\n" "<html>" "<head><title>" "Service Temporarily Unavailable" "</title></head>" "<body>" "<h3>This service is currently unavailable</h3>" "<p><em>" "The main server is currently off-line.<br />" "Please try again later." "</em></p>" "</body>" "</html>" ; void setup(){ Serial.begin(57600); Serial.println("\n[backSoon]"); if (ether.begin(sizeof Ethernet::buffer, mymac) == 0) Serial.println( "Failed to access Ethernet controller"); #if STATIC ether.staticSetup(myip, gwip); #else if (!ether.dhcpSetup()) Serial.println("DHCP failed"); #endif ether.printIp("IP: ", ether.myip); ether.printIp("GW: ", ether.gwip); ether.printIp("DNS: ", ether.dnsip); } void loop(){ // wait for an incoming TCP packet, but ignore its contents if (ether.packetLoop(ether.packetReceive())) { memcpy_P(ether.tcpOffset(), page, sizeof page); ether.httpServerReply(sizeof page - 1); } } |
The code defaults to DHCP, but you can also change this to static IP and define your own board and gateway IP addresses. The MAC address is also hard-coded in the source, and if you plan to have a few you’ll need to store and read the MAC in the EEPROM, but I’ll leave it as it is for this test.
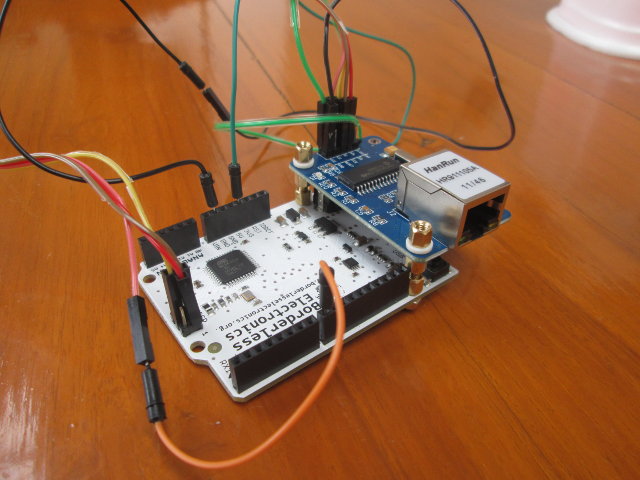
It’s now time to connect the Arduino board to your computer via the micro USB to USB cable in order to power and program the board. Also connect an Ethernet cable to ENC module.
Click on the upload button (or press Ctrl+U) to load and run the program on the board. In theory, you can also run the Serial monitor in the Arduino IDE, and after a few seconds see network parameters similar to:
|
1 2 3 |
IP: 192.168.1.107 GW: 192.168.1.1 DNS: 24.49.173.40 |
But for some reasons, my serial connection is unstable, and I did not manage to get it to work. However, I used Wireshark to check for DHCP messages and find the IP address. You should also be able to find the IP address of the board via your router settings.
The IP address was 192.168.0.111 and I could access the web page via Firefox.
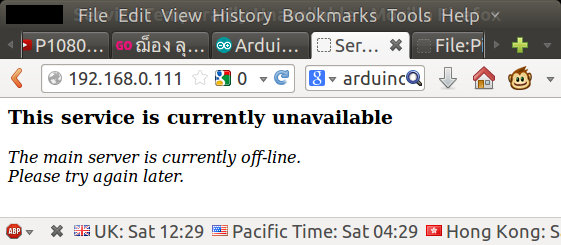 That’s the error message hard-coded in the source, and it means the Ethernet connection and web server are working. Success!
I’ve used charger doctor to have a look at the power consumption. I could measure 0.12 to 0.15A (0.6 to 0.75 Watts) whether the connection was mostly idle or I used ping -f. If I disconnect the ENC28J60 module, the current to power the Arduino board drops to 0.02 to 0.03 mA (0.1 to 0.15 W). Some people have reported ENC28J60 may lose connection after a few hours due to overheating and a small heatsink may be needed.
If you want to learn more about ENC28J60 and Arduino, you may want to visit Luca Dentella’s blog with many related tutorials including one which explains how to control a relay via a web page optimized for smartphones.

Jean-Luc started CNX Software in 2010 as a part-time endeavor, before quitting his job as a software engineering manager, and starting to write daily news, and reviews full time later in 2011.
Support CNX Software! Donate via cryptocurrencies, become a Patron on Patreon, or purchase goods on Amazon or Aliexpress


What about Hi-Link HLK-RM04? It’s 12 to 15 buck on usual Chinese sites and have wifi, 2 Ethernet ports (although you need to provide your own RJ45 connector-transformer combo), some GPIOs, and best of all – a full-blown Linux on it (also supported by OpenWRT distro) – same money, not at all much higher power consumption but waaay more power.
This AsiaRF board is better than the HiLink one. It is set up for use as a module. Support for it is in OpenWRT.
http://www.asiarf.com/Smallest-Tiny-Ralink-802-11n-Wireless-AP-Router-Module-Board-AWM002-product-view-375.html
There is a starter kit with carrier eval board for $45. But once you get going the modules are under $10.
This is another option that is supported in OpenWRT
http://www.asiarf.com/IoT-Home-Automation-Sever-WiFi-11n-MT7620-High-Speed-Multi-Functions-Router-Board-AP2620-P-product-view-388.html
All of those pin headers make it easy to connect IOT things.
It almost impossible to beat using these single chip Wifi SOC solutions when it comes to building an IOT bridge.
IMO UIPEthernet is better library for ENC28J60 as it is compatible with stock Arduino Ethernet library.
That’s even less expensive than the TI CC3000!
But what part of the TCP/IP stack are built-in to the ENC28J60? I know it has a integrated MAC and PHY, but how much of the web server must be implemented by the user software?
I haven’t done any socket programming, but if it’s simple enough, I’d love to be able to control and view status via a webpage for a cheapy 8-bit pic!
cc3000 is great but overpriced
@Jon Smirl
put an enclosure, power supply and antenna etc the price will go up I assume, plus, you need get FCC approval for that too? looks interesting, but the webpage did not tell much to encourage a purchase.
I actually registered and logged in, single unit is $15, the site was not actively updated either
@ben that is all done in microchip libraries so essentially not much. But I still think the launchpad is the best value with integrated programmer/debugger.
@ben
I should be included in the link to Microchip’s ENC28J60 page -> http://www.microchip.com/wwwproducts/Devices.aspx?dDocName=en022889
It looks like it’s taking care of everything at the MAC level, but TCP/IP and server parts are done in EtherCard library running in the Atmel MCU. You could check the EtherCard source code (C++) to see how it has be implemented.
If your Leonardo clone is not 3.3Volt IO, the ENC28J60 module will be damaged or unstable.
I think you might need to add the level shifter.
@xxiao
Email paul@asiarf.com with questions. This is an OEM manufacturer, not a retail store. Not really meant for sales of one unit except for eval. $15 is for Q1 sample. In Q1000 the module are well below $10. Somebody should use this module as the basis for making a retail hobbyist board.
The module has FCC but you need to use the antenna he supplies to make it valid. I think is costs under $1. If you pick your own antenna you need to redo FCC. He can help with that for about $1,000.
Note that these modules run full Linux. You can log into a command prompt and run all of your normal networking apps. Openwrt even runs a web server on them. I know of no other solution for getting a 802.11n, Ethernet and Linux all running for sub-$10. cnx – profile on these would make a good article.
The modules are similar to what is on an Arduino Yun but $10 instead of $100.
An article is already planned 🙂
@Jon Smirl
sounds great. TL-WR703N is another option and a fully finished product, but it does not expose any pins(e.g. UART,GPIO,etc) for hobby kits.
@xxiao
TL-WR703N is what we started on before switching to module. Pins are the problem on TL-WR703N.
Module exposes – USB (480Mb), two UART, SPI, I2C, GPIO, PWM, I2S, PCM, two Ethernet
The MT7620 board exposes a very hard to find PCIe connection. Those are almost always on boards over $100. Main use for PCIe is attaching 802.11ac. 11ac is too fast for USB2. I think he has a 11ac module for that board.
@Digiko
It’s a good remark, and something I completely forgot to check beforehand.
I got lucky, as the block diagram on page 3 of ECN18J60 specs (http://ww1.microchip.com/downloads/en/devicedoc/39662a.pdf) indicates the SPI pins are 5V tolerant.
You may also try to port OpenWRT to those 10$ RT5350F dongles (4MB NAND, 32MB RAM, wi-fi, ethernet, usb) http://www.aliexpress.com/item/Mini-Portable-2in1-150Mbps-Mobile-Hotspot-RJ45-AP-Wireless-USB-3G-Wifi-Router-For-iPhone-4G/1603594053.html
@ade Do you have pictures of the PCB inside on these dongles?
If OpenWRT can be ported to a ~=$10 router, that would be very cool 🙂 Shame there’s no USB though…
@onebir Read this article. http://www.cnx-software.com/2014/04/28/15-asiarf-awm002-awm003-wi-fi-modules-run-openwrt-expose-gpios/
It seems that someone did it: http://my-embedded.blogspot.com/2013/12/mini-4g-router-rt5350f.html
For some reasons, there’s now an ENC28J60 HAT for the Raspberry Pi -> https://www.seeedstudio.com/ENC28J60-OVERLAYS-HAT-for-Raspberry-pi-p-3045.html
Why not just run Linux on a secondhand or new Android TV box with power supply? Providing you can get Linux for your model?