
NanoPC-T4 is one of the many Rockchip RK3399 SBCs now available, and as we’ve seen in the “unboxing review” the company sent me two samples. So far, I’ve been reviewing RK3399 boards with Linux distributions in posts such as “Checking Out Debian and Linux SDK for VideoStrong VS-RD-RK3399 Board” and more recently “AIO-3399J Development Board Review with Ubuntu 16.04“. But in this NanoPC-T4 review, I’ll switch to Android, specifically Android 7.1, as I’ll soon try Android 8.1 on Firefly-RK3399 which might make for an interesting comparison between the two versions of the OS, before switching to Linux with Pine64 RockPro64 board which I received yesterday.
First Boot with NanoPC-T4 Development Board
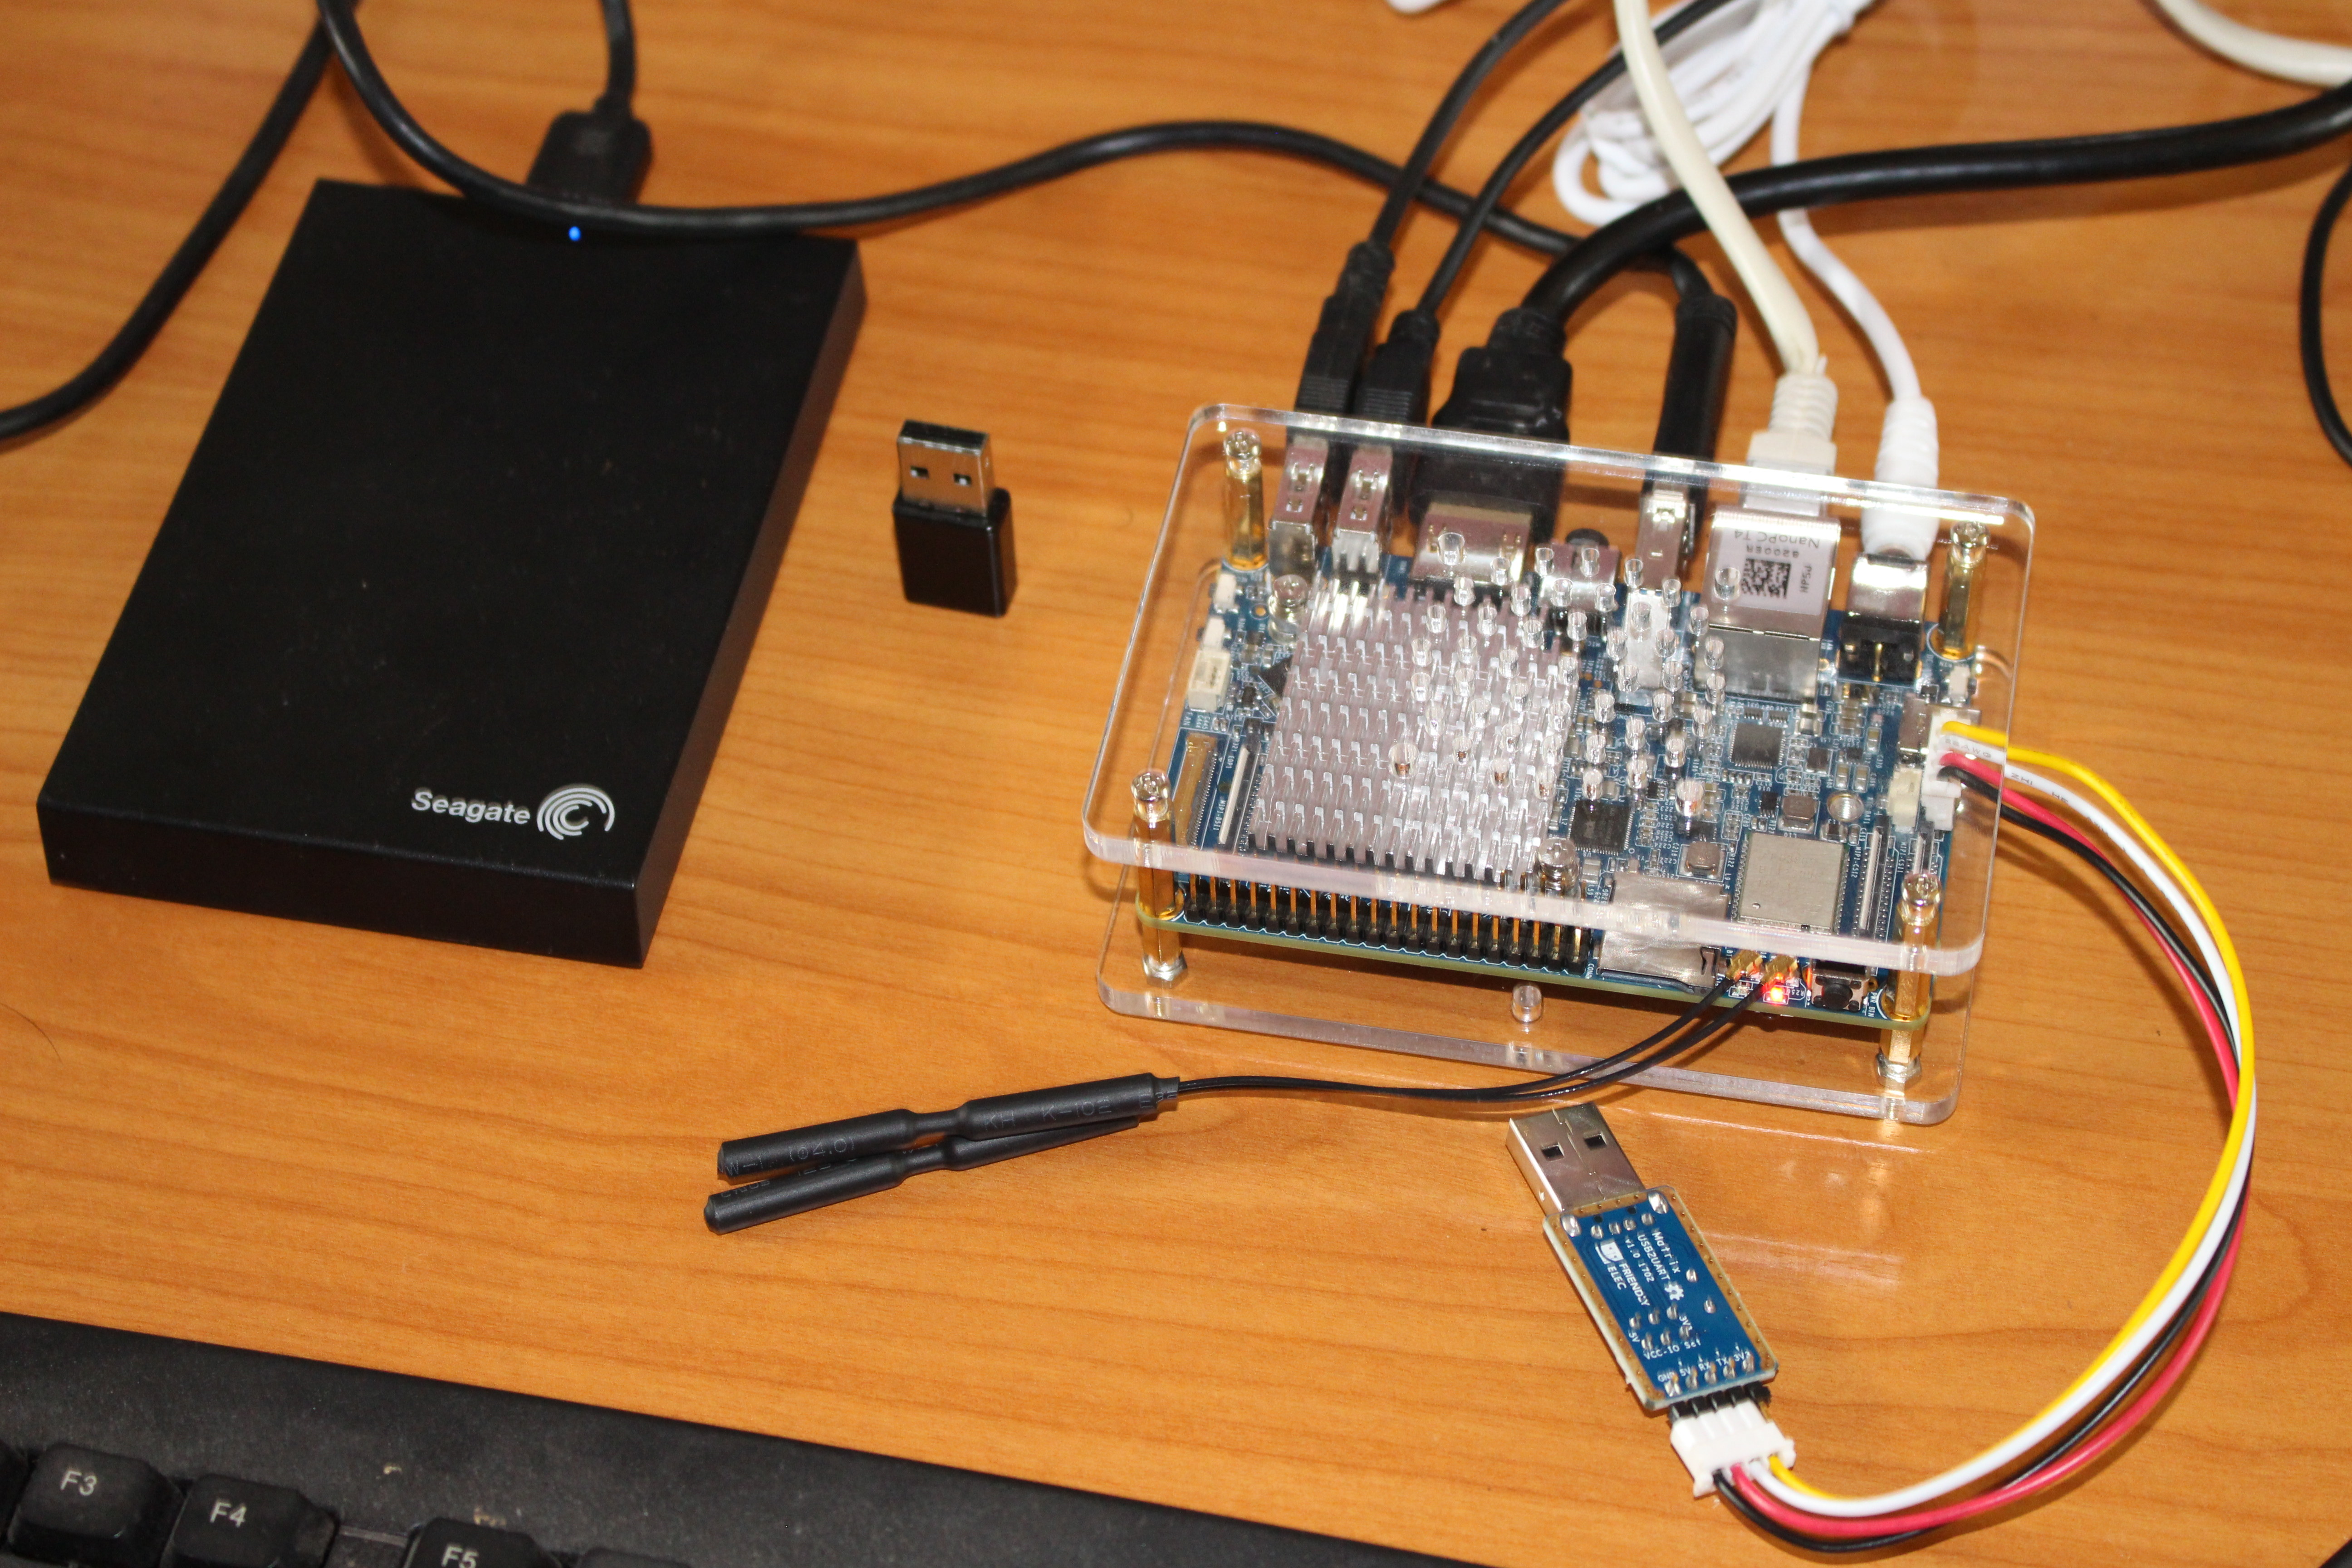
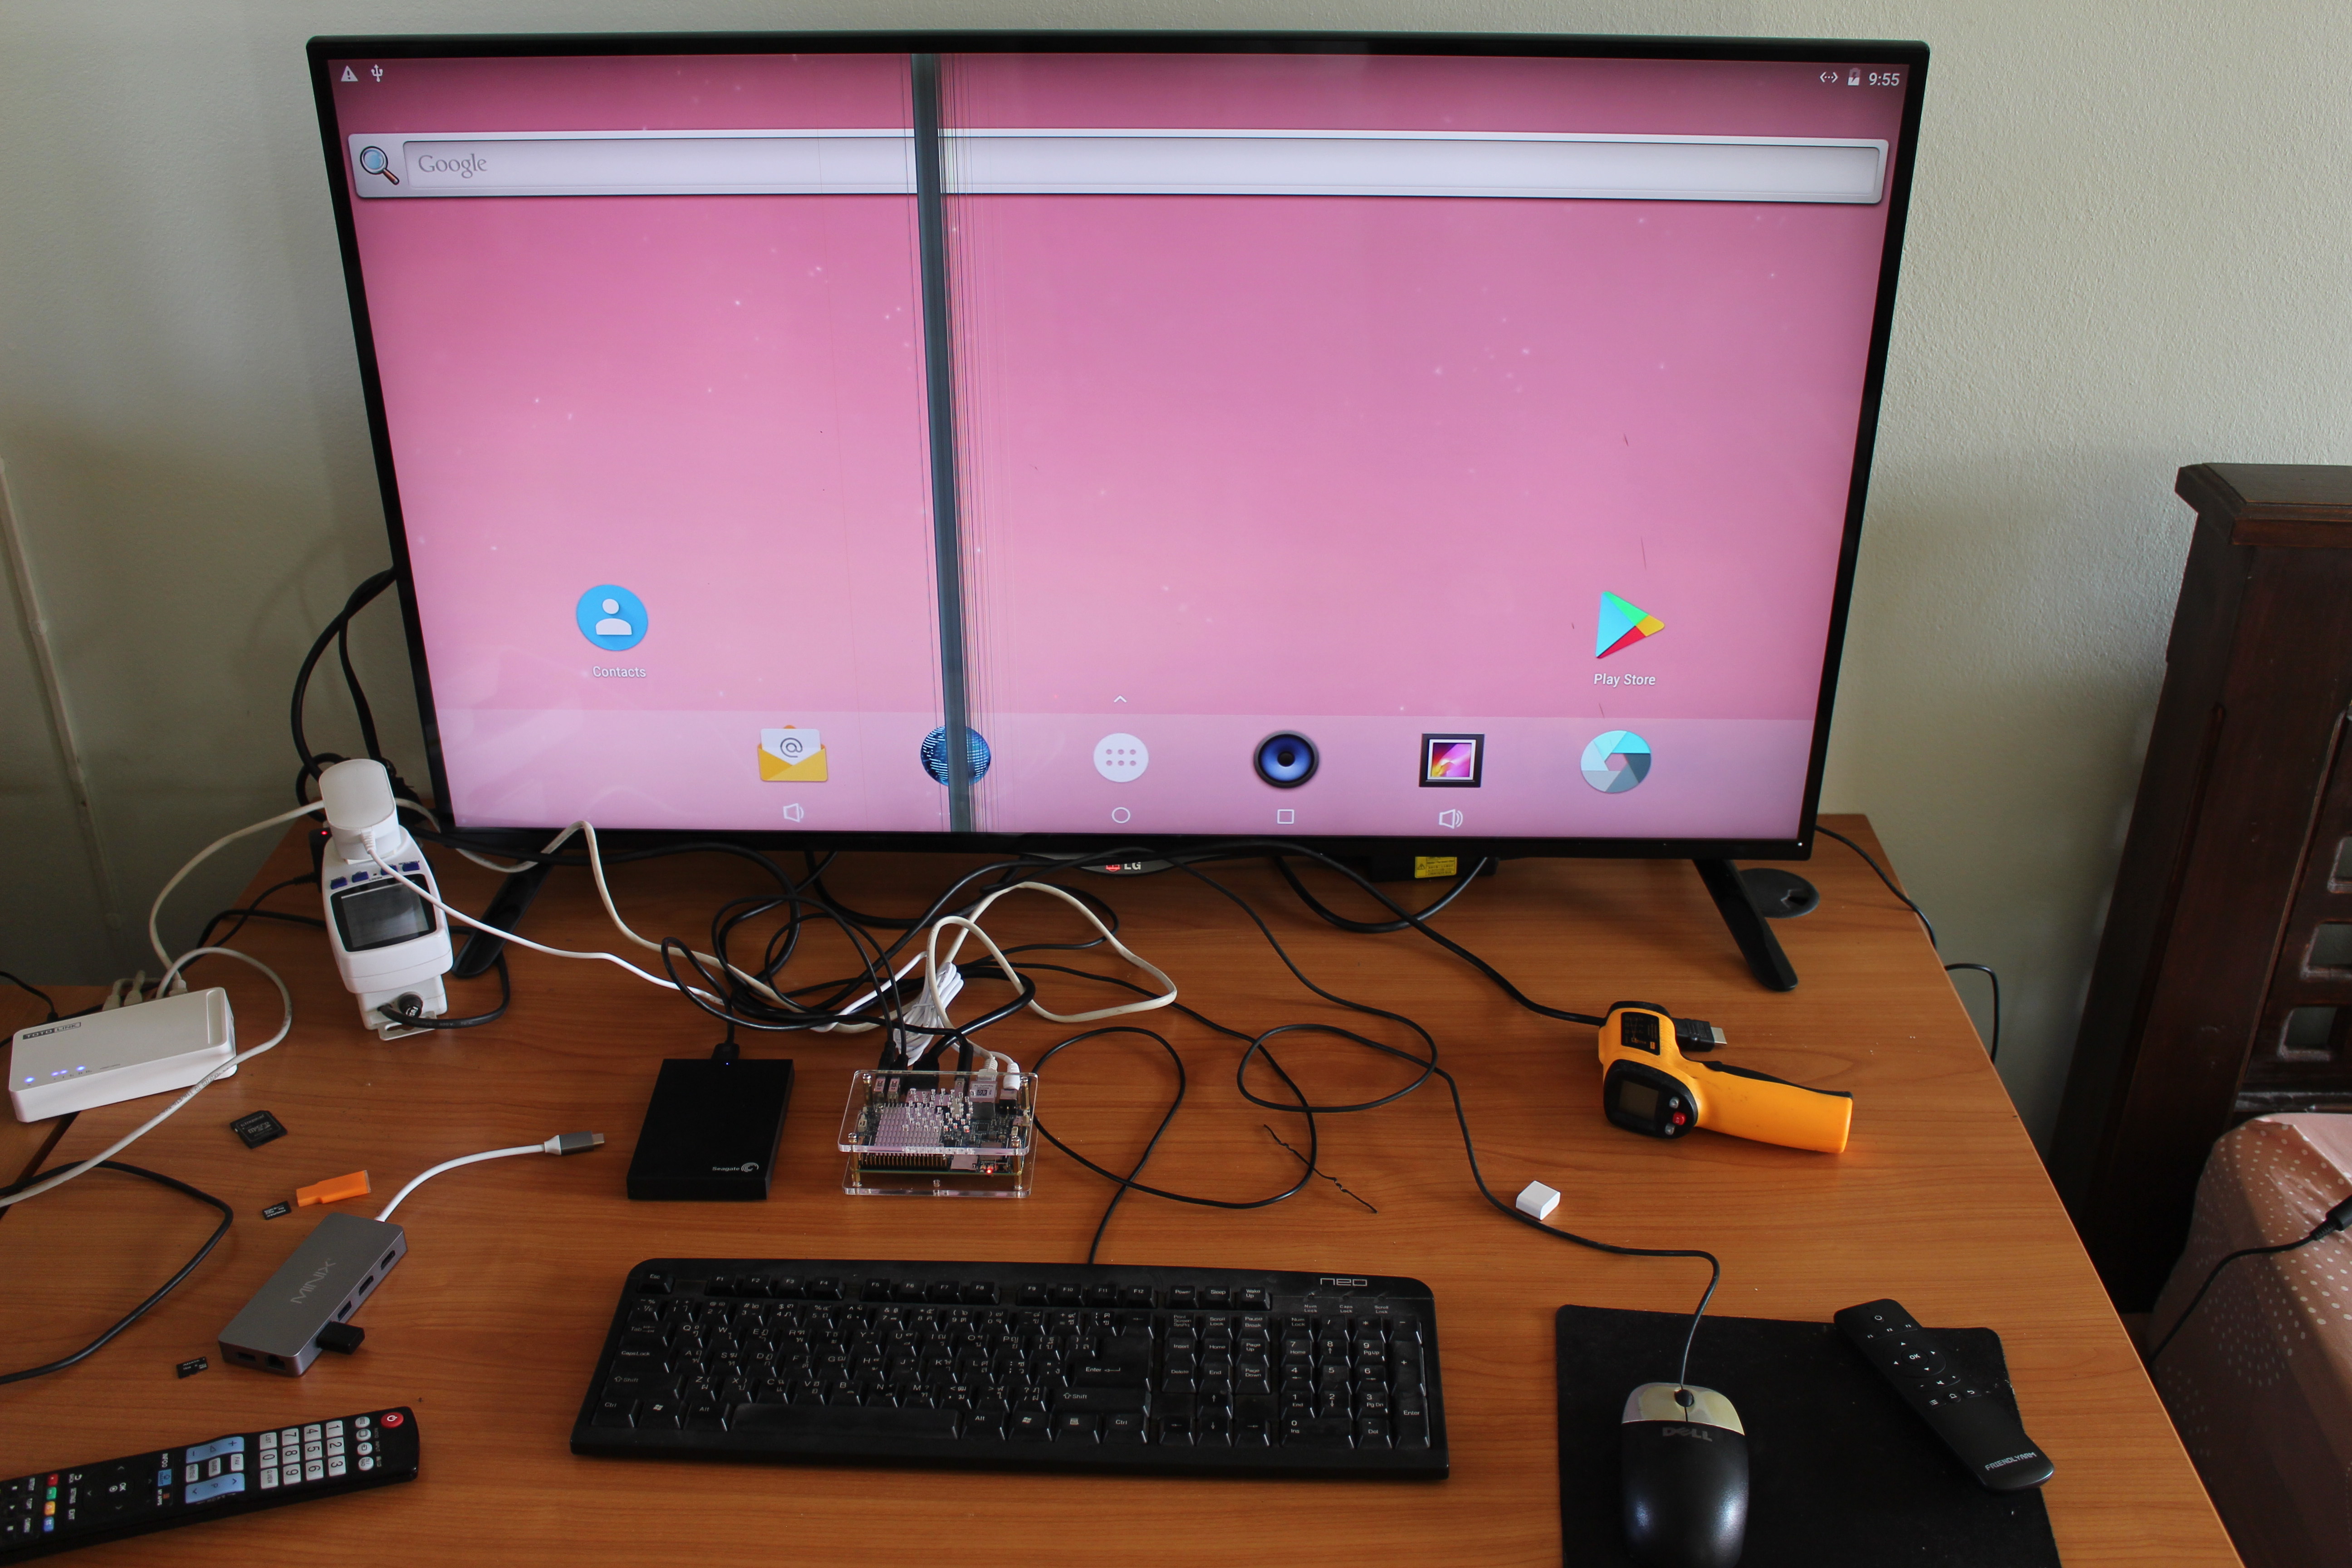
I had already assembled the board in the first part of the review, so I just added the two WiFi antennas, the optional USB to serial debug board, and connected various accessories and cables from left to right: USB keyboard and mouse, HDMI cable to 4K TV, USB 3.0 expansion drive, Ethernet cable, and power adapter. I also prepared the RF dongle for MINIX NEO A2 Lite air mouse since I’ll use it later in the review.
There’s also a USB type C port with data and DisplayPort alternate board support, but I won’t test it in this review simply because I’ve already tested it with MINIX NEO C Plus USB-C adapter and managed to drive two HDMI displays over the USB type C port, and managed accessories like flash drives and mouse. The only major issue I really had was that USB-C and HDMI output ports can not work at the same. But one user commented that’s because the image defaults to HDMI and eDP, and it’s possible to change the device tree file to have HMDI and DisplayPort over USB-C work at the same time:
I have the same issue with other USB-C to HDMI adapter. The NanoPC-T4 default display config is “HDMI + eDP”, so I modify the dts file to “HDMI + DP” config , VOP_LIT(2K) for HDMI and VOP_BIG(4K) for DP, it works fine now
I have not had time to look into it in details yet, but will write a separate post if time permits.
Back to the first boot… Once you connect the power nothing happens. That’s because you need to press the power button on the right the antenna connectors to boot the board. If you’re going to use the serial console the connection parameters are the typical – for Rockchip devices – 1,500,000 bps 8N1 no flow control.
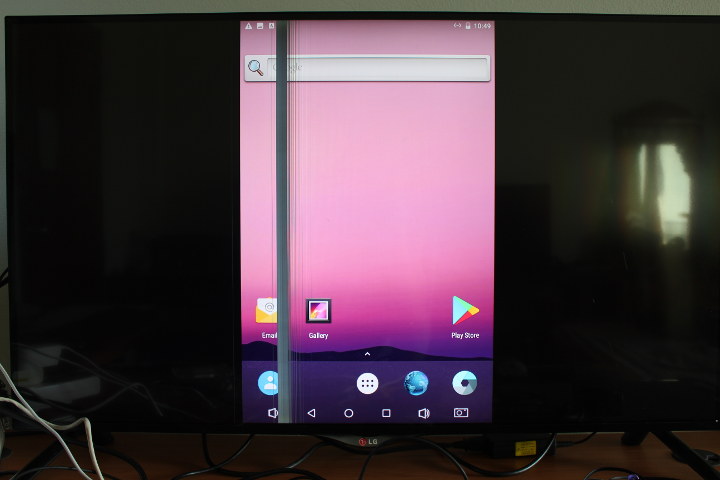 First, ignore vertical line just a problem with my LG 4K TV. Second, something does not look too good as the Android launcher is not showed a proper landscape mode. I went to the settings, and could change display orientation, but then I noticed HDMI output was limited to 1080p only.
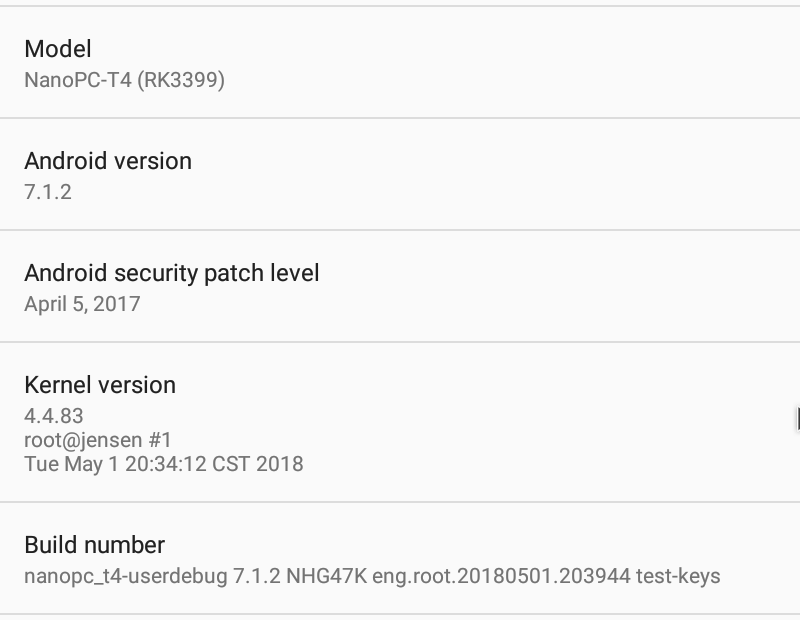 So I went to check the firmware version: May 1, 2018. We are in August, so there must be a newer image.
Upgrading Android Firmware in NanoPC-T4
Going to the board’s Wiki, we’ll find the list of firmware images for NanoPC-T4, and for Android, I could only find an “eflasher” Android image (rk3399-eflasher-20180728-android.img.zip) for the board. What are those? Rockchip already have plenty of options to flash firmware to a board or device: OTA over network or micro SD card, graphical tools to flash over USB port for Windows or Linux, command line tools for Linux, and other tools to create a bootable image.
eFlasher is yet another method where a bootable micro SD card is flashed tools like Win32DiskImager, dd, or Etcher, and upon boot it will launch an upgrade program to flash the firmware to the internal flash storage.
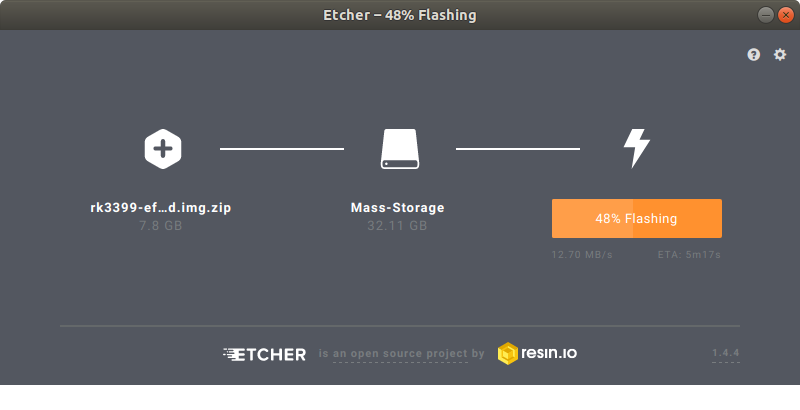 I went with Etcher since it validates the micro SD card after flashing. I then just inserted the micro SD card into the board, and pressed the button for over 1.5 seconds.
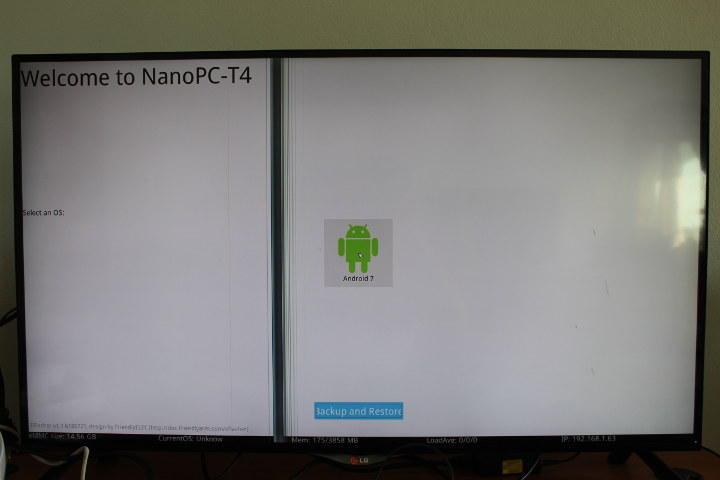
After a few short seconds the flashing application starts. Now use an air mouse or USB mouse to click on “Android 7” logo…
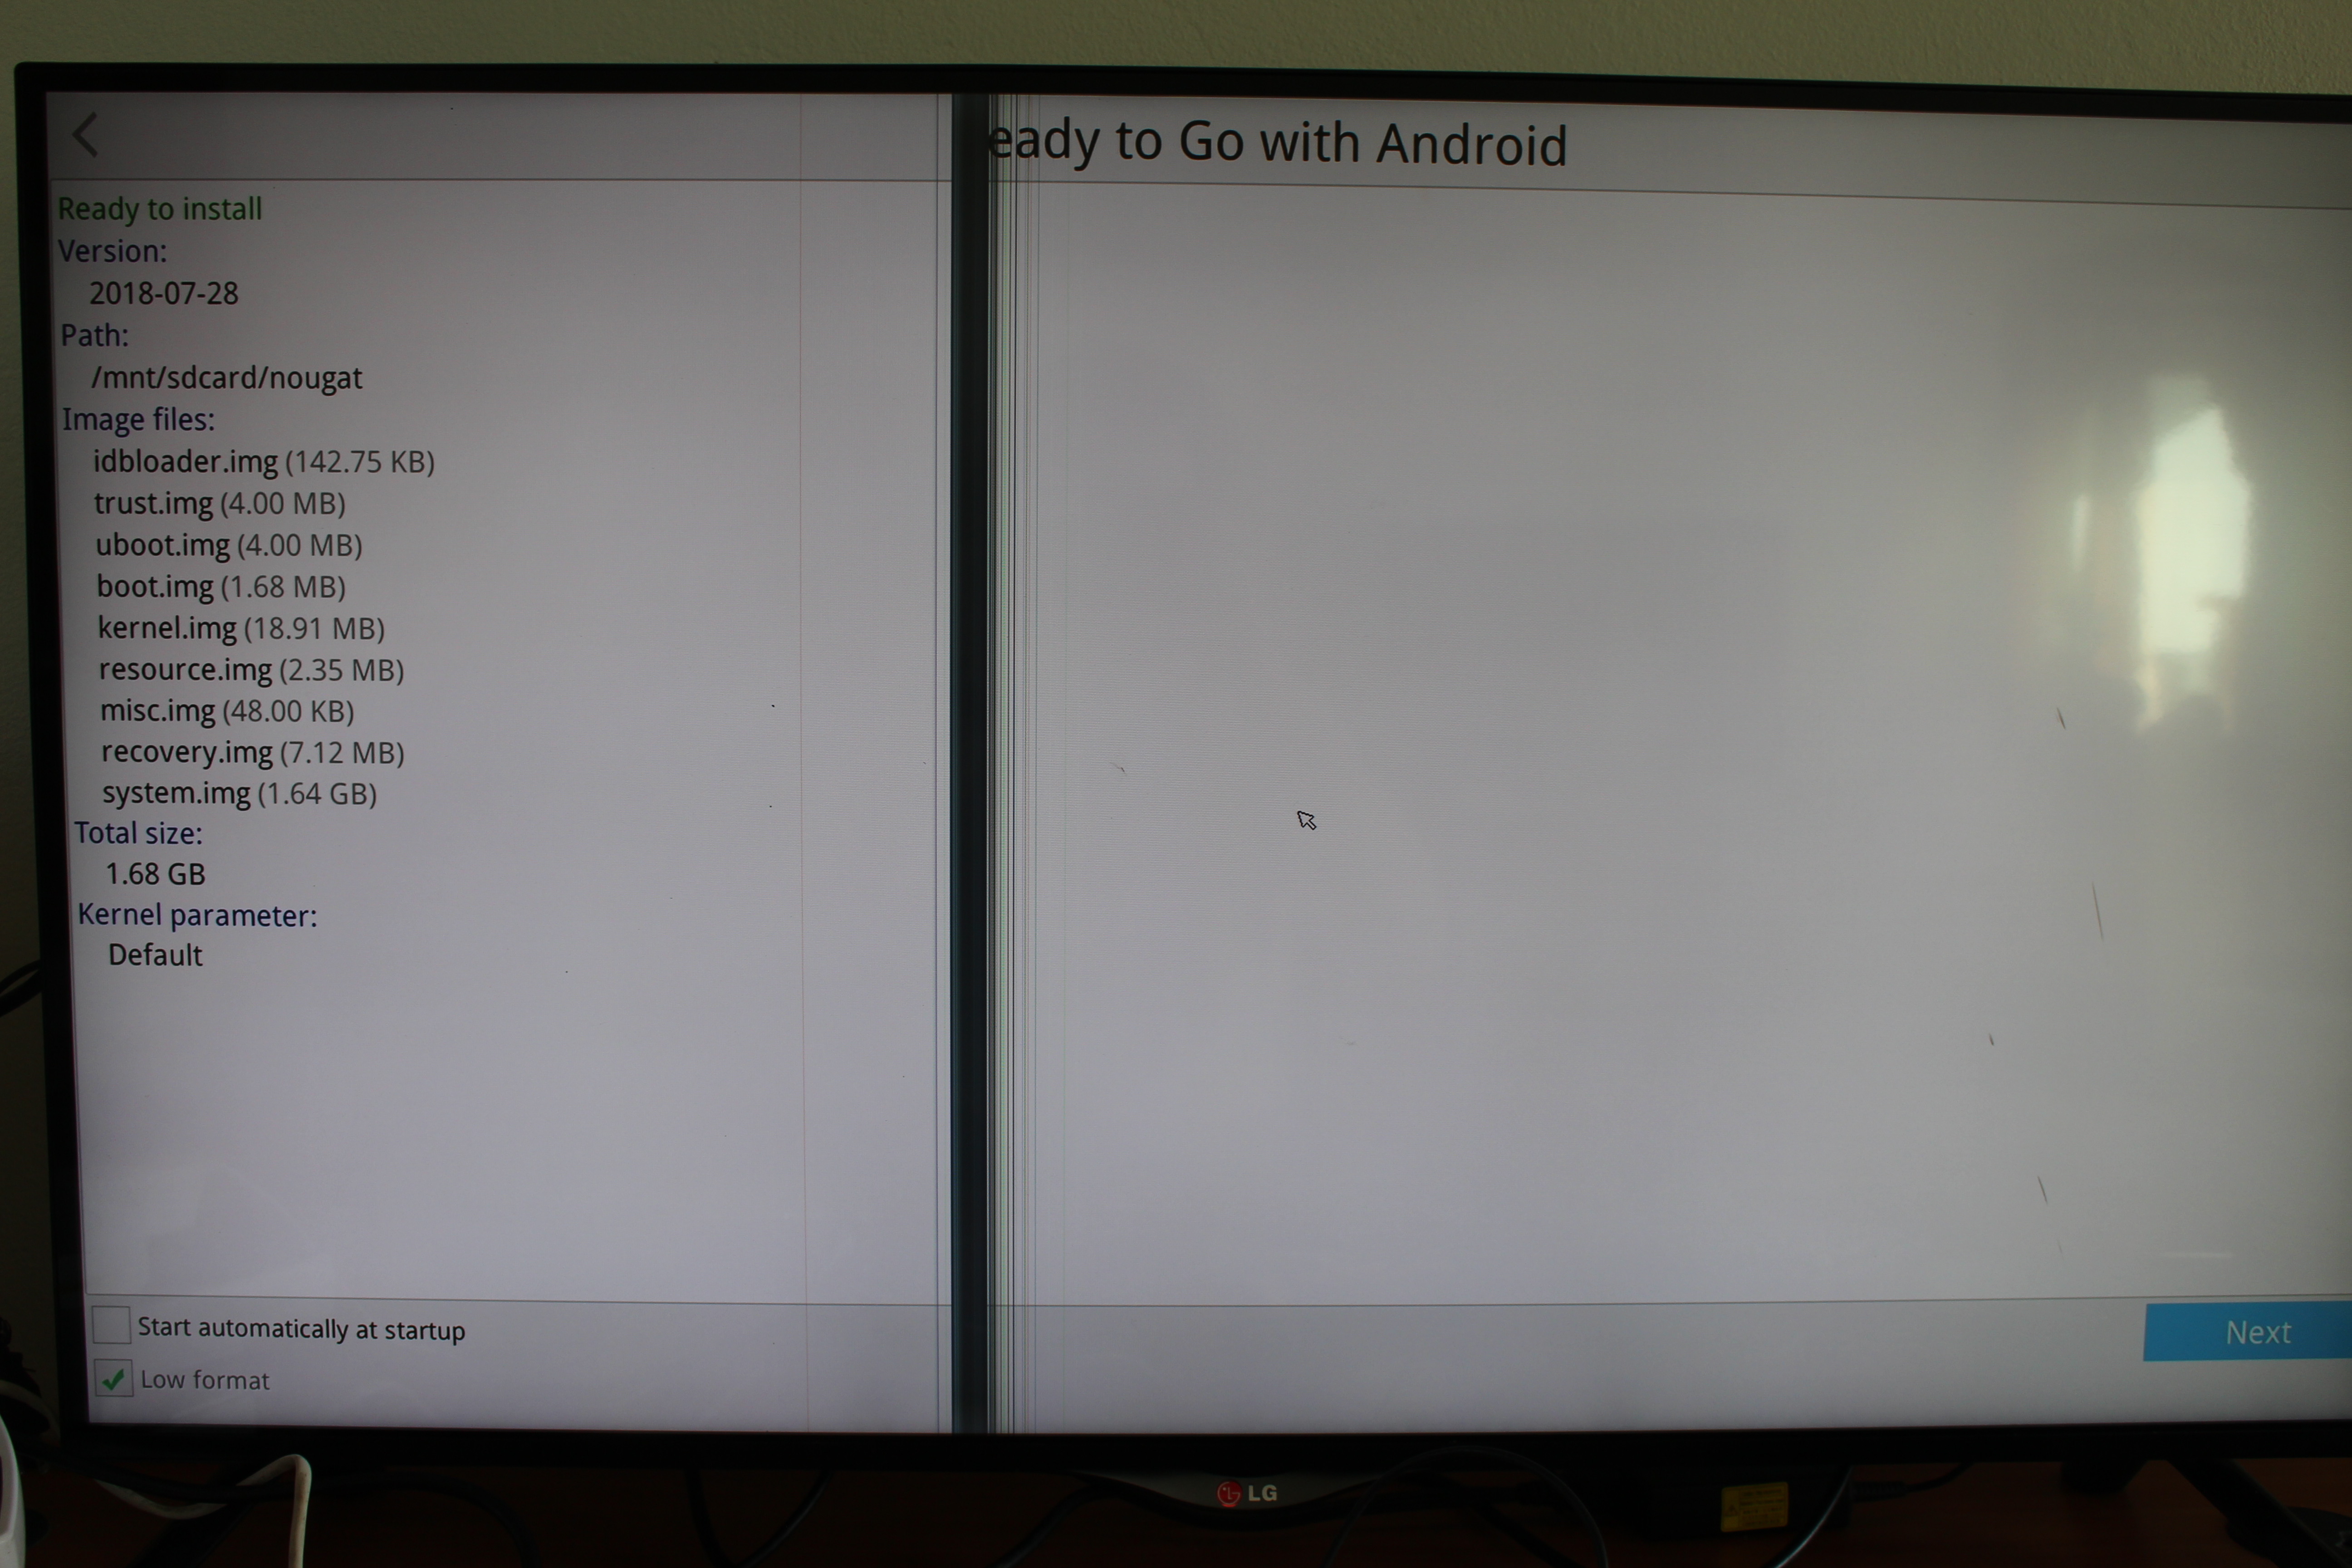
… It will show some details about the firmware, and you can click on Next to start the process.
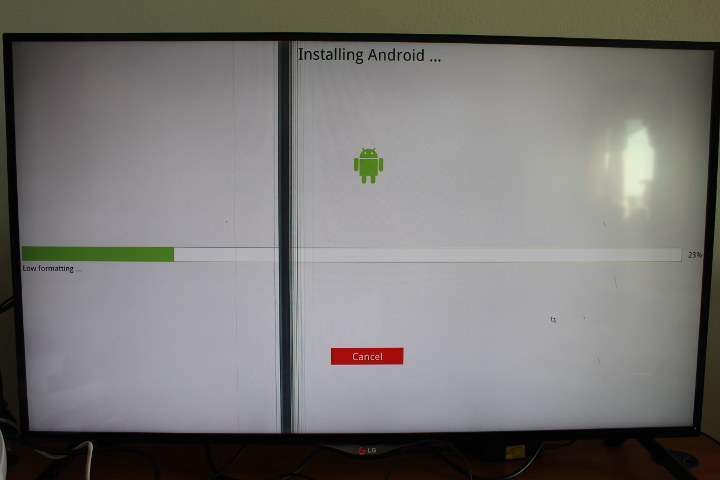 It took around 2 minutes here, and upon completion it will automatically reboot, and I got my display problem fixed.
Android Info and Settings
I could also select 4K UHD resolution in the settings like 3840×2160 @ 60 Hz or 4096×2160 @ 24 Hz, and even fractional refresh rate such as 59.94 Hz or 23.98 Hz.
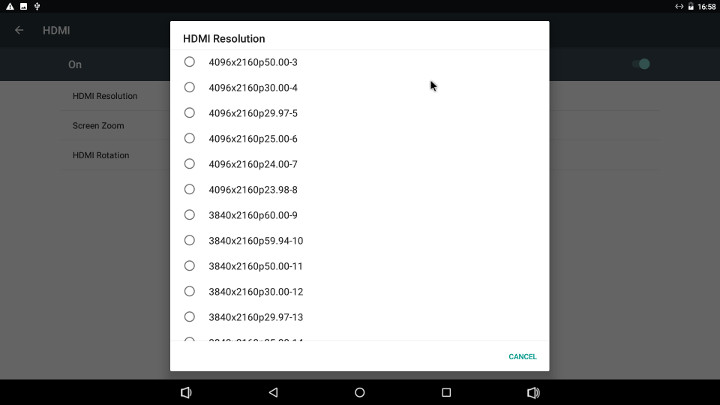 Beside HDMI resolution, you’ll also have the “Screen Zoom” option to adjust for potential overscan issues, and HDMI rotation to rotate the screen 0, 90, 180, or 270º.
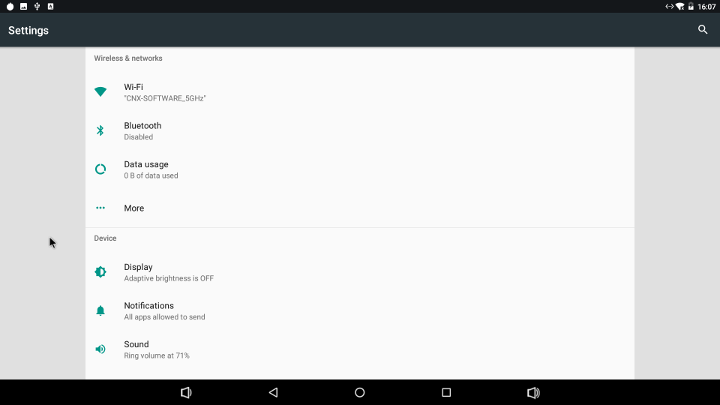
I’ll go through some of the other settings to show interesting parts.
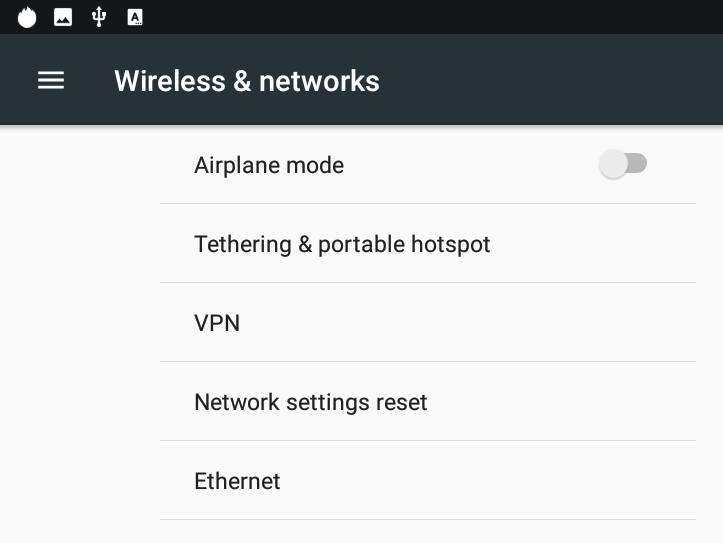
There aren’t too many custom options in the current firmware. Ethernet options, VPN, Tethering & portable hotspot can be found in More in the Wireless & networks section
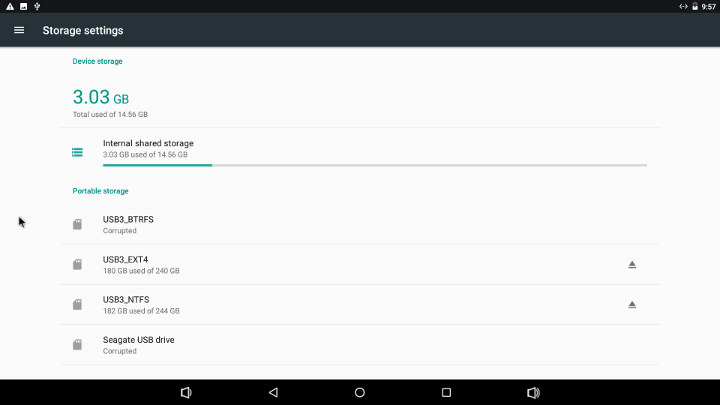
Storage shows 3.03GB used out of 14.56GB in the internal share storage partition, and the system could mount EXT-4 and NTFS partitions in my hard drive, but not BTRFS and exFAT. That should just be a tweak the SDK (Linux kernel) to enable both file systems. FAT32 was also supported in a micro SD card.
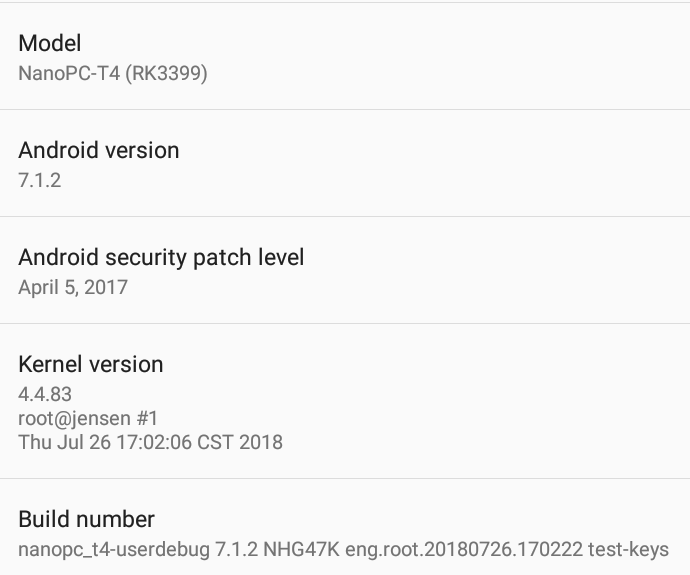
The About section shows the updated firmware was still based on Android 7.1.2 and Linux 4.4.83, and featuring the same April 5,2017 security patch level.
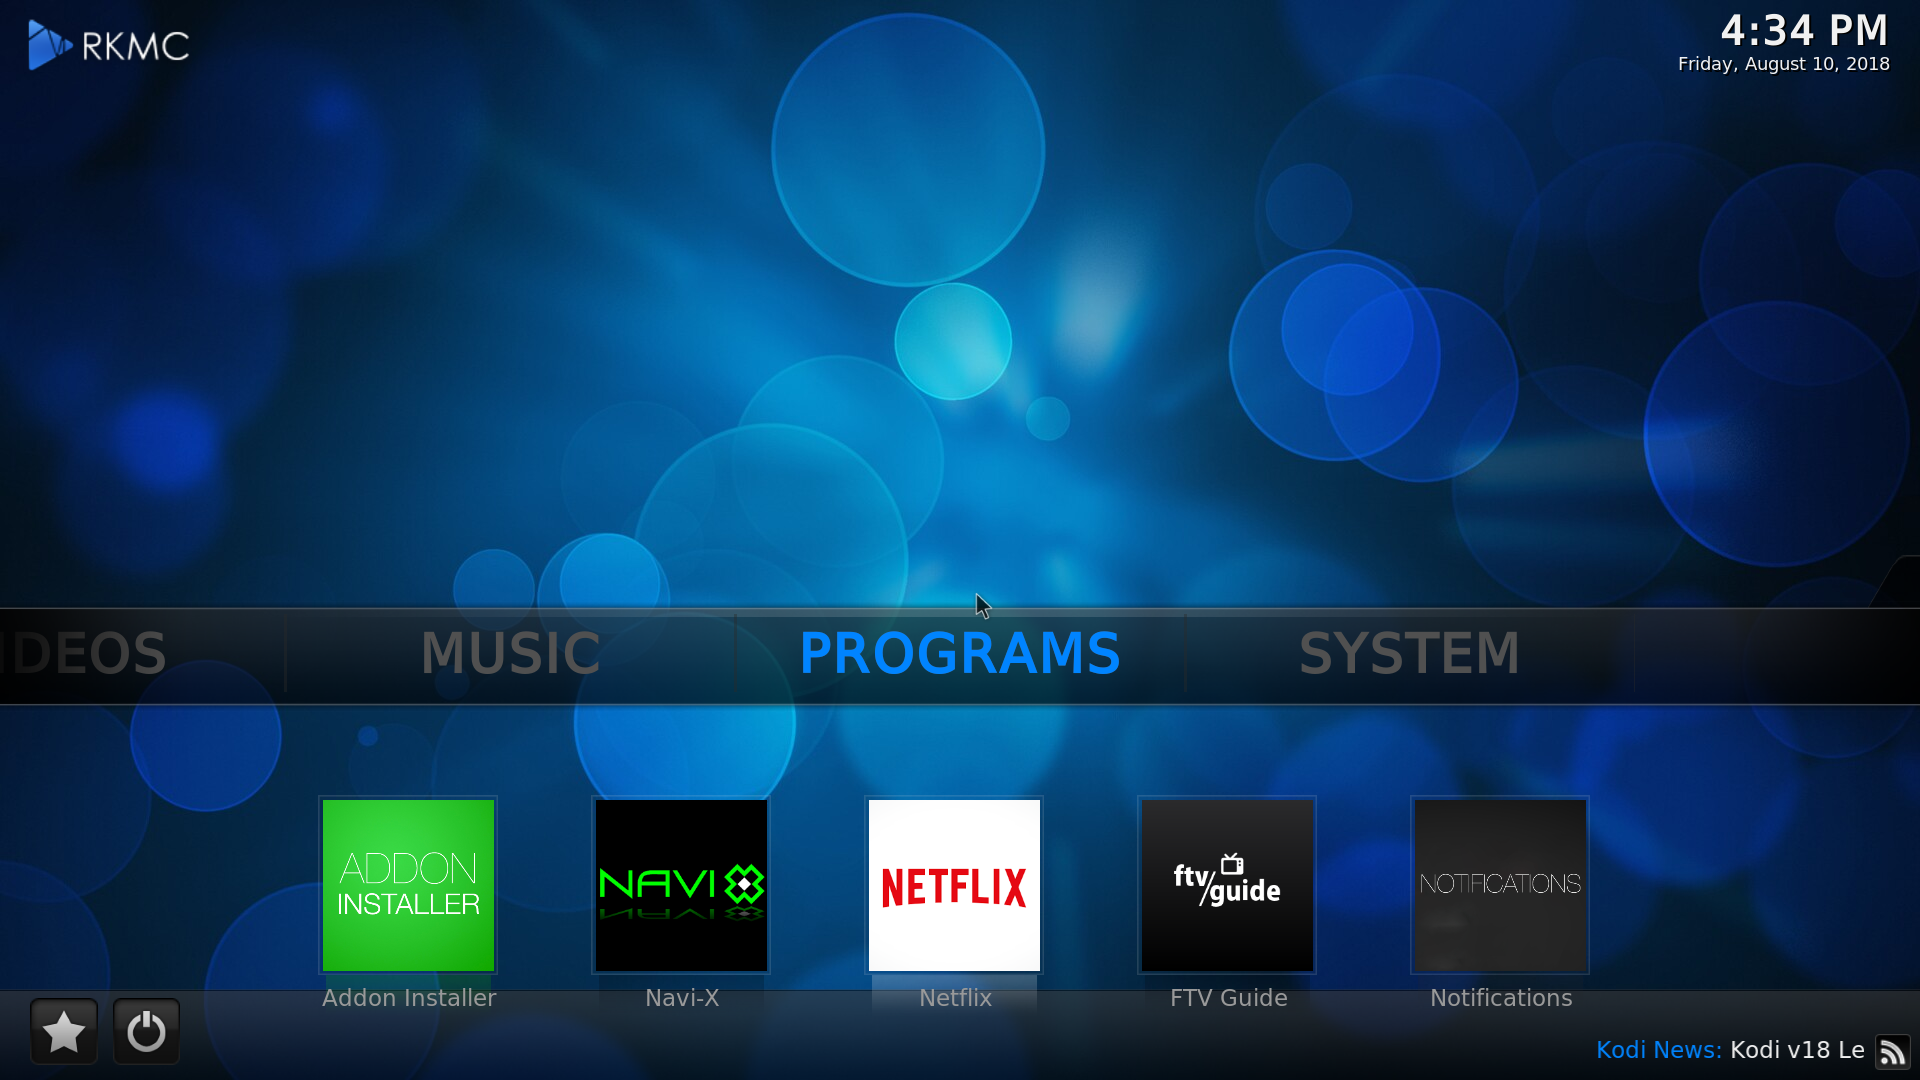
Pre-installed applications included the Play Store and RKMC, a fork of Kodi 16.1 with optimization for Rockchip processors.
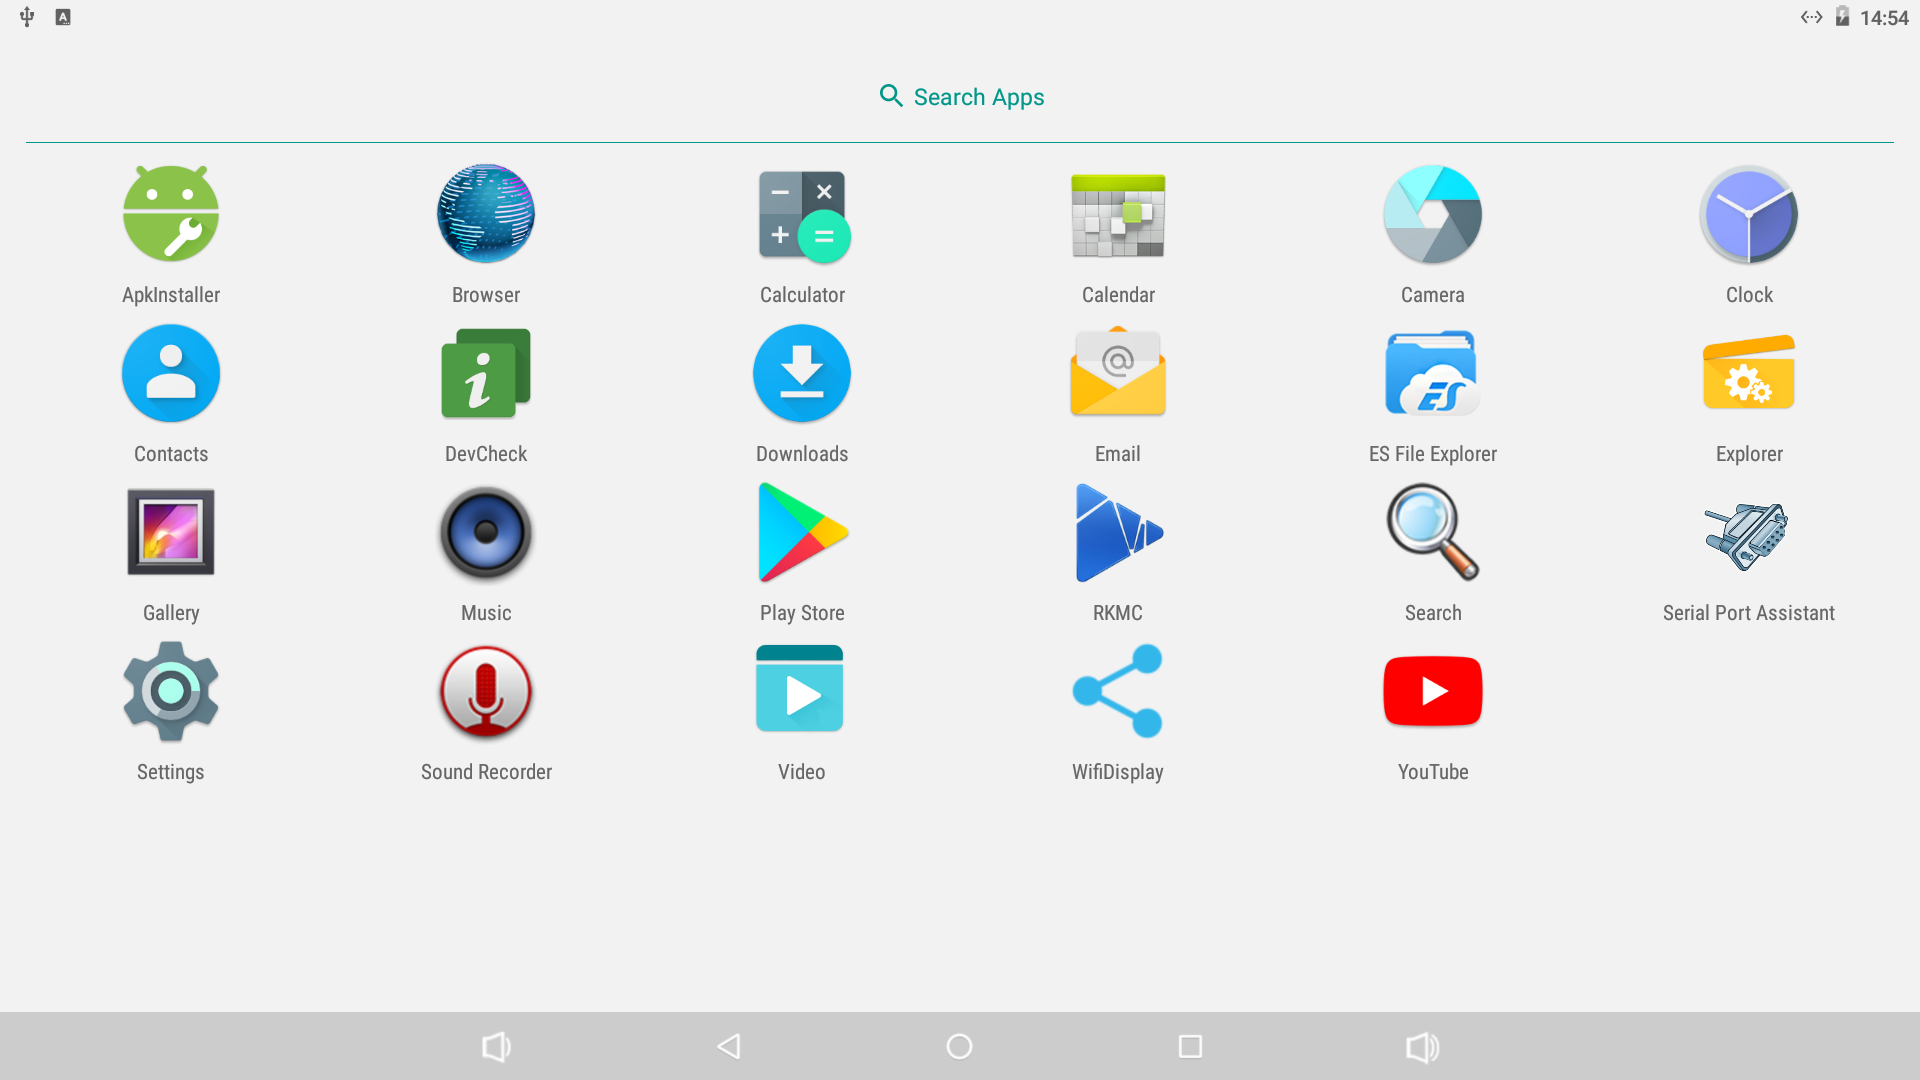
I install both DevCheck and ES File Explorer in the sreenshot above, all others were already installed. There’s also a SerialPort Assistant that may be useful to control communication USB dongle or PCIe cards with AT commands.
If you want more system information, check out the DevCheck app post I’ve written using NanoPC-T4 as the test device.
Video Playback
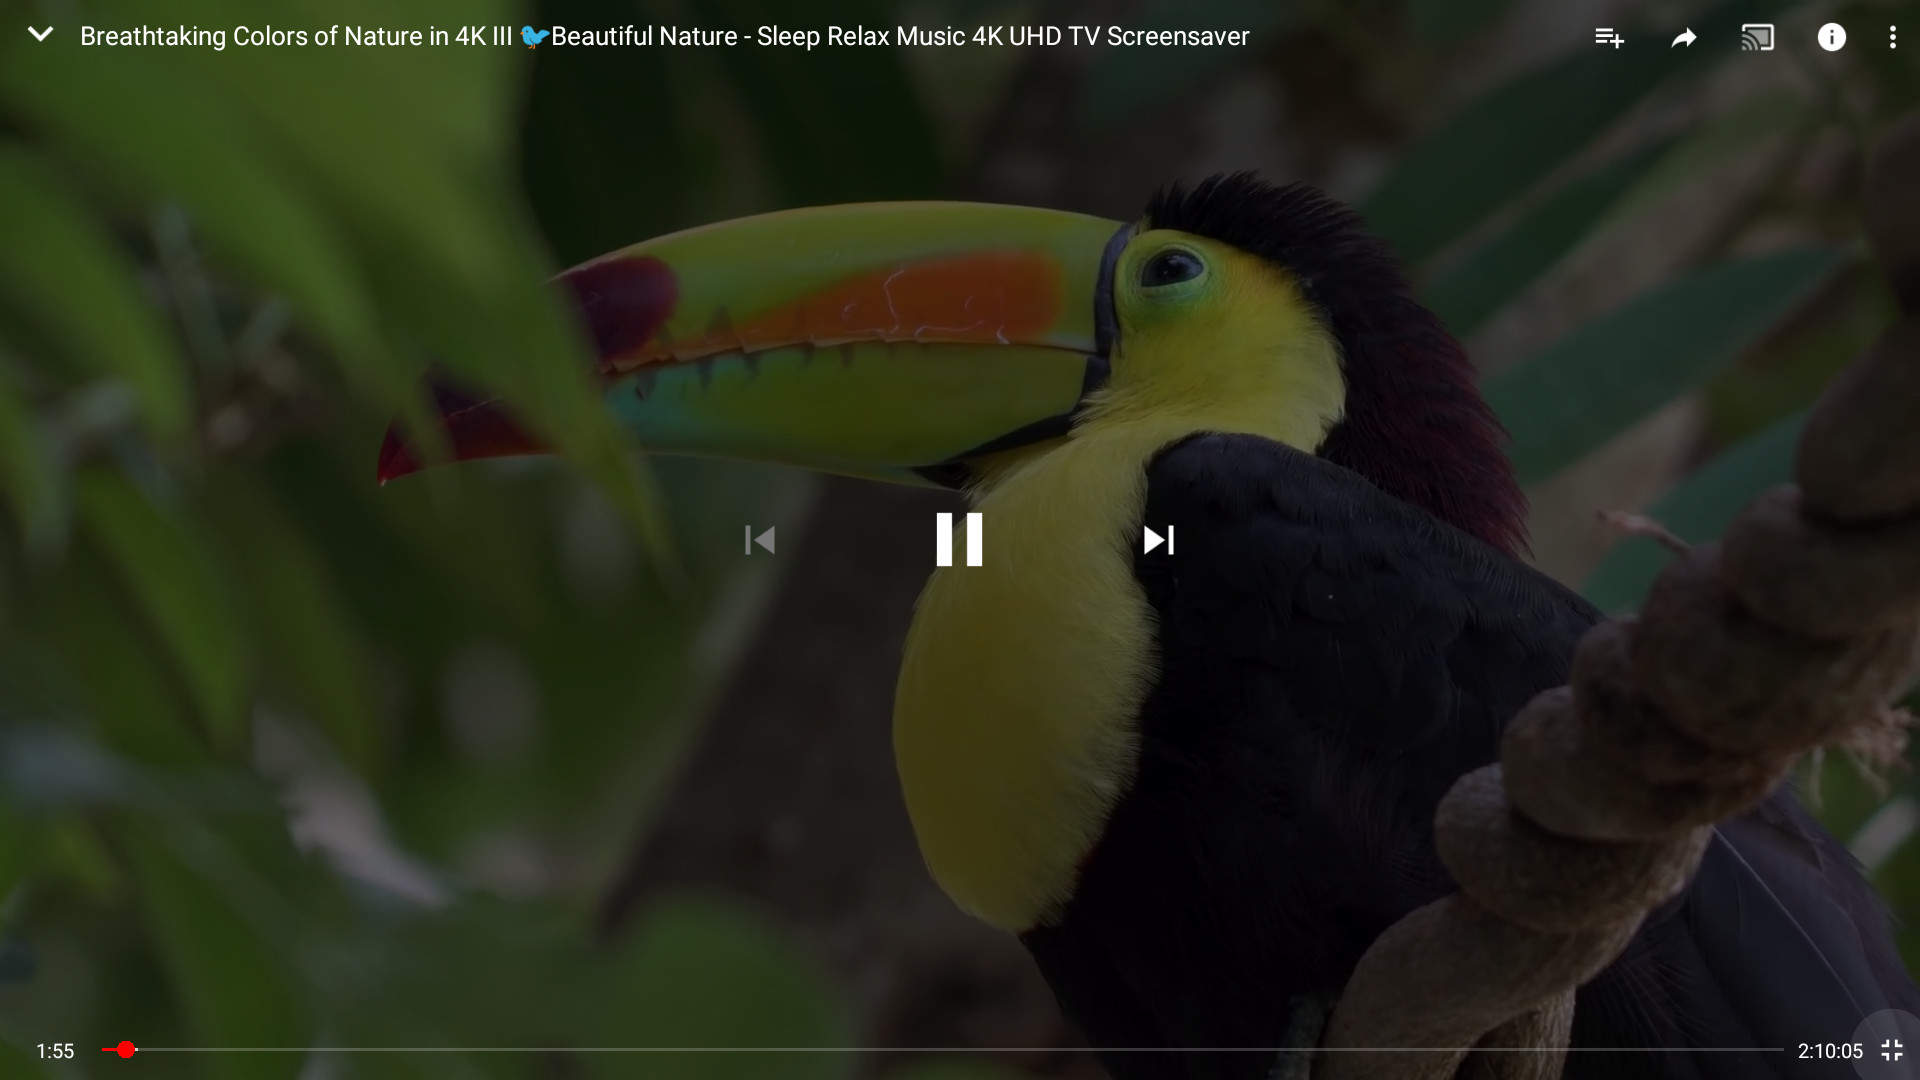
Let’s do some actual testing with 1080p and 4K video using RKMC app that comes with some pre-installed add-ons like Navi-X, Netflix, YouTube, FTV Guide, etc…
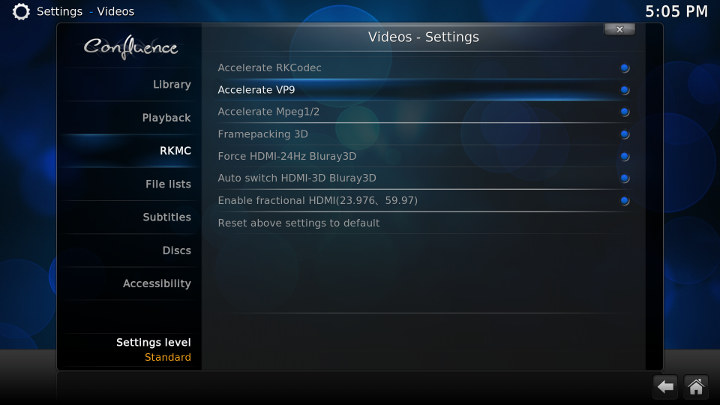
Before playing video, I changed some settings for automatic framerate switching and enabled VP9 hardware decoding (which was disabled by default).
 I played videos from the NTFS partitions of the drive connected to the USB 3.0 port of the board starting with some Linaro media + Elecard samples:
- H.264 codec / MP4 container (Big Buck Bunny) – 1080p – OK
- MPEG2 codec / MPG container – 1080p – OK
- MPEG4 codec, AVI container – 1080p – OK
- VC1 codec (WMV) – 1080p – OK
- WebM / VP8 – 1080p – OK
- H.265 codec / MPEG TS container – 1080p – OK
All video were decoding with RKCodec (hardware video decoding) so Core 4/5 (2x Cortex A72) were barely used at all. Automatic frame rate switching was not working however, and all video were played using 2160p60 video output.
I carried on with some 4K videos:
- HD.Club-4K-Chimei-inn-60mbps.mp4 (H.264, 30 fps) – OK
- sintel-2010-4k.mkv (H.264, 24 fps, 4096×1744) – OK
- Beauty_3840x2160_120fps_420_8bit_HEVC_MP4.mp4 (H.265) – OK
- BT.2020.20140602.ts (Rec.2020 compliant video; 36 Mbps; 59.97 Hz) – Audio only, stays in UI.
- big_buck_bunny_4k_H264_30fps.mp4 – OK
- Fifa_WorldCup2014_Uruguay-Colombia_4K-x265.mp4 (4K, H.265, 60 fps) – OK
- Samsung_UHD_Dubai_10-bit_HEVC_51.4Mbps.ts (10-bit HEVC / MPEG-4 AAC) – OK
- 暗流涌动-4K.mp4 (10-bit H.264; 120 Mbps) – OK most of the time, but some audio cuts and artifacts in some scenes
- tara-no9-vp9.webm (4K VP9 YouTube video @ 60 fps, Vorbis audio) – OK
- The.Curvature.of.Earth.4K.60FPS-YT-UceRgEyfSsc.VP9.3840×2160.OPUS.160K.webm (4K VP9 @ 60 fps + opus audio) – Mostly OK, but some scenes are not 100% smooth (as on many other TV boxes).
Bear in mind that RK3399 is NOT a TV chip, so it does not support some feature like HDR (High Dynamic Range) found in recent media processors.
I also tried YouTube, and it can play videos up to 1080p resolution.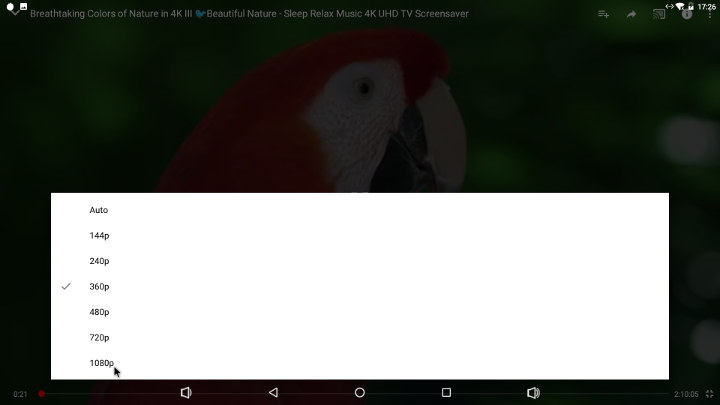 The only problem is that controls and video titles at the top, center and bottom will never hide, even after several minutes. It’s probably just some silly bug that will be fixed in an upcoming firmware however.
DRM Info shows only ClearKey CDM is enabled, so no Google Widewine, nor Microsoft Playready. Those should not be expected in a development board though.
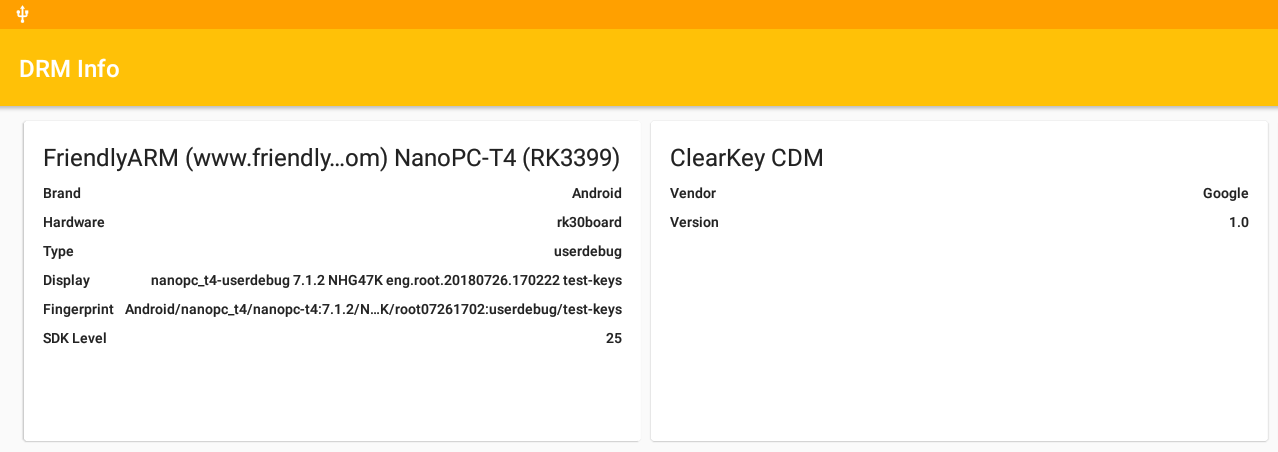
It might be possible to get Widewine Level 3 since it’s a free option. For other, you’d have to pay for it for your commercial projects, and I’m not sure how this is handled in details.
NanoPC-T4 Benchmarks
Time for some benchmarks starting with Antutu 7.1.
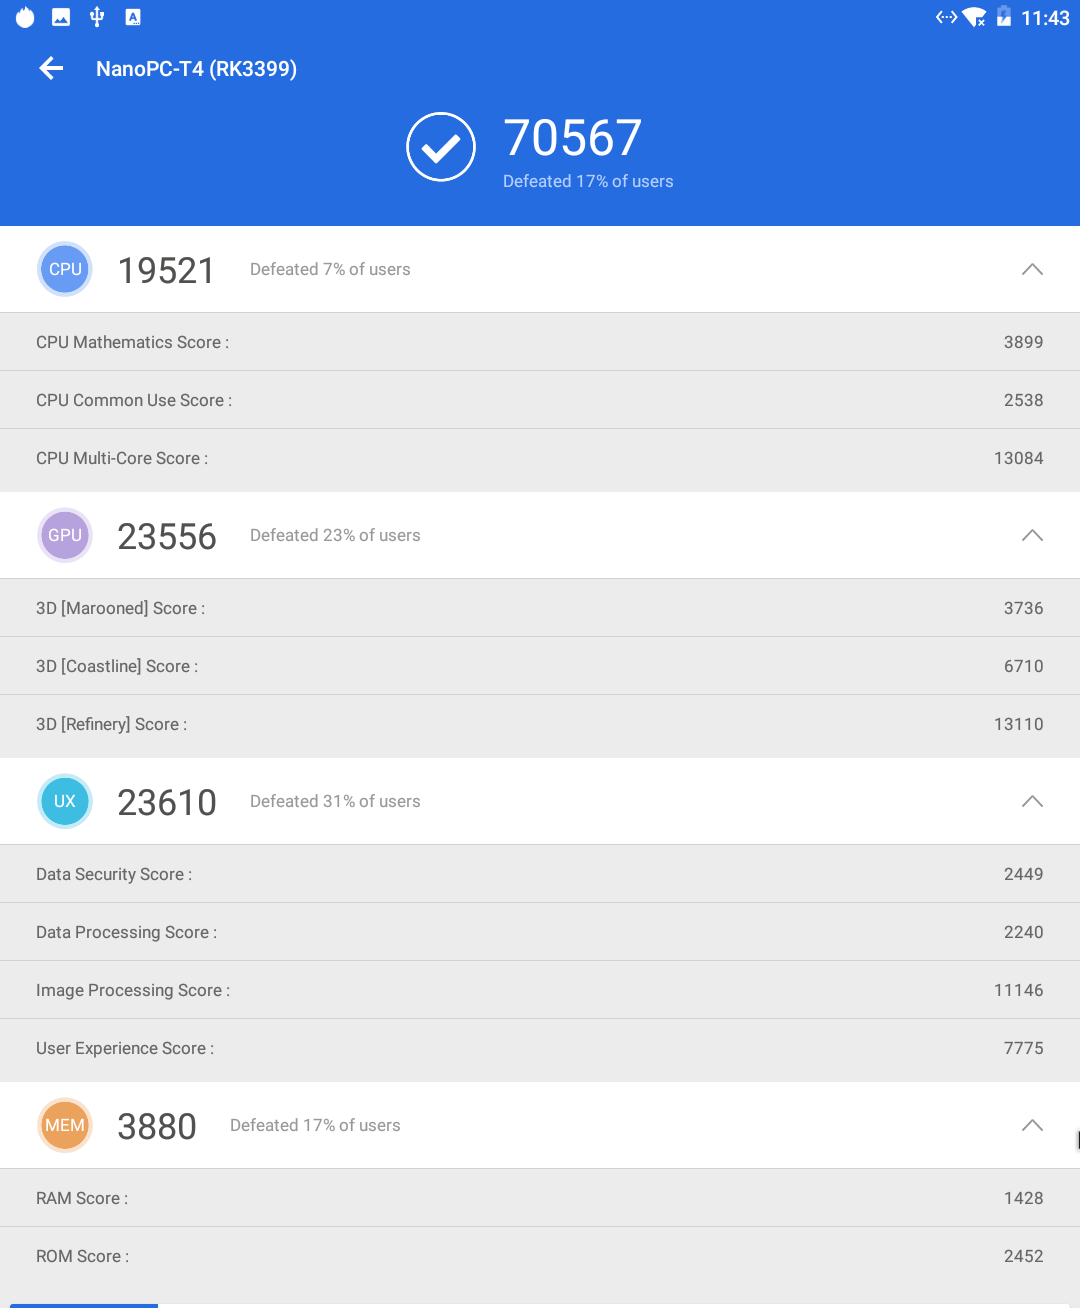
NanoPC-T4 achieved 70,657 points. Note this can not be compared to Antutu 6.x results, and I don’t have many Antutu 7.x results. For reference, Onda V18 Pro tablet powered by Allwinner A63 quad core Cortex A53 processor @ 1.80 GHz get 55,000 points.
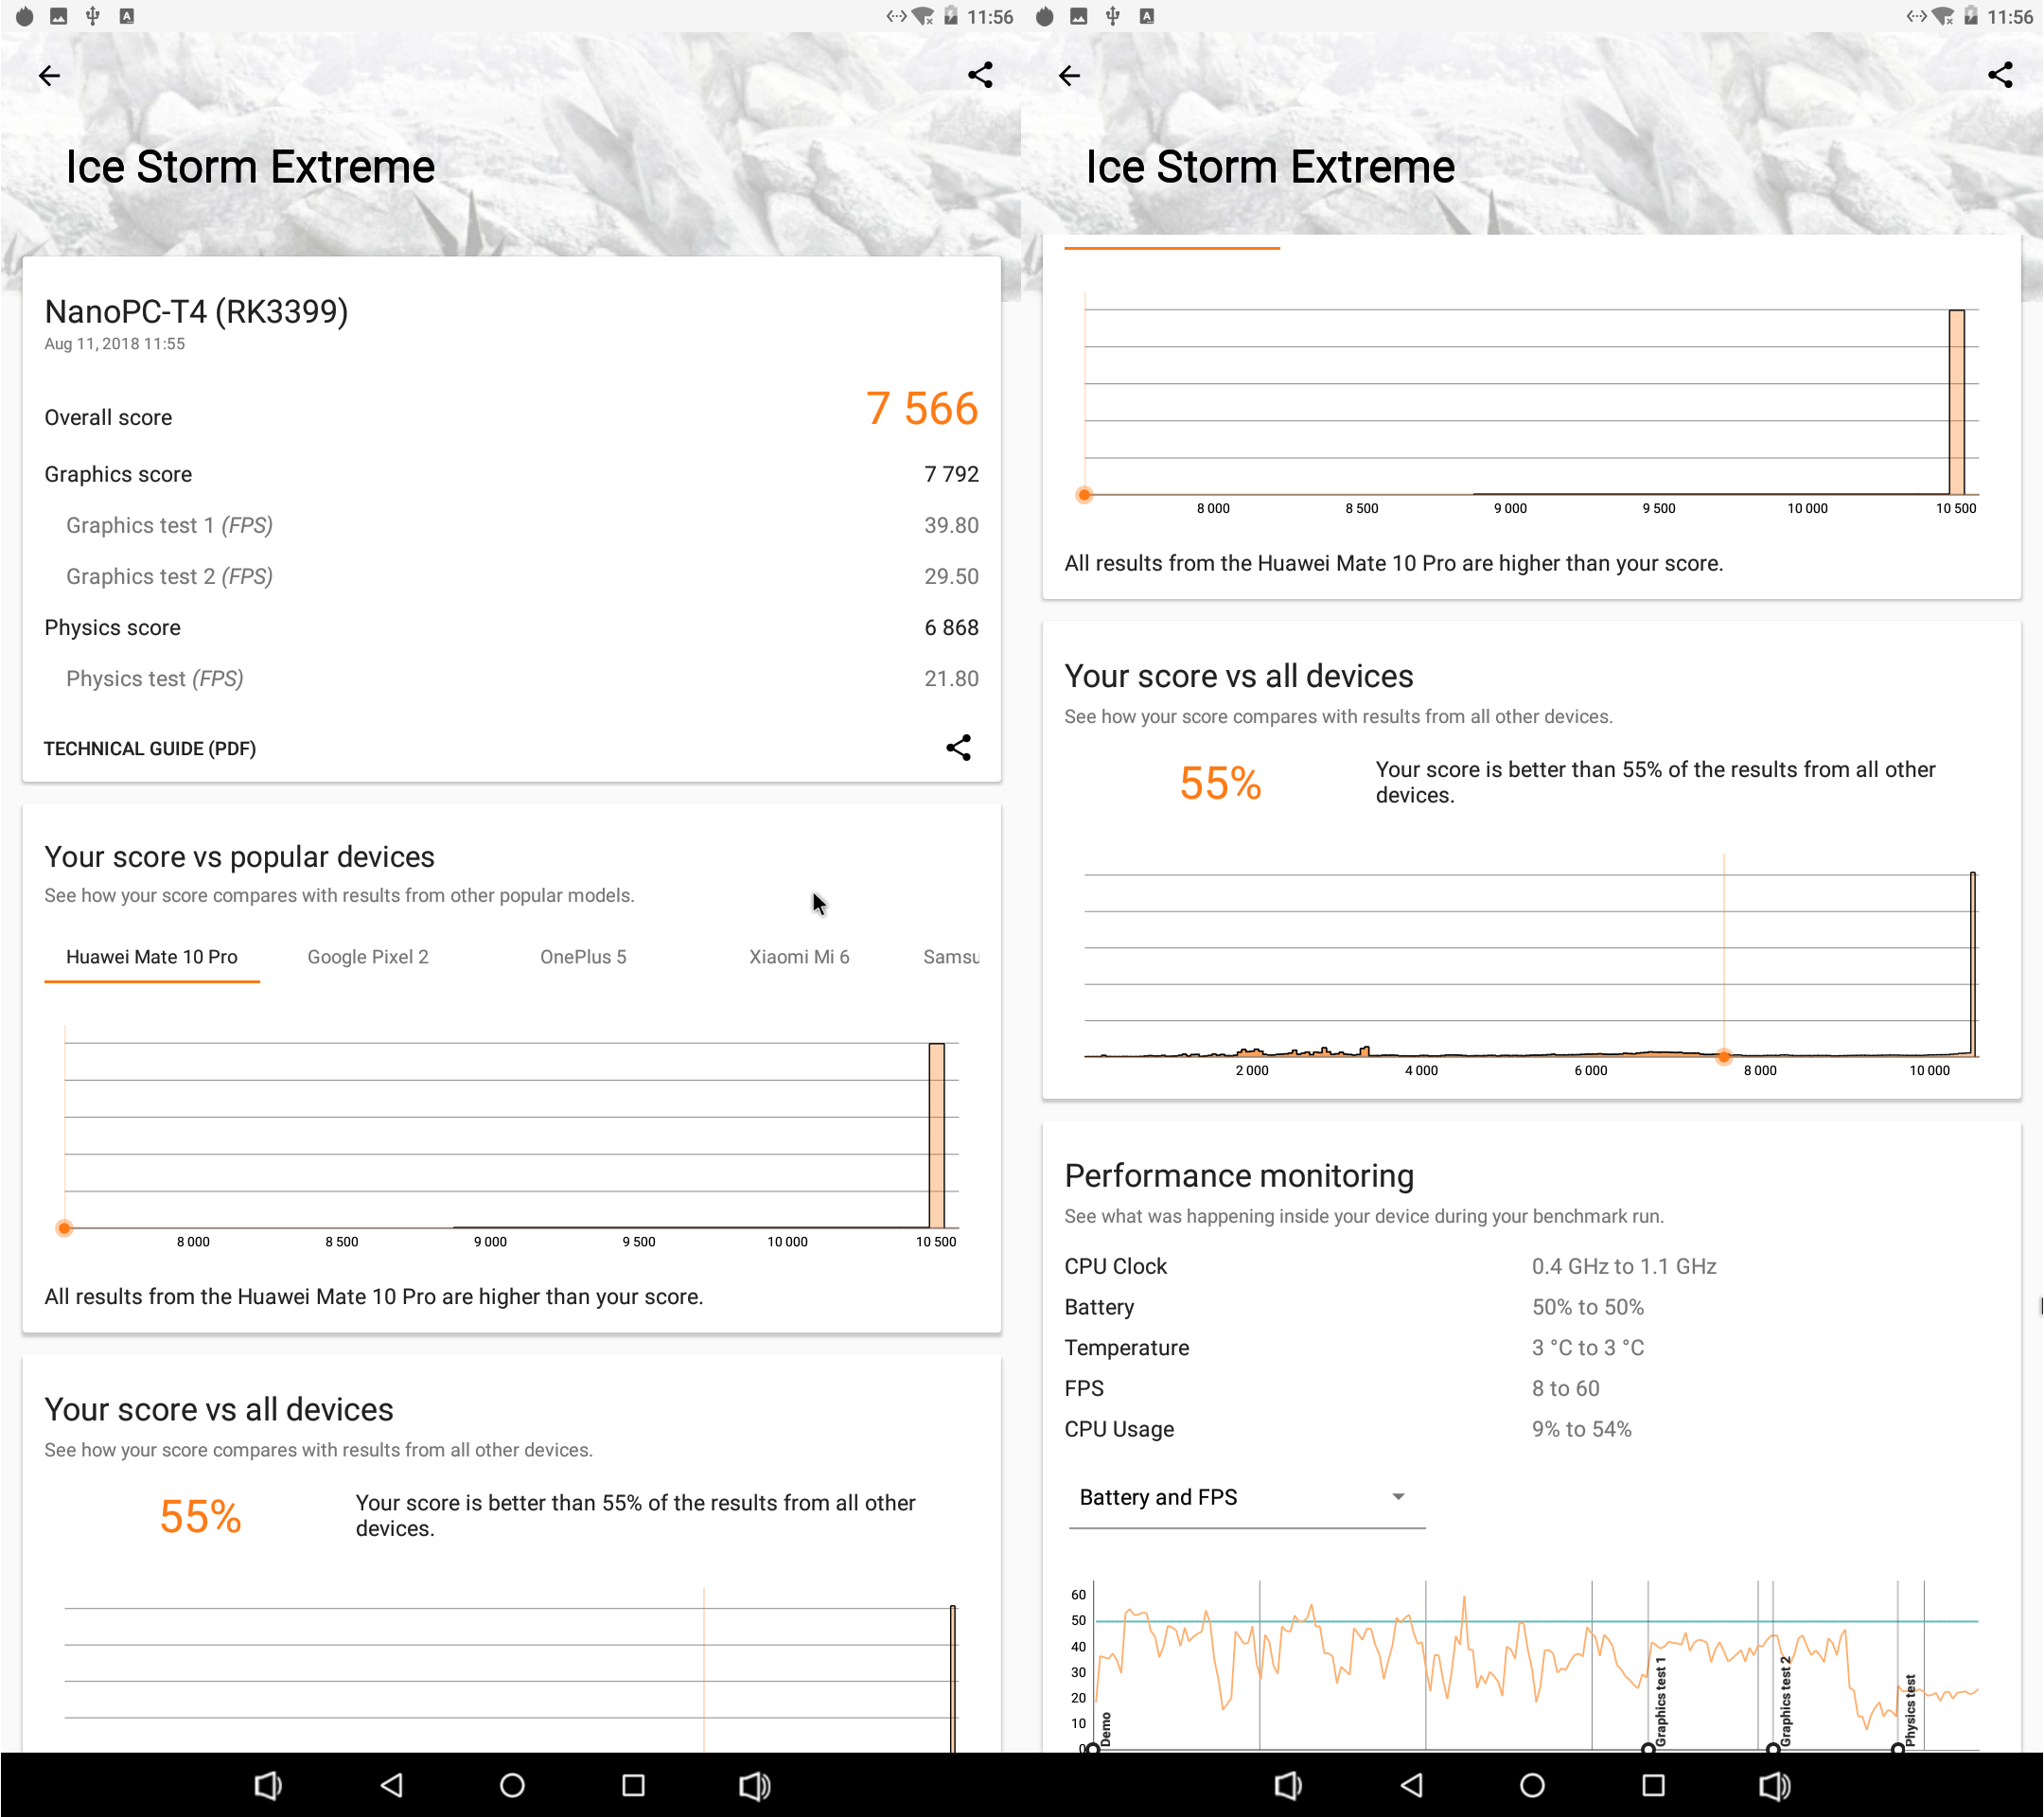
I also installed 3DMark to check 3D performance. Ice Storm Extra results: 7,566 points. It does seem quite low compared to Vorke Z3 and Yundoo Y8 RK3399 TV boxes which both get around 9,700 – 9,900 points.
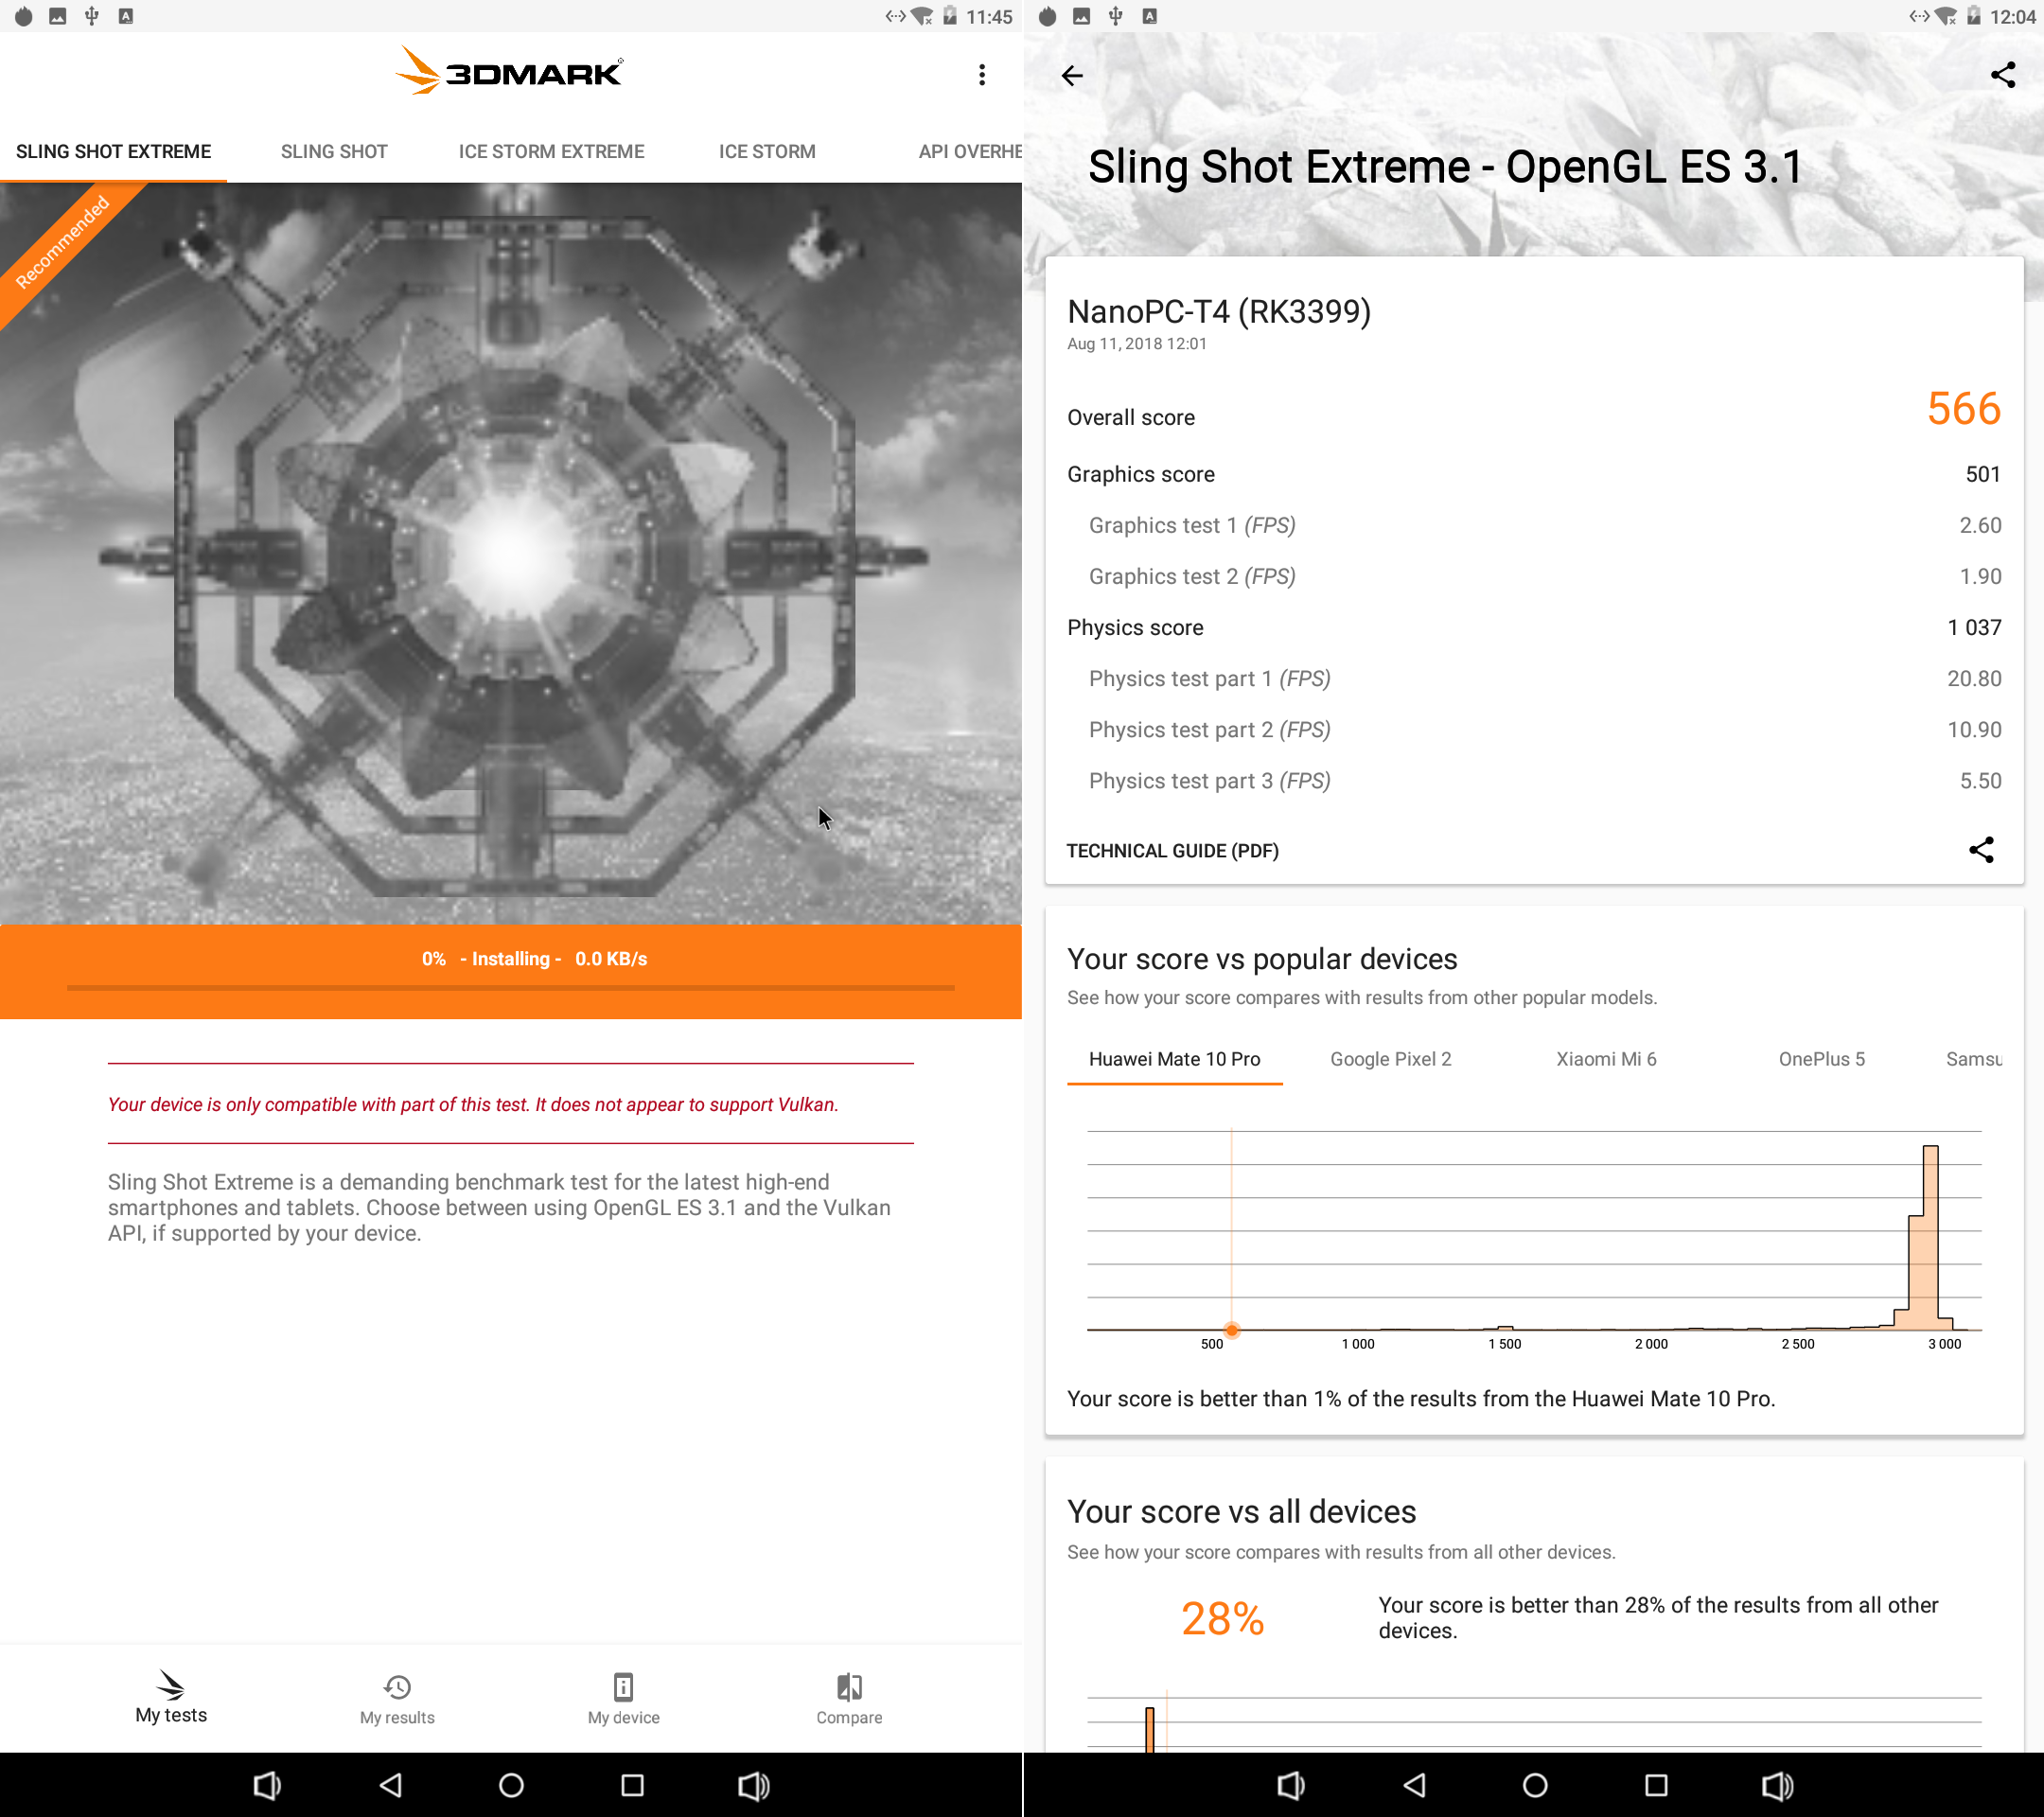
I also ran Sling Shot Extreme, which reports Vulkan is not supported, so the test was run using OpenGL ES 3.1. Against I don’t have a lot of data for that test, and AFAIK I only run it on Vernee Apollo Lite smartphone with a MediaTek Helio X20 processor. Score: 995 points
Storage Performance
A1 SD bench app is normally a decent app to get sequential speed performance data, but for whatever reasons, I struggled to get write speed values, and had to repeat the tests several times. I finally have up on the eMMC write speed, as it would never work.
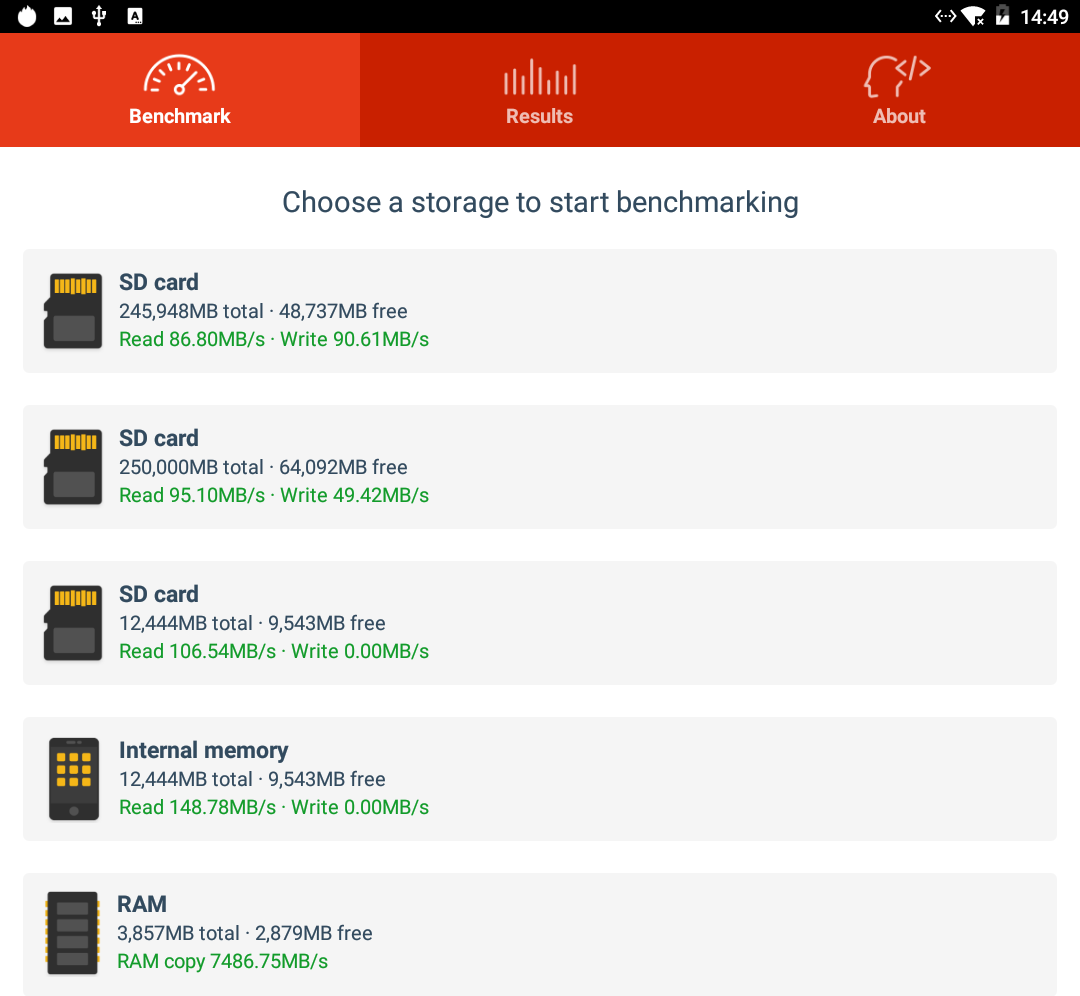
But the results are in for USB 3.0 and internal storage:
- USB 3.0 EXT-4 – Read: 86.80 MB/s; write: 90.61 MB/s
- USB 3.0 NTFS – Read: 95.10 MB/s ; write: 49.42 MB/s
- eMMC flash – Read 106.54MB/s or 148.78 MB/s, so there’s some variability there…
So USB 3.0 EXT-4 is roughly where it should be a mechanical hard drive, while USB 3.0 NTFS read speed is also OK, but write speed might be improved. The eMMC flash results are incomplete, but at 100 to 150 MB/s sequential performance is pretty good for a 16GB eMMC flash, although not quite as good as the one in AIO-3399J board that delivers close to 300 MB/s (in Ubuntu). The exact model used in NanoPC-T4 is Samsung KLMAG1JENB-B041 eMMC 5.1 flash chip (EOL) with theoretical speeds of 285 MB/s (read) and 40 MB/s (write), as well as 8K/10K random R/W IOPS, still very values. I’m not sure why we don’t get closer to 285 MB/s with A1 SD bench, but it’s been that way in other Android devices too.
Network Performance – Gigabit Ethernet and WiFi AC
I’ll use iperf for both Gigabit Ethernet and 802.11ac WiFi. Le’ts start with Gigabit Ethernet:
- iperf full duplex (both direction at the same time)
|
1 2 3 |
[ 6] local 192.168.1.10 port 51364 connected with 192.168.1.28 port 5001 [ 6] 0.0-60.0 sec 2.80 GBytes 400 Mbits/sec [ 4] 0.0-60.0 sec 5.47 GBytes 782 Mbits/sec |
The performance is not quite maxed out in either direction. I’ve been told in previous reviews that it might be due to the transfer being assigned to Cortex A53 cores instead of Cortex A72 cores, but I’m not sure how to change that in Android.
- Upload only
|
1 2 |
[ 4] local 192.168.1.10 port 5001 connected with 192.168.1.28 port 33232 [ 4] 0.0-60.0 sec 6.40 GBytes 916 Mbits/sec |
- Download only
|
1 2 3 |
[ 3] local 192.168.1.10 port 51414 connected with 192.168.1.28 port 5001 [ ID] Interval Transfer Bandwidth [ 3] 0.0-60.0 sec 6.50 GBytes 931 Mbits/sec |
But if we can in one direction only, then the Gigabit Ethernet bandwidth is basically maxed out. So no problems here.
and now WiFi 802.11ac:
- upload
|
1 2 |
[ 4] local 192.168.1.10 port 5001 connected with 192.168.1.6 port 56962 [ 4] 0.0-60.1 sec 601 MBytes 83.9 Mbits/sec |
- Download
|
1 2 |
[ ID] Interval Transfer Bandwidth [ 3] 0.0-60.0 sec 912 MBytes 127 Mbits/sec |
I normally get close to 250 Mbps over 802.11ac, and I would have expected similar performance, especially the router is now just one meter away from the DUT. I used to be around 3 meters away behind a ~10cm thick wall
Misc Tests
Gaming
I played the three games I normally feature in TV box reviews:
- Candy Crush Saga
- Beach Buggy Racing with maximum resolution settings
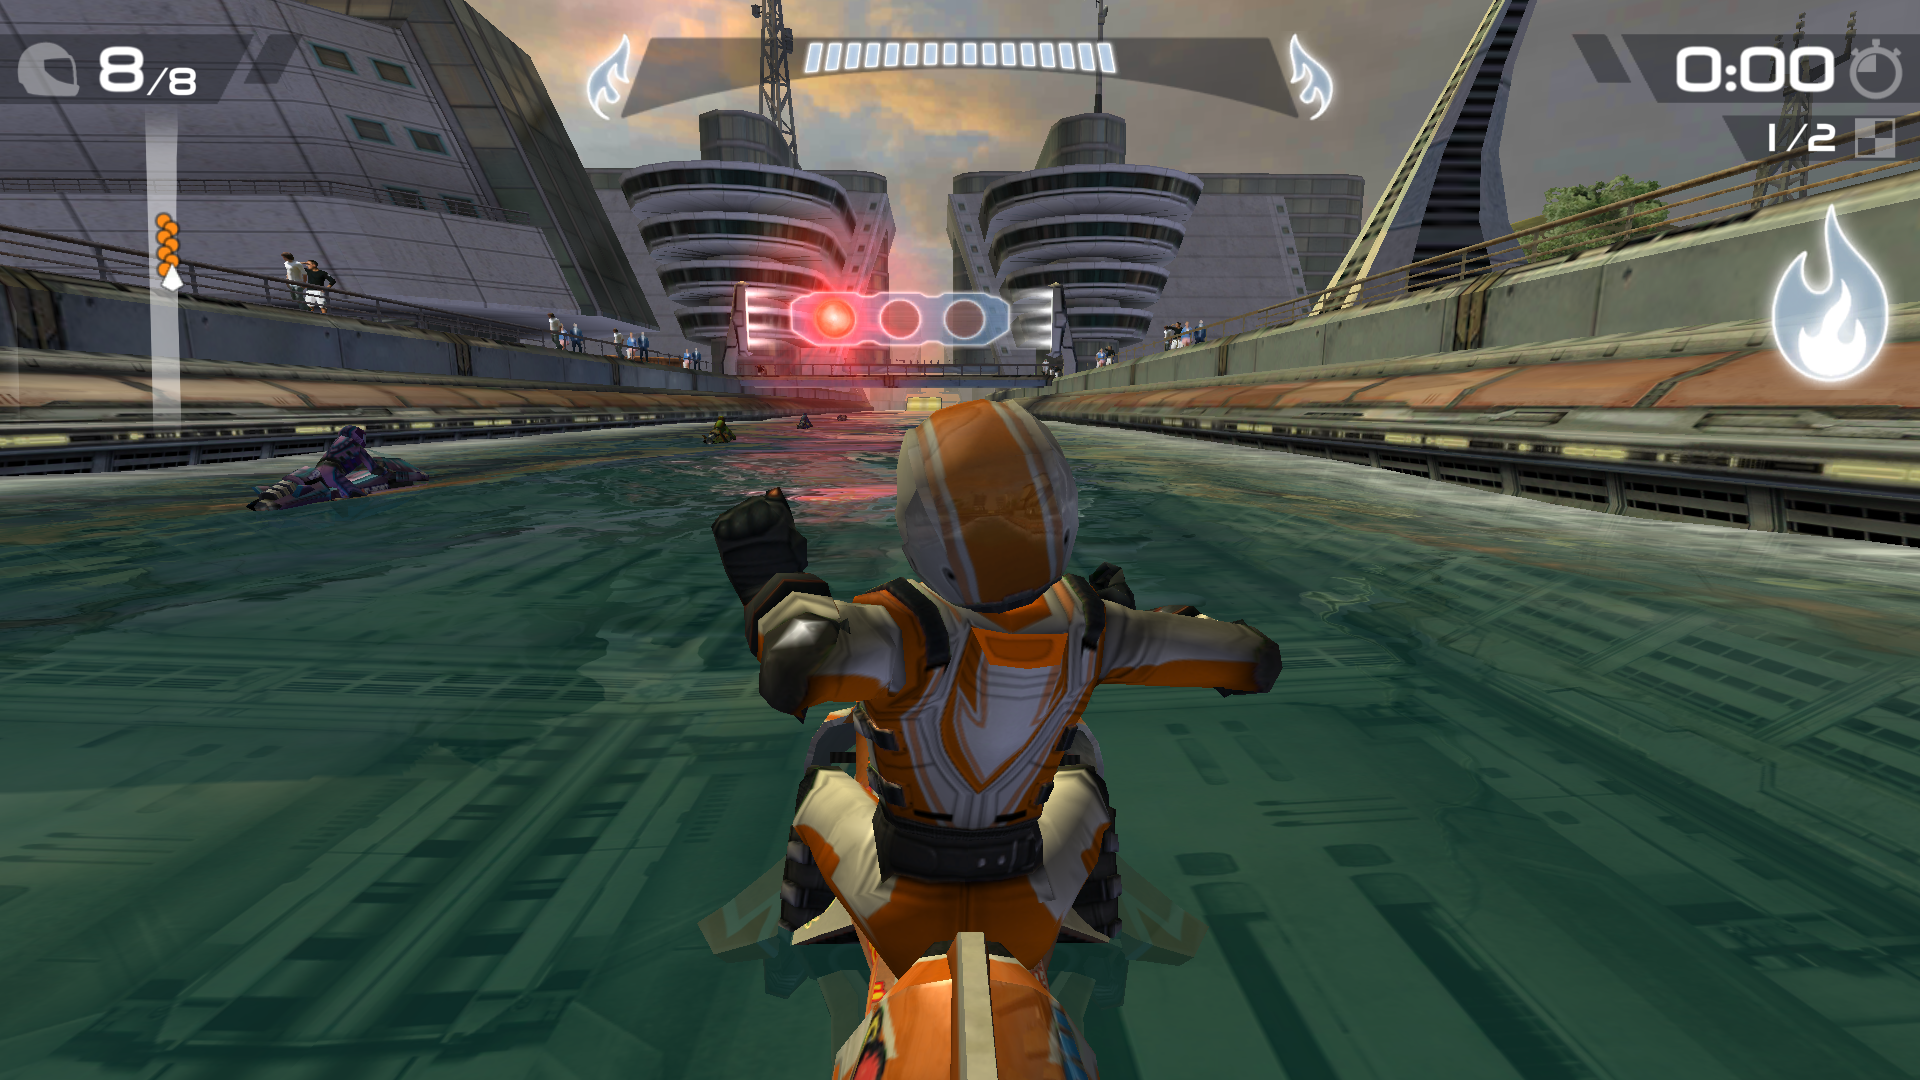
- Riptide GP2 with maximum resolution settings
I played Candy Crush Saga with the keyboard and mouse, and as expected everything went smoothly. I then connected the USB dongle of Tronsmart Mars G01 wireless gamepad to the USB port right next to the HDMI port on the board, and I noticed some stability problems with the gamepad losing signal frequently. I moved it to the USB port on the left, and all problems disappeared!
I could play Beach Buggy Racing for 45 minutes with no problem, and the game being super smooth. I then switch to Riptide GP2 for 15 more minutes, the framerate felt more like 15 to 25 fps, which remain playable, not far from perfect. The graphics details however seemed higher than lower end hardware based on processors with a Mali-450MP. See screenshot below for reference.
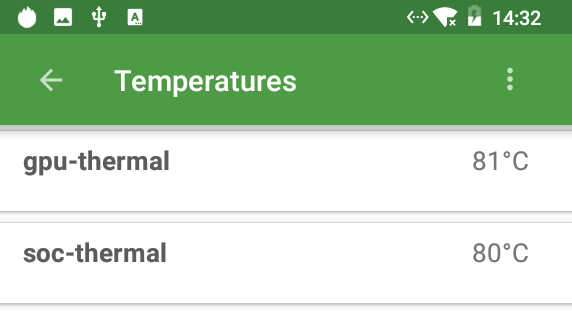
I measured temperature on the side of the heatsink (to avoid the acrylic case) and temperature was 66°C. I also went to CPU-Z, but there was not CPU/GPU tempeature in that app, so instead I reverted to DevCheck with the GPU and CPU temperatures being 81°C and 80°C respectively roughly one minute after exiting the game.
 So it’s likely some throttling was involved here, and a larger heatsink and/or a fan might be needed for better performance.
Bluetooth
I could pair Xiaomi Mi A1 Android phone to the board, and transfer a few photos to the board. I also connected X1T Bluetooth earbuds, and watch a few music videos. No problems at all in either cases.
Power Consumption
Finally I measured power consumption in various states:
- Power off – 0.1 ~ 0.2 Watt
- Standby – 1.4 Watts
- Idle – 6.3 ~ 6.4 Watts
- Power off + USB HDD – 0.1 ~ 0.2 Watt
- Standby – 4.2 Watts
- Idle + USB HDD – 10.2 ~ 10.4 Watts
That will be all for today. If you are interested in getting the board, you can now do so for $109.99 + shipping on FriendlyArm website.

Jean-Luc started CNX Software in 2010 as a part-time endeavor, before quitting his job as a software engineering manager, and starting to write daily news, and reviews full time later in 2011.
Support CNX Software! Donate via cryptocurrencies, become a Patron on Patreon, or purchase goods on Amazon or Aliexpress


I think I found a typo: 1.5TBits/s serial? 😉
Well spotted 🙂
Have you tried the Lubuntu OS on it? I have, several times, and it is still quite buggy. I can’t even use Software Update.
Not yet, and I’m on the road for several weeks, so I won;t be able to try it out.
The company send me an email about a new released on August 22nd:
Are you using that one (or newer)?
I only tried Lubuntu 18.04, but couldn’t get VNC to work. In 16.04 very version of VNC worked well, but I could never get VNC to connect to the T4 from my Mac with Lubuntu 18.04. Real VNC does not work with 18.04 either. I have not trued Friendly. How well does that work with VNC?
First attempt at using FriendlyDesktop failed. First the system Upgrade had several errors, and then followed these steps to add a VNC server and it failed so bad I had to reinstall the FriendlyDesktop OS from scratch again. Here’s the steps I tried: https://linuxize.com/post/how-to-install-and-configure-vnc-on-ubuntu-18-04/
If you know of a better VNC server that works, please let me know. This is show stopper for me. I am using the NanoPC to run a remote telescope system and it needs a simple VNC server (no SSH tunnel) to connect my MacBook Air to it. No security is needed as I am the only one close enough to the scope to access it, and besides, there is nothing on the NanoPC worth worrying about. I only use one astronomy application on it.
For VNC, as long as Ethernet is working, I would not expect any driver issues. So it’s probably some configuration issue, or potentially some missing features in the kernel or rootfs. Have you look at the server log? And maybe monitor packets with Wireshark between the board and you Mac.
I can see the instructions use systemd, it should be useful to find out if the vncserver daemon actually runs. I’ve found it easy to mess up the wrong way with systemd when I played with it.
Success! I got X11 VNC to run well, and the machine starts a local WIFI network hotspot as well. All I need to do now is add an autostart line so VNC runs at start up. I installed the aps that this whole endeavor is for (Kstars and the INDI astronomical server) and they run flawlessly.
The last part will be to fix the USB3 on this computer. I have a USB CCD astro camera and so far it has failed to capture more than 10 images before it hangs up. If I reconnect it to a USB2 port on the T4 it works perfectly – just slower. I am not sure why USB3 fails. I tried the camera on a different computer (Zotac PI332) and it runs great on USB3. I wish I knew why it fails on the NanoPC T4.
I created this HowTo a while back for Linux Mint, but I have also used these same steps on other Systemd-based distros. You can adapt it for your environment. It installs X11VNC as a service.
https://community.linuxmint.com/tutorial/view/2334
New cooling set launched for NanoPC-T4
https://www.friendlyarm.com/index.php?route=product/product&product_id=263