
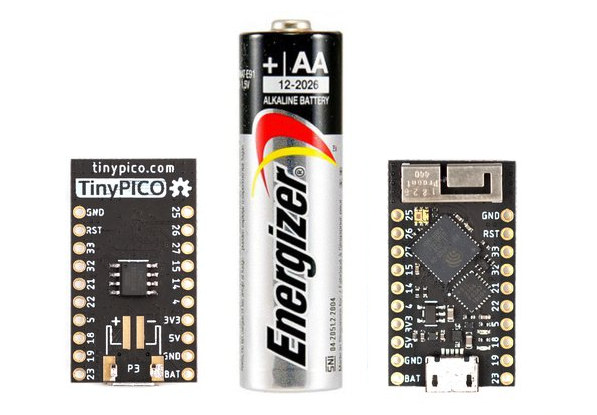
There are so many ESP32 boards available now, so why bother with another ones. Some of the key selling points of TinyPICO are that it is really small at 32 x 18 mm, it’s easy to use out of the box with MicroPython firmware pre-loaded, and supports LiPo batteries with an optimized power path for low-power battery usage.
The developer, named Unexpected Maker, also provides various shields for TinyPICO adding a display, sensors, an audio amplifier, an RTC, Grove headers, and more.
 TinyPICO board specifications:
- System-in-Package – Espressif Systems ESP32-PICO-D4 SiP with ESP32 dual-core processor operating at 240 MHz, 4 MB SPI flash
- External System Memory – 4 MB PSRAM
- Connectivity – 2.4 GHz WiFi 4 802.11b/g/n, Bluetooth 4.2 LE, 3D antenna
- Expansion – 14x GPIO broken out to standard pitch headers
- Debugging / Programming – USB + serial/UART for programming
- Misc – Power (red) & charge (orange) LED’s, APA102 RGB LED
- Power Supply
- 5V via micro USB port
- 700 mA 3.3 V LDO regulator
- Optimized power path for low-power battery usage
- LiPo battery management
- Battery pads on the bottom support both JST PH & MicroBlade connectors (included unassembled with every TinyPICO)
- Power Consumption – Deep sleep: 18 uA
- Dimensions – 32 x 18 mm (Breadboard-friendly)

While the board comes with MicroPython pre-installed, it also supports the Arduino IDE and Espressif IDF like other ESP32 boards, as well as plenty of example code and libraries.
Five shields have been designed for TinyPICO board so far:
- Play Shield with a 128×64 white OLED display, 3-axis accelerometer, light sensor, mono amplifier, magnetic buzzer, blue LED, 4x input buttons + reset button, and a LiPo connector with power switch
- Audio Shield with a 1.5 W mono amplifier, a magnetic buzzer, a trimmer potentiometer for gain control, and s switch to swap between on-board buzzer and external speakers
- RTC Shield with MCP7940N RTC chip and a battery holder for one CR1025 battery
- Grove I²C Shield with three I²C headers compatible with Seeed Studio Grove modules
- Proto Shield with a prototyping area to solver components and three buttons (reset + 2x user buttons)
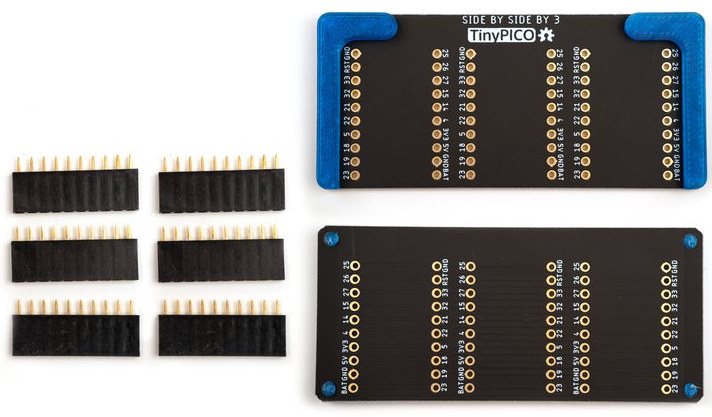 The “3 Up Shield” board enables you to connect a TinyPICO and up to 2 shields without having to stack the boards vertically.
The project will be open source with all hardware released under the CERN open hardware license, all software under the MIT open software license, and you’ll find both in TinyPICO GitHub account.
TinyPICO launched on Crowd Supply a few days, and the campaign is going well so far with over $11,000 raised from close to 160 backers. Pledges start at $26 for TinyPICO board with unassembled male headers, stackable headers, a JST PH battery connector, and a JST MicroBlade battery connector. There are bundles with multiple boards, and some with shields, but if you want to have a bit more fun, TinyPICO Shield Pack adds the last four shields listed above (Audio, RTC, Grove, Proto), plus the 3 Up Shield to the basic reward in a bundle that goes for $55. Shipping is free to the US, $9 to the rest of the world, and backers should expect their toy(s) to be shipped by the end of July 2019.
Thanks to Alexis for the tip.

Jean-Luc started CNX Software in 2010 as a part-time endeavor, before quitting his job as a software engineering manager, and starting to write daily news, and reviews full time later in 2011.
Support CNX Software! Donate via cryptocurrencies, become a Patron on Patreon, or purchase goods on Amazon or Aliexpress


It looks absolutely awesome. They addressed *all* the issues that bother me with other boards: – pin pitch => 0.1″ is breadboard friendly – width => leaves enough exposed pads on the bread board – small size => the development board can be placed directly in the final project – battery power => no need to design your own DC-DC converter – UART over USB => it doesn’t increase the board’s size so that’s great. Usually you can have only some of these addressed but not all. I’m going to have a look on how to back it. Thanks for… Read more »
Sadly crowdsupply only takes credit cards, no paypal 🙁
It looks like they accept PayPal, but you have to go through hoops: The easiest way to pay is with a credit card. We accept any form of Visa, MC, Amex, or Discover, including credit, debit, and pre-paid cards. We do not accept any other credit cards, including Diner’s Club. Under certain circumstances, we can also accept other forms of payment such as Bitcoin, PayPal, personal checks, cash, Automated Clearing House (ACH) transfers, and wire transfers (domestic and international). These alternate forms of payment may incur additional service charges and fees, and require pre-payment. To use them, you’ll need to… Read more »
Now tried, thanks Jean-Luc!
Will it be FCCed or CEd? Quite important, as it isn’t based on a module.
Microcontroller development boards don’t need to pass FCC (see FCC 15.101 exemption for subassemblies). If someone builds a commercial product around the TinyPICO by using it as a module, the product would need FCC certification. I don’t believe TinyPICO is marketed for this purpose, though. CE is the same, the CE electromagnetic compatibility directive explicitly does not apply to “components … which is not itself an apparatus with an intrinsic function intended for the final consumer” (see definition 3.1(d) here – http://www.ce-marking.org/directive-89336eec-emc.html ). Also CE doesn’t have an equivalent of the FCC concept of “modular certification” in compliance, so even… Read more »
I understand those exemptions for unfinished goods, especially eval boards, but I seriously doubt you can use a TX under this exemption.
Too late to edit: I quickly checked a bit and it really seems you are right in that you don’t have to formally carry a CE declaration of conformity, but to be allowed using it you still have to follow the requirements, so as a user i would feel much more comfortable with a module, even though legally it means nothing at all, but at least I know someone tested the TX part of it. Maybe I’m paranoid, the 2.4GHz band is after all the most uncritical of all, but I don’t really like having our equivalent of the FCC… Read more »
Hi Diego, though certification would be nice, it’s quite expensive. So for boards that don’t need it, it just increases the price for everyone.
Certification costs on development and prototyping boards only start making sense at the 35-50k unit mark, and well, I’d love TinyPICO to do those quantities, but it will be more like 1-2k 😉
mm $26. Seems like a lot to be honest.
It’s the same price as any other “same class” board , not bought from AliExpress. Like Adafruit, SparkFun etc… and yes you can buy cheaper boards from China, but none of them match the specs – not even close. None are this small, none come with extra PSRAM, or have an RGB LED on it… but most of all, almost none of them have a power path even close to TinyPICO. Both for general battery use and deep sleep. But if a cheaper Chinese board does what you need, use it. I’ve used my fair share in my projects 🙂… Read more »
>but none of them match the specs – not even close.
Which specs? Don’t pretty much all of these boards have the same ESP32 + SPI NOR and PSRAM to make it useful?
>a power path even close to TinyPICO.
The schematics don’t seem to be on github yet but this looks like some LDOs with enables that are attached to the 5v rail?
TinyPICO has 4 MB of extra PSRAM on top of the RAM packaged with the ESP32.
All boards use a LDO to go from 5V to 3.3V… which LDO makes a difference, but more importantly, how the power paths are configured makes a world of difference.
TinyPICO is not designed to compete with the Chinese boards on price. That’s impossible. It was made to address all of the issues myself and Matt had with using any of the Chinese boards and it was made to be the flagship ESP32 board for MicroPython.
>TinyPICO has 4 MB of extra PSRAM on top of the RAM packaged with the ESP32. The Chinese $10 boards seem to have that too. >All boards use a LDO to go from 5V to 3.3V… which LDO makes a difference, You mean one with a low drop out so you don’t need a boost circuit to run from a li-ion/li-po cell? >but more importantly, how the power paths are configured makes a world of difference. You mean putting stuff on an LDO with an enable so you can turn it off when you don’t need it? Saying “power path”… Read more »
lol, most current pico D4 Chinese board have PSRAM and identical design, i can see nothing innovative in the schematic, it just use an LDO and a PMOS like anyone else, and 12uA IQ for an LDO is a lot, we can find some with 0.5uA IQ. Also TP4065 is not even isolated when it run on battery, same goes for the voltage divider which is always connected (lol), that is a lot of waste IQ. I see mostly high profit on the back of gullible buyers, these board are obviously assembled in SZ for about 4USD.
>All boards use a LDO to go from 5V to 3.3V… which LDO makes a difference
>but more importantly, how the power paths are configured makes a world of difference.
Now your schematics are out we can see this whole PMIC power path mumbo jumbo is a load of tripe.
You have a standard LDO and a lipo charger. There is no PMIC.
Thanks for the write up about TinyPICO and the campaign Jean-Luc! Also, thanks to Angus for jumping in re the certification question. TinyPICO is targeted as a development & prototyping board, so as Angus mentioned, certification is not required.
TinyPICO looks very promising. Great idea, good job! All GitHub repositories at the moment seem empty with just an initial commit for the README. Once the schematics and software examples are released, it would be great to see the project certified by OSHWA as open source hardware.
Thanks!
The TinyPICO repro will be populated during the campaign, just no ETA right now, though sooner than later is my plan. I’m still tidying up schematics etc, and software is in active development.
I’ll post an update to the campaign once it’s out, so make sure you’re subscribed for updates.
Cheers 🙂
Hardware files, Arduino and Micropython samples have now been released in their Github account linked above.