
Yesterday I played with my new “ICE Tower CPU cooling fan” for Raspberry Pi 4 which cools the board just great but is clearly over the top. Regular reader and commenter m][sko mentioned it was possible to overclock Raspberry Pi 4 to 2.0 GHz after a firmware upgrade. That looks like a perfect task for my new fansink!
I’ve upgraded both the firmware and operating system:
|
1 2 |
sudo rpi-update sudo apt dist-upgrade |
then edited /boot/config.txt as root (sudo) to add the following lines to boost the maximum frequency to 2.0 GHz:
|
1 2 3 |
force_turbo=0 arm_freq=2000 over_voltage=6 |
Do not try to set force_turbo=1, as while it would allow to further boost the voltage, it will change a fuse in the chip, and it will void your warranty.
We can now reboot the board to validate the settings, and check those are applied:
|
1 2 3 |
vcgencmd get_config int | grep "arm\|over" arm_freq=2000 over_voltage=6 |
Good. At idle the frequency is lower, but that normal:
|
1 2 |
vcgencmd measure_clock arm frequency(48)=666826176 |
Voltage is set to 1.0335V:
|
1 2 |
vcgencmd measure_volts volt=1.0335V |
over_voltage will decrease or increase the max voltage in decrements/increments of 0.025V steps. The range -16 to 8, or 0.8V to 1.4V.
Let’s run sbc-bench.sh as we did previously, and monitor the temperature with rpi-monitor:
|
1 2 3 4 5 6 7 8 9 10 11 12 13 14 15 16 17 18 19 20 21 22 23 24 25 26 27 28 29 30 31 32 33 34 35 |
sudo /bin/bash ./sbc-bench.sh -c WARNING: this tool is meant to run only on Debian Stretch or Ubuntu Bionic. When running on other distros results are partially meaningless or can't be collected. Press [ctrl]-[c] to stop or [enter] to continue. sbc-bench v0.6.7 Installing needed tools. This may take some time... Done. Checking cpufreq OPP... Done. Executing tinymembench. This will take a long time... Done. Executing OpenSSL benchmark. This will take 3 minutes... Done. Executing 7-zip benchmark. This will take a long time..../sbc-bench.sh: line 600: 4724 Killed taskset -c 0 "${SevenZip}" b -mmt 1 >> ${TempLog} Done. Checking cpufreq OPP... Done. It seems neither throttling nor frequency capping has occured. Memory performance: memcpy: 2547.2 MB/s memset: 3651.0 MB/s (0.8%) 7-zip total scores (3 consecutive runs): 6900,6877,6939 OpenSSL results: type 16 bytes 64 bytes 256 bytes 1024 bytes 8192 bytes 16384 bytes aes-128-cbc 83479.79k 102077.25k 110821.72k 112916.14k 113631.23k 113541.12k aes-128-cbc 83514.12k 102155.14k 110784.17k 112935.59k 113573.89k 113382.74k aes-192-cbc 67566.13k 86925.76k 95294.38k 97361.58k 98189.31k 98331.31k aes-192-cbc 75028.43k 90016.62k 96037.97k 97670.83k 98301.27k 98178.39k aes-256-cbc 68036.63k 79945.09k 84813.82k 86112.60k 86035.11k 86338.22k aes-256-cbc 61634.20k 77697.69k 84171.18k 85799.94k 86406.49k 86474.75k Full results uploaded to http://ix.io/1PxG. Please check the log for anomalies (e.g. swapping or throttling happenend) and otherwise share this URL. |
Let’s go to the log to check the maximum temperature and actual frequency during 7-zip test:
|
1 2 3 4 5 6 7 8 9 10 |
System health while running 7-zip multi core benchmark: Time fake/real load %cpu %sys %usr %nice %io %irq Temp VCore 15:11:29: 2000/2000MHz 3.17 14% 1% 12% 0% 0% 0% 48.7°C 1.0335V 15:11:52: 2000/2000MHz 3.28 85% 2% 83% 0% 0% 0% 52.1°C 1.0335V 15:12:34: 2000/2000MHz 4.43 96% 48% 47% 0% 0% 0% 53.1°C 1.0335V 15:12:54: 2000/2001MHz 4.21 83% 3% 79% 0% 0% 0% 52.6°C 1.0335V 15:13:37: 2000/2000MHz 4.96 95% 40% 54% 0% 0% 0% 52.1°C 1.0335V 15:13:57: 2000/2000MHz 4.61 82% 3% 79% 0% 0% 0% 52.6°C 1.0335V 15:14:39: 2000/2000MHz 4.92 95% 37% 57% 0% 0% 0% 52.1°C 1.0335V |
Broadcom BCM2711 processor Arm Cortex-A72 cores were indeed clocked at 2.0 GHz, and the temperature went as high as 53.1°C, so we still have a good safety margin here.
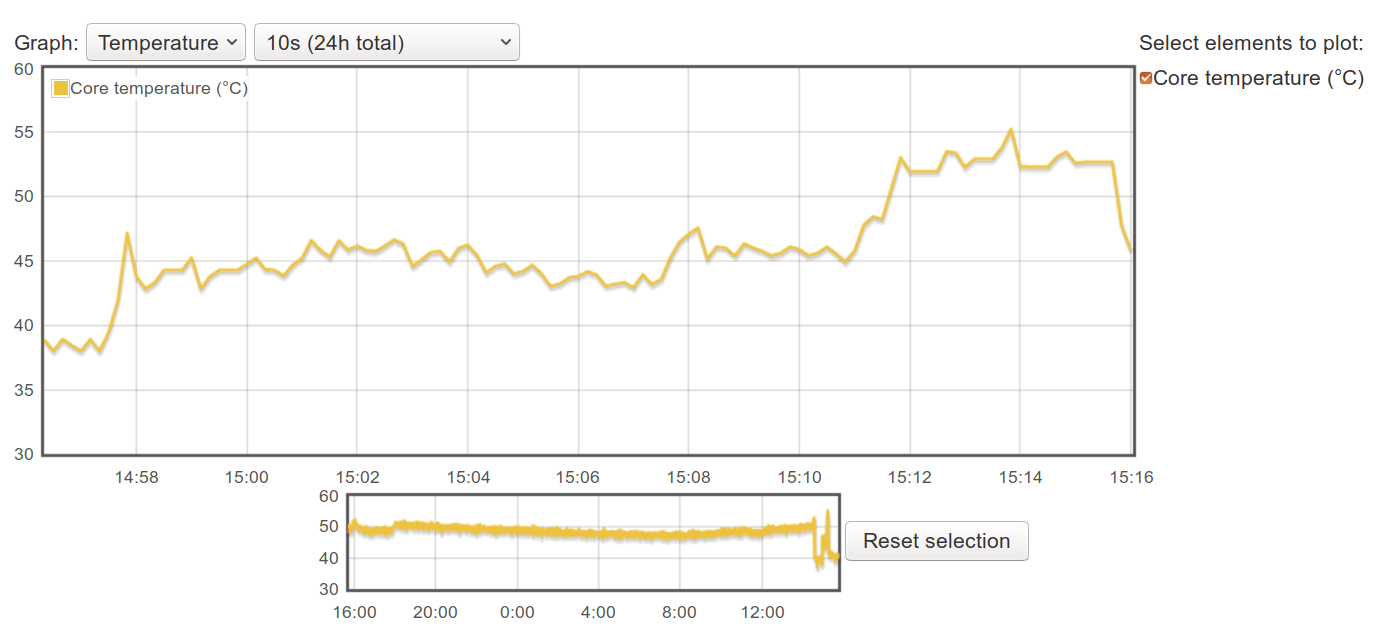
rpi-monitor chart actually shows a peak at 55°C, but still 30°C from the 85°C temperature limit of the processor.
Let’s see how much performance we’ve gained against running Raspberry Pi 4 at the default 1.5 GHz frequency.
| Raspberry Pi 4 @ 1.5 GHz | Raspberry Pi 4 @ 2.0 GHz (overclocked) | Ratio | |
| memcpy | 2636.2MB/s | 2547.2MB/s | 0.97x |
| memset | 3707.9MB/s | 3651MB/s | 0.98x |
| OpenSSL AES-256-CBC 16K | 64744.11k | 86338.22k | 1.33x |
| 7-zip | 5454 | 6905.33 | 1.27x |
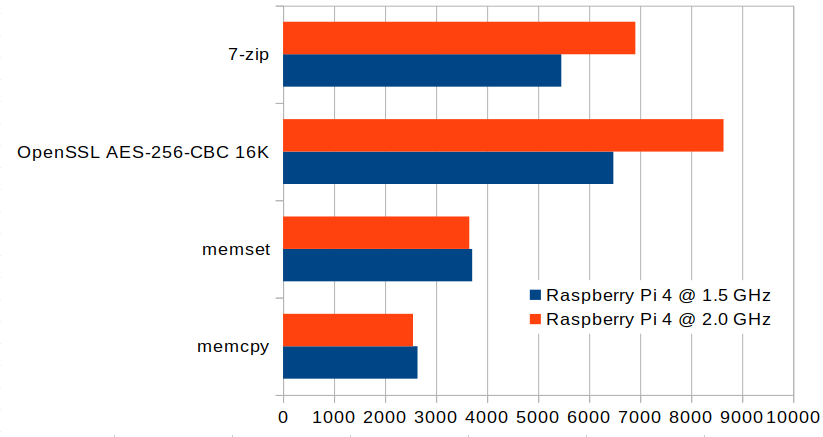
Memory benchmarks are basically the same meaning the bandwidth is not limited by the processor, but for other benchmarks, we get 27% to 33% performance improvement which mostly matches the theoretical 33% improvement we ought to expect.
If for some reasons, you’d like to have higher memory bandwidth, you could mess up with sdram_freq and over_voltage_sdram as explained in RPi overclocking options.

Jean-Luc started CNX Software in 2010 as a part-time endeavor, before quitting his job as a software engineering manager, and starting to write daily news, and reviews full time later in 2011.
Support CNX Software! Donate via cryptocurrencies, become a Patron on Patreon, or purchase goods on Amazon or Aliexpress


Now that’s a good use of that fan.
I was expecting that you submerged that thing in liquid nitrogen when I read the headline ?
Would someone really use it long term sat open on desk with the ice tower or should it be tested in a case?
I’m waiting for the 4GB model. I still have a few giants CPU coolers from the late 90s in my stash. I think I’ll be able to adapt one of them.
Let us all know how you go on and can you test when in a suitable case.
There are very nice ATX full towers now :)) This being said these coolers were work of art at the time, I’m thinking in particular of one which had a full circle of copper plates (not the horizontal one Zallman.) Almost a crime to hide them in a box.
Another nice idea for article is
raspbian 32bit (debian buster 10 ) vs ubuntu 18.04 64bit on raspberry pi
there is download for ubuntu 18.04 64bit for raspberry pi 4
https://jamesachambers.com/raspberry-pi-ubuntu-server-18-04-2-installation-guide/
as it is kind of interesting as for example x264 encoding is like on 3/5 speed on 32bit
Nice one. I think that the frequency in the table header is inverted.
Still, I think that those high temps and need for such big heatsinks are limiting it’s usage. Maybe underclocking is better than overclocking in this case so you can use it without heatsink. For example a nice benchmark would be, how much do you need to underclock rpi4 so it doesn’t throttles with a simple passive heatsink and how well it performs at that frequency.
> I think that the frequency in the table header is inverted.
Are you referring to this?
‘Fake’ is what the Linux kernel thinks would happen. But Linux on the RPi is just a secondary OS running on the ARM guest processors. And a guest OS like Linux on the RPi has no idea what’s really going on: https://github.com/raspberrypi/linux/issues/2512#issuecomment-382703153
The Linux kernel will display 2.0 GHz even if the ARM cores are just running with 600 MHz due to undervoltage or throttling.
That’s what the ‘real’ column is for. Here the primary operating system running on the VideoCore (ThreadX) is asked about the real clockspeeds using
/usr/bin/vcgencmd measure_clock arm. No idea why ThreadX reported once 2001 GHz since Jean-Luc configuredarm_freq=2000.No I meant the table in the end of the post with the memcpy and memset tests.
_But it’s my mistake_.
I expected those test to be faster @2.0GHz and I thought it was inverted.
Thanks for the info, I haven’t realised that Linux is a guest OS. Interesting and concerning at the same time. I’ll have a look at it.
See starting at ‘The real brain of the Pi is not open source’ here https://ownyourbits.com/2019/02/02/whats-wrong-with-the-raspberry-pi/
Thanks for the link!
Mickmake did a good review where he tried to see just how little power it took to boot a pi.
https://youtu.be/AHIld3cjmTM
Alternative article title: How to make your Pi 4 run for two weeks instead of two years :))
We didn’t change voltage too much so I don’t see any problems 🙂
Pi4 SOC without metal cover
https://www.raspberrypi.org/forums/viewtopic.php?f=29&t=246173&p=1509054#p1509054
I did it with scalpel
Your stability issues might possibly be caused by light or other radiations that can reach the silicon while they were blocked by the aluminum before. Make sure no area around is visible from outside. The edges are not supposed to be sensitive but the hole square centimeter of silicon can be sensitive to intense light. Just try to photograph it with a flash during a build and you’d be surprised to see it hang or crash.
It looks like when I exchange thermal tape to proper thermal paste everything works just fine and temperature is much better. It looks like 3M thermal tape from isn’t big win after all.
That doesn’t surprise me. I found as well in my build farm that thermal tape isn’t that good.
Mine peak at 65 degrees, passively cooled with official Pi micro USB power adapter converted to usb-c with adapter
http://ix.io/1QAG