
Shenzhen Wesion released the NPU toolkit for Khadas VIM3/VIM3L last November, so I decided to try the latest Ubuntu 18.04 image and the NPU toolkit on Khadas VIM3L, before switching to VIM3 for reasons I’ll explain below.
I’ve followed two tutorials from the forum and wiki to run pre-built samples and then building a firmware image and samples from source.
Khadas VIM3L and VIM3 Have Different & Optional NPUs
This will be obvious to anyone who read the specs for Khadas VIM3 and VIM3L that the former comes with a 5 TOPS NPU, while the one in the latter only delivers up to 1.2 TOPS. But somehow, I forgot about this, and assume both had the same NPU making VIM3L more attractive but this type of task, Obviously I was wrong.
But the real reason I stopped using Khadas VIM3L can be seen in the photo below.

My board is an early sample that comes with Amlogic S905D3 processor, but people who purchased Khadas VIM3L got a board with Amlogic S905D3-NON processor instead, and the NON part means it integrates an NPU. All Khadas VIM3L will ship with the NON version so you don’t have to worry, but if you ever wanted to use the NPU on other S905D3/S905X3 devices you’d have to make sure you have a “NON” processor first.
Running Pre-built Yolo & Facenet Demos
First, download the latest Ubuntu Desktop firmware for VIM3, and flash it using the same method we used for Android:
|
1 |
$ burn-tool -v aml -b VIM3 -i VIM3_Ubuntu-xfce-bionic_Linux-4.9_arm64_EMMC_V20191231.img |
You may also consider using the server image to run those demos. If you choose the desktop image, you are told to switch to the framebuffer console using Ctrl+Alt+F1 before running them. I tried in XFCE, and I did not notice any issues, buy when running in an SSH session, I found out it would corrupt the video output.
We can now download the NPU demo binaries as follows:
|
1 |
git clone https://gitlab.com/khadas/aml_npu_demo_binaries --depth=1 |
You’ll get four directories:
- detect_demo – Yoloface/YoloV2/YoloV3 demo with video (camera)
- detect_demo_picture – Yoloface/YoloV2/YoloV3 demo with picture
- detect_demo_khadas – YoloV2/YoloV3 for MIPI or UVC camera
- inceptionv3 – Inceptionv3
I don’t have any USB webcam working in Linux right now, so I’ll play with detect_demo_picture in this section, and checking inceptionv3 when we are building the image from source.
|
1 2 |
cd ~/aml_npu_demo_binaries/detect_demo_picture sudo ./INSTALL |
After installation, we can check out the samples described in Gitlab.
- Yoloface demo
|
1 |
./detect_demo 0 1080p.bmp |
Demos will generate output.bmp file which I’ll show under each command.
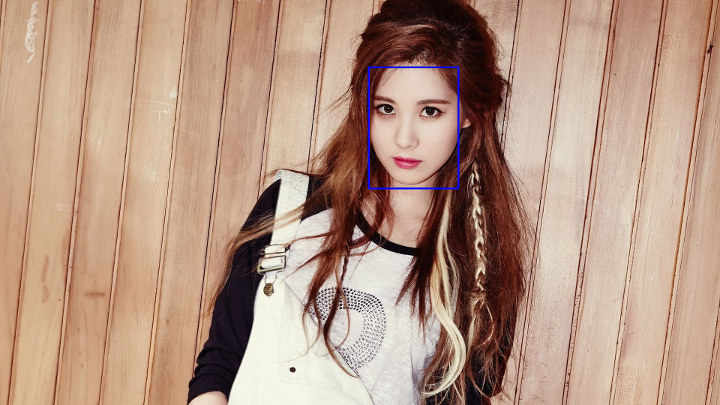 As its name implies, Yoloface specifically tries to detect faces.
- YoloV2 demo
|
1 |
./detect_demo 1 1080p.bmp |

- YoloV3 demo
|
1 |
./detect_demo 2 1080p.bmp |

YoloV3 looks to be more accurate than YoloV2, but the samples do not output any performance data for other comparisons.
The last demo Facenet demo works with two passes: (0) writes data to emb.db, (1) performs inference:
|
1 2 3 4 5 6 7 8 9 10 11 12 13 |
$ ./detect_demo 11 1080p.bmp 0 W Detect_api:[det_set_log_level:19]Set log level=1 W Detect_api:[det_set_log_level:21]output_format not support Imperfect, default to DET_LOG_TERMINAL W Detect_api:[det_set_log_level:26]Not exist VSI_NN_LOG_LEVEL, Setenv set_vsi_log_error_level $ ./detect_demo 11 1080p.bmp 1 W Detect_api:[det_set_log_level:19]Set log level=1 W Detect_api:[det_set_log_level:21]output_format not support Imperfect, default to DET_LOG_TERMINAL W Detect_api:[det_set_log_level:26]Not exist VSI_NN_LOG_LEVEL, Setenv set_vsi_log_error_level i=0 temp=0 i=1 temp=1 i=2 temp=1 mindis:0, index=0 face detected,your id is 0, name is deng.liu |
Facenet detects a face, provides a name (Deng Liu), and save the results into two image files:
- face_160.bmp (160×160 pixels)

- face.bmp with slightly higher resolution and keeping the aspect ratio of the original photo
As mentioned above, I don’t have a USB camera that works properly in Linux. But it’s still detected, and for reference, here are some of the info I got when I connected mine and tried the samples:
|
1 2 3 4 5 6 7 8 9 10 11 12 13 14 15 16 17 |
$ sudo apt install v4l-utils $ v4l2-ctl --list-devices amlvideo (amlvideo-000): /dev/video10 amlvideo2 (amlvideo2): /dev/video11 /dev/video12 ionvideo (platform:ionvideo-000): /dev/video13 juno R2 (platform:isp-v4l2-0): /dev/video1 Venus USB2.0 Camera (usb-xhci-hcd.0.auto-1.2): /dev/video0 |
The camera is Venus USB2.0 camera, but using the sample fails:
|
1 2 3 4 5 6 |
./detect_demo_uvc /dev/video0 1 > /dev/null W Detect_api:[det_set_log_level:19]Set log level=1 W Detect_api:[det_set_log_level:21]output_format not support Imperfect, default to DET_LOG_TERMINAL W Detect_api:[det_set_log_level:26]Not exist VSI_NN_LOG_LEVEL, Setenv set_vsi_log_error_level (detect_demo_uvc:5595): GStreamer-CRITICAL **: 13:37:53.644: gst_element_get_state: assertion 'GST_IS_ELEMENT (element)' failed |
We can check the kernel log for more details:
|
1 2 3 4 5 6 7 8 9 10 11 12 13 14 15 16 17 18 19 20 21 22 23 24 25 26 27 28 29 30 31 32 33 34 35 36 37 38 |
[ 2858.391560] vout: vmode set to 1080p60hz [ 2858.391565] vout: don't set the same mode as current, exit [ 2858.392220] fb: osd[0] canvas.idx =0x40 [ 2858.392221] fb: osd[0] canvas.addr=0x6b400000 [ 2858.392223] fb: osd[0] canvas.width=7680 [ 2858.392224] fb: osd[0] canvas.height=2160 [ 2858.392225] fb: osd[0] frame.width=1920 [ 2858.392226] fb: osd[0] frame.height=1080 [ 2858.392226] fb: osd[0] out_addr_id =0x1 [ 2858.434368] fb: osd[0] enable: 1 (sh) [ 2858.451460] fb: osd[0] canvas.idx =0x40 [ 2858.451462] fb: osd[0] canvas.addr=0x6b400000 [ 2858.451464] fb: osd[0] canvas.width=5760 [ 2858.451466] fb: osd[0] canvas.height=2160 [ 2858.451467] fb: osd[0] frame.width=1920 [ 2858.451469] fb: osd[0] frame.height=1080 [ 2858.451471] fb: osd[0] out_addr_id =0x1 [ 2858.527792] _setpower,control status:1 [ 2858.527797] ====>>>>poweron in _SetPower [ 2858.573231] amlvideo2.0 cma memory is 58000000 , size is 1800000 [ 2858.573470] amlvideo2.0 cma memory release succeed [ 2858.573648] amlvideo2.1 cma memory is 58000000 , size is 1800000 [ 2858.573887] amlvideo2.1 cma memory release succeed [ 2858.574470] soc_lens_ioctl@soc_lens.c:158 GENERIC(WARNING) :Unknown lens ioctl cmd -2140645888 [ 2858.574551] camera_ioctl@soc_sensor.c:439 GENERIC(WARNING) :Unknown soc sensor ioctl cmd -2140645888 [ 2858.574635] isp_v4l2_stream_try_format@isp-v4l2-stream.c:1326 GENERIC(CRIT) :[Stream#0] format 0x00000000 is not supported, setting default format 0x34424752. [ 2858.574721] fw_intf_stream_stop@fw-interface.c:331 GENERIC(CRIT) :Stream off 4 [ 2858.574830] ionvid: dbg: ionvideo open [ 2858.574839] ionvid: dbg: vidioc_close!!!! [ 2858.574845] ionvid: dbg: vidioc_close [ 2858.632092] _setpower,control status:0 [ 2858.632098] ====>>>>poweroff in _SetPower [ 2889.028169] _setpower,control status:1 [ 2889.028176] ====>>>>poweron in _SetPower [ 2889.041837] _setpower,control status:0 [ 2889.041844] ====>>>>poweroff in _SetPower |
It looks like the format used by the camera is not supported, and I had a similar issue when I tried similar inference samples with Jetson Nano SBC.
The source code for the above demo programs is available on Gitlab, but you’ll need to setup your host PC as described below in order to build those from source.
Building NPU demo from source
First, I had to download the NPU toolkit, and as noted in the announcement you’ll need to provide your contact and project details before download. However, at the time I did so, there was no manual review of my request, and I received receive an email almost immediately after application.
The file is named aml_npu_sdk.tgz, and we need to extract the file in a directory. I did so in ~/edev/amlogic/, and we’ll find four directories in aml_npu_dsk with docs, acuity-toolkit (Model conversion tools), and the Android and Linux SDKs.
Installing Tensorflow in a computer running Ubuntu 18.04
The first step is to install Tensorflow in your Ubuntu 16.04/18.04 computer. Mine is a laptop running Ubuntu 18.04:
|
1 2 3 4 |
sudo apt update sudo apt install python3 python3-pip python3-virtualenv cd ~/edev/amlogic/aml_npu_sdk/acuity-toolkit pip3 install -r requirements.txt |
One it’s done, we can check whether TensorFlow is properly installed by launching Python3, and running the following four commands in the shell:
|
1 2 3 4 |
import tensorflow as tf sess = tf.Session() hello = tf.constant("Hello World") print(sess.run(hello)) |
This is the output on my machine:
|
1 2 3 4 5 6 7 8 9 10 |
python3 Python 3.6.9 (default, Nov 7 2019, 10:44:02) [GCC 8.3.0] on linux Type "help", "copyright", "credits" or "license" for more information. >>> import tensorflow as tf >>> sess = tf.Session() 2019-12-14 14:33:47.991325: I tensorflow/core/platform/cpu_feature_guard.cc:141] Your CPU supports instructions that this TensorFlow binary was not compiled to use: AVX2 FMA >>> hello = tf.constant("Hello World") >>> print(sess.run(hello)) b'Hello World' |
The last line means that’s OK.
Models Conversion
Khadas VIM3(L) NPU SDK supports Caffe, Tensorflow, Tflite, Darknet, and ONNX models, and some sample scripts can be found in acuity-toolkit/conversion_scripts folder in the SDK to convert the model. We can execute the scripts as follows:
|
1 2 3 4 |
cd conversion_scripts ./0_import_model.sh ./1_quantize_model.sh ./2_export_case_code.sh |
It will take a few minutes to complete (less than 10 minutes on my system).
Fenix installation
Fenix is a script to build Ubuntu/Debian images for Khadas VIM boards. Let’s make sure the system is up-to-date and install dependencies first:
|
1 2 3 |
sudo apt-get update sudo apt-get upgrade sudo apt-get install git make lsb-release qemu-user-static |
Now we can create a working directory and retrieve the script from Github, before entering the directory, configuring the script and build the image:
|
1 2 3 4 5 6 |
mkdir ~/code/ cd ~/code/ git clone https://github.com/khadas/fenix cd ~/code/fenix source env/setenv.sh make |
The line before make configures the build. Here’s what I selected:
|
1 2 3 4 5 6 7 8 9 10 11 12 13 14 15 16 17 18 19 20 21 22 23 24 25 26 27 28 29 30 31 32 33 34 35 36 37 38 39 40 41 42 43 44 45 46 47 48 49 50 51 52 53 54 55 56 57 58 59 60 61 62 63 64 65 66 |
source env/setenv.sh Choose Khadas board: 1. Edge 2. VIM1 3. VIM2 4. VIM3 5. VIM3L Which board would you like? [2] 4 Choose uboot version: 1. uboot-2015.01 2. uboot-mainline Which uboot version would you like? [1] Choose linux version: 1. linux-4.9 2. linux-mainline Which linux version would you like? [1] Choose distribution: 1. Ubuntu 2. Debian Which distribution would you like? [1] Choose Ubuntu release: 1. bionic Which Ubuntu release would you like? [1] Choose Ubuntu type: 1. server 2. xfce 3. lxde Which Ubuntu type would you like? [1] 2 Set architecture to 'arm64' by default. Choose install type: 1. EMMC 2. SD-USB Which install type would you like? [1] 1 =========================================== #VERSION: 0.8.2 #KHADAS_BOARD=VIM3 #VENDOR=Amlogic #CHIP=A311D #LINUX=4.9 #UBOOT=2015.01 #DISTRIBUTION=Ubuntu #DISTRIB_RELEASE=bionic #DISTRIB_TYPE=xfce #DISTRIB_ARCH=arm64 #INSTALL_TYPE=EMMC =========================================== Environment setup done. Type 'make' to build. |
Running make will take a while, as you’ll be asked to input your password at one point to get sudo access:
This is what the output should look like at the end of a successful build:
|
1 2 3 4 5 6 7 |
Info: IMAGE: /home/jaufranc/code/fenix/build/images/VIM3_Ubuntu-xfce-bionic_Linux-4.9_arm64_EMMC_V0.8.2-20200105.img is ready! Cleanup... Done. Sun Jan 5 21:56:07 +07 2020 Time elapsed: 75 minute(s). |
We can now flash the image to the eMMC flash using the usual method:
|
1 2 |
cd ~/code/fenix/build/images burn-tool -v aml -b VIM3 -i VIM3_Ubuntu-xfce-bionic_Linux-4.9_arm64_EMMC_V0.8.2-20200105.img |
The system boots and everything seems to be as it should good.
 Now we can go back to our host computer, and build (cross-compiler) Inceptionv3 from source:
|
1 2 3 |
cd ~/edev/amlogic/aml_npu_sdk/acuity-toolkit/conversion_scripts/nbg_unify_inception_v3/ cp ~/edev/amlogic/aml_npu_sdk/linux_sdk/demo/inceptionv3/build_vx.sh . ./build_vx.sh ~/edev/amlogic/aml_npu_sdk/linux_sdk/linux_sdk ~/code/fenix/ |
Once the build is done we can see inceptionv3 binary in bin_r folder:
|
1 2 3 4 5 6 7 |
ls -l bin_r/ total 156 -rwxr-xr-x 1 jaufranc jaufranc 125440 Dec 15 10:51 inceptionv3 -rw-r--r-- 1 jaufranc jaufranc 6216 Dec 15 10:51 main.o -rw-r--r-- 1 jaufranc jaufranc 3608 Dec 15 10:51 vnn_inceptionv3.o -rw-r--r-- 1 jaufranc jaufranc 3168 Dec 15 10:51 vnn_post_process.o -rw-r--r-- 1 jaufranc jaufranc 16152 Dec 15 10:51 vnn_pre_process.o |
But we’ll find all file needed for our demo in the bin_demo directory:
|
1 2 3 4 5 6 7 |
ls -l ~/edev/amlogic/aml_npu_sdk/linux_sdk/demo/inceptionv3/bin_demo/ total 28376 -rwxr-xr-x 1 jaufranc jaufranc 15981 Oct 15 09:17 dog_299x299.jpg -rwxr-xr-x 1 jaufranc jaufranc 88322 Oct 15 09:17 goldfish_299x299.jpg -rw-r----- 1 jaufranc jaufranc 10479 Oct 15 09:17 imagenet_slim_labels.txt -rwxrwxr-x 1 jaufranc jaufranc 129568 Oct 15 09:17 inceptionv3 -rw-rw-r-- 1 jaufranc jaufranc 28807168 Oct 15 09:17 inception_v3.nb |
After copying all files to the board, the sample did not run successfully:
|
1 2 3 4 5 6 7 8 9 10 11 12 13 14 15 16 17 18 19 20 21 22 23 24 25 26 27 28 29 30 31 |
./inceptionv3 inception_v3.nb goldfish_299x299.jpg D [setup_node:367]Setup node id[0] uid[0] op[NBG] D [print_tensor:129]in : id[ 1] shape[ 3, 299, 299, 1 ] fmt[u8 ] qnt[ASM zp=137, scale=0.007292] D [print_tensor:129]out: id[ 0] shape[ 1001, 1 ] fmt[f16] qnt[NONE] D [optimize_node:311]Backward optimize neural network D [optimize_node:318]Forward optimize neural network I [compute_node:260]Create vx node Create Neural Network: 41ms or 41210us I [vsi_nn_PrintGraph:1308]Graph: I [vsi_nn_PrintGraph:1309]***************** Tensors ****************** D [print_tensor:137]id[ 0] shape[ 1001, 1 ] fmt[f16] qnt[NONE] D [print_tensor:137]id[ 1] shape[ 3, 299, 299, 1 ] fmt[u8 ] qnt[ASM zp=137, scale=0.007292] I [vsi_nn_PrintGraph:1318]***************** Nodes ****************** I [vsi_nn_PrintNode:156]( NBG)node[0] [in: 1 ], [out: 0 ] [0a2fdec0] I [vsi_nn_PrintGraph:1327]****************************************** I [vsi_nn_ConvertTensorToData:732]Create 268203 data. Verify... Verify Graph: 1ms or 1667us Start run graph [1] times... Run the 1 time: 30ms or 30286us vxProcessGraph execution time: Total 30ms or 30330us Average 30.33ms or 30330.00us I [vsi_nn_ConvertTensorToData:732]Create 2002 data. --- Top5 --- 2: 0.826660 795: 0.008255 974: 0.004066 393: 0.002390 408: 0.002285 I [vsi_nn_ConvertTensorToData:732]Create 2002 data. |
For some reason, the sample does not bother doing a look-up on “imagenet_slim_labels.txt” file, but if we open the file…
|
1 2 3 4 5 6 7 8 9 10 11 12 13 14 |
dummy tench goldfish great white shark tiger shark hammerhead electric ray stingray cock hen ostrich brambling goldfinch house finch |
We can see “2” is goldfish (the index starts at 0), so it works fine.
For reference, if you try the sample, on hardware without NPU, or firmware that does not support the NPU, you’ll get the following error as I did on my early sample of Khadas VIM3L without NPU:
|
1 2 3 4 5 6 |
./inceptionv3 bin_demo/inception_v3.nb bin_demo/goldfish_299x299.jpg [ 1] Failed to open device: No such file or directory, Try again... [ 2] Failed to open device: No such file or directory, Try again... [ 3] Failed to open device: No such file or directory, Try again... [ 4] Failed to open device: No such file or directory, Try again... [ 5] _OpenDevice(1205): FATAL: Failed to open device, errno=No such file or directory. |

Jean-Luc started CNX Software in 2010 as a part-time endeavor, before quitting his job as a software engineering manager, and starting to write daily news, and reviews full time later in 2011.
Support CNX Software! Donate via cryptocurrencies, become a Patron on Patreon, or purchase goods on Amazon or Aliexpress

