
CNXSoft: This is a guest about OBD-II and CAN support in embedded Linux by Andre Márcio de Lima Curvello, Sr. FAE and Technical Evangelist, Toradex
A connected world makes it possible to track your online orders being shipped to your home through your smartphone in real-time, and getting information about your vehicle such as tire pressure, outside temperature, and even details like if a lamp is broken – has begun to be possible via smartphones in modern vehicle models. But behind the magic of knowing where the truck carrying your package is at all times and other details of the vehicle, there is a very complex world made of embedded devices ‘talking’ to each other so the information makes its way from the device to you.
In this article, you will learn how to create an application to communicate with a vehicle through CAN via the OBD-II standard. We use modern software containerization with Docker and Torizon, the state-of-the-art Industrial Embedded Linux Platform from Toradex. We implement the application on the Verdin Computer-on-module, which is designed to be used in rugged environments, like that of commercial vehicles. While this example outlines a hypothetical vehicle application, you can use CAN even in industrial applications as well.
A brief conversation about CAN
Before we go into the technical details of our application, you need to know that it will be using CAN, which stands for Controller Area Network. It is one of the most used communication protocols for vehicles, trucks, and even tractors. If you have a vehicle manufactured after 2004, it has a CAN network for certain, connecting dozens of ECUs.
For those who are not familiar with the term, ECU is the acronym of Electronic Control Unit. It corresponds to each electronic device in a CAN network that can receive and transmit data, being responsible to control one or more features in a vehicle, like an engine, transmission, and even the multimedia system.
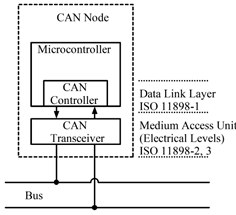
Generally, any given ECU acting as a CAN node capable of interacting with the vehicle CAN bus must have two major components: a CAN Controller, which implements the ISO 11898-1 Data Link Layer for CAN, and a CAN Transceiver, which in turn takes care of the Physical Layer as defined by ISO 11898-2/3 standards, as shown in Figure 1.
The CAN bus was initially aimed to be used on vehicles, but it proved to be so robust that other fields started using it, adding transport protocols so it can support more applications, like the CAN J1939 standard created for trucks and ISO-11783 (also known as ISOBUS) created for tractors. OBD-II over CAN, which we’ll be talking about, is built upon ISOTP, or, in other words, ISO-15765-2.

In that same direction, the CAN network in the majority of vehicles also has to communicate over an On-Board-Diagnostics (OBD-II) standard, in which it shall respond to a series of queries to provide information about speed, RPM, battery level, fuel level, among a lot of other data related to engine information. As the name itself indicates, OBD-II can be (and is) used to execute diagnostics on vehicles, as shown in Figure 2.
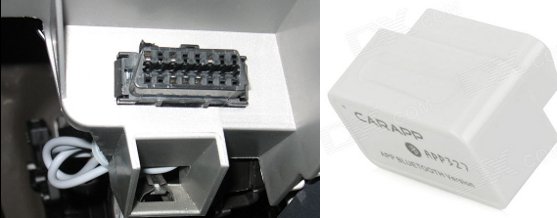
The possibility to interact with a given vehicle with the OBD-II standard allows any application to query information from a given vehicle’s main ECU, without having to know the proprietary CAN messages used by each manufacturer to transmit a message of interest. An OBD-II does not only mean a standard of messages through a network protocol, but also refers to a common physical connector to be used, as shown in Figure 3.
This connector is normally used for telematics devices by companies to monitor, among other available vehicle variables, vehicle speed, fuel level, battery level, grouped together with geolocation data obtained through a GPS/GNSS receiver. Other information may also be obtained, like engine temperature and RPM, which can indicate high-intensity conditions that a given engine may be exposed to.
Using the OBD-II is a query-response approach. In other words, you won’t be reading messages of interest as they appear. You will be sending messages for the main vehicle ECU to respond to the given information, like vehicle speed. The main vehicle ECU will respond to that query and you will process the message as the OBD-II standard details it. Good practices for this approach involve NOT spamming the CAN bus and periodically query the messages of interest, such as once per minute, for example.
Torizon and Verdin
If you have not yet heard about Torizon, I invite you to take a look. Torizon is Toradex’s easy-to-use Industrial Embedded Linux Platform, which uses applications within containers managed by Docker with an approach to facilitate the development of embedded systems solutions. It does also come with an OTA Client with Automotive grade security. It is open-source.
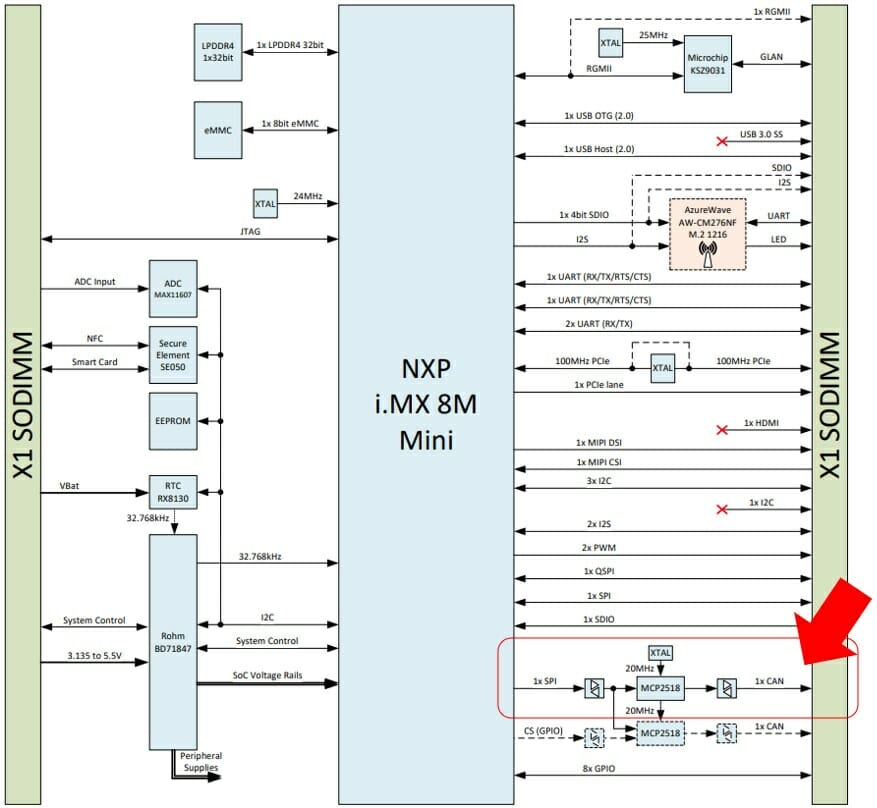
Together with Torizon, Toradex is already providing a new family of Computer on Modules called Verdin, based on the DDR4 SODIMM connector. Verdin comes with an optimized interface, as well as simplified requirements for the power supply and full system power management. It is designed for harsh environments and its direct breakout allows for the addition of real-world I/O ports without needing to cross traces or traverse layers. The first Verdin modules are based on i.MX 8M Mini applications processors, like the one shown in Figure 6, which was used in this example.

The NXP i.MX8 M Mini SoC does not come with native CAN Controllers. To compensate, Toradex has added an MCP2518 SPI CAN Controller in the module, as showed in Figure 7. The MCP2518 CAN Controller is compatible with CAN-FD, being a good choice for high-end CAN applications. You can find more details about the Verdin iMX8M Mini on its page at Toradex. CAN is also available on other Toradex Computer on Modules, like the Apalis and Colibri families.
There are currently two carrier boards that you can use to evaluate the Verdin Computer on Module: Dahlia, and the Verdin Development Board. Dahlia is a compact carrier board providing easy access to the most common features of the Verdin family, and the Verdin Development Board is a carrier board that aims to expose all the features of the module. In this demo, we’ll be using the Verdin Development Board, but you can easily use the Dahlia.
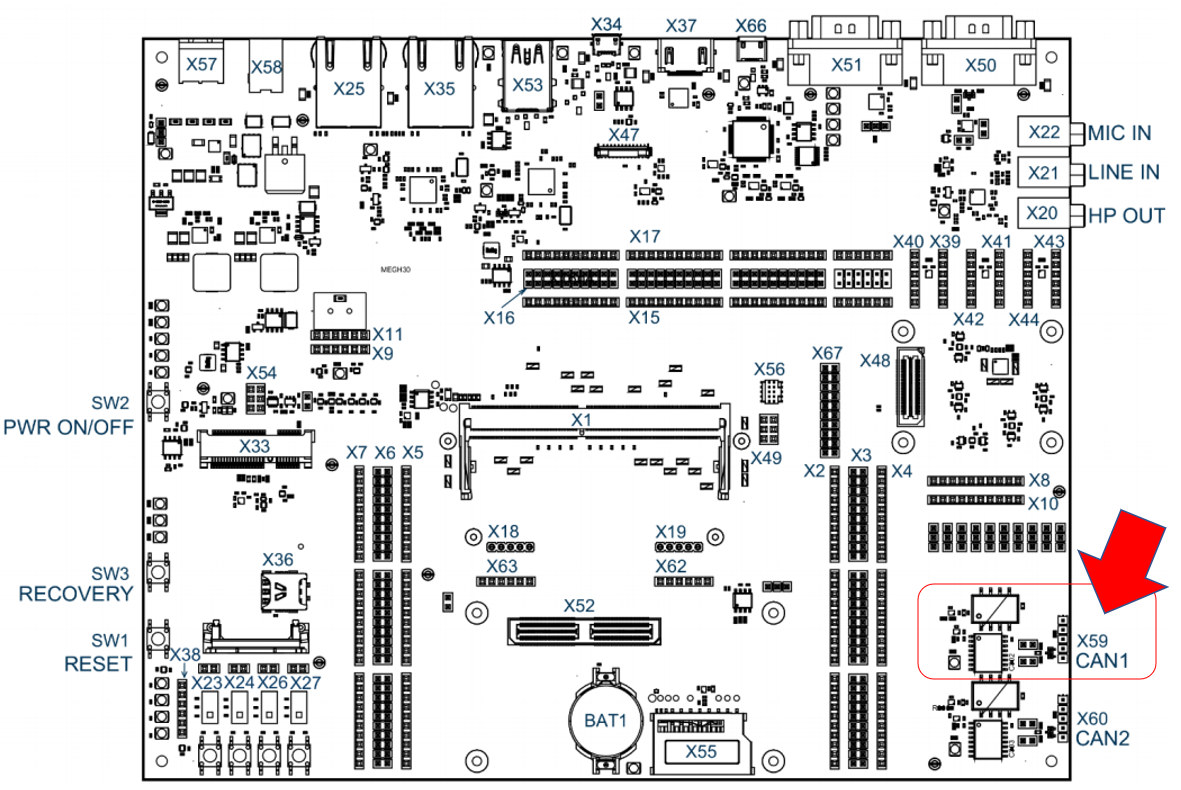
The Verdin Development Board uses the Texas Instruments isolated ISO1042BDWR CAN transceiver, which exposes all the requires signals for CAN, such as: CAN High, CAN Low, and GND (never forget the ground ?). We’ll be using the CAN1 interface in the Verdin Development Board, as shown in Figure 8.
We provide detailed instructions for the proper usage of Verdin iMX8MM and the Verdin Development Board in the Toradex Quickstart Guide.
As TorizonCore is an Embedded Linux distribution, it has support for SocketCAN provided by the Linux Kernel, which makes it possible for an application to interact with the CAN network as a socket connection with the Linux Socket API.
With everything now set, let us go step-by-step so you can have TorizonCore 5 in your Verdin iMX8MM and our container application for CAN communication with OBD-II standard.
Installing the TorizonCore 5
At the moment of writing this article, TorizonCore 5 is still in the development phase. We choose to use it in our article because it will be our main focused version of TorizonCore. Please visit the Torizon webpage to see its release roadmap for more information.
To have it installed in your Verdin iMX8MM, first, you have to use our latest version of Toradex Easy Installer, which is 2.0b6 and is available through our Nightly builds in Toradex Artifactory. You can find detailed instructions on how to obtain it in our Nightly Release section on the Toradex Easy Installer page.
With the Toradex Easy Installer 2.0b6 loaded in the Verdin iMX8MM, you need to use our CI feeds in order to load the TorizonCore 5, which you can do by clicking the “Feeds” menu option in the Toradex Easy Installer menu, and marking the CI feeds option, as shown in Figure 9.
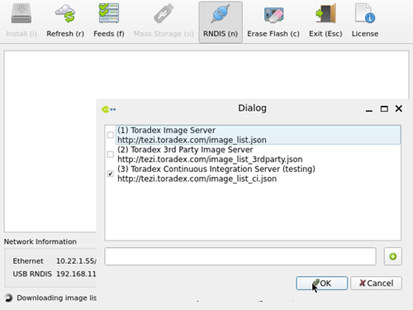
Figure 9. Feeds dialog with checkbox for Toradex CI Feeds
This process will take a while, as it will load a lot of image references from Toradex Artifactory.
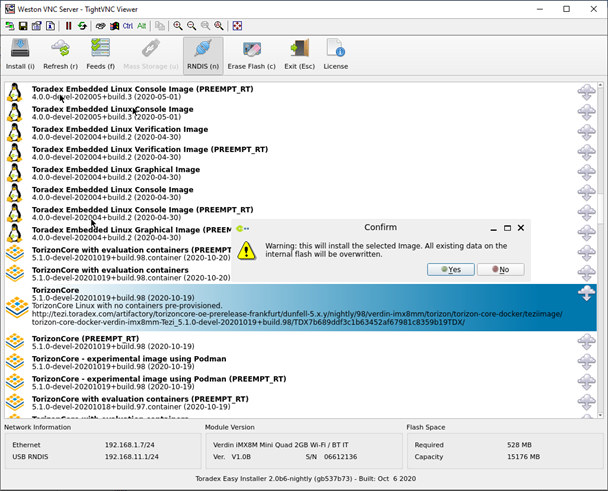
After the load is complete, please select one TorizonCore 5 image, like the “5.1.0-devel-20201019+build.98” selected below (one of our latest nightly builds), and install it. If you don’t find this one, select the closest nightly build to your date, as our retention policy for nightly builds is for 7 releases in the sequence.
Note that the nightly builds may be unstable. If you do find an issue, do not hesitate to publish it via our Toradex Community and we’ll analyze it as quickly as possible.
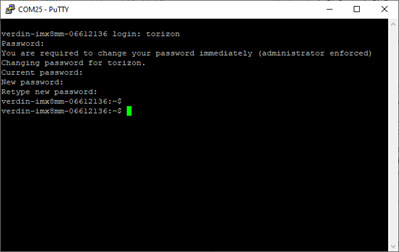
After the installation, you will be able to access the TorizonCore 5 through the Verdin Development Board USB-to-Serial adapter X66. Instructions on how to access the module console through serial are presented in our article Configuring Serial Port Debug Console (Linux/U-Boot). In the first login, both user and password are torizon. You will be prompted to change the password, as showed in Figure 11.
Now we have a Verdin iMX8MM with TorizonCore 5, and it’s time for a container hands-on.
Loading a Container ready for CAN Communication on TorizonCore 5
One of the foundations of TorizonCore is the usage of containers to isolate and manage applications, which is done through Docker. That may be confusing for “old-school” embedded developers, but it is a market tendency as embedded devices are more powerful and capable of executing more complex tasks than in the past. Also, security is more of a concern today than ever before.
We invite you to go through an overview of TorizonCore with our documentation, and you can also read our article for a quick start with containers on Torizon.
But, for the impatient, the necessary setup for this tutorial is to have a host development machine with Docker and configured with Arm emulation, so you can build container images for your target device. We have a detailed article about it.
Please, always build your docker images for TorizonCore in a host development computer. While it is possible to do it in the target device (as the Verdin iMX8MM), it will take much more time.
For the purpose of this tutorial, we can create a docker image with the following Dockerfile:
|
1 2 3 4 5 6 7 8 9 10 11 12 13 14 |
ARG IMAGE_ARCH=arm64v8 FROM torizon/$IMAGE_ARCH-debian-shell:1.0 WORKDIR /home/torizon RUN apt-get -y update && apt-get install -y \ nano \ python3 \ python3-pip \ python3-setuptools \ git \ iproute2 \ can-utils \ python3-can \ && apt-get clean && apt-get autoremove && rm -rf /var/lib/apt/lists/* |
Rhis Dockerfile will create a container image with the following pre-requisites for executing a CAN application:
- iproute2 for configuring, enabling, and disabling the CAN network interfaces.
- can-utils – A set of Linux command-line utilities for debugging CAN network.
- Python3-CAN – A wrapper of SocketCAN for Python3.
- Plus, other useful tools as nano, to edit files within the container.
With this Dockerfile in a given development directory at your host machine, you can start the build of the container image with the following command:
|
1 |
$ docker build -t can-torizon. |
It will build a container image with the name “can-torizon”.
Once the build is complete, we can save the image in a tar file so we can send it to the target development module, the Verdin iMX8MM with TorizonCore 5:
|
1 |
$ docker save -o can-torizon.tar can-torizon |
You can now send the can-container.tar to the Verdin module using SCP, like the command below, but replacing X.X.X.X with the IP of the Verdin iMX8MM in your network.
|
1 |
$ scp can-torizon.tar torizon@X.X.X.X:/home/torizon/ |
Now in the TorizonCore 5 console at Verdin iMX8MM, you can execute the following command (remembering to be at /home/torizon directory) to load the compressed docker image we’ve sent before.
|
1 |
$ docker load -i can-torizon.tar |
You can check that the image was successfully loaded by executing the command “docker image ls”, which will list the docker images in the system.
|
1 2 3 |
$ docker image ls REPOSITORY TAG IMAGE ID CREATED SIZE can-torizon latest 7a0a734a8ddf 6 hours ago 203MB |
Now that the image is properly loaded, we can execute it through the “docker run” with the following parameters:
|
1 2 3 |
docker run -it --rm --name=can-test --net=host --cap-add="NET_ADMIN" \ -v /dev:/dev -v /tmp:/tmp -v /run/udev/:/run/udev/ \ can-torizon |
After the given “docker run” command, you will have access to the container console, being able to start executing commands and/or applications within it.
With our container ready, now it is time to start writing some Python code to demonstrate how to interact with OBD-II over CAN.
Architecting a Python Application to interact with OBD-II over CAN
To create our simple application in Python, we’ll be using the Python CAN library for handling the CAN networking. You can also use the Python sockets API for CAN communication, as Python supports CAN since version 3.3, but that is a more low-level approach for the moment.
To exemplify an OBD-II request for PID 0x0C, as defined in the standard for Engine Speed (RPM), we present the code below. It will:
- Create a CAN bus interface
- Create a CAN message reference for the request
- The CAN message request is a CAN frame with DLC of 8 bytes.
- The message will be constructed in the following format for SAE Standard:
- Byte 0 – Number of additional bytes: 2
- Byte 1 – 1, to show current data
- Byte 2 – PID code to be requested
- Byte 3 to 7: They are not used, but ISO 15765-2 suggests setting CCh on them
- Send the query message to the main ECU with ID 0x7DF
- Receive the message and check it against the expected response ID 0x7E8
- If we receive a message from the expected response ID, it will print the result in hexadecimal format
To execute our CAN application, we have to first configure and enable the CAN network in the module. The CAN1 interface, physical, is already enabled on its device-tree, being identified as “can0” on the Linux side. The process of configuring and enabling can be done through os.system() calls within Python, in which we configure a CAN network with a bitrate of 500k.
|
1 2 3 4 5 6 7 8 9 10 11 12 13 14 15 16 17 18 19 20 21 22 23 24 25 26 27 28 29 30 31 32 33 34 35 36 |
import time import os import sys import can # In the extension we shall bring up the interfaces directly within our Python app os.system("ip link set can0 type can bitrate 500000") time.sleep(1) os.system("ip link set can0 up") time.sleep(1) # set up a CAN bus bus = can.interface.Bus(channel="can0", bustype='socketcan') # using defaults functional address obd2_tx_arb_id = 0x7DF obd2_rx_arb_id = 0x7E8 # CAN Frame for a PID Request of 0x0C (RPM) with SAE Standard obd_req_data = [2, 1, 0x0C, 0xCC, 0xCC, 0xCC, 0xCC, 0xCC] # Send our OBD-II query in CAN 11-bit format msg = can.Message(arbitration_id=obd2_tx_arb_id, data=obd_req_data, is_extended_id=False) bus.send(msg) message = bus.recv(1.0) # Timeout in seconds. if message is None: print('Timeout occurred, no message.') sys.exit(1) # Check if received the expected response message if message.arbitration_id == obd2_rx_arb_id: print("Message received from OBD-II request!") hex_data = "" for c in message.data: hex_data += "%02X " % c print("Response ID: %03X | Response Data: %s" % (message.arbitration_id, hex_data)) |
You can upload this code to your target by copying and pasting through nano editor, which we installed in our container image as observed in its Dockerfile. Another way would be to bind this container to /home/torizon, making it easy to send the code through scp.
With the application on hand, let us try it out.
Testing our Sample Application with an OBD-II Simulator
We have two ways of testing a CAN OBD-II application:
- Connecting our device to an OBD-II connector on a vehicle and start communicating with the real vehicle.
- Using another device to behave as an “ECU” and respond to the OBD-II queries over CAN.
Option 2 is viable, otherwise, it would require a good power extension so we could try that in this article writer’s vehicle ?.
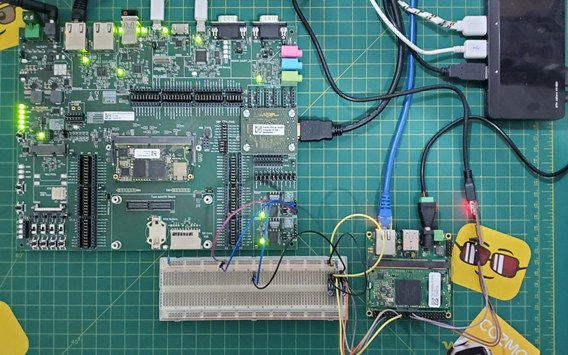
Keeping the “Python” theme, there is also a Python project of a virtual ECU to respond OBD-II queries, called OBDSimulator. We used it on a Colibri iMX6 with a Viola Carrier Board, so, it will behave as an ECU responding to our Verdin iMX8MM over a CAN network between them.
The usage of the Viola carrier board was more of a challenge in order to assembly the setup with an external CAN transceiver. A more straight forwarded way would be to use the Colibri Evaluation Board, for the Colibri family, or even the Ixora Carrier Board, for the Apalis family, because those carrier boards already come with CAN transceivers onboard, making them ideal as a reference design implementation.
The setup used for this test is shown in Figure 12. For the Viola Carrier Board we used an SN65HVD230 CAN Transceiver, as the iMX6 already have CAN controllers. It also uses 120-ohm resistors on each end of the “simple” CAN network between them.
With the OBDSimulator server running on the Colibri iMX6 (as detailed on the GitHub repo), we executed the following queries at the Verdin iMX8MM:
- Query the current data (Mode 1) of Engine Speed (also known as RPM, PID 0x0C):
123# python3 can_obd2_test.pyMessage received from OBD-II request!Response ID: 7E8 | Response Data: 04 41 0C 08 08
We use the CAN with 11-bit format, and after a given OBD-II query, the response will be in the following format:
- Byte 0 – Number of additional bytes
- Byte 1 – 41h = showing current data
- Byte 2 – PID code
- Byte 3 and beyond – The content of the query response.
In Wikipedia’s table of OBD-II PIDs, the Engine Speed information is obtained through the content of the query using the following formula:![]()
The A variable is the third byte in the response, and the B variable is the fourth byte (look the “Hex:” response of our command above). In the OBDSimulator, the Engine Speed is 514 RPM. Let us check if that is true?
((256 * 8) + 8)/4 = 514
That also shows another valuable resource: Note the detailed description of each OBD-II PID in order to decode the information requested!
We can change the code to query other OBD-II PIDs. Change the value of obd_req_data so it’ll now query the PID 0x0D (Vehicle Speed in km/h) with current data (Mode 1):
|
1 |
obd_req_data = [2, 1, 0x0D, 0xCC, 0xCC, 0xCC, 0xCC, 0xCC] |
Executing the code will now give us the output for the OBD-II PID 0x0D request:
|
1 2 3 |
# python3 can_obd2_test.py Message received from OBD-II request! Response ID: 7E8 | Response Data: 03 41 0D 1A |
If you receive the message “RTNETLINK answers: Device or resource busy” after executing the code again, it is because the Network interface is already configured and up.
In Wikipedia’s table of OBD-II PIDs, the Vehicle Speed information is obtained through the direct result of the third byte of the response, which is the response of our query. In the OBDSimulator, the Vehicle Speed is set to 26 km/h. Let us check if that is true?
1A in hexadecimal is 26 in decimal. So, it is!
Making it easy through the Torizon Extension with Visual Studio Code
Some of you may not be too familiar with Docker and Containers. That is not a problem for working with Torizon, do you know why? Toradex is also providing you with the Torizon Extension, available for both Visual Studio and Visual Studio Code. With the Torizon Extension, you will be able to quickly develop and load applications in a module with TorizonCore.

The benefits of using our Torizon Extension for Visual Studio Code are many, to mention the support for developing applications with the following programming languages:
- C/C++
- Python
- .NET Core
The Torizon Extension makes it possible to deploy and debug your application in the target over the network with just a few clicks, having also the capability to manage and monitor your devices and the containerized applications with them.
In this particular example, I’ll show you how you can easily set up a Python application with our Torizon Extension for Visual Studio Code, and run it on Verdin iMX8MM with TorizonCore 5 installed.
Let us follow these simple steps to configure our environment:
- Download and install both Visual Studio Code and Torizon Extension, as per the instructions.
- Be aware that you shall Configure Build Environment for Torizon Containers as we explained above.
- Create a new Torizon/Python Project in Visual Studio code
After proceeding with this initial setup, you have your environment ready for developing a Python application for Torizon. The next steps normally will involve the definition of required parameters, additional packages, and the code itself.
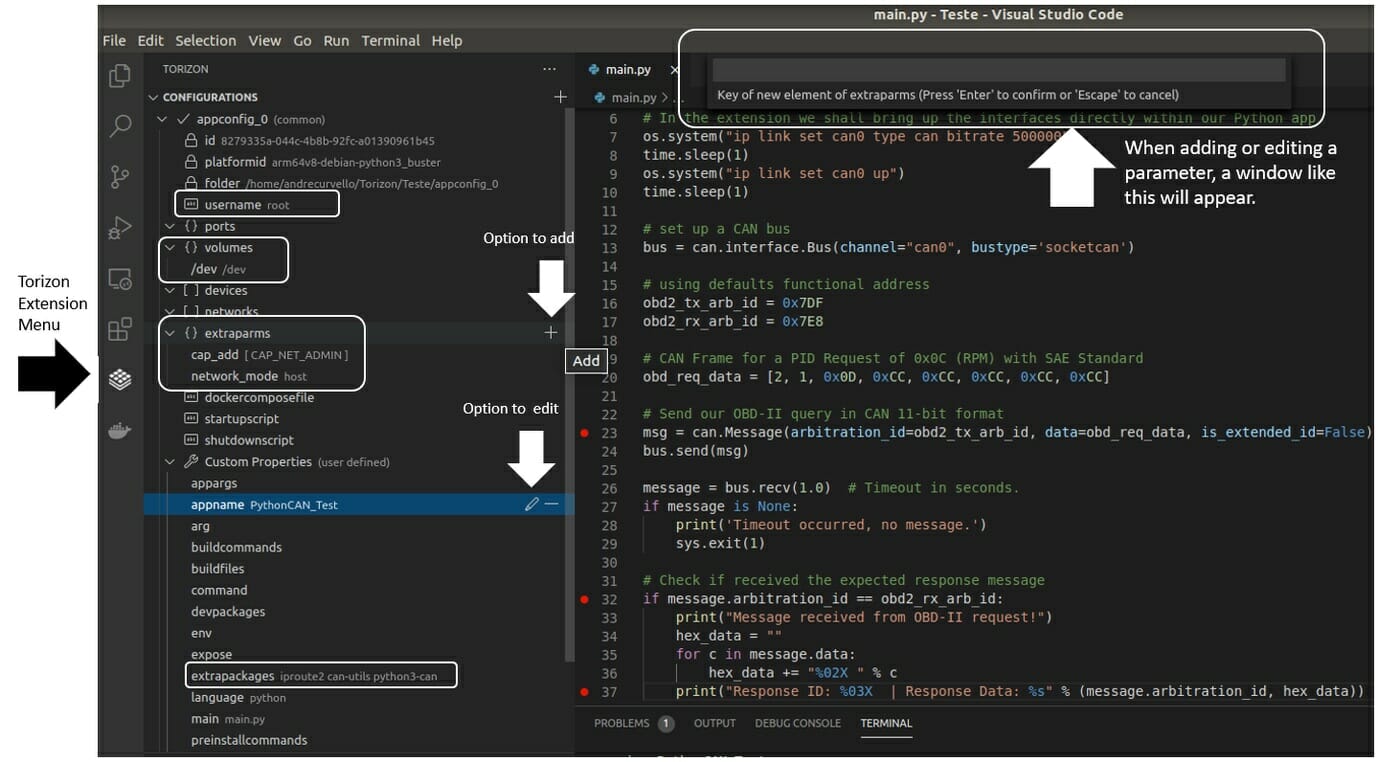
You can see that in the Visual Studio Code there is a panel at the left of the screen that contains the icons of each resource of the editor. One of them is the Torizon icon. Click on it and adjust the following parameters, observing that in each item it will appear an icon like “+” or the symbol of a pencil to the right, which you shall click in order to add or edit that specific item:
- username: root
- volumes: /dev and /dev
- extraparams:
- cap_add with value CAP_NET_ADMIN
- network_mode with value host
- extrapackages: iproute2 can-utils python3-can
See an overview of this part in Figure 14.
Essentially, those are the changes we made in the Dockerfile together with the “docker run” commands we executed manually above. But now the Torizon Extension will take care of the formalities for us.
Now, go to the “Explorer” menu in the Visual Studio Code, then open the “main.py” file of your project. Copy and paste the same code we used in the command line example above.
To load this code in your board, wherein the Torizon Extension has already asked for its credentials (hostname/IP, user, and password, for example), you can just press F5 on your keyboard. The utility will then begin to build the container image, will load it in the device, and will start the execution in Debug mode, a process that you can observe in the Output section of the Visual Studio Code.
With the Torizon Extension and Visual Studio Code, you can also add breakpoints in your application to track parts of your program execution process. See Figure 15 for an example of the program above being executed with breakpoints.

Considerations
As mentioned at the beginning of the article, you can use OBD-II to query vehicle data but avoid spamming the CAN bus, use the minimum required number/period of queries to avoid impacting the main ECU performance. Considering that the CAN bus works with a priority of CAN messages through the CAN ID, and as lower the CAN ID, the bigger the priority, the priority of our OBD-II queries is likely low.
You can improve both the sample application to query OBD-II data, so it can already obtain and decode the information of interest. And knowing that there is a possibility to use an OBDSimulator, can further facilitate your tests.
In a real scenario (like in a real car), there will be a lot of CAN messages flowing in the CAN bus. That way, it’s recommended that you implement a Listener callback filtering the received messages, to lower the chances to miss a CAN frame.
There is also another good library (with examples) for CAN communication with Python3, which is pyvit: Python Vehicle Interface Toolkit. Its example for OBD-II uses a Dispatcher to handle the transmission and reception of CAN frames.
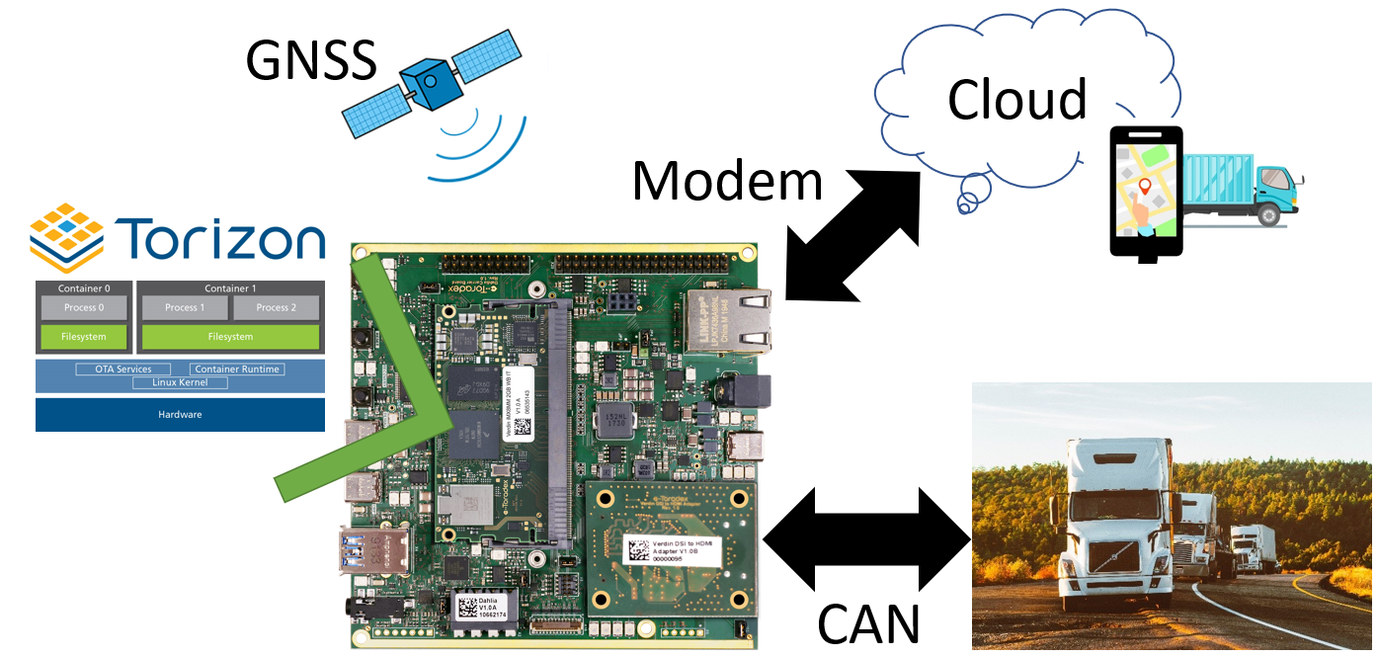
Further improvements to our telematics device could be to interface a GNSS module with the Verdin iMX8MM through UART, or/and add a Modem through the Modem Manager.
We hope you enjoyed this tutorial! Please let us know what you think.

Jean-Luc started CNX Software in 2010 as a part-time endeavor, before quitting his job as a software engineering manager, and starting to write daily news, and reviews full time later in 2011.
Support CNX Software! Donate via cryptocurrencies, become a Patron on Patreon, or purchase goods on Amazon or Aliexpress


I fear we are over complicating things more and more and adding layer over layer requiring even faster hardware. Every Cellular Modem Chip could do this task one-handed while cumminicating wirelessly at the same time. No need for python, containers, .Net and other dependencys, just 1kB larger monolithic firmware file.
Hi Flip,
I understand your feeling.
But, please, understand that this was a simple example as part of a much more complex scenario.
The choices of an architecture of an embedded system components from hardware to software depends on case by case.
Of course, if your project only requires collecting data from a CAN bus, receive geolocation data from a GNSS receiver and sending it to a remote server over GSM, the project can be much simpler. Most of the cases a good microcontroller can handle this.
But, let us now consider that you may require to have a local database.
Then, add a graphical user interface with multiple screens, dashboards, maps, etc.
Then, add a security layer for you communication with the cloud.
Then, add the possibility to securely receive updates over the air.
Not to mention that state-of-the-art applications for the automotive sector are starting to adopt concepts of ADAS to increase the security of driving a car/truck/etc.
Embedded Linux allows you to have complex applications on embedded devices.
And the usage of containers allows you to create a controlled and secure environment for the execution of a given application.
I invite you to have a look on ours offerings, and I’m available to talk if you want too.
Best regards,
André Curvello
Hi …this was a fantastic post. However while trying it our using my gateway I am stuck. The gateway has been programmed to send the obd data format over can like you have explained above. But, fail to receive any response back. The byte format are identical to what you have stated above. Stuck in between a project so a fast response would be appreciated.
Hi Subbu,
Feel free to reach out to Toradex’s experts via https://community.toradex.com/. We’d be happy to help answer your query.
Else you could email us with details at marketing@toradex.com.