
We’ve written several articles detailing methods to flash firmware to Rockchip devices in Windows or Linux over the years, with tools like RKAndroidTool, RkFlashKit, upgrade_tool, or the open-source rkdeveloptool utility. This is mostly useful to flash another OS or if the device does not boot, as most products will now support OTA firmware updates.
But following my review of Zidoo M6 with Android 11, I’ve now got a Linux image for the Rockchip RK3566 mini PC, so let’s revisit the firmware flashing methods in 2021. Zidoo sent me instructions for Windows, but since I’m a Ubuntu user, I flashed the firmware with the Linux tools used by Firefly. The same methods should work for the older processors such as RK3066, RK3288, and RK3399, besides the more recent Rockchip RK3566 and RK3568 processors.
How to flash Rockchip firmware in Linux
[Important update: If your device comes with both eMMC flash and SPI flash, you may want to use the Windows tool instead to avoid bricking your device. See Willy’s comment for details]
We’ll need the firmware file (update.img) and the upgrade_tool utility downloaded from the Firefly website. Then we’ll need to enter the Loader mode to flash the image.
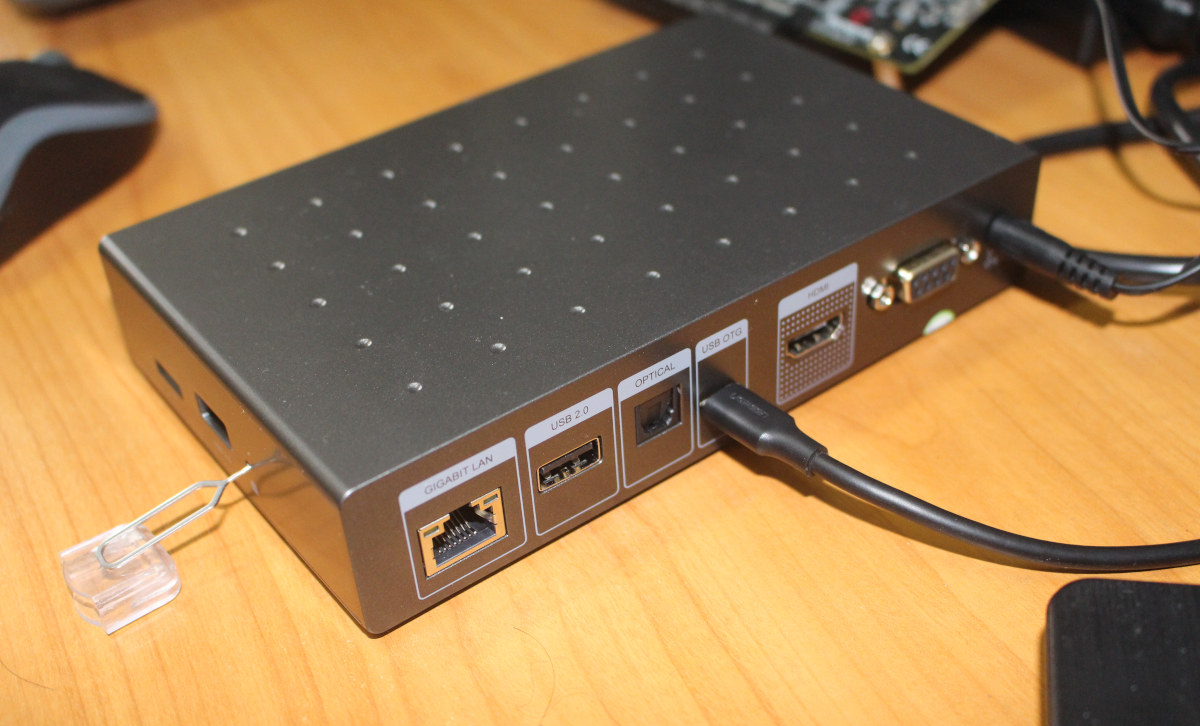 To do so, connect the USB OTG port from the board to your PC, press the boot/recovery button from your board, mini PC, or TV box (I used a SIM card tool here), and connect the power, wait one or two seconds and release the button. The first time, I thought connecting the power adapter first, pressing the recovery button, and inserting the USB cable would work too, as I got the following output from the dmesg:
|
1 2 3 4 5 6 7 |
[19722.743329] usb 1-1: USB disconnect, device number 4 [19728.753590] usb 1-1: new high-speed USB device number 6 using xhci_hcd [19728.904094] usb 1-1: New USB device found, idVendor=2207, idProduct=0006, bcdDevice= 3.10 [19728.904106] usb 1-1: New USB device strings: Mfr=1, Product=2, SerialNumber=3 [19728.904110] usb 1-1: Product: M6 [19728.904114] usb 1-1: Manufacturer: rockchip [19728.904117] usb 1-1: SerialNumber: EA4R1B8R7J |
I thought it meant the box was properly detected, but I could not upgrade the firmware.
|
1 2 3 |
sudo ./upgrade_tool uf update.img Program Data in /home/jaufranc/edev/Rockchip/Linux_Upgrade_Tool_v1.59 No found any rockusb device,please plug device in! |
So it’s important to press the recovery button before powering up the device or board, and we can see it shows as a “USB download gadget”
|
1 2 3 4 5 6 7 8 9 10 11 12 13 |
[20085.784286] usb 1-1: new high-speed USB device number 7 using xhci_hcd [20085.939483] usb 1-1: New USB device found, idVendor=2207, idProduct=350a, bcdDevice= 2.23 [20085.939493] usb 1-1: New USB device strings: Mfr=1, Product=2, SerialNumber=3 [20085.939497] usb 1-1: Product: USB download gadget [20085.939500] usb 1-1: Manufacturer: Rockchip [20085.939503] usb 1-1: SerialNumber: EA4R1B8R7J [20088.295252] usb 1-1: USB disconnect, device number 7 [20089.972159] usb 1-1: new high-speed USB device number 8 using xhci_hcd [20090.124739] usb 1-1: New USB device found, idVendor=2207, idProduct=350a, bcdDevice= 2.23 [20090.124750] usb 1-1: New USB device strings: Mfr=1, Product=2, SerialNumber=3 [20090.124754] usb 1-1: Product: USB download gadget [20090.124758] usb 1-1: Manufacturer: Rockchip [20090.124760] usb 1-1: SerialNumber: EA4R1B8R7J |
In this mode, I had no trouble to flash the board:
|
1 2 3 4 5 6 |
sudo ./upgrade_tool uf update.img Program Data in /home/jaufranc/edev/Rockchip/Linux_Upgrade_Tool_v1.59 Loading firmware... Support Type:RK3568 FW Ver:1.0.00 FW Time:2021-08-11 19:27:19 Loader ver:1.01 Loader Time:2021-08-11 19:25:04 Upgrade firmware ok. |
Connecting the mini PC is a TV confirmed everything worked as planned.
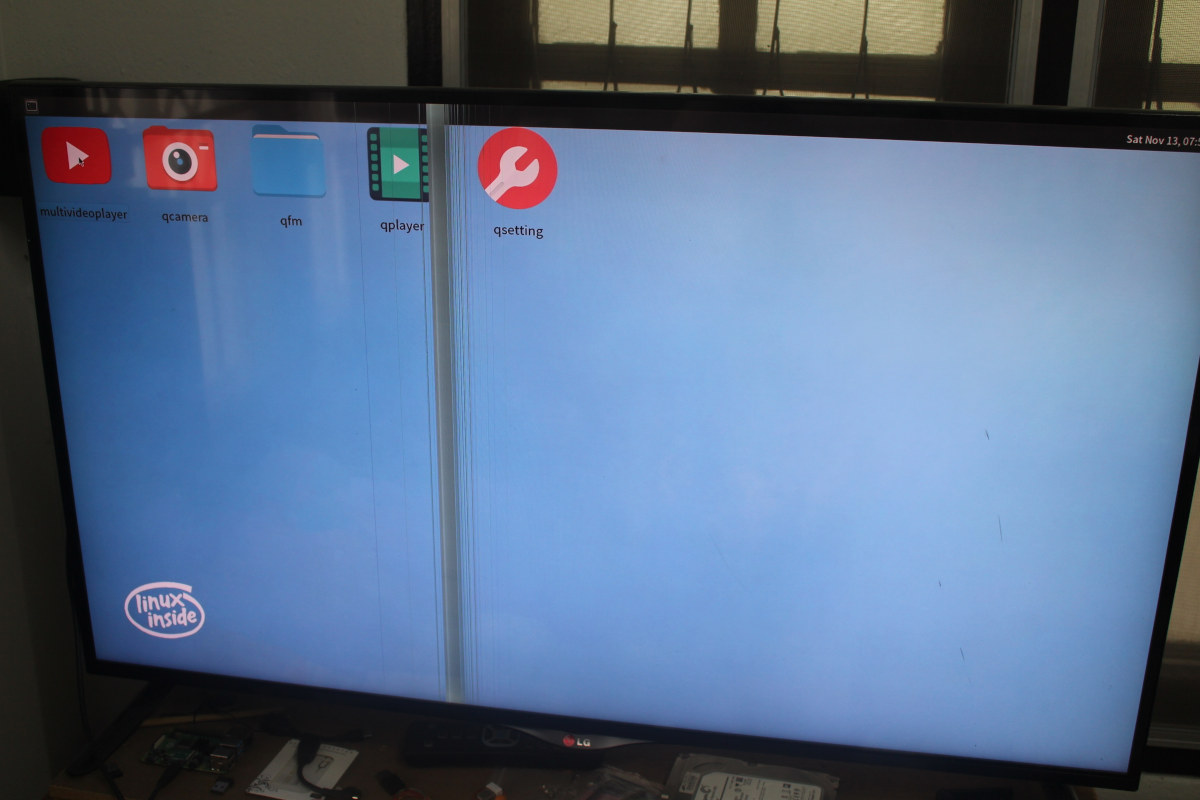 The Android 11 firmware was replaced by a Linux image with Qt. It’s basically the same method as in previous years, and it works without too many difficulties for me.
Rockchip firmware update in Windows
I have not personally tried the Windows version, but I’ll share the method Zidoo provided me in a Word file. Updating firmware on Rockchip hardware in Windows requires a bit more effort than the Linux method with driver installation and a graphical utility to perform the firmware update. You can download both on Mega in a single ZIP file called M6 Flash Tool.zip.
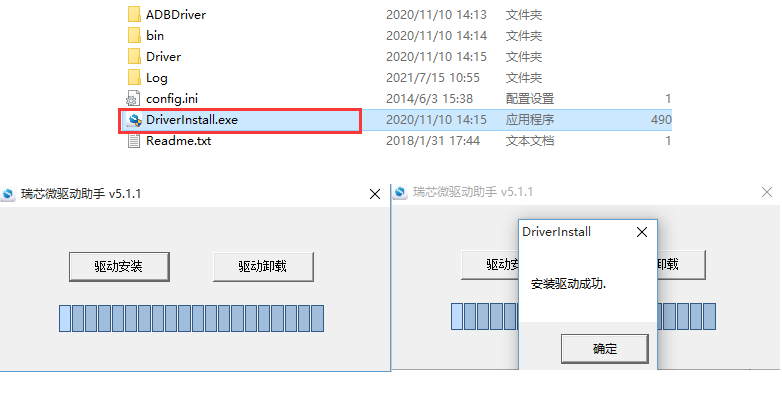
The latest version of USB DriverAssitant can be found in the ZIP file in /Flash Tool/PC Drive/DriverAssitant_v5.1.1.zip, while FactoryTool.exe is located in /Flash Tool/Flash Tool/FactoryTool_1.72.4. Extract DriverAssitant and run DriveInstall.exe executable to install the proper drivers.
 Now extract FactoryTool run the program, optional change the language, and load the update.img image with the Firmware button on the top left corner.
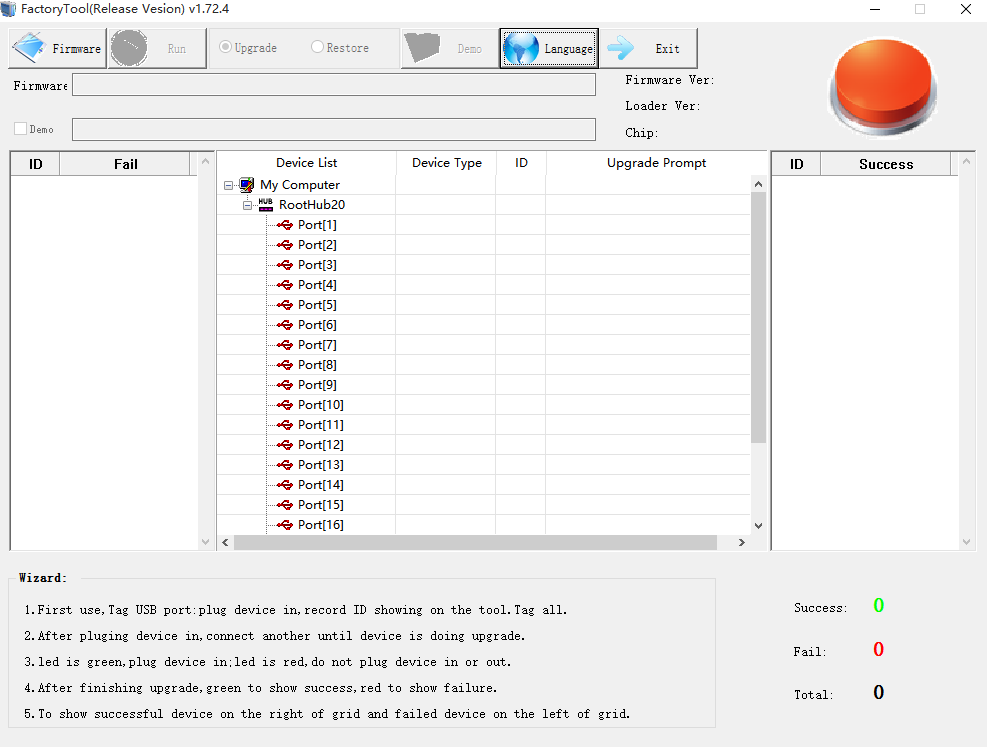
Now we need to connect the Rockchip device to the computer with a USB cable (USB OTG from board to a USB port on the computer), and enter the Loader mode as per the same method detailed in the Linux section, which involves pressing the recovery button and connecting the power.
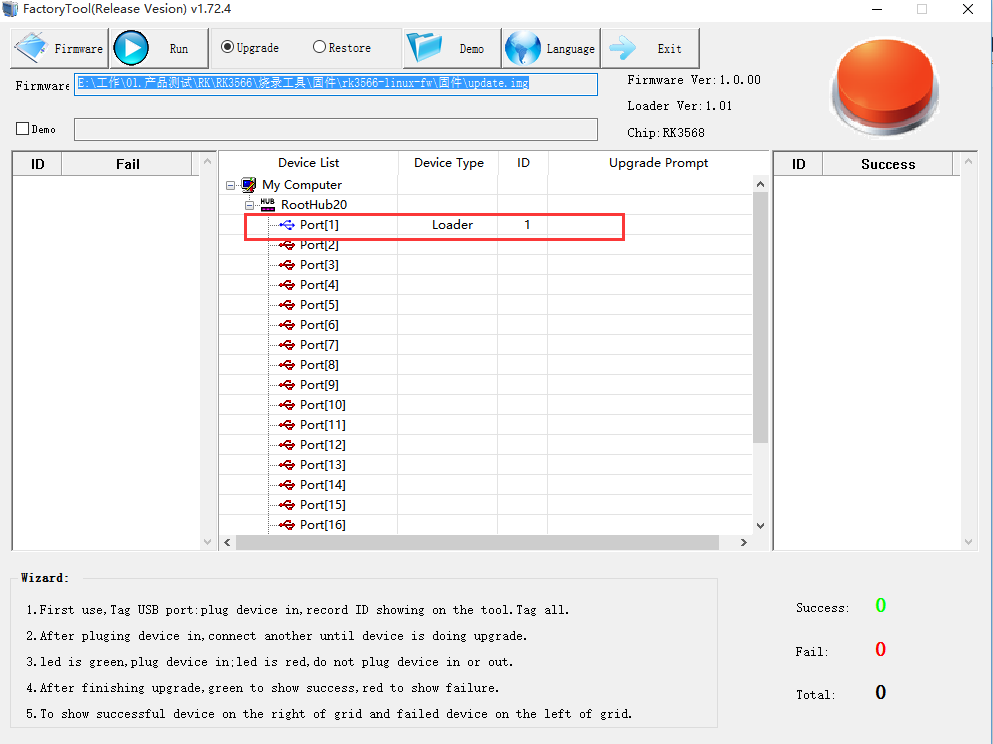 A “Loader” type device should be detected in FactoryTool, and we can now press the Run button to perform the update…
 That’s it.

Jean-Luc started CNX Software in 2010 as a part-time endeavor, before quitting his job as a software engineering manager, and starting to write daily news, and reviews full time later in 2011.
Support CNX Software! Donate via cryptocurrencies, become a Patron on Patreon, or purchase goods on Amazon or Aliexpress


does this work for rk3328 too?
Yes. The same tools are used for all Rockchip devices, but the firmware file is different for each device.
I’ve currently “bricked” my Zidoo M6 by flashing the Ubuntu 20.04 firmware for Firefly RK3566 mini PC, and it will not show as a USB device anymore. Normally, it’s possible to enter maskrom mode (code from the read-only ROM inside the processor) to get USB OTG working again, and flash another firmware. The maskrom mode makes the Rockchip device unbrickable, I’m just waiting for Zidoo to provide the method, usually a switch on the board, or shorting some pins.
can i flash Ubuntu lite version called lububtu on it?
If you mean Lubuntu (Ubuntu + LXDE) then yes, some Rockchip hardware should support it, but potentially with limitations.
Note, the procedure will vary depending on available storage. The Linux versions of the flashing utilities do not allow you to select the target device, and in my case, I bricked two Station-M2 devices by applying the exact documented procedure, just because apparently the eMMC image was sent to the NOR, which resulted in confusing the ROM code, preventing from detecting the NOR when booted from SD, thus not being able to erase it anymore. Once in this situation, even the Windows utility failed with timeouts. I could recover only one of the two by pure luck. I started to seriously doubt about the device being physically damaged at some point. The firefly team replaced the remaining faulty one, and confirmed the hardware was OK and that it was “only” a problem of image flashed at the wrong place. Sadly I don’t think there is any solution to this problem for now given how limited the linux tools are, so in short if you buy an RK3566 device which contains both NOR+eMMC, either use the Windows utility, or if like me, you do not have this OS, ask for the device to be sent pre-flashed with at least a working boot loader! BTW the Station-M2 probably is the coolest ARM board I’ve had, but now I know I won’t upgrade it anymore, by fear of bricking it again!
I thought Rockchip hardware was unbrickable as there’s a bootROM in the chip, so if something goes wrong it’s always possible to switch to USB OTG mode from the bootROM.
In my case, I’ll have to short some pins connected to the eMMC flash, but indeed if there’s an SPI flash, it might be tricker.
It was still possible to boot off micro-SD but from there there was no access to the SPI. And the image they used to provide was only in the crappy Rockchip’s proprietary format, so you couldn’t simply flash the eMMC from a valid working image. In short, in order to use the vendor’s image, you needed to open it via the stupid tools that tried to write it to the NOR, and once the machine booted to a boot-loader or kernel, these ones didn’t detect it to allow to fix it. Trying to erase it from the stupid tools would timeout.
By the way I suspect that simply desoldering the NOR would have fixed everything but I didn’t want to hack on it before a possible RMA 🙂
The really is a need for a protected software area on today devices, a software boot to bios feature, so as to reduce bricked devices.
I agree. Ideally boot loaders ought to always be pre-loaded to ease the deployment of any other OS. That’s what EFI based firmware do, but they come with their own other set of problems 🙂
I keep getting ” switch MSC fail” not sure what that means when trying to upgrade my rk3288 to the android 10 version.
Good afternoon,
I ended up in this forum because I had a problem with my Rockchip 3568, I bought it from a supplier and it was running Xubuntu, so, I wanted to try to install Ubuntu Desktop via terminal from the screen, the thing is that it downloaded correctly, when it rebooted, I see on the screen Rockchip Kernel, and it gets attached there.
I just installed Ubuntu Desktop on the hard drive, but it seems that it made something more, now i’m stucked in the Rockchip Kernel screen, and I don’t know how to go back to Xbuntu, or proceed with more options on my current situation, I saw that in this forum you have some tutorials,
May be in this website some tutorial on how to solve this?. I’m pretty stucked and I don’t know how to proceed, so any help is perfect
Thanks for all,
Your vendor should have the Xubuntu image for the board, as well as some instructions.