
When I completed my review of Raspberry Pi Zero 2 W, I mentioned I would test the power consumption of the board later. It took a while, but I’ve finally come around it using Otii Arc from Qoitech and Otii software to provide some pretty power consumption charts, and even energy consumption. Since the Raspberry Pi Foundation recommends a 5V/2.5A power supply, I’ll first try to get as close as possible as 2.5A, then I’ll go through tricks to reduce idle power consumption to less than 75 mA / 375 mW, and finally check the energy consumption under various CPU core count and frequency.
Raspberry Pi Zero 2 W Power consumption under load, with accessories
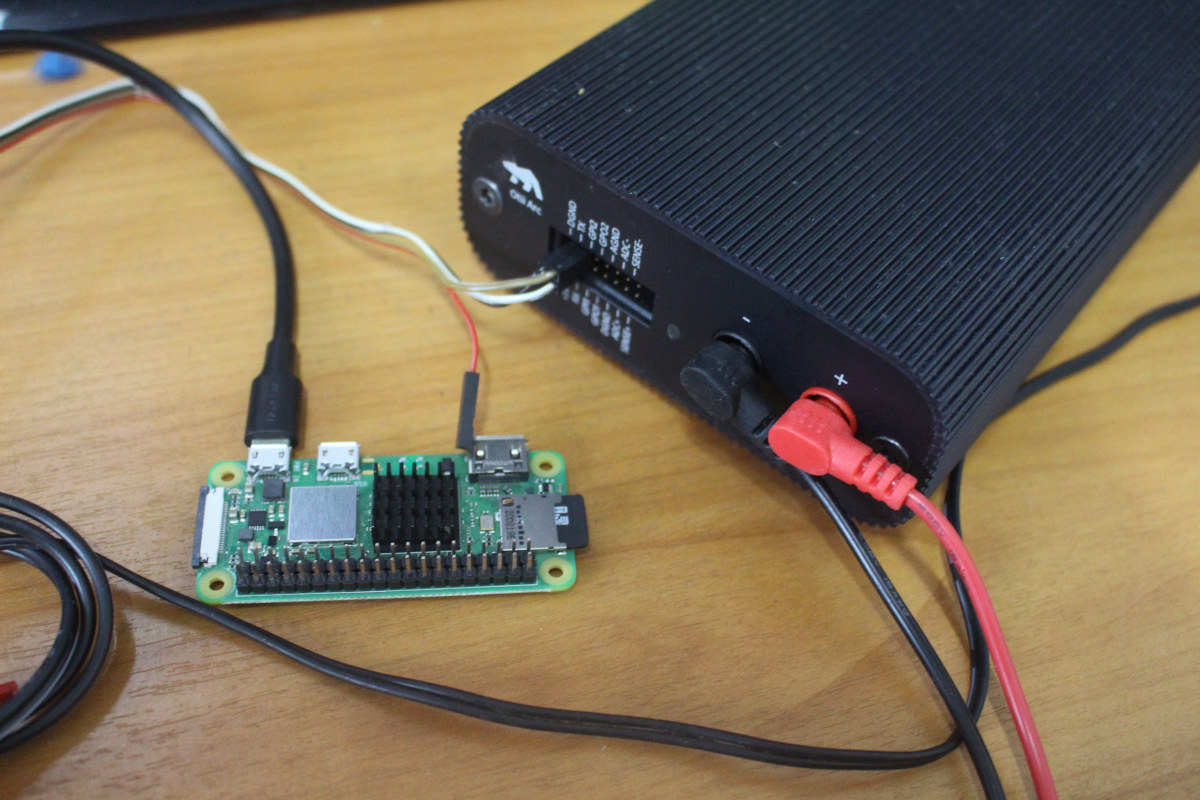
I started with the latest Raspberry Pi OS Lite “Bullseye” image and connected my Raspberry Pi Zero 2 W board to Qoitech Otii Arc tools as shown below. It used to cost around $500, but now pricing starts at $699, and it’s a great tool for people developing battery-powered devices, and I admit it’s a bit over the top, but the purpose of this post, but it still does the job.
Let’s turn on the Raspberry Pi, and check the idle power consumption using the image we’ve just flashed without any modifications.
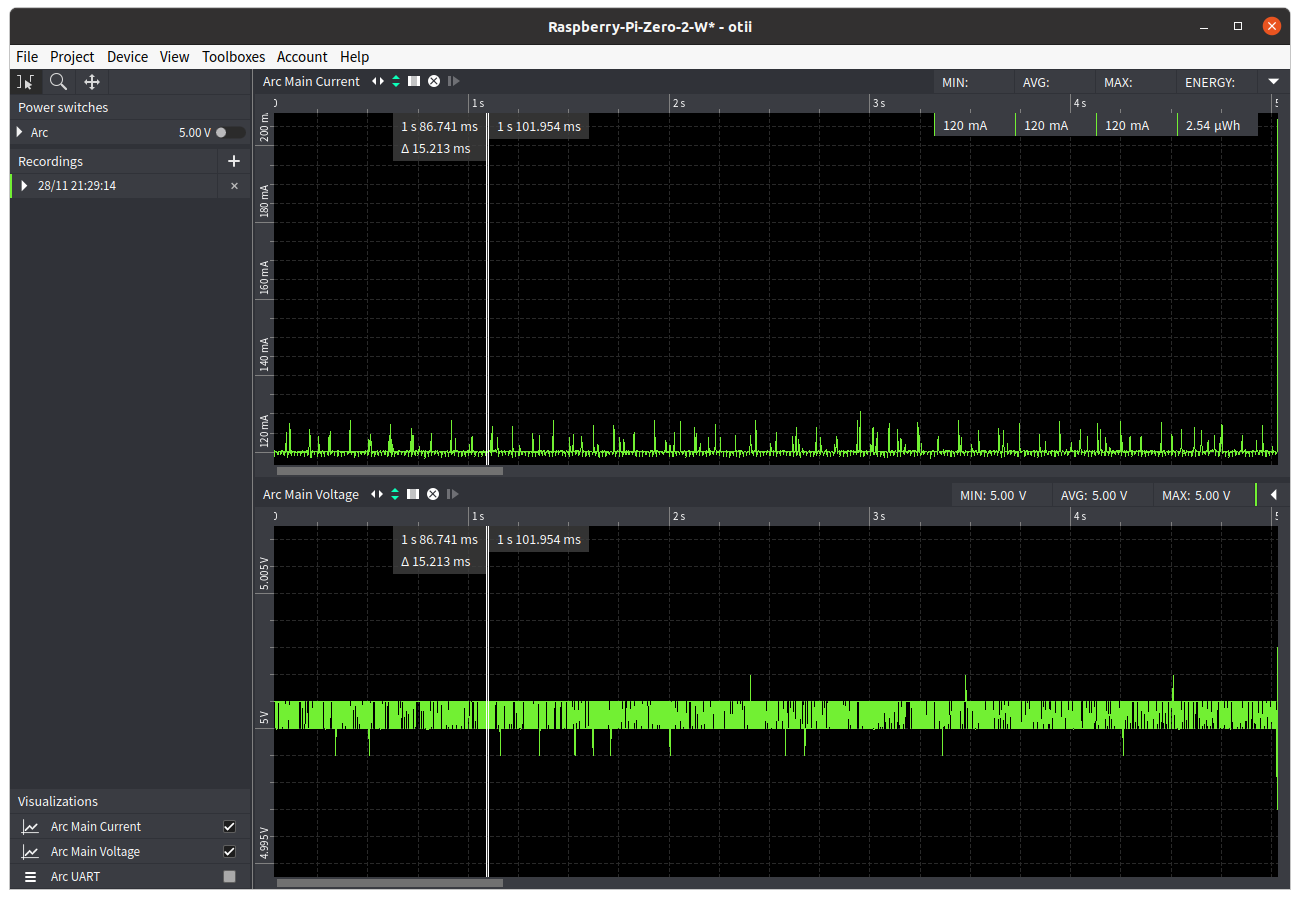
That’s about 120 mA @ 5V, or 600 mW. If you’ve seen lower numbers with earlier reviews of the Raspberry Pi Zero 2 W that’s because we’re using the Raspberry Pi OS Bullseye image instead of the Buster image, and we’ll explain the reason why that is later in this post.
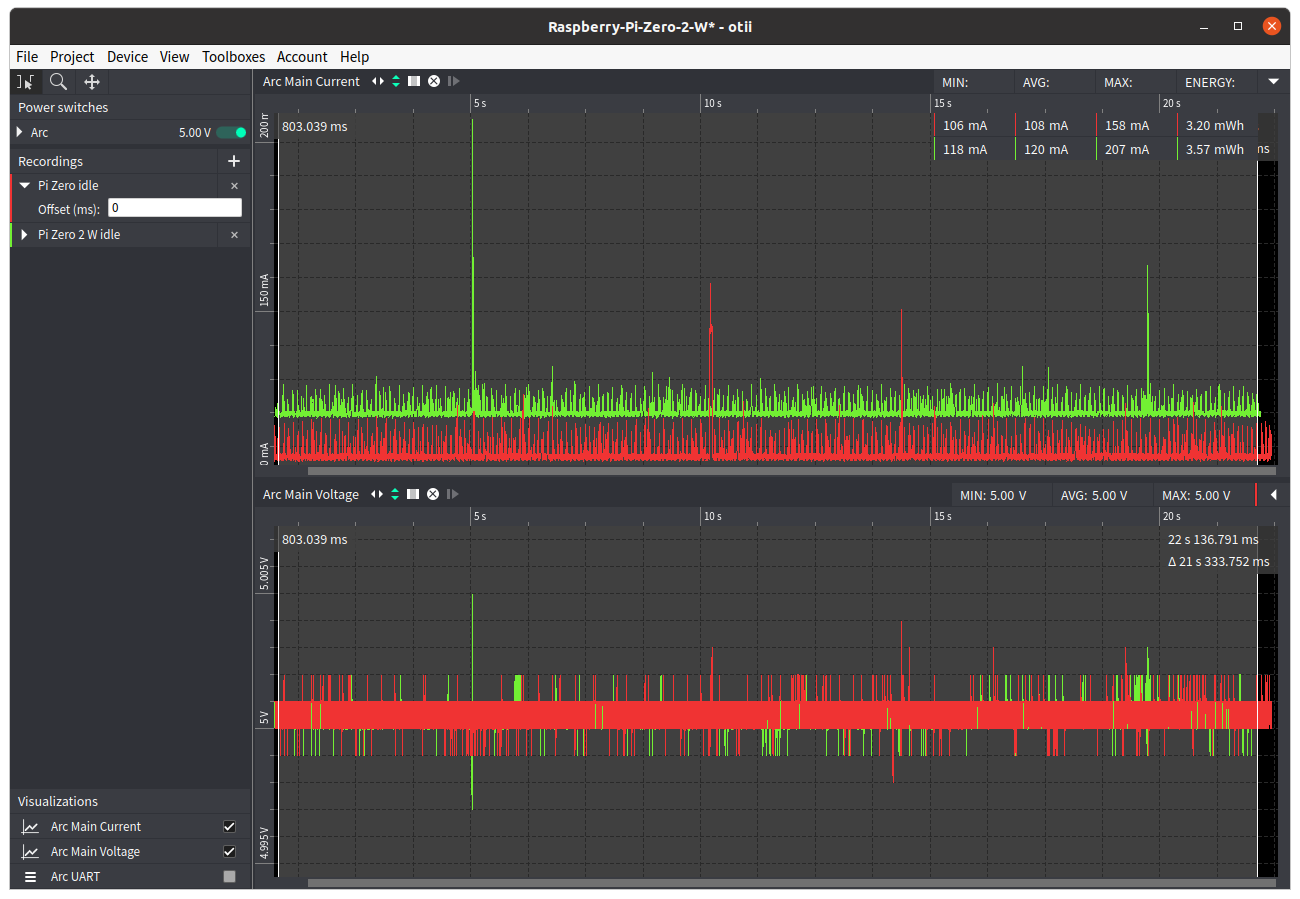
I also own a Raspberry Pi Zero (without WiFi), and it consumes 108 mA with the same image.
Another neat feature of the Otii Arc is synchronization of the power measurement data with the serial console, so I connected the wires to access the serial console in Otii program.
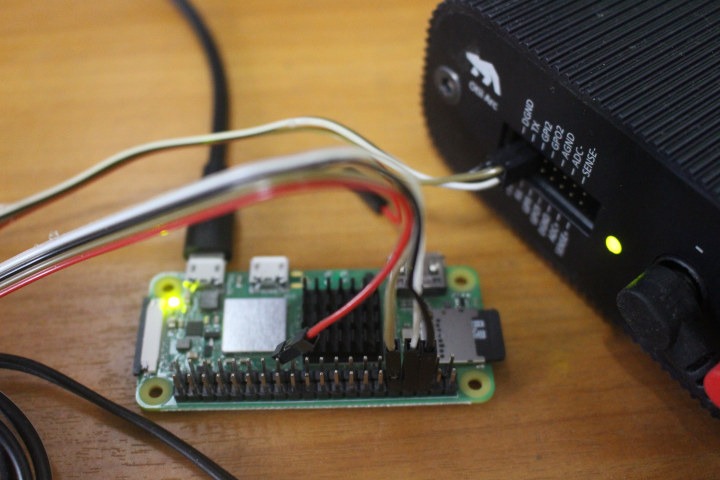 I also enabled UART in config.txt:
|
1 |
enable_uart=1 |
and SSH by creating an empty /boot/ssh file on the microSD card. That’s because the serial console in Otii is not super convenient to use, there’s no history, programs like vim or raspbi-config can be run and so on, so I’ll still do a lot of work over SSH unless I need to match the serial console output with V/A data. The power consumption went up to 125 mA after that.
I’ve tested USB Ethernet, WiFi, a USB hard drive and connecting an HDMI cable to see how each accessory/feature would impact power consumption. The numbers show the approximate additional mA per item compared to idle.
| Delta | Remark | |
|---|---|---|
| USB Ethernet dongle | +104 mA | No network connection, only a USB Ethernet dongle inserted into the USB OTG port. |
| USB Ethernet dongle + link | +180 mA | After inserting an Ethernet cable. |
| USB Ethernet dongle + iperf | +244 mA | Average. See chart below for details. |
| 2.4 GHz WiFi | +11 mA | Connected to 2.4 GHz access point. |
| 2.4 GHz WiFi + iperf | +187 mA | Average. See chart below for details. |
| Logitech RF dongle for keyboard/mouse | +29 mA | |
| Seagate USB HDD (idle) | +255 mA | Stable current after initial insertion that peaked at 1.06A. See chart below for details. |
| Seagate USB HDD (iozone) | +554 mA | Average. See chart below for details |
| HDMI cable | +7 mA | This is only after inserting the cable, not about enabling/disabling HDMI. More on that below. |
WiFi is much more efficient than Ethernet especially when idle, hard drives draw a lot of power when initially connected, and connecting an HDMI cable only marginally impacts power consumption.
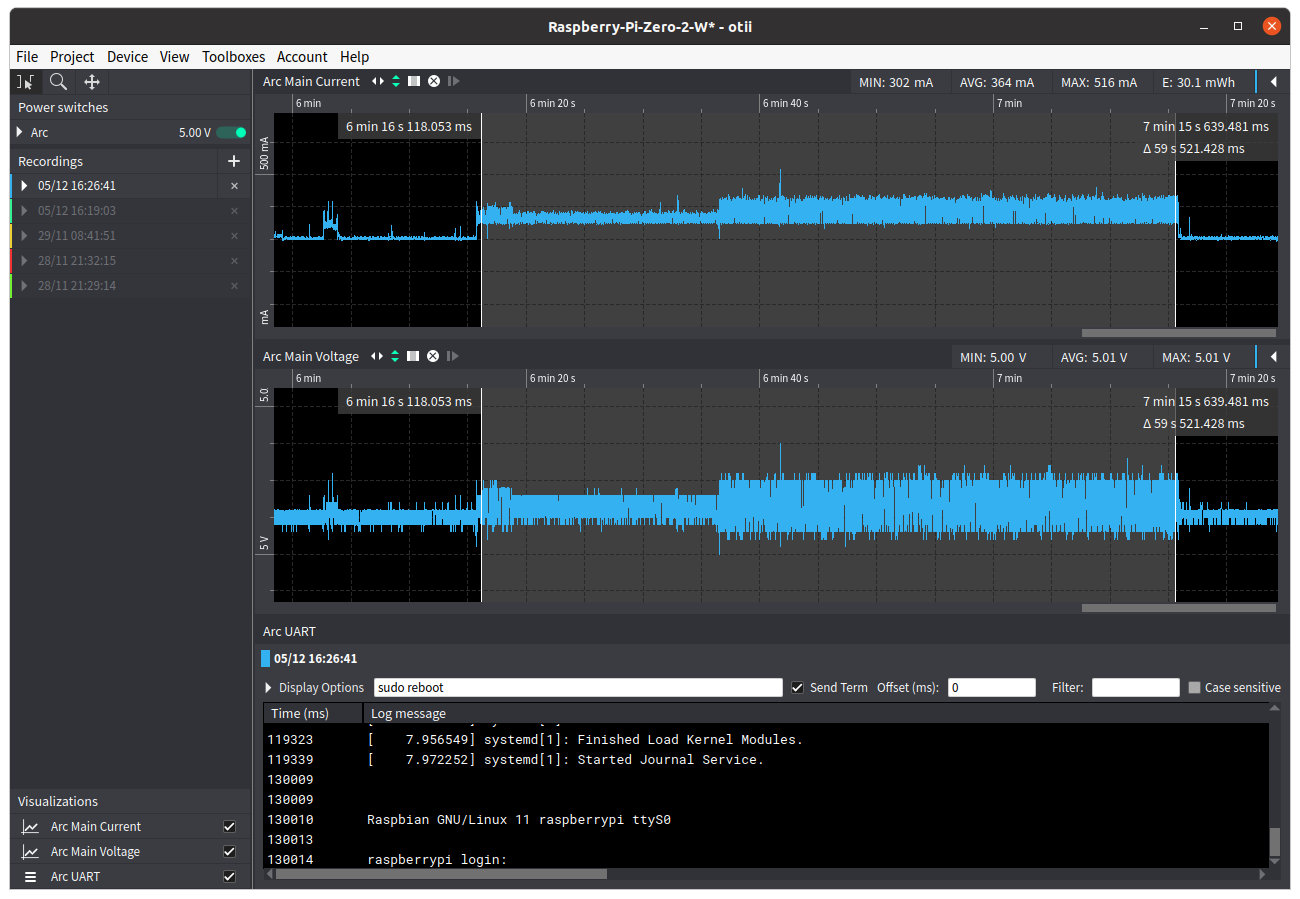
The iperf Ethernet chart shows both the voltage and current were stable at the beginning, and somehow fluctuate a bit more after around 20 seconds, maybe packet collisions occur after a while? There’s also a short spike to 516 mA, but it could be related to another process.
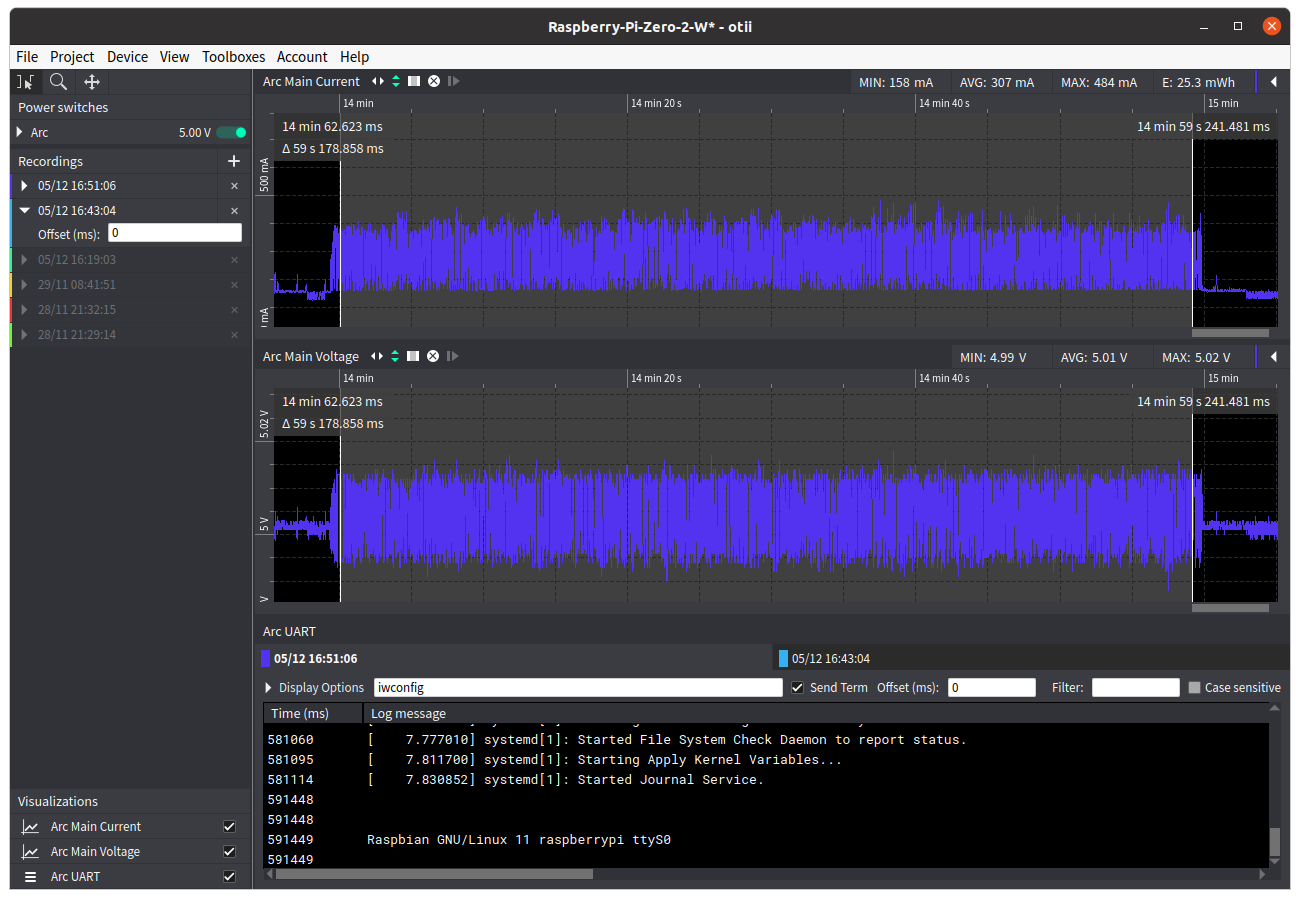
WiFi is a lot more “noisy” with the current quickly oscillating between about 160 to 480 mA during the data transfer. The total energy is slightly lower than Ethernet, but less data was transferred.
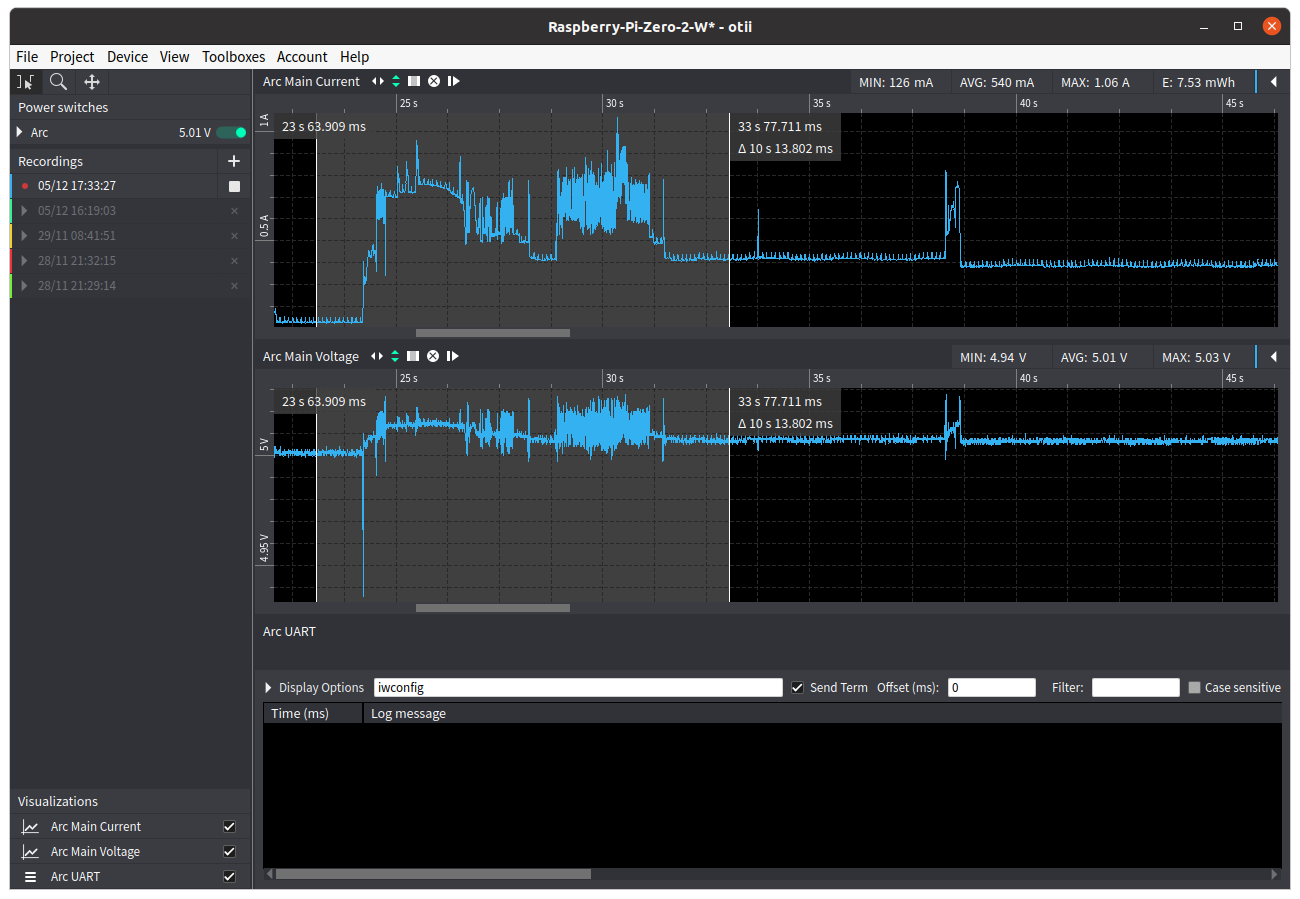
Connecting a USB hard drive makes for a pretty chart with a high current draw at the beginning up to 1.06A, follows by peaks while mounting the partition(s). After a while, the system stabilizes to 386 mA on average.
iozone can not be installed with apt on Raspberry Pi OS, so I built iozone 3.492 with the same instructions as in my Raspberry Pi 4 review.
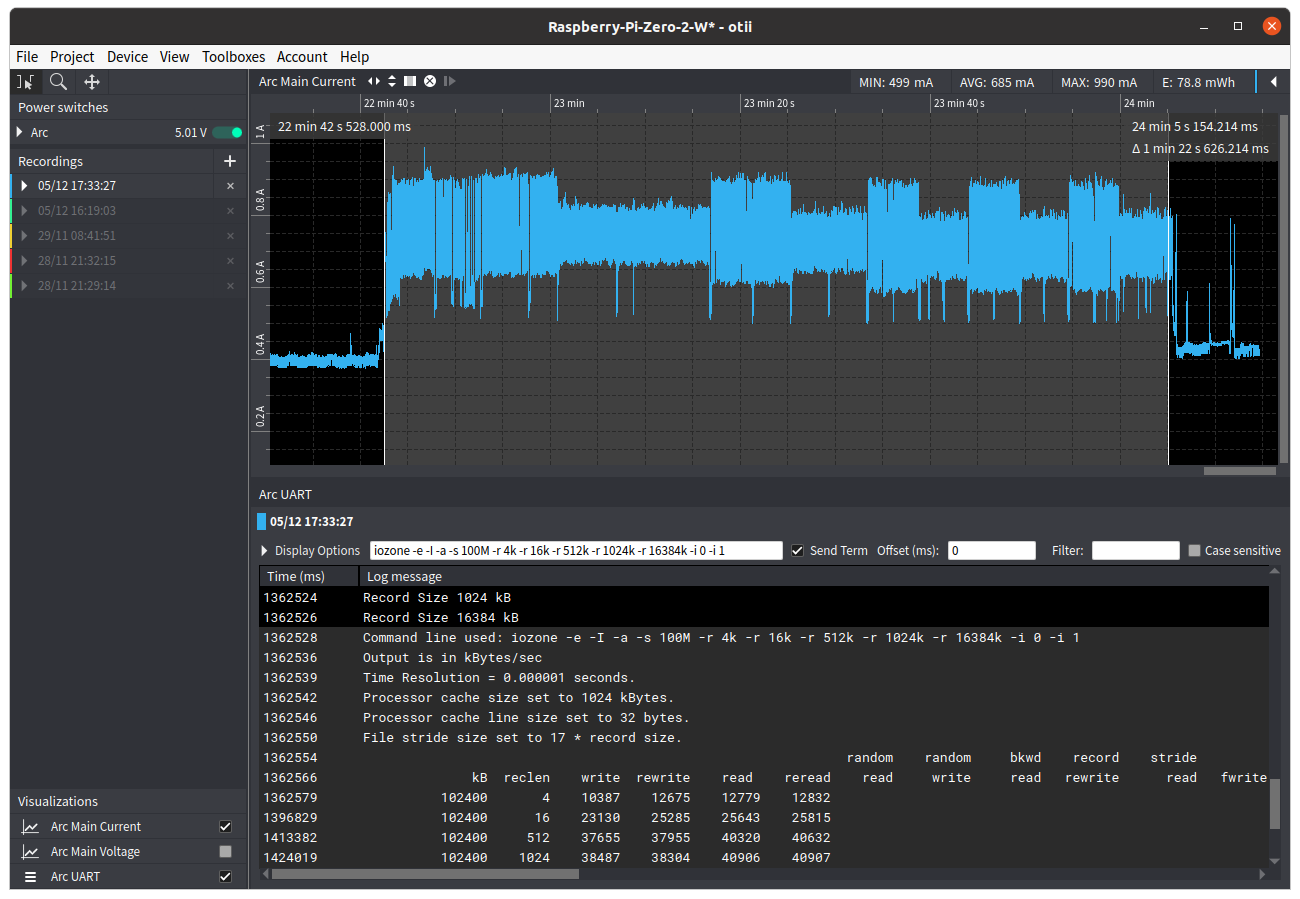 It’s difficult to look into the details the way the console is written too, but it appears writes consume more than reads.
To check the power and energy consumption under load I used Thomas Kaiser’s SBC Bench script launched from Otii serial console.

We can clearly see the multi-threaded 7-zip compression/decompression test on the right with the much higher power consumption with peaks to close 600 mA.
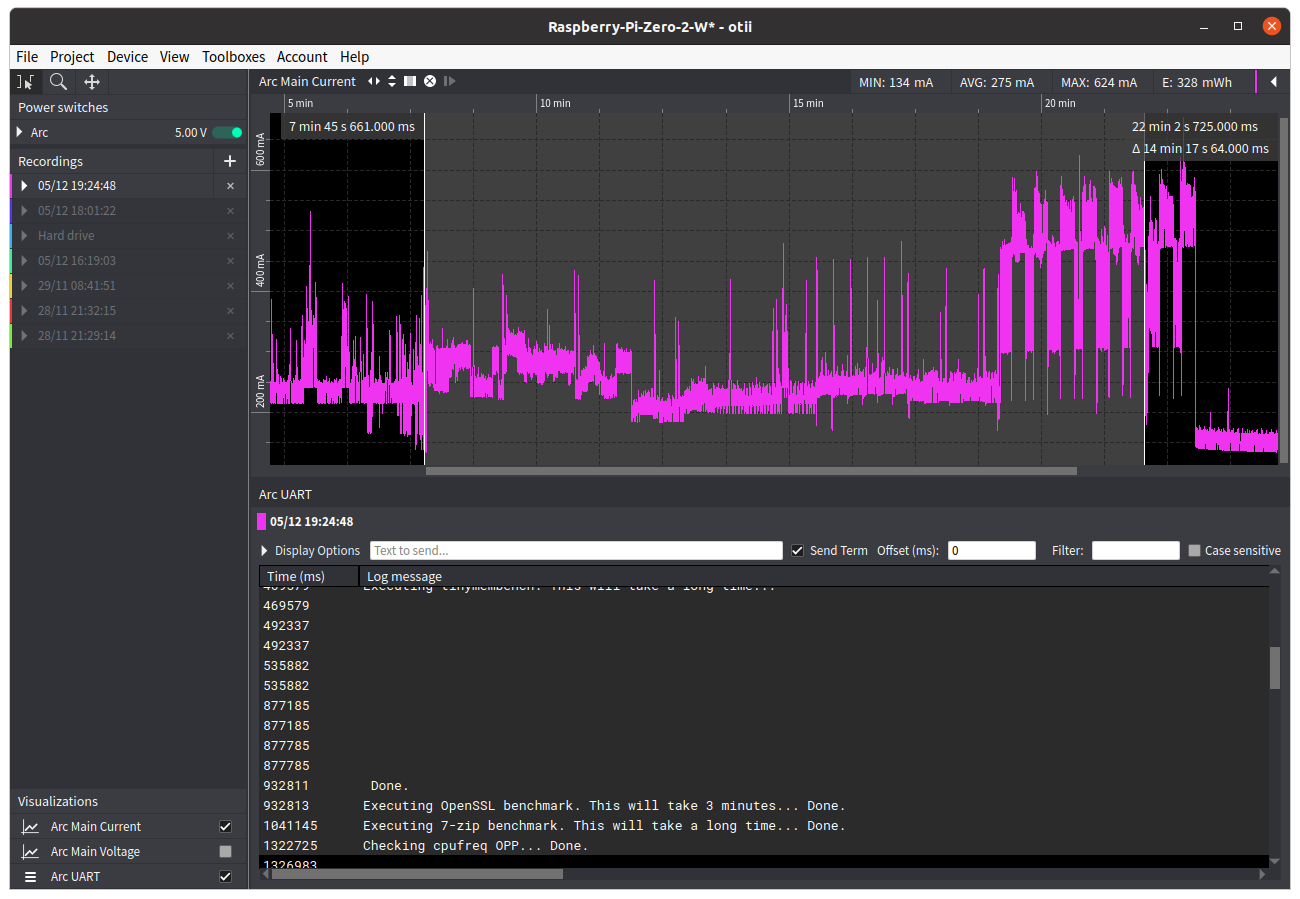
If we select the text between “tinybench” and “cpufreq OPP” in the serial console, we can see the actual benchmark (excluding installing and post-execution) used 328 mWh of energy, with a peak of 624 mA, and a runtime of 14 minutes and 17 seconds. Let’s keep those numbers in mind, as we’ll use them later on.
We’re still far from our 2.5A target with a 1.06 A peak so far. So let’s try Raspberry Pi OS Desktop instead.
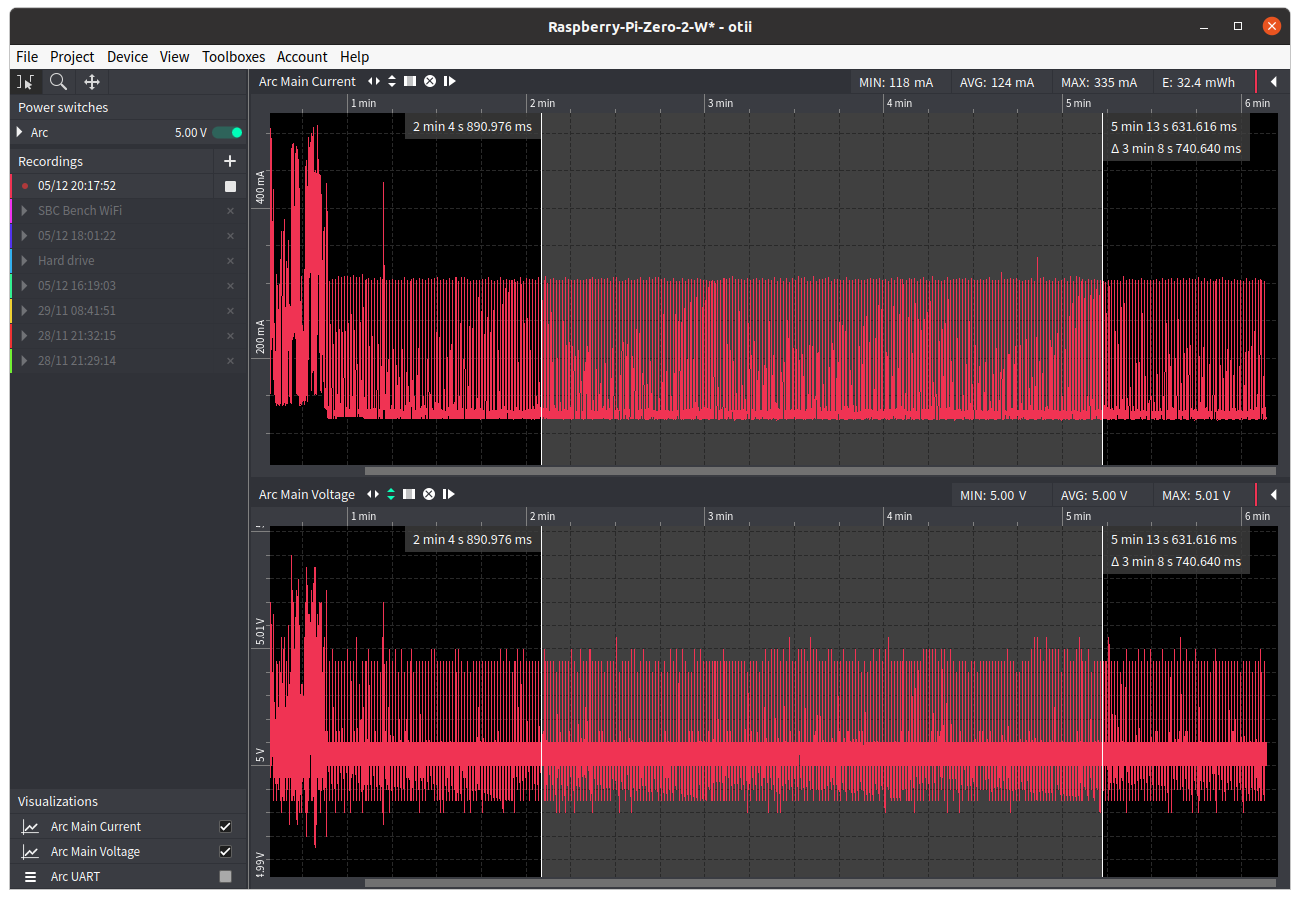 The average is 124 mA which is about the same as the Lite image, but there are many spikes to around 300 mA.
If I connect an HDMI monitor the average goes up to just 131 mA. The idea was to connect USB Ethernet, USB hardware, keyboard and mouse through a USB hub to stress test the system, but none of my USB hubs will work with the Raspberry Pi Zero 2 W:
|
1 2 3 4 5 6 7 8 |
241458 - [ 67.054308] usb usb1-port1: Cannot enable. Maybe the USB cable is bad? 241465 - [ 67.054406] Indeed it is in host mode hprt0 = 00021501 241470 - [ 67.194343] Indeed it is in host mode hprt0 = 00021501 241475 - [ 67.474308] Indeed it is in host mode hprt0 = 00021501 241480 - [ 67.754293] Indeed it is in host mode hprt0 = 00021501 241485 - [ 68.034321] Indeed it is in host mode hprt0 = 00021501 241491 - [ 68.314287] usb usb1-port1: Cannot enable. Maybe the USB cable is bad? 241497 - [ 68.314344] usb usb1-port1: attempt power cycle |
So I gave up that part and simply connected the USB drive to the USB OTG port and WiFi.
|
1 2 |
sudo apt install stress-ng stress-ng --cpu 0 --cpu-method fft |
I planned to play YouTube videos and run some 3D graphics benchmarks like OpenArena, but with just 512MB RAM that’s asking too much… OpenArena could launch, and I could select “Demo”, but it crashed without fail while loading the demo. So I ran es2gears instead (which really appears to run a software renderer), inserted the HDD, ran iozone, and then stress-ng. That means es2gears, iozone and stress-ng were all running at the same time.
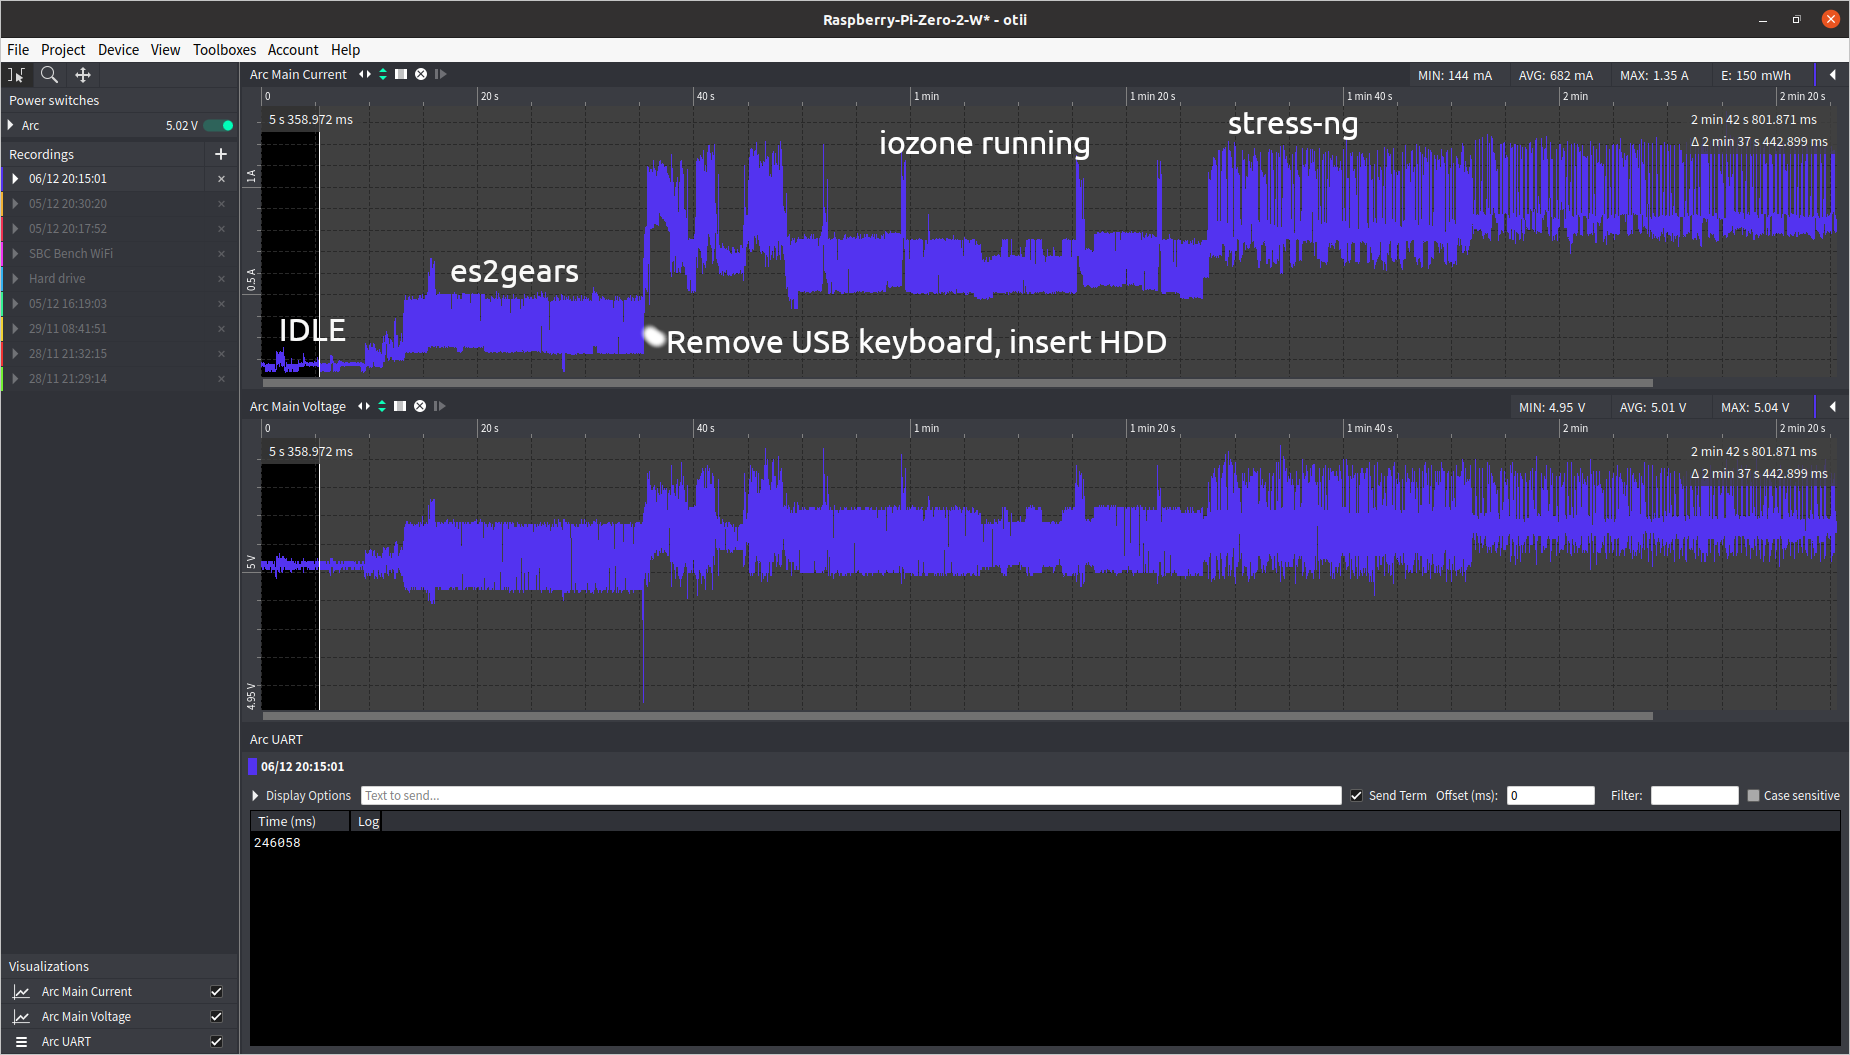 This peaked to a maximum of 1.35A, with still plenty of headroom using the recommended 5V/2.5A power supply. Although I had it longer than the screenshot above and I had at least one peak at 1.46A. If I had run stress-ng first, and then inserted the USB drive, we would probably have a slightly higher peak, which I would estimate to 1.7 or 1.8A. I’m sure I could have reached closer to 2.5A if I had been able to play a video from the hard drive, run a 3D graphics demo, while stress-ng is running. But without a working USB hub, nor Bluetooth keyboard that’s challenging. Anyway, that means in most cases, a weaker power supply, even 5V/1A would be sufficient with Raspberry Pi Zero 2 W. I haven’t been able to test a MIPI CSI camera since I don’t have any.
Lowering Raspberry Pi Zero 2 W power consumption
Let go back to the Raspberry Pi OS Lite image with only UART and SSH enabled and nothing else at 125 mA idled. We’ll make some modifications to try to lower the power consumption mostly via raspi-config utility and editing config.txt.
Let’s force Raspberry Pi RP3A0 to 600 MHz.
|
1 |
arm_freq=600 |
I don’t expect improvements here while idle… and indeed we’ve got 127 mA somehow. Let’s disable the GPU completely by setting the memory to 16:
|
1 |
gpu_mem=16 |
Still 127 mA on average at idle….
We can disable LED in theory by adding the following lines in config.txt:
|
1 2 3 |
# Disable the ACT LED on the Pi Zero. dtparam=act_led_trigger=none dtparam=act_led_activelow=on |
But it’s not working for me whether I set the second line to off or on. But I can turn off the LED manually from the command line:
|
1 2 |
$ echo none | sudo tee /sys/class/leds/led0/trigger $ echo 1 | sudo tee /sys/class/leds/led0/brightness |
It shaves 1mA to 126 mA, or about 5mW. What’s very odd is that sometimes I have to run the following instead to turn the LED off:
|
1 |
$ echo 0 | sudo tee /sys/class/leds/led0/brightness |
Let’s now disable audio, WiFi and Bluetooth, and camera/display auto detects in config.txt:
|
1 2 3 4 5 6 7 8 9 |
# Enable audio (loads snd_bcm2835) dtparam=audio=off dtoverlay=disable-bt dtoverlay=disable-wifi # Automatically load overlays for detected cameras camera_auto_detect=0 # Automatically load overlays for detected DSI displays display_auto_detect=0 |
We are down to 114 mA, instead of 125 mA when we first ran the image without modifications, i.e. default settings including no WiFi, but SSH and UART enabled. That’s a small saving of 9 mA.
Another trick is to disable HDMI with the following command:
|
1 |
/usr/bin/tvservice -o |
But it’s not working apparently because of the new standard KMS video driver for 3D graphics in Raspberry Pi OS Bullseye:
|
1 2 3 4 |
/usr/bin/tvservice -o /usr/bin/tvservice is not supported when using the vc4-kms-v3d driver. Similar features are available with standard linux tools such as modetest from libdrm-tests. |
We can go to raspi-config to change that, namely in “Advanced options->GL driver“, where it will install some packages, and then we can select “G1 Legacy“.
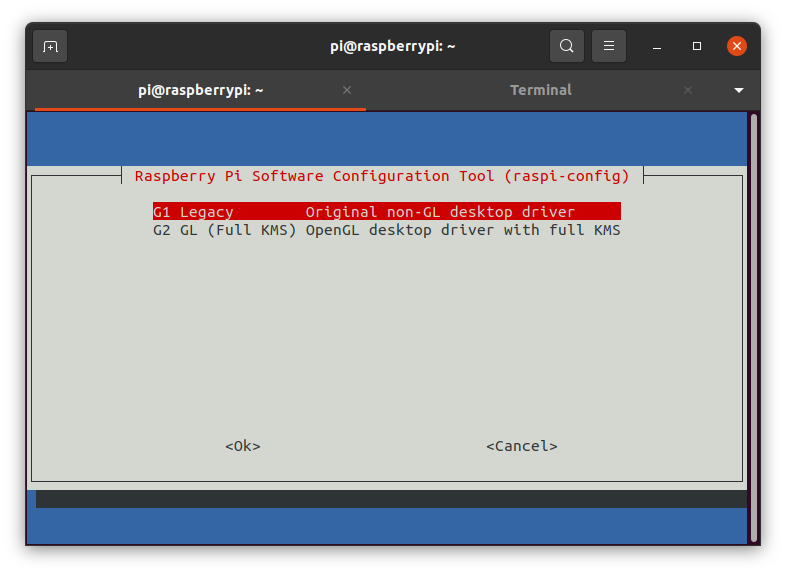
It will change config.txt from:
|
1 2 3 |
# Enable DRM VC4 V3D driver dtoverlay=vc4-kms-v3d max_framebuffers=2 |
to
|
1 2 3 |
# Enable DRM VC4 V3D driver #dtoverlay=vc4-kms-v3d max_framebuffers=2 |
Now we are talking! The power consumption went down to 92.7mA, or about 21mA less, and we’ve yet to disable HDMI output:
|
1 2 |
/usr/bin/tvservice -o Powering off HDMI |
That’s down to 75.5 mA, another ~17 mA. If you want to disable HDMI automatically at boot time add the line to /etc/rc.local file. That’s also where I ended up turning off the LED (just don’t ask me why I don’t need to run the line to set it to 0 or 1):
|
1 2 3 4 5 6 7 8 9 |
# Print the IP address _IP=$(hostname -I) || true if [ "$_IP" ]; then printf "My IP address is %s\n" "$_IP" fi /usr/bin/tvservice -o echo none | sudo tee /sys/class/leds/led0/trigger exit 0 |
We’ve got one more trick that will probably not lower idle power consumption much, but Jeff Geerlink provided instructions to disable cores, so let’s modify /boot/cmdline.txt to limit the number of cores to one with maxcpus=1:
|
1 |
console=serial0,115200 console=tty1 maxcpus=1 root=PARTUUID=9105aa44-02 rootfstype=ext4 fsck.repair=yes rootwait |
It works as we can only see one core in /proc/cpuinfo:
|
1 2 3 4 5 6 7 8 9 10 11 12 13 14 15 16 |
2235650 - [?2004hpi@raspberrypi:~$ cat /proc/cpuinfo 2238007 - [?2004l 2238036 - processor: 0 2238037 - model name: ARMv7 Processor rev 4 (v7l) 2238041 - BogoMIPS: 38.40 2238043 - Features: half thumb fastmult vfp edsp neon vfpv3 tls vfpv4 idiva idivt vfpd32 lpae evtstrm crc32 2238051 - CPU implementer: 0x41 2238053 - CPU architecture: 7 2238055 - CPU variant: 0x0 2238057 - CPU part: 0xd03 2238058 - CPU revision: 4 2238058 - 2238060 - Hardware: BCM2835 2238062 - Revision: 902120 2238064 - Serial: 00000000e51cb671 2238066 - Model: Raspberry Pi Zero 2 Rev 1.0 |
But what about the power consumption? 74.6 mA, so there may be some limited benefit going to one core only with regards to idle power consumption. Now let’s disable SSH:
|
1 |
sudo apt purge openssh-server |
as well as UART to see if we can get to 70 mA.
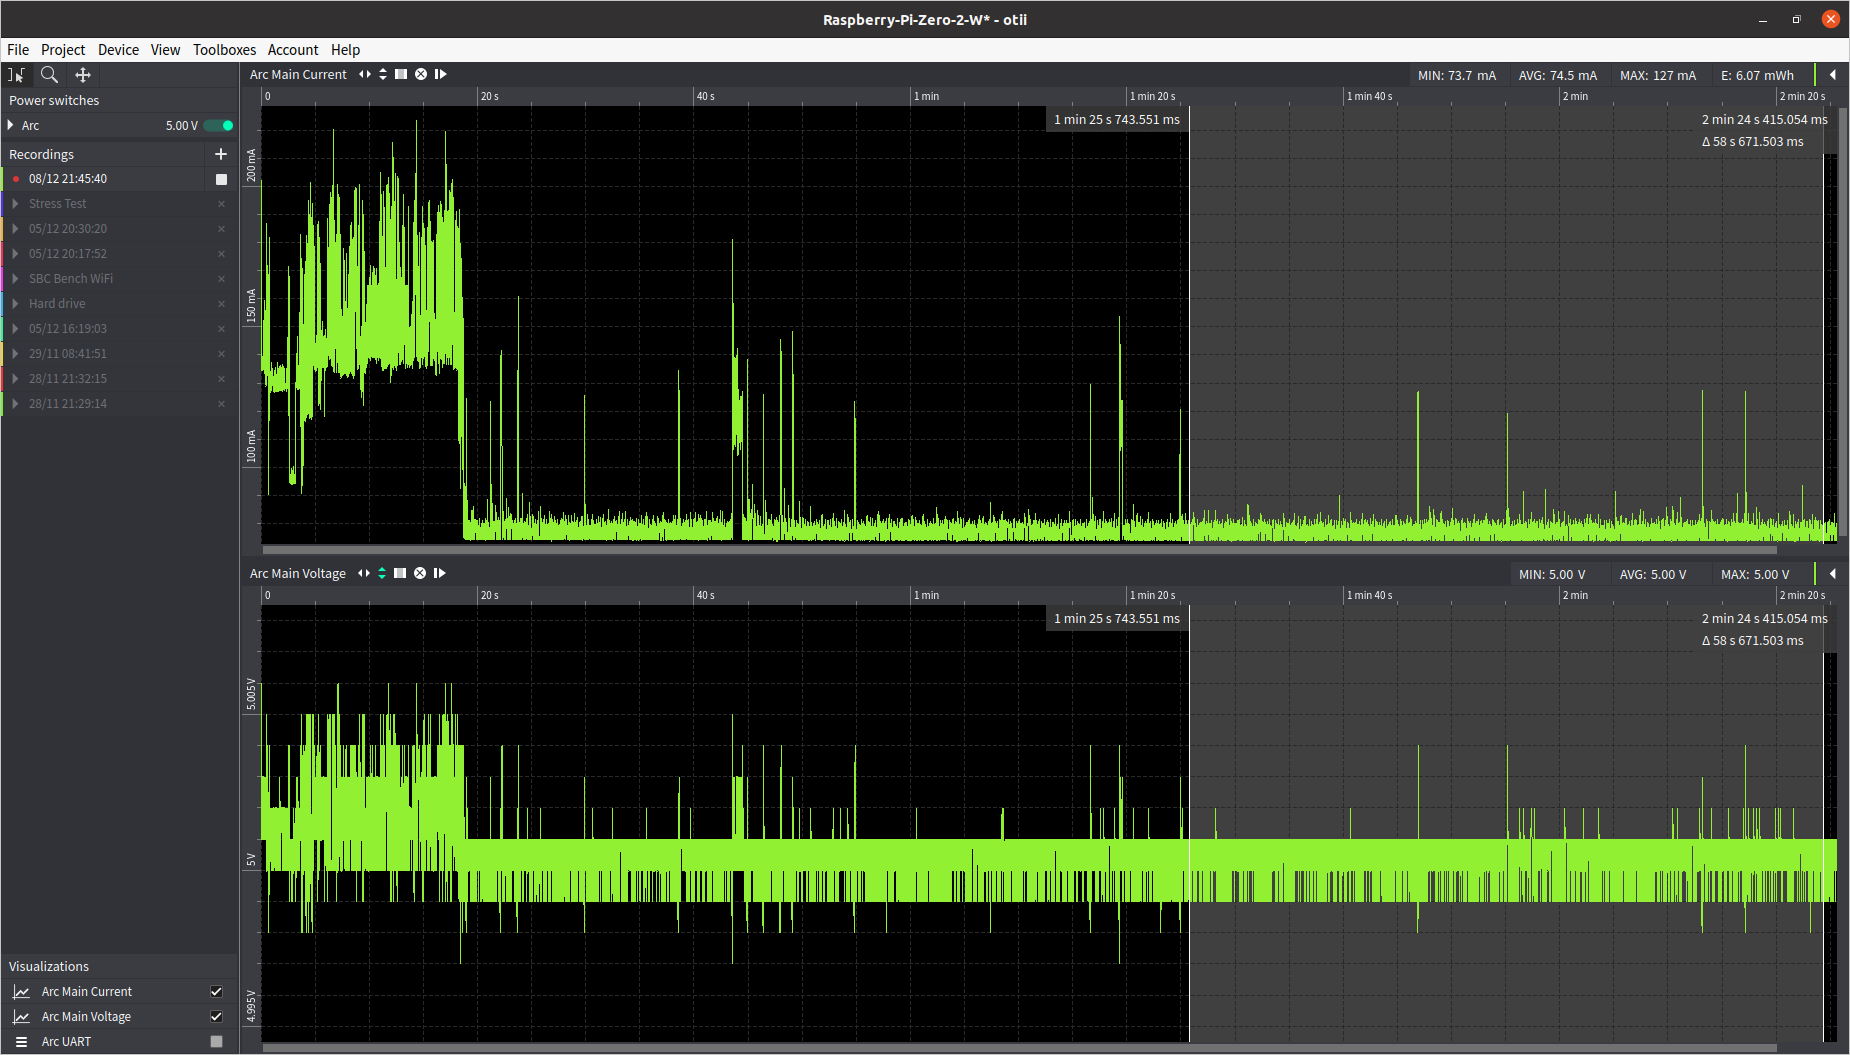 Sadly it did not help that much, as I could only achieve 74.5 mA at idle. There may be some other optimizations as we can see spikes to 100 mA from time to time. Some processors have some low power modes where all application cores and some blocks can be turned off and on as needed or/and various sleep modes, but I could not find anything for Broadcom BCM2837 / BCM2710A processor.
Energy usage
Now let’s see if it is possible to lower the energy usage by adjusting the frequency and the number of cores used. That’s useful for battery operation. I’ll rerun SBC bench with four cores at the default frequency (1.0 GHz) with WiFi, SSH, and some of the optimization we’ve enabled to check how it affects energy usage. For reference, the idle power consumption is just under 80mA in this configuration.
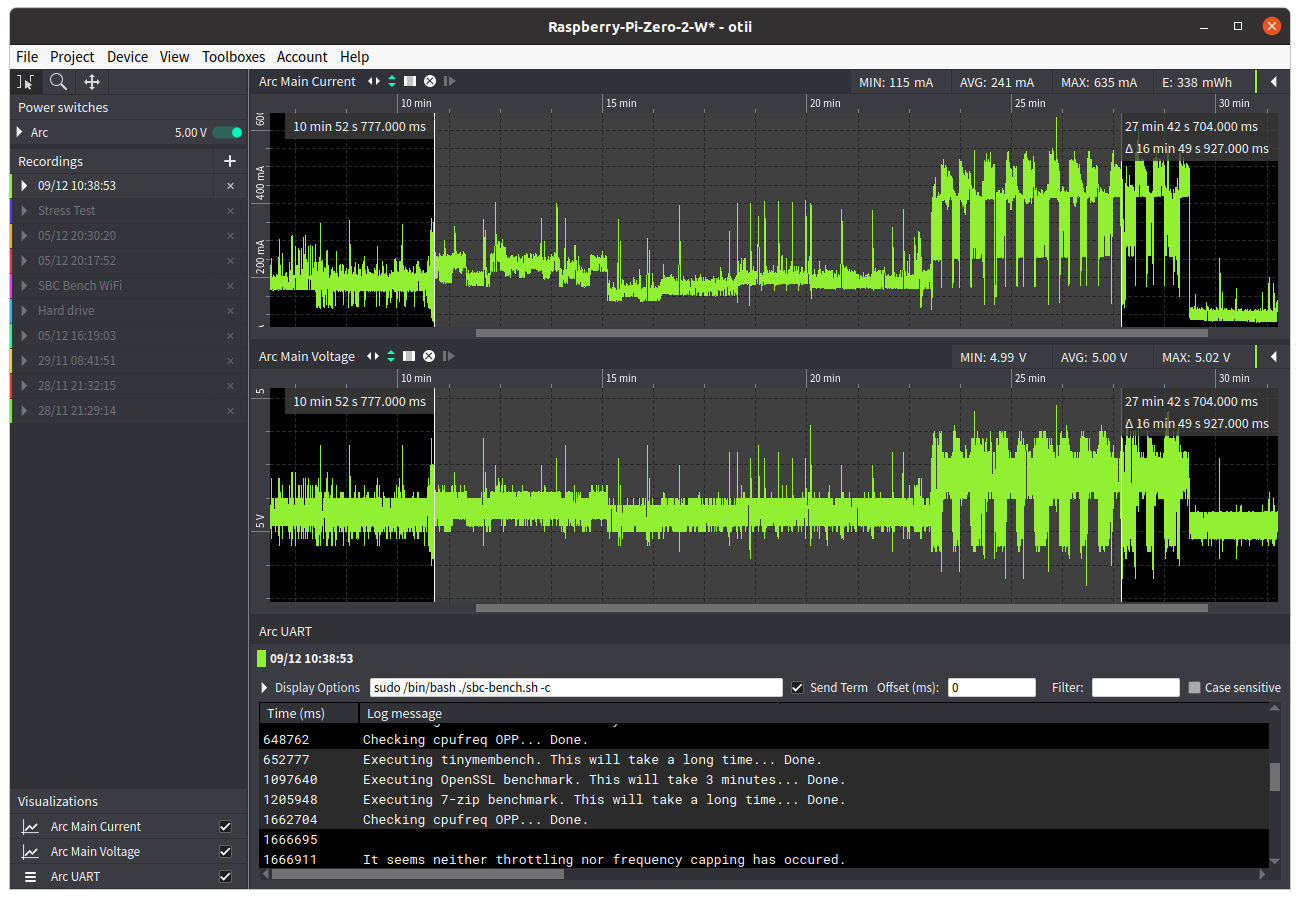
The full results can be found at http://ix.io/3HrM. That’s odd, because slightly more energy was used with 338mWh than in our first run without optimization (328 mWh), and the test took 16 minutes and 49 seconds to complete (vs 14:17), while the maximum current draw was 635 mA. I thought I had not saved the first results, but luckily, I saved the power measurements, and Otii will keep the serial output, so I could recover the first results @ http://ix.io/3H54.
A quick check at 7-Zip to compare the first run:
|
1 |
Total: 2968,2961,2972 |
with the second:
|
1 |
Total: 2996,2975,2988 |
reveals some minimal performance differences.

I compared both outputs in Meld, and I could not see much difference, apart from the KMS driver being enabled, and the higher idle percentage in the first run, slightly higher iowait percentages in the second.
Anyway, let’s switch to using four cores @ 600 Mhz to see if we can save energy and extend battery life while running the same tasks.
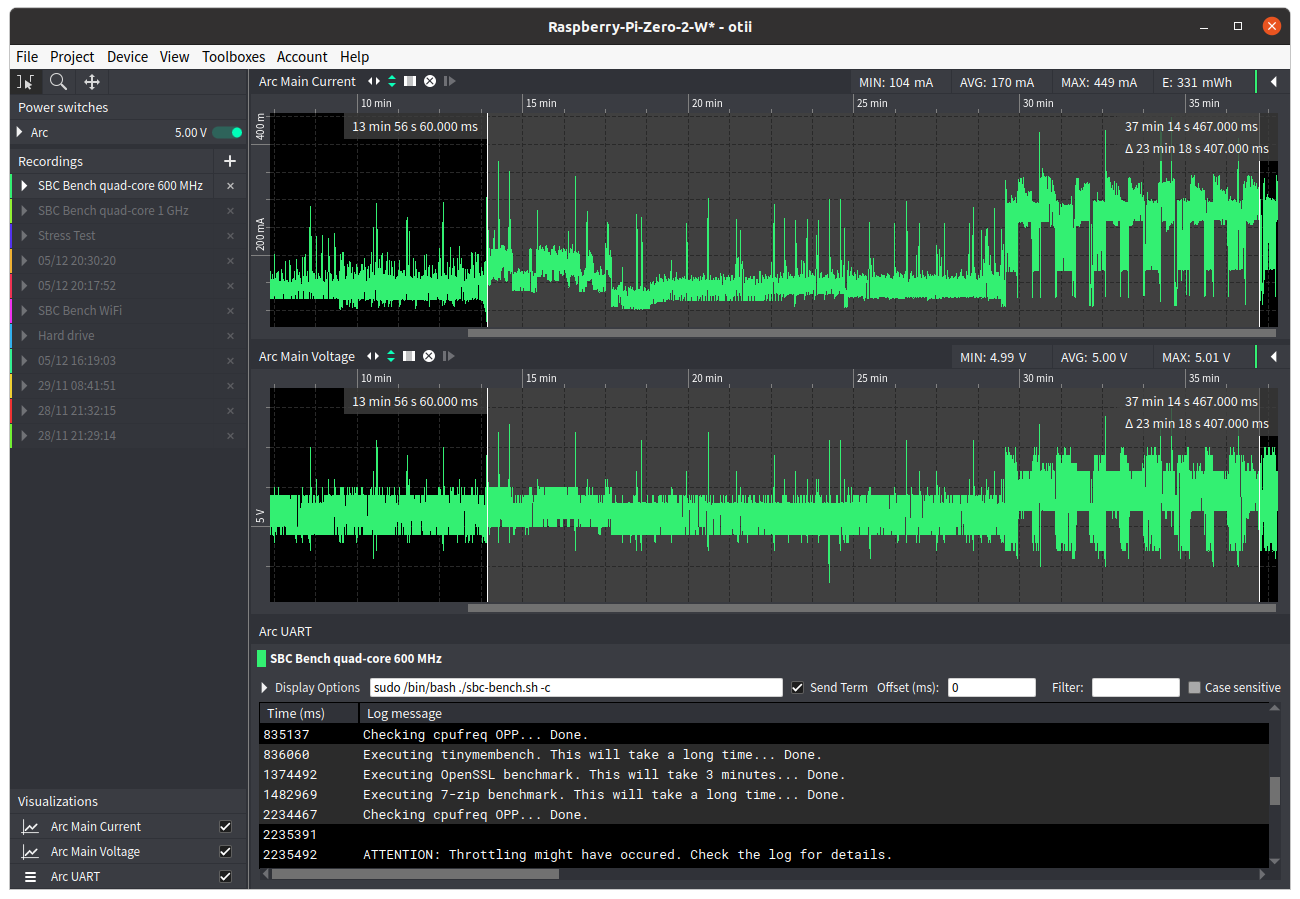
Full output: http://ix.io/3HrU. Interestingly almost the same amount of energy was used with 331mWh (still 7 mWh less, but similar to the first run @ 1.0 GHz), and the test took long as expected at 23 minutes and 18 seconds. The maximum power draw was only 449 mA, which means the board can be safely powered by a USB port from a router or computer with this workload.
Let’s do a final run with a single-core configuration @ 600 MHz.
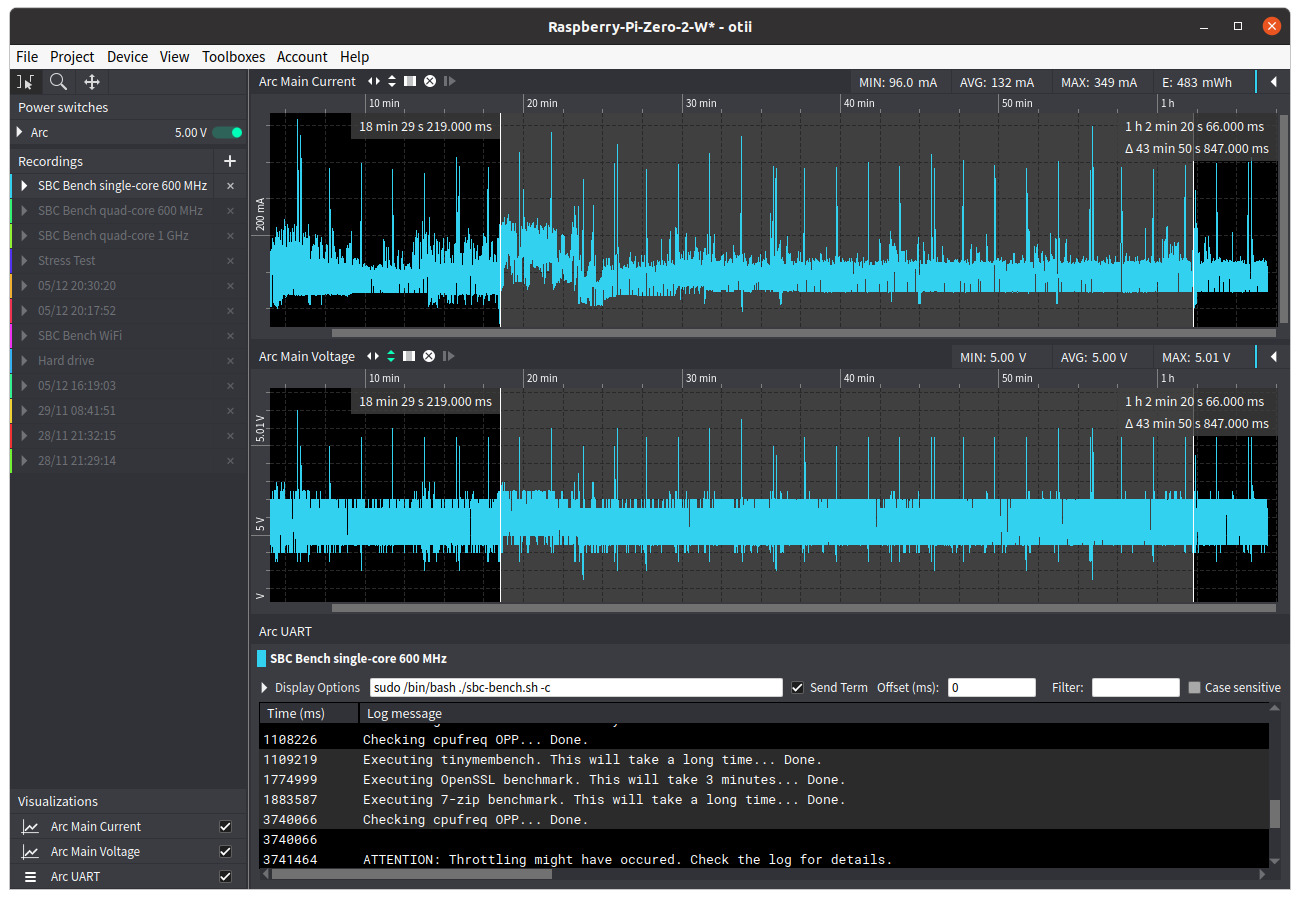
Full results: http://ix.io/3Hsg. The energy consumption is much higher at 483 mWh, maybe that’s because of the way 7-zip handles “multi-core” compression/decompression on a single core system, I don’t know, maybe somebody will have an idea in the comments section. Unsurprisingly, It also took much longer to complete everything: 43 minutes and 50 seconds. The only potential advantage is that the maximal current draw was only 349 mA, but again this is exactly as it should be since three cores were turned off.
[Update: After discussion in the comment, I realized I should have taken measurements for the same amount of time because of the idle current draw, so I’ll adjust the results to 43m50s using 80 mA idle power consumption for the first two scenarios to get a better idea of the differences:
- 4x cores @ 1,000 MHz: 338 mWh (16:49) + 180 mWh (27:01) = 518 mWh
- 4x cores @ 600 MHz: 331 mWh (23:18) + 137 mWh (20:32) = 468 mWh
- 1x core @ 600 MHz: 483 mWh
That means here we simulate a workload where sbc-bench runs on the board every ~44 minutes, excluding installation and post-benchmark activity. The actual result will obviously depend on your specific application/workload.
]
That will be all for now. Feel free to ask if you need me to test something else while I still have the testbed on my desk.

Jean-Luc started CNX Software in 2010 as a part-time endeavor, before quitting his job as a software engineering manager, and starting to write daily news, and reviews full time later in 2011.
Support CNX Software! Donate via cryptocurrencies, become a Patron on Patreon, or purchase goods on Amazon or Aliexpress


BullEyes -> Bullseye
An interesting read, thanks.
> that’s a shocker because the energy consumption is much higher at 483 mWh There’s 2 problems. In sbc-bench I simply forgot to care about designs with just 1 CPU core since there’s no need to run a multi-threaded benchmark here. And then 7-zip’s own code still detects 4 cores even if 3 are sent offline via cmdline.txt and runs the benchmark with 4 threads on the single core. While the benchmark ‘results’ are in this case just BS there’s an interesting implication for real-world tasks: do other tools like pigz (parallel gz) fail in the same way when cores… Read more »
A very thorough examination of the power consumption of the RPi Zero 2 W.
Very good article, thank you.
> I haven’t been able to test a MIPI CSI camera
When letting the VideoCore scale a video stream down and encode it (h.264) then I measured +730mW additional consumption. Or translated into weird numbers that’s a little less than 150mA.
Lower frequency*core increases the 7z test duration; during which, background processes and peripherals contribute to an increased total consumption. Do you think that the increased consumption you saw with underclocking can be explained by this?
Yes, that makes perfect sense. But the energy used for the 4x 1 GHz and 4x 600 MHz tests is about the same, so I was surprised by the big difference with the single-core only. But now that I think about it, with a “background” current draw of 80 mA for an extra 20 minutes, that would have added around 134 mWh. If I deduct this from 483 mWh that would be 349 mWh, quite close to the 331/338 mWh we’ve measured with the quad-core tests.
You should test this for maximum power consumption by the cpu
GitHub – ssvb/cpuburn-arm: A collection of cpuburn programs tuned for different ARM hardware
How does it differ from stress-ng? Is it using more power because of the use of Arm specific instructions?
OK. I can see it downloads libjpeg-turbo, so it will use some SIMD instructions as well. Anyway, I’ve run it with sudo since it needs to set the CPU governor. The tool will test each core independently at all available frequencies, but it’s not a multicore test, or I ran the wrong command. I can see a peak of 370 mA, and the average with one core @ 1000 MHz is 220 mA, down to 161 mA @ 600 MHz.
If you want ‘multicore test’ then you simply fire up as many processes as CPU cores. Cpuburn ist a great tool when you develop optimal DFVS operating points (as we did in the past for Allwinner SoCs) but that’s not possible with any RPi unless you’re employed by RPi Trading Ltd.
That said I’ve no idea for what to use synthentic loads like this on something like an RPi Zero…
This was a great read. Thank you.
Low speed single core runs may take more total power because they take more time to complete and thus they have to pay for more base power draw. If you want to compare them, you need to measure a fixed time period of power consumption which is long enough to encompass the testing–this normalized out the fixed power useage. This can make sense as a means of comparison if you have a task that needs done periodically, is not sensitive to how long it takes, and the machine has to stay on the whole time anyway. Which, honestly, is a… Read more »
We already have the idle power consumption, so it should give a pretty good idea of the energy for a system that just sends a message every 5 minutes for example.
I think I got your point. If I measure energy on the single-core test for 45 minutes, I should do the same for the quad-core tests, even while they are idle most of the time.
As already mentioned above there’s another problem with those artificial single core RPi (cores sent offline via kernel cmdline): tools that don’t get it that cores are offline and still use 4 threads.
Asides making benchmark numbers meaningless (fixed with sbc-bench 0.8.7 BTW) this can have implications for real-world use cases too and should be considered when playing around with limiting max power consumption on an RPi Zero.
Maybe I missed something. Any tests with the pi zero camera connected?
Thanks
JM
You missed two things 🙂
Is there something like hybrid sleep or suspend to ram or suspend to disk on regular Raspberry OS distros? Thanks
Nope.
The main CPU (VideoCore) is designed for that and also for really low-power modes (those true VC SoCs ran MP3 players and stuff) but those hybrid VC designs with crappily integrated ARM cores (all those at the heart of Raspberries) do not support that (or the interaction of the two OS that run on any RPi does not support it).
Just read Kristina Brooks’s comments on when she was giving a try to implement a blob free ‘firmware’ for RPi.
Interesting but I was really looking forward to a power comparison with the Pi Zero W/WH… We all know of the performance boost of the Pi Zero 2 so it is likely many will find their way upgrading Pi Zero W based projects…
> power comparison with the Pi Zero W/WH
Those numbers exist all over the web. 🙂
Now the obvious: idle consumption difference of both Zero is negligible but if you care about this stuff you need to have an eye on the power source. Using a bad wall wart a Zero W can have a significantly higher idle consumption than a Zero 2 with better power source.
And wrt peak consumption it’s all about strategies to deal with the much higher demand of those four A53 fully loaded which the article explains in detail.
Nice work. I wonder how much variation there is between different microSD cards, particularly different capacity, but also speed rating and brand.
If you care about storage consumption then it’s as easy as this: avoid frequent writes (which might require changing some Raspberry Pi OS defaults).
If there’s no access to the card its consumption is negligible. Looking into data sheets is pointless since only peak numbers are written. Testing for real-world consumption figures is not easy since it would require using different cards and replaying identical storage access patterns representing the use case in question (synthetic storage benchmarks are BS for this).
Still, I have often wondered: if I’ve got a semi-vanilla Raspbian OS installed and a “normal” usage pattern, whatever that is, what’s the delta power draw between that deployed on a 16GB SanDisk C10 microSD vs a 128GB SanDisk C10 microSD – does the extra storage capacity also draw power just being there “on standby” – it seems, unlike RAM, that it shouldn’t, but I’ve never had the equipment to properly test, and as you say: spec sheets and benchmarks are useless.
In theory it shouldn’t, because as you know, even with no power, the device retains its data. In practice it can differ because the largest devices usually have much more powerful controllers so that it doesn’t take 3 days to completely read/erase/copy a single device. And this is where you may observe differences, with higher peak consumption during accesses. But differences may possibly vary even more between vendors than between models of a same vendor. One thing that most people forget about nowadays, is to make sure that /tmp uses a tmpfs and is not stored on the SD. I’m… Read more »
> 16GB SanDisk C10 microSD vs a 128GB SanDisk C10 microSD To draw which conclusion? When I started benchmarking SD cards over 5 years ago the 1st thing to learn was that stuff printed on the card doesn’t matter. The early Samsung Pro I bought were much faster than those acquired a year later, the early SanDisk A1 I bought were faster than the (more expensive and better specced) A2 bought later and so on. So if you find a way to measure your two cards the benefit is small since results only apply to your two cards. Asides that… Read more »
Great post, ya cheap dude. LOL
Funny how you did not test the most important power metric : the current draw on startup…. most pi zero problems are caused by the startup current not being met.
Because I consider power draw on start up to be completely irrelevant.
Agreed! It a booting system usually shows during startup a (significant) fraction of the consumption under load, nothing more. It will generally correspond to the load of a single-threaded task. What can be heavier is if a spinning disk is attached to it (e.g. via USB), but in this case the current draw will solely depend on that specific disk and would be irrelevant here.
Thanks a lot, extremely useful!
In the initial table would be nice to add added consumption from full CPU load, 1, all and reduced freq cores.
Personally want to run it on a 1A power. Seems to be fine without peripherals to just run it without optimizations.