Using ChatGPT for Robotics – Programming myCobot 280 robotic arm with natural language (Sponsored)

ChatGPT myCobot 280 Robotic Arm

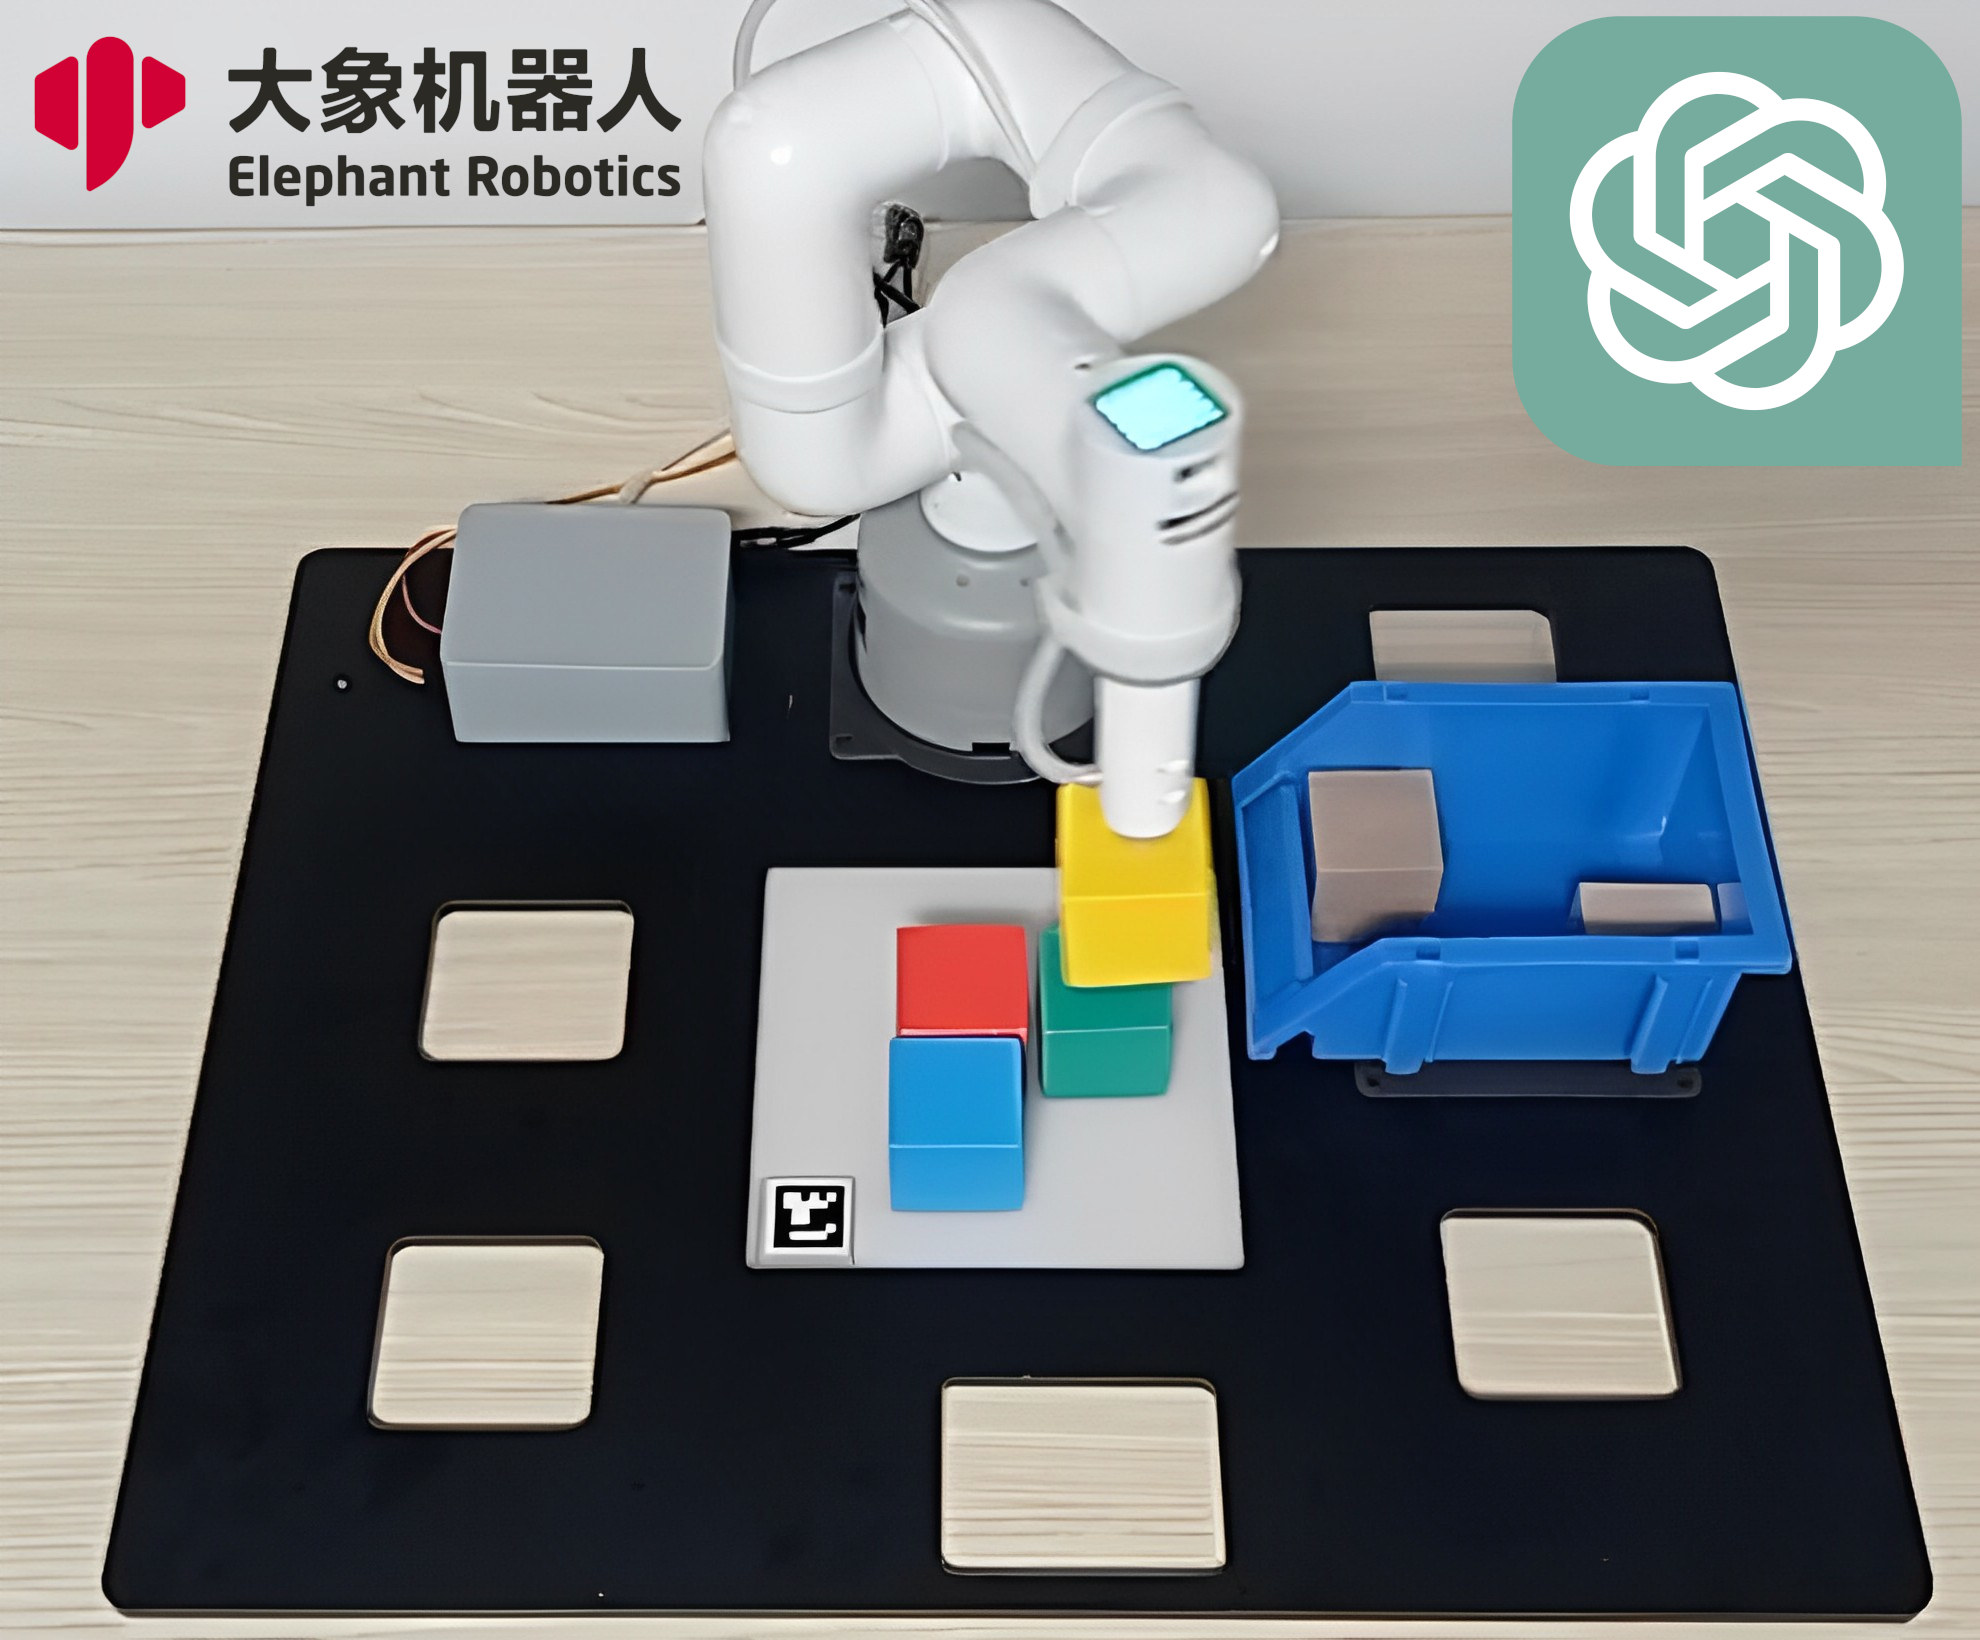
ChatGPT AI chatbot can help engineers write programs, and we recently tested it by letting it write a Python program to read data from an I2C accelerometer. But it can be used for more advanced programs and Microsoft Autonomous Systems and Robotics Group used ChatGPT for robotics and programmed robot arms, drones, and home assistant robots intuitively with (human) language. The long-term goal is to let a typical user control/program a robot without having an engineer write code for the system. Microsoft explains that the current robotics pipelines begin with an engineer or technical user that needs to translate the task’s requirements into code for the system. That’s slow, expensive, and inefficient because a user needs to write code, skilled workers are not cheap, and several interactions are required to get things to work properly. With ChatGPT or other large language models (LLM), a user could “program” the robot with […]

How to setup a WireGuard server on Ubuntu for remote login

WireGuard Server Network Topology

In this article, we will show you how to set up a WireGuard server on Ubuntu in order to use it for remote login. Introduction to WireGuard First of all, let’s first understand, what is WireGuard? WireGuard is a very simple and fast VPN tool with state-of-the-art encryption. Its goal is to be faster, simpler, more streamlined, and easy to use than IPsec, while avoiding the hassle of large-scale configuration. WireGuard is designed as a general-purpose VPN to run on embedded interfaces and supercomputers in many different environments. Originally released for the Linux kernel, WireGuard is now widely deployed and supported across platforms (Windows, macOS, BSD, iOS, Android). WireGuard is growing rapidly and is already considered the most secure, easiest-to-use, and simplest VPN solution in the industry. Basic Concepts of WireGuard Several basic concepts are involved in WireGuard: Peer: A node in WireGuard. Private key: Each node has its own […]

Using Pico:ed V2 board as a replacement for BBC Micro:bit

Pico:ed V2 BBC Micro:bit Alternative

We’ve received a sample of the Pico:ed V2 board developed by ELECFREAKS and will show how to use it as a replacement for the BBC micro:bit in a project using CircuitPython. We’ve already covered the board in detail with specifications, block diagram, and pinout diagram before, and it’s basically a Raspberry Pi Pico RP2040 board with BBC Micro:bit form factor including a 17×7 Dot Matrix LED display, some buttons, a buzzer, but no wireless connectivity, relying only on USB instead. CircuitPython firmware installation on the Pico:ed V2 board The board supports C/C++, MicroPython, and CircuitPython programming languages, and for this review, we’ve decided to download the CircuitPython UF2 firmware. Press and hold the BOOTSEL button after having downloaded the firmware file… … and connect the board to your computer using a USB cable before releasing the BOOSEL button on the Pico:ed V2 board, which should then show up as the […]

Servo and motor control with Raspberry Pi Pico, CircuitPython, and Wukong 2040 breakout board

Raspberry Pi Pico Wukong 2040 Motor Control CircuitPython

ELECFREAKS Wukong 2040 is a multifunctional breakout board designed for Raspberry Pi Pico. It is equipped with interfaces for four DC motors, up to twelve servos, a buzzer, A\B buttons, RGB “rainbow” lights, a Reset button, etc… The board can be powered by a single 18650 3.7V LiPo battery and integrates a power management IC that monitors the battery level and can also charge the battery via a USB charger. Battery life is typically 60 minutes per charge but can last over 120 minutes depending on the load.   Wukong 2040 key features and specifications Description of the Wukong 2040 interfaces Specifications and dimensions of the Wukong 2040 Expansion Board for Raspberry Pi Pico The Wukong 2040 breakout board for the Raspberry Pi Pico can control up to four DC motors and up to 12 servo motors as shown in the diagram below. Pinout diagram of the Wukong 2040 board […]

Getting Started with GL-S200 Thread Border Router kit

Getting Started GL-S200 Thread Border Router

Last week we checked out the hardware for the GL.iNet GL-S200 Thread Border Router kit with three nRF52840 Thread Dev Boards, and I’ve now had time to work with the kit, so I’ll report my getting started experience in the second part of the review. GL-S200 Initial Set Up I connected the WAN port to my Ethernet Switch itself connected to my modem router and the LAN port to my laptop, so I could access the web interface using the default IP address (192.168.8.1). The GL-S200 uses the same Admin Panel as other GL.iNet routers such as the Beryl AX router we reviewed at the beginning of the year. You’ll be greeted by a wizard to let you select the language and set a new password for the Admin Panel, and once you’re done you’ll have access to the familiar GL.iNet Admin Panel 4.x.x. After completing the wizard, the system […]

ODROID-H3+ SBC review with “Unlimited Performance” mode and 2.5GbE Net Card

ODROID-H3+ Review with Net Card and Case Type 7

Hardkernel have added Intel Jasper Lake mini PCs to their ODROID-H series and they are known as the ODROID-H3 and ODROID-H3+. Like the discontinued ODROID-H2/H2+, this new series also supports the Net Card which will add four extra 2.5 gigabit Ethernet ports. Hardkernel kindly sent an ODROID-H3+ together with a selection of accessories for review and I’m going to look at the effect on performance when changing the Power Limit values in the UEFI (BIOS) together with the network performance of the Net Card. ODROID-H3+ hardware overview The ODROID-H3+ physically consists of a 110 x 110 mm (4.33 x 4.33-inch) motherboard complete with an Intel Pentium Silver Jasper Lake mobile N6005 processor which has 4 cores and 4 threads and can boost to 3.3 GHz and also includes Intel UHD Graphics. The processor, and nearly the entire motherboard, is covered by a large metal heat sink: The front of the […]

Making a DIY Raspberry Pi camera mount with privacy mode!

XYLITOL Raspberry Pi Camera Mount

I’ve just repurposed an empty XYLITOL gum bottle into a DIY camera mount for the Raspberry Pi Camera Module 3 with privacy mode to boot… In order to avoid confusion, while Xylitol is a chemical compound, it’s also a Japanese brand of chewing gums (Lotte XYLITOL) that is sold in Thailand and other countries. I’m specifically talking about the latter in this post. Raspberry Pi Trading has just sent me a bunch of Raspberry Pi Camera Modules 3 for review, and since I don’t have any camera mount I initially thought maybe I’ll laser cut some mount or use some LEGOs as I did with the e-CAM20_CURB camera for Raspberry Pi 4. But then I saw some empty XYLITOL gum bottles, noticed the cap would open vertically, and it seemed like the modules might fit in there as well. And indeed they do with the Raspberry Pi camera modules snugged […]

Review of Creality Ender-3 S1 Pro 2-in-1 3D printer & laser engraver – Part 1: Unboxing and assembly

Ender-3 S1 Pro 3D printer converted into a laser engraver

Creality Ender-3 S1 Pro is a 3D printer that can be converted into a laser engraver thanks to a choice of 1.6W, 5W, and 10W laser modules, making it in theory a space-saving machine that can print 3D objects and engrave & cut materials. The company sent me a full kit with a 10W laser module, so after looking at the 3D printer’s specifications, I’ll check the various packages, and report my experience assembling the 3D printer, and then converting it into a laser engraver in this article, before actually testing both functions in the second part of the review. Since Karl reviewed the Ender-3 Pro 3D printer over two years ago, I asked about the difference and was told the new model got various improvements such as a direct extruder, CR-Touch auto bed-leveling, and support for high-temperature printing. Creality Ender-3 S1 Pro specifications Technology – FDM Maximum printing volume […]