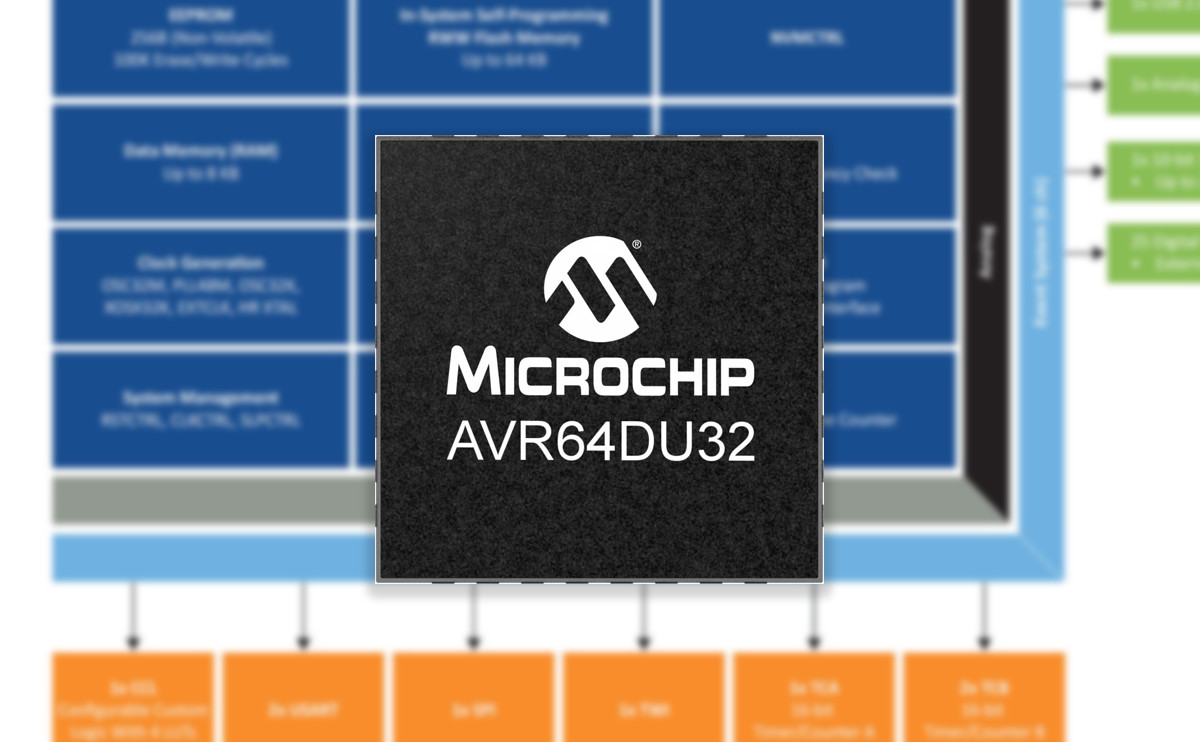
Archive

Posts Tagged ‘power’

Linux 3.9 Release

April 29th, 2013 No comments

Linus Torvalds has announced the release of Linux Kernel 3.9:

So the last week was much quieter than the preceding ones, which makes me suspect that one reason -rc7 was bigger than I liked was that people were gaming the system and had timed some of their pull requests for just before the release, explaining why -rc7 was big enough that I didn’t  actually want to do a final release last week. Please don’t do that.

Anyway. Whatever the reason, this week has been very quiet, which makes me much more comfortable doing the final 3.9 release, so I guess the last -rc8 ended up working. Because not only aren’t there very many commits here, even the ones that made it really are tiny and not pretty obscure and not very interesting.

Also, this obviously means that the merge window is open. I won’t be merging anything today, but if you start sending me your pull requests (Konrad already sent in his Xen pull request for the 3.10 merge window a week ago), tomorrow the flood gates start opening..

Linux 3.8 brought file systems enhancement for Btrfs, XFS and ext-4, introduce F2FS file system, memory management improvement, and the removal for i386 support.

Linux 3.9 brings the following key changes (Sources H-Online and Phoronix):

  • File-system improvements:
    • Btrfs has experimental RAID5/6 support and fsync performance improvements.
    • EXT-4 bug fixes for corruption issue, and JBD2 journaling layer issue which affected performance.
    • Various improvements for F2FS file-system.
  • Added ability to use SSDs as hard-disk cache.
  • Update the latest LZO compression implementation within the kernel. Decompression and compression performance has been massively improved and x86 and ARM targets.
  • Improved power management, including “lightweight suspend” (aka “suspend freeze”) mode.
  • Improved ARM SoC support
    • Added Nvidia Tegra 4 support including support for Dalmore and Pluto development boards.
    • Added Nvidia Tegra 3 Beaver Board support
    • Kernel-based Virtual Machine (KVM) support for ARMv7 (Cortex A15 required)
  • Mainlining of Google’s Goldfish virtual CPU.
  • Initial ARC Linux support. See commit.
  • Added support for Imagination Meta ATP (Meta 1) and HTP (Meta 2)
  • Graphics drivers updates – Nouveau, the open-source reverse-engineered NVIDIA Linux graphics driver, is faster for some Linux OpenGL games. There’s also some Intel OpenGL performance changes.
  • Support for Intel 7000 Wi-Fi components supporting 802.11ac.
  • CONFIG_EXPERIMENTAL kernel configuration option has been removed

More details about Linux 3.9 will be available on Kernelnewbies.org (which is currently down).

Digg This
Reddit This
Stumble Now!
Buzz This
Vote on DZone
Share on Facebook
Bookmark this on Delicious
Kick It on DotNetKicks.com
Shout it
Share on LinkedIn
Bookmark this on Technorati
Post on Twitter

ARM big.LITTLE Processing Demo (HMP) on ARM TC2 Test Chip

February 16th, 2013 1 comment

Samsung launched Exynos 5 Octa at CES 2013. This processor comes with 8 cores: 4 Cortex A15 cores and 4 Cortex A7 cores, and it’s the first processor that’s been announced to work in big.LITTLE configuration, where the big cores (A15) handle demanding tasks, and the LITTLE cores (A7) handle simpler tasks such as audio playback or background tasks. This is all done to optimize power consumption. There are 2 big.LITTLE software implementations: In-kernel switcher (IKS) and heterogeneous multi-processing (HMP). The first one is easier to implements but can only use 4 cores (in Exynos 5 Octa) at a time, and the second is more complex, but can handle all 8 cores, and assign individual tasks to a particular core. For more technical details about big.LITTLE implementations, you can read my previous post.

ARM and Samsung recently uploaded a video providing an overview of big.LITTLE (but instead of IKS and HMP, it’s called “Cluster Migration Mode” and “Full MP”), and showing an interesting demo (2:44) running on TC2 development platform (2x A15, 3x A7, no GPU) that shows the load all five cores, power consumption on the big cluster and LITTLE cluster, which all vary depending on the tasks. This demo runs in Linaro Android with HMP/Full MP implementation, and the software showing the load and power consumption must be ARM Development Studio 5 (DS5).

Digg This
Reddit This
Stumble Now!
Buzz This
Vote on DZone
Share on Facebook
Bookmark this on Delicious
Kick It on DotNetKicks.com
Shout it
Share on LinkedIn
Bookmark this on Technorati
Post on Twitter

Debugging Embedded Linux (Kernel) Power Management – ELCE 2012

January 17th, 2013 No comments

Tero Kristo, Linux kernel developer at Texas Instruments, explains how to debug power management in Embedded Linux at ELCE 2012.

Abstract:

The presentation will talk about debugging various problems a kernel developer can face when working with power management. These include hardware related issues (IC / HW layout bugs, bad documentation) and software related (kernel bugs, driver problems, adding new kernel features, bad userspace behavior.) Along with presenting some of these problems, I will discuss about ways to debug these… power management typically requires specific tools to be used. I will base the discussion on my first hand experience from working with Linux PM. Target audience is (kernel) software developers interested in power management.

Linux Power Management Architecture

Linux Power Management Architecture

The presentation is divided into 3 sections:

  • Debugging tools / methods for PM
    • Disabling kernel features
    • Stress testing
    • Tracing (printk / low level UART)
    • GPIO / LED trace
    • Debugger
    • Buffered traces / statistics with trace-cmd & kernelshark
  • Kernel power management features
    • Suspend – echo mem > /sys/power/state
    • Cpuidle – Debug info available at /sys/devices/system/cpu/*/cpuidle/*
    • Regulators – Userspace API available at /sys/class/regulator
    • Clock framework – Userspace interface: /sys/kernel/debug/clk/*
    • Cpufreq – Debug info in /sys/devices/system/cpu/*/cpufreq/*, /sys/class/regulator/* and /sys/kernel/debug/clk/
    • Devfreq
  • Typical power management problems / bugs
    • Bootloader madness insanity
    • Device crash
    • Device malfunction
    • Increased power consumption – Can be kernel, hardware or userspace issues

You can  download the slides for this presentation, and you may also want to have a look at Powertop & Powerdebug for Linux power management debugging.

Digg This
Reddit This
Stumble Now!
Buzz This
Vote on DZone
Share on Facebook
Bookmark this on Delicious
Kick It on DotNetKicks.com
Shout it
Share on LinkedIn
Bookmark this on Technorati
Post on Twitter

PowerUSB Computer Controlled Power Strips Review

January 6th, 2013 5 comments

PowerUSB power strips are four outlets power strips designed to help users save power by better understanding their devices power consumption, and automatizing tasks such as power on/off using timers, printer on/off controls, and more. One outlet is always on (for the main computer) and the 3 remaining outlets can be controlled via USB and the control software installed in a Linux, Mac or Windows x86 machine. The three of the four outlets are controlled through the software.  Those power strips should allow lower electricity bills, and cover the cost of the strips ($69 to $129) within a few months.

There are 4 models:

  • PowerUSB Basic - $69.99 – The simplest model. You can control the 3 programmable outlets with on/off timers and keyboard shortcuts.
  • PowerUSB Digital IO – $109.99This version adds 5 digital input/output lines for instrumentation and automation. The current model has 3 inputs and 2 outputs with external opto-isolation board supplied with option of 5V or 12V or 24V. The future model will have integrated opto-isolation board with 5 inputs and 4 outputs.
  • PowerUSB Watchdog – $89.99 -  With the Watchdog version, PowerUSB can be configured to ping computers connected to the 3 programmable outlets, and if ping fails after several times, it consider the computer hung, and turn off/turn on the power to reset the machine. Of course, this only works for device which does not require the user to press the ON button.
  • PowerUSB Smart – $89.99 -  Like the other models, it can be programmed via USB, but then it can be used without computer. A button on the power strip allow you to cycle between timer on-off mode, 2 smart modes, and always on mode. The smart mode will automatically turn off or on all devices once the device connected to the always on plug is turned off or on.

PowerUSB (also the name of the company) sent me the Basic and Smart models for review. Since I’ve received the Smart model about 10 days earlier than the Basic model, the review will focus on the Smart model, and I’ve used the Basic model for the dreaded “wife test” including automatic printer on/off.

You’ll receive your power strip in the package below that gives a summary of the 4 types of power strips manufactured by the company.

I’ve also taken a picture of the content with PowerUSB Smart power strip, a USB to miniUSB cable, a CDROM and 4 universal power adapters since all PowerUSB power strip comes with US outlets.

PowerUSB basic looks exactly the same, except there is no LCD, and they did not include the 4 adapters.

Let’s have a closer at the PowerUSB Smart power strip. You’ll get an On/Reset switch, the 4 outlets with proper marking to identity the always on always, and outlet 1, 2 and 3, an LCD screen, and 3 LEDs showing where the outlet is turned on or not. On the side of the power strip, we just have the miniUSB connector and the user button to cycle between the different modes.

Top and Side of PowerUSB Smart LCD (Click to Enlarge)

The first thing to do is to connect your devices to the plug. A typical setup and outlet characteristics are as follows:

  • Always On – Computer
  • Outlet 1 – Modem. Max 4A (2A continuous). No Leakage current.
  • Outlet 2 – Monitor. Max 16A (4A continuous). Leakage current of up to 3VAC due to snubber circuit.
  • Outlet 3 – Printer. Max 16A (4A continuous). Light Leakage current of up to 0.2VAC.

Then you’ll have to do is to install PowerUSB software from the USB, or better IMHO, from the download section, although you’ll need to request a password first. There are 4 files for download:

  • Application Files (ApplicationFiles.zip) – Contains the user manuals for the 4 models and the Windows software.
  • Developer Files (DeveloperFiles.zip) – API documentation, C++/C# code and dll files for Windows.
  • Linux Files (Linux.zip) – GUI and command line executables for Linux, C++ source code and 32-bit and 64-bit x86 libraries. (So It won’t run on ARM).
  • Mac Files (Mac.zip) – Binaries for GUI and command line applications, C+ source code for command line.

Let’s install the Windows software first, but running Setup.exe. Everything is pretty straightforward so I won’t go into details for the installation. You’ll have a small green leaf icon the taskbar to pop-up the configuration window.
powerUSB Software
The very first thing I’ve noticed, is that you can control each outlet power with shortcuts such as Ctrl+Shift+B. I’ve tried and it works, very neat. The rest of the windows shows power consumption, accumulated cost and kWh, and status of the power strip. The current is also shown in mA on the bottom left of the LCD screen of the power strip, so you can still see the power consumption as you turn on/off devices such as monitors. I would really have prefer it to be displayed in Watt instead, as it seems weird (to me) to show power consumption in mA.

Powerusb Smart LCD Display

Left to Right:
Row 1 – Day of the week, Time (am/pm mode only) and Mode.
Row 2 – Power consumption in mA, Cost in $ and TV on time for the day, or next timer on/off depending on selected mode.

I’ve just have the computer (Always On) and the monitor (Outlet 2) connected to the power strip, and you can save about 30 Watts with this power strip if you turn off the outlet 2 instead of setting the monitor to standby:

  • Computer + Monitor On – 1122 to 1224 mA (~260 Watts @ 220V)
  • Computer On + Monitor Standby – 748 to 884 mA (~180W @ 220V)
  • Computer On + Monitor Off (Ctrl+Shift+B) – 646 to 680 mA (~150W @ 220V)

Of course, you could just do the same with a normal power strip with individual On/Off switches, but this may not be quite as convenient depending on the location of the power strip.

I personally find the lack of customization of the LCD display disappointing. I prefer my dates to be displayed in 24h format, my power consumption in Watts, and my costs in Thai Baht. Those are minor, but when everything adds up it will eventually start to count in the final impression of the device.

Let’s carry on by selecting Advanced Options.

PowerUSB Advanced OptionsFor some reasons, you can’t select the default power update of the programmable outlet, which is a shame, as all outlet will turn on as you connect the power strip to the mains. So at each start of the computer, I have to press Ctrl+Shift+A and Ctrl+Shift+P to turn off the unused outlets. Another annoyance is that it will ask to synchronize the time between the computer and the power strip each time I start my computer. One possible reason for those issues  is that I completely disconnect the power strip at night, and there’s no RTC in the power strip.

You can also change some power options such as Voltage (default 110V),  price per unit (I pay around 4Baht per unit), smart mode trigger mode (threshold in mA to decide whether the device on Always On outlet is on or off) and Off delay in seconds. Changing the settings here will show the correct information in the Windows software, but the power strip LCD display will show different information. You can also reset the cumulative power reset.

Finally, there’s a section to automatically reset computer on outlets 1 and/or 2 if pinging to pwrusb.com or another url fails. I haven’t tried this last feature, but the purpose is to reset your modem/router if it can’t connect to the internet.

The SMART mode window does not server many purpose for now (Update: It seems it may be used to enable SMART mode), and you can only monitor the TV on time for the past 7 days. Other options are disabled for now.

PowerUSB SMART OptionsThe only problem, unless I have missed a very important news and Saturdays have now been extended to last at least 115 hours, is that this feature simply does not work for now.

Finally, one the most interesting feature are the schedules on/off timer, that may help companies to turn off devices at a specified times. This could be useful  for retailers with digital signage players, that want those to operate during opening hours. You can select different times on week-days and week-ends. Each outlet can be programmed independently, and you can set on/off timers, or set an on/off frequency (e.g. for Xmas lights).

PowerUSB Timed On-Off

Yet again I failed to make this feature work after several attempts, and setting the plug to TIMED with the user button. I’ve set specific On/Off times on Outlet 1 (15:30:00 to 15:45:00 on), with Outlet 2 schedules to be turned on all today, & Outlet 3 set to be always off, and pressed OK at around 15:40. At this point, everything works correctly (O1:On, O2 On, O3: Off). But then at 15:45, nothing happened, and at 15:49 all Outlets were turned off. So for some reasons, none of the feature using date/time are working for me, I wonder if this could be related to my regional settings and/or 24h format in Windows XP. It got worse once I disabled the timers (Set all times to 00:00:00), and reverted to SMART mode via the user button, as when I pressed Ctrl+Shift+B to turn on the monitor, it would just turn on automatically after about a minute for no reason. It’s now working, after I clicked on Smart on OK in the Windows software. It looks like the power strip does not update its status to the computer.

On top of all the problems mentioned above, I would have really liked the software to be able to display historical and live power consumption, since this product is intended to help users better understand their power usage. The good thing is that you could still do this yourself either using a script calling pwrusbcmd / pwrusbcmd.exe command line utility, either by writing a program with the provided API. Before receiving the power strips, I thought I could do power measurement like the Kill A Watt, but there’s only one ammeter for the whole strip, the resolution is 10mA, and I’ve been told it’s better to call the API every 4 to 5 seconds, so you can only do rough measurements with PowerUSB power strips. But that’s OK, since this is not exactly what the product is meant to do.

At now the wife test… So I setup my wife’s home office with PowerUSB Basic, connected the printer to Outlet 3 and the monitor to Outlet 2, and installed the software in her Windows 7 laptop. The main thing I wanted to test was the printer, since this power strip can automatically power on the printer when you print, and turn off the printer automatically after 10 minutes of inactivity. It worked just fine. This is a multifunction printer so it’s not ideal with PowerUSB, because if you want to use in Standalone mode (scan + print), you may have turn on the computer first to turn on the Outlet. However, the following day, my wife tried and it did not work. I wanted to check the settings, but PowerUSB icon would just not show up, even after I set Windows 7 to always display the icon. I told my wife she could always press Ctrl+Shift+P to turn On/Off the outlet for the printer/scanner, but she did not understand why she would have to do that, and said a “plug” should just work, no need to press buttons. So she ended up connecting a tiny 2 outlets adapter on top on the Always On outlet… Women…

Initially, I was pretty excited about this product, but the more I used it the more I became disappointed. I could be unlucky and have a unit with an old firmware, or I may not have followed the right procedures for each test, but the whole experience makes PowerUSB power strips look like products in beta phase. However, most of the issues should be (easily) fixed by firmware and/or software updates, and I sincerely hope the product can be improved.

Having said that, I will keep using PowerUSB Smart power strip, as for the parts that work (SMART function, and shortcuts to control outlets) the product is just great, and I estimate it will save me about 4 kWh per month by allowing me to completely turn off my monitor, instead of setting it to standby.

Update: Picture of PCB with Zetler relays.

PowerUSB Board (Click to Enlarge)

PowerUSB Board (Click to Enlarge)

Digg This
Reddit This
Stumble Now!
Buzz This
Vote on DZone
Share on Facebook
Bookmark this on Delicious
Kick It on DotNetKicks.com
Shout it
Share on LinkedIn
Bookmark this on Technorati
Post on Twitter
Categories: Hardware Tags: Linux, power, powerusb, review, windows

SoC Power Measurement with ARM Energy Probes and Linux EAP Tools

November 29th, 2012 No comments

Andy Green, TI Landing Team lead at Linaro,  gave an interesting presentation entitled “How to measure SoC power” at Linaro Connect Europe 2012. This talk was specifically aimed at software engineers, so that they know how to properly measure power consumption, and take actions to optimize the software to decrease it.

In the first part of the presentation, he gives an overview of electronics basics with definition of voltage, load, current and power, units used for power measurements (Clue: you need to use Watts), and how voltage, current and power can be measured with voltmeters and ammeters. When you want to measure power in a rail, you would usually insert a shun resistor, use a multimeter and derive the power from the resistance and the measured voltage (P=V2/R). He also gives details about regulator efficiency, choosing measurement sampling…

There are 4 common measurements strategies:

  • DC IN – Easiest way, gives the complete board consumption, but you cannot see exactly which parts of the board consume power
  • Indirect output-side regulator measurements – Measure at the regulator level
  • Shunts on all SoC rails – Useful to measure SoC power
  • Shunts on all board assets – Most ideal scenario, shunts on all power consumption in exact detail, using many channels. Samsung Origen board is particularly suited to this measurement strategy as the board breaks power tree into 14 shunts.

ARM Energy Probe (AEP) Hardware

The ARM Energy Probe (AEP) allows you to measure power via up to 3 channels composed of 2 voltmeters each. The channels appear as ttyACM serial ports in Linux. The green cable below is used for grounding.

ARM Energy Probe

This is the probe used at Linaro for power measurement, and Andy explains in details how to add 3 probes to the Pandaboard by soldering shunts at strategic locations on the board, headers for the probes, etc.. The final result looks like that:

You can get further information and/or a quote on ARM Energy Probe page. Documentation is available in ARM Information Center.

He then explains there can be variability in power measurement due to the weather temperature, measurement bandwidth (if you are really unlucky), differences between channels, low voltage (15mV) challenges, and more.

Power Measurement with Linux AEP App or AEPD + HTML5 User Interface

After going through electronics basics, power measurement methods, and having massively hacked your board to add probes, you can now take power measurement using AEP app, an open source command line tool for Linux or, possibly better, aepd daemon and seeing the result in an HTML5 page in your browser (Google Chrome or Chrome for Android).

Linux AEP app (arm-probe) gather measurements by synchronizes sampling across multiple energy probes, outputs ascii numbers in column format in a Gnuplot-friendly output, e.g.

Sample# volts amps watts

A better way is to capture the data via aepd daemon and transforms your web browser into a “power scope” as it updates data in real-time at 24 fps. The “power scope” is accessible via a local or remote network link.

AEPD “Power Scope” in Google Chrome

What makes it different from an oscilloscope, is that all samples can be recorded in to a file having basically an infinite data memory, and you can just see previous data by scrolling back in the browser. Other features include rail selection (so you only see one channel), instantaneous average, 2 sliders at the top of the window that allow to adjust the duration and power zoom, search function are more.

The source code for arm-probe, aep and libarmep is available on git://git.linaro.org/tools/arm-probe.git. This repo also contains a PDF presentation (arm-energy-probe-101.pdf) that gives further technical details about the ARM Energy Probe, and arm-probe command line  tool.

A recording of the presentation is available on Youtube (56 minutes with rather poor audio).

Digg This
Reddit This
Stumble Now!
Buzz This
Vote on DZone
Share on Facebook
Bookmark this on Delicious
Kick It on DotNetKicks.com
Shout it
Share on LinkedIn
Bookmark this on Technorati
Post on Twitter

Comparing Power Saving Techniques For Multicore ARM Platforms – ELC 2012

February 27th, 2012 No comments

Vincent Guittot, ST Ericsson and Linaro, compares power saving techniques for multicore ARM plaforms at Embedded Linux Conference 2012.

Abstract:

CPU hotplug is used on ARM platform as a power management feature for aggressive low power use cases. It has not been initially designed for that purpose, which implies some constraints on its use but the same power consumption level can’t be reached with the scheduler load balance and/or additional features like cpuset up to now. This presentation will discuss how CPU hotplug matches the low power use case requirements and how we can get closer to this behavior with sched_mc. Then we will also show what prevents the scheduler to reach the same power consumption level as CPU hotplug and how we can solve some of these issues. This presentation is aimed at anybody who is interested to understand why ARM platforms still use CPU hotplug and what should be done to replace CPU hotplug by a load balance decision.

You can also download the presentation slides on elinux.org.

Digg This
Reddit This
Stumble Now!
Buzz This
Vote on DZone
Share on Facebook
Bookmark this on Delicious
Kick It on DotNetKicks.com
Shout it
Share on LinkedIn
Bookmark this on Technorati
Post on Twitter

Accurate Time Keeping in Embedded Systems

November 1st, 2010 No comments

In many embedded systems, there is a need to keep accurate time/date. This is often performed using an RTC (Real-Time Clock). However,  uncalibrated RTC are not that accurate. For example, ST Microelectronics M41T94 RTC datasheet explains that:

Uncalibrated clock accuracy will not exceed ±35 ppm (parts per million)
oscillator frequency error at 25°C, which equates to about ±1.53 minutes per month. .

In order to improve the accuracy, you’ll need to calibrate the crystal for each board at the factory using a frequency counter, that will greatly improve accuracy, for M41T94:

When the Calibration circuit is properly employed, accuracy improves to better than ±2 ppm at 25°C.

However, calibrating the crystal will further increase the manufacturing costs.

Another way to have a very accurate time keeping, is to use the power supply frequency (50 Hz/60 Hz) which is extremely accurate due to interoperability requirements between electricity providers.

Diagran shopwing Time Keeping Meachanism Using Mains Frequency

In the diagram above, you can see an overview of such system design based on 220V / 50 Hz mains.

The transformer will generate 5V AC @ 50Hz, then another circuit (in blue), will generate +5V DC to power all board components and a 5V / 50 HZ squared signal that is fed into a MCU  interrupt pin. While the board is running, the time is kept based on the 50Hz interrupt (or 60 Hz). 50Hz/60Hz detection might be required in your software if your device is to be used to several countries. If there is a power failure, the board will switch to battery power and keep the time using the crystal or ceramic oscillator (less accurate). With this system design, there is no need to perform crystal calibration at the factory and a RTC is not needed as time keeping is handled by the MCU. The MCU shoud obviously be a low power MCU that may be used to only control the power for a more powerful MPU.

The final choice of the best design depends on your own system requirements.

Digg This
Reddit This
Stumble Now!
Buzz This
Vote on DZone
Share on Facebook
Bookmark this on Delicious
Kick It on DotNetKicks.com
Shout it
Share on LinkedIn
Bookmark this on Technorati
Post on Twitter
Categories: Hardware Tags: power, rtc