Recently, we received a custom-made-to-order smart shade from SmartWings for review. We never heard about SmartWings before, but the company claims to have been in the smart blind/shade and home automation industry for over 15 years. Their standout feature is the high degree of customisation they offer—whether it’s the type of shade, custom size up to almost 3 meters in width and height, various fabric styles, and compatibility with major Smart Home platforms like Amazon Alexa, Google Home, Apple HomeKit, Samsung SmartThings, Home Assistant, and Hubitat.
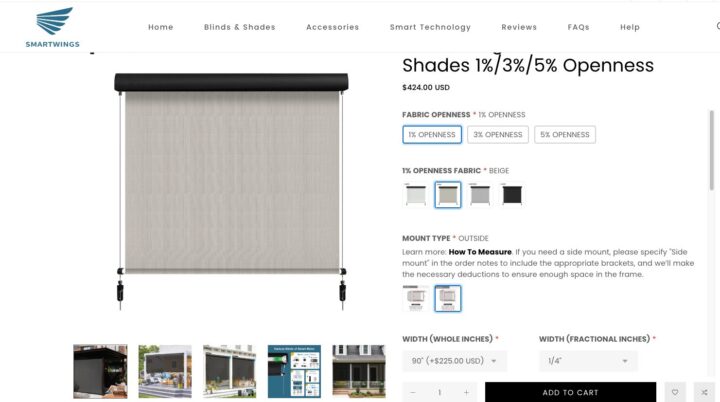
SmartWings asked us to select a location in the house where we wanted to review the smart shade. We wanted to review a solar-powered outdoor shade, so we selected a windowed door with direct sunlight. We carefully measured the dimensions following the instructions on the company’s website to understand the process. We had to select the shade type, privacy level of the fabric (openness), desired dimensions, motor types, and other options. Below is an example of a “Made to Order” configuration page.
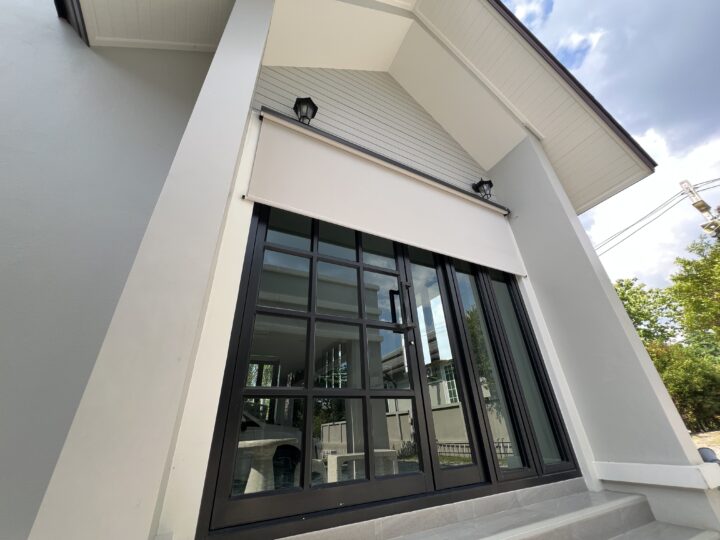
Two weeks later, we received the shade for testing. The model we selected was the following
- Outdoor Shade, as we intended to install it at the building’s entrance, where it gets strong afternoon sunlight. SmartWings offers up to 10 types of shades to choose from, including Roller, Cellular, Zebra, Woven Wood, Outdoor, Dual, Harmony Duo Plus Dual, Roman, Drapery, and Special Window — an impressively wide variety
- Fabric Openness 1% (which offers the highest privacy). The available openness levels are 1%, 3%, and 5%
- Beige colour. For 1% openness, the available colours are black, grey, beige, and white. While for 3% and 5%, there are more options: coffee, grey, dark grey, and dark gold
- Outdoor solar panel option because the installation area doesn’t have any power outlets. We wanted to test how much power it consumes, how quickly the battery charges, and of course, how long one battery charge lasts
- Compact remote control to operate and adjust the shade’s position and set the upper and lower limits
- Matter (over Thread) motor type, the newest technology on major smart home platforms. There are other motor options: Amazon Alexa, Zigbee, Z-Wave, Apple HomeKit, as well as the standard version (RF remote control)
- Right-hand side motor type with an outside mount type
As for the made-to-order configuration experience, honestly, it is easy. Typically, when buying shades, you need to visit a store or dealer, speak to a staff member, and have a professional install them. However, after going through this process, our perspective has changed, and we found it rather easy.
This review focuses on testing the shade with the smart home, not the general usage of the shade. We tested the shade with Home Assistant and Apple HomeKit platforms. Generally, if a product supports the Matter protocol, it can work with other Matter-compatible platforms such as Amazon Alexa, Google Home, or Samsung SmartThings.
SmartWings Smart Shade Unboxing
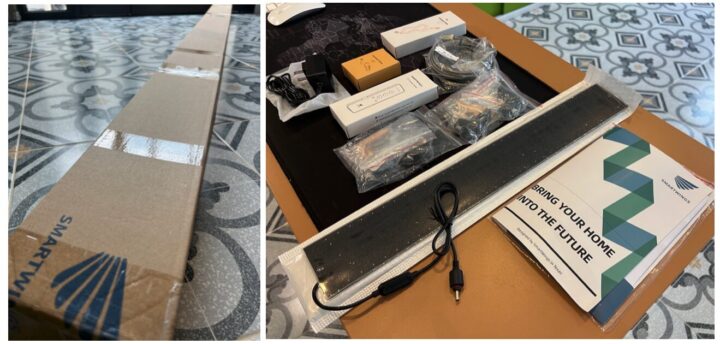
The package that arrived contained just one box, but it was very tightly packed, even though it was over two meters long. Inside the box were: the shade head rail track together with fabric, an installation and quick start guide, a Matter getting started guide, a remote programming guide, a power adapter, a battery charging cable, an extension cable for the solar panel, screws, wall plugs, mounting brackets (x4), remote control, shade wire guide set and a solar panel.
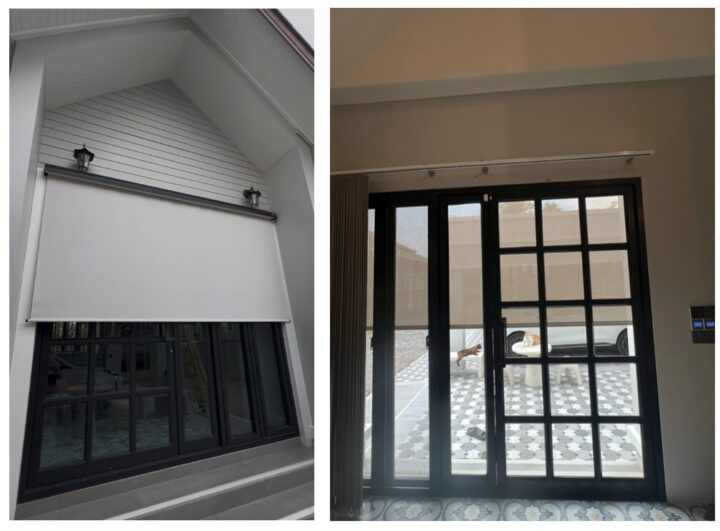
From what we could feel when touching their shade fabric, it is made with good-quality material and looks premium. The shade head rail track also feels sturdy. The image below shows the 1% openness from outside and inside the office.
Smart Wings outdoor smart shade specifications
Since SmartWings allows almost every aspect of the shade to be customized, it’s difficult for us to provide highly specific details. However, we contacted SmartWings to inquire about the battery and chip used in the motor. Here are the details:
- Motor Type: Matter over Thread
- Chip: Nordic Semiconductor nRF52840
- Battery Type: Lithium Battery
- Nominal Voltage: 8.4V
- Nominal Current: 0.4–0.7A
- Battery Capacity: 2,600mAh
- Standby Current: Less than 120µA
- Charging Cycles: Rechargeable
- Battery Life per Charge: 4–6 months (with one open/close cycle per day)
From our quick testing, we fully opened and closed the shade 6 times and observed the battery level drop from 95% to 92%—a 3% decrease. That is, if you open and close the shade once a day on a full charge, it could last for about 200 days, or approximately 6 months, which is in line with SmartWings’ claims. Given the size of the shade we tested, this shows the shade is quite energy-efficient, and charging the battery every 6 months (if you’re not using a solar panel) shouldn’t be a problem.
If you installed the shade to protect from sun exposure, the area gets at least some sunlight, and solar panel charging is a good option. Unfortunately, we couldn’t test it under optimal conditions due to cloudy then stormy weather. However, after testing the shade with its solar panel over a full week, we noted that the battery level rose from 57% during unboxing to 94%.
Shade and solar installation
To be honest, I had never installed a shade before, and this was the first one I did it on my own. The most important part is accurate physical measurement before you order. SmartWings has documentation to explain every step. I had no help at all during installation, and this was a one-man job. Luckily, the shade wasn’t too heavy, even though it was over two meters long. The fabric is lightweight but feels durable.
I spent quite a bit of time measuring the position for the brackets that would attach the shade to the wall. Four brackets were included (see photo below). Once installed, the shade felt sturdy, and since it could slide slightly side-to-side, fine-tuning afterward to fit the location was easy.
The installation involved drilling into the wall, inserting wall plugs, and screwing in the brackets. In order to avoid mistakes, so for each bracket, I used a bubble level tool to make sure all four were as aligned as much as possible.
When I finally lifted the shade into place, everything went smoothly. The mounting mechanism locked the shade securely. I adjusted the rail slightly left and right so that the bottom edge of the shade wouldn’t hit the decorative white trim below. Since the area where we installed it doesn’t get strong winds, I didn’t install the guide wires to prevent flapping.
After installation, we tested various functions, including measuring the motor noise during operation. Using a sound level meter app on my iPhone while standing within one meter of the motor, the noise level was around 40–50 decibels, which is quiet enough, roughly the same as normal conversation.
As for the solar panel used to charge the motor’s battery, I placed it on the concrete ledge, where it is well-hidden from view below, making the installation look clean and aesthetically pleasing. However, that location still receives direct sunlight, which seems to be a good balance between appearance and charging efficiency.
During the ordering process, we ordered an extension cable for the solar panel in case we had to install the solar panel farther, but with hindsight, it wasn’t necessary because the included cable was long enough.
The solar panel comes with 3M double-sided tape on the back, allowing it to be easily mounted to the desired surface without using any screws, as the panel is extremely lightweight.
Before moving on to configuring the shade with Smart Home integration, we wanted to talk about setting the Upper Limit and Lower Limit first, because each installation site is different, and users’ needs vary. You may need to adjust the points where the shade rolls up to the highest position (top) and where the shade is released to the lowest position (bottom).
We found that this adjustment cannot be done through any app and must be done only with the remote control. Therefore, we recommend purchasing a remote for this purpose, even though you might not use it as much as the app or automation features.
For example, during our actual test, we forgot to close the door before closing the shade, which caused the shade to get stuck on the door. This shifted the balance point and required re-adjustment, which could only be done via the remote.
At this point, the shade was successfully installed on the building. It wasn’t too difficult for someone who had never installed one before. Just one person and about one hour, and the shade was ready for the next step
The next step is installing the shade into the Smart Home system. Since the shade’s motor comes with a factory-charged battery, it is ready to use right away. At our installation site, there was no power outlet nearby. In fact, we intended to charge the battery with the solar panel for convenience during installation.
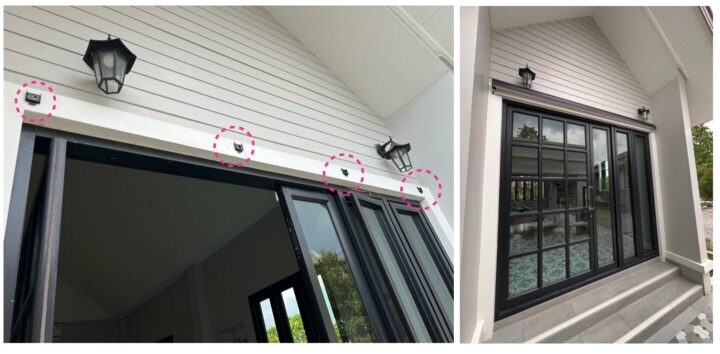
The motor we chose is located on the right side, and there are several wires around the motor area (see the photo above). The small black wire (antenna) is used to communicate with the remote control, which we believe works at 433 MHz RF. The white wire (antenna) is for 2.4 GHz communication via Matter. The large black wire connects to the solar panel, and the grey wire has a button for manual control. There is also a small button beside the red LED for factory reset.
The first step in installing with Smart Home is to wake up the shade. Before the company ships it out from the factory, they put the shade into sleep mode in order to prevent damage to the motor during transport. To exit sleep mode, press the grey button for about 2 seconds until the motor moves slightly and a red LED appears (as shown in the photo above). This indicates the motor is ready for use and has entered pairing mode, which we will discuss in the next section for each platform.
SmartWings Smart Shade Review with Home Assistant
We tested the SmartWings shade with the Home Assistant platform first, with the following setup:
- Home Assistant version 2025.4.4
- Thread and Matter Integration installed in Home Assistant
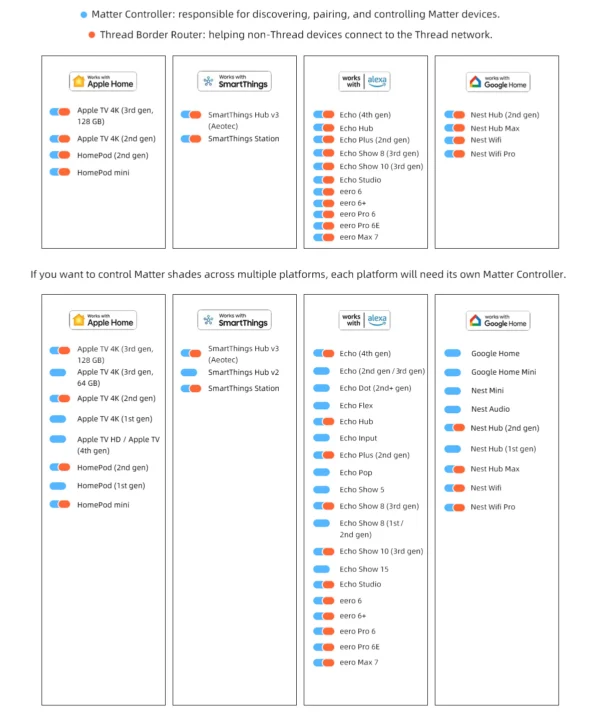
- A Thread Border Router was required because we selected a Matter over Thread motor. For this test, we used our Apple HomePod Mini as the Thread Border Router
SmartWings provides a list of compatible Thread Border Routers, as shown in the table below. You only need one Thread Border Router to create a Thread network (2.4GHz) between the shade and the Smart Home system. As for the Matter Controller, each smart home platform you use must have its own Matter Controller. If you plan to share the shade across multiple platforms, you’ll need more than one Matter Controller.
For example, we used two platforms for this review: Home Assistant and Apple Home. So, we had a Home Assistant server acting as the Matter Controller for Home Assistant, and a HomePod Mini acting as both the Matter Controller and Thread Border Router for Apple HomeKit
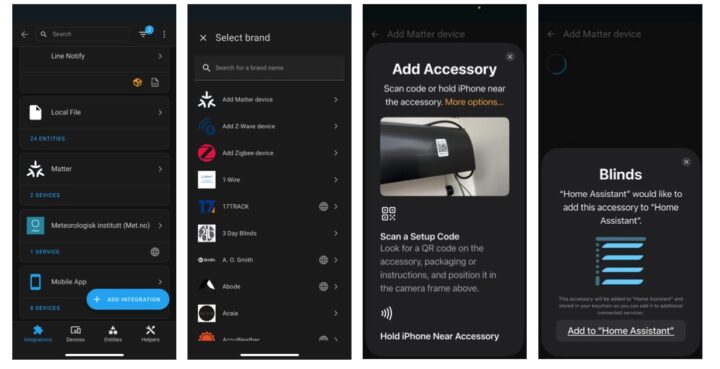
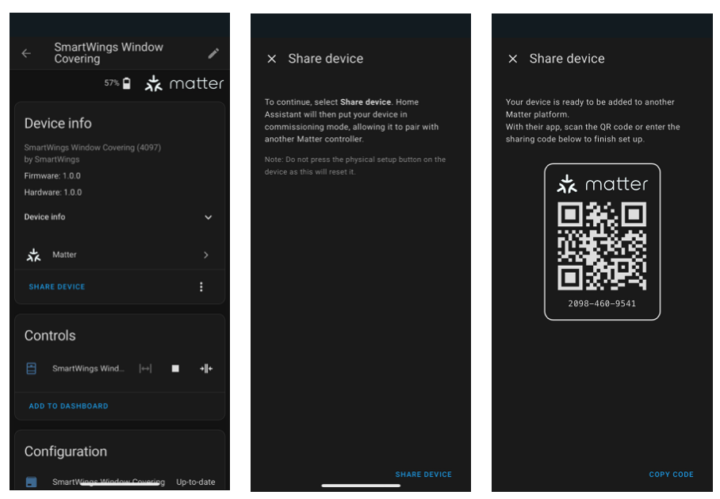
Since we selected the Matter version of the motor, adding the SmartWings shade to Home Assistant was done through the Matter Integration. Go to Settings > Devices & Services, then click Add Integration, followed by Add Matter device. Next, scan the QR code and follow the steps as shown in the image below.
As for Thread installation, if Home Assistant detects a Thread Border Router, the Thread Integration will appear automatically and be ready to use. In this test, it worked seamlessly with Matter
After the SmartWings shade was successfully added to Home Assistant, it was immediately ready for use. If we look at the info, we’ll see that the available entities include: control of the shade (open, close, stop), the motor battery voltage, and the battery percentage.
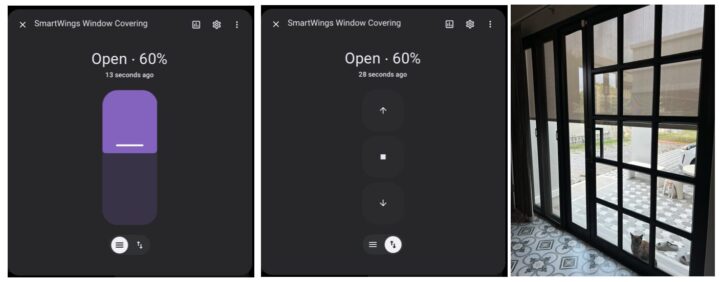
We tested controlling the shade via the Home Assistant mobile app, adjusting it to specific positions like 60%, as well as fully open and fully closed. Everything worked smoothly.
At this point, we feel that the installation and usage were much easier than expected.
Next is creating an automation to control the shade to operate automatically based on the conditions we want, so that it can be used to its fullest potential. In this case, we set up a simple trigger to test, using temperature and wind speed as the determining factors for opening or closing the shade.
We already have a wind speed sensor installed outside and an indoor temperature sensor (see image below), so we can leverage their data as conditions in the automation.
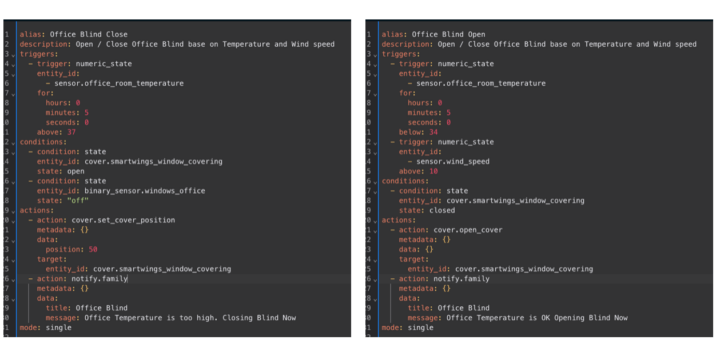
The image below shows an automation setup for opening and closing the shade automatically based on conditions from wind speed and temperature sensors:
If the indoor temperature exceeds 37°C for more than 5 minutes, the shade will close to a 50% position to help reduce the temperature, making the air conditioning system consume less energy.
If the indoor temperature drops below 34°C for more than 5 minutes, the shade will fully open. Alternatively, if wind speed exceeds 10 m/s, the shade will also fully open to prevent it from flapping and damaging the windows.
We could also add safety conditions for opening or closing, such as checking the status of a window/door sensor before closing the shade to ensure there are no obstructions. The shade does not come with built-in sensors to detect collisions or impacts, so we must set those conditions ourselves.
Additionally, we could set other conditions as desired, such as using sunrise and sunset times to control when the shade opens or closes, or scheduling specific time ranges to move the shade to a desired position.
The next step is to prepare SmartWings shade to work with the Apple HomeKit platform. We will not remove the device from Home Assistant, but instead, we’ll use the method of sharing the pairing code. In Matter, this is a common practice that allows us to control the SmartWings shade from multiple platforms simultaneously.
Using SmartWings Shade with Apple HomeKit
Before Apple HomeKit can control the SmartWings shade, we first need to retrieve the pairing code via Home Assistant, which was the first platform the SmartWings shade was added to. This is done by sharing the device and noting down the pairing code, as shown in the image below.
If you had initially added the SmartWings shade directly to Apple HomeKit as the first platform, then copying the pairing code step would not be necessary—just scanthe QR code on the shade to add it to Apple HomeKit.
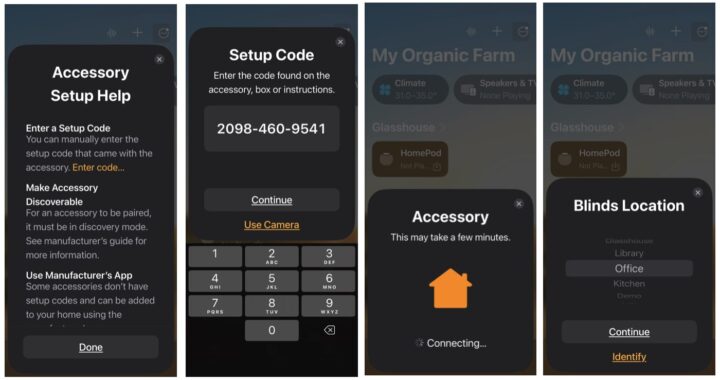
After noting down the pairing code, go to Apple HomeKit to add the accessory by following the steps below. Enter the pairing code during the setup process, then proceed with additional details such as the name and location.
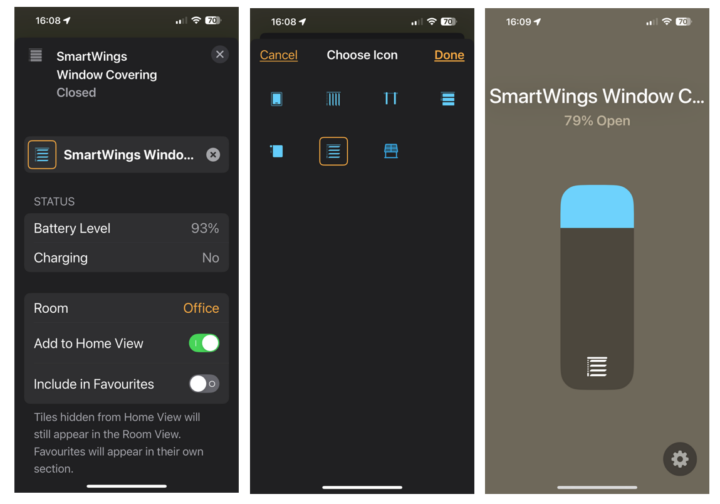
Adding the SmartWings shade to Apple HomeKit is just that simple, and it’s ready to use. We tested it manually by opening the shade to the desired position and customized the level of the shade to our liking, which works just the same as what we have done in Home Assistant
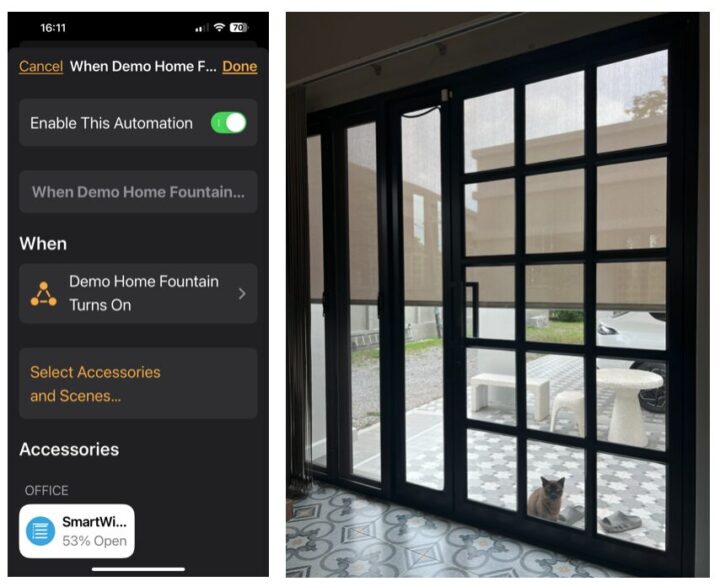
The next step was testing Automation in Apple HomeKit, similar to what we created in Home Assistant. We used the turning on or off of another device (a water fountain nearby) as the trigger to open the shade to a desired position. The result was the same as what we achieved in Home Assistant
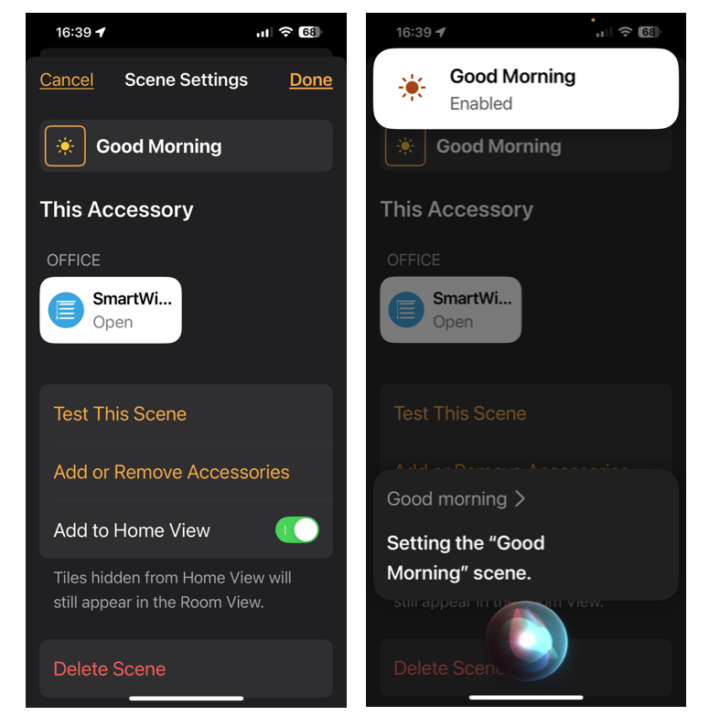
And finally, we created a Scene in HomeKit that allows us to control the shade via Siri using voice commands. For example, we included opening the shade in the morning, or we can simply say “Good Morning”, and it will operate according to the voice command, including triggering at sunrise as well
The status of the SmartWings shade shown in both Home Assistant and Apple HomeKit syncs with each other. Whether it’s the battery level, the position of the shade, or the open/close status. This is a key advantage of Matter, allowing the SmartWings shade to work with multiple devices across different platforms simultaneously. For example, a father might prefer using Apple HomeKit on iOS for its simplicity, while his son prefers Home Assistant for its depth and flexibility.
Summary
After about a week of testing for the review, we think the SmartWings device is an impressive smart shade from the quality of the shade itself to the ease of integration with various Smart Home platforms. We had a positive experience right from the beginning when ordering the shade to our very own requirements, and with a wide range of customization options for shades.
The materials are durable, the fabric looks beautiful, and even my wife complimented it. It operates quietly and is relatively easy to install, even by one person, in about one hour. The Smart Home integration allows users to select various platforms such as Apple HomeKit, Amazon Alexa, and others. The Matter-compatible motor used in the review makes it compatible with several platforms out of the box, and setup was easy and took less than two minutes.
We encountered only one issue during testing. The shade got stuck if there is an obstacle like a window, so we had to fine-tune the upper and lower limits, and this can only be done with the RF remote control. With this incident, we got a chance to deal with SmartWings Customer support over email, and it was quick, with the representative responding within one day and answering all our questions.
Downside? Slightly premium price, and the fact that there are many add-ons, which could increase the cost further. Considering it’s a shade that comes with smart technology and very well made in one package, it’s worth the money if you can afford it.
We’d like to thank SmartWings for sending us a solar-powered outdoor Smart shade for review. You can order one of their shades on their official website or Amazon for $199.99 and up. But the price varies a lot since it depends on the type of shade, fabric, size, solar panel, and other options based on your preferences.

Computer Engineering who previously worked with multinational IT company, rich experience in IT infrastructure, has a passion on Internet Of Thing i.e., Smart Home, Smart Farm as well as interested on Sustainability such as renewable energy, organic farming
Support CNX Software! Donate via cryptocurrencies, become a Patron on Patreon, or purchase goods on Amazon or Aliexpress


