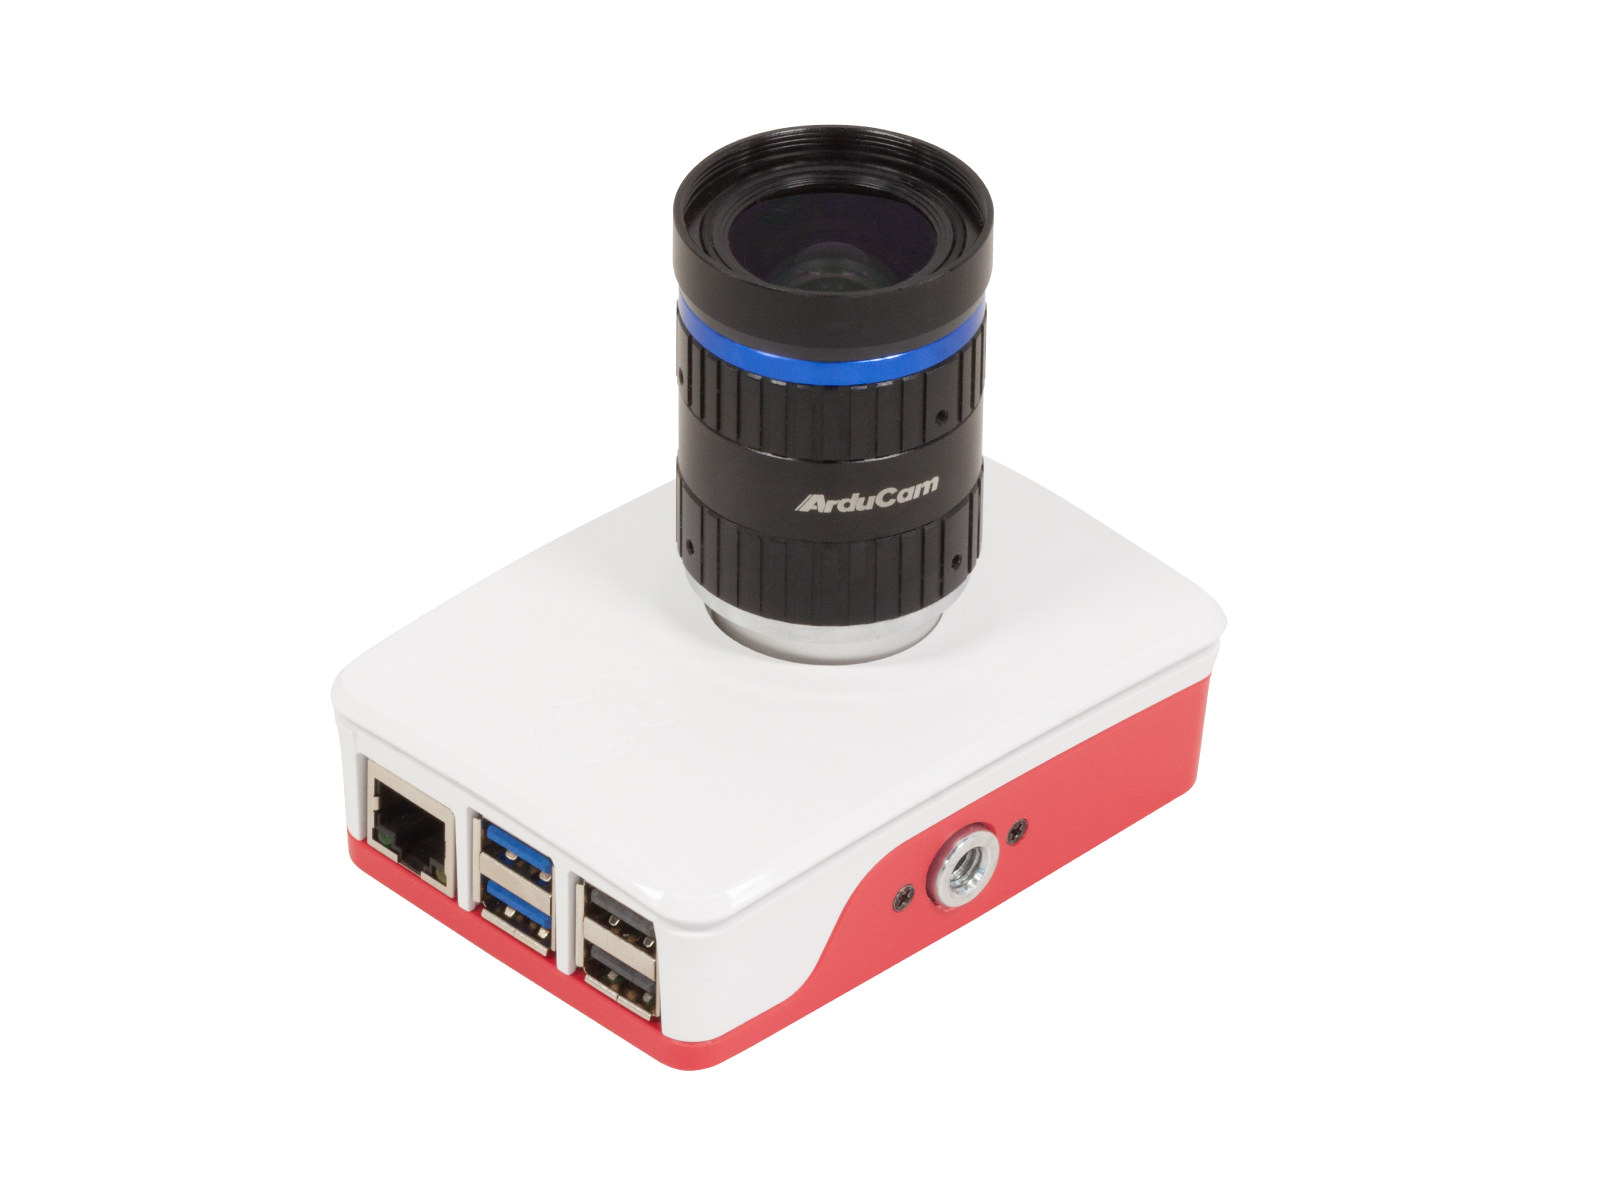
Archive

Posts Tagged ‘raspberry pi’

Raspberry Pi Camera Module Is Now Available, How-to Use It

May 15th, 2013 No comments

About one year after showing the first image from the camera module prototype, the Raspberry Pi Foundation announced the Camera board is now available for purchase on RS Component or Element14. Navigating either of these sites is a nightmare, but, if you’re lucky, you should eventually find the camera board for around $25 before taxes and shipping.

Raspberry_Pi_Camera_Module

“Raspicam” features the following hardware specifications:

  • Omnivision 5647 sensor in a fixed-focus module
  • 5MPixel sensor
  • Still picture resolution: 2592 x 1944
  • Max video resolution: 1080p
  • Max frame rate: 30fps
  • Size: 20 x 25 x 10mm
  • Connection by flat ribbon cable to 15-pin MIPI Camera Serial Interface (CSI) connector S5 on Raspberry Pi computer board

The first thing you’ll have to do with the camera is to connect it to the CSI connector on your Raspberry Pi, just behind the Ethernet connector on model B. James explains it very clearly in the video below.

]

Now that the camera is connected, you’ll need to update your Raspbian installation. Login to your pi, and run those commands:

sudo apt-get update
sudo apt-get upgrade

This may take a little while. After completion, run

sudo raspi-config

and enable the camera module, as shown below.
Raspberry Pi Camera Configuration

Save the settings, and reboot.

Two command lines applications called raspivid and raspstill are available respectively to capture video and still images.

Some example s:

  • Capture an image in jpeg format:
    raspistill -o image.jpg
  • Capture a 5s video in h264 format:
    raspivid -o video.h264
  • Capture a 10s video:
    raspivid -o video.h264 -t 10000

You can use the arrow keys to scroll, and type q to exit. Read here for further details.

It’s also possible to stream the Feed to a Linux, Mac OS X, or Windows computer:

  • Linux PC
    Install dependencies:

    sudo apt-get install mplayer netcat-openbsd

    and run the following command:

    nc -l 5001 | mplayer -fps 31 -cache 1024 -
  • Windows PC
    Download MPlayer and Netcat.
    Start a command promt, and type the following type:

    [Path to nc.exe]\nc.exe -L -p 5001 | [Path to mplayer.exe]\mplayer.exe -fps 31 -cache 1024 -
  • Mac OS X
    Download MPlayer.
    Run the following command in Terminal to view the feed using MPlayer:

    nc -l 5001 | mplayer -fps 31 -cache 1024 -

You may also want to view the feed directly from the Raspberry Pi:

mkfifo buffer
nc -p 5001 -l > buffer | /opt/vc/src/hello_pi/hello_video/hello_video.bin buffer

Raspicam source code is available on github.

Digg This
Reddit This
Stumble Now!
Buzz This
Vote on DZone
Share on Facebook
Bookmark this on Delicious
Kick It on DotNetKicks.com
Shout it
Share on LinkedIn
Bookmark this on Technorati
Post on Twitter

Coocox Embedded Pi is an STM32-Based MCU Board That Connects to Arduino Shields and Raspberry Pi

May 6th, 2013 2 comments

Embedded Pi is a platform capable of interfacing the Raspberry Pi with 3.3V and/or 5V Arduino shields, based on an 32-bit ARM Cortex M3 STMicro STM32 MCU. It can also be used in standalone mode as an Arduino compatible ARM MCU evaluation board.

Embedded Pi
Embedded Pi Hardware Specifications:
  • MCU – STMicro STM32F103RBT6 Cortex M3 @ 72MHz with 20KB SRAM and 128KB flash.
  • Raspberry Pi Connector with I2C, SPI, UART, PWM and GPIOs
  • Arduino Interfaces – 1x SPI, 1x I2C, 4x PWM, 1x UART, 6x Analog Input
  • Extended Interfaces – 1x SPI, 1x I2C, 1x UART with flow control, 2 pairs PWM, 6x Analog Input, and 1x CAN
  • 3 Power Sources – Micro USB port, external DC adapter, and 5V from the Raspberry Pi
Embedded Pi Block Diagram

Embedded Pi Block Diagram

Depending on the jumper placement on the Embedded Pi, you can select each of the three modes of operation:
  • STM32/Standalone Mode – The Embedded Pi works as an Arduino form factor compatible mother board where the STM32 controls the Arduino shields directly without the use of Raspberry Pi.
  • ST Adapter Mode – The STM32 controls the Arduino shields, and the Raspberry Pi works as the GUI or command line console to send commands/data to and receive data from the STM32.
  • Raspberry Pi Mode – The Embedded Pi works as a hardware connection bridge between Raspberry Pi and Arduino shields, allowing the Raspberry Pi to interface directly with existing Arduino shields.

Embedded_Pi_Usage

Development can optionally be done using Coocox development tools such as CoIDE that works with Windows XP SP3/Windows Vista, and Windows 7 computers.

Embedded Pi can be purchased for $34 on Newark/Element14 website. However, if you plan on using it with the Raspberry Pi and Arduino shields, this new board competes directly with the single board solution provided by UDOO boards, which costs only slightly more than an Raspberry Pi + Embedded Pi solution.

Further information is available on Coocox Embedded Pi page.

Via Micro4you Studio Facebook Page.

Digg This
Reddit This
Stumble Now!
Buzz This
Vote on DZone
Share on Facebook
Bookmark this on Delicious
Kick It on DotNetKicks.com
Shout it
Share on LinkedIn
Bookmark this on Technorati
Post on Twitter

DroneShield – Raspberry Pi Powered Drone Detector

May 2nd, 2013 1 comment

In case you are wary of having drones, such as RC helicopters, quadrotors…, flying around your house and invading your privacy, DroneShield can help you detect consumers’ drones by using a Raspberry Pi, a microphone and FFTW library, a C library for computing the discrete Fourier transform.

DroneShield

The device will capture the audio with the microphone, analyze the noise spectrum of the drone flying around, and search for an entry in a signature database, and if a match is found the device will then send an email or SMS to inform you of the “invader”.
DroneShield_Block_Diagram

There are complex challenges to overcome, or limitations, with this method, as any background noise will affect the detection, and drone emitting little noise or flying at high altitude won’t be detected. Spectrum analyses should however help avoid false positives such as a loanmowers and leafblowers as those emit a different kind of noise.They also need to gather more signatures to store in their database for this device to be more useful, and plan to rely on the community, but I haven’t found links and/or instructions to do so yet.

Currently, they have a working prototype (DroneShield V0.0) on a laptop, and they’ll port the code to the Raspberry Pi (DroneShield V1.0). FFTW library supports x86 SSE/SSE2/Altivec SIMD instructions, as well as NEON instructions on ARM, which are not available on the ARMv6 processor (Broadcom BCM2835) used in the Raspberry Pi. I don’t know the processing power required to do real-time FFT, but there could potentially be performance issues on the Raspberry Pi.

They give hints, but do not commit, that they may release the source code for V0.0 and V1.0, as well as the hardware documentation for V1.0 after the indiegogo campaign.

You can get a DroneShield fully assembled by pledging $69 on Indiegogo, alternatively you can pledge $59 to get a box with all parts needed, and do the assembly yourself. Delivery is expected in August 2013. This is very much an “American thing”, and there does not seem to be an option to ship this internationally.

The next step, DroneShield V2.0, will be to build a specialized hardware, possibly based on ARM Cortex processor, and at a cost close to $20.

Digg This
Reddit This
Stumble Now!
Buzz This
Vote on DZone
Share on Facebook
Bookmark this on Delicious
Kick It on DotNetKicks.com
Shout it
Share on LinkedIn
Bookmark this on Technorati
Post on Twitter

BeagleBone Black vs Raspberry Pi – Features and Price Comparison

April 25th, 2013 14 comments

The Beagleboard community officially announced the BeagleBone Black and its $45 price tag on the 22nd of April. Many blogs and news sites touted it as a Raspberry Pi killer, and R-Pi vs BBB fanboys fights ensued, and many articles with incorrect information or heavily biased were published. There’s however one decent BeagleBone Black vs Raspberry Pi comparison from a robotic point of view, so I’ll build from there with some corrections and additions. I’ll compare both the features and the price differential between the Raspberry Pi Model B and BeagleBone Black boards depending on use cases.

BeagleBone Black vs Raspberry Pi

BeagleBone Black vs Raspberry Pi – The Features

BeagleBone Black
Raspberry Pi Model B
Comment
Processor TI Sitara AM3359AZCZ100 Cortex A8 @ 1GHz

(will be changed to AM3358BZCZ100 in future versions)

Broadcom BCM2835 ARM11 @ 700 MHz
(Overclockable to 1GHz)
Even thoughboth processors can run at the same frequency (after overclocking the R-Pi), but Cortex A8 architecture is about 70% faster than ARM11 at the same frequency (2.0 DMIPS/MHz vs 1.2 DMIPS/MHz).

TI processor also supports NEON instructions.

GPU PowerVR SGX530 VideoCore IV I can’t find proper numbers to compare both GPUs, but  SGX530 is getting a bit old, and VideoCore 4 has been said to have excellent performance.
Video Decoder N/A VideoCore IV
1080p video decoding for H.264, MPEG2* and VC1*
1080p video encoding (H.264)* Extra license required
The BeagleBone Black should be able to play 480p/720p videos with NEON software decode depending on codecs, but if you plan to play 1080p videos, the Raspberry Pi is really the only option.
RAM 512 DDR3L @ 400 Mhz 512 MB SDRAM @ 400 Mhz Same amount of RAM and same frequency. The DDR3L used in the BeagleBone Black may consume less power (TBC).
Storage 2GB eMMC & micro SD card slot SD card slot eMMC will give a massive performance boost in Linux, at least compared to cheap SD cards. Class 10 SD card should have similar performance, but this will add to cost.
Ethernet 10/100M (Supported by SoC) 10/100M (USB to Ethernet chipset) Same specs, but the BeagleBone Black should deliver better throughput, especially if R-Pi is transferring data via its USB ports.
USB 1 client / 1 host port 2 host 2 host ports are convenient for plugging a USB mouse for keyboard, but the USB device on BBB is nice to have for debugging and file access. Difficult to select a winner here, as it really depends on what you do with the board.
Video micro HDMI (1280×1024 max) HDMI (1080p), Composite The Raspberry Pi has a standard HDMI port and composite output, whereas BBB has a microHDMI output with limited resolution.
Audio Via HDMI Via HDMI
Audio Jack
Both board can output audio via HDMI, and R-Pi also has a stereo audio jack, whereas you’ll need external hardware to output audio via I2S on BBB.
Peripherals SPI, I2C, SPI, CAN, Timers, LCD, MMC, Analog, 65 GPIO 12 –GPIO, USART, SPI, I2C (P1 and P5), CSI (camera serial interface) and DSI (display serial interface). BBB has much more I/O than R-Pi, so unless your needs are only limited to the pins available on R-Pi, BBB is the clear winner here.

R-Pi however features a CSI interface where you can connect a camera modules. [Update: There's also a 3.1MP camera cape for the Beaglebone]

Power USB 5V
DC Jack
210 to 460mA @ 5V
USB 5V
322ma @ idle. Rated at 700mA.
Difficult to comment on that one, but it looks like BBB may consume less than R-Pi. Again it’s highly dependent on your application.
Linux Support Any ARM Linux distribution.2 main OS supported: Ubuntu and Angstrom ARM Linux distributions supporting ARMv6.Two main OS supported: Debian and Arch Linux ARM You have more choices with BBB, and the latest work on ARM is done by Linaro teams who mainly work with Ubuntu, so if you like to try new things out, BBB is the way to go. But if you don’t care about this, then Debian in R-PI is just fine.
Android Support Android Jelly Bean (Stable version) Android 4.0.3 (work in progress, and no download available)
Some CyanoGenMod builds are also available but just too slow to be usable.
That’s one is easy. BBB support a stable release of Android, and there’s no working Android release for R-Pi
Community Active and largish community, and it appears most of them have a technical background. Very large and active community with participants with different technical levels (most R-Pi owners appear to be beginner, but there are also members with excellent technical levels) No comments :)
Documentation, source code and hardware files. Full software and hardware documentation is available including reference manual, schematics, gerbers files, BoM, etc. Bootloader and Linux kernel are available.The only closed source part is related to PowerVR SGX530 which is only required if your application uses the GPU.Texas Instruments has a team of engineers working on the project. Documentation is available via eLinux RPI Wiki. The schematics are available in PDF format only, and, AFAIK, the PCB layout and gerber files are not available.VideoCore 4 GPU is the only part that’s not open, but thanks to the SoC architecture and a small communication lib, it’s possible to use the GPU drivers with any OS. The GPU binary blob is required to boot the board.Most (all?) of the technical work is done by volunteers. -

The Beaglebone Black has the fastest processor, more I/O, an internal flash, support both Android and Linux, including Ubuntu, but lacks the video decoding and encoding capabilities of the Raspberry Pi, does not have camera interface (a USB cam could be used though), HDMI resolution is limited to 1280×1024 maximum, and composite output is not available. So if your project requires HD video playback, a HD camera, high resolution display via HDMI, or uses an old CRT TV, the Raspberry Pi is a better option, but for other use cases, the BeagleBone Black should be the best solution. Teaching materials should be better for the Raspberry Pi, since it is its purpose, and the BeagleBone Black is  geared toward hardware hacking. Both projects have an active community, I’d say it’s a tie for online support.

Both boards also support expansion boards to add functionalities, but I won’t address this here, as there are just too many options, and this would be another blog post in itself.

Raspberry Pi vs BeagleBone Price – The Price

You can’t really compare the cost of the boards directly ($35 vs $45), as you have to think about the total cost of ownership depending on what you plan to do with the boards. Shipping may be an important part of the cost, but Element14/Newark, the only company which sells both board, did not provide shipping costs when I tried to order a board for the White House… So I’ll assume the shipping costs are the same for the Raspberry Pi and the BeagleBone Black. If this is incorrect, please let me know in the comment section.

I’ll compare 2 configurations:

  • Minimum – Just what you need to boot.
  • Desktop – Board connected to a USB keyboard and mouse,  HDMI monitor, and network.

The minimum configuration requires the board, a  power supply, and a bootable storage device. Even though you could just boot using a USB cable (included with BBB, not R-Pi) connected with your computer, I added a power supply. The BBB has an internal flash, so it does not need an external SD card. I provided pricing both for 4GB class 4 SD card (minimum costs), and 4GB Class 10 SD card (performance equivalent to eMMC) for the Raspberry Pi. Prices are in US dollars.

  BeagleBone Black Raspberry Pi
4GB Class 4 SD Card
Raspberry Pi
4GB Class 10 SD Card
Board 45 35 35
Power Supply 2.50 2.5 2.5
Boot device 0 5.50 11.50
Total 47.50 43 49

With this setup the $35 Raspberry Pi board can even be more expensive than the $45 BeagleBone Black thanks to the internal 2GB eMMC, but the total costs remain very similar between the 2 boards.

I agree that it may not the most useful or common setup for these types of board, but the desktop configuration is easy to compare. You need the board, a power supply, a USB keyboard and mouse, an HDMI TV, an HDMI cable, and an Ethernet cable. I’ll assume you already have (space) USB keyboard and mouse, HDMI cable, Ethernet cable, and HDMI TV, and keep those out from the cost. With the Raspberry Pi you can use your existing accessories, just insert the SD card, connect the power and you’re done. The BeagleBone Black has a micro HDMI port, so you’ll need a an adapter for your HDMI cable, and it only has one USB host port, so a USB hub is required to connect the keyboard and mouse.

BeagleBone Black Raspberry Pi
Board 45 35
Power Supply 2.50 2.50
Boot Storage 0 11.50
micro HDMI to HDMI adapter 3.50 0
USB Hub 3.50 0
Total 54.50 49

I used the class 10 SD card with the R-Pi because this is needed to get decent performance with a desktop environment. It’s possible to run Linux Desktop with the 2GB eMMC in the BeagleBone Black, but I reckon storage space will be tight. You may have to add an SD card, use cloud storage, or an external USB drive. In the setup above, the Raspberry Pi is $6 cheaper than the BeagleBone Black.

With those 2 examples, you can see the price between the Raspberry Pi and BeagleBone Black can even be closer than advertised, so personally, I would just forget about the price If I had to chose between the 2 boards, and focus on the features. If you just want to run XBMC, BBB is useless, so go with Raspberry Pi. You have an hardware project with lots of sensors and motors to control, just go with the BeagleBone Black. You are an educator wanting to teach some programming skills to your pupils, go with R-Pi and its education materials. You want to tinker with the latest ARM development, play around with Android, Linux, go with BBB. And so on.

I’ve seen a project where it’s not BeagleBone OR Raspberry Pi, it’s BeagleBone AND Raspberry Pi, respectively for sensors & motors control, and video playback. So at the end of the day, there’s not a board that’s better than the other one, the best board is just the one that best matches your particular needs.

Digg This
Reddit This
Stumble Now!
Buzz This
Vote on DZone
Share on Facebook
Bookmark this on Delicious
Kick It on DotNetKicks.com
Shout it
Share on LinkedIn
Bookmark this on Technorati
Post on Twitter

UDOO Single Board Computer Features Freescale i.MX6 Dual/Quad and Atmel SAM3 MCU

April 12th, 2013 8 comments

Have you ever dreamed of a single board with the power of 4 Raspberry Pi and Arduino Due functionality? This dream should soon become reality thanks to UDOO single board computer. This open source hardware board is powered by Freescale i.MX6 Dual or Quad with 1GB RAM, as well as Atmel SAM3 Cortex M3 MCU that provides access to Arduino compatible headers.

UDOO_Board

Here are the specifications of the board:

  • SoC – Freescale i.MX6 ARM Cortex-A9 CPU Dual/Quad Core @ 1GHz + Vivante GPU
  • MCU – Atmel SAM3X8E ARM Cortex-M3 (same as Arduino Due)
  • System Memory – 1GB DDR3
  • Storage – micro SD (boot device) + SATA (i.MX6 Quad only)
  • Video Output – HDMI and LVDS + Touch (I2C signals)
  • Audio I/O – Analog Audio and Mic
  • Expansion Headers – 54 Digital I/O + Analog Input (Arduino-compatible R3 1.0 pinout)
  • Connectivity
    • Ethernet RJ45 (10/100/1000 MBit)
    • WiFi Module
  • USB – mini USB and mini USB OTG,  2x USB type A (x2) and USB connector (requires a specific wire)
  • Camera connection
  • Power Supply – 12V power adapter and external battery connector
  • Dimensions – 11 cm x 8.5 cm

The UDOO board will run Android 4.0 ICS and Ubuntu Linaro 11.10 initially. The Kicksrtarte video below gives and overview of the board, and showcases 6 use cases: educational kit, digital signage with RFID reader, games using sensors, automation, Android hacking with Arduino motor shield (Google ADK 2012), and digital urban furniture.

Seco, an Italian embedded systems company, is a partner of the project, and I’ve written about Seco‘s products several times before, so I’m pretty sure any technical and manufacturing challenges will be resolved. They are also building a community around the board involving some universities (Carnegie Mellon, USA; University of California San Diego, USA; Aarhus University, DK; Siena, IT; OCADU Toronto; CA) before opening up to the rest of the world. The schematics, documentation, education materials, etc.. will eventually be available on udoo.org.

The UDOO board is on Kickstarter, and they have already reached the $27,000 US funding target of their campaign.  You can get an UDOO board for as low as $99 and up to $169 depending on the options you select. Most pledged have gone to the $99 version with Freescale i.MX6 dual with Ethernet and Wi-Fi, but the one I really find interesting is the $129 pledge with Freescale i.MX6 Quad, as you get 1GBe, Wi-Fi, SATA, and Arduino compatible MCU and header. If you prefer received the board with a 12V power adapter, an HDMI cable, and 2 SD card preloaded with Android and Ubuntu, it will cost you $169. Design is almost complete and the boards should start to ship in September 2013. If you live outside the US, you’ll have to add $15 for shipping.

Thanks to Teji and renw0rp for the tip.

Digg This
Reddit This
Stumble Now!
Buzz This
Vote on DZone
Share on Facebook
Bookmark this on Delicious
Kick It on DotNetKicks.com
Shout it
Share on LinkedIn
Bookmark this on Technorati
Post on Twitter

Design West Summit – 23-25 April 2013

April 9th, 2013 No comments

design_west_2013Design West 2013, previously known as the Embedded Systems Confertence, will take place later this month, on 23-25 April to be exact, at San Jose McEnery Convention Center in San Jose, California, US. The event will be divided into 22 tracks dealing with software development, hardware design, operating systems, security and more:

  • Android Certificate Program – Two-day hands-on embedded android workshop.
  • Black Hat Summit – The Black Hat Embedded Security Summit will provide electronics professionals with essential information and tools, as well as a forum for the discussion and evaluation of the latest solutions for securing their embedded systems. Training courses will focus on topics such as Network Security, Incident Response, Web Application Security, and Exploit Development.
  • Connectivity and Networking – The Connectivity and Networking track educates design engineers on wired and wireless communications, spanning need-to-know topics from essentials of USB device development to antenna and RF system design.
  • Debugging and Test – This track features a mix of lectures focusing on useful insights on troubleshooting real world embedded software, and tips and tricks with highly practical takeaways that embedded systems designers can apply immediately.
  • Embedded Android – This track covers the tradeoffs of Android versus Linux in a real-world case study, teaches engineers how to streamline Android implementation on embedded systems, and provides information on how to apply USB technology and provide connectivity to various configurations of Android platforms.
  • Hardware: Design, I/O, and Interfacing – This track examines how to ameliorate the challenges associated with design element such as the interface between hardware and firmware; synchronizing I/O, integrating embedded vision and motion control, and leveraging existing sensor drivers.
  • Internet of Things – This track covers some of the specific challenges and opportunities for embedded designers, including today’s fragmented sensor and device market, the move from IPv4 to IPv6, and the return to resource-constrained embedded systems.
  • Linux Kernel and Operating Systems – The Linux Kernel and Operating Systems Track focuses on the kernel itself, and the operating system and programs running above it. Sessions cover best practices for engineers to leverage the use of open source software within embedded systems while avoiding common pitfalls, plus a session showing how Linux, though not a real time kernel, is likely good enough for your application.
  • Low-Power Design – The Low-Power Design track covers the latest techniques to conserve power at the system; architectural and component level as well as the advantages and trade-offs of different power optimization techniques.
  • Processors and Programmable Devices – The Processors and Programmable Devices track focuses on embedded systems that feature the use of processors (MPUs, MCUs, DSPs) and/or programmable devices (FPGAs, Programmable SoCs).
  • Programming – The Programming track focuses on embedded system programming languages, tools and techniques. Sessions provide practical tips and tricks and actionable information that developers can apply immediately to their code.
  • Prototyping – The Prototyping track focuses on the science and art of rapidly creating embedded systems for proof of concepts, demonstrations and iterative product developments.
  • Real Time Operating Systems – This track focuses on delivering real-time performance with the assistance of a real-time scheduler and related tools and techniques. Sessions include practical information on the design of real-time embedded systems that will be timely and predictable, design options for achieving real time without an RTOS, and the application of RTOS in safety critical applications.
  • Safety, Security and Hacking Embedded Systems – The Safety, Security, and Hacking Embedded Systems covers the latest techniques for designing and managing more secure systems. Sessions cover a mixture of hacking history, security knowledge, techniques for building more secure embedded system, and coping with the special case of Android.
  • Software Architecture and Design – Using practical, real-world advice from experts, this track will guide you through everything from requirements and specification development techniques, to optimizing your multicore and user-interface design. Agile design techniques will also be introduced.
  • Software Development – The Software Development Track will guide you toward a more disciplined approach to software development to improve performance, while emphasizing agility. A special session on common traps and pitfalls when developing real-time software will underscore the importance of such approaches.
  • Systems Engineering – The Systems Engineering Track’s objective is to improve analytical skills, impart an enhanced understanding of the impact of your engineering decisions on others on the design team, and the impact of other decisions on you. Engineers will learn the benefits of looking at the big picture, in addition to focusing only on the detail.
  • Hello World! – Track engineers share their embedded design experiences and provide information that will help you bring your ideas to life more quickly and successfully.
  • Lessons and Lessons Learned – Engineers share their successes and failures along with some practical tips, tricks, and how-tos to jump start your next big embedded systems project.
  • Connected Devices – Learn about the whacky wonderful future of mobility and learn about some real world examples of products with embedded systems that are already talking to the cloud.
  • Tech Fundamentals – This 3-day series consists of 18 45-minute sessions designed specifically for engineers who are new to embedded or experienced embedded engineers who want an introduction to topics outside of their core expertise. These practical sessions delivered in a tutorial format cover topics ranging from Embedded 101 to Analog for Digital Designers to Why the Programming Language C matters.
  • Hands-on Speed Training – Attendees can get some drive time on the latest development boards, hardware, and software tools and face time with expert engineer-trainers.  Developments boards include Arduino, Beaglebone, Raspberry Pi… software tools include Microchip MPLAB X, TI WEBENCH Power Designer, etc..

To select the sessions, the best way is to use the schedule builder available on UBM website.

If you plan to only access the expositions, attend a few of the many vendor-sponsored sessions, and listen to keynotes, the pass (Expo Only Pass) is free and you only need to register. For details about the other pass see table below.

All Access
Pass
Expo
Plus Pass
Expo Only Pass Black Hat
Summit
Advanced | Feb 16 – Apr 18 $1,999 $199 Free $1099
Onsite | April 19 – 25 $2,299 $199 Free $1199
Conference Sessions
April 21 – April 25
Check
Black Hat Conference Sessions
April 23 – April 24
Check Check
Monday Workshops Check
Monday Lunch Check
Vendor Sessions
April 22 – April 25
Check Check Check Check
Keynotes
April 23 – April 25
Check Check Check Check
Expo
April 22 – April 25
Sketch to Shenzhen, Fundamentals, and Hands-On Training Lab Included
Check Check Check Check
Parties & Giveaways
April 22 – April 25
Check Check Check Check
DESIGN West Conference Proceedings Check Check
Black Hat Summit Proceedings Check Check
Android Certification
April 22 – April 23
Check
IEEE Certification
April 22 – April 25
Check
Expo Plus Extras

– 3 Class Passes
Check

Further details are available on Design West Official Website.

Digg This
Reddit This
Stumble Now!
Buzz This
Vote on DZone
Share on Facebook
Bookmark this on Delicious
Kick It on DotNetKicks.com
Shout it
Share on LinkedIn
Bookmark this on Technorati
Post on Twitter

$25 Expansion Board for the Raspberry Pi

April 2nd, 2013 4 comments

There are already several expansion boards for the Raspberry Pi such as the Gertboard or RaspiComm, but none of them originated from China. Onebir spotted a new expansion board from a Chinese supplier on Aliexpress that’s available for $25 including shipping.

Raspberry_Pi_Expansion_Board_Large

There’s no description on the seller website, the seller provided us some details in Chinese. With Google translate help, the key features of the board(s) can be summarized as follows:

  • 3.3V / 5V SPI interface
  • 3.3V / 5V I2C interface
  • Opto-isolator for GPIOs supporting 8-channel 50V/600mA to control motors, drive LEDs, etc…
  • Power LED (The pictures are crap, but I can’t see any LEDs on the boards)
  • External power fuse to protect the expansion board and the Raspberry Pi.

The features in Chinese are shown below in case something was lost in translation:

1.全尺寸完美兼容树莓派,
2.将3.3V的SPI接口转换为通用的5V SPI接口(并且可以通过P13跳线切换回3.3V)
3.将3.3V的I2C接口转换为通用的5V I2C接口(并且可以通过P13跳线切换回3.3V)
4.GPIO放弃光耦隔离方式,采用芯片驱动,支持8路50V、600mA的高电压大电流驱动,意味着可以直接连接舵机,驱动LED等等(要做小车,机器人,智能家居,远程控制的必备哟) 芯片采用插座方式, 不小心烧坏以后方便更换
5.增加LED电源灯
6.外接电源使用保险丝,更好的保护你的扩展板和树莓派

I’m not even sure this “expansion kit” includes the 2 boards pictured above, and questions about software support remained unanswered. Beyond the total lack of information, although the seller has good ratings he is relatively new, so only people willing to risk $25 should give it a try.

Digg This
Reddit This
Stumble Now!
Buzz This
Vote on DZone
Share on Facebook
Bookmark this on Delicious
Kick It on DotNetKicks.com
Shout it
Share on LinkedIn
Bookmark this on Technorati
Post on Twitter