
This blog is hosted on a Linode VPS with 512 MB RAM and running Ubuntu 11.10. Up until today, Apache2 was the web server, and it worked fine except sometimes, it reached connection and memory limits, and the blog would go offline for a short period of time, especially right after a new blog post. So this week-end, I decided to switch to nginx (pronounced engine-x) web server which is said to use less memory than Apache2. Let me know if something suddenly stopped working…
nginx is a relatively recent web server, and the documentation on the web seems to become outdated pretty fast, so I’ve decided to document what I’ve done.
The first thing I would recommend is to try it in your own local server first, and make sure most things are working including plugins.
Testing your WordPress blog with nginx in a local server
I run Ubuntu 12.04 in VirtualBox, and since we are going to run a server, I’ve set the network connection in VirtualBox to “Bridged Adapter” and not “NAT” in order to make things easier.
The very first thing you want to do is to backup your WordPress site either manually, or thru tools such as BackWPup.
Install ngnix, php and mysql in the server:
|
1 2 |
sudo apt-get install nginx php5-fpm php5-cli php5-curl php5-gd php5-mcrypt php5-mysql php5-cgi sudo apt-get install mysql-server |
Create a nginx configuration file for your wordpress blog in /etc/nginx/sites-available/wordpress:
|
1 2 3 4 5 6 7 8 9 10 11 12 13 14 15 16 17 18 19 20 21 22 23 24 25 26 27 28 29 30 31 32 33 34 35 36 37 38 39 40 41 42 43 44 45 46 47 48 |
# Upstream to abstract backend connection(s) for php upstream php { server unix:/var/run/php-fpm.sock; server 127.0.0.1:9000; } server { ## Your only path reference. root /srv/www/wordpress/public_html; ## Change port to 80 in VPS listen 8080; ## Your website name goes here. Change to domain.ltd in VPS server_name _; access_log /srv/www/wordpress/logs/access.log; error_log /srv/www/wordpress/logs/error.log; ## This should be in your http block and if it is, it's not needed here. index index.php; location = /favicon.ico { log_not_found off; access_log off; } location = /robots.txt { allow all; log_not_found off; access_log off; } location / { # This is cool because no php is touched for static content try_files $uri $uri/ /index.php; } location ~ \.php$ { #NOTE: You should have "cgi.fix_pathinfo = 0;" in php.ini include fastcgi_params; fastcgi_intercept_errors on; fastcgi_pass php; } location ~* \.(js|css|png|jpg|jpeg|gif|ico)$ { expires max; log_not_found off; } } |
Source: Nginx Wiki and wpmu.
Note that I used port 8080 instead of 80, because I eventually intended to test this in the VPS at the same time as the main apache2 server was still running, but finally decided against it… Using port 80 would be slightly simpler.
Enable your wordpress blog:
|
1 |
sudo ln -s ../sites-available/wordpress ../sites-enabled/wordpress |
As mentioned in the note in the config file above, edit /etc/php5/fpm/php.ini to enable the line:
|
1 |
cgi.fix_pathinfo = 0; |
Now import your blog using the backup file in /srv/www/wordpress/public_html, e.g.:
|
1 2 3 4 |
cd /srv/www/wordpress/public_html tar xjvf backwpup_cnxsoft_2012-06-23_06-01-50.tar.bz2 cd .. sudo chown www-data.www-data public_html -R |
Open /srv/www/wordpress/public_html/wp-config.php to retrieve WordPress dabatase name (DB_NAME), user (DB_USER) and password (DB_PASSWORD).
Now add the wordpress user to mysql:
|
1 2 3 4 5 |
sudo mysql -u root -p create user 'wpuser'@'localhost' identified by 'dbpassword'; GRANT ALL PRIVILEGES ON *.* TO 'wpuser'@'localhost' with grant option; flush privileges; quit; |
Create the empty wordpress database:
|
1 2 3 |
mysql -u wpuser -p mysql> create database wordpress; quit; |
Import the database previously backed up:
|
1 |
mysql -u wpuser -p -h localhost wordpress < wordpress.sql |
If you want to access the blog from another device on the LAN, you need to make sure port 8080 is open:
|
1 2 |
sudo apt-get install ufw sudo ufw allow 8080 |
Finally start nging and php5-fpm:
|
1 2 |
sudo /etc/init.d/nginx start service php5-fpm start |
You should now be able to access your blog with http://localhost:8080 or http://server_ip:8080.
Check everything is working as expected. If it does, you’re now ready to update your server.
Migrating from nginx to apache2 in the VPS
There are fewer steps for this part as most of required components are already installed and configured, if you are already running a WordPress blog with Apache2.
First install nginx and php5-fpm:
|
1 |
sudo apt-get install nginx php5-fpm php5-cli php5-curl php5-gd php5-mcrypt php5-mysql php5-cgi |
Create a nginx configuration file for your wordpress blog in /etc/nginx/sites-available/wordpress. Assuming you used the same paths in your local server and your VPS, It’s the same file as in the section above, expect you need to change two lines:
|
1 2 |
listen 80; server_name domain.com; |
Enable your wordpress blog and delete the default server config:
|
1 2 |
sudo ln -s ../sites-available/wordpress ../sites-enabled/wordpress rm ../sites-enabled/default |
Edit /etc/php5/fpm/php.ini with the line:
|
1 |
cgi.fix_pathinfo = 0; |
You’ll also need to edit /etc/php5/fpm/pool.d/www.conf and change the line:
|
1 |
listen = 127.0.0.1:9000 |
by
|
1 |
listen = /var/run/php-fpm.sock |
That’s all. Now it’s time to turn off Apache2 and start nginx:
|
1 2 3 |
sudo service apache2 start sudo /etc/init.d/nginx start sudo service php5-fpm start |
Go to your blog (e.g. http://www.domain.com) and it should work (mostly) fine.
I had to change a couple of things.
- W3 Total Cache plugin. I use this plugin for better performance, but it uses some specific web server configuration files. Updating those files are easy. In the WordPress Dashboard, go to Performance->General Settings, and you should see the following warnings:
 Click on auto-install to update nginx.conf. Minify fails for me, and I haven’t found a solution yet, but page caching appears to be working fine using “Disk: basic” caching method.
 - Publish/Save draft failure with iNove Theme
I’ve come across another issue each time I clicked on “Save Draft“:Warning: Cannot modify header information – headers already sent by (output started at /srv/www/wordpress/public_html/wp-content/themes/inove/functions.php:1181) in /srv/www/wordpress/public_html/wp-includes/pluggable.php on line 866
functions.php was saved in DOS mode, and converting it to Unix mode fixed the issue:
123sudo apt-get install dos2unixcp functions.php functions_bkup.phpdos2unix functions.php - Cloudflare and nginx
Cloudflareis really a great “CDN” service which is free (as long as you don’t use https), saves a lot a bandwidth and improves the site performance. The problem is that it will screw up your stats (all visitors will appears to come from the same set of IPs), if you don’t make some modifications. For Apache, there is a module cloudflare_mod. For nginx, you need to edit /etc/nginx/nginx.conf and add the following lines somewhere in the http section:
12345678910# Cloudflareset_real_ip_from 204.93.240.0/24;set_real_ip_from 204.93.177.0/24;set_real_ip_from 199.27.128.0/21;set_real_ip_from 173.245.48.0/20;set_real_ip_from 103.22.200.0/22;set_real_ip_from 141.101.64.0/18;set_real_ip_from 108.162.192.0/18;set_real_ip_from 190.93.240.0/20;real_ip_header CF-Connecting-IP;

Once you’re happy with the changes, make sure Apache won’t be start at next boot:
|
1 |
sudo chkconfig apache2 off |
ngnix and php5-fpm have already been configured to start automatically at boot time during installation.
The blog appears to work fine, but I still have a few things to work out such as Awstats support and minify.
[Update: July 5, 2012. I’ve been running nginx for a little over 10 days, everything seems to be working fine, and I/O rate has decreased, and swapping is basically a thing of the past (The little spike during nginx usage was due to a virus scan)

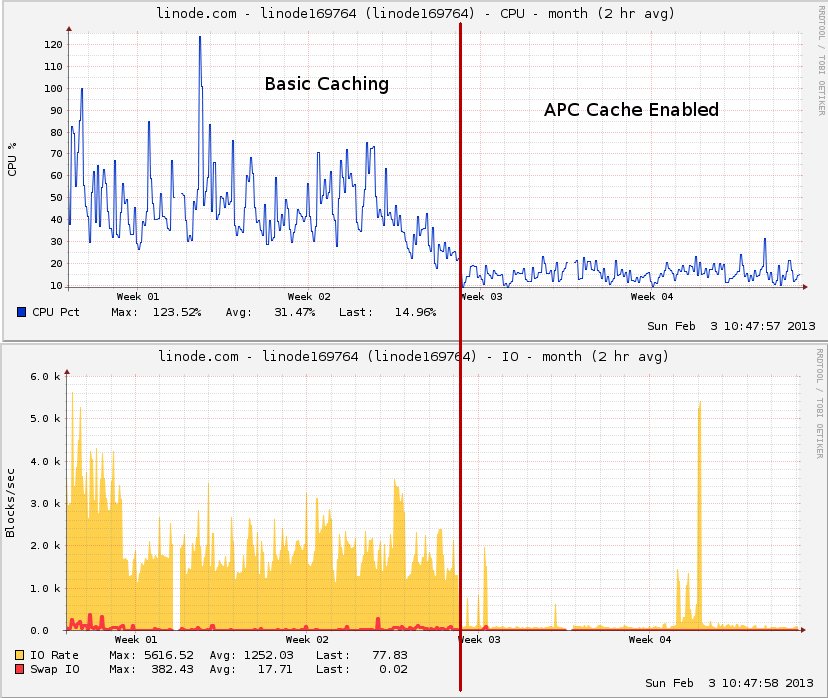
[Update 2: After I updated my server to Ubuntu 12.04, CPU usage and I/O rate went slightly up, so I decided to give a try at apc. It’s actually very easy to setup:
- Install apc: sudo apt-get install php-apc
- Go to your wordpress dashboard and setup W3 to use “Opcode: Alternative PHP Cache (APC)” for page and object caches.
And the results are pretty impressive with both CPU usage and Disk IO rates taking a plunge.
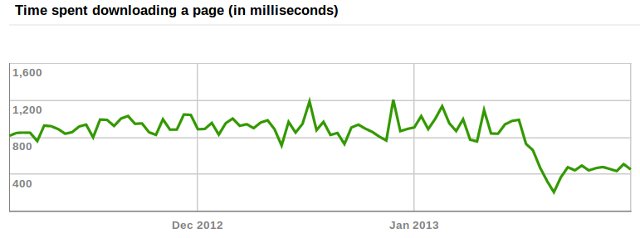
Strangely I did not see any improvements in Google Analytics Page Speed charts, but Googlebot seems to be happy about it, as it now takes a bit over 400 ms to download a page on average instead of around 900 ms before APC was enabled.

Jean-Luc started CNX Software in 2010 as a part-time endeavor, before quitting his job as a software engineering manager, and starting to write daily news, and reviews full time later in 2011.
Support CNX Software! Donate via cryptocurrencies, become a Patron on Patreon, or purchase goods on Amazon or Aliexpress


