

Karl here with part 2 of my experiences with the K280. In the first part of HE3D K280 3D printer review, I spoke about some of the challenges with the K280 getting it calibrated and getting Marlin to work and the initial build. In this part, we are going to look at the new effector, cooling solution I designed, calibration, and general use. If you purchase a machine now you get an injected molded effector and 2 24v cooling fans which HE3D sent over after they saw my initial review. If you purchased a kit before they started including these parts you can pick them up here to upgrade. I would like to point out that this is my first Delta printer. I don’t want to really call this a review but a way to show my experiences.
First things first
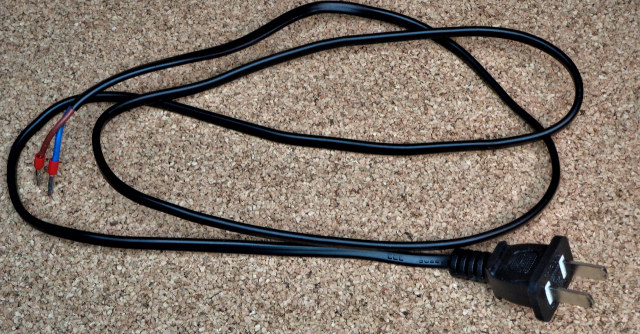
If you purchase this kit I urge you to use a 3 prong power cord. The included one is only 2 prong and you need to have the third prong to be safe. I kept getting static shocks and the last one fried my screen. It might not have happened if a ground was in place. Not to mention if a wire came loose and made the frame live with mains voltages you could be harmed or possibly killed. I sent HE3D a note urging them to change this.
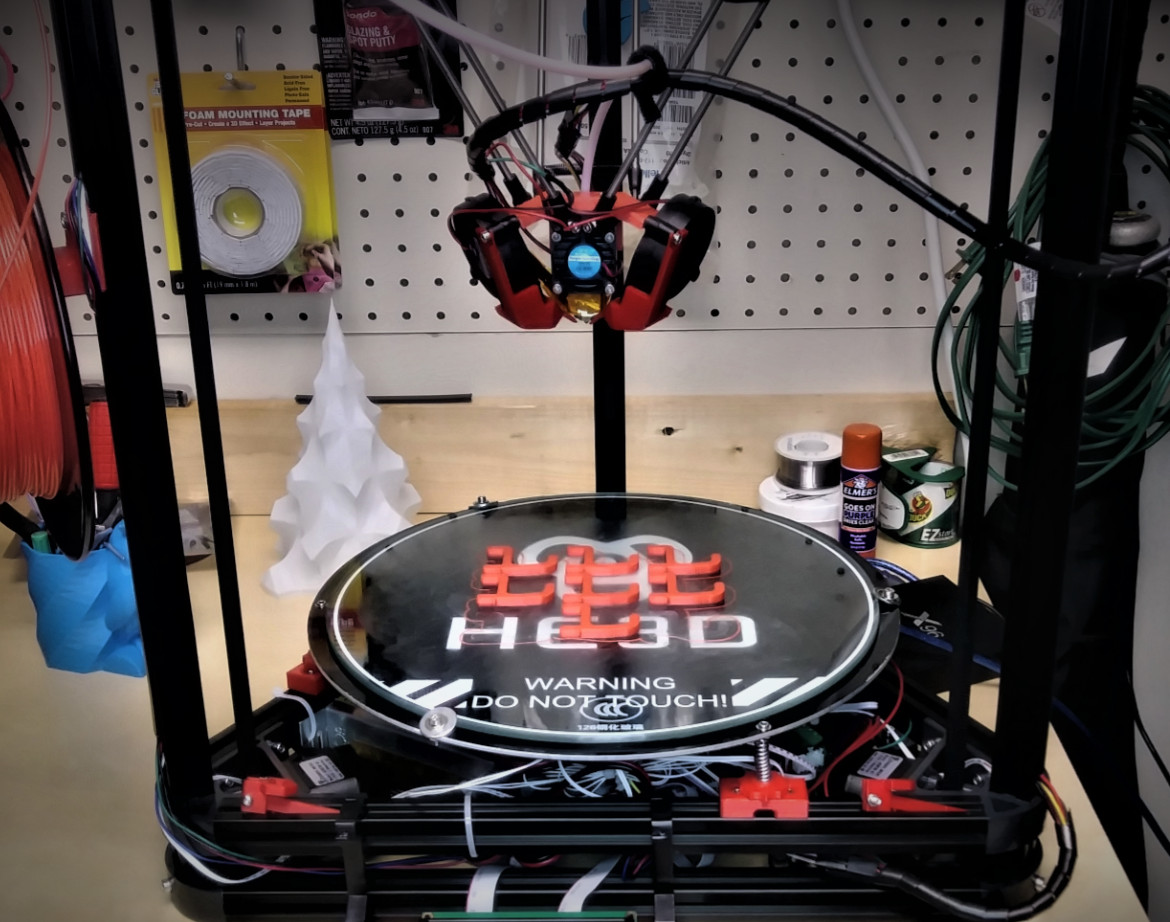
HE3D K280 Upgrades
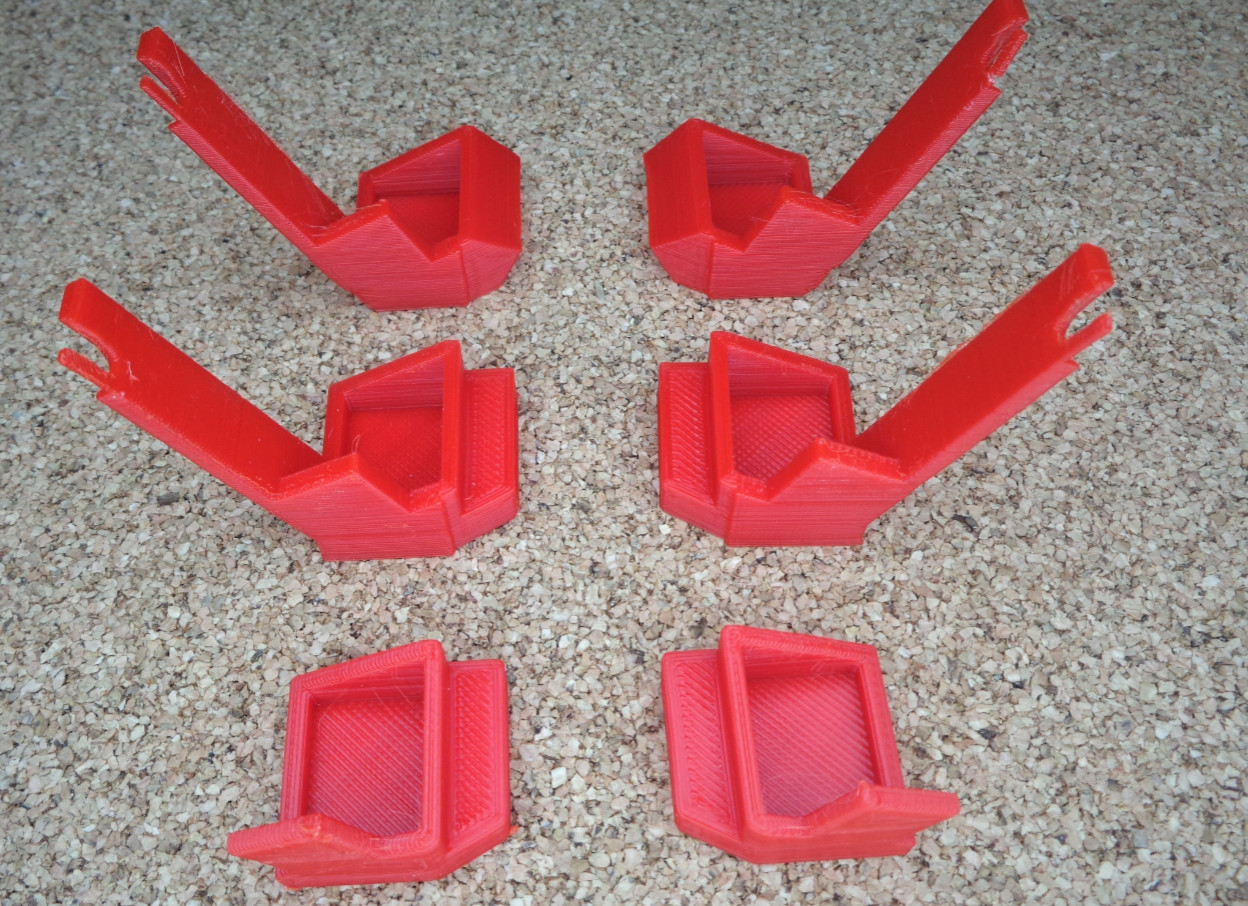
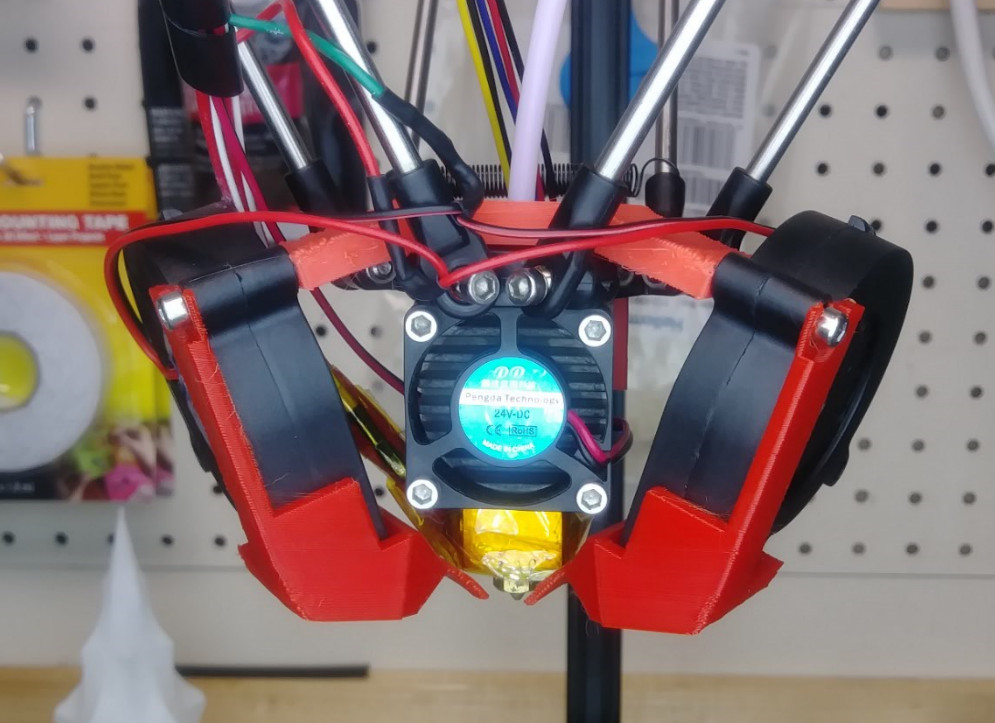
I installed the injected molded effector easily but the design that HE3D provide for the blowers on Thingiverse blocks you from using the entire build volume on the K280. They hit the rods toward the edges. I think they were designed for the K200. So I set out and designed some new ones in Fusion 360. I was able to design them to where the build volume is not affected. I had to abandon the binder clips as well and I used some M4 nuts and bolts and some washers. The blowers would hit the clips. I would say that this took about a week to design, prototype, and test. When designing blowers it is not only just directing air at the parts. In this case these fans are far too powerful and I only run that at 40% after the first layer and they are printing beautifully. I will go into setting more in detail later. I also had to run a pid tune. This reprap wiki page goes into detail on this subject. The new Marlin I am sharing is tuned for this design. I am new to this aspect so it oscillates a little but I believe at acceptable levels. All the mods that I made can be found here on Thingiverse. For instructions on the bed mounting system check out here.

HE3D sent me the new effector and blowers, and I asked Gearbest for the 3D touch sensor. I spent nearly a month of evenings working on these upgrades. First I worked on a suitable cooling solution with the blowers as I mentioned above. Then I worked on upgrading the firmware to the latest Marlin which took most of the time troubleshooting a stuttering problem.
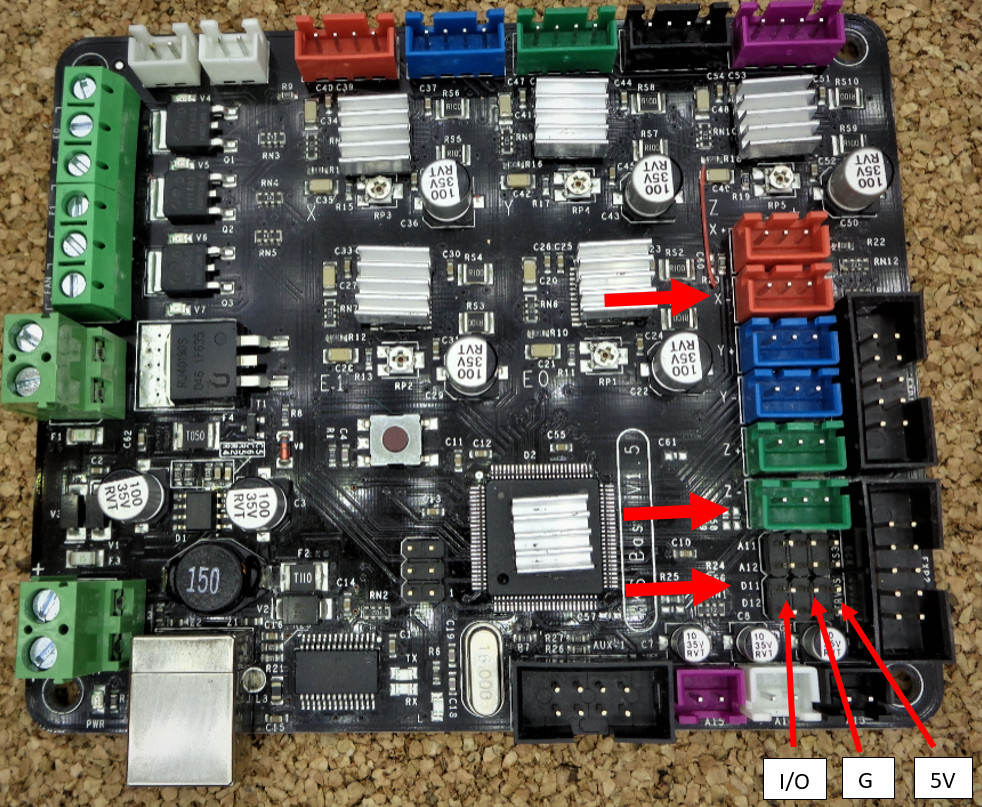
Installation of the touch sensor and runout sensor is pretty self explanatory with the wiring as an exception.
- Z min is used for the touch sensor
- D11 is the servo pin for the touch sensor
- X min is used for the filament sensor.
There a few caveats when using these upgrades that I designed. You must wrap the hotend in Kapton tape or some other way to insulate it. Second, the last couple of mm of the reflector needs to be cut off. They are down to the build plate to make easier to print. Third, since the reflector is so close to the hotend you need to run the blower at all times or swing out of the way on filament that doesn’t require a blower. It is not necessary but I also shortened the bowden tube as much as possible without restricting the movement/causing strain.
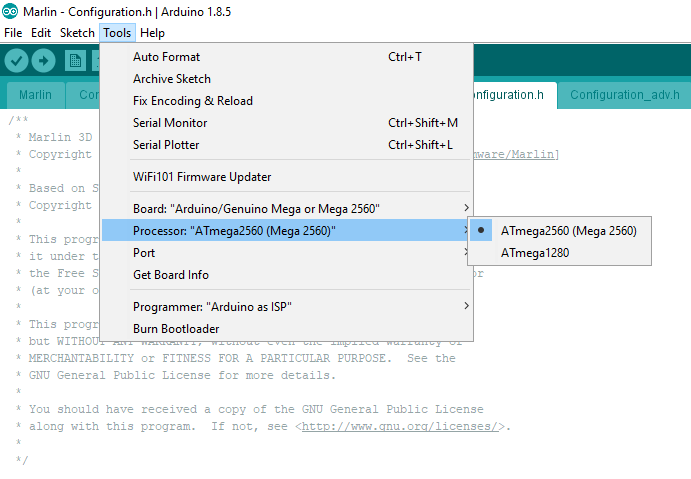
Marlin 1.1.8
Here is a copy of a portable Arduino IDE 1.8.5 and Marlin 1.1.8 with the dependencies. I prefer a portable version. You can move this to a new PC and not have to do anything. Upgrading is just a matter of moving the portable folder to the new Arduino. Finally if you use the windows installer you will always be fighting UAC because it is normally installed in a protected folder.
In the past, I did a pre-compiled version but with so many options I would have to compile too many. I put comments in the configuration.h file where the filament sensor is and touch sensor with instructions and outlined below.
I have included an untested K200 build based off of Terb Terbich’s config in the Facebook group as well as K200 dual extrusion.Use at your own risk. Again these are untested. If someone would test and let me know any issues I can fix and update.
Search for prahjister to find comments in Configuration.h
Change to this to use stock probe:
|
1 2 3 4 5 6 7 8 9 10 11 12 13 14 15 16 17 18 19 20 21 22 23 24 25 |
/** * A Fix-Mounted Probe either doesn't deploy or needs manual deployment. * (e.g., an inductive probe or a nozzle-based probe-switch.) * Prahjister Uncomment this to use provided probe or some other probe */ #define FIX_MOUNTED_PROBE /** * Z Servo Probe, such as an endstop switch on a rotating arm. * Prahjister comment this if you want to use provided probe or some other type of probe */ //#define Z_ENDSTOP_SERVO_NR 0 // Defaults to SERVO 0 connector. //#define Z_SERVO_ANGLES {10,90} // Z Servo Deploy and Stow angles #define Z_MIN_ENDSTOP_INVERTING true // set to true to invert the logic of the endstop. #define Z_MIN_PROBE_ENDSTOP_INVERTING true // set to true to invert the logic of the probe. Change to this to disable runout sensor * RAMPS-based boards use SERVO3_PIN. * For other boards you may need to define FIL_RUNOUT_PIN. * By default the firmware assumes HIGH = has filament, LOW = ran out * Prahjister Comment Filament Runout sensor if you do not want to use */ //#define FILAMENT_RUNOUT_SENSOR |
One obstacle that I ran into when getting this ready was that after upgrading to the latest IDE it would take forever to compile. It went from a 2 minute compile to about a 10 minute. After a little searching I found that I had to tell Windows Defender to exclude the Arduino directory.
Micro Stutters
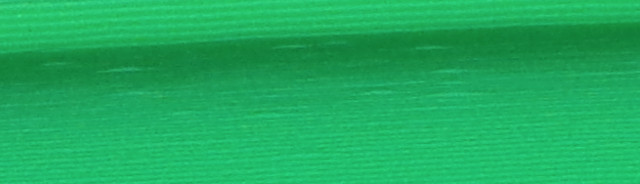
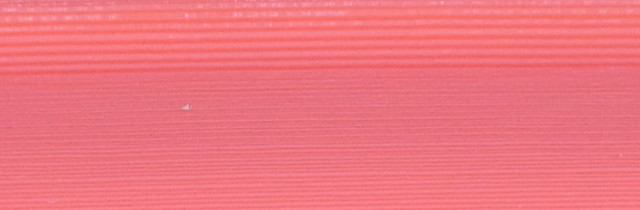
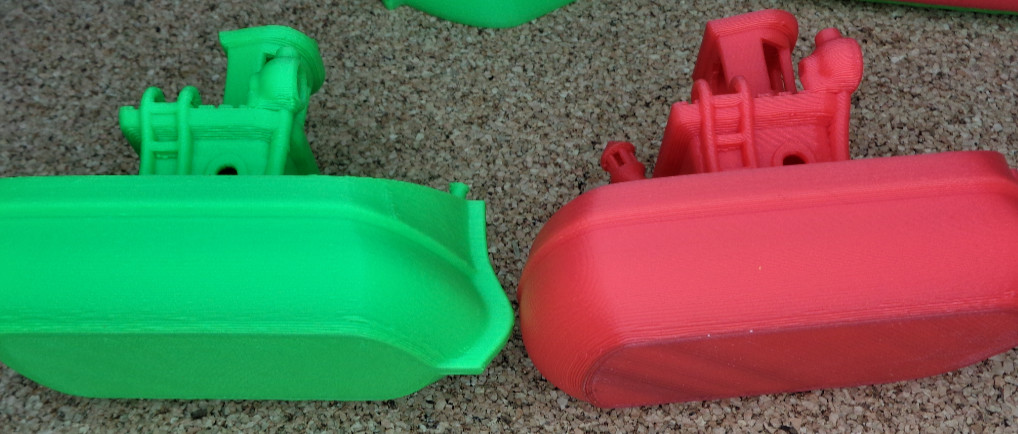
There is an issue and workaround implemented in the above firmware. I ran into some microstutters that left little imperfections on the print surface. I compiled every version since last November with varied settings including new 2.0. After studying and using Google-fu it became apparent that the stutter was happening when the x y z were updating on the info screen. Only if I printed around 20-30mm/s did the issue go away. I was going to give up and suggest that everyone print the outer skin at 20mm/s to avoid stutters on the surface, but I started to think how else could I avoid and came up with the workaround.
It is very difficult to to capture in a picture. The little bumps on the green are the stutters. Red(pink) is with workaround. I ran out of the green while troubleshooting. As you can see the printer is laying down nice and even layers now. These boats are printed at .2 layer height using the same gcode.
The fix was to add defer_return_to_status = true; in ultralcd.cpp:
|
1 2 3 4 5 6 7 8 9 10 |
/** * * "Main" menu * */ void lcd_main_menu() { START_MENU(); defer_return_to_status = true; MENU_BACK(MSG_WATCH); |
This stops the firmware from going to the info screen after a timeout period. If you decide to use this firmware, after you start the print, go into the menu and let the screen sit there instead of the info screen. I have an issue open on Github with Marlin so maybe they will find the source of the stutter in the near future.
Calibration with or without 3D Touch Sensor
With 3D Touch Sensor
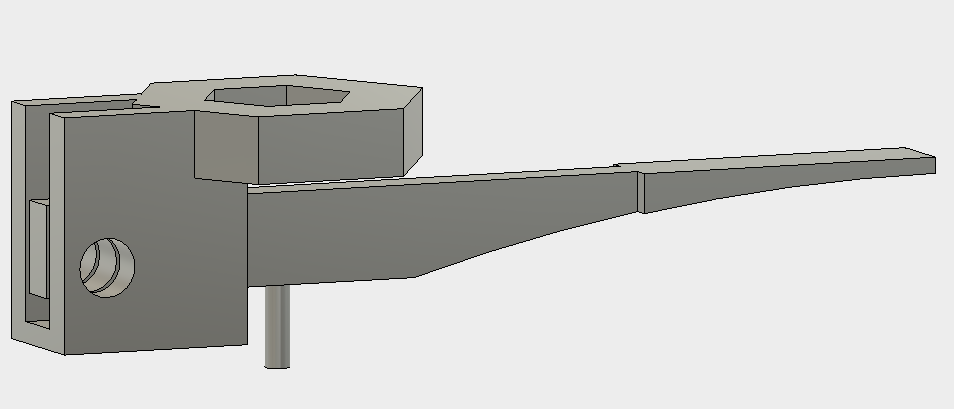
If you are using the 3D touch sensor, you will need to use this jig for calibrating. At this time Marlin doesn’t take the offset of the probe into account during the calibration process. Print this off and put together with a nut and bolt. Fit over your cool nozzle. If it doesn’t line up with the hex head of your hotend no worries. Just press on and make sure the part triggering the sensor lines up and it wont fall off. I just pressure fit it. There is very little force exerted on it so it doesn’t take much.
Without 3D Touch Sensor
Install the sensor that is provided over the nozzle.
Instructions for Both
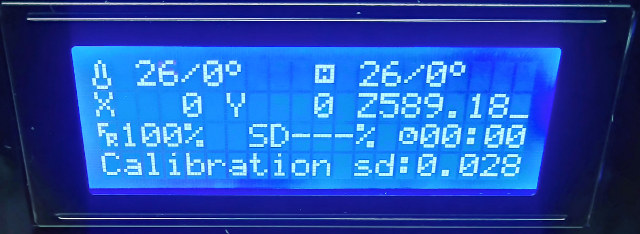
Once your sensor is setup run the Prepare>Delta Calibration>Auto Calibration then navigate to your info screen. (remember it will not do this automatically anymore) It will go around the bed probing up to 10 times. Once it is complete you should see a sd:0.0xx in the bottom right of your main screen. According the the author of this routine you want a standard deviation of .05 or less. If you get a higher value you can run it again until you do.
Now you need to set your height. If you are using the 3D touch sensor remove the jig. Go Prepare>Delta Calibration>Set Delta Height. The offset is set in firmware for it. If you are using the provided probe go into Control>Motion>Z offset and set your Z offset to .3 then run Prepare>Delta Calibration>Set Delta Height. On both of these after you are done, Prepare>Auto Home then Prepare>Move Axis>Move Z>Move 10mm and bring down to 0. If you need the nozzle closer or further away you can just adjust the height manually Prepare>Delta Calibration>Delta Settings>Height. If you need it close increase your height. Further away lower. My height is 599.13.
Dimensional Accuracy
At this point your Z should be spot on but you may need to adjust your X and Y. To test, print a 50mm calibration cube. To save time you do not need any top or bottom layers and just the walls. I would do 3 walls or whatever you normally do. You can adjust this in your slicer. Print the cube and once it is sufficiently off the build plate you can stop the print. Measure the cube on the X and Y and see if you are too big or too small. If your cube is too small lower your diagonal rod in the Prepare>Delta Calibration>Delta Settings>Diag Rod and conversely if it is too large increase the diagonal rod length. Then print a cube until it is calibrated. After you are done you can print an entire cube and check all your dimensions.
PID Tune
If you find the hotend oscillating up and down too much. Or not reacting fast enough. You can also run a calibration of the hotend and blower. Set your hotend a few cm away from the build plate and turn on your fans to your desired speed. Go into the menu and run Control>Temperature> PID Autotune your desired temperature. This is a little bit of a mystery to me but it stopped mine from getting a min temp errors and not reacting fast enough.
Remember to store your settings in EEPROM when you are done calibrating.
Settings that worked for me for PLA

First I would like to say that the Ultrafast and Economical stringing test is my favorite test for tuning a printer/filament. I would do temperature towers in the past and it would take more time. With the tower, we are stuck with some of these settings the entire print. With this test, I tune temperature, retraction speed, retraction distance, and fan speed. If you are hyper critical of the outcome you can fix stringing easily. Stinging is a mixture of these settings and it takes me no more than an hour to dial in a new printer and very little time between similar filaments if any. It prints very quickly and if I am making changes back to back as soon as the test stops I go into the settings and go to preheat PLA so nothing has a chance to cool down and doesn’t slow down the tuning.
I have been running the fan at 20% on the first layer and 40% on the rest with PLA. If you print with ABS you can swing the blowers out of the way. For PLA, I have been running 210°C on the first layer and around 205°C for the rest. It took a really long fast retraction of 6.5mm at 150mm/s.
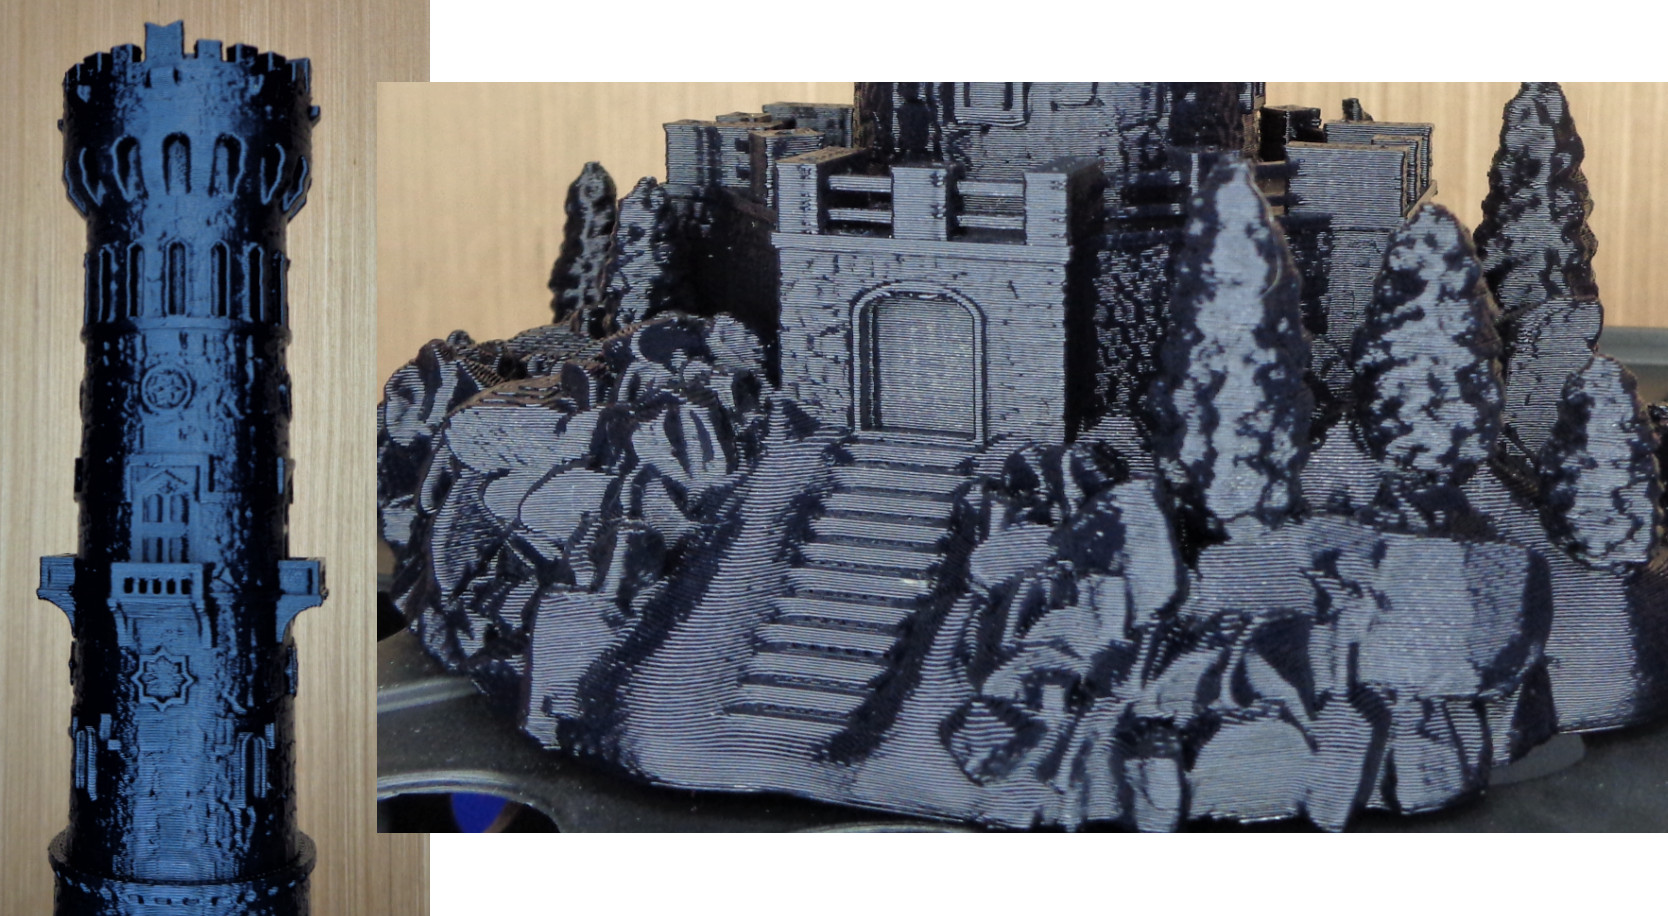
Massive Print
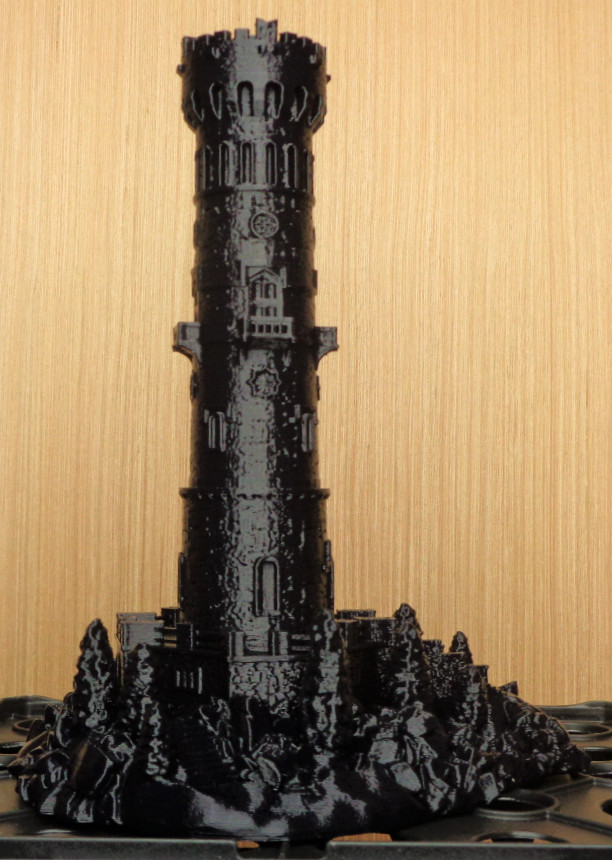
I printed this massive model it is 550mm tall. Took about 65 hours to print and about 2lbs of PLA. This was before I even had the stutter problem and not 100% tuned. Largest print I have ever done.
One thing to note about this print. I used this opportunity to test the filament runout sensor. You can see several bad layers about mid print. The problem was that when they loaded the filament onto the spools that I have they put a kink at the very end where they start loading it. This has caught twice on me now when it ran out. Once on this model and once on another. There was no way I was starting over so I cut the kink off and let the filament sensor kickin. It does work and stops the print. Luckily it was just a few bad layers and I caught it relatively early and I will fix with some Bondo. I plan on painting this one. Overall it turned out well.

Final Test Print
Here is the final test print. This is a fantastic model by Jukka Seppänen. I didn’t realize it until writing this, but he also did the extremely popular Moon City Which I just recently printed. I would follow the link so you can see all the pictures. Approx 180mm tall. .2 layer height, generic $10 PLA. It turned out extremely well and I plan on painting it. Picture of the painted model is from the designer and his paint job.
 |
|
Final Words
What a long road but it is very satisfying. I am getting some really good prints off of it now. I wish HE3D did some more work on there end to make it easier to print on but I like giving back and filling in the gaps. I believe anyone can reproduce these results. I have seen many people in the Facebook forum say that they never could get these delta printers to calibrate and print until Marlin was available. They had it for months and were very grateful.
On another note. If you are an enthusiast think about giving back, I am doing my second presentation at our local library on 3D printing. My first session was building a printer. We built a Raiscube A8R in just a couple hours. This weekend, I am introducing the kids to Tinkercad and we will design something that they choose. I bring in few printers especially the HE3D because everyone is fascinated by its movement. Arduino projects would also be a cool idea to show kids. Whatever your passion/expertise I encourage you to get kids involved. It is extremely satisfying.
I would like to thank Gearbest for sending the K280 to work with. If you would like to purchase the 3D printer, the company currently sells it for about $430 shipped.

Karl is a technology enthusiast that contributes reviews of TV boxes, 3D printers, and other gadgets for makers.
Support CNX Software! Donate via cryptocurrencies, become a Patron on Patreon, or purchase goods on Amazon or Aliexpress. We also use affiliate links in articles to earn commissions if you make a purchase after clicking on those links.


Hi Karl, can you post your marlin configuration please? I followed your tutorial, but it’s giving filament error. I do not know what it can be, he keeps asking me to insert filament, even if it’s in the printer.
Hi, I am very interested in this printer. I am wondering what type of quality you are getting at the higher speeds. I have n the market for a fast printer and this is one of the faster printers I have found.
Hey guy, thank you for the wealth of information. Where are the links for all the files including the stl for the BLtouch sensor jig. I have been searching for about an hour but I do not know where it is. I am probably not looking in the right spots.
https://www.thingiverse.com/thing:2771548
I need to know the repetier values for if I have 2 in 1 out extruder set… But am using original calibration sensor…
Also would like to know how to add the 2 in1 out to that K280 Arduino you have…
Hey Karl.. great piece. Building it with my son.. I have a Wanhao/monoprive MSelect 2plus, but this is our first real but ld. Came with terrible, limited instructions. We’ve finally got all the mechanical and board/wires hooked up. I’m a EE so was also shocked (pun) to see an non-polarized, ungrounded AC cord on this thing. Talk about a hazzard!. We put a good three prong on there.
Anyway, I’m still afraid to power it up, as we still have a bunch of left over, important looking parts!.. so I’m am little nervous:
https://photos.app.goo.gl/mUwF26mncJ5tzGDa8
From left to right
• A bunch more 1010 mounting hardware, plus some kind of black anodized aluminum rectangle thing.
• A bunch of important looking black springs
• More 1010 hardware, plus three extra brass print tip, another filiment feed line nut and some ~30mm long steel threaded tube thing
• Another 24v fan (w/broken wire) plus some kind of cooling shrowd (can’t figure out where/how to mount it)
• And what appears to be (far right) extra replacement parts? (Piezo level sensor, bed thermistor, axis limit switch?) Are these replacement parts?
The black springs and broken fan make me the most nervous of powering it up.
Greats article.. Cheers,
Tweeks
Hey I’ve been following this I for the life of me could not get this printer to print with the stock firmware. It would home downand crash into the bed (used the sensor they sent) it did not work still.. but the sensor shows when it’s triggered when I press it.. I would think it should home the top endstops then lower?
I’ve tried all kinds of firmwares and I’m stuck it’s been a week here and I can’t even get it to home in the right direction.. when I inverted the section in the firmware it will home downwards but still crash into the bed with the endstop.
Hey. I have been having trouble finding an instruction link… and if I could get the ling that would be great!! Thanks!!!!