
Hello all, Karl here. I just wanted to send a note about what I have been working on. As the title says shows it is about 3d scanning. I have found it pretty fascinating so far. These are mainly based on structured light 3d scanning.
From Wikipedia:
Structured light is the process of projecting a known pattern (often grids or horizontal bars) on to a scene. The way that these deform when striking surfaces allows vision systems to calculate the depth and surface information of the objects in the scene, as used in structured light 3D scanners.
There are a few commercial offerings that I have run across or have found while searching around but they are very expensive. The first one I ran across was made by Einscan. They are over 1k and have been reviewed a lot. It seems like they put out a good product and keep evolving the software and hardware.
A few other offerings are David 3D by HP. Thunk3d, and oooooo.
All of these solutions are over 1k but HP (Formerly David 3D) offers a software only license for about $600 and you can bring your own hardware. I really wish they would have a version for hobbyists.
I am hoping with these articles to show you don’t have to spend tons of money on home 3D scanning and get good results. I am also hoping to find some people who can take the software and modify to either fix the minor issues and add some enhancements.
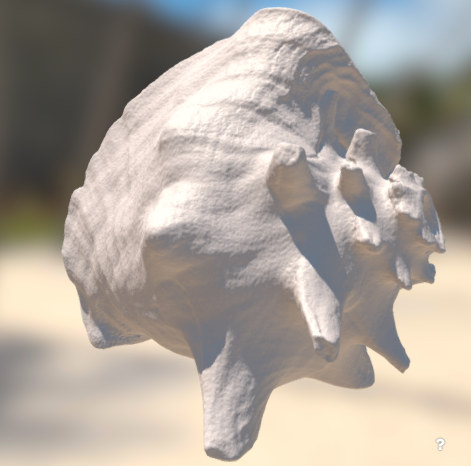
The first article will be on software calibration. I plan on sharing my experience with it and what I have found to work for me. Below is first scan and I’m really happy with it. The software is already working but needs just a few tweaks. For example the Logitech C920 camera is scanning at 2304×1536 and is like a slideshow, and I have to scan slowly. A pattern is projected onto the part you are scanning and it takes nearly a second to update the image I wish resolutions could be picked and a more modest 1920×1080 be used. A turntable feature would be excellent as well. The great thing is the the source is available but just need someone to come in and tweak. Visual Studio, QT, and OpenCV are used. I am trying to talk my brother into modding and will see how that goes.

John Deere Witt has this excellent project (SLTK OpenCV-based structured light processing toolkit). I found this project a while ago and it seemed within grasp and I have been working with John to bring it to Armbian and run on an Amlogic S905X box. If it works like I hope I think it could be made into a octoprint plugin which would be fantastic. From the looks of it, it seems like he uses the best calibration method for finding camera lens distortion. All the methods I have seen use a checkerboard pattern printed off. He uses a pattern and scans the monitor directly with the webcam. Everything is compiling now and working on the calibration process. One tool I think could also be used with Browns software is his plyalign. It attempts to automatically align point clouds when used with automatic turntable.
Finally I received an HE3D Ciclops scanner. It is not a very exciting scanner and this laser based scanner has been reviewed quite a bit. I am trying to upgrade the webcam to use C920 and it has been challenging.
I also purchased a Kinect v1 on letgo a while back and it is user friendly. I used Skanect but resolution is not very good.
So why write about future articles you ask… Well I am hoping maybe I have overlooked a project and hoping to get someone to help on the software side. There is a gap that needs to be filled in the hobbyist area of 3D scanning. With just a little tlc with the Brown software I think a home scanner with good results can be achieved with little money. I just don’t have the skills to code. All I can do is provide feedback and test. If you know of any other Structured Light software please leave a comment below.

Karl is a technology enthusiast that contributes reviews of TV boxes, 3D printers, and other gadgets for makers.
Support CNX Software! Donate via cryptocurrencies, become a Patron on Patreon, or purchase goods on Amazon or Aliexpress


Interesting write up, thank you. That small ceramic owl test in John’s GitHub sample is very interesting for how the inside of the owl is scanned. I assumed that the structured light would only be useful for scanning the outside surfaces. Would be great to see the rig that was used to scan it.
I’m looking forward to your next article! The SLTK project looks fantastic. I actually have an sony mp-cl1and was thinking about doing structured light with it (the advantage being its infinite focal depth) – but I guess someone beat me to it 🙂 I’ll be definitely playing around with his library once I have a bit of time He really broke down the problem the way I had planned to do it. The one trick I never could figure out is how to go from a point cloud to a good mesh. I found a few papers that claimed to… Read more »
I’m enjoying these articles on 3D scanning, modelling and printing, thanks.
Which software did you use for your first scan above? The Brown Software or the SLTK? I ask because I installed the Brown software and downloaded the sample calibration and image files, however, it does not recognize those images.
For the pig i used Brown. Ill be doing a livestream soon on this topic. To import the example from brown use the change directory….and you also need to calibrate with his calibration if i remember correctly.
Thank you Karl. I tried to the change directory but no luck. The problem appeared to be the file type possibly. The sample images are .PNG. I didn’t see and indication of the expected format though. I didn’t have time to connect a projector and webcam and was just trying to get a quick indication of the how well the software worked.
Karl,
Did you build the Brown software from the source or install the binaries? Which OS?
Should I subscribe to get notifications about upcoming livestreams?
Thanks!
I’ll do the livestream tonight on the Brown project and show how I do it.
That’s awesome – thank you!
Are you still working on it?
I would like to help.
Please let me know.
Best Greetings
Sebastian
Unfortunately, the software license from HP (formerly David) comes on a USB dongle and it can sometimes break. So I prefer open source.
Mr. Karl Johnson : Now I want to use the slcrunch.cpp for generate 3D point-cloud . And I use Raspberry pi 4B , opencv4.4 , and 2021-03-04-raspios-buster-armhf-full . But when I do “make” command , some errors appear , as the following : pi@raspberrypi:~/opencv/opencv/samples/cpp/example_cmake $ make Scanning dependencies of target opencv_example [ 50%] Building CXX object CMakeFiles/opencv_example.dir/example.cpp.o In file included from /usr/include/c++/8/vector:69, from /home/pi/opencv/opencv/samples/cpp/example_cmake/example.cpp:66: /usr/include/c++/8/bits/vector.tcc: In member function 'void std::vector<_Tp, _Alloc>::emplace_back(_Args&& ...) [with _Args = {cv::Vec<double, 3>}; _Tp = cv::Vec<double, 3>; _Alloc = std::allocator<cv::Vec<double, 3> >]': /usr/include/c++/8/bits/vector.tcc:109:4: note: parameter passing for argument of type '__gnu_cxx::__normal_iterator<cv::Vec<double, 3>*, std::vector<cv::Vec<double, 3> > >'… Read more »