
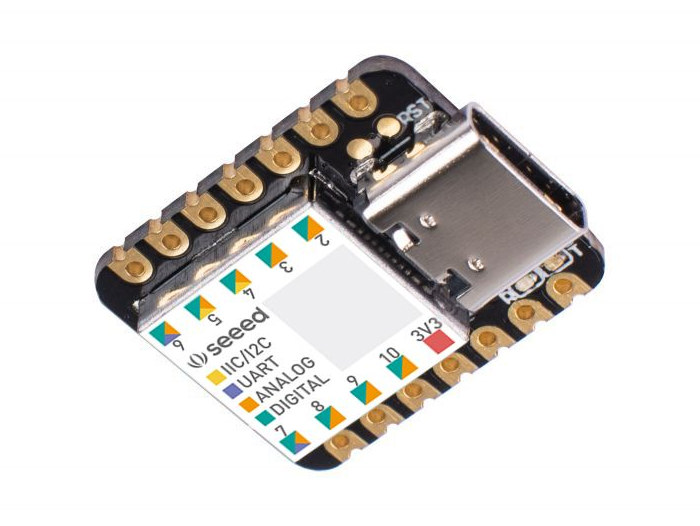
 Seeeduino XIAO is the smallest Arduino compatible board from SeeedStudio’s Seeduino family. Measuring just 23.5×17.5 mm, the board is equipped with Microchip SAMD21 Arm Cortex-M0+ microcontroller and exposes various digital and analog I/Os.
Seeduino XIAO specifications:
- MCU – Microchip SAMD21G18 ARM Cortex-M0+ microcontroller at up to 48MHz with 256KB Flash,32KB SRAM
- USB – 1x USB type C port for power and programming
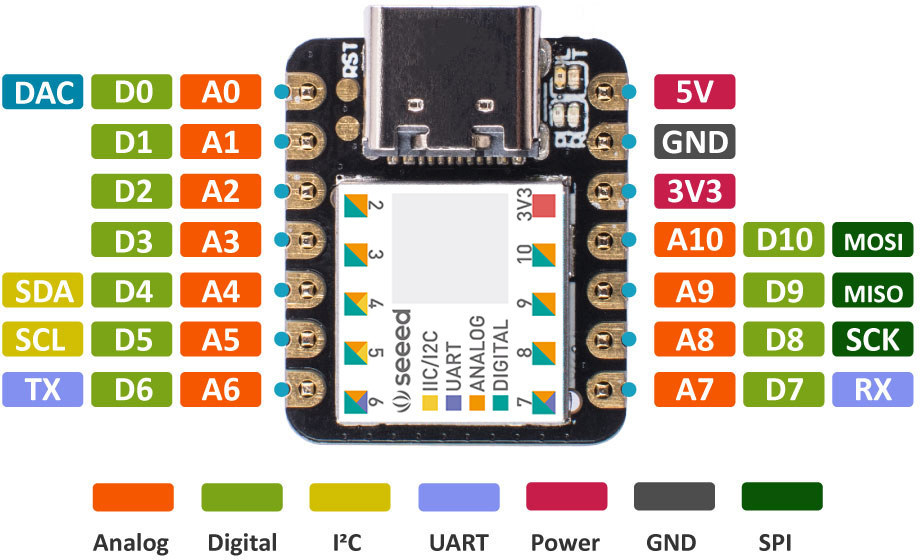
- Expansion I/Os
- 2x 7-pin headers with 11x analog inputs, 11x digital I/Os, 1x DAC, SPI, UART, and I2C
- 3.3V I/O voltage (not 5V tolerant)
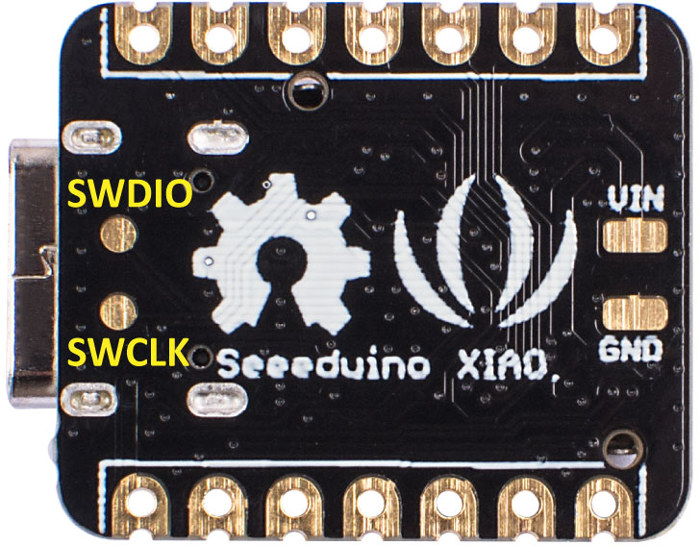
- Misc – 1x user LED, power LED, 2x LEDs for serial port downloading, Reset pads, SWD pads, 32.768KHz crystal oscillator
- Power Supply – 5V via USB-C power, power pads (VIN/GND) for battery
- Dimensions – 23.5×17.5×3.5 mm
All main components are placed under a shield, but there may be some charger chip (nope: see comments) as the company explains the board supports batteries via the VIM/GND pins which makes it suitable for wearable devices.
Seeeduino XIAO is compatible with Arduino Zero board, and you can program it in the Arduino IDE or Arduino Create. You’ll find resources to get started on Github.
The board sells for $4.90, and ships with two headers, and four different stickers to place on top of the metal shield.

Jean-Luc started CNX Software in 2010 as a part-time endeavor, before quitting his job as a software engineering manager, and starting to write daily news, and reviews full time later in 2011.
Support CNX Software! Donate via cryptocurrencies, become a Patron on Patreon, or purchase goods on Amazon or Aliexpress. We also use affiliate links in articles to earn commissions if you make a purchase after clicking on those links.


If it really supports a battery it looks like it could be a great replacement for a number projects which are too large to fit on an ATTINY and too small to require a larger board + voltage converters. I’ll probably get one to test. Thanks for the link!
It doesn’t support battery charging if that is what you are asking. The schematic is on the product page. It’s basically just the SAMD21G18 and a linear regulator.
OK, thanks for checking. It’s slightly less interesting then as it may still require a buck-boost converter to improve efficiency over a linear regulator. Also it’s very likely that plugging the battery to the 5V pin will go directly through the same LDO regulator as well.
In the same boat. If they had somehow managed to squeeze in a battery charge controller, this would be a major winner for me.
By the way I figured that 3.3V is a real showstopper for IoT. It requires buck-boost to be powered from a LiPo (4.2 down to 2.75V), which takes space and kills efficiency. Having MCUs working on 2.5 or 1.8V would allow to simply use higher efficiency buck converters over the whole battery’s voltage range. I suspect we’ll see more battery-powered DIY projects once this becomes more common. Today even if an ATTINY can work from 1.8 to 5.5V, many of the sensors you plug on it will not work below 3.0 or so :-/
I’m interested in that 2.75V minimum figure. Under what circumstances is that? I’d never discharge a LiPo below 3.0 and usually I’d keep them above 3.4 – in which case a plain old LDO is fine for 3.3V.
Many lithium batteries’ capacities are specified at 2.75V end of discharge. This is also how they cheat on the real capacity. One vendor even insisted on me to discharge till 2.5V to confirm the advertised capacity (and the worst news is that in the end they were right). Between 3.0 and 2.75 you might get 10 or 20 extra percent of juice. It’s more significant with an LDO than with a buck converter where the current will raise as the voltage drops, of course. You likely degrade them faster but it’s mostly the end-of-charge voltage that kills them in fact. And just like you for 3.3V I try to keep them above 3V (since most of the time LDOs and voltage margin make that OK down to 3V). In my tests, ESP8266 work fine down to 2.7-2.8V approximately.
But if you want to respect 3.3 with a buck converter (or even an LDO), you indeed need to stop around 3.4-3.5 and there you can miss about half of the capacity, which is a real problem as it forces you to use twice as big a battery as really required.
Does the sample https://github.com/SeeedDocument/Seeeduino-XIAO/blob/master/USB-to-Serial-Port.md mean that the usual Arduino logging via Serial.println() again does not work via the on-board USB? This would be same issue as on the Longan then. Is this a technical limitation by USB-C (no UART emulation)? This is a nightmare for any dev acitivity. Who wants to use two USB ports and this cable mess?
USB-C certainly doesn’t place any such restriction. I guess this external UART connection example might be for applications that don’t use USB at all?
I checked this code and it seems that it just shows how to make XIAO as an USB to UART debugging tool (for replacing CH320 / CP210x). In fact, because XIAO uses SAMD21, it should use the UF2 bootloader. When plugged it into the computer, the UART will appear for Arduino download and debugging
Thanks Nicho, good to know!
Maybe he changed the title to make the demo more understandable, “How to use Seeeduino XIAO to log in to your Raspberry PI “. Wouldn’t that be better
Cheapest shipping option is $9.21 to the U.S.
Yeah, that really sucks. I’ll wait for a similar board in eBay.
I installed the Seeeduino Xiao into the Arduino IDE. It doesn’t come up as a Com port on device manager. It lists as a Seeed femto M0 under “Other devices”. Double resetting gives me 2 copies of Seeeduino Xiao under “other devices”, and a virtual disk with a UF2 bootloader v3.7.0-33-g90ff611-dirty SFHWRO. No serial port though, and I don’t know how to get it to “Arduino serial” mode. Any ideas? Thanks
I’ve never used Seeeduino Xiao, but If a UF2 drive is mounted that could mean the board is in “bootloader” mode. This normally happens when the reset pin is shorted.
Yes. Thanks Jean-Luc. I believe that’s what’s happening. It shows that the board is up and communicating. What I don’t know is how to get it into serial port mode. If I press reset again, It leaves boot loader mode. It ends up back in “Other devices: Seeed femto M0”.
I’d expect it to be in “Xaio Serial Port (COMxx)” or some such. Any pointers?
Can you flash the board if you select “Seeed femto M0”?
On the Arduino IDE, I can select: Board – Arduino XIAO, but no ports are visible. When I do a compile/download, I can see IDE searching for the com port until it times out. On other M0 variants, if I double-reset while it is searching for a com port, it usually finds it & flashes. I’m thinking this fault is due to the board identifying as a “femto” not a “XIAO”, and the driver doesn’t know to set this as a serial port.I’ve also tried setting the IDE to search for a femto, without success. I’m stuck.