Looking for Inspiration for a 3D Printed Project

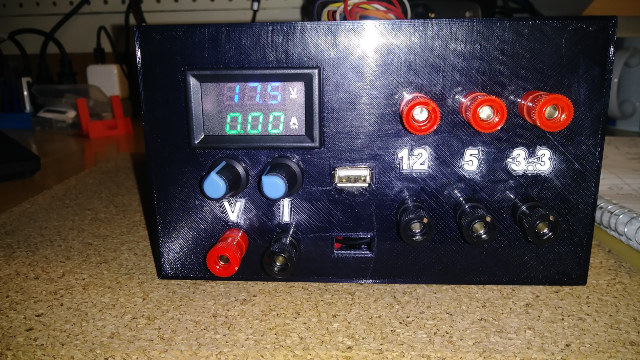
Hello CNX readers. Karl here. I am looking for some inspiration on a practical project to design and print from scratch. I am hoping someone might come up with an idea. I will share on Thingiverse, and I will ship it to you if you live in the continental United States. I will only do the plastic part. For example I just finished a bench power supply from an old PC power supply with the standard voltages and variable one from 2 to 30 volts. This has been done a million times already so just did it for personal use. It will be designed in Fusion 360. I can screen capture the build process, and speed up and put on YouTube if interested. Leave feedback in the comments below. Thank you for your help. Karl JohnsonKarl is a technology enthusiast that contributes reviews of TV boxes, 3D printers, and other […]

Sonoff S31 Smart Socket Review – Power Consumption Monitoring with eWelink Android App

Today we are looking at the Sonoff S31. It is another device in the Sonoff line by ITEAD Studio. Similar to the Sonoff POW, you can see power usage but on the S31 you can keep historical data up to 100 days. This time around I am using it with the standard firmware, and will not be flashing the popular MQTT Tasmota firmware. Specifications per ITEAD website: Max. Current: 16A Voltage Input: 90~264V AC, 50/60HZ Wireless Standard: 2.4GHz, 802.11 b/g/n Receive Sensitivity: 802.11b: <-84dBm(11Mbps); 802.11g: <-68dBm(54Mbps) Output Power: 802.11b:16±2dBm; 802.11g:13±2dBm Security Mechanism: WEP/WPA-PSK/WPA2-PSK Encryption: AES/TKIP Working Temp: -20 °C ~ 75 °C Working Humidity: 10%-80% Product Dimensions: 75.7×39.7x32mm Gang: 1 Weight: 135g Certification: FCC (Download) Sonoff S31 Unboxing & Teardown Taking the S31 apart is rather easy but I did not take it fully apart for fear of breaking it. Just pop the power button off the left side. Then […]

Raiscube A8R 3D Printer Review

Hello Karl here with a look at the Raiscube A8R. If you recall I reviewed the R2 3D printer quite a while ago. I really liked the R2, so when I heard that this newer version came out I reached out to Raiscube directly and asked for a review sample. Raiscube kindly obliged, and I am so glad that they did. The A8R is the upgraded version to the R2. The most prominent differences is the acrylic frame is gone, being replaced with an aluminum frame, and the build time is slashed considerably. Build Volume: 210 x 210 x 225mm Material diameter: 1.75mm Direct Drive Extruder Dual Z 12V/25A power supply Up to 95°C on the bed Up to 250°C on the nozzle Ramps Plus2 Board v1.8.26 Educational Opportunity This review has been in the works since last November. I liked it a lot so wanted to put it through […]

JGAURORA A5 Review – A Large Build 3D Printer That Works (Mostly) Out of the Box

Karl here and today we are going to look at the JGAURORA A5. I specifically asked Gearbest for this printer. Features and specs looks good. Not to mention that you can go from opening the box to printing in 20 min. Nice large build volume of 305 x 305 x 320mm. Color touch screen. Filament runout sensor. Power Fail feature. Power Fail is so nice. I have lost some long prints due to power going out. I have not lost any for filament because I have always been conscious of it but it’s nice to have peace of mind. The A5 has an assisted leveling feature that is nice. When using this feature there are 5 point that it will go to. One in each corner and one in the center and you adjust the bed. It saves a little time and I believe is standard feature in Marlin now. […]

HE3D K280 Delta 3D Printer Review – Part 2: Upgrades, Calibration, and More 3D Prints

Karl here with part 2 of my experiences with the K280. In the first part of HE3D K280 3D printer review, I spoke about some of the challenges with the K280 getting it calibrated and getting Marlin to work and the initial build. In this part, we are going to look at the new effector, cooling solution I designed, calibration, and general use. If you purchase a machine now you get an injected molded effector and 2 24v cooling fans which HE3D sent over after they saw my initial review. If you purchased a kit before they started including these parts you can pick them up here to upgrade. I would like to point out that this is my first Delta printer. I don’t want to really call this a review but a way to show my experiences. First things first If you purchase this kit I urge you to […]

HE3D K280 3D Printer Review – Part 1: Build, Tweaks, and First Prints

Hello Karl here again with another 3D printer review. Today we are looking at an HE3D K280. I saw the brand for the first time on Gearbest a couple months ago and asked for it to review. I never heard of this brand before and have been wanting to review a delta style printer. In my case, I should have been careful what I asked for. It took me quite some time to get it to print utilizing the whole print bed. I experienced several challenges and after defeating them I enjoy this printer quite a bit. Delta style printers mesmerize me with the movements that they make and all the math that goes into moving the extruder in the X, Y and Z. Regular Cartesian printers are rather simple in this respect. Build Volume – 280×600 mm Heated bed No Parts cooling 2020 aluminum and all injected molded parts […]

Tronxy X3S 3D Printer Review – Part 3: Upgrades to Fix Bed Leveling Issues (Permanently)

Karl here. I have had the Tronxy X3S 3D printer for a while now. It prints well but as I mentioned in previous articles I had to level for every print. Actually near the end I would just overpower the stepper motors while the skirt was printing and level. Leveling front to back was not affected. Only the z height. So this worked but it was frustrating. Before that I tried several different things to mitigate. I thought maybe the endstop for Z homing was inconsistent and replaced it. I tried heating the bed for extended period of time thinking that maybe some thermal expansion. Didn’t help. I finally did a major change to the X carriage with success. I even moved the printer to our local library and the bed stayed leveled for a demo. I call this a success, and will show how I did it. Inspiration for […]

Tronxy X3S 3D Printer Review – Part 2: Upgraded Heatbed and RAMPS Board

Karl here. So the bed I mentioned in the first part of Tronxy X3S review is not very good. It took about 10-11 minutes to heat up to 60 deg Celsius. I also mentioned I was going to upgrade the board to a RAMPS board. Today we are going to look at both these upgrades. New Heated Bed I can take no credit for this one but I wanted to pass this along. Folger tech sells a 12v 280w heated bed stick on pad. I picked this up for $20, but is now $22. In order to do this upgrade you will need a MOSFET, 12V/30A power supply, and of course the pad above. Super easy installation. Remove the bed and stick on the self adhesive pad centered. Replace the power supply with new one. Should be self explanatory. In order to power this bed a MOSFET is needed. A […]