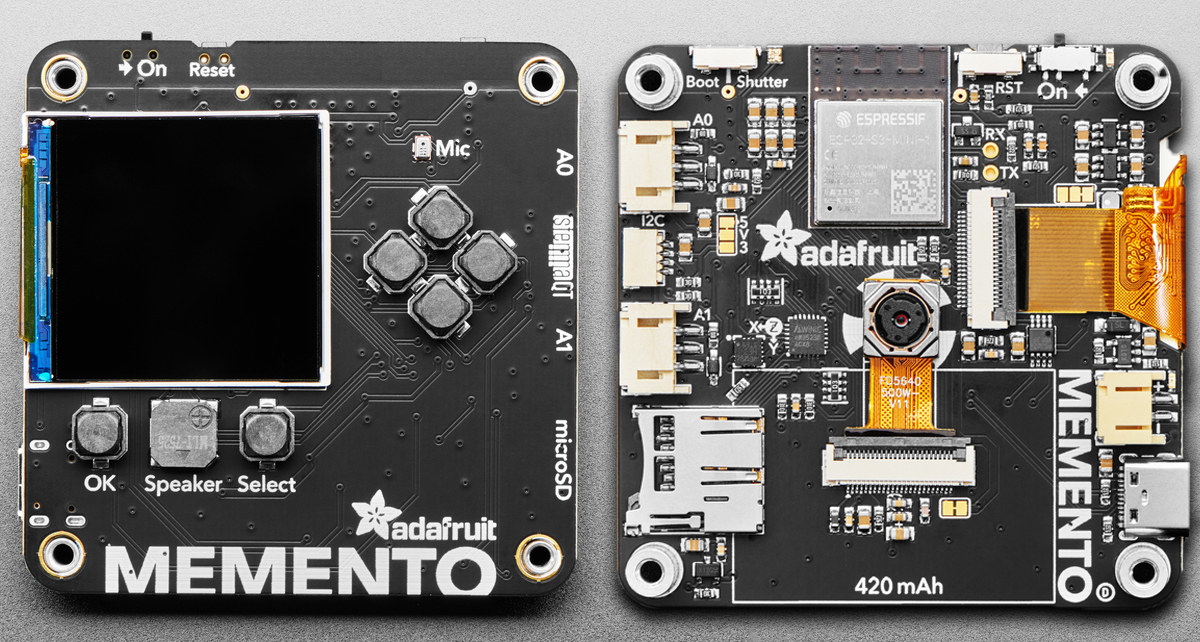
PiSquare enables wireless Raspberry Pi HAT control though ESP8266 and RP2040 MCUs (Crowdfunding)

PiSquare Wireless Raspberry Pi HAT RP2040 & ESP8266

SB Components PiSquare is a board following the Raspberry Pi HAT form factor, and based on Raspberry Pi RP2040 microcontroller & ESP-12E Wireless module in order to control multiple Raspberry Pi HATs wirelessly without stacking them on their Raspberry Pi. The PiSquare uses Socket programming to control multiple Raspberry Pi HATs wirelessly, and for instance, you could connect multiple HATs with SPI or UART without the expansion boards conflicting with each other since the physical interface is handled by the Raspberry Pi RP2040 on each PiSquare connected over WiFi (ESP8266) to the Raspberry Pi SBC. PiSquare hardware specifications: MCU – Raspberry Pi RP2040 dual-core Cortex-M0+ microcontroller @ up to 133 MHz Storage – 16Mbit SPI flash Display – 0.91-inch OLED display Connectivity – 802.11b/g/n WiFi 4 via ESP-12 (ESP8266) module USB – 1x USB Type-C port 40-pin header and form factor compatible with the official Raspberry Pi HATs Power Supply […]

ESP32 Composite Video Library outputs PAL, SECAM and NTSC, supports LVGL

ESP32 video composite library

It’s been possible to use the I2S for video output on ESP8266 and ESP32 chips for years, but aquaticus’ ESP32 Composite Video Library is may simplify the task of outputting PAL, NTSC, or SECAM video signals from any Tensilica-based ESP32 platforms. The library does not require any external hardware, and you can just connect an RCA connector to GPIO25 (I2S data) and GND, plus integration with the LVGL library makes it easy to create graphical user interfaces as showcased with the captures below.   The library supports grayscale video output (no color at this stage), multiple resolutions from 384×288 to 720×288 at up to 25 or 30 Hz, six different pixel clocks for PAL/SECAM and NTSC, as well as six framebuffer formats with namely RGB565, RGB332, Grey 8 bits/pixel, Grey 4 bits/pixel, Monochrome 1 bit/pixel, and LVGL monochrome 1 byte/pixel. You’ll find the source code for the ESP32 Video Composite […]

LOLIN C3 Mini ESP32-C3 board is compatible with Wemos D1 Mini shields

Lolin C3 Mini

Wemos LOLIN C3 Mini board is powered by Espressif ESP32-C3 WiFi and BLE RISC-V microcontroller and follows the company’s earlier Wemos D1 Mini (ESP8266) and LOLIN S2 Mini (ESP32-S2) form factor for compatibility with the original stackable Wemos D1 shields. The tiny board comes with 4MB flash embedded in the ESP32-C3 chip, a USB Type-C connector, reset and user buttons, as well as sixteen through holes for GPIOs, VBUS, 3.3V, and ground signals. LOLIN C3 Mini V1.0.0 specifications: SoC – Espressif Systems ESP32-C3FH4 single-core 32-bit RISC-V (RV32IMC) microcontroller up to 160 MHz with 400 KB SRAM, 4MB Flash Connectivity – 2.4 GHz WiFi 4 and Bluetooth 5.0 LE (in SoC) Expansion headers – 2x 8-pin headers with up to 12x GPIO, ADC, I2C, SPI, UART (3.3V I/O voltage) USB – 1x Type-C USB for 5V power and programming Misc – Reset button and button 0 also used to enter Device […]

Pockit modular Linux computer gets a Raspberry Pi CM4 upgrade

Pockit modular computer

We first wrote about the Pockit modular Linux computer with hot-plugging magnetic blocks about a year ago. The system was based on a STM32+ESP32 mainboard with a socket for an optional Raspberry Pi Compute Module 3 and included magnets and electrical contacts to snap and hot-plug modules/blocks while the computer is running. The developer (Anil Reddy) has made good progress with the project and added the option to use a Raspberry Pi CM4 with Pockit (provided you can find one) to improve performance, for example for computer vision. Other changes include support for AI accelerators, an improved dashboard, home automation integration, and more. Pockit now supports over 80 feature BLOCKS ranging from a rotary encoder to a microSD card reader to various camera types, an HDMI block, AI accelerators, and so on. All of which can be magnetically snapped while the computer is running, and automatically detected in the dashboard. […]

ESP8285 WiFi DIP module replaces ATMega328P MCU on Arduino UNO board (Crowdfunding)

Arduino UNO WiFi DIP Module

Released over 10 years ago, Arduino UNO is still the best-selling Arduino board, but lacking WiFi in the IoT era is not ideal, so Gianluca Martino, Arduino co-founder and working with the company until 2015, decided to design the Jolly DIP module based on ESP8285 WiFi chip that can replace the ATmega328P 8-bit AVR DIP-40 microcontroller. Since ESP8285 cannot provide all I/Os, notably analog inputs offered by ATmega328P, Gianluca combined it with the ATMega328PB microcontroller in a compact SMD package to offer firmware compatibility plus WiFi connectivity in the same DIP form factor. Jolly module specifications: MCU – Microchip ATMega328PB 8-bit AVR microcontroller with 32 KB ISP Flash, 1 KB EEPROM, 2 KB SRAM (Based on data from the datasheet) Wireless chip – Espressif Systems ESP8285H16 WiFi SoC with 2MB integrated flash plus ceramic antenna Communication interfaces between the two chips – SPI + UART (the latter exclusively for ESP8285 […]

Adafruit ESP32 Feather V2 ships with 8 MB Flash, 2 MB PSRAM, USB-C port, and more

Adafruit ESP32 Feather V2

Adafruit ESP32 Feather V2 (aka Huzzah32 Feather V2) is an upgrade to the company’s HUZZAH32 ESP32 Feather, still based on ESP32 WiFi & Bluetooth processor, and designed with the initial goal of replacing the obsolete CP2104 with the CP2012N USB to TLL chip. But Adafruit ended up doing a complete redesign with extra storage (8MB flash in total), 2MB PSRAM, a USB-C port replacing the Micro USB port, an extra tactile switch, an RGB LED, lower power consumption, and more. Adafruit ESP32 Feather V2 specifications: Wireless module – Espressif Systems ESP32-PICO-Mini-02 (PDF datasheet) with an ESP32 dual-core Xtensa processor @ up to 240MHz with 2.4 GHz WiFi and Bluetooth Classic/LE, 8MB flash, 2MB PSRAM, PCB antenna, FCC/CE certification. USB – USB Type-C port for power and programming via CP2102N chipset I/Os 16-pin and 12-pin GPIO headers with GPIOs, analog inputs, I2C, UART, SPI, DAC, etc… STEMMA QT connector for I2C devices, […]

M5Stamp C3U IoT module relies on ESP32-C3’s own USB interface for firmware programming

M5Stamp C3U

M5Stamp C3U is an update of the M5Stamp C3 RISC-V IoT module with heat-resistant cover, support for WiFi 4 and Bluetooth 5.0, that does without CH9102 USB to TTL chip, relying instead on the internal USB interface of ESP32-C3 processor to handle serial programming of the firmware, and gaining on extra GPIO pin in the process. While several ESP32 processors come with a built-in USB interface, many boards still use an external USB to TTL chip such as CH340 or CP2102 to handle the serial interface used for debugging and flashing the firmware likely because of limitations when using ESP32-C3’s USB serial/JTAG controller console, but M5Stack probably considered those to be workable, and the small cost-saving beneficial. M5Stamp C3U specifications: WiSoC – ESP32-C3FH4 32-bit single-core RISC-V processor @ up to 160 MHz, with 384KB ROM, 400KB SRAM, 8KB RTC SRAM, 4MB embedded flash, WiFi and Bluetooth Connectivity 2.4 GHz WiFi […]

Sonoff ZBBridge gateway can be used as a Zigbee router/repeater

Sonoff ZBBridge Zigbee router

Sonoff ZBBridge WiFi to Zigbee gateway was introduced in April 2020, and a few months later got support for Tasmota ESP8266 firmware and Gecko firmware for either Home Assistant or Zigbee2MQTT support. But there’s now a new Tasmota firmware that converts Sonoff ZBBridge into a Zigbee router (a.k.a. Zigbee Signal Repeater or Zigbee Range Expender) following a request on Tastoma Github’s issue tracker from last year. The firmware, unofficial yet signed, was released a few days ago by xsp1989 Github’s user with a link to the firmware on Google Drive. Digiblur successfully tried it out on its own Sonoff Zigbee bridge and published the instructions. Assuming you already have Tasmota flashed to the device, switching to the router software is basically a firmware upgrade from the Tasmota web interface. Once the update is complete, you’ll still need to access the console in Tasmota in order to run a command to […]

Exit mobile version