
I reviewed Rikomagic MK22 TV box about two weeks ago, and with the firmware I had, online firmware update was not enabled, and the company only released .IMG firmware for Amlogic USB Burning Tool, a windows-only tool that’s not well designed, and requires some procedure that vary slightly from boxes to boxes which in some cases forces to buy a male to male USB cable.
I’ve now started reviewing R-Box Pro TV box also based on Amlogic S912 processor, online firmware update is not working either, and again I only managed to find .IMG firmware for the box on GeekBuying. However, I’ve been informed that “USB Burning Tool” firmware can now be flashed through a micro SD card, or USB flash drive with all recent Amlogic TV boxes, so I’ve tried this method instead of R-Box Pro, and decided to report my experience in this post following some instructions on Freaktab made by user Calc. I’ll show instructions in Linux (which could be further streamlined), and then Windows.
Linux Method
After downloading and extracting the rar’ed firmware file (twice), I ended up with a single img firmware files (aml_s912_q6330-R-BOX-PRO-3gddr-mac-20161015.img).
First we’ll need to have a tool to extract some files from the firmware. Create aml-upgrade-package-extract.c with the code below which I found on Freaktab too and slightly modified it to parse the firmware filename:
|
1 2 3 4 5 6 7 8 9 10 11 12 13 14 15 16 17 18 19 20 21 22 23 24 25 26 27 28 29 30 31 32 33 34 35 36 37 38 39 40 41 42 43 44 45 46 47 48 49 50 51 52 53 54 55 56 57 58 59 |
#include <errno.h> #include <inttypes.h> #include <stdio.h> #include <stdlib.h> #include <string.h> #include <arpa/inet.h> uint32_t convert(uint8_t *test, uint64_t loc) { return ntohl((test[loc] << 24) | (test[loc+1] << 16) | (test[loc+2] << 8) | test[loc+3]); } void main (int argc, char **argv) { FILE *fileptr; uint8_t *buffer; long filelen; FILE *f; char *filename; uint64_t record; uint64_t record_loc; uint64_t file_loc; uint64_t file_size; if (argc <= 1) { printf("Usage: %s [firmware-file-name]\n", argv[0]); exit (0); } fileptr = fopen(argv[1], "rb"); fseek(fileptr, 0, SEEK_END); filelen = ftell(fileptr); rewind(fileptr); buffer = (uint8_t *)malloc((filelen+1)*sizeof(uint8_t)); fread(buffer, filelen, 1, fileptr); fclose(fileptr); for (record = 0; record < (uint8_t)buffer[0x18]; record = record + 1){ record_loc = 0x40 + (record * 0x240); filename = (malloc(32)); sprintf(filename,"%s.%s",(char *)&buffer[record_loc+0x120], (char *)&buffer[record_loc+0x20]); file_loc = convert(buffer,record_loc+0x10); file_size = convert(buffer,record_loc+0x18); f = fopen(filename, "wb"); if (f == NULL) { printf("ERROR: could not open output\n"); printf("the error was: %s\n",strerror(errno)); free(filename); continue; } fwrite(&(buffer[file_loc]), sizeof(uint8_t), (size_t)file_size, f); fclose(f); free(filename); } free(buffer); } |
Now compile the tool with gcc:
|
1 |
gcc aml-upgrade-package-extract.c -o aml-upgrade-package-extract |
and run the thing on the firmware file:
|
1 |
./aml-upgrade-package-extract aml_s912_q6330-R-BOX-PRO-3gddr-mac-20161015.img |
It will extract a bunch of files:
|
1 2 3 4 5 6 7 8 9 10 11 12 |
jaufranc@FX8350:~/edev/amlogic/s912$ ls aml_s912_q6330-R-BOX-PRO-3gddr-mac-20161015.img logo.PARTITION aml_sdc_burn.ini logo.VERIFY aml_sdc_burn.UBOOT manifest.xml aml-upgrade-package-extract meson1.dtb aml-upgrade-package-extract.c platform.conf bootloader.PARTITION recovery.PARTITION bootloader.VERIFY recovery.VERIFY boot.PARTITION system.PARTITION boot.VERIFY system.VERIFY DDR.USB UBOOT.USB keys.conf |
You’ll just need aml_sdc_burn.ini and aml_sdc_burn.UBOOT, plus the IMG file itself to create a bootable mass storage device.
Now find the device for your micro SD card (formatted with FAT32) with lsblk:
|
1 2 3 4 5 6 7 8 9 10 11 12 13 14 15 |
lsblk NAME MAJ:MIN RM SIZE RO TYPE MOUNTPOINT sda 8:0 0 931.5G 0 disk ├─sda1 8:1 0 915.9G 0 part /media/hdd └─sda2 8:2 0 15.6G 0 part sdb 8:16 0 111.8G 0 disk └─sdb1 8:17 0 111.8G 0 part / sdc 8:32 0 931.5G 0 disk └─sdc1 8:33 0 931.5G 0 part /media/jaufranc/SEAGATE EXTENSION sdd 8:48 1 3.8G 0 disk └─sdd1 8:49 1 3.8G 0 part /media/jaufranc/6106-E11B sr0 11:0 1 630M 0 rom /media/jaufranc/CanonEOS285W loop0 7:0 0 75M 0 loop /snap/ubuntu-core/423 loop1 7:1 0 4.3M 0 loop /snap/canonical-livepatch/17 loop2 7:2 0 4.3M 0 loop /snap/canonical-livepatch/15 |
In my case, it’s /dev/sdd, but I’ll use /dev/sdX in the instructions below, just change the command with yours.
|
1 2 3 4 |
sudo umount /dev/sdX* sudo dd if=aml_sdc_burn.UBOOT of=/dev/sdX bs=1 count=442 sudo dd if=aml_sdc_burn.UBOOT of=/dev/sdX seek=1 skip=1 bs=512 sync |
and finally, re-mount the SD card/flash drive, copy the firmware file and aml_sdc_burn.ini to the root of the device, and rename the firmware to aml_upgrade_package.img to match the string in aml_sdc_burn.ini:
|
1 2 3 |
cp aml_sdc_burn.ini aml_sdc_burn.UBOOT [device-mount-point] cp aml_s912_q6330-R-BOX-PRO-3gddr-mac-20161015.img [device-mount-point]/aml_upgrade_package.img sudo umount /dev/sdX* |
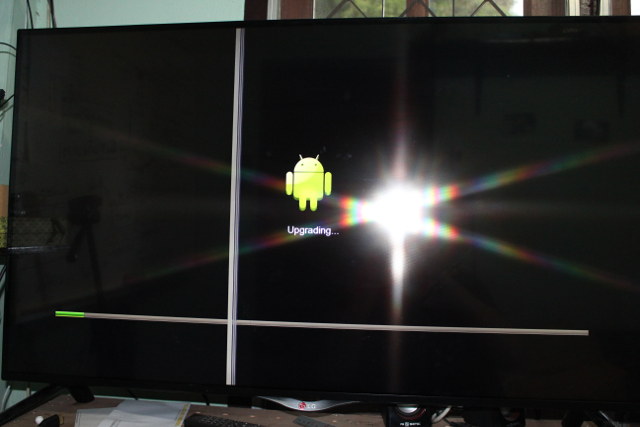
Now make sure no other USB devices or SD cards are inserted in the TV box, and insert your bootable (micro) SD card or USB flash drive into the TV box. If your TV box is fully bricked, you have nothing to do, and the update should start straight away, but if it is partially bricked or just working fine, you still need to press the recovery button, apply power, and release the button in order to enter recovery mode. The upgrade should then start automatically as shown below.
Patiently wait for the update to complete and you should be all good. Please note that I first tried with a USB flash drive, and the method did not work. Once the update is complete, you’ll see the “Android success” logo.
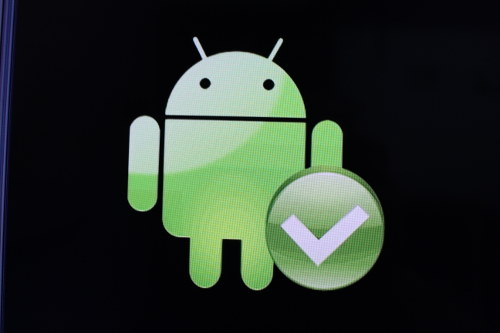 At this point, remove the micro SD card, and power cycle the board to complete the final steps of the update, and within one or two minutes you should get the Android launcher. If instead, the firmware ends with “Android failure” logo showing a red cross, verify your firmware MD5 (e.g. with md5sum in Linux) to make sure it’s not corrupted. If it is, re-download the file and/or re-copy the file to the micro SD card.
Windows Method: Burn Card Maker
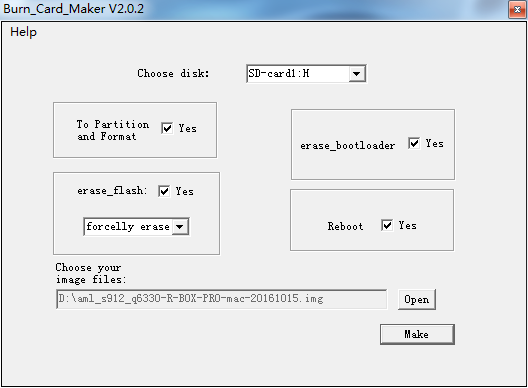
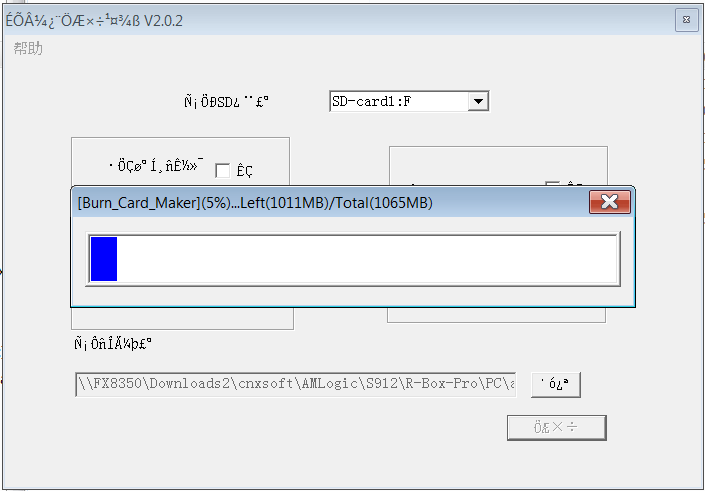
If you are a Windows user it’s much easier as you just need to use Burn_Card_Marker tool (bootcardmaker.exe), which you can download here or there. The documentation shows the interface as shown below.
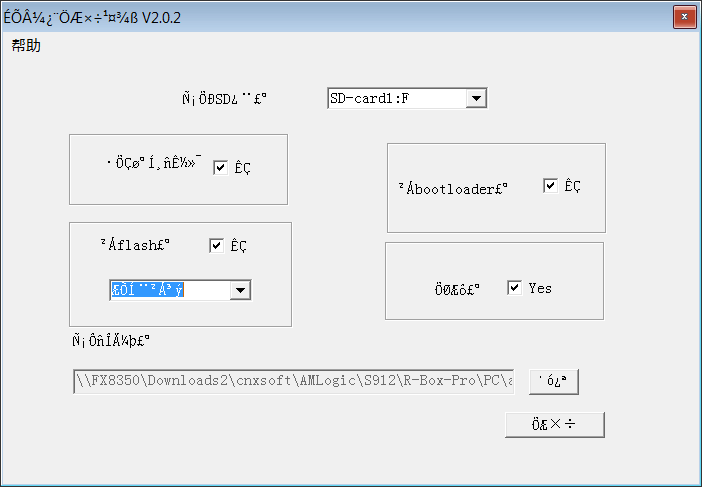
But after starting the program in Windows 7, and changing the language with the top menu, second option to English, it stayed in Chinese language and looked like the screenshot below instead.
[Update: After changing the language to English, select the third option in the top menu to apply the change…
…restart the app, and it will be in English.]
It’s not really a big issue, but you can still select your SD card device (F: drive in my case), load the file, and press “Make” button to start creating a bootable recovery (micro) SD card.
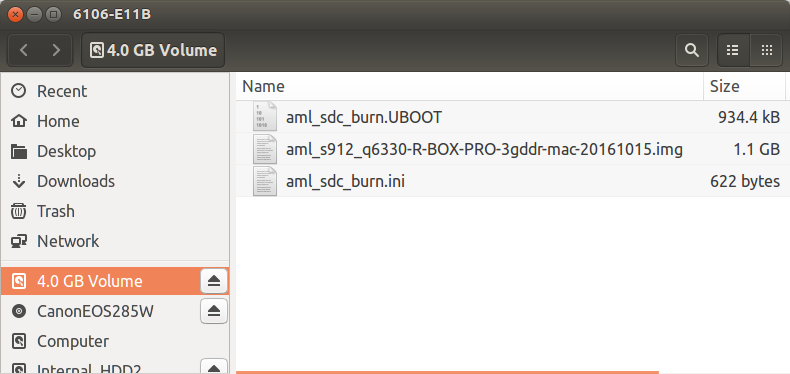
You’ll get a “Success!” pop-up window and the end, and the content of the SD card will show the firmware and the two aml_sdc_burn files.
Now you can insert the micro SD card in the TV box, enter the recovery menu with the pinhole or other method for your TV box, and the firmware update will start automatically.
Good Luck!

Jean-Luc started CNX Software in 2010 as a part-time endeavor, before quitting his job as a software engineering manager, and starting to write daily news, and reviews full time later in 2011.
Support CNX Software! Donate via cryptocurrencies, become a Patron on Patreon, or purchase goods on Amazon or Aliexpress. We also use affiliate links in articles to earn commissions if you make a purchase after clicking on those links.


On a 2GB card, the partition start had to be moved or UBOOT didn’t fit. (mount failure after dd’ing)
I wonder if getting Update&Recovery to reboot via a random .zip file on the card would work?
@cnxsoft Copying aml_sdc_burn.UBOOT is probably redundant, no?
> cp aml_sdc_burn.ini aml_sdc_burn.UBOOT [device-mount-point]
Not redundant. These files are necessary for it to boot – the box is not smart enough to extract them from the firmware image so if they are missing on the microSD, it will treat this as a data microSD, not a bootable microSD. I have also found that having both a bootable micoSD in its slot and another bootable micoSD in a USB reader attached to one of the USB ports will cause the box to boot neither and instead go to the internal maintenance code that provides a CLI terminal (if that is not also bricked).
@GanjaBear
It could be, but at first I had troubles without it, and when I tried the Windows method, I discovered the tool also copied that file to the micro SD card.
Hi, what if i dont have the IMG file, but have an OTA zip?? is there a way i can flash?
I followed the steps to make a bootable SD card, and I can confirm that it in fact does NOT start right away. All it does is go to the recovery menu.
In Linux, you can try to create boot card of these files for this manual. You need to follow two boot loader entries.
dd if=u-boot.bin.sd.bin of=/dev/mmcblk0 conv=fsync bs=1 count=442
dd if=u-boot.bin.sd.bin of=/dev/mmcblk0 conv=fsync bs=512 skip=1 seek=1
https://yadi.sk/d/U41GQWcJsapLV
@FGBonn
If you have an OTA image, then you can just copy the file to the micro SD card, and use the update app to flash it, or enter recovery mode and select your micro SD card to complete the update. If your device is bricked then you can’t use the OTA image, you need the IMG one.
@AARON
I’m assuming you used the Linux method. Maybe I missed a step in the instructions, but it did work for me. Please let us know if balbes150 extra line fixed it for you.
I have also the rbox pro but the 2g variant downloaded the latest firmware.unzip the file and got the .img file downloaded burn card maker tool and make a bootable sd card. When i used it in the sd card and reset using the toothpick method the robot logo and x appear and does nothing. When i create it to a 4gig usb disk it just went to the stock recovery. Pls help me
@Vin
Sometimes to possibly check:
* Make sure all options were ticked in the window program
* Make sure you download the right firmware for your box, e.g. for R-Box Pro you can 2GB and 3GB firmware
* Maybe try micro SD card from 4 to 16 GB, but nothing smaller or bigger.
@cnxsoft
Yes all option are tick in the burn card maker. R-BOX Pro 2+16GB PC Upgrade Firmware–>this is what i downloaded from geekbuying website. For the sd card i used 8 gig and for the usb disk its 4db. So im wondering what am i missing
I too cannot make the SD Upgrade work… I spent 4 hours last night using the tools and step described above. I insert the 4gb SD card and press the reset button – I get a green android with red cross only.
If I remove the SD and go to recovery, I navigate to the SD card but the .IMG file is not visible at all… I am assuming because it is looking for a .ZIP file instead…
Life would be ALOT EASIER if they simply provided the .ZIP version instead (right)??? There would be no need for SD burn tools. I am trying to re-download the IMG file again and go through the steps again. I have no idea why! can someone provide feedback?
@davidMetal
If you used the method above with the IMG firmware, then flashing should start automatically. In you get into the recovery menu that means something did not work.
I also had a red cross Android before due to a corrupted download:
@cnxsoft
Thank you @cnxfsoft.
I appreciate your response.
I will review the downloaded file again using MD5 to confirm it is not corrupted.
I was also thinking – the file name of the latest R-Box Pro 3g on the geekbuying site includes “(” “)” parenthesis…
I have a theory if I remove the non alpha characters before I use the burn tool I may have better luck? Unfortunately, I will not have a chance to try it again for another 2 days. 🙁
I will keep you posted if this works.
@cnxsoft
Thank you @cnxsoft
I figured out why the SDCard process did not work!
The filename from Geekbuying had named the firmware file with special characters… I removed “(” and “)” and “+” and the upgrade by sd card worked.
I still have NO WIFI but this is seperate to the topic on this page. I am so furious the wifi does not work! >:(
THANK YOU!
I was almost blowind my brain to figure out the problem…… now I know the problem!
just follow this guy advice!
@cnxsoft
Will this method work to flash a Mecool BB2-Pro s912 Box with 3Gb DDR4 16GB Rom
or is there a specific method for said box?
preferably for Win10
Thanks in advance,
Phatboyj
…
.
@Phatboyj
That’s for Amlogic TV boxes, so it should work in BB2 Pro too.
If it does not then revert to Amlogic burning tool method.
Note that many companies simply release a ZIP file that just need to be copied on a micro SD card to do the update.
Hello, I have a question about my boxes for anyone that might be able to help.
I have purchase 4 separate Mini M8S II S905X boxes that have identical pre-installed setups. They came with Kodi 16 installed and I updated ONE of them to Kodi 17. After this ALL of the installed content associated with Kodi was gone. Being a newbie to these type boxes but a veteran of computer world, I spent weeks of “finding” the required installation procedures and files out of all the “crap” all over the internet, then installing all the accessories, a new skin, figuring out customizing new skin, testing all the apps (which Kodi has now shut off access to some in version17), and setting the cache correctly with ares wizard.
Now finally down to the question:
Is it somehow possible to download my entire systems settings, programs AND zip files COMPLETELY from this machine to a SD card and then install ALL that info including settings on these 3 other identical machines? Or use a USB to USB cable and somehow copy the system from the one to the other?
If so ANY instructions or links would be GREATLY appreciated!
This would undoubtedly save me a week of setup on each machine. I did a backup of this machine on a USB stick. Using the system backup AND then the Kodi backup. Then inserted the USB into the other machine. It wouldn’t find the backup file. I then installed Kodi 17 on the second machine and tried again. I also tried backup with ares wizard and still the second machine would not use the backup.
@Poetatoman
If you go on Google Play, you can install the Complete Kodi setup Wizard by The app guru
It can install or remove builds with a button click. I recommend it to you 🙂
Yes, However I lose ALL my custom skin settings, favorites list, optional programs, ect., PLUS the last 4 weeks of work just to start all over again, no thanks…
I’m looking to copy my entire ROM to SD and then copy that to the 3 other identical machines.
So far I’ve tried:
1. ROM Manager, (which was GREAT at fixing permissions to everything and I’m pretty sure it accomplished rooting. It has the option of Installing ROM from SD card, but NOT to save current ROM to SD card.) I also don’t really understand how to use it which may be my problem on this one.
2. TWRP Manager (which states upon startup that the program is NO LONGER able to choose SD for backup and MUST use the ROM drive which makes NO sense. 4.7 GB of info backing up to an 8 GB ROM with 4.7 GB already there. Not sure how that would even work.
3. Superuser which seems to just want you to upgrade to PRO to even use it so is USELESS to me.
@Poetatoman
From your comment above, I understand you’ve already use Kodi backup & restore instructions @ http://kodi.wiki/view/Backup using the Backup add-on. But while you can backup your Kodi 17 files, you can’t restore then on a similar model also pre-installed with Kodi 17.
If so, I don’t have a solution, but have you already asked on Kodi forums?
Thanks for this input, but I am not trying to ONLY back-up just the Kodi program. I purchased 4 identical Amlogic S905X boxes. After 4 weeks of customizing 1 of them, I now want to “copy” the ENTIRE BOXE’S ROM from this 1 machine to the other 3 directly, with USB, OR with SD. Kodi PLUS ALL the other base programs other than Kodi that come on before Kodi.
I see many ways of downloading other peoples AND update .img files for this machine. I am trying to find out if there is any program or hardware which will copy this particular box’s ENTIRE SYSTEM. Then put it on the other boxes. It seems that this (should) be possible. After all the producer made 1 and then copied that system to thousands after it. Would this technology make it out to the public or is it just done by the manufacturer ONLY? Thanks again! The MBOX’s main backup won’t load into another machine either.
@Poetatoman
Sorry I misunderstood.
Normally companies develop the firmware using an SDK, commit changes to a version control repository, and then build the firmware image from that SDK before flashing it to the board. They don’t flash the image to a board, then make some modifications there, and read it back.
There might be a way, but I just don’t know it. You could use dd to backup the complete eMMC flash, and then dump it on another device. This could word, but this could also brick your target device. The guys at freaktab are very good at this, but I think they do the changes inside the firmware image, instead of the doing it on the box. You could ask on their forums if you have not done so already.
Hi
I just reinstalled the software of my Android tv box i.e CSA93 32 GB ROM 3 GB ram. But after reinstalling I lost my connection to WiFi.
Neither my wifi is connects nor its highlighting.
So pls guide me which firmware I should install.
Regards
Umar amin
@Umar Amin
The likely reason you don’t have WiFi anymore is because the image you used is not made for your TV box. You need to find the right image. Contact your seller to try to get it.
Not so sure about TWRP Manager, but regular TWRP works for me.
Boot into recovery, select storage and backup the data partition only, or the boot,system and data partitions to ensure that all boxes are identical. Boot into recovery, select storage and restore on the other three boxes.
Just search for TWRP+S905X
Hi, I have H96 pro plus, and tried the bootable card method, and on the boot, it only showed H96 logo and then no more display, and no further activity, plus my box doesn’t load/boot, only blue light appears and that’s it, any suggestion how to recover from this?
@Ibraheem
If the SD card methods above do not work, then try Amlogic USB burning tool.
Does somebody have a download link for a “Wetek Core” full .img file?
Not just the ***** OTA file…
Just have to say how pleased I am to see some source code. I received a H96 Pro+ a couple of days ago and decided to upgrade the firmware shortly after getting the box up and running. In exploring the procedure for performing the upgrade, I was shocked at how many folk are willing to download an executable from some file-sharing site and run it on their workstation. That’s putting a lot of trust in several parties. My workstation is just too important to me for that kind of recklessness.
But your snippet of C source is perfectly readable. I don’t have to trust it, because I can understand exactly what it is doing. Thanks for sharing it. I’ll sleep more soundly tonight.
Hello
Have anyone here been able to update the firmware on a Rikomagic media player using the SD (microSD) card method ? thanks
Hello,
I do it for my bricked MINI M8S PRO 2G/32G s912 but burning failed
I change erase_flash on aml_sdc_burn.ini file to “1” but after few houres a screen is blocked with message “upgrading…”
I also tried with USB BURNING TOOL but i have this error after few seconds:
[23:22:06 454][HUB3-2][Inf]————-ERASE FLASH———–
[23:22:06 454][HUB3-2][Inf]–disk_initial 1
[23:22:06 454][HUB3-2][Inf]–Send command success
[23:22:07 641][HUB3-2][Err]–failed:[23:22:07 641][HUB3-2][Err]–Check command return failed
Any idea?
Regards
[23:22:07 673][HUB3-2][Err]–[0x30201004]UBOOT/Disk initialize/Send command/Error result
Hi,
First of all; thank you for sharing this information!
I tried creating a bootable sdcard (8GB microsd) using the instructions below. But for some reason the card becomes unreadable/unmountable with these parameters.
sudo umount /dev/sdd1
sudo dd if=aml_sdc_burn.UBOOT of=/dev/sdd bs=1 count=442
sudo dd if=aml_sdc_burn.UBOOT of=/dev/sdd seek=1 skip=1 bs=512
sync
Not sure what I am doing wrong. I checked the dd manual and information on this website: http://linux-sunxi.org/Bootable_SD_card but that did not make clear for me how I should change the command to work with my particular card. Could someone please guide me in the right direction? I have no access to a windows machine; was thinking about running the bootcardmaker.exe tool in Wine or another VM but the link to the file on Mediafire seems to be expired.
Any help would be much appreciated.
Sandor
@Poetatoman
you could use ares backup to make a full system and kodi backup to usb… install ares on the other boxes and use the restore function to make em all duplicates
@Sandor
Have you seen the very first comment in this thread? It’s probably a safe bet your problem is the same and it’s necessary to move the start of the 1st partition to make more room for uboot.
As for the latter part of the comment, I was simply musing on how to get this method to work with no reset switch present. I guess it’s not possible.
Doesn’t work for me with a USB thumb drive. First time I flashed with an SD card. Right now I don’t have one. It just boots into TWRP. Won’t do anything else.
Hi and sorry for my english.
Android or another Linux distro can run directly from SDCARD ?
I have a S802H box with bad NAND and can’t replace because pcb trace (pad) are broken.
I tried with image for ODROID C1 (S905) but is not same CPU.
Many thanks!
EEEE I3000000032940xf100110003877500EEEE I400000004294_M8_BL1_10221D113B323EEEE I3000000032940xbbbb000026A22525EEEE I3000000032940xf100110003877500EEEE I400000004294_M8_BL1_10221D113B323EEEE I6000000062940 stage is skipped63936475EEEE I3000000032940xbbbb000126B22525
———————————————————————–
* Welcome to Hardkernel’s ODROID-C… (Built at 19:33:00 Dec 8 2014) *
———————————————————————–
CPU : AMLogic S805
MEM : 1024MB (DDR3@792MHz)
@Stefan
It could be possible, but I don’t think there’s a ready to use image. So you’d need to work a bit on it.
Once I could boot from the network on an Amlogic S802 box: https://www.cnx-software.com/2014/05/15/how-to-boot-linux-server-amlogic-s802/
I could get to the terminal, but then I did not try further.
@cnxsoft
Many thanks for response!
I’ll try but I don’t know if I can do something.
@Sandor
Perhaps you are having trouble because you are following instructions from linux-sunxi. They are for Allwinner Technology firmware. Perhaps AMLogic firmware expects a different format.
@cnxsoft
Thanks for this article. I’m trying to figure out how to update an S912 box.
In you C code, you try to report strerror when the fopen fails. Unfortunately you use errno after a printf and that printf might have disturbed errno. The simplest fix is to combine the two printfs into one so that errno is fetched before the printf is called.
Just to be bulletproof, I’d put “errno = 0;” immediately before the fopen.
@lev2k
Did you find IMG for Wetek Core? I need the same (hard brick).
work for h96 pro plus
but for h96 max plus notwork and when push make button error
L100aml_sdc_burn.uboot and bootloader.partion all not in package
Can’t conpile
# gcc aml-upgrade-package-extract.c -o aml-upgrade-package-extract
aml-upgrade-package-extract.c: In function ‘main’:
aml-upgrade-package-extract.c:24:1: error: stray ‘\302’ in program
�� if (argc <= 1) {
^
aml-upgrade-package-extract.c:24:2: error: stray ‘\240’ in program
�� if (argc <= 1) {
^
aml-upgrade-package-extract.c:25:1: error: stray ‘\302’ in program
�� printf("Usage: %s [firmware-file-name]\n", argv[0]);
^
aml-upgrade-package-extract.c:25:2: error: stray ‘\240’ in program
�� printf("Usage: %s [firmware-file-name]\n", argv[0]);
^
aml-upgrade-package-extract.c:25:3: error: stray ‘\302’ in program
�� printf("Usage: %s [firmware-file-name]\n", argv[0]);
^
aml-upgrade-package-extract.c:25:4: error: stray ‘\240’ in program
�� printf("Usage: %s [firmware-file-name]\n", argv[0]);
^
aml-upgrade-package-extract.c:25:5: error: stray ‘\302’ in program
�� printf("Usage: %s [firmware-file-name]\n", argv[0]);
^
aml-upgrade-package-extract.c:25:6: error: stray ‘\240’ in program
�� printf("Usage: %s [firmware-file-name]\n", argv[0]);
^
aml-upgrade-package-extract.c:26:1: error: stray ‘\302’ in program
�� exit (0);
^
aml-upgrade-package-extract.c:26:2: error: stray ‘\240’ in program
�� exit (0);
^
aml-upgrade-package-extract.c:26:3: error: stray ‘\302’ in program
�� exit (0);
^
aml-upgrade-package-extract.c:26:4: error: stray ‘\240’ in program
�� exit (0);
^
aml-upgrade-package-extract.c:26:5: error: stray ‘\302’ in program
�� exit (0);
^
aml-upgrade-package-extract.c:26:6: error: stray ‘\240’ in program
�� exit (0);
^
aml-upgrade-package-extract.c:27:1: error: stray ‘\302’ in program
�� }
^
aml-upgrade-package-extract.c:27:2: error: stray ‘\240’ in program
�� }
^
Are you trying to compile the program in Windows? If so, you may have to convert the file to Windows format, but if you are running Windows 10, probably better build the program in Windows subsystem for Linux (WSL).
I use Archlinux
# uname -a
Linux MY-PC 4.19.9-arch1-1-ARCH #1 SMP PREEMPT Fri Dec 14 00:58:26 UTC 2018 x86_64 GNU/Linux
Maybe you need some libraries
I think it may be a copy/paste problem. You seem to have special characters in your text file.
Yes, exactly, I just solved it ^^
Thank you
I have created a script to make life easier for some users. Feel free and complete or change it to your liking.
https://gitlab.com/satriani-vai/tv-box_card_creator/blob/master/TV-Box_card_creator
And please report the bugs if you found any 😉
Awesome, vielen Dank!!!!
I tried run this by sudo gcc -o TV-Box_card_creator.c
and i get gcc: fatal error: no input files
can you say how use this 🙂
You just have to run the script, it will compile the program.
In case you want to build the code with gcc yourself, type:
You asked for the output (compiled and linked object code) to be written to TV-Box_card_creator.c
A very bad idea.
Thanks a lot for the instructions, was really helpful. One note, on my device I had to keep the reset button held during the entire process otherwise it would freeze (no idea why). If you have some soldering skill, I soldered jumper cables to gnd, tx, rx pads, having a serial terminal to monitor this process is really handy.
Boa tarde amigo. Serve tambem para Rockchip?
It’s been possible for a while @ https://www.cnx-software.com/2014/12/11/boot-ubuntu-linux-or-android-from-an-sd-card-on-rockchip-rk3288-devices/
Those instructions are somewhat old, but hopefully they still work.
I thought I had solved my problem. I have a Scishion V88 PRO that has no reset button. Perhaps for my mistake in using USB BURNING ROM, the box is no longer recognized by the Windows USB port. If the food stops with the Amlogic-s905x screen and does not go further. I was hoping that with your solution you would start by reinstalling the firmware. I did the microsd creation procedure with Windows, but nothing happens. Maybe you should boot from the microsd card, but not having the reset button I don’t know how to do it. If you can help me I would thank you, otherwise I have to throw the box in the garbage.
I’m not sure what your problem may be, but make sure you are using an microSD card with a capacity of 32GB or lower.
Good evening.
Thank you for the above howto. I did everything as described and have now a SDCard with the files (made using the Linux method, as my laptop runs only Linux …).
When booting the TVBox either with or without the recovery button pressed, I can only get the following text displayed using the UART port : GXL:BL1:9ac50e:a1974b;FEAT:ADFC318C;POC:3;RCY:0;EMMC:0;READ:0;CHK:AA;SD:0;READ:0;CHK:AA;USB:8;LOOP:1;EMMC:0;READ:0;CHK:AA;SD:0;READ:0;CHK:AA;USB:8;LOOP:2;EMMC:0;READ:0;CHK:AA;SD:0;READ:0;CHK:AA;USB:8;LOOP:3;EMMC:0;READ:0;CHK:AA;SD:0;READ:0;CHK:AA;USB:8;
The TVBox does nothing else than increasing the value of the LOOP, but does not enter any recovery stage …
Could you please help ? Many thanks in advance !
Jean
As I wrote the box has no reset button, not even putting a toothpick in the AV input. He starts with the Amlogic badge and gets stuck there. Sorry if I don’t understand your questions well (I’m Italian and I have to use google translate to communicate in English). I don’t understand your question: “The TVBox does nothing else than increasing the value of the LOOP”, but it still doesn’t go into recovery.
Thanks for the help you try to give me
PS: I thought that if the amlogic box fails to connect to the PC via USB, the automatic installation from an SD card as described by you was the only possible alternative; but unfortunately the installation does not start.
You saved my X96Max box with this post, which I was stupid enough to brick into hang in boot logo!!! I used your Linux instructions and flashed stock firmware “X96Max_V311_4G_190302.img” onto it and it worked from start to finish!! We Linux users don’t have the luxury of Windows users, but I like Linux so much I don’t want to return to whole Windows register/update pain thing. Thank you so much!!!!!!!
Very good C program for extracting aml_sdc_burn.ini and aml_sdc_burn.UBOOT from Amlogic firmware for recovery! Your download link for the Windows method needs to be updated as that link is broken.
Thanks for the link broken report. I’ve added two working links.
First of all, thanks a lot for such detailed instructions!
I am trying to flash IMG firmware to my x96max plus2 box via Linux method.
The box is not bricked.
At the moment of power on with the reset button pressed, the android logo with “Upgrading” appears just for a second, then the box reboots and the old installed firmware is loaded as normal. It looks like the flashing process breaks off at the very beginning. Tried 16 and 2 GB cards. The result is the same.
If there is no card, the recovery is loaded.
Where to dig?
I’m not sure what the problem may be. You may have to connect to the serial console with a USB TTL debug board to see what’s going on. You’d have to open the box, and connect the wires. Sometimes soldering is required.
If that does not appeal to you, you may have to try with USBBurningTool in Windows.
Thank you so much for such a quick response! Ok, I’ll try to find a Windows machine first…
Any chance you’ll eventually work on a reverse script that joins the splits into a .img file? That would make creating ROMs with tweaks so easy!
Hello
I have silly question what should be insted [device-mount point] i tried /dev/sdb but i get no such file or directory
I’m not sure this tool is suitable for you unless you are using a Virtual Machine without important data… Don’t try random commands like that, or you may wipe out your hard drive. You can check the drives with lsblk command.
Yes i checked with lsblk and my sd card is on sdb/sdb1 🙂
Two years ago, I hacked on aml-pugrade-package-extract.c
I made it a bit more portable and report more errors.
This shit even detects youre drive and format it, shows as sdcard1 =a secount sdcard2 =a it killed my D: drive
macos version ?
Hi !
First thank you for this tutorial, I arrive maybe late but I’m stuck after the dd’s / sync
When I try to mount the SDcard (/dev/sdg) in order to copy the img file I have an error message that complain about the file system type.
Did I miss something ?
Thank you very much
l 1005 aml_sdc.UBOOT,and bootleader.PARTITION all not pkg
I rewrote the extractor code in python: