You’ll find the full details for installing Android SDK at http://developer.android.com/sdk/installing.html. The purpose of this blog entry is to summarize what I had to do to install Android development environment (Android 2.3 SDK (Gingerbread)) on Windows XP.
Before installing the Android SDK per se, you’ll need to install some set of tools used by the SDK. Here are the steps to setup your Windows XP computer for Android development:
1. Install Java Developer Kit (JDK)
You need to go to http://www.oracle.com/technetwork/java/javase/downloads/index.html, select your OS (e.g. Linux, Windows, MAC…) and the file you want to download. I selected Java Platform (JDK), then downloaded Java SE Development Kit 6u23. I got the jdk-6u23-windows-i586.exe which I installed in the default directory, i.e. C:\Program Files\Java\jdk1.6.0_23).
2. Install Eclipse Classic
Then you’ll need to install Eclipse, and open source IDE.
Several versions are available at http://www.eclipse.org/downloads/, but since Google recommends Eclipse Classic, I just download it (version 3.6.1 – Helios) and got the file eclipse-SDK-3.6.1-win32.zip, which I extracted in C:\ (a directory eclipse will be created).
3. Install Android SDK
Now is the time to install the SDK. It will be installed directly, you’ll first need to download the SDK Starter Package, a tools used in install the SDK, The latest version is available at http://developer.android.com/sdk/index.html. Right now the latest version is revision 8, so I downloaded the installer for Windows XP. Then run installer_r08-windows.exe to install the starter package. After that start the SDK Manager, click on Available Packages (I selected all) and click on Install Packages. The download will take a while.
4. Install ADT plugin for Eclipse
The ADT (Android Development Tools) plugin for Eclipse is designed to give you a powerful, integrated environment in which to build Android applications.
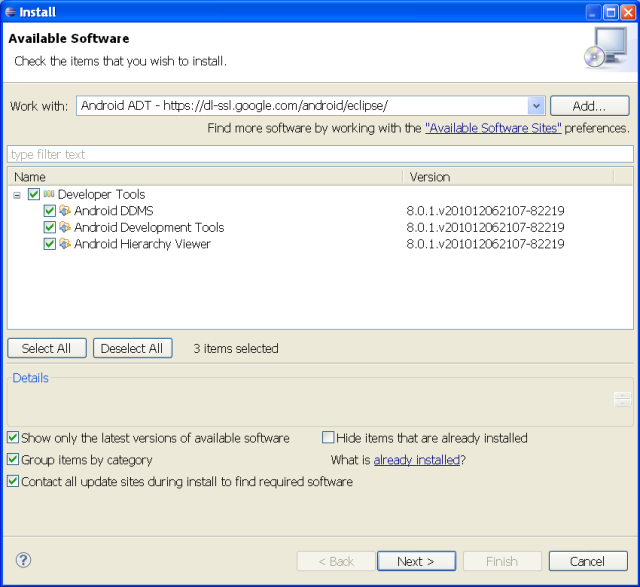
First start Eclipse (C:\eclipse\eclipse.exe), then select Help->Install New Software, click Add on the right top corner. In the Add Repository dialog that appears, enter “ADT Plugin” for the Name and the following URL for the Location: https://dl-ssl.google.com/android/eclipse/ (if case of problems, use http instead of https). Then click OK and Next. You should see the list of available tools:
- Android DDMS (Dalvik Debugger Monitor Server)
- Android Developer Tools
- Android Hierarchy Viewer
Click Next, tead and accept the license agreements, then click Finish. Finally restart eclipse.
That’s it your system should now be fully configured to develop Android applications.
Hello World Android Application
Google also provides a Hello World application tutorial and quite a few other examples to get started. Here are the step to follow to run the Hello World application:
1. Create an AVD
The first think you’ll have to do is to create an Android Virtual Device (AVD). In Eclipse, go to Window > Android SDK and AVD Manager, select Virtual Devices in the left panel, click New. Type the name of the AVD, for example “my_avd”. Choose a target. The target is the platform (i.e. the version of the Android SDK, such as 2.1) you want to run on the emulator, ignore the other fields for now and click Create AVD.
2. Create a New Android Project
In Eclipse, select File > New > Project. Then select Android -> Android Project and click Next.
Fill in the project details with the following values:
- Project name: HelloAndroid
- Application name: Hello, Android
- Package name: com.example.helloandroid
- Create Activity: HelloAndroid
Click Finish.
3. Modify the code to add “Hello World” text.
Now open HelloAndroid.java, and modify it to display some text (added lines in Green):
|
1 2 3 4 5 6 7 8 9 10 11 12 13 14 15 16 |
package com.example.helloandroid; import android.app.Activity; import android.os.Bundle; <span style="color: #339966;"><strong>import android.widget.TextView;</strong></span> public class HelloAndroid extends Activity { /** Called when the activity is first created. */ @Override public void onCreate(Bundle savedInstanceState) { super.onCreate(savedInstanceState); <span style="color: #339966;"><strong>TextView tv = new TextView(this); tv.setText("Hello, Android"); setContentView(tv);</strong></span> } } |
4. Run the application
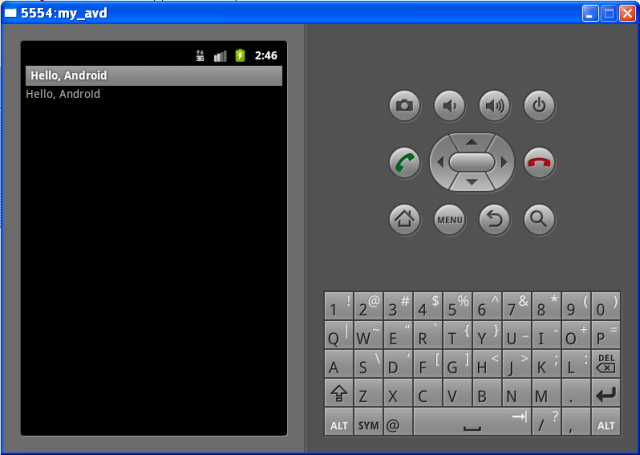
Select Run > Run then “Android Application”. Eclipse will create a new run configuration for your project and start the Android Emulator. The latter took a while on my computer (2 to 3 minutes), this is ready when you see the usual Android UI in the emulator. I noticed some errors the first time, I ran the app (disconnected from target),. If this happen, wait the Android to fully boot in the emulator and Run the application again. You should then see your application (on the left) and the emulator controls on the right.
 That’s it. To know more about the right method to construct a UI in Android, you may want to carry on with the Hello World Tutorial section “Upgrade the UI to an XML Layout” and play around with the other Android tutorials.

Jean-Luc started CNX Software in 2010 as a part-time endeavor, before quitting his job as a software engineering manager, and starting to write daily news, and reviews full time later in 2011.
Support CNX Software! Donate via cryptocurrencies, become a Patron on Patreon, or purchase goods on Amazon or Aliexpress


So competent! I want some infos in this posting for my rapport de stage. Can i have your contact please? We need your permission to quote it :D. Anyway, That’s congrats. Continue.
Great tutorial,thanks.I expected emulator to appear but it came up wirelessly on my WM8650 7″.Bonus,Isz (keep up the gr8 wrk)
Also make sure the installation directory of the Android SDK (e.g.installer_r16-windows.exe) does not contain spaces or you may encounter the following error:
while running the emulator.
The default installation path is C:\Program Files\Android\android-sdk-windows, you may want to change it to C:\Android\sdk.
how can i get” ginger bread ” sourcecode for Android-sdk-windows??????????????/
@sandeep
I guess you can use the SDK manager to download the source code. If you can’t find it there, a google search lead me to that site: http://wolfpaulus.com/journal/android-journal/androidsdksource
What nonsense there is no file for Windows XP 32 bits
i want to have that talking cat version 3 through android..
@Amaan
But in January 2011, there was one: http://dl.google.com/android/installer_r08-windows.exe
when i installd android sdk on windows,an error is displyed as “Failed to fetch URL https://dl-ssl.google.com/android/repository/repository.xml, reason: dl-ssl.google.com”..so please clarify why i am getting this error on my pc
@purushotam
It may be a transient error. Can you try again and/or download this file in your web browser?
how i can program my torque tablet .deadbot or bootlop tab how to fix
I can’t find the ADT. I open Eclipse but I think I a newer version because there isn’t anything about (Help-> Install new Software)