What a title. Just a quick update on the Tevo I am reviewing. I didn’t want to upgrade the firmware, but I read so many posts on Facebook about it I took the plunge. I didn’t like was the firmware that came with it. It only did a 3 point level, and seemed to go outside the build plate dimensions. The first 2 printers I have reviewed were Marlin, so it was what I am most familiar with.
I used Jim Brown’s Marlin fork as a base. It was missing dual extruder and auto level sensor in the pre-configured profiles. It took a while, but I was able to add the extra features. The auto bed level sensor connects to where the normal Z end stop sensor is connected. I would like to warn you to warm your bed for 5 minutes for the best reproducible results. I tested several times from cold to hot, and can see variances. After it is warm, it does well and only varies in the thousands of a mm. I also found out I made and dumb mistake, and I never set the power supply to my country’s proper voltage. It was messing everything up including the auto level.
Testing the auto level as it warms up. You can see variances and the metal expands.
Recv: Bilinear Leveling Grid:
Recv: 0 1 2 3
Recv: 0 +0.340 +0.292 +0.317 +0.380
Recv: 1 +0.418 +0.342 +0.338 +0.392
Recv: 2 +0.494 +0.408 +0.381 +0.396
Recv: 3 +0.545 +0.457 +0.442 +0.499
Recv: Bilinear Leveling Grid:
Recv: 0 1 2 3
Recv: 0 +0.307 +0.277 +0.308 +0.379
Recv: 1 +0.392 +0.327 +0.336 +0.372
Recv: 2 +0.492 +0.390 +0.367 +0.391
Recv: 3 +0.519 +0.447 +0.446 +0.488
Recv: Bilinear Leveling Grid:
Recv: 0 1 2 3
Recv: 0 +0.302 +0.254 +0.298 +0.367
Recv: 1 +0.369 +0.313 +0.321 +0.369
Recv: 2 +0.459 +0.376 +0.348 +0.380
Recv: 3 +0.492 +0.431 +0.424 +0.473
Here you can see after letting it warm up they are relatively consistent.
Recv: Bilinear Leveling Grid:
Recv: 0 1 2 3
Recv: 0 +0.019 -0.302 -0.492 -0.598
Recv: 1 +0.108 -0.259 -0.490 -0.618
Recv: 2 +0.186 -0.202 -0.468 -0.625
Recv: 3 +0.221 -0.171 -0.444 -0.606
Recv: Bilinear Leveling Grid:
Recv: 0 1 2 3
Recv: 0 +0.013 -0.302 -0.488 -0.591
Recv: 1 +0.097 -0.261 -0.488 -0.615
Recv: 2 +0.173 -0.206 -0.466 -0.614
Recv: 3 +0.205 -0.177 -0.442 -0.601
Recv: Bilinear Leveling Grid:
Recv: 0 1 2 3
Recv: 0 +0.004 -0.299 -0.483 -0.576
Recv: 1 +0.094 -0.255 -0.490 -0.615
Recv: 2 +0.163 -0.210 -0.466 -0.612
Recv: 3 +0.190 -0.186 -0.445 -0.600
This is a 16 point level so it takes a little bit of time but I think it is worth it.
To help with setting your sensor height you may want to look here. But in retrospect it might not be necessary. Set your sensor height just barely above the nozzle height and adjust with the Z offset in the menu’s. First initialize your EEPROM under Control at the bottom. Then go to Control -> Motion Z-offset. A negative number brings the head down and positive up. Print a small cube see how much closer to the bed you need to be. Adjust the offset until you get a good distance. Then store with Control -> Store Settings to lock it in.
I tested movement in X, Y, and Z directions, and they were spot on as well as the extruders. I homed then did a 100mm move and checked with my caliper. This was done in all directions. For the extruder I disconnected the bowden tube, then heated up the hotend due to protection then extruded 100mm of filament.
Here are the 2 separate files. Full is full Arduino 1.6.8 portable setup and ready. Pretty much run it, connect printer and upload. The second is just the configuration files. If you need the configuration I assume a write up is not necessary.
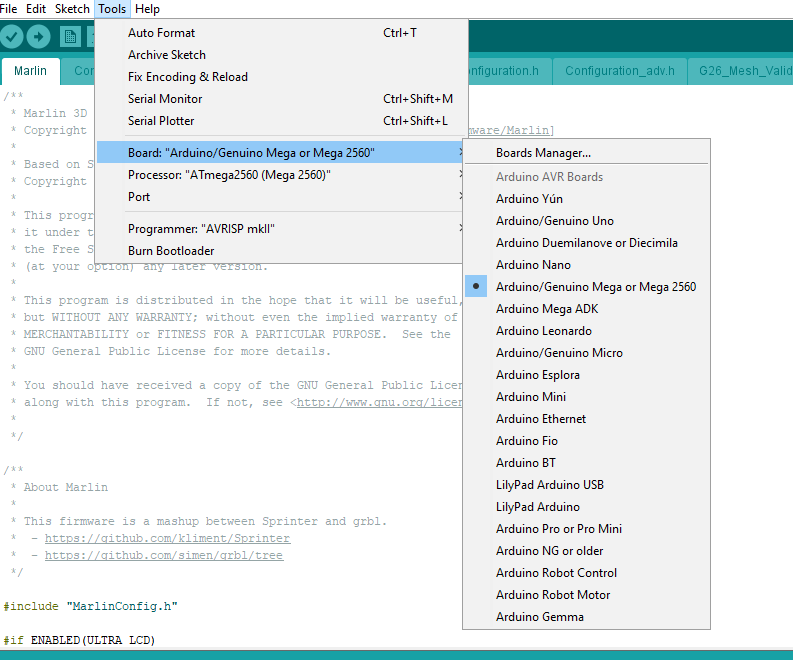
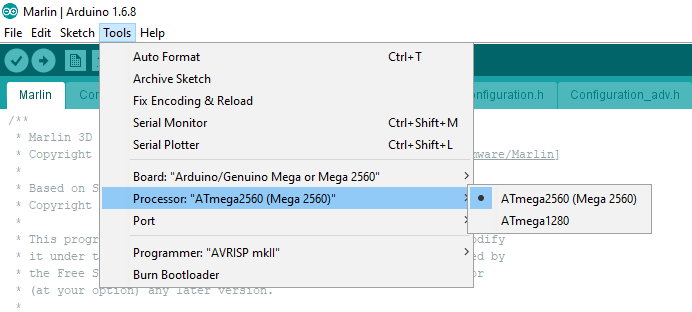
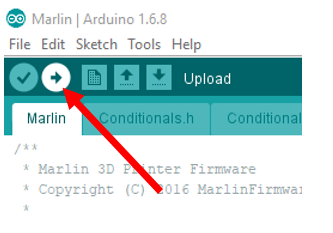
First connect your printer to your PC, and let Windows find the drivers. In device manager you should see it show up under comm ports. The first time I plugged it in I had to right click and tell windows to update the drivers. It went to the web, and found and updated them. Next, start Arduino then navigate to the Marlin directory, then open Marlin.ino. Ensure you have the correct board, processor, and port selected, then press the arrow pointing to the right to upload.
Once uploaded add G28 to home then G29 in your slicer.
You’ll find the first part of review in “2017 Tevo Tarantula Dual Extruder 3D Printer Review – Part 1: Assembly and First Prints” post..
I would like to thank Gearbest for sending this printer. If you are interested, you can purchase it on their store for $418.59 includding worldwide shipping. If you use TEVODUAL coupon, price will go down to $349.99. Note that there are various models of Tevo Tarantula with 200×200 or 200×280 (large) beds, single or dual extruder, with or without auto-leveling, and the one reviewed here is the higher end model with all a large bed, dual extruder for bi-color prints, auto-leveling, and flexible filament.

Karl is a technology enthusiast that contributes reviews of TV boxes, 3D printers, and other gadgets for makers.
Support CNX Software! Donate via cryptocurrencies, become a Patron on Patreon, or purchase goods on Amazon or Aliexpress. We also use affiliate links in articles to earn commissions if you make a purchase after clicking on those links.


G28 where do i write this or what does it mean??
-Noob
you do it in the your the repetier software
hi there I just checked out your write up on the tevo tarantula 2017. I have the 2018 eBay kit, large heated bed, dual extruder (one Titan one standard gold and blue) auto level and I’m wondering if you know if the firmware files on the write up will work with this kit? I’m having all sorts of issues getting it to work. Previously I had everything working except heating the hot ends, for example heating hotend 1 would fail but heating hotend 2 actually heats the primary (hotend 1). Some have suggested that I have the hot end cables back to front though I find this impossible/negligible as even if they were around the wrong way they would both work but would be opposite rather than one failing and one working! any help would be appreciated and a donation will be made!