
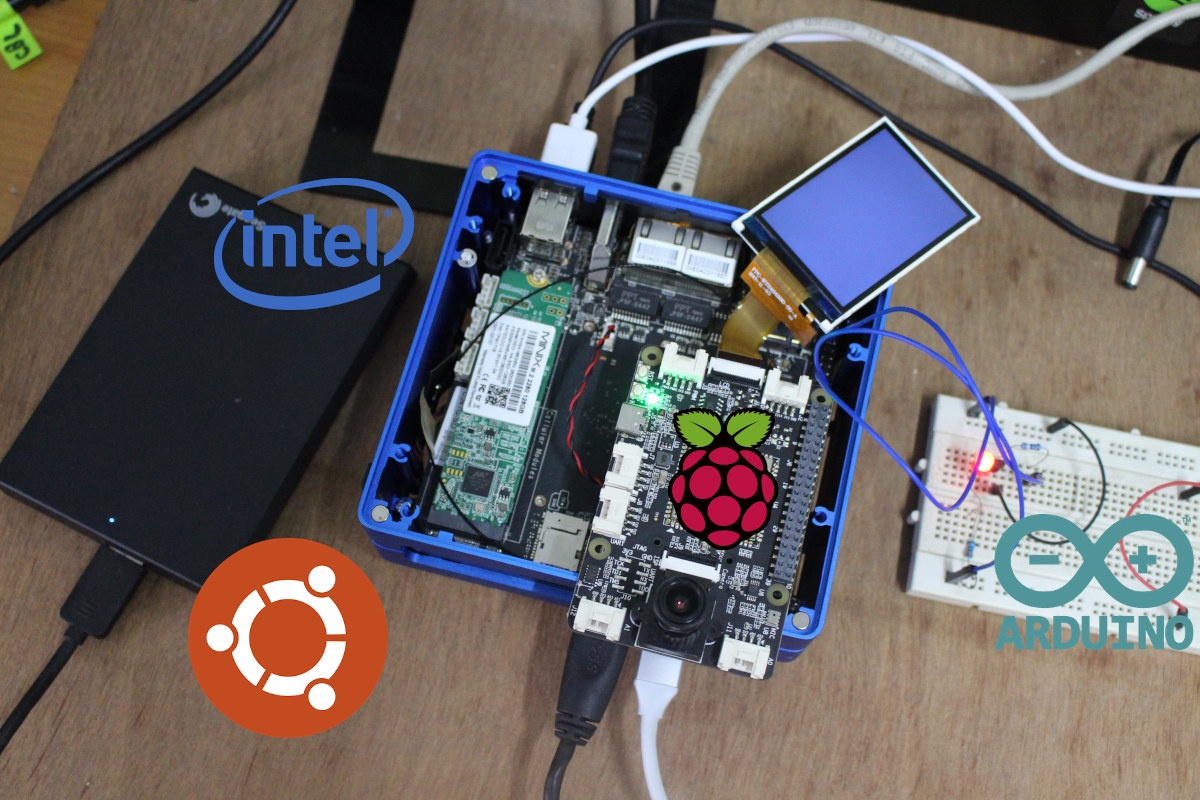
We’ve already reviewed ODYSSEY-X86J4105 SBC with Windows 10. When combined with Re_Computer enclosure it’s a typical Intel Gemini Lake mini PC but with a twist: Arduino and Raspberry Pi header. The latter works fine in Windows, but at the time, the Raspberry Pi header does not. So Linux is our only option.
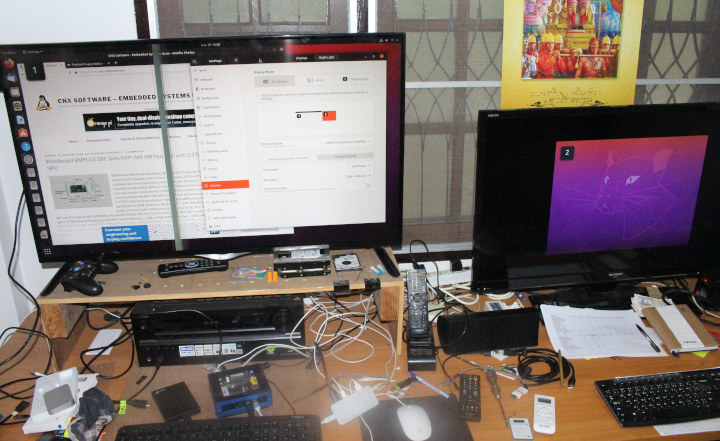
I’ve now had time to install and test Ubuntu 20.04 on ODYSSEY-X86J4105 single board computer. I did not install Ubuntu on the internal eMMC flash where Windows 10 resides, but instead on a 128GB M.2 SATA SSD. I’ll first run some usual command to check system information, then run benchmarks, and check whether all features are working before focusing the review on the Arduino and Raspberry Pi headers.
ODYSSEY-X86J4105 Ubuntu 20.04 System Info
We can check some of the information from the system in the terminal:
|
1 2 3 4 5 6 7 8 9 10 11 12 13 14 15 16 17 18 19 20 21 22 23 24 25 26 27 28 29 30 31 32 33 34 35 36 37 38 39 40 41 42 43 44 45 46 47 48 49 50 51 52 53 54 55 56 57 58 59 60 61 62 63 64 65 66 67 68 69 70 71 72 73 74 75 76 77 78 79 80 81 82 83 84 85 86 87 88 89 90 91 92 93 94 95 96 97 98 99 100 101 102 103 104 105 106 107 108 109 110 111 112 113 114 115 116 117 118 119 120 121 122 123 124 125 126 127 128 129 130 131 132 133 134 135 136 137 138 139 140 141 142 143 144 145 146 147 148 149 150 151 152 153 154 155 156 157 158 159 160 161 162 163 164 165 166 167 168 169 170 171 172 173 174 175 176 177 178 179 180 181 182 183 184 185 186 187 188 189 190 191 192 193 194 195 196 197 198 199 200 201 202 203 204 205 206 207 208 209 210 211 212 213 214 215 216 217 218 219 220 221 222 223 224 225 226 227 228 229 230 231 232 233 234 235 236 237 238 239 240 241 242 243 244 245 246 247 248 249 250 251 252 253 |
jaufranc@CNX-ODYSSEY:~$ lsb_release -a No LSB modules are available. Distributor ID: Ubuntu Description: Ubuntu 20.04.1 LTS Release: 20.04 Codename: focal jaufranc@CNX-ODYSSEY:~$ uname -a Linux CNX-ODYSSEY 5.4.0-42-generic #46-Ubuntu SMP Fri Jul 10 00:24:02 UTC 2020 x86_64 x86_64 x86_64 GNU/Linux jaufranc@CNX-ODYSSEY:~$ inxi -Fc0 System: Host: CNX-ODYSSEY Kernel: 5.4.0-42-generic x86_64 bits: 64 Console: tty 0 Distro: Ubuntu 20.04.1 LTS (Focal Fossa) Machine: Type: Desktop Mobo: WeiBu model: WTGLKC1R120 v: SD-BS-CJ41G-M-101-B 12/09/2019 18:14:02 serial: <superuser/root required> UEFI: American Megatrends v: SD-BS-CJ41G-M-101-B date: 12/09/2019 CPU: Topology: Quad Core model: Intel Celeron J4105 bits: 64 type: MCP L2 cache: 4096 KiB Speed: 998 MHz min/max: 800/2500 MHz Core speeds (MHz): 1: 1013 2: 1069 3: 1023 4: 1065 Graphics: Device-1: Intel UHD Graphics 605 driver: i915 v: kernel Display: server: X.org 1.20.8 driver: i915 tty: 80x24 Message: Advanced graphics data unavailable in console. Try -G --display Audio: Device-1: Intel driver: snd_hda_intel Sound Server: ALSA v: k5.4.0-42-generic Network: Device-1: Intel driver: iwlwifi IF: wlo2 state: down mac: 24:41:8c:a0:0e:42 Device-2: Intel I211 Gigabit Network driver: igb IF: enp2s0 state: up speed: 1000 Mbps duplex: full mac: 00:e0:4c:01:15:56 Device-3: Intel I211 Gigabit Network driver: igb IF: enp3s0 state: down mac: 00:e0:4c:01:15:57 Drives: Local Storage: total: 177.48 GiB used: 7.89 GiB (4.4%) ID-1: /dev/mmcblk0 model: DA4064 size: 58.24 GiB ID-2: /dev/sda model: MINIX SSD 128GB KHSA186335N size: 119.24 GiB Partition: ID-1: / size: 116.87 GiB used: 7.82 GiB (6.7%) fs: ext4 dev: /dev/sda1 Sensors: System Temperatures: cpu: 42.0 C mobo: N/A Fan Speeds (RPM): N/A Info: Processes: 207 Uptime: 9m Memory: 7.62 GiB used: 576.2 MiB (7.4%) Init: systemd runlevel: 5 Shell: bash inxi: 3.0.38 jaufranc@CNX-ODYSSEY:~$ df -h Filesystem Size Used Avail Use% Mounted on udev 3.8G 0 3.8G 0% /dev tmpfs 780M 1.8M 779M 1% /run /dev/sda1 117G 7.9G 104G 8% / tmpfs 3.9G 0 3.9G 0% /dev/shm tmpfs 5.0M 4.0K 5.0M 1% /run/lock tmpfs 3.9G 0 3.9G 0% /sys/fs/cgroup /dev/loop1 55M 55M 0 100% /snap/core18/1705 /dev/loop0 241M 241M 0 100% /snap/gnome-3-34-1804/24 /dev/loop2 28M 28M 0 100% /snap/snapd/7264 /dev/loop3 63M 63M 0 100% /snap/gtk-common-themes/1506 /dev/loop4 50M 50M 0 100% /snap/snap-store/433 /dev/mmcblk0p1 96M 76M 21M 79% /boot/efi tmpfs 780M 24K 780M 1% /run/user/125 tmpfs 780M 8.0K 780M 1% /run/user/1000 jaufranc@CNX-ODYSSEY:~$ lsblk -a NAME MAJ:MIN RM SIZE RO TYPE MOUNTPOINT loop0 7:0 0 240.8M 1 loop /snap/gnome-3-34-1804/24 loop1 7:1 0 55M 1 loop /snap/core18/1705 loop2 7:2 0 27.1M 1 loop /snap/snapd/7264 loop3 7:3 0 62.1M 1 loop /snap/gtk-common-themes/1506 loop4 7:4 0 49.8M 1 loop /snap/snap-store/433 loop5 7:5 0 0 loop loop6 7:6 0 0 loop loop7 7:7 0 0 loop sda 8:0 0 119.2G 0 disk └─sda1 8:1 0 119.2G 0 part / mmcblk0 179:0 0 58.2G 0 disk ├─mmcblk0p1 179:1 0 100M 0 part /boot/efi ├─mmcblk0p2 179:2 0 16M 0 part ├─mmcblk0p3 179:3 0 57.4G 0 part └─mmcblk0p4 179:4 0 800M 0 part mmcblk0boot0 179:8 0 4M 1 disk mmcblk0boot1 179:16 0 4M 1 disk jaufranc@CNX-ODYSSEY:~$ sudo lshw -C cpu *-cpu description: CPU product: Intel(R) Celeron(R) J4105 CPU @ 1.50GHz vendor: Intel Corp. physical id: 37 bus info: cpu@0 version: Intel(R) Celeron(R) J4105 CPU @ 1.50GHz slot: SOCKET 0 size: 937MHz capacity: 2700MHz width: 64 bits clock: 100MHz capabilities: lm fpu fpu_exception wp vme de pse tsc msr pae mce cx8 apic sep mtrr pge mca cmov pat pse36 clflush dts acpi mmx fxsr sse sse2 ss ht tm pbe syscall nx pdpe1gb rdtscp x86-64 constant_tsc art arch_perfmon pebs bts rep_good nopl xtopology nonstop_tsc cpuid aperfmperf tsc_known_freq pni pclmulqdq dtes64 monitor ds_cpl vmx est tm2 ssse3 sdbg cx16 xtpr pdcm sse4_1 sse4_2 x2apic movbe popcnt tsc_deadline_timer aes xsave rdrand lahf_lm 3dnowprefetch cpuid_fault cat_l2 pti cdp_l2 ssbd ibrs ibpb stibp ibrs_enhanced tpr_shadow vnmi flexpriority ept vpid ept_ad fsgsbase tsc_adjust smep erms mpx rdt_a rdseed smap clflushopt intel_pt sha_ni xsaveopt xsavec xgetbv1 xsaves dtherm ida arat pln pts umip rdpid md_clear arch_capabilities cpufreq configuration: cores=4 enabledcores=4 threads=4 jaufranc@CNX-ODYSSEY:~$ sudo lshw -C memory *-firmware description: BIOS vendor: American Megatrends Inc. physical id: 0 version: SD-BS-CJ41G-M-101-B date: 12/09/2019 size: 64KiB capacity: 4544KiB capabilities: pci upgrade shadowing cdboot bootselect socketedrom edd int13floppy1200 int13floppy720 int13floppy2880 int5printscreen int14serial int17printer acpi usb biosbootspecification uefi *-memory description: System Memory physical id: 23 slot: System board or motherboard size: 8GiB *-bank:0 description: DIMM LPDDR4 Synchronous 2133 MHz (0.5 ns) product: 123456789012345678 vendor: ABCD physical id: 0 serial: 1234 slot: A1_DIMM0 size: 2GiB width: 16 bits clock: 2133MHz (0.5ns) *-bank:1 description: DIMM LPDDR4 Synchronous 2133 MHz (0.5 ns) product: 123456789012345678 vendor: ABCD physical id: 1 serial: 1234 slot: A1_DIMM1 size: 2GiB width: 16 bits clock: 2133MHz (0.5ns) *-bank:2 description: DIMM LPDDR4 Synchronous 2133 MHz (0.5 ns) product: 123456789012345678 vendor: ABCD physical id: 2 serial: 1234 slot: A1_DIMM2 size: 2GiB width: 16 bits clock: 2133MHz (0.5ns) *-bank:3 description: DIMM LPDDR4 Synchronous 2133 MHz (0.5 ns) product: 123456789012345678 vendor: ABCD physical id: 3 serial: 1234 slot: A1_DIMM3 size: 2GiB width: 16 bits clock: 2133MHz (0.5ns) *-cache:0 description: L1 cache physical id: 35 slot: CPU Internal L1 size: 224KiB capacity: 224KiB capabilities: synchronous internal write-back configuration: level=1 *-cache:1 description: L2 cache physical id: 36 slot: CPU Internal L2 size: 4MiB capacity: 4MiB capabilities: synchronous internal write-back unified configuration: level=2 jaufranc@CNX-ODYSSEY:~$ free -mh total used free shared buff/cache available Mem: 7.6Gi 493Mi 6.5Gi 42Mi 633Mi 6.9Gi Swap: 2.0Gi 0B 2.0Gi jaufranc@CNX-ODYSSEY:~$ sudo lshw -C network *-network description: Wireless interface product: Intel Corporation vendor: Intel Corporation physical id: c bus info: pci@0000:00:0c.0 logical name: wlo2 version: 03 serial: 24:41:8c:a0:0e:42 width: 64 bits clock: 33MHz capabilities: pm msi pciexpress msix bus_master cap_list ethernet physical wireless configuration: broadcast=yes driver=iwlwifi driverversion=5.4.0-42-generic firmware=46.6bf1df06.0 latency=0 link=no multicast=yes wireless=IEEE 802.11 resources: irq:44 memory:a1314000-a1317fff *-network description: Ethernet interface product: I211 Gigabit Network Connection vendor: Intel Corporation physical id: 0 bus info: pci@0000:02:00.0 logical name: enp2s0 version: 03 serial: 00:e0:4c:01:15:56 size: 1Gbit/s capacity: 1Gbit/s width: 32 bits clock: 33MHz capabilities: pm msi msix pciexpress bus_master cap_list ethernet physical tp 10bt 10bt-fd 100bt 100bt-fd 1000bt-fd autonegotiation configuration: autonegotiation=on broadcast=yes driver=igb driverversion=5.6.0-k duplex=full firmware=0. 6-2 ip=192.168.1.13 latency=0 link=yes multicast=yes port=twisted pair speed=1Gbit/s resources: irq:22 memory:a1200000-a121ffff ioport:e000(size=32) memory:a1220000-a1223fff *-network description: Ethernet interface product: I211 Gigabit Network Connection vendor: Intel Corporation physical id: 0 bus info: pci@0000:03:00.0 logical name: enp3s0 version: 03 serial: 00:e0:4c:01:15:57 capacity: 1Gbit/s width: 32 bits clock: 33MHz capabilities: pm msi msix pciexpress bus_master cap_list ethernet physical tp 10bt 10bt-fd 100bt 100bt-fd 1000bt-fd autonegotiation configuration: autonegotiation=on broadcast=yes driver=igb driverversion=5.6.0-k firmware=0. 6-2 latency=0 link=no multicast=yes port=twisted pair resources: irq:23 memory:a1100000-a111ffff ioport:d000(size=32) memory:a1120000-a1123fff jaufranc@CNX-ODYSSEY:~$ lsusb Bus 002 Device 001: ID 1d6b:0003 Linux Foundation 3.0 root hub Bus 001 Device 005: ID 8087:0aaa Intel Corp. Bus 001 Device 006: ID 2886:800b Seeed Studio Seeeduino Zero Bus 001 Device 004: ID 0bda:0129 Realtek Semiconductor Corp. RTS5129 Card Reader Controller Bus 001 Device 003: ID 1a2c:0002 China Resource Semico Co., Ltd USB Keykoard Bus 001 Device 002: ID 04f2:1718 Chicony Electronics Co., Ltd HP USB Optical Mouse Bus 001 Device 001: ID 1d6b:0002 Linux Foundation 2.0 root hub jaufranc@CNX-ODYSSEY:~$ lspci 00:00.0 Host bridge: Intel Corporation Gemini Lake Host Bridge (rev 03) 00:00.1 Signal processing controller: Intel Corporation Celeron/Pentium Silver Processor Dynamic Platform and Thermal Framework Processor Participant (rev 03) 00:02.0 VGA compatible controller: Intel Corporation UHD Graphics 605 (rev 03) 00:0c.0 Network controller: Intel Corporation Device 31dc (rev 03) 00:0e.0 Audio device: Intel Corporation Device 3198 (rev 03) 00:0f.0 Communication controller: Intel Corporation Celeron/Pentium Silver Processor Trusted Execution Engine Interface (rev 03) 00:12.0 SATA controller: Intel Corporation Device 31e3 (rev 03) 00:13.0 PCI bridge: Intel Corporation Gemini Lake PCI Express Root Port (rev f3) 00:14.0 PCI bridge: Intel Corporation Gemini Lake PCI Express Root Port (rev f3) 00:14.1 PCI bridge: Intel Corporation Gemini Lake PCI Express Root Port (rev f3) 00:15.0 USB controller: Intel Corporation Device 31a8 (rev 03) 00:17.0 Signal processing controller: Intel Corporation Device 31b4 (rev 03) 00:17.1 Signal processing controller: Intel Corporation Device 31b6 (rev 03) 00:17.2 Signal processing controller: Intel Corporation Device 31b8 (rev 03) 00:18.0 Signal processing controller: Intel Corporation Celeron/Pentium Silver Processor Serial IO UART Host Controller (rev 03) 00:18.1 Signal processing controller: Intel Corporation Celeron/Pentium Silver Processor Serial IO UART Host Controller (rev 03) 00:18.2 Signal processing controller: Intel Corporation Celeron/Pentium Silver Processor Serial IO UART Host Controller (rev 03) 00:18.3 Signal processing controller: Intel Corporation Celeron/Pentium Silver Processor Serial IO UART Host Controller (rev 03) 00:19.0 Signal processing controller: Intel Corporation Celeron/Pentium Silver Processor Serial IO SPI Host Controller (rev 03) 00:1c.0 SD Host controller: Intel Corporation Celeron/Pentium Silver Processor SDA Standard Compliant SD Host Controller (rev 03) 00:1e.0 SD Host controller: Intel Corporation Device 31d0 (rev 03) 00:1f.0 ISA bridge: Intel Corporation Device 31e8 (rev 03) 00:1f.1 SMBus: Intel Corporation Celeron/Pentium Silver Processor Gaussian Mixture Model (rev 03) 02:00.0 Ethernet controller: Intel Corporation I211 Gigabit Network Connection (rev 03) 03:00.0 Ethernet controller: Intel Corporation I211 Gigabit Network Connection (rev 03) |
An Intel Celeron J4105 processor with 8GB RAM and the rootfs on a 127GB partition looks good to me.
Features Testing
Most devices look to be supported, but since there may also be some issues with drivers, I also tested the main hardware features from the board:
- Multimedia
- HDMI – Video OK, Audio OK
- 3.5 audio jack – OK (headphone + mic)
- Storage
- eMMC flash – OK (Windows partition, but read-only)
- MicroSD card slot – Failed (no output from dmesg at all, not shown with lsblk)
- M.2 SATA SSD – OK (See benchmarks below)
- M.2 SATA NVMe SSD – Not tested since I don’t own one yet
- USB
- USB 2.0 Ports – OK with mouse and keyboard
- USB 3.0 Port – OK (~94MB/s read/write on USB HDD EXT-4 partition)
- USB-C 3.0 port – Works but apparently limited to 480 Mbps as per USB 2.0 specs when tested with MINIX NEO Storage Plus with HDMI video output up to 1024×768, Gigabit Ethernet (192/177Mbps via iperf full-duplex), data via internal 480GB SSD (39MB/s)
- Networking
- LAN1 (Close to HDMI) – OK (iperf full-duplex: 883Mbps/811Mbps)
- LAN2 (Close to DC jack) – OK. Works but iperf full-duplex: 920Mbps/185Mbps. Download only: 947 Mbps; upload only: 854 Mbps
- WiFi 5 – OK (iperf DL: 326 Mbps; iperf UL: 426 Mbps) – Note: for some reason, much faster than in Windows 10…
- Bluetooth – OK. Tested with Huawei Y9 Prime 2019 Android phone to transfer files to/from board
So that’s not too bad, except the MicroSD card is not detected, and USB-C port is limited to USB 2.0 speeds (480 Mbps) meaning performance is limited, and video output is only up to 1024×768 via the USB-C port.
|
1 2 3 |
lsusb -t | grep Mass |__ Port 1: Dev 2, If 0, Class=Mass Storage, Driver=uas, 5000M |__ Port 1: Dev 13, If 0, Class=Mass Storage, Driver=uas, 480M |
The command line above shows the two USB drives connected to the board. Dev 2 is my 1TB USB DATA drive, and Dev 13 the 480GB SSD embedded into the USB-C hub. I could confirm the 480GB USB SSD achieves 450MB/s in Windows 10 with CrystalDiskMark, so the USB Type-C issue only happens in Ubuntu.
ODYSSEY-X86J4105 Ubuntu 20.04 Benchmarks
I’ve run the same Phoronix and SBC Bench benchmarks as did in my recent AMD Ryzen Embedded SBC review with Ubuntu 20.04, mostly to make sure there were no issues since we’ve reviewed so many Gemini Lake mini PCs and boards.
Phoronix Test Suite
Let’s start with Phoronix showing the differences between.ODYSSEY-X86J4105 and the AMD board.
|
1 2 3 4 5 6 7 8 9 10 11 12 13 14 15 16 |
Result Highlights Test Configuration Relative stream Scale 1.504 gmpbench Total Time 0.593 cachebench Write 0.254 cachebench R.M.W 0.349 dcraw R.T.P.I.C 0.704 encode-mp3 WAV To MP3 0.687 pybench T.F.A.T.T 0.736 Harmonic Mean Of MB/s Test Results Harmonic Mean MB/s > Higher Is Better ODYSSEY-X86J4105 - Ubuntu 20.04 ........................ 5821.26 |========= DFI GHF51 AMD Ryzen Embedded R1606G SBC - Ubuntu 20.04 . 6389.34 |========== |
You’ll find the full details on OpenBenchmarking, but the table below compares four of the benchmarks.
| Device | DFI GHF51 | MINIX NEO J50C-4 with SSD | ODYSSEY-X86J4105 with SSD |
|---|---|---|---|
| Processor | AMD Ryzen Embedded R1606G dual-core/quad-thread 2.6 / 3.5 GHz 12W TDP | Intel Pentium J5005 quad-core 1.5 / 2.3 GHz 10W TDP | Intel Celeron J4105 quad-core 1.5/2.5 GHz 10W TDP |
| CLOMP 3.3 OpenMP benchmark | 2.94 | 2.36 | 2.07 |
| TSCP 1.81 AI Chess Performance | 683,862 | 677,631 | 561,904 |
| 7-Zip Compression | 7,272 | 7,598 | 6,614 |
| PHPBench | 342,215 | 287,503 | 258,513 |
As expected ODYSSEY-X86J4105 is the slowest platform due to the processor used but results are within the expected range.
SBC Bench
It’s also useful to run SBC Bench to check for potential CPU throttling.
|
1 2 3 4 5 6 7 8 9 10 11 12 13 14 15 16 17 18 19 20 21 22 23 |
sudo ./sbc-bench.sh -c sbc-bench v0.7.2 Memory performance: memcpy: 5140.3 MB/s memset: 7115.9 MB/s Cpuminer total scores (5 minutes execution): 19.13,19.12,19.11,19.10,19.09,19.08,19.07,19.03,19.02,19.01,19.00,18.99,18.98,18.88,18.12 kH/s 7-zip total scores (3 consecutive runs): 8393,8364,8403 OpenSSL results: type 16 bytes 64 bytes 256 bytes 1024 bytes 8192 bytes 16384 bytes aes-128-cbc 317301.18k 681485.08k 859691.26k 938578.94k 964498.77k 966109.87k aes-128-cbc 317315.63k 682137.07k 859967.57k 939272.87k 964463.27k 967289.51k aes-192-cbc 298524.05k 598992.43k 732979.63k 790139.22k 807313.41k 809249.45k aes-192-cbc 298388.94k 599605.29k 732354.05k 789578.07k 806387.71k 808621.40k aes-256-cbc 281482.88k 534618.41k 633138.35k 680344.23k 694553.26k 694850.90k aes-256-cbc 281446.87k 535112.02k 633773.65k 679372.80k 694796.29k 695817.56k Full results uploaded to http://ix.io/2uwg. Please check the log for anomalies (e.g. swapping or throttling happenend) and otherwise share this URL. |
Again results are as expected, but somehow temperature was not reported correctly by the system as set to 20°C. Check out this comment for SBC Bench results for AMD Ryzen Embedded R1606G and Intel Pentium J5005 systems, as well as Raspberry Pi 4 8GB.
Storage
SATA SSD (Rootfs – EXT4):
|
1 2 3 4 5 6 7 8 9 |
iozone -e -I -a -s 100M -r 4k -r 16k -r 512k -r 1024k -r 16384k -i 0 -i 1 -i 2 random random bkwd record stride kB reclen write rewrite read reread read write read rewrite read fwrite frewrite fread freread 102400 4 50916 67034 15018 16301 14094 53831 102400 16 134076 162520 175457 180377 28217 116004 102400 512 209073 206677 160343 156161 74120 211372 102400 1024 111073 103392 145065 145888 79299 112152 102400 16384 134530 127520 220647 209008 103790 140662 |
In Windows 10, we got 442 MB/s sequential read speed, and 219MB/s sequential write speed, but somehow it’s quite slower in Ubuntu 20.04 with 220MB/s and 134 MB/s.
I wanted to check the eMMC flash performance in Ubuntu as well, but as mentioned earlier the partition would be read-only, and even when remounted as read/write, I would not get the permissions to write any files to it.
GPU Benchmark
Final benchmark for the day: Unigine Heaven Benchmark 4.0.
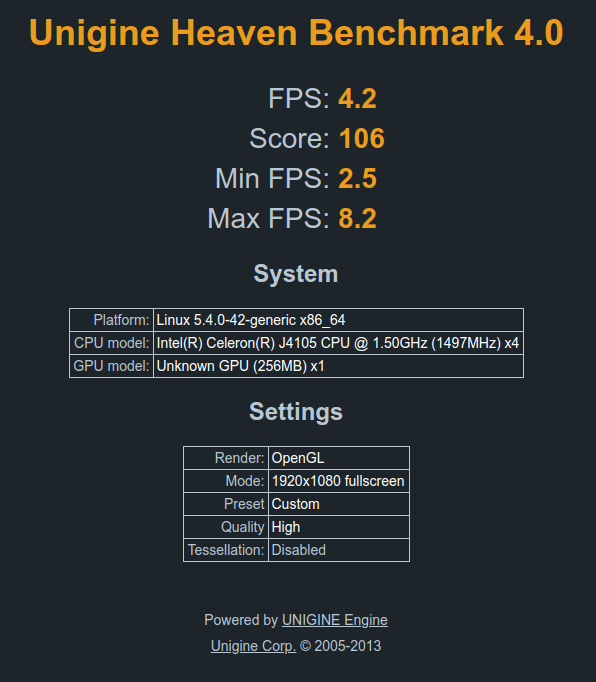
4.2 fps average / 106 points score compares to 4.7 fps / 119 points on Intel Pentium J5005, and 5.4 fps / 135 points on AMD Ryzen Embedded R1606G. Again no issues here, and I did not get an artifacts during the benchmark contrary to my experience with the Ryzen Embedded SBC.
Arduino Header
We could use the Arduino header in Windows, so I just reproduced the steps in Ubuntu 20.04, except I had to install the Arduino IDE. Make sure to add the current user to the dialout group to avoid permissions issues:
|
1 |
sudo adduser $USER dialout |
After logging out, I still had a permission denied message in the Arduino IDE, so I rebooted the board, and everything worked.
The important steps in Ubuntu are almost the same as in Windows 10, and once you are in the Arduino IDE, go to:
- File->Preferences and add https://files.seeedstudio.com/arduino/package_seeeduino_boards_index.json to the Additional Boards Manager URL field
- Then Tools->Board->Boards Manager to add support for Seeed SAMD Boards
- Select Seeeduino Zero board and /dev/ttyACM0 serial port
I rewired the little circuitry I had on the breadboard to control a LED connected to D6 digital pin…
…and modified the blink sketch accordingly:
|
1 2 3 4 5 6 7 8 9 10 11 12 13 14 |
int ledpin = 6 // the setup function runs once when you press reset or power the board void setup() { // initialize digital pin LED_BUILTIN as an output. pinMode(ledpin, OUTPUT); } // the loop function runs over and over again forever void loop() { digitalWrite(ledpin, HIGH); // turn the LED on (HIGH is the voltage level) delay(500); // wait for a second digitalWrite(ledpin, LOW); // turn the LED off by making the voltage LOW delay(500); // wait for a second } |
Finally, I flashed the program to the Arduino MCU…
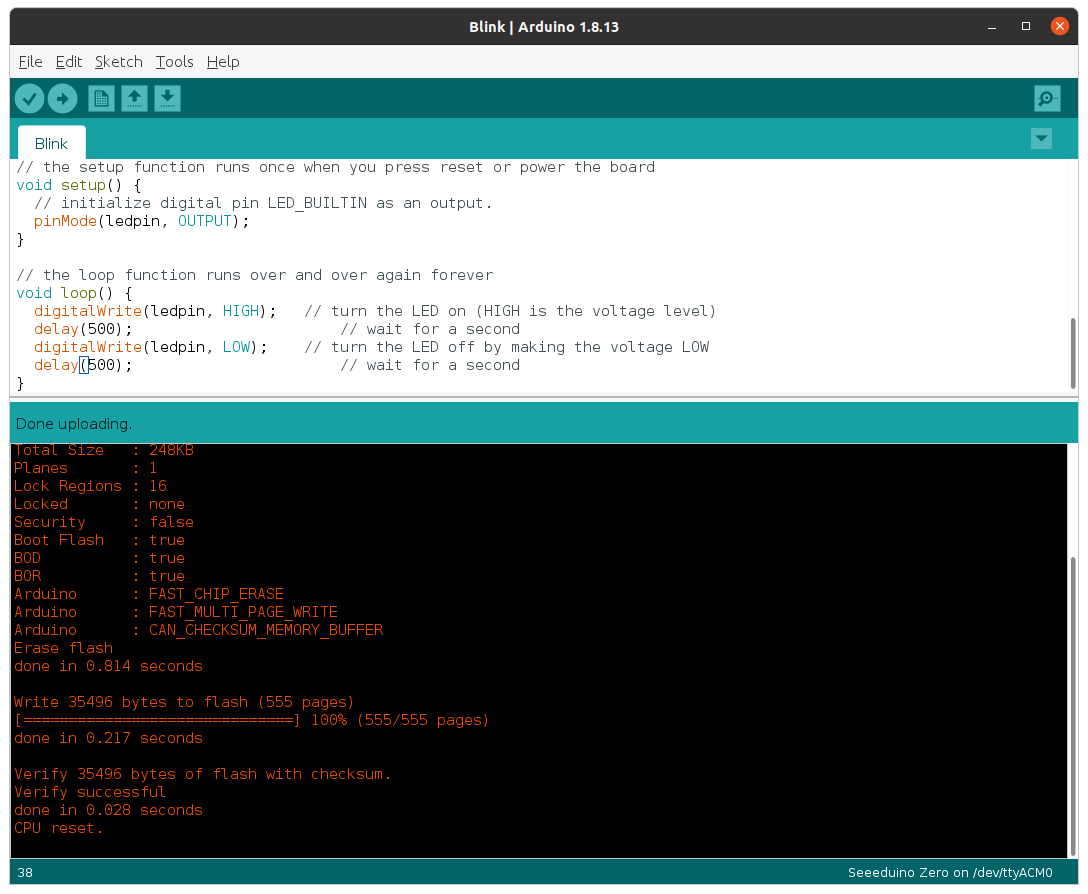
… and success! I got the LED blinking. Note the Arduino header is not compatible with Shields, so you can’t just insert a shield on top, and instead, you’d have to so some wiring as I did here. I have no worries about software compatibility because the board embeds a Microchip SAMD21 microcontroller.
Raspberry Pi Header
I was expecting the Arduino part to be easy since it just worked in Windows 10. Time to test the Raspberry Pi header. We should probably check the pinout first if we’re going to connect a Pi HAT.

It’s close enough to the Raspberry Pi header, and I’d expect many Raspberry Pi HAT to be compatible. So I initially decided to go with Grove AI HAT that mostly relies on the SPI interface… But after talking with Seeed Studio whether it was just a question of enabling SPI on the board, and changing the GPIO numbers in the code, the company told me it was more complicated as the x86 framework is not supported yet.
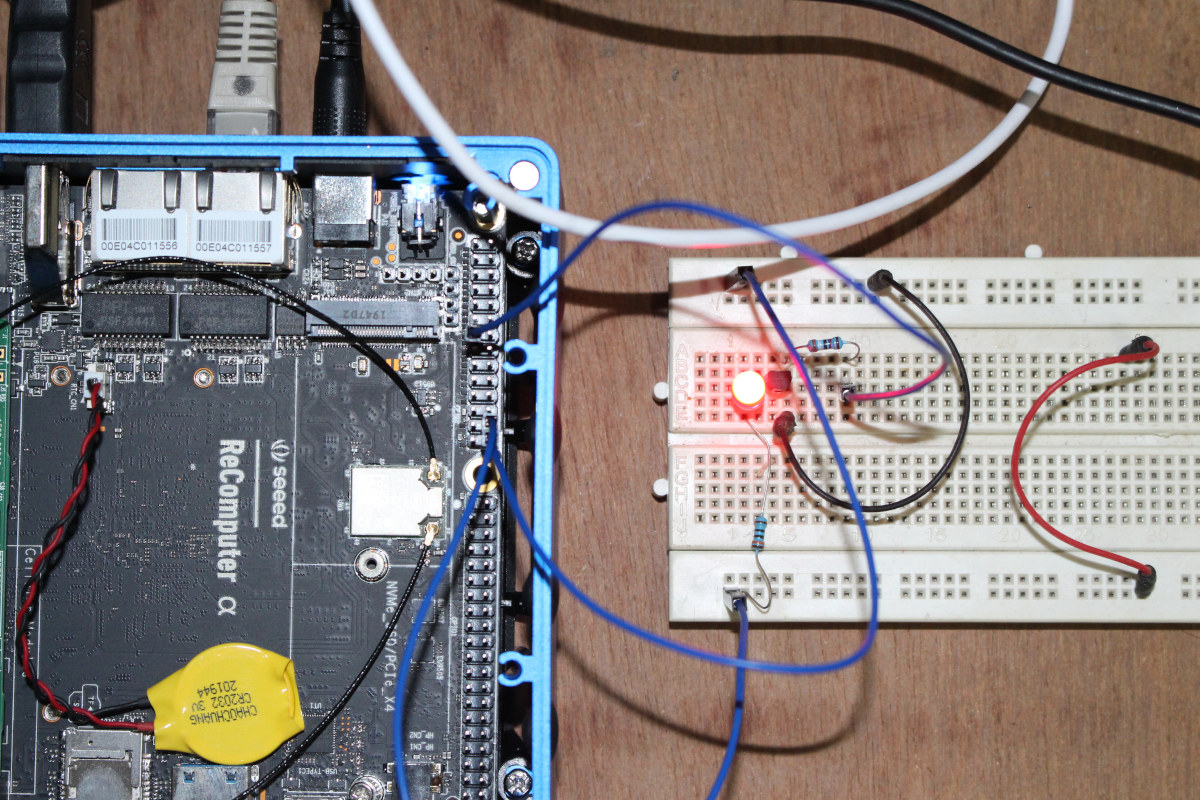
I don’t have any other HAT’s that I haven’t already given away, so I reverted to test Raspberry Pi GPIOs with my breadboard and LED, plus a BH1750 light sensor to test I2C.
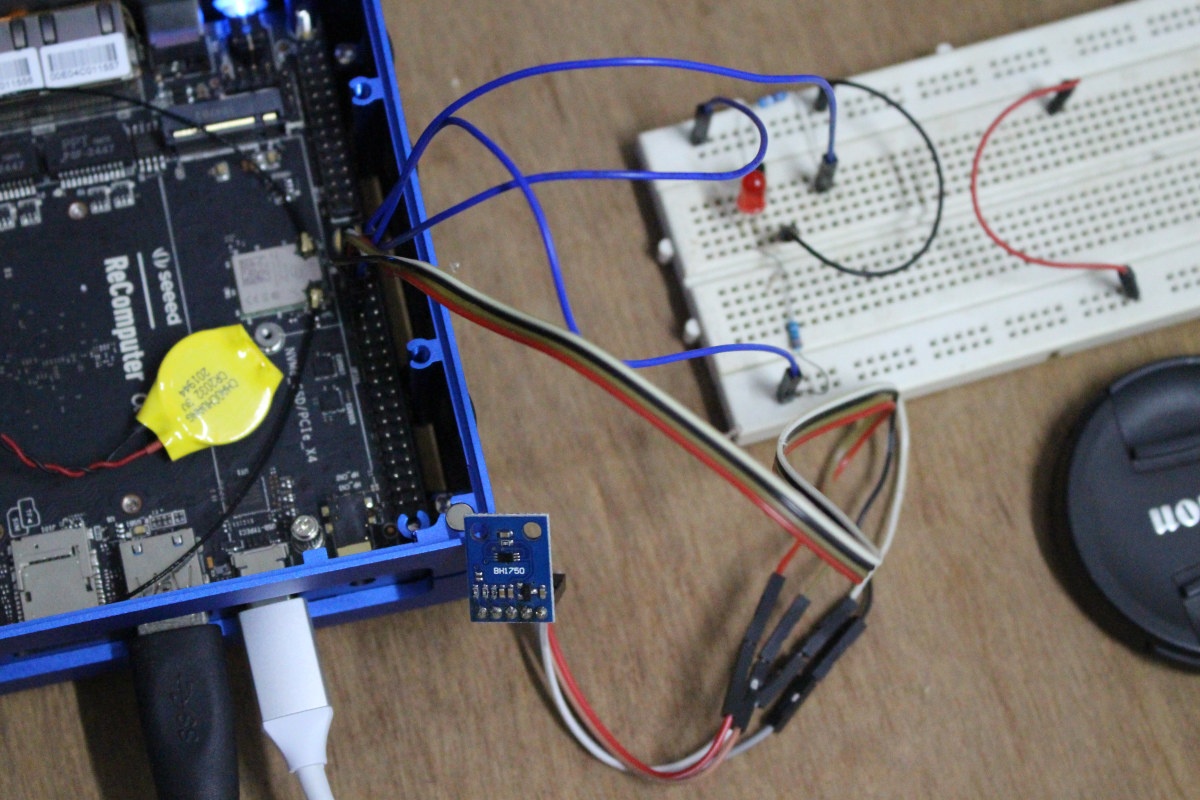
I mostly followed the instructions in the Wiki. Let’s start with GPIO. I connected the LED to GPIO 337 (pin 7), and we’ll need to export the IO, set the direction and value to 1 to turn on the LED:
|
1 2 3 4 |
cd /sys/class/gpio echo 337 | sudo tee export echo "out" | sudo tee direction echo 1 | sudo tee value |
To turn it off:
|
1 |
echo 0 | sudo tee value |
All good as this works perfectly. Seeed Studio recommends to unexport the GPIO once you are done, but I don’t see why this may be necessary:
|
1 2 3 |
echo "in" | sudo tee direction cd .. echo 337 | sudo tee unexport |
For reference, there are four GPIO blocks defined:
|
1 2 3 4 5 6 7 8 |
ls -l total 0 --w------- 1 root root 4096 ส.ค. 18 20:12 export lrwxrwxrwx 1 root root 0 ส.ค. 18 20:00 gpiochip297 -> ../../devices/platform/INT3453:03/gpio/gpiochip297 lrwxrwxrwx 1 root root 0 ส.ค. 18 20:00 gpiochip332 -> ../../devices/platform/INT3453:02/gpio/gpiochip332 lrwxrwxrwx 1 root root 0 ส.ค. 18 20:00 gpiochip352 -> ../../devices/platform/INT3453:01/gpio/gpiochip352 lrwxrwxrwx 1 root root 0 ส.ค. 18 20:00 gpiochip432 -> ../../devices/platform/INT3453:00/gpio/gpiochip432 --w------- 1 root root 4096 ส.ค. 18 20:34 unexport |
It’s also possible to use Interrupts, and the company provides a Python script for testing which can be installed as follows:
|
1 2 3 4 5 |
cd ~ sudo apt install python3-pip sudo pip3 install python-periphery wget https://files.seeedstudio.com/wiki/ODYSSEY-X86J4105864/Documents/IRQtest.zip unzip IRQtest.zip |
We can now run the test program:
|
1 2 3 4 5 6 7 8 9 10 11 12 13 14 15 16 17 |
sudo python3 IRQtest.py GPIO IRQ test on pin 412 Press Ctrl-C to terminate Check poll falling 1 -> 0 interrupt, current value = True Starting thread... Got interrupt! Value = False -------------------- NEXT CYCLE Check poll falling 1 -> 0 interrupt, current value = True Starting thread... Got interrupt! Value = False -------------------- NEXT CYCLE Check poll falling 1 -> 0 interrupt, current value = True Starting thread... |
Next up we can try I2C. As previously mentioned, I connected BH1750 I2C light sensor to 3.3V, GND, IC2 clock and data ping, and checked if the board would detect the sensor:
|
1 2 3 4 5 6 7 8 9 10 |
sudo i2cdetect -r -y 0 0 1 2 3 4 5 6 7 8 9 a b c d e f 00: -- -- -- -- -- -- -- -- -- -- -- -- -- 10: -- -- -- -- -- -- -- -- -- -- -- -- -- -- -- -- 20: -- -- -- -- -- -- -- -- -- -- -- -- -- -- -- -- 30: -- -- -- -- -- -- -- -- -- -- -- -- -- -- -- -- 40: -- -- -- -- -- -- -- -- -- -- -- -- -- -- -- -- 50: -- -- -- -- -- -- -- -- -- -- -- -- -- -- -- -- 60: -- -- -- -- -- -- -- -- -- -- -- -- -- -- -- -- 70: -- -- -- -- -- -- -- -- |
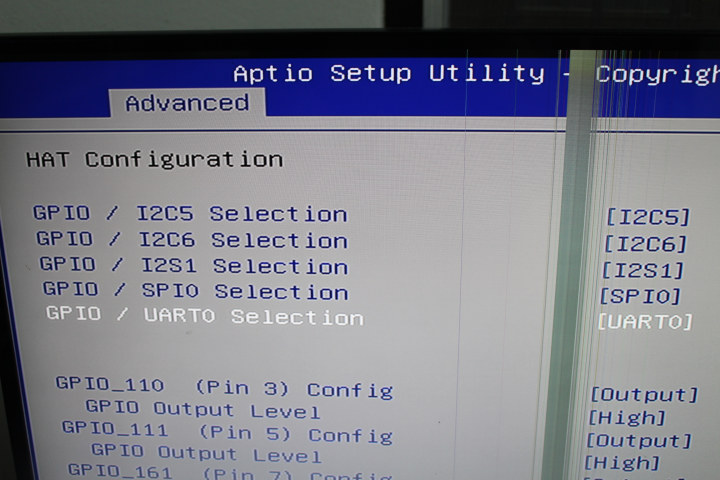
Oops…nothing detected… So I went to the BIOS, and all “special functions” were set to GPIO.
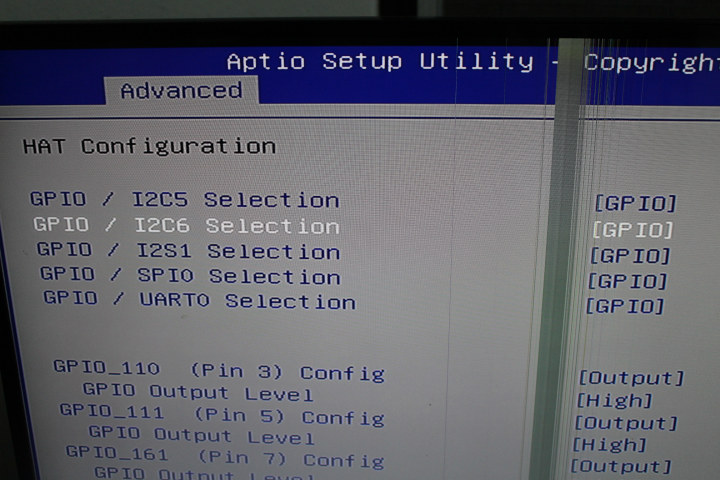
I can’t quite remember if I changed that earlier since those are not supposed to be the defaults, but in any case, I changed them all to enable I2C, SPI, UART and SPI.
When I came back to Ubuntu, I still had the same output from i2cdetect command. So I read the Wiki for carefully… and ran two commands to check I2C devices again:
|
1 2 3 4 |
ls /sys/bus/pci/devices/*/i2c_designware.0/ | grep i2c i2c-1 ls /sys/bus/pci/devices/*/i2c_designware.1/ | grep i2c i2c-2 |
I2C designware 0 is supposed to represent I2C6 (pins 27 and 28), while designware 1 if for I2C5 for pins 3 and 5 to which our light sensor is connected to. So let’s try again with I2C device 2:
|
1 2 3 4 5 6 7 8 9 10 |
udo i2cdetect -r -y 2 0 1 2 3 4 5 6 7 8 9 a b c d e f 00: -- -- -- -- -- -- -- -- -- -- -- -- -- 10: -- -- -- -- -- -- -- -- -- -- -- -- -- -- -- -- 20: -- -- -- 23 -- -- -- -- -- -- -- -- -- -- -- -- 30: -- -- -- -- -- -- -- -- -- -- -- -- -- -- -- -- 40: -- -- -- -- -- -- -- -- -- -- -- -- -- -- -- -- 50: -- -- -- -- -- -- -- -- -- -- -- -- -- -- -- -- 60: -- -- -- -- -- -- -- -- -- -- -- -- -- -- -- -- 70: -- -- -- -- -- -- -- -- |
Success! The light sensor is detected!
I have not connected anything to SPI, but SPI is detected by the kernel:
|
1 2 |
ls /sys/bus/pci/devices/0000\:00\:19.*/pxa2xx-spi.*/spi_master/ | grep spi spi1 |
If we want to access it from userspace, we’ll need to run a few commands:
|
1 2 3 4 5 |
wget https://files.seeedstudio.com/wiki/ODYSSEY-X86J4105864/Documents/SPI-Enable.zip unzip SPI-Enable.zip cd spi-enable/ chmod +x acpi-add acpi-upgrades install_hooks sudo ./install_hooks && sudo acpi-add spidev* |
Once it’s done, reboot the board, and we can see two SPI devices:
|
1 2 3 |
ls -l /dev/spi* crw------- 1 root root 153, 0 ส.ค. 18 21:32 /dev/spidev1.0 crw------- 1 root root 153, 1 ส.ค. 18 21:32 /dev/spidev1.1 |
Contrary to the Arduino header, the Raspberry Pi header allows you to insert most Raspberry Pi HAT’s directly on the board, but while low-level software is working, you’ll have to work on system configuration and modifications to the software running on Raspberry Pi to make it work on the x86 board. This includes BIOS and I/Os configurations, modifying the code to match the GPIO names, and so on. AFAIK, nobody has made a “WiringPix86” library that could simplify the process.
Final Words
Seeed Studio ODYSSEY-X86J4105 is a nice, and fairly unique little board I had fun to play with. Those are the main takeaways:
- In Windows 10, it performs just like a standard Intel Gemini Lake mini PC and everything works with expect performance, but you’ll only be able to control the Arduino header, as currently, the Raspberry Pi GPIO’s are not accessible.
- In Ubuntu 20.04, the performance matches expectations, but there are also some issues with the MicroSD card not working, and the USB-C port limited to 480 Mbps, at least with MINIX NEO Storage Plus USB-C multifunction adapter. Both Arduino and Raspberry Pi I/O header can be controlled in Linux, but you may have to spend some time on porting the software, especially for the Raspberry Pi I/Os.
Some people may be bothered by the fan noise, although it can be adjusted or disabled in the BIOS.
I’d like to thank Seeed Studio for sending a review sample. If you’re interested there are three variants of the board with price ranging from $188 to $258 plus shipping:
- ODYSSEY – X86J4105800 ($188) without eMMC flash (you can boot from M.2 or USB storage)
- ODYSSEY – X86J4105864 ($218) with a 64GB eMMC flash pre-loaded with an unactivated version of Windows 10 Enterprise. That’s what I reviewed here.
- ODYSSEY – X86J4105864 ($258) with a 64GB eMMC flash pre-load with an activated version of Windows 10 Enterprise. Same hardware as above but with a Windows license.
If you’d like to get a complete mini PC with Re_Computer case, you may consider getting Odyssey Blue J4105 mini PC with a 128GB SATA SSD, just like I tested in this part of the review, for $239 plus shipping.

Jean-Luc started CNX Software in 2010 as a part-time endeavor, before quitting his job as a software engineering manager, and starting to write daily news, and reviews full time later in 2011.
Support CNX Software! Donate via cryptocurrencies, become a Patron on Patreon, or purchase goods on Amazon or Aliexpress. We also use affiliate links in articles to earn commissions if you make a purchase after clicking on those links.


Great review! Too bad that one of the I211 is implemented badly 🙁
Nice board. It doesn’t make sense to me to spend $258Usd for a similar Win10 version just to be able to use an Arduino header and a 40 pin Raspberry pi header(GPIO)which BTW seems totally overkill. Intel Celeron j4105! No thanks. My Odroid-H2+ with an updated Intel Celeron J4115 Processor at only $119 is a much better deal(Vs $188 for Odyssey basic version). If you still need to use GPIO on H2+, you need to purchase separately a 16Port I2C GPIO Board for H2+ which costs a measly $5 only.
ODROID-H2+ is a nice board especially for people needing 2.5 GbE, but you’d need to add the price for 8GB memory, and the power supply to make a somewhat fair comparison. I’m not 100% sure how Seeed Studio and Hardkernel compare in terms of shipping, but I’ve heard people complain about both companies due to relatively expensive shipping.
Both boards come with no RAM, which means H2+ will be always $70 cheaper no matter what configuration you chose for the Odyssey. There’s a big difference between those 2 companies. One is based in China and there are still limitations and restrictions for shipping goods from China to the rest of the world due Covid-19 situation. HK is a south korean company and they have no delays or restrictions to ship to North America for example. HK uses DHL express for international shipping and it’s about $20 USD for shipping an H2+ for example which is a low price IMO because you will get your order within 1 week and, if you order on monday, you’ll get it by friday on the same week. Worth to mention, you have to deal with additional Customs fees depending on your country when you order from HK, they are not like aliexpress and they wouldn’t send your goods as a gift to avoid you paying custom fees. Seeed Studio shipping to Canada for example is $32usd with DHL express and will take 2-5 business days to arrive. I do not recommend using cheaper SZ Post service ($18USD) with them. I may take 1-2 months to arrive. Also, for HK products you can find official HK distributors around the globe. In North america, reseller ameridroid.com is great, they sell at comparable prices and even offer additional warranty for your H2+(H2+ warranty is 4 weeks only, if you buy from ameridroid you can purchase an extended warranty/replacement for just $14.99 for 1 year ), also your shipping is totally insured with them for only $2 in case of a lost shipment. FYI, I’ve ordered from both companies before quite a few times. I’m not affiliated to any of those companies.
Not sure what you mean by “Both boards come with no RAM” as all three versions of the Odyssey board come with 8GB LPDDR4 RAM. And the Odyssesy board is available via Amazon for only a $20 markup and free shipping in the US.
You’re right!
8Gb for H2+ is $32
H2+ is $119
You have to buy BT and WIFI modules, that’s extra $12
Extended Warranty/replacement plan for H2+ is $14.99
Total would be $177 for a comparable setup including 1 year extended warranty Vs Odyssey at $188.
Little difference in price then.
It all comes down to reliability, support and warranty between those 2 companies.
[would add especially ‘trusted data security’ to that list]