
I’ve recently received ODYSSEY-X86J4105 SBC with Re_Computer case, and we’ve had a look at the SBC hardware, installed some internal components like an M.2 SATA SSD, and play around Re_Computer case using Raspberry Pi 4, Beaglebone Green Wireless and Jetson Nano SBC, before assembling the Intel SBC into the enclosure.
I’ve now taken the time to test the combo using the pre-installed Windows 10 Enterprise operating systems. ODYSSEY-X86J4105 is very much like any Intel Gemini Lake mini PC, but with the addition of Arduino and Raspberry Pi headers, so we’ll look at those as well.
Connections and First Boot
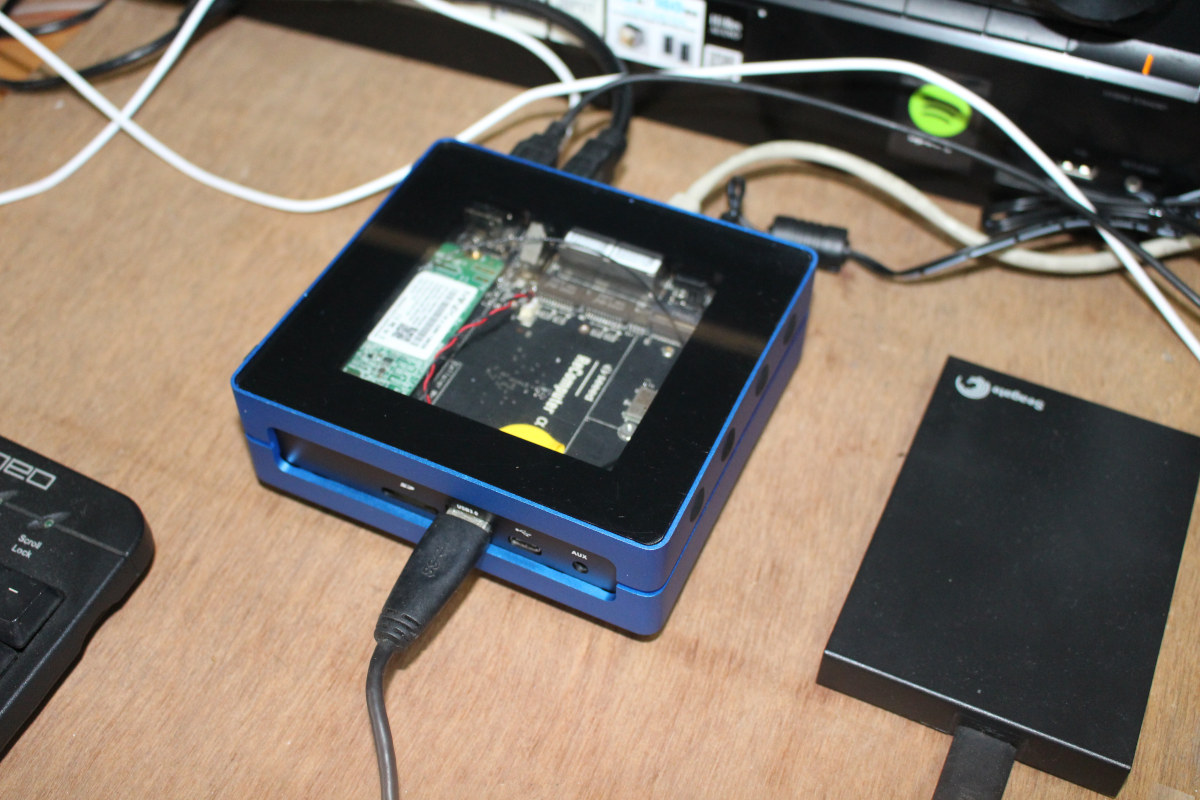
For the first boot, I connect USB mouse and keyboard, a HDMI cable to a 4K TV, an Ethernet cable, a USB 3.0 hard drive, and finally the power supply.
 I actually had a small problem during boot, but we’ll talk about it later as it’s really specific to my setup, and not any issue with the device as a BIOS setting change fixed the issue.
The computer booted quickly, with Re_Computer user as the default user (without password0, and Arduino IDE pre-installed.
But since the board has a USB-C port, I’ve also tried to connect all peripherals via the USB-C port including the mouse, the keyboard, USB 3.0 drive, and Gigabit Ethernet via MINIX NEO-C Plus USB-C hub. If you own a 12V USB-PD power adapter, you should not even need to use the DC jack as the back of the board since it can be powered via the USB-C dock.
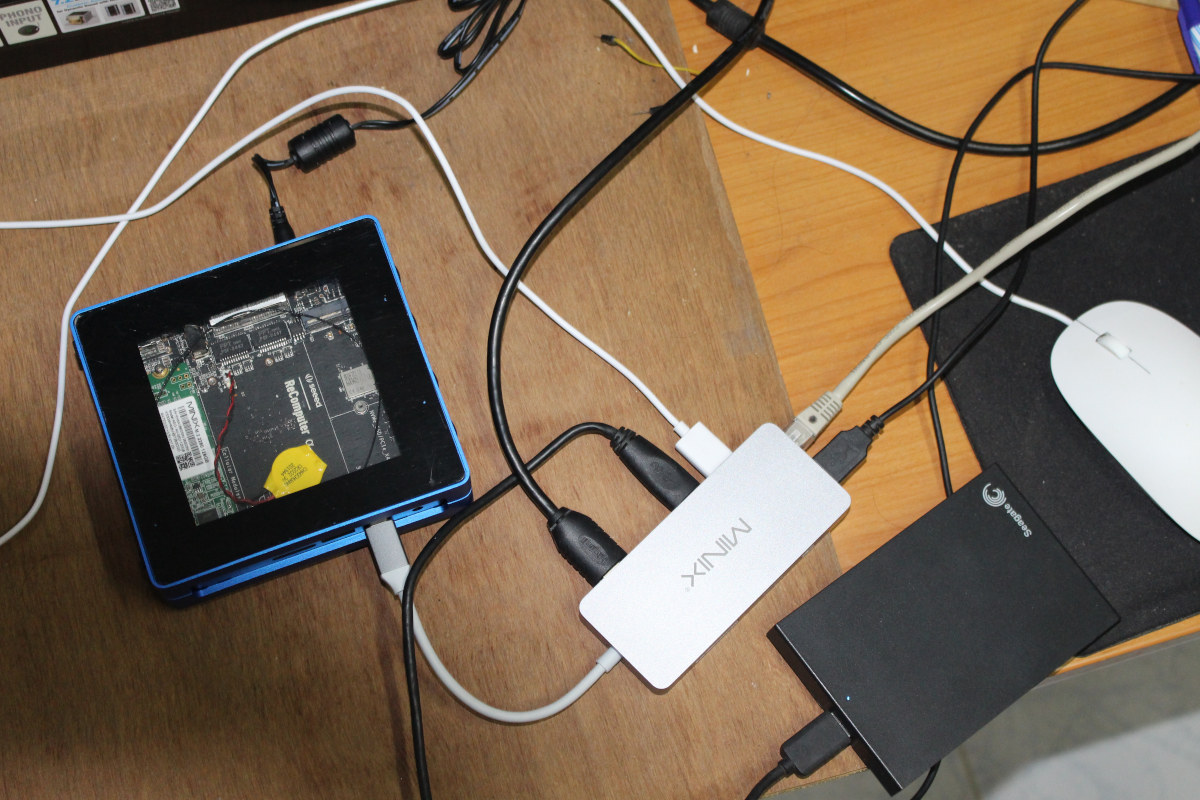
Does it work? Yes. Ethernet, USB 3.0 drive, HDMI output, and USB mouse and keyboard all worked fine.
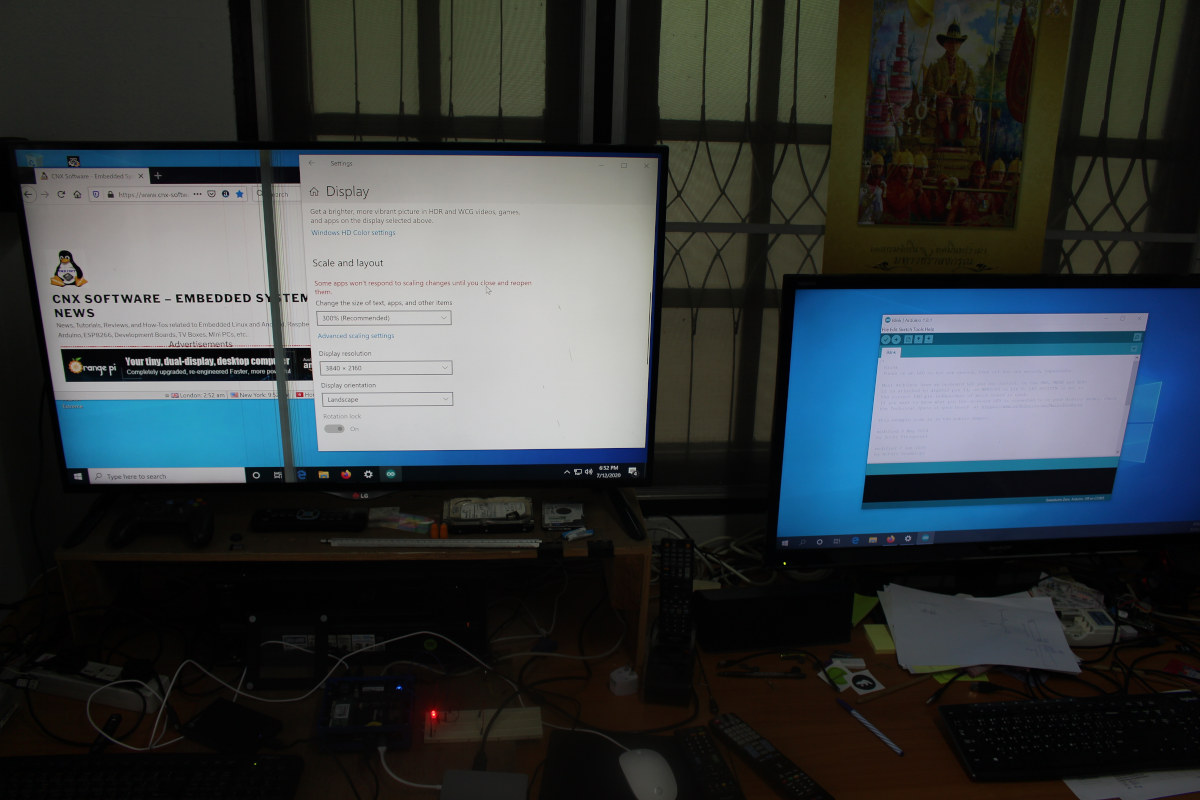
I also re-connected the HDMI port on the SBC to get a dual-display setup with 3840×2160 @ 59 Hz on the left 4K UHD TV, and 1920×1080 @ 50 Hz on the right Full HD TV. Using a USB-C hub for everything is not the best option for overall I/O performance, but it shows it works.
System Info
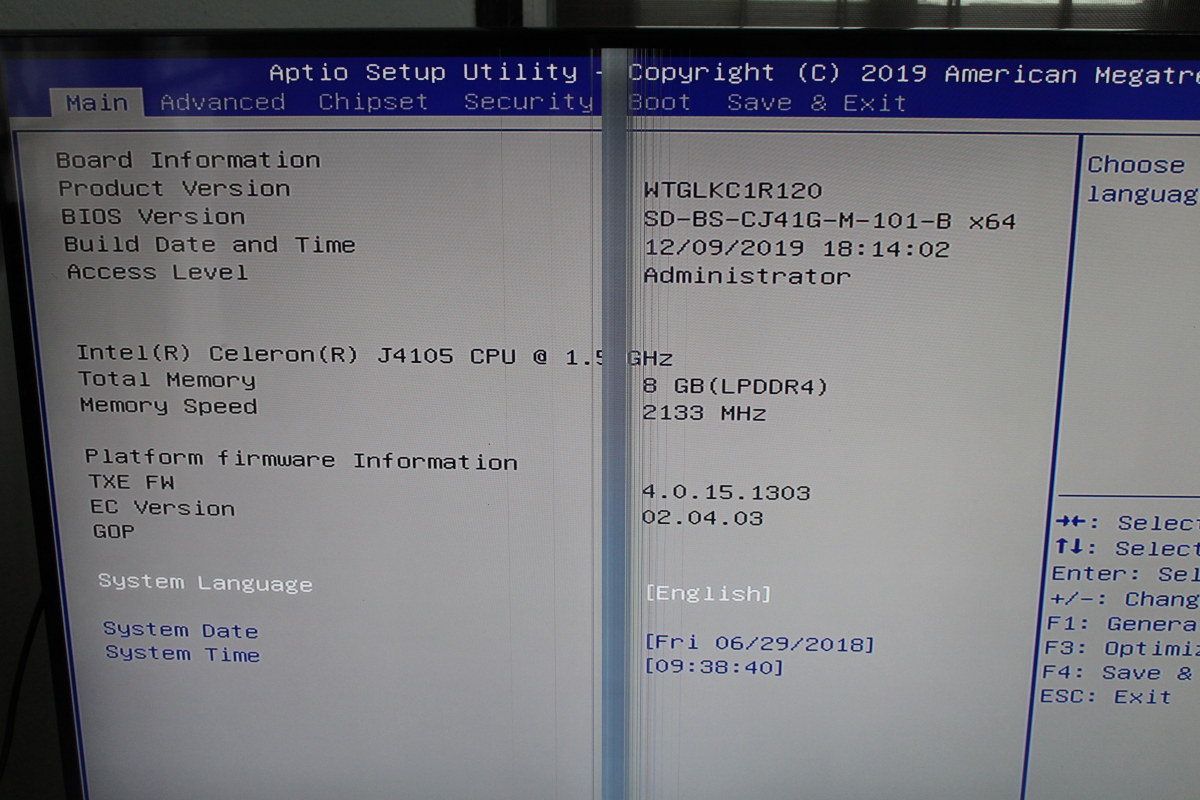
The system is running Windows 10 Enterprise 64-bit on Intel Celeron J4105 quad-core processor with 8GB RAM.
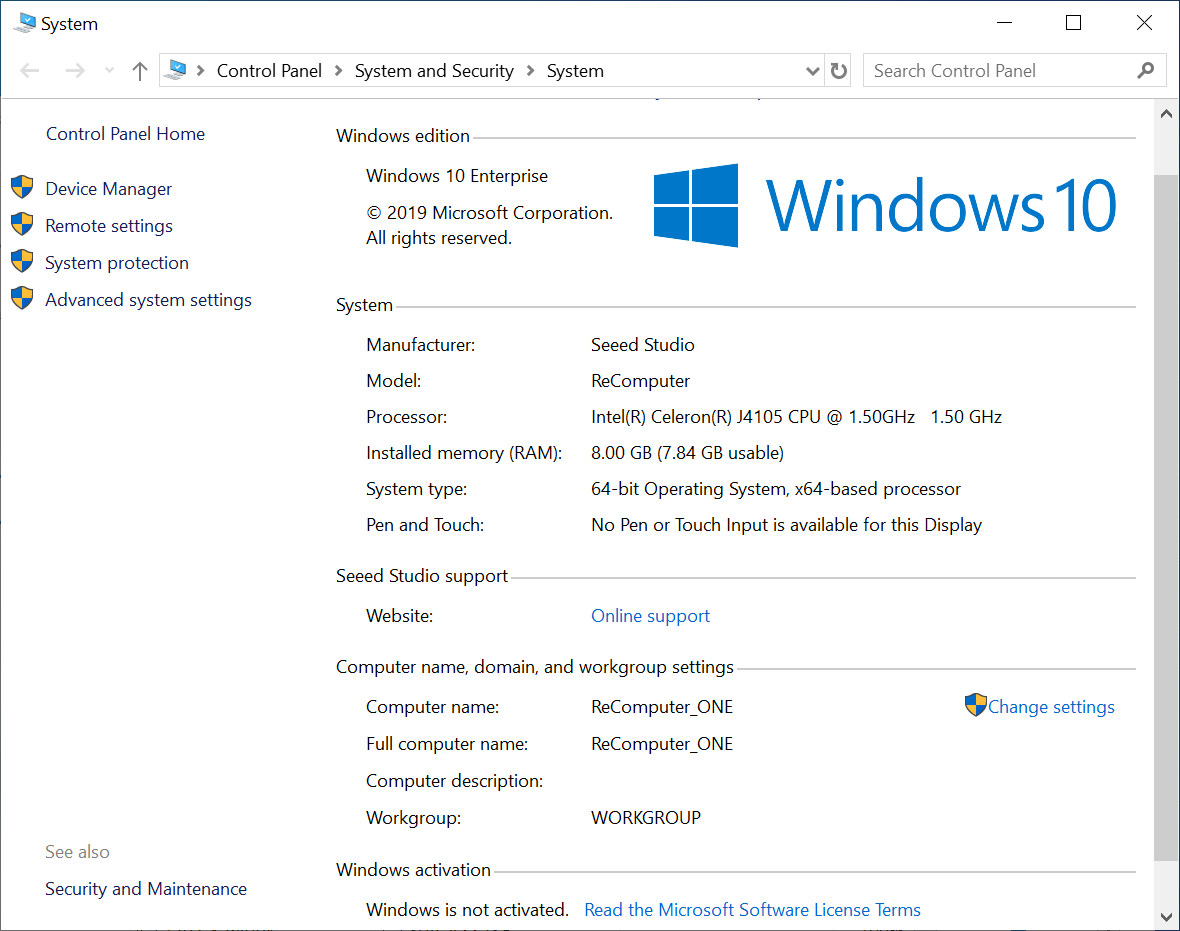
Windows is not activated, and no product key can be found on the device.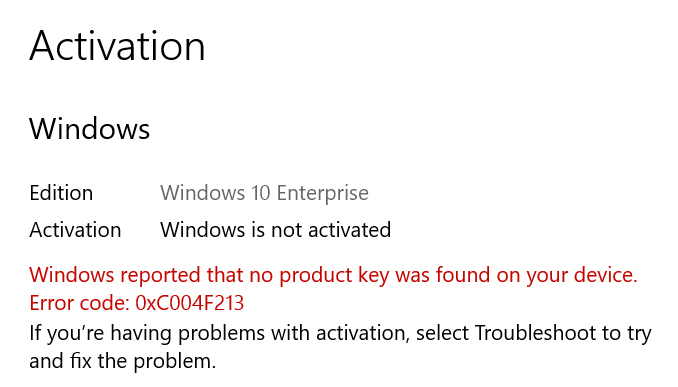
I asked Seeed Studio, and that’s normal as my model ships with a 64GB eMMC pre-loaded with Windows 10 Pro, but there’s also a more expensive model with the same hardware and a proper license.
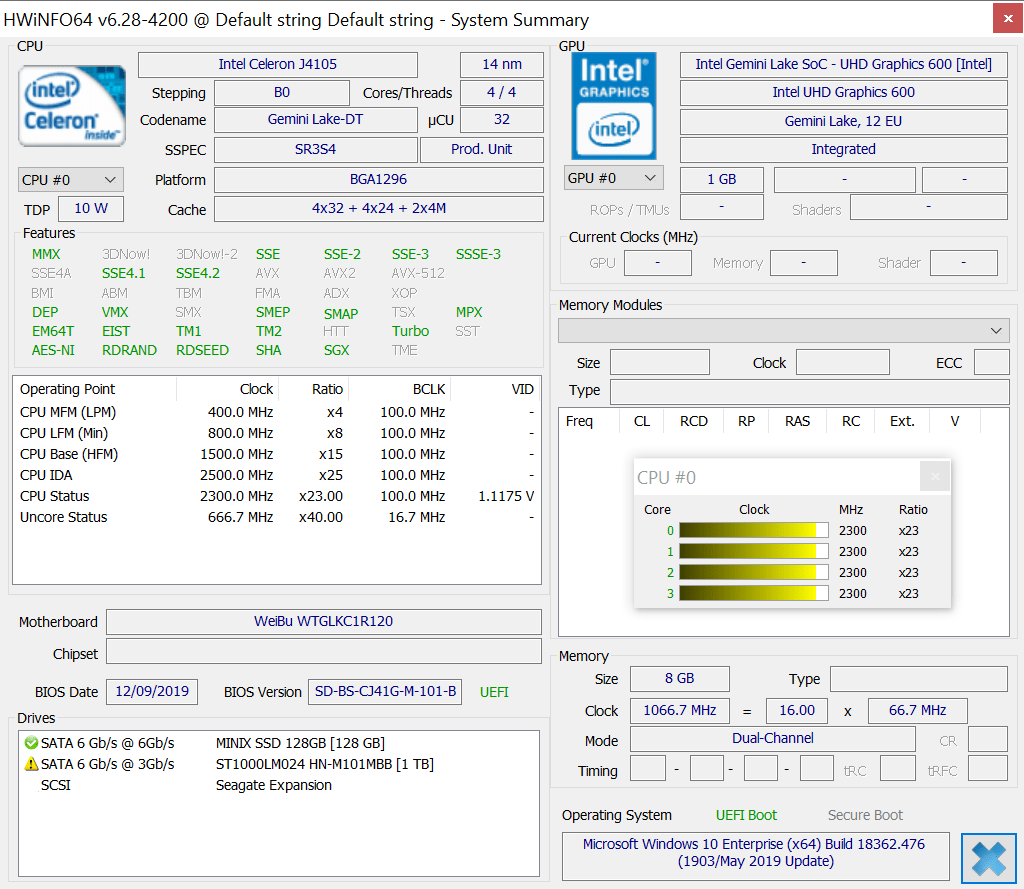
HWiNFO64 provides a bit more details about the processor, GPU, and we can see dual-channel memory is used we should provide optimal graphics performance. The utility also reports the motherboard name as “WeiBu WTGLKC1R120”, so maybe the BIOS was adapted from the one for some other board.
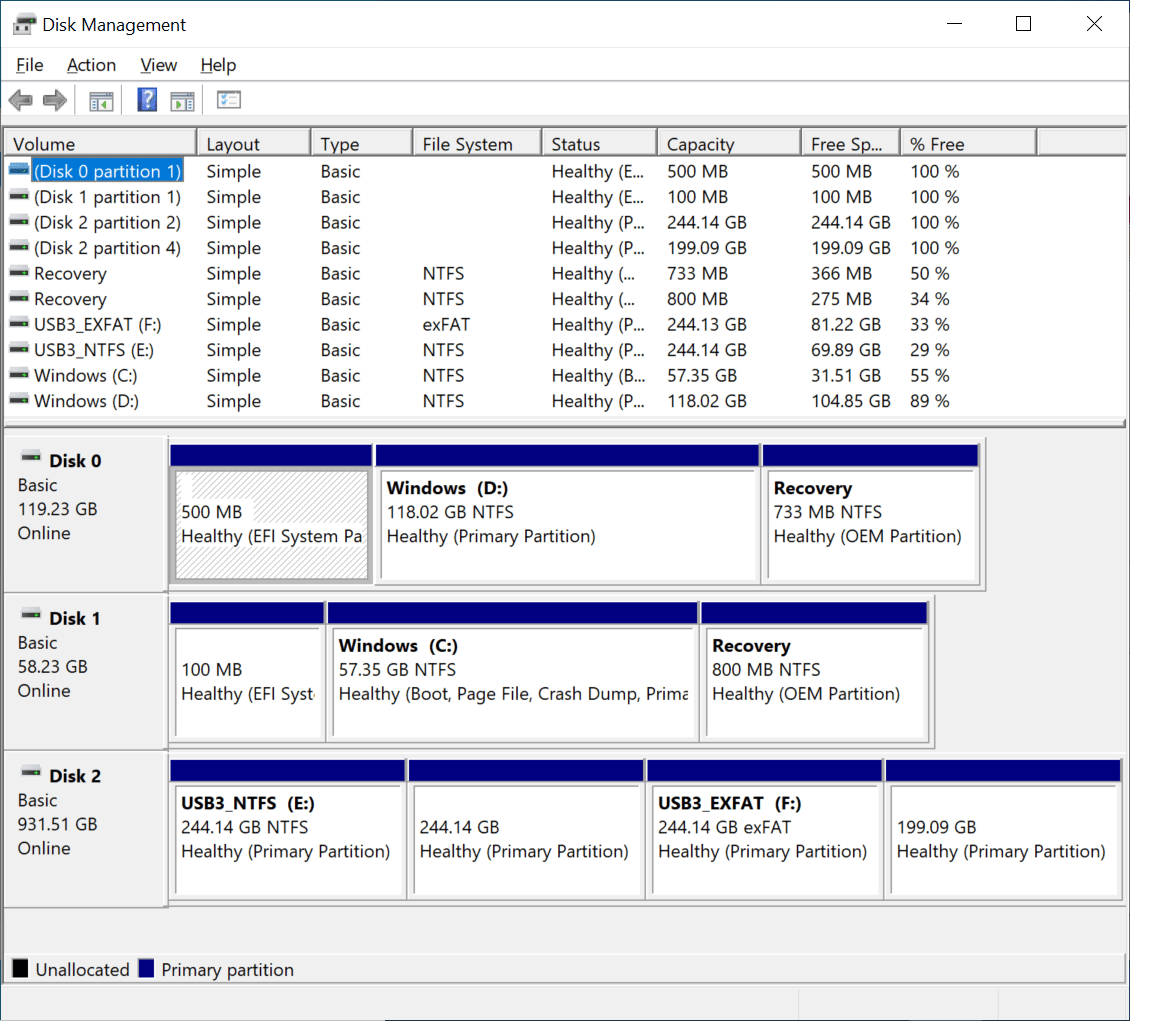
The list of disk partition will be a little confusing, and explain why I had troubles during the first boot. The D: Windows drive is part of the M.2 SATA SATA I installed in the first part of the review. It’s a 120GB SSD from MINIX pre-loaded with Windows 10 Pro. The C: Windows drive is part of the 64GB eMMC soldered to ODYSSEY-X86J4105 SBC. Partitions from disk 2 are the NTFS and exFAT partitions of the USB 3.0 expansion drive. Other unmounted partitions use BTRFS and EXT-4 file systems which are not supported in Windows by default. So all good.
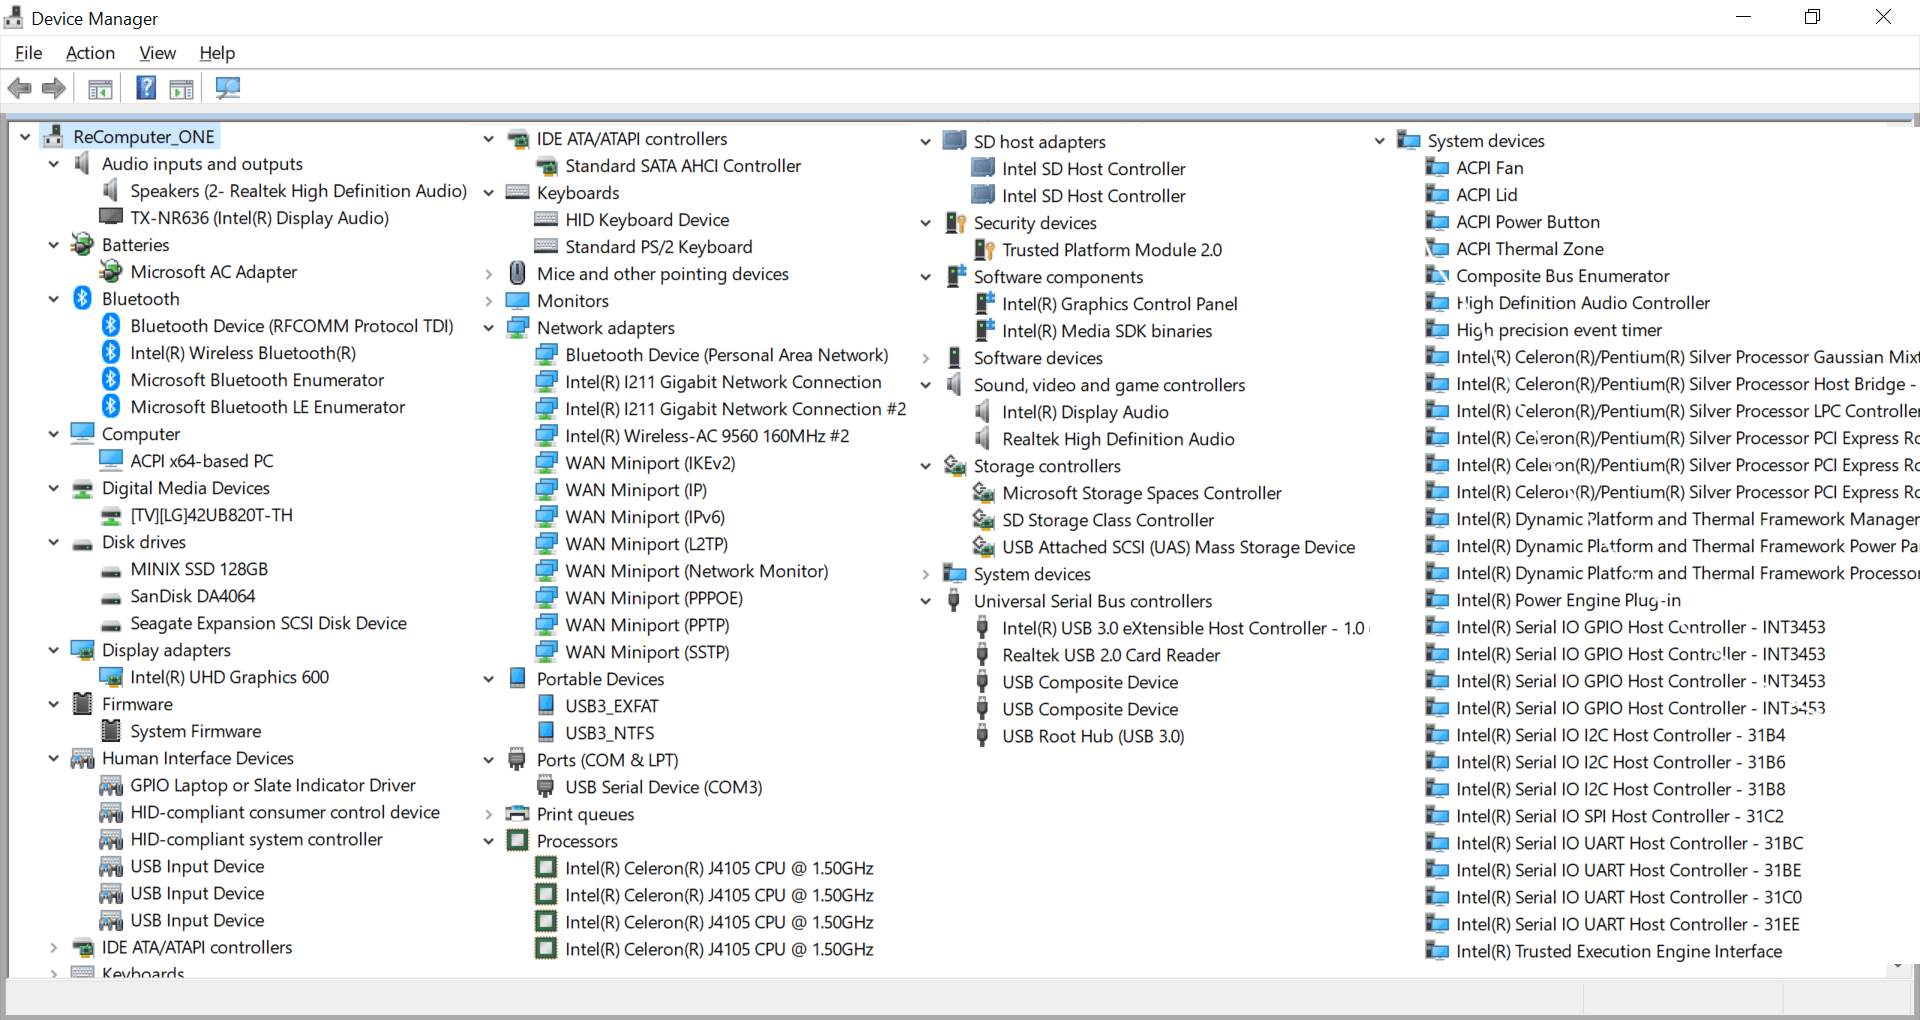
I’ve also includef a screenshot with most entries from Device Manager for people interested in details.
A Quick Look at the BIOS
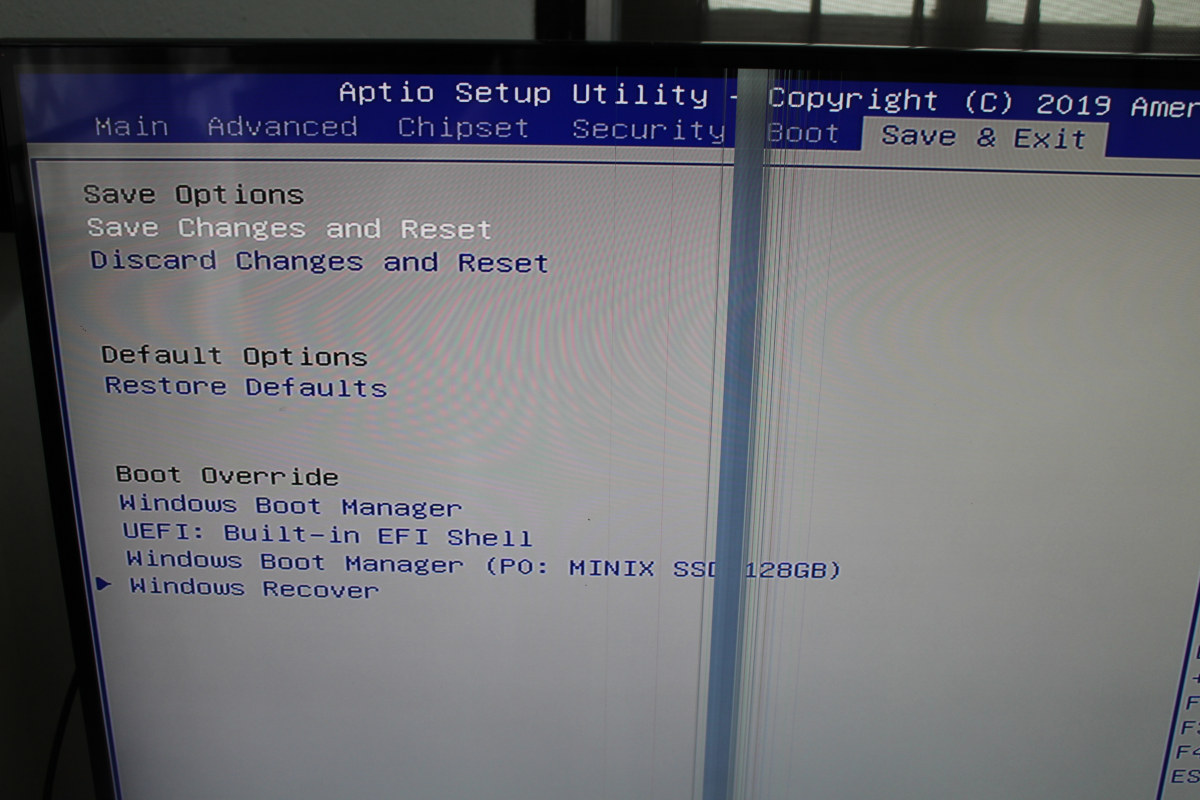
The very first time I boot the board I got the error message “OOBEIDPS” because it booted from the M.2 SATA SSD first, and Windows 10 Pro on the SSD is only licensed to work on MINIX mini PCs. Any I could boot after changing the boot order in the BIOS.
Let’s have a look at the BIOS since it’s quite complete and has some interesting options.
It’s the typical AMI Aptio Setup Utility, but contrary to my Acer laptop where the BIOS options are cut to the minimum, Seeed Studio provides a long list of options in the Advanced section.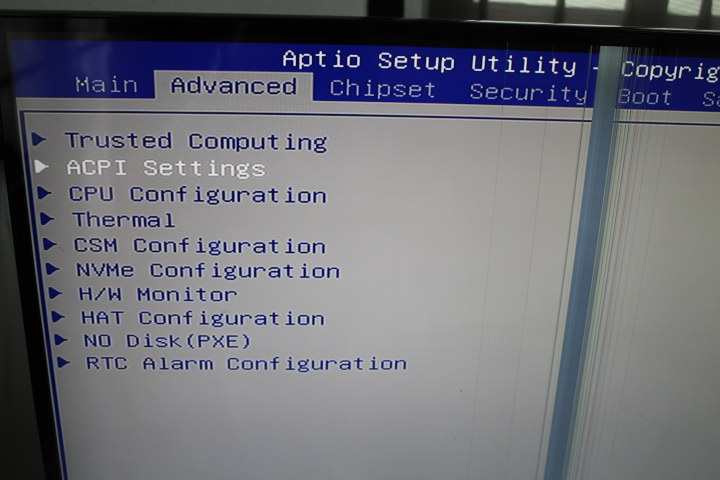
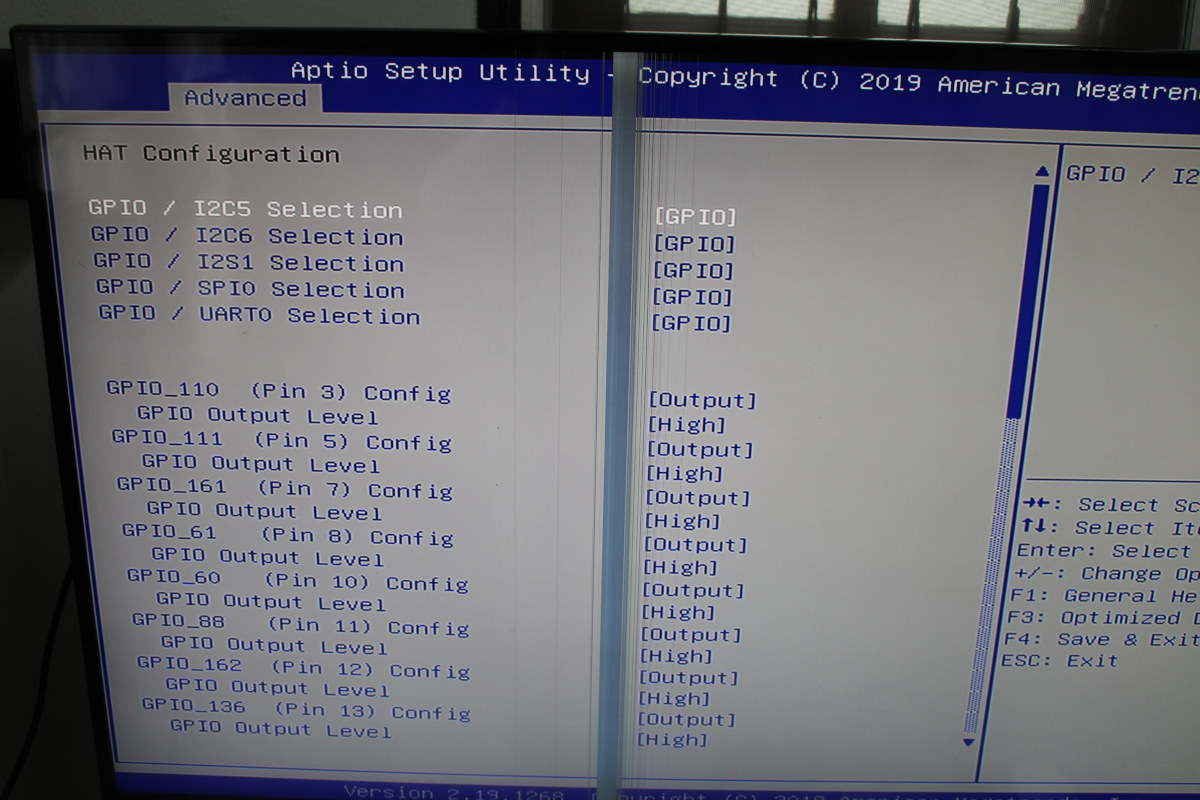
The HAT configuration got me curious, it’s designed to configure I2C, SPI or UART on specific pins of the 40-pin GPIO header, and defined the default status output/input and high/low level of each and every pin. Pretty nice.
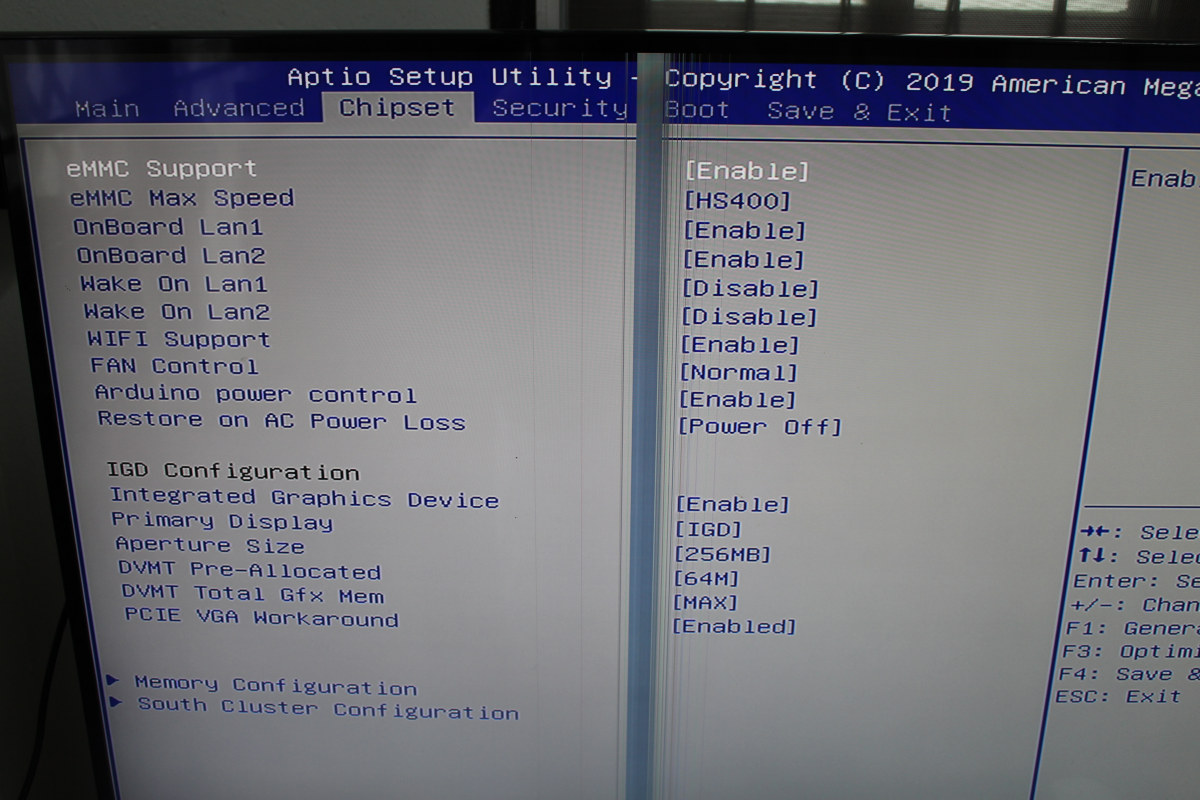
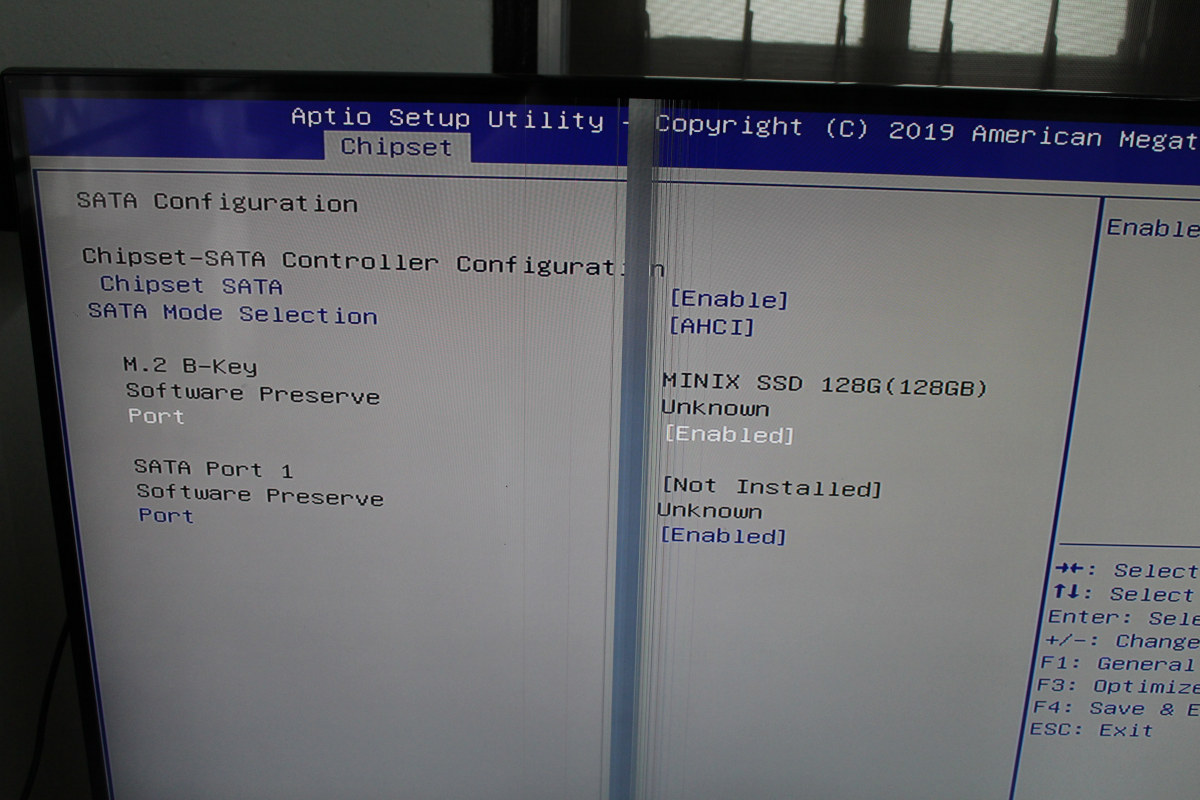
The Chipset submenu also has plenty of options including a menu to enable various ports and storage options, restore an AC power loss, and more.
SATA (shown below) and NVMe configuration are also available.
I could easily change the boot order to make sure the Windows Boot Manager on the eMMC flash, instead of the MINIX SSD, was used first.
ODYSSEY-X86J4105 Benchmarks
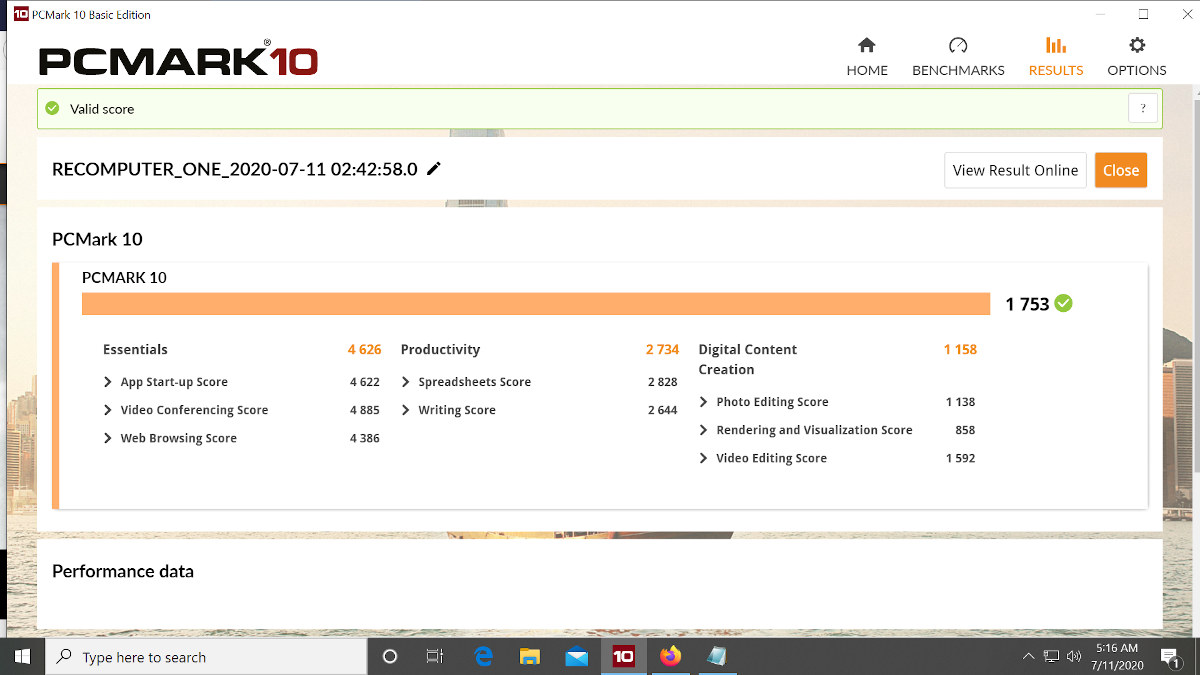
Let’s run the usual benchmarks starting with PCMark 10 where the mini PC achieved 1,753 points. This compares to 1,877 points for Beelink X55 mini PC with a slightly faster 10W Intel Pentium J5005 Gemini Lake processor.
ODYSSEY-X86J4105 SBC got 934 points in Passmark PerformanceTest 10.0, against 1,377.3 points for Beelink X55. At first sight, it may look like a poor showing from the Seeed Studio board, but remember that Passmark benchmark is highly sentitive to storage performance, and The Beelink mini PC comes 128GB mSATA SSD, while we run Windows from the eMMC flash here.
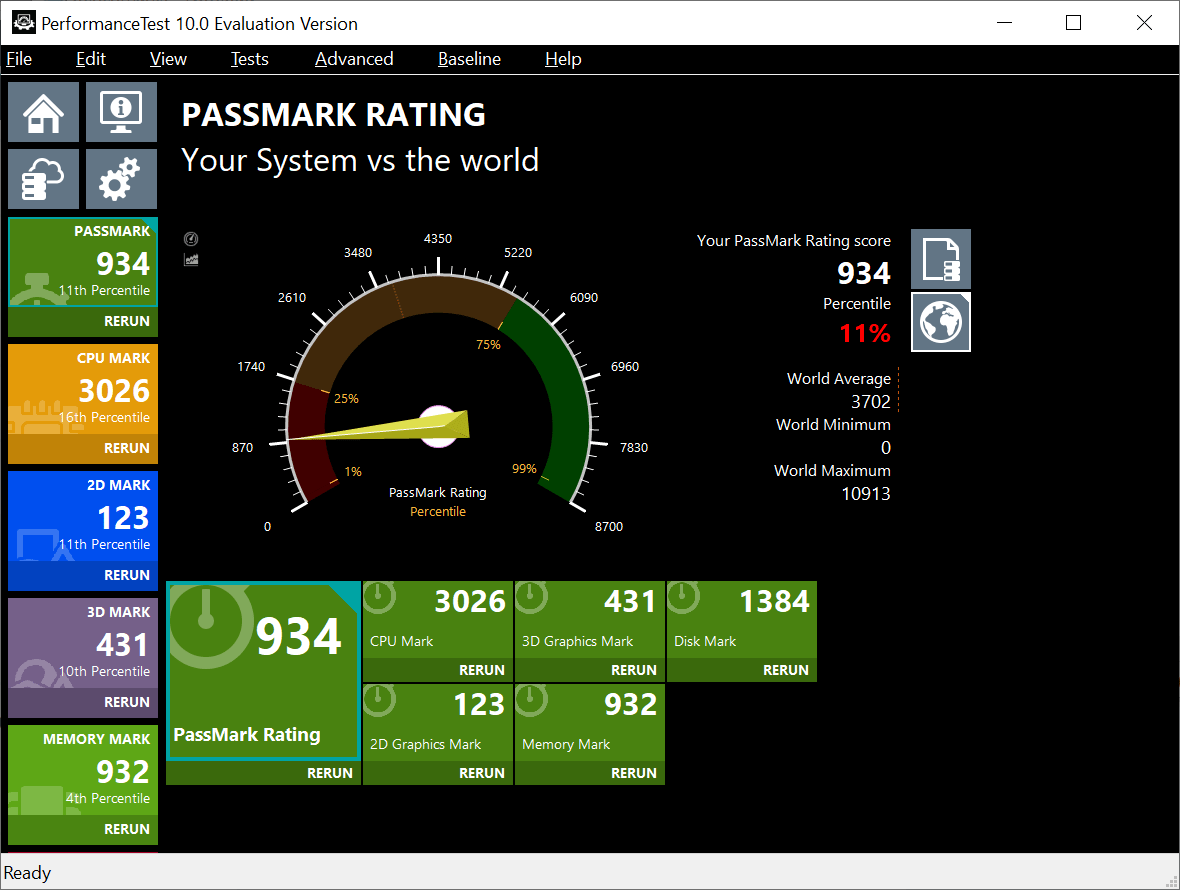
For example, the CPU score is 3,026 here, but in Beelink mini PC it was 2,734.9 points. But looking at the Disk Mark results, we have 1,384 vs 2864.8 points respectively. That means you’d be able to extra more performance by running Windows 10 from an M.2 SATA or NVMe SSD in the ODYSSEY board.
Let’s run some 3Dmark benchmarks to check 3D graphics performance is as one would expect.
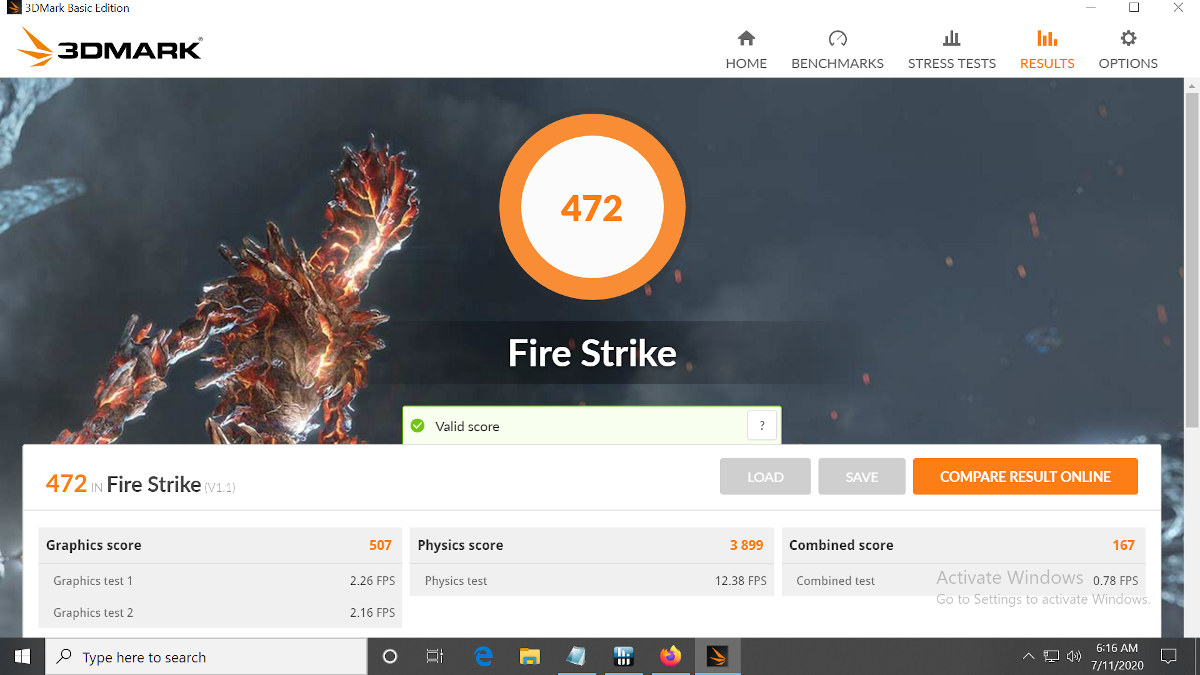
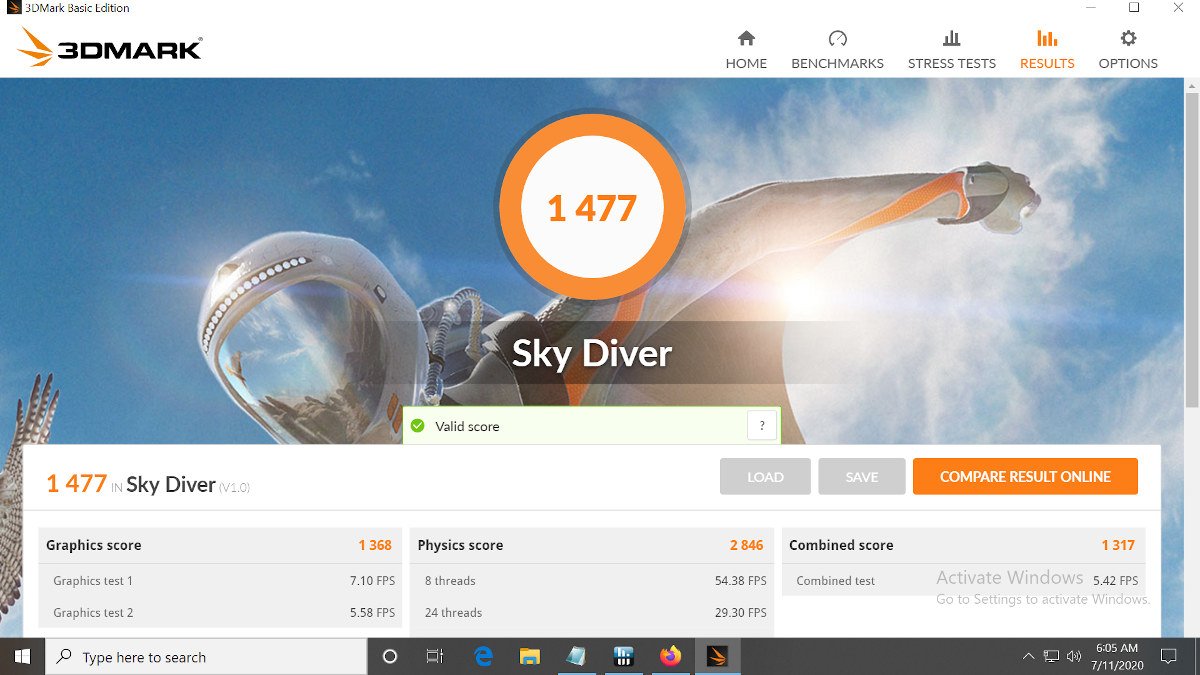
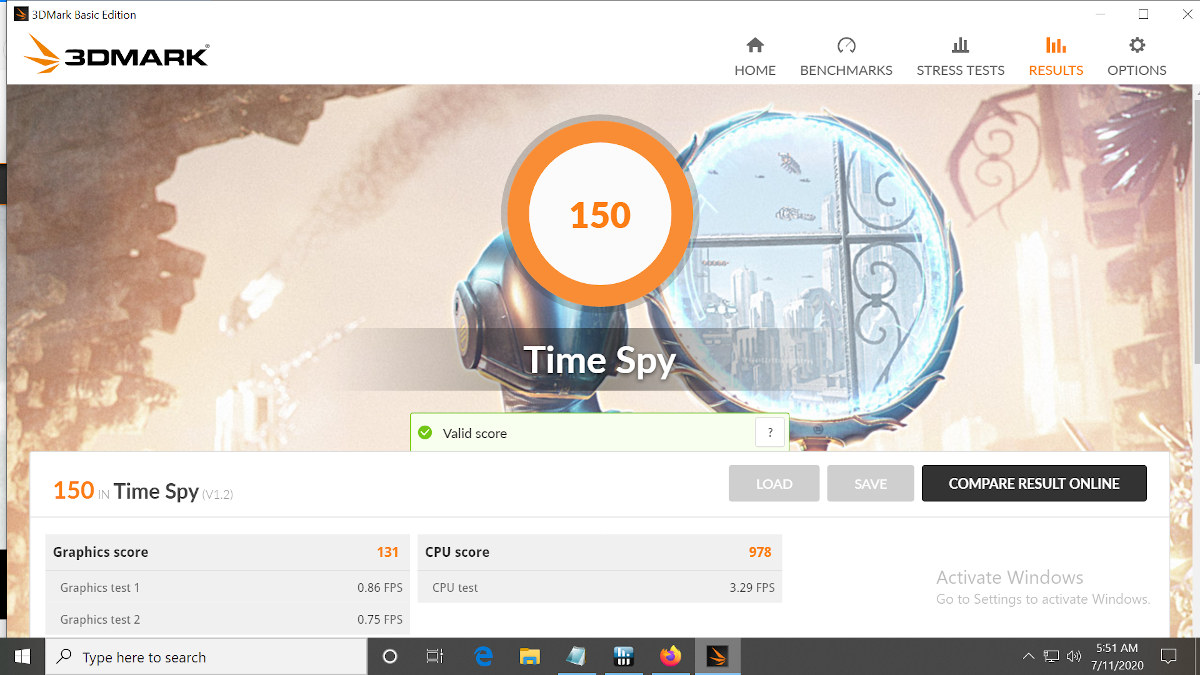
Let’s compare each of the results between ODYSSEY-X86J4105 (left) and Beelink X55 (right). We only have Sky Diver in common and the Celeron J4105 SBC got 1,477 points against 1,290 points for the Pentium J5005 mini PC.
Storage Performance
Most Gemini Lake processors have very similar performance, and what really makes the difference in Gemini Lake mini PCs is storage, the use of dual-channel memory (for graphics or other workload relying on high memory bandwidth), thermal design to avoid CPU throttling, as well as the selection of ports.
So let’s have a look at storage performance here with CrystalDiskMark 7.0.0.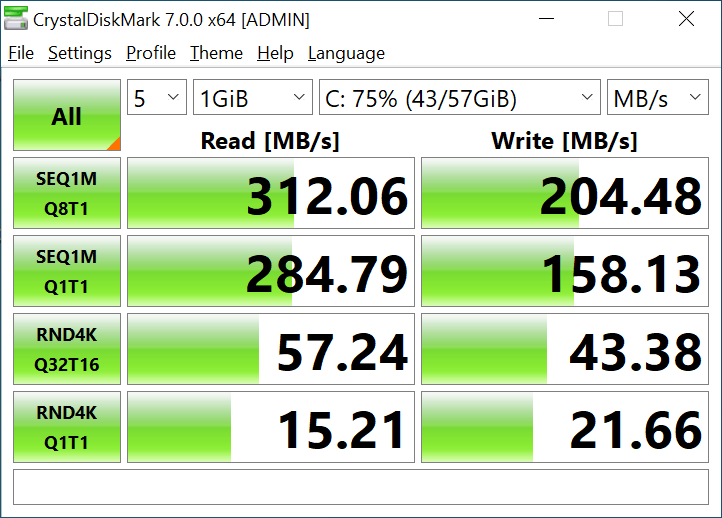
The performance of the eMMC flash can be seen above, and sequential read speed of around 300 MB/s and write speeds between 150 and 200MB/s are pretty good for an eMMC. Random I/Os do not look too bad either.
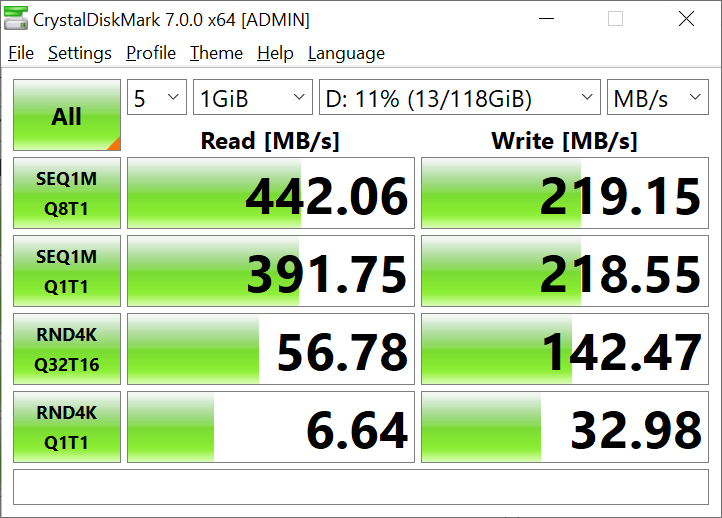
But switching to the M.2 SATA SSD does offer a performance boost in terms of sequential read/write speed, but especially in terms of random writes. Using an NVMe SSD on the other M.2 slot on the board would even be faster.
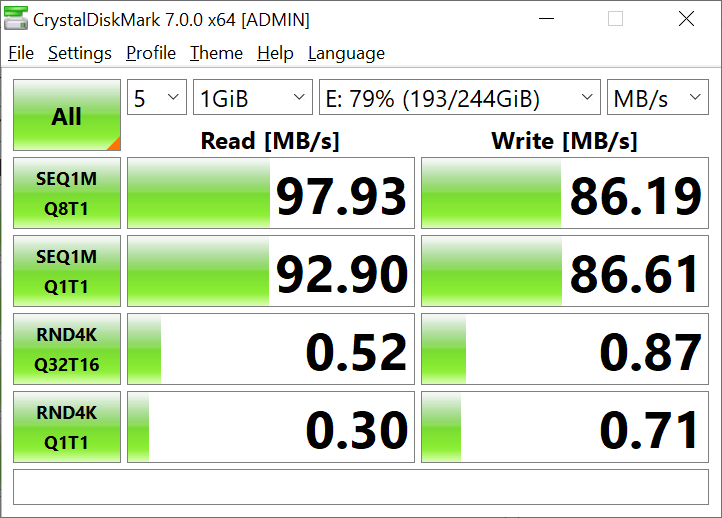
My USB 3.0 hard drive is normally capable of around 100MB/s sequential read and write speeds, and it’s a bit slower in ODYSSEY-X86J4105 SBC with 93 to 98MB/s reads, and 86MB/s writes. That’s when connected to the USB 3.0 port at the front of the case.
But I wondered what the performance would be via MINIX USB-C hub instead.
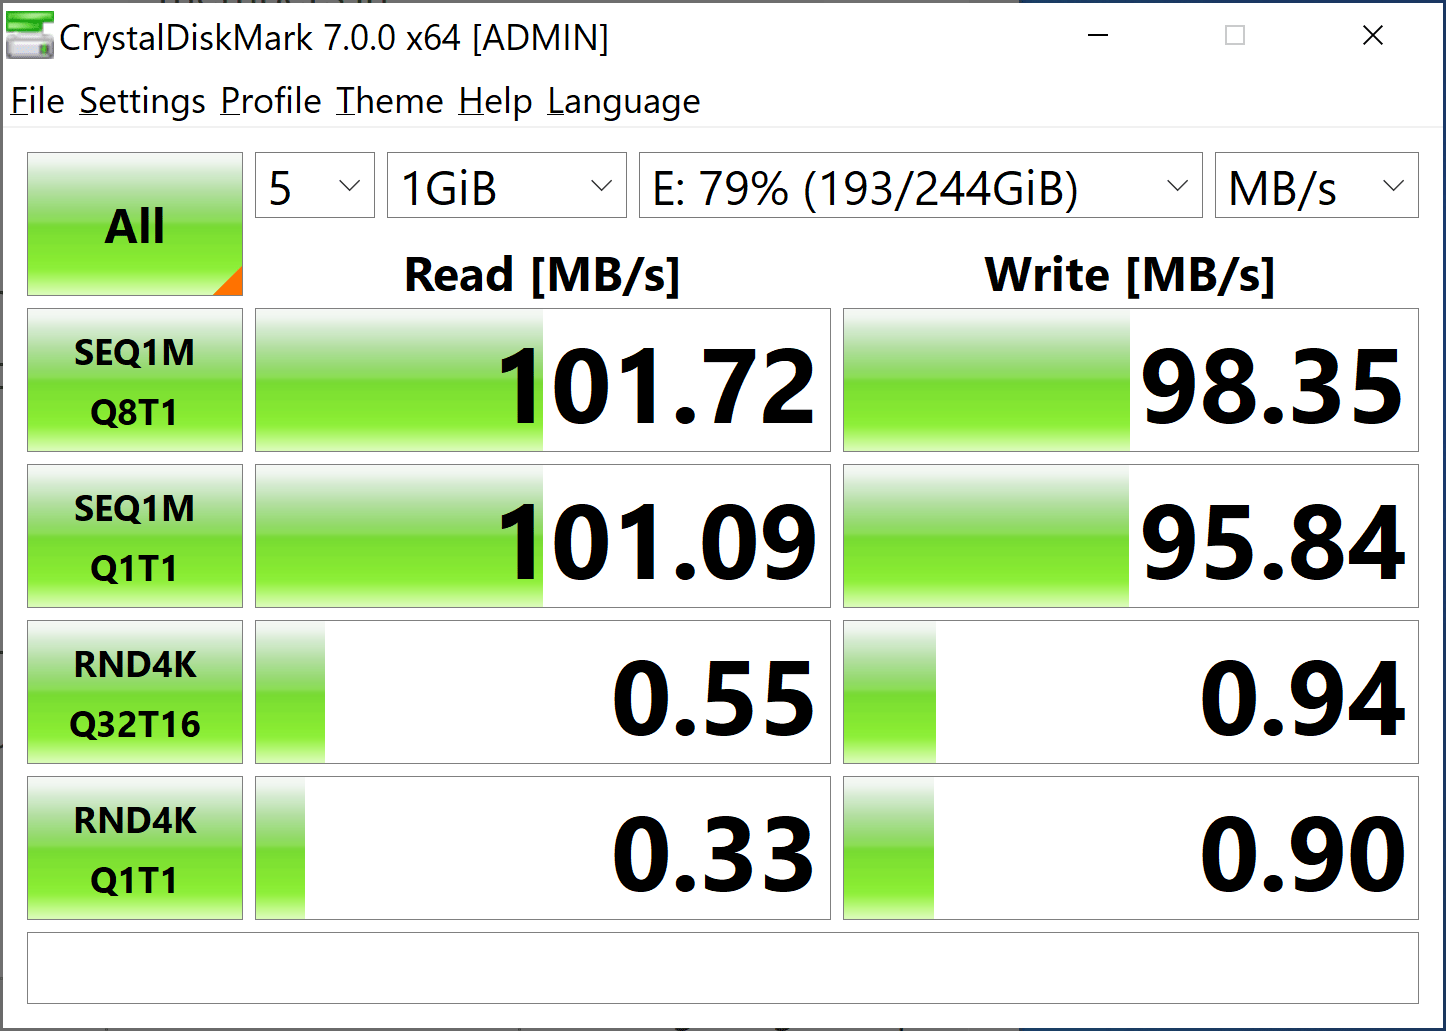
Oh. That’s more like it, although quite surprising. So if you wanted to optimize USB 3.0 performance you may want to connect the hard drive via the USB-C port… It may be specific to my setup, but still worth a try.
Networking Performance
Networking performance, especially WiFi performance, is something that can vary between devices.
I started with Gigabit Ethernet connected to LAN1 (close to HDMI port):
|
1 2 3 4 5 6 7 |
Client connecting to 192.168.1.13, TCP port 5001 TCP window size: 238 KByte (default) ------------------------------------------------------------ [ 4] local 192.168.1.4 port 5001 connected with 192.168.1.13 port 50248 [ 6] local 192.168.1.4 port 43896 connected with 192.168.1.13 port 5001 [ 6] 0.0-60.0 sec 5.29 GBytes 757 Mbits/sec [ 4] 0.0-60.0 sec 5.66 GBytes 810 Mbits/sec |
Not bad for a full-duplex transfer. I switch to LAN2 port close to the DC power jack:
|
1 2 3 4 5 6 7 |
Client connecting to 192.168.1.11, TCP port 5001 TCP window size: 170 KByte (default) ------------------------------------------------------------ [ 6] local 192.168.1.4 port 33186 connected with 192.168.1.11 port 5001 [ ID] Interval Transfer Bandwidth [ 6] 0.0-60.0 sec 2.01 GBytes 288 Mbits/sec [ 4] 0.0-60.0 sec 1.90 GBytes 272 Mbits/sec |
Wow, it’s much slower. Why? Let’s check with download only:
|
1 2 3 4 5 6 |
Server listening on TCP port 5001 TCP window size: 208 KByte (default) ------------------------------------------------------------ [ 4] local 192.168.1.11 port 5001 connected with 192.168.1.4 port 43298 [ ID] Interval Transfer Bandwidth [ 4] 0.0-60.0 sec 5.87 GBytes 840 Mbits/sec |
and then upload only:
|
1 2 3 4 5 6 |
Client connecting to 192.168.1.4, TCP port 5001 TCP window size: 208 KByte (default) ------------------------------------------------------------ [ 3] local 192.168.1.11 port 52461 connected with 192.168.1.4 port 5001 [ ID] Interval Transfer Bandwidth [ 3] 0.0-13.4 sec 619 MBytes 386 Mbits/sec |
So if you were you download a file locally both LAN1 and LAN2 would have similar performance, but uplink via LAN2 is much slower. Not sure why, but that’s something to keep in mind depending on your use case.
I’ve then removed the Ethernet cable, and connected the board to over WiFi 5
- WiFi Upload
|
1 2 3 4 5 6 |
Server listening on TCP port 5001 TCP window size: 128 KByte (default) ------------------------------------------------------------ [ 4] local 192.168.1.4 port 5001 connected with 192.168.1.12 port 50074 [ ID] Interval Transfer Bandwidth [ 4] 0.0-60.0 sec 1.64 GBytes 235 Mbits/sec |
- WiFi download:
|
1 2 3 4 5 6 7 |
------------------------------------------------------------ Client connecting to 192.168.1.12, TCP port 5001 TCP window size: 170 KByte (default) ------------------------------------------------------------ [ 3] local 192.168.1.4 port 40130 connected with 192.168.1.12 port 5001 [ ID] Interval Transfer Bandwidth [ 3] 0.0-60.0 sec 1.26 GBytes 180 Mbits/sec |
I typically get 250 Mbps in either direction on the best hardware I’ve tested, and here the download speed is a bit slower, but wireless connectivity is always something that varies a lot depending on conditions.
ODYSSEY-X86J4105 + Re_Computer Case Stress Test and CPU Throttling
Let’s check how well cooling works with ODYSSEY-X86J4105 board inside Re_Computer case, and stressed for several hours using both AIDA64 Extreme and HWiNFO64 to monitor CPU Throttling in Windows 10.
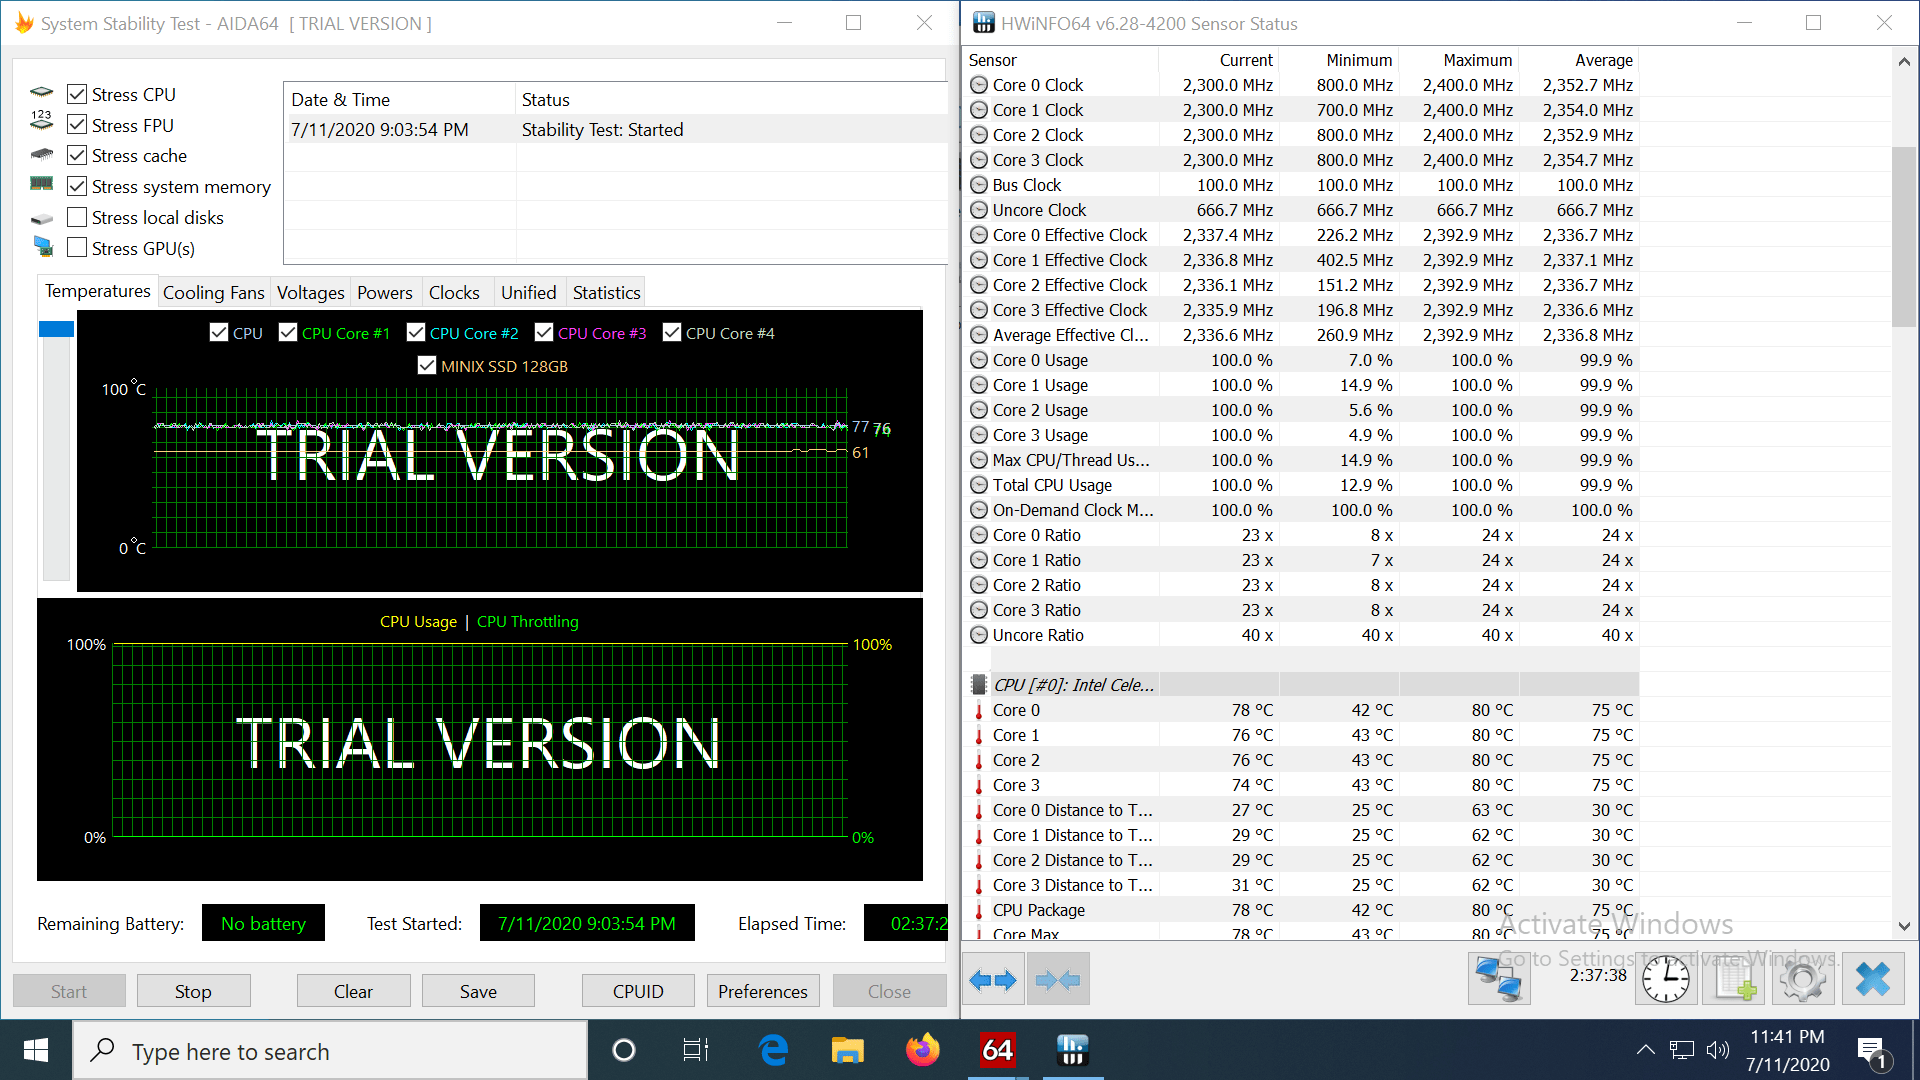
I ran AIDA64 stress test for a little over two hours, and the processor never throttled with the maximum temperature reaching 80°C with a room temperature of around 30°C. The CPU clock will oscillate between 2.3 and 2.4 GHz when all four cores are used.
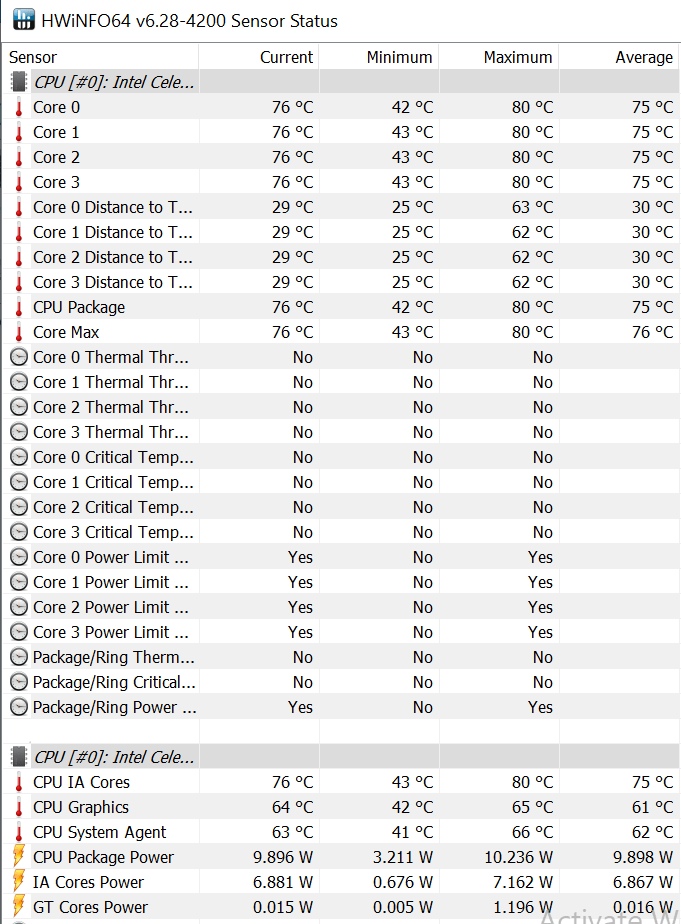
The screenshot above confirms thermal throttling never occurred, but we did hit the 10W power limit which is normal. Note the fan is what helps keep everything cool and running optimally, but it’s not exactly silent. It’s possible to adjust fan settings in the BIOS, but doing so may obviously impact performance. It all depends on your workload, ambient temperature, and other environmental factors.
At this stage, I usually do some video testing, gaming, program testing, and I did play a bit with the computer, but since it’s so similar to other properly designed Gemini Lake mini PCs, I invite you to check other reviews from Linuxium or myself.
Arduino & Raspberry Pi Headers
One of the main differentiating features of the board is the presence of Arduino and Raspberry Pi headers. So let’s see if and how we can use those in Windows 10.
Using the Arduino Header on ODYSSEY-X86J4105
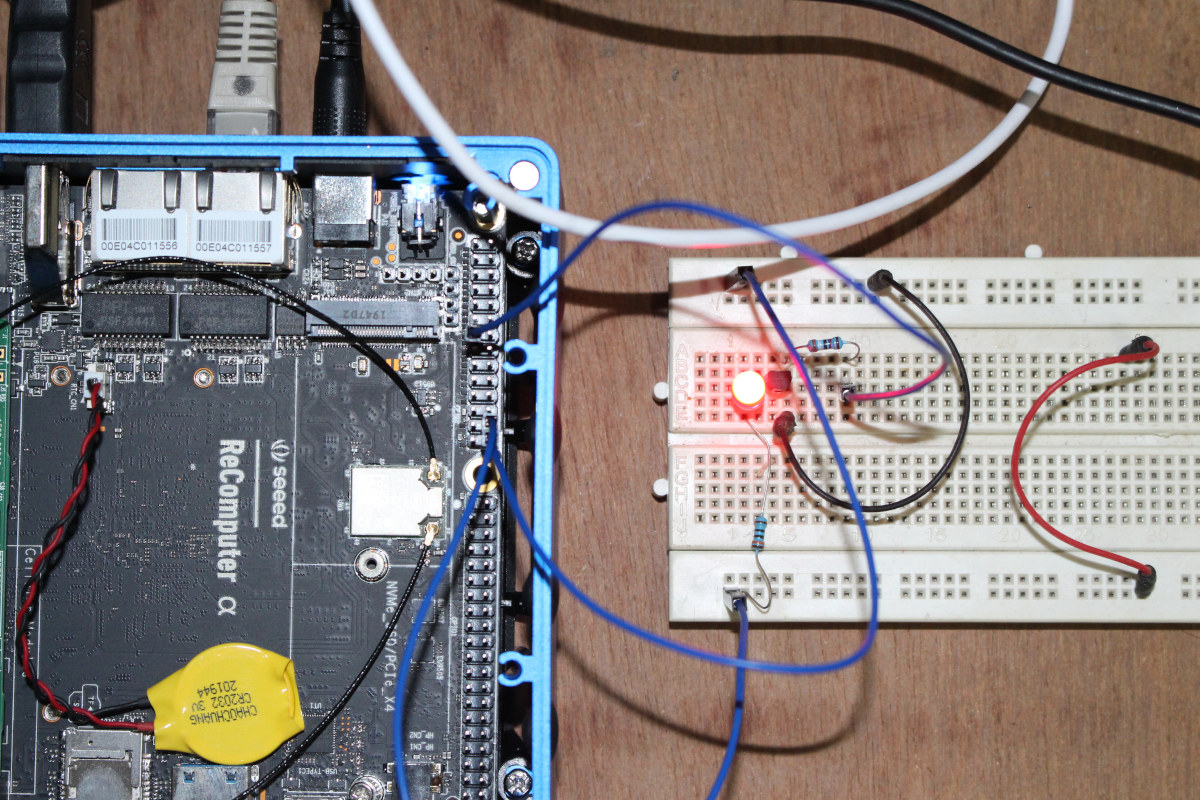
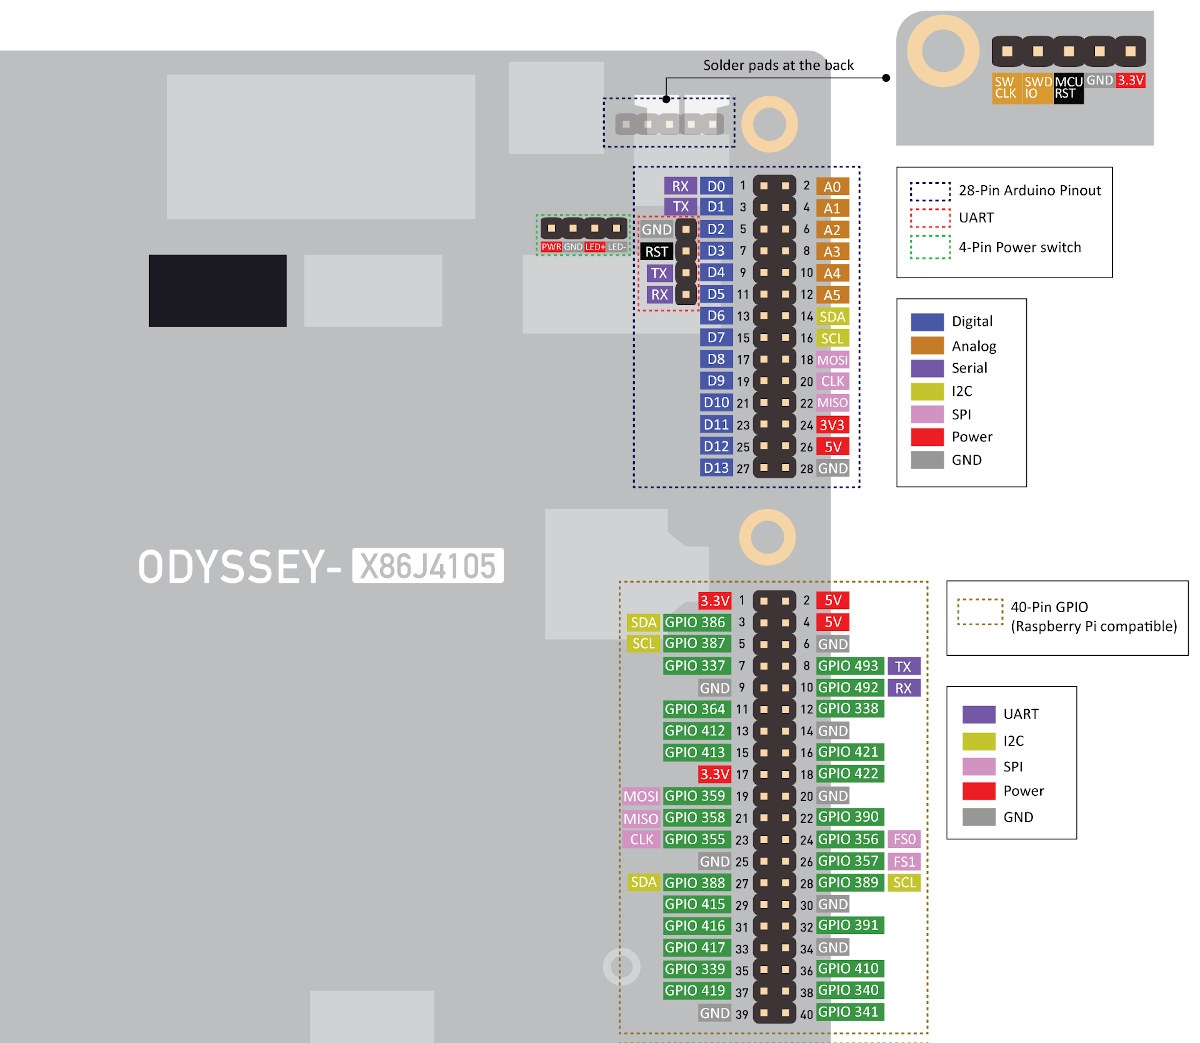
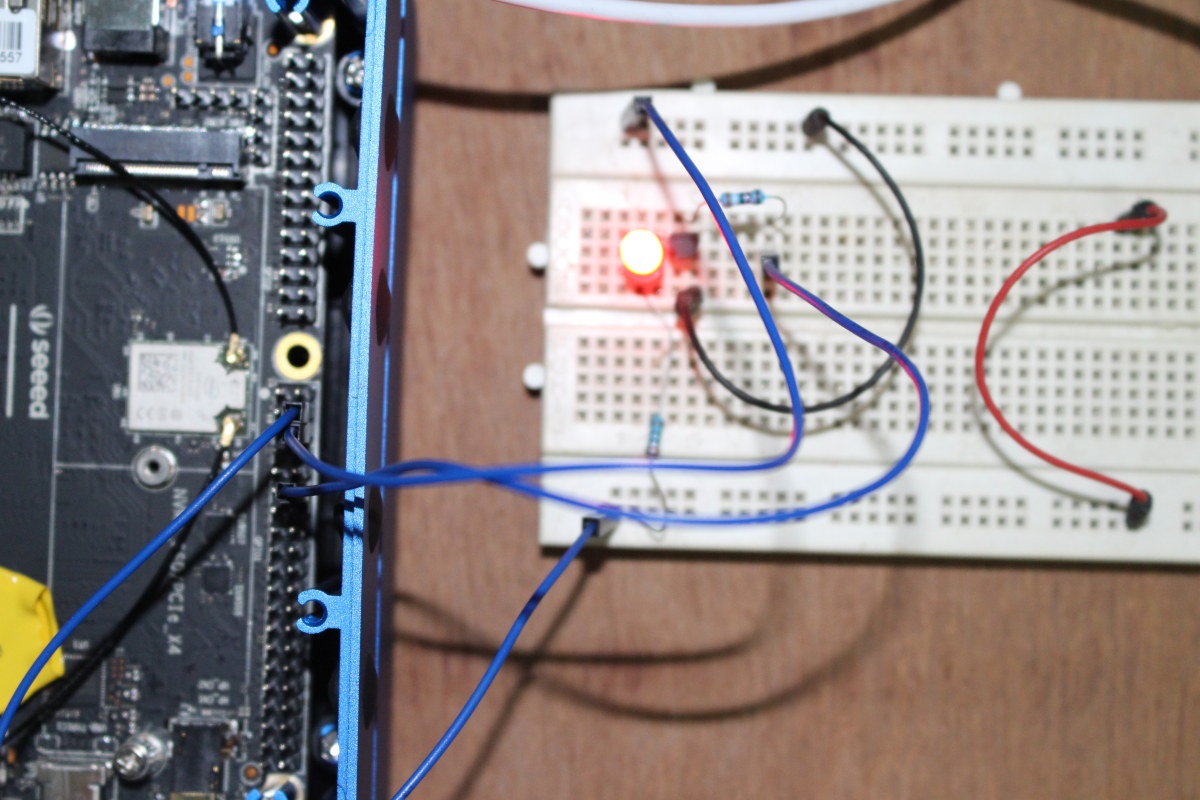
I connected an external LED fitted to a breadboard to the SBC using 5V, GND, and D6 GPIO. We’ll now need to configure the Arduino IDE to use Seeeduino Zero board since it’s not done out of the box even though the Arduino IDE is already installed. Everything is explained in the Wiki, but basically we need to go to:
- File->Preferences and add https://files.seeedstudio.com/arduino/package_seeeduino_boards_index.json to the Additional Boards Manager URL field
- Then Tools->Board->Boards Manager to add support for Seeed SAM Boards
Once it’s done we can select Seeeduino Zero board and COM port as shown below.
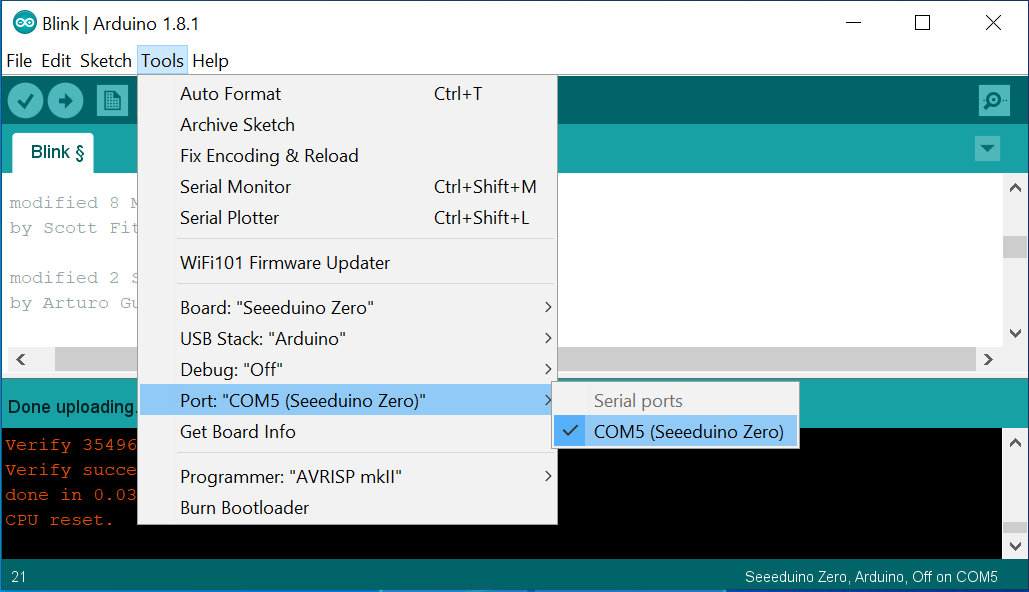
Then I loaded the Blink sketch and modified it to use D6 digital pin as shown in the screenshot below.
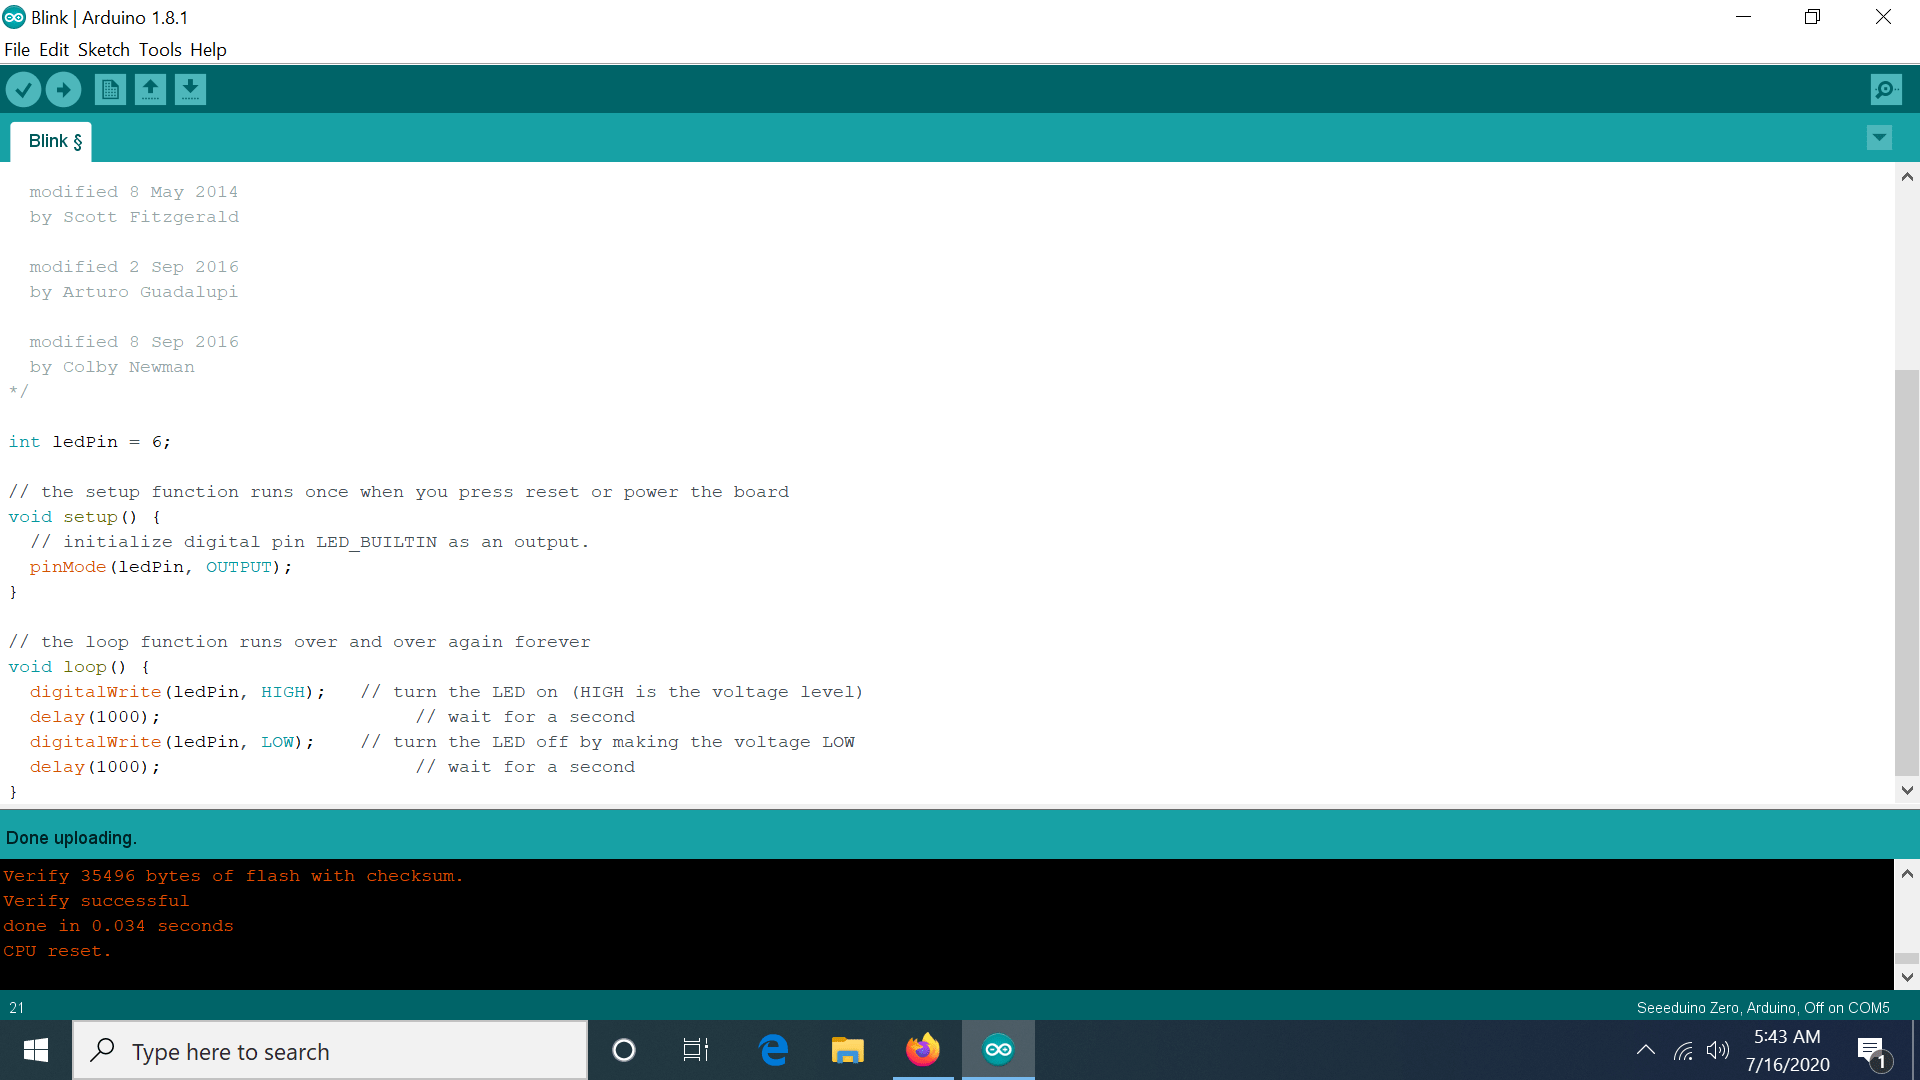
Finally, you could verify the code, and load it to get the LED blinking. Success!
(Not) Using the Raspberry Pi Header on ODYSSEY-X86J4105 SBC
Let’s try to do the same with the Raspberry Pi header by connected 5V, GND, and GPIO 338 (pin 12) to our breadboard.
There’s a section about using the 40-pin GPIO header in the Wiki, but it’s only for Linux/Ubuntu. I could not find any method or instructions, so I asked Seeed Studio and the answer was disappointing:
Currently cannot
Fair enough. We’ll have to try in Linux in the third part of our review.
Conclusion
ODYSSEY-X86J4105 SBC offers plenty of connectivity options, unique features with IO headers compatible with Arduino and Raspberry Pi, and combined with Re_Computer enclosure it makes for a decent Gemini Lake mini PC with virtually no issues and good performance even a hot climate (~30°C).
It’s not to say it’s for everyone, as the fan is a little noisy, and won’t be acceptable to some people. There are a few shortcomings you may want to be aware of including a slower upload speed on the Gigabit Ethernet port close to the DC jack, and somehow my USB 3.0 hard drive was a bit faster when connected through the USB-C port (and a USB-C hub) instead of a USB 3.0 port on the unit.
Advanced users will be pleased with all options in the BIOS, and support for Arduino header, but the Raspberry Pi header can only be used in Linux at this stage. Using an M.2 SATA or NVMe storage will extract more performance from the system, so if you plan on using such a card, selecting the version without eMMC flash is recommended.
There are three variants of the board on offer with price ranging from $188 to $258 plus shipping:
- ODYSSEY – X86J4105800 ($188) without eMMC flash (you can boot from M.2 or USB storage)
- ODYSSEY – X86J4105864 ($218) with a 64GB eMMC flash pre-loaded with an unactivated version of Windows 10 Enterprise. That’s what I reviewed here.
- ODYSSEY – X86J4105864 ($258) with a 64GB eMMC flash pre-load with an activated version of Windows 10 Enterprise. Same hardware as above but with a Windows license.
This does not include Re_Computer case which adds $19.99 to the total.
Update: The final part of ODYSSEY-X86J4105 review with Ubuntu 20.04 is up.

Jean-Luc started CNX Software in 2010 as a part-time endeavor, before quitting his job as a software engineering manager, and starting to write daily news, and reviews full time later in 2011.
Support CNX Software! Donate via cryptocurrencies, become a Patron on Patreon, or purchase goods on Amazon or Aliexpress. We also use affiliate links in articles to earn commissions if you make a purchase after clicking on those links.


Quite an encouraging sounding product and the additional versatility offered by the USB-C port to expand things further makes it even more appealing.
Whilst more expensive that something like an N2+ it offers up so much more and being x86 rather than ARM and with the range of options on the board.
I would like to see what they could come up with in terms of a cheaper and more box/NUC orientated solution that had the same USB-C implementation and M.2 expansion.
The Chuwi Larkbox nearly hit the right note but failed on the lack of USB-C versatility and the upper end of the ARM market is littered with a narrow field of options, with dodgy hardware and warranties that only jut outlive that of a loaf of bread.
Hardkernel also has the ODROID-H2 / ODROID-H2+ boards with a similar processor, but no USB-C. Both boards are quite cheaper, but do not include RAM. (SO-DIMM sticks need to be installed)
Indeed that is true enough but I would love to see what Seeed could come up with as Hardkernel seem to be adverse to using USB-C for one and from my perspective, I am more excited by what Seeeddo than HK.
I own a bunch of H2 and H2+. I also own an ODYSSEY-X86J4105.
What kind of application/use cases would leverage Arduino and Raspberry Pi combined with a Celeron J4105? I’m looking for ideas for the Odyssey!
Possibly some robotics project where you would attach an Arduino shield and/or a Raspberry Pi HAT.