
The Raspberry Pi 4 will soon be able to install Raspberry Pi OS without the need for external hardware to flash the image. Raspberry Pi Network install will allow users to install a blank MicroSD card into their board, which will trigger the launch of Raspberry Pi Imager on the Raspberry Pi, and flash the image downloaded from the Raspberry Pi website.
So far in order to install Raspberry Pi OS, you had to download Raspberry Pi Imager on a computer or a working Raspberry Pi, insert the MicroSD card into the host, and flash the image, before moving the MicroSD card into the Raspberry Pi board. This works just fine for most people, but if the Raspberry Pi is your only computing device, as may be the case in developing countries, that does not work. Network Installs may also speed up the installation process in the classroom where multiple boards may need to be set up.
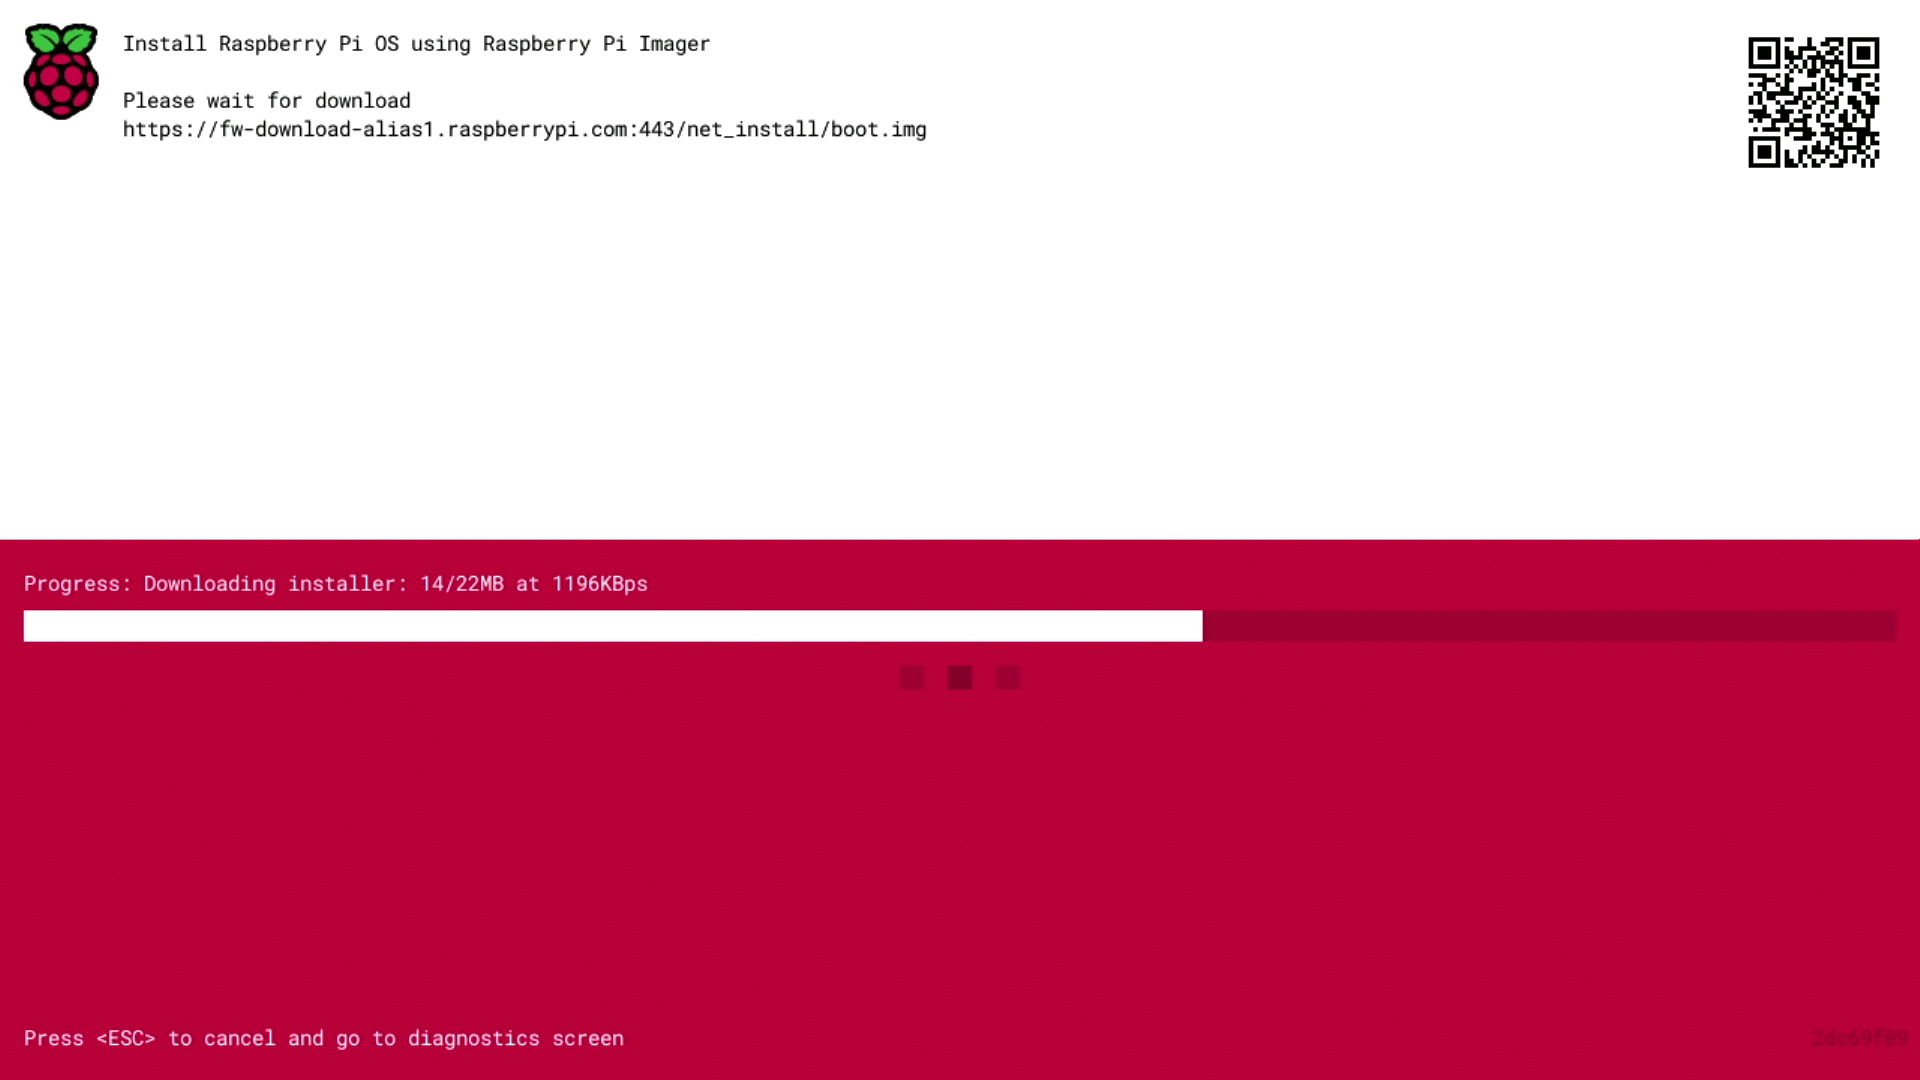
But wait… If the SD card is empty how can this possibly work? That’s because while the bootloader (bootcode.bin) used to be found in the MicroSD card’s boot partition in earlier Raspberry Pi boards, the bootloader is now located in the Raspberry Pi 4 EEPROM. The Raspberry Pi Foundation simply changed the bootloader code to enable the Network install feature, and yes, it will only work with Raspberry Pi 4, CM4, and Raspberry Pi 400 keyboard PC, but not Raspberry Pi 3 and earlier models. You’ll need an Ethernet cable too since WiFi is not available from the bootloader.
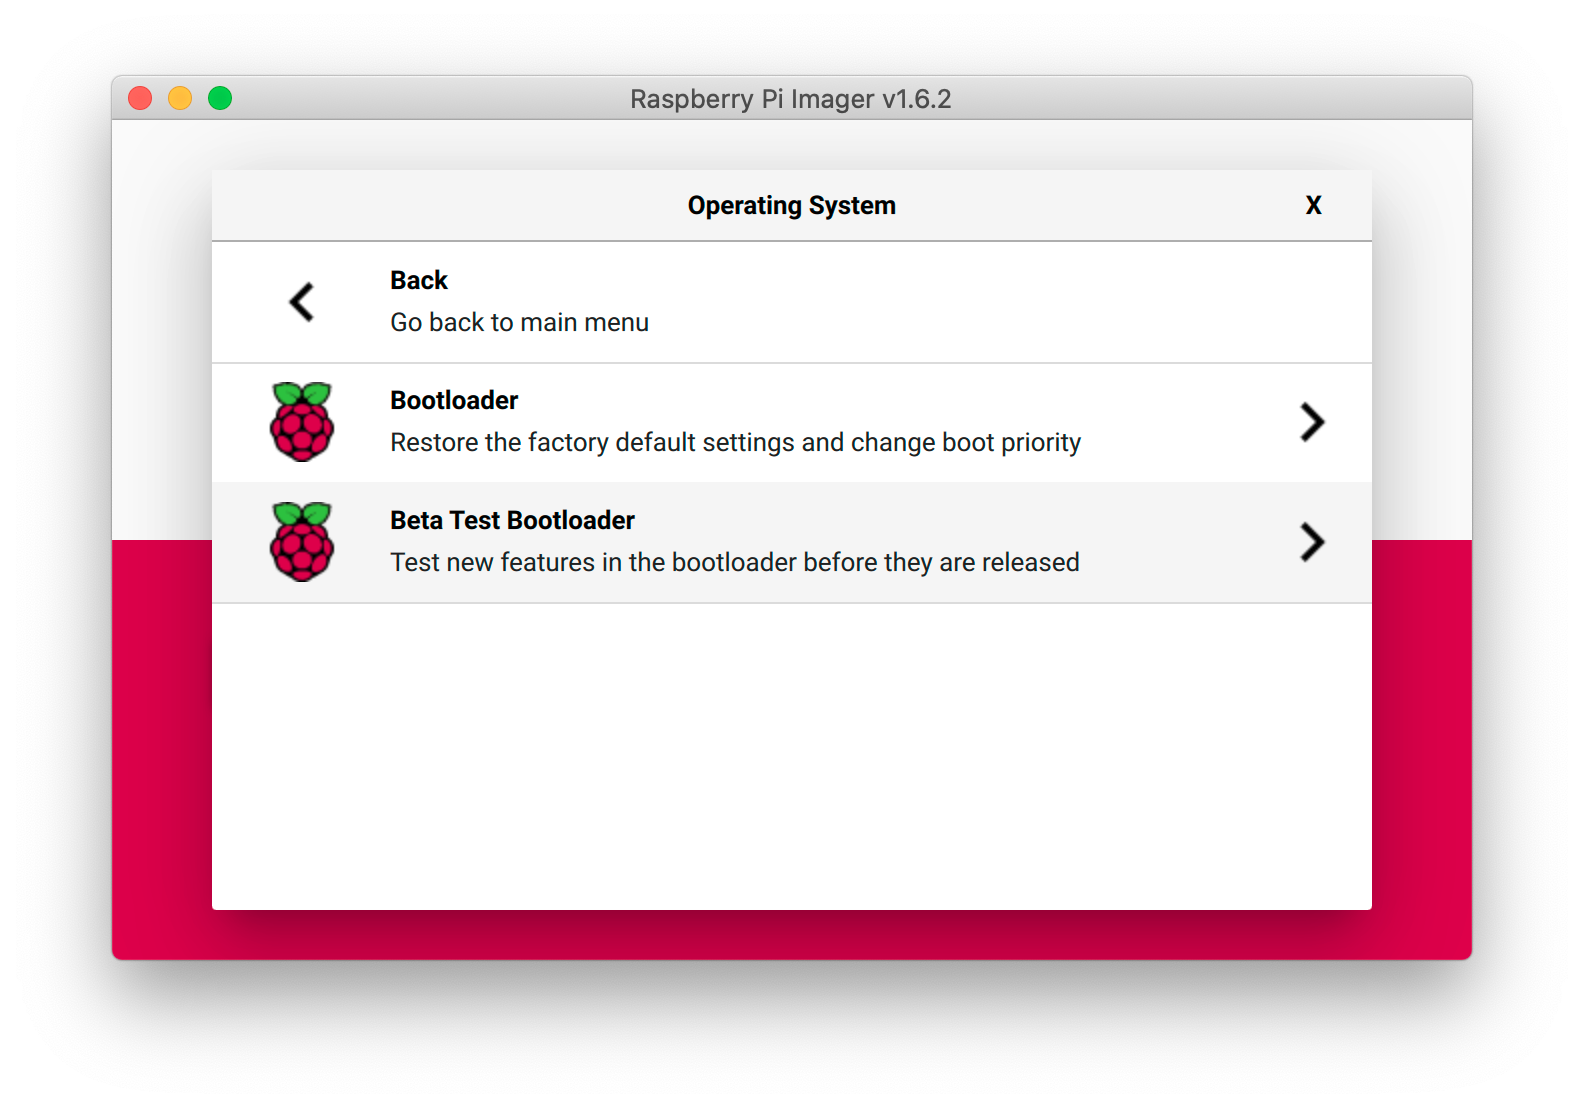 Eventually, the new bootloader will be installed in the factory, so it will work out of the box. But if you want to try it today, you’ll need to install the Beta Test Bootloader using Raspberry Pi Imager by clicking on the “Choose OS” button, scrolling down to “Misc utility images”, then selecting “Beta Test Bootloader”, and finally “SD card boot”. Once the image is flashed to the MicroSD card, insert it to your powered-down Raspberry Pi 4, connect the power, and wait until the display turns green, or the boards’ LED blinks regularly indicating success.
Now you’re ready to go through the Network Install procedure as shown in the video below.

It looks like only Raspberry Pi OS is supported at this time, and you may not be able to change that easily since the Raspberry Pi Bootloader is closed-source and the Raspberry Pi Foundation only provides binary files.
Via Raspberry Pi Blog.

Jean-Luc started CNX Software in 2010 as a part-time endeavor, before quitting his job as a software engineering manager, and starting to write daily news, and reviews full time later in 2011.
Support CNX Software! Donate via cryptocurrencies, become a Patron on Patreon, or purchase goods on Amazon or Aliexpress. We also use affiliate links in articles to earn commissions if you make a purchase after clicking on those links.


I don’t know what the eeprom size is, but it’s nice that some such devices start to sell with some early boot code, we’re getting closer to what’s done in the PC world where the BIOS provides lots of options to boot/install a machine. This is definitely missing a lot in the SBC domain.
I’m unable to find information about the EEPROM size, but the bootloader binary is 512KB.
When I created the wikidevi page I somewhere found info that it was 512KB, but I can no longer find the link. There are actually two EEPROM on board, one for the boot loader firmware and a 2nd for the firmware for the VL805 USB 3.0 host controller.
The VL805 EEPROM is not included in the board since a lot of time. The part is missing in the board. The firmware for VL805 is loaded from the main firmware.
I wold guess this is just using the existing tftp boot code with a few modifications. I already tftp boot all of my pis and run over NFS.
Same feature from Libre Computer roughly 1.5 years before Raspberry Pi decided to do it:
https://twitter.com/librecomputer/status/1281498458814390272?cxt=HHwWgIC9neCD5sgjAAAA
Great work, indeed!
When I first heard about this, it sounded like a security nightmare, but my understanding is that it doesn’t do it *automatically*, but requires user interaction. That’s reassuring. The last thing I would want was for an rpi to reset, temporarily not see the uSD card, and decide to re-image it with a fresh copy of raspbian OS–with all those default passwords, etc.
Now I trust even less rpi and its closed source bootloader!
Why?
What’s happening in ThreadX is checking for ’empty SD card’ then pressed shift button on USB keyboard, then establishing HTTPS to fw-download-alias1.raspberrypi.com (maybe doing certificate/CA checking?) and from then on control is handed over to the ARM cores and Linux (at least the boot.img they use now is plain Linux).
This is the way we use to install SunOS back in the late 80s. Glad to see RPi can now do it too.
Yes, good memories indeed. “boot net” was all you had to type. By then it was using RARP to get an address, later replaced by BOOTP, later by DHCP but the principle remained the same, get an address, load the image from TFTP and boot it.
PXE FTW!
That was still used in the 2000’s. You could even boot Linux (Mandrake?) from a network server. No install needed.
And all of this was LAN only. The only similarity is now ThreadX trying to obtain IP address / default route via Ethernet cable and trying to establish a HTTPS connection to fw-download-alias1.raspberrypi.com (TLS config ‘grade T’ rated or B ignoring trust issues).
Ouch, indeed: https://www.sslshopper.com/ssl-checker.html#hostname=fw-download-alias1.raspberrypi.com shows an invalid chain …
And the great tool testssl.sh tells:
Grade capped to T. Issues with the chain of trust (chain incomplete)
> Issues with the chain of trust (chain incomplete)
Who cares? There’s some hard coded routine in ThreadX that should try to ensure fw-download-alias1.raspberrypi.com belongs to ‘Raspberry PI Limited’. That certificate is valid until almost 2047 and this should already indicate the purpose –> prevent simple variants of DNS spoofing and the like.
For a few years, my home reverse-proxy used to be an HP PA-RISC booting Linux over the network (through my firewall) and running entirely in RAM.
bah, responded to the wrong one, too much scrolling 🙂
In the late 80s you were using HTTPS to download OS images directly from Sun’s webservers to image machines? Really?
“This works just fine for most people, but if the Raspberry Pi is your only computing device, as may be the case in developing countries”
Jean-Luc … that is also the case for a lof of young people in developed countries: mobile only. And I think writing RaspiOS to an SD-CARD with your iphone/ipad/android is hard.
Then phones need to evolve to match PCs in terms of connectivity/extensibility.
Next step is to add the raspberry pi imager functionality and an ad hoc WiFi mode so it can be done completely headless.
Then maybe cloud-init?
Actually it might be possible to hack the bootloader to install your own OS that way:
I don’t think so since downloading boot.img from this one address results in Linux running Raspberry Pi Imager full-screen and only here is where you select the stuff to image.
But I would believe they’re smart enough to copy Balena guys / Etcher behaviour and provide a ‘catalog’ of other OS variants later to allow burning of ‘trusted’ 3rd party images also… maybe even ‘local image’ fetched via TFTP or something like this.
It seems it’s all there. Even the short video above shows Raspberry Pi imager listing all the other OS variants being able to be burned and at the bottom ‘custom’ for an own image (provided as image on USB or NVMe storage for example).
All that seems to be missing is something like TFTP/NFS but if you’re about to setup this stuff most probably you’ll run your ‘clients’ diskless anyway…
I think it’s a step forward; especially for new users that never tried Linux before (like one of my brothers).
It’s also great for those who have only annoying tools and hardware.
But most of all, I like that the Raspi is becoming more “independent”.
If Raspi can achieve this, maybe also interesting for non-Raspi hardware: Laptops with Windows (or Linux), Chromebooks … Nice. No need anymore for a usb stick, or restore partition on a disk.
You can already do this with Windows, it has supported pxe installs for years now.
but PXE is local / LAN-only. I have no PXE-server on my LAN.
The Raspi solution: boot & get the OS from an Internet location.
> Windows … has supported pxe installs
The other way around? Windows can be installed via PXE which is a LAN technology and requires something called an administrator and some local server setup.
We’re talking here about something entirely different: almost some sort of a hardware feature or at least a bootoader thing: being able to fetch an OS image from the Internet (no admin required) to install this on local storage.
> Laptops with Windows (or Linux)
Laptops supposed to run macOS do this for more than 10 years now (and of course Desktop Macs as well). It’s called Internet Recovery and results in the so called ‘Recovery Partition’ being recreated from Apple servers (via Ethernet or Wi-Fi doesn’t matter). With a working ‘Recovery Partition’ the OS can be reinstalled from scratch but usually Mac users only let the OS and Apps reinstall and fetch everything else from latest TimeMachine backup.
Nothing shocking here.
If you use u-boot you can configure it to boot from a tftp server. Assuming the server is reachable you can boot off that image.
Note that you need a wired connection as you cannot configure wireless and the bootloader quite likely does not support wireless in the first place
> Nothing shocking here.
Yep, Apple is doing this for over a decade now. But it’s really funny how many people are not able to differentiate between LAN technologies that require both a human being called administrator and something called a local server with something that just works (connecting to the hardware vendor’s servers somewhere on the Internet and downloading stuff from there).