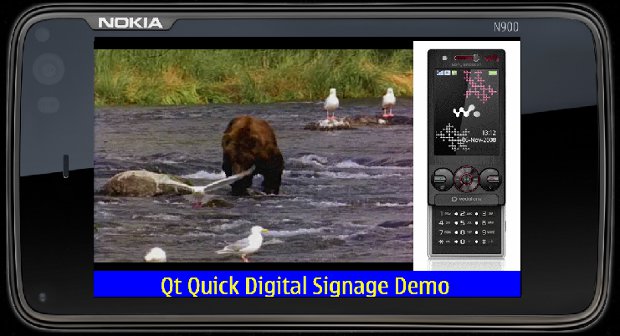
I’ve recently started to play around with Qt and since I’d like to do a digital signage player running on Raspberry Pi, I’ve decided to try to make a simple digital signage demo application to evaluate the development platform.

In Part 1, my goal was to make a 3 zones layout with a video zone, a picture zone and a scrolling text zone. I would just play one hard-coded media in each zone and the video and scrolling text would have to continuously loop.
I used Qt Creator to create a “Pigital Signage” application (or should it be Πgital Signage ?).
To create the 3 zones I used the Gridview Element with 3 rectangles:
- Video zone: 600×432
- Picture zone: 200×432
- Text zone: 800×48
Displaying the image is very easy with the Image Element:
|
1 2 3 |
Image { source: "pic/phone.jpg" } |
The video playback was also supposed to be easy with the Video Element but it can not work on Desktop, so I had to revert to used the Nokia N900 emulator to be able to play a short video (hence the 800×480 resolution of the demo). It works fine but there is a transparency issue with the emulator (in my PC), so if I want to clearly see the video I have to open a black picture and move the emulator on top. Here’s the video playback code:
|
1 2 3 4 5 6 7 8 9 10 11 12 |
Video { id: videofile playing: true source: "video/Bear.wmv" width: 600 height: 432 opacity: 0.9 focus: true onStopped: { /* To loop the video */ videofile.play() } } |
The scrolling text should also have been easy since we can use Webview Element and html marquee, but I could not solve a problem with left and top margins that always left white border to the text zone. Finally, I wrote the scrolling text code based on sample code provided by Kunal. I added a new file called ScrollingText.qml to the project:
|
1 2 3 4 5 6 7 8 9 10 11 12 13 14 15 16 17 18 19 20 21 22 23 24 25 26 27 28 29 |
import QtQuick 1.0 Item { id:marqueeText height: scrollingText.height clip: true property int tempX: marqueeText.width property alias text: scrollingText.text Text { x: tempX id:scrollingText color: "Yellow" /* Hard code text color for now */ font.pixelSize: marqueeText.height - 6; } Timer { id:timer interval: 200; running: true; repeat: true onTriggered:{ tempX = tempX - 5 scrollingText.x = tempX; console.debug("Tempx = " + tempX + "Text Width = " + scrollingText.width, " Height = " + marqueeText.height) if( tempX < -scrollingText.width) { tempX = marqueeText.width; console.debug("Restart Scrolling Text") } } } } |
The code is modified to start scrolling the text from the right until it fully disappears on the left and continuously repeat it.
Here’s the full main.qml with the code for the 3 zones:
|
1 2 3 4 5 6 7 8 9 10 11 12 13 14 15 16 17 18 19 20 21 22 23 24 25 26 27 28 29 30 31 32 33 34 35 36 37 38 39 40 41 42 43 44 45 46 47 48 49 50 51 52 53 54 55 56 57 58 59 60 61 |
import QtQuick 1.0 import QtMultimediaKit 1.1 import QtWebKit 1.0 Rectangle { id: screen width: 800 height: 480 Grid { columns: 2 spacing: 0 Rectangle { id: video; color: "black"; width: 600; height: 432 Video { id: videofile playing: true source: "video/Bear.wmv" width: 600 height: 432 opacity: 0.9 focus: true onStopped: { /* To loop the video */ videofile.play() } } } Rectangle { id: picture; width: 200; height: 432 anchors.left: video.right Image { source: "pic/phone.jpg" } } Rectangle { id: text width: 800; height: 48 color: "blue" ScrollingText { id:scrolltext width: 800 height: 48 text: "Qt Quick Digital Signage Demo" } /* Method 2: Webview (issue with white border) WebView { width: 800; height: 48 preferredWidth: 800; preferredHeight: 46 anchors.top: video.bottom // Marquee code generated with http://www.quackit.com/html/html_generators/html_marquee_generator.cfm html: "<style type=\"text/css\"> .html-marquee {height:48px;width:800px;background-color:3333FF;font-family:Verdana;font-size:24pt;color:FFFF33;font-weight:bold;} </style> <marquee class=\"html-marquee\" direction=\"left\" behavior=\"scroll\" scrollamount=\"6\" >Qt Quick Digital Signage Demo</marquee>" } */ } } } |
In order for QtMultimediaKit to work properly, you also need to modify PigitalSignage.Pro since it is part of QtMobility:
|
1 2 |
CONFIG += mobility MOBILITY += multimedia |
Developing with Qt Creator and QML language seems relatively straightforward as this short demo could be written in one afternoon.
I’m not sure Qt 5 Video Element will be supported for the Raspberry Pi so QML Binding Element may have to be used to call an external video player that support R-Pi GPU.
In Part 2, I plan to list video and pictures file in a directory and play them continuously. For the scrolling text, the plan is to use a (twitter) RSS feed, scroll it and reload it each time the scroll is finished. I may also try to play online video (e.g. YouTube) and parse a config file to configure things like picture display duration, text color and scrolling speed etc…

Jean-Luc started CNX Software in 2010 as a part-time endeavor, before quitting his job as a software engineering manager, and starting to write daily news, and reviews full time later in 2011.
Support CNX Software! Donate via cryptocurrencies, become a Patron on Patreon, or purchase goods on Amazon or Aliexpress


