
PowerUSB power strips are four outlets power strips designed to help users save power by better understanding their devices power consumption, and automatizing tasks such as power on/off using timers, printer on/off controls, and more. One outlet is always on (for the main computer) and the 3 remaining outlets can be controlled via USB and the control software installed in a Linux, Mac or Windows x86 machine. The three of the four outlets are controlled through the software. Those power strips should allow lower electricity bills, and cover the cost of the strips ($69 to $129) within a few months.
There are 4 models:
- PowerUSB Basic – $69.99 – The simplest model. You can control the 3 programmable outlets with on/off timers and keyboard shortcuts.
- PowerUSB Digital IO – $109.99 – This version adds 5 digital input/output lines for instrumentation and automation. The current model has 3 inputs and 2 outputs with external opto-isolation board supplied with option of 5V or 12V or 24V. The future model will have integrated opto-isolation board with 5 inputs and 4 outputs.
- PowerUSB Watchdog – $89.99 – With the Watchdog version, PowerUSB can be configured to ping computers connected to the 3 programmable outlets, and if ping fails after several times, it consider the computer hung, and turn off/turn on the power to reset the machine. Of course, this only works for device which does not require the user to press the ON button.
- PowerUSB Smart – $89.99 – Like the other models, it can be programmed via USB, but then it can be used without computer. A button on the power strip allow you to cycle between timer on-off mode, 2 smart modes, and always on mode. The smart mode will automatically turn off or on all devices once the device connected to the always on plug is turned off or on.
PowerUSB (also the name of the company) sent me the Basic and Smart models for review. Since I’ve received the Smart model about 10 days earlier than the Basic model, the review will focus on the Smart model, and I’ve used the Basic model for the dreaded “wife test” including automatic printer on/off.
You’ll receive your power strip in the package below that gives a summary of the 4 types of power strips manufactured by the company.

I’ve also taken a picture of the content with PowerUSB Smart power strip, a USB to miniUSB cable, a CDROM and 4 universal power adapters since all PowerUSB power strip comes with US outlets.

PowerUSB basic looks exactly the same, except there is no LCD, and they did not include the 4 adapters.
Let’s have a closer at the PowerUSB Smart power strip. You’ll get an On/Reset switch, the 4 outlets with proper marking to identity the always on always, and outlet 1, 2 and 3, an LCD screen, and 3 LEDs showing where the outlet is turned on or not. On the side of the power strip, we just have the miniUSB connector and the user button to cycle between the different modes.

The first thing to do is to connect your devices to the plug. A typical setup and outlet characteristics are as follows:
- Always On – Computer
- Outlet 1 – Modem. Max 4A (2A continuous). No Leakage current.
- Outlet 2 – Monitor. Max 16A (4A continuous). Leakage current of up to 3VAC due to snubber circuit.
- Outlet 3 – Printer. Max 16A (4A continuous). Light Leakage current of up to 0.2VAC.
Then you’ll have to do is to install PowerUSB software from the USB, or better IMHO, from the download section, although you’ll need to request a password first. There are 4 files for download:
- Application Files (ApplicationFiles.zip) – Contains the user manuals for the 4 models and the Windows software.
- Developer Files (DeveloperFiles.zip) – API documentation, C++/C# code and dll files for Windows.
- Linux Files (Linux.zip) – GUI and command line executables for Linux, C++ source code and 32-bit and 64-bit x86 libraries. (So It won’t run on ARM).
- Mac Files (Mac.zip) – Binaries for GUI and command line applications, C+ source code for command line.
Let’s install the Windows software first, but running Setup.exe. Everything is pretty straightforward so I won’t go into details for the installation. You’ll have a small green leaf icon the taskbar to pop-up the configuration window.
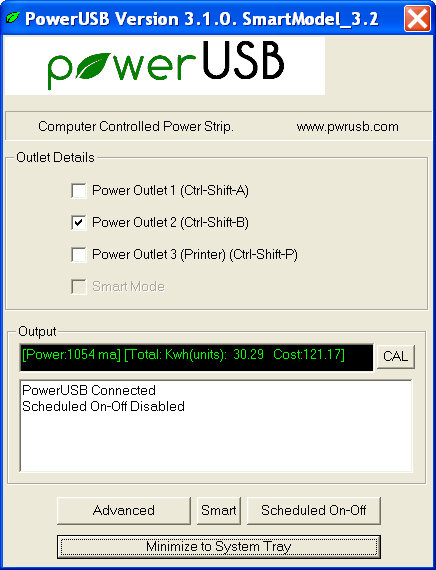
The very first thing I’ve noticed, is that you can control each outlet power with shortcuts such as Ctrl+Shift+B. I’ve tried and it works, very neat. The rest of the windows shows power consumption, accumulated cost and kWh, and status of the power strip. The current is also shown in mA on the bottom left of the LCD screen of the power strip, so you can still see the power consumption as you turn on/off devices such as monitors. I would really have prefer it to be displayed in Watt instead, as it seems weird (to me) to show power consumption in mA.
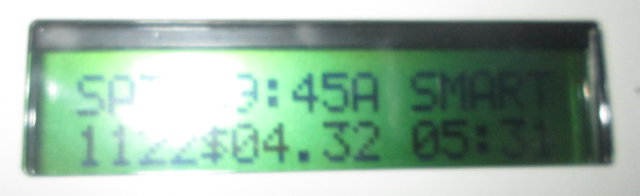
Row 1 – Day of the week, Time (am/pm mode only) and Mode.
Row 2 – Power consumption in mA, Cost in $ and TV on time for the day, or next timer on/off depending on selected mode.
I’ve just have the computer (Always On) and the monitor (Outlet 2) connected to the power strip, and you can save about 30 Watts with this power strip if you turn off the outlet 2 instead of setting the monitor to standby:
- Computer + Monitor On – 1122 to 1224 mA (~260 Watts @ 220V)
- Computer On + Monitor Standby – 748 to 884 mA (~180W @ 220V)
- Computer On + Monitor Off (Ctrl+Shift+B) – 646 to 680 mA (~150W @ 220V)
Of course, you could just do the same with a normal power strip with individual On/Off switches, but this may not be quite as convenient depending on the location of the power strip.
I personally find the lack of customization of the LCD display disappointing. I prefer my dates to be displayed in 24h format, my power consumption in Watts, and my costs in Thai Baht. Those are minor, but when everything adds up it will eventually start to count in the final impression of the device.
Let’s carry on by selecting Advanced Options.
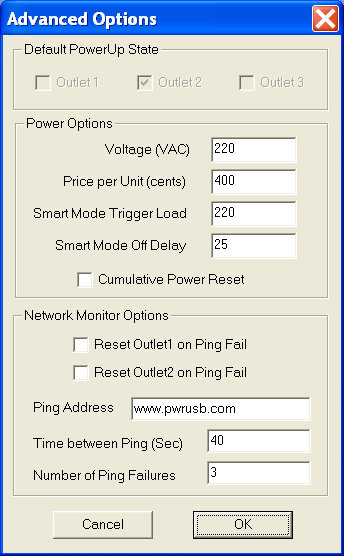 For some reasons, you can’t select the default power update of the programmable outlet, which is a shame, as all outlet will turn on as you connect the power strip to the mains. So at each start of the computer, I have to press Ctrl+Shift+A and Ctrl+Shift+P to turn off the unused outlets. Another annoyance is that it will ask to synchronize the time between the computer and the power strip each time I start my computer. One possible reason for those issues is that I completely disconnect the power strip at night, and there’s no RTC in the power strip.
You can also change some power options such as Voltage (default 110V), price per unit (I pay around 4Baht per unit), smart mode trigger mode (threshold in mA to decide whether the device on Always On outlet is on or off) and Off delay in seconds. Changing the settings here will show the correct information in the Windows software, but the power strip LCD display will show different information. You can also reset the cumulative power reset.
Finally, there’s a section to automatically reset computer on outlets 1 and/or 2 if pinging to pwrusb.com or another url fails. I haven’t tried this last feature, but the purpose is to reset your modem/router if it can’t connect to the internet.
The SMART mode window does not server many purpose for now (Update: It seems it may be used to enable SMART mode), and you can only monitor the TV on time for the past 7 days. Other options are disabled for now.
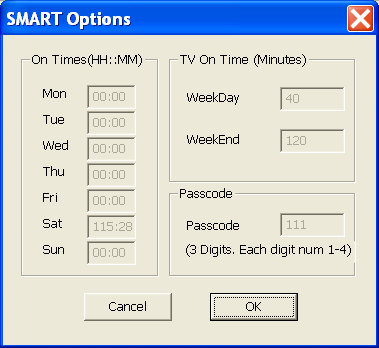 The only problem, unless I have missed a very important news and Saturdays have now been extended to last at least 115 hours, is that this feature simply does not work for now.
Finally, one the most interesting feature are the schedules on/off timer, that may help companies to turn off devices at a specified times. This could be useful for retailers with digital signage players, that want those to operate during opening hours. You can select different times on week-days and week-ends. Each outlet can be programmed independently, and you can set on/off timers, or set an on/off frequency (e.g. for Xmas lights).
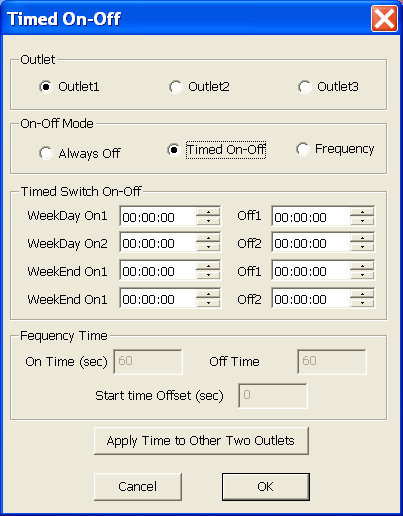
Yet again I failed to make this feature work after several attempts, and setting the plug to TIMED with the user button. I’ve set specific On/Off times on Outlet 1 (15:30:00 to 15:45:00 on), with Outlet 2 schedules to be turned on all today, & Outlet 3 set to be always off, and pressed OK at around 15:40. At this point, everything works correctly (O1:On, O2 On, O3: Off). But then at 15:45, nothing happened, and at 15:49 all Outlets were turned off. So for some reasons, none of the feature using date/time are working for me, I wonder if this could be related to my regional settings and/or 24h format in Windows XP. It got worse once I disabled the timers (Set all times to 00:00:00), and reverted to SMART mode via the user button, as when I pressed Ctrl+Shift+B to turn on the monitor, it would just turn on automatically after about a minute for no reason. It’s now working, after I clicked on Smart on OK in the Windows software. It looks like the power strip does not update its status to the computer.
On top of all the problems mentioned above, I would have really liked the software to be able to display historical and live power consumption, since this product is intended to help users better understand their power usage. The good thing is that you could still do this yourself either using a script calling pwrusbcmd / pwrusbcmd.exe command line utility, either by writing a program with the provided API. Before receiving the power strips, I thought I could do power measurement like the Kill A Watt, but there’s only one ammeter for the whole strip, the resolution is 10mA, and I’ve been told it’s better to call the API every 4 to 5 seconds, so you can only do rough measurements with PowerUSB power strips. But that’s OK, since this is not exactly what the product is meant to do.
At now the wife test… So I setup my wife’s home office with PowerUSB Basic, connected the printer to Outlet 3 and the monitor to Outlet 2, and installed the software in her Windows 7 laptop. The main thing I wanted to test was the printer, since this power strip can automatically power on the printer when you print, and turn off the printer automatically after 10 minutes of inactivity. It worked just fine. This is a multifunction printer so it’s not ideal with PowerUSB, because if you want to use in Standalone mode (scan + print), you may have turn on the computer first to turn on the Outlet. However, the following day, my wife tried and it did not work. I wanted to check the settings, but PowerUSB icon would just not show up, even after I set Windows 7 to always display the icon. I told my wife she could always press Ctrl+Shift+P to turn On/Off the outlet for the printer/scanner, but she did not understand why she would have to do that, and said a “plug” should just work, no need to press buttons. So she ended up connecting a tiny 2 outlets adapter on top on the Always On outlet… Women…
Initially, I was pretty excited about this product, but the more I used it the more I became disappointed. I could be unlucky and have a unit with an old firmware, or I may not have followed the right procedures for each test, but the whole experience makes PowerUSB power strips look like products in beta phase. However, most of the issues should be (easily) fixed by firmware and/or software updates, and I sincerely hope the product can be improved.
Having said that, I will keep using PowerUSB Smart power strip, as for the parts that work (SMART function, and shortcuts to control outlets) the product is just great, and I estimate it will save me about 4 kWh per month by allowing me to completely turn off my monitor, instead of setting it to standby.
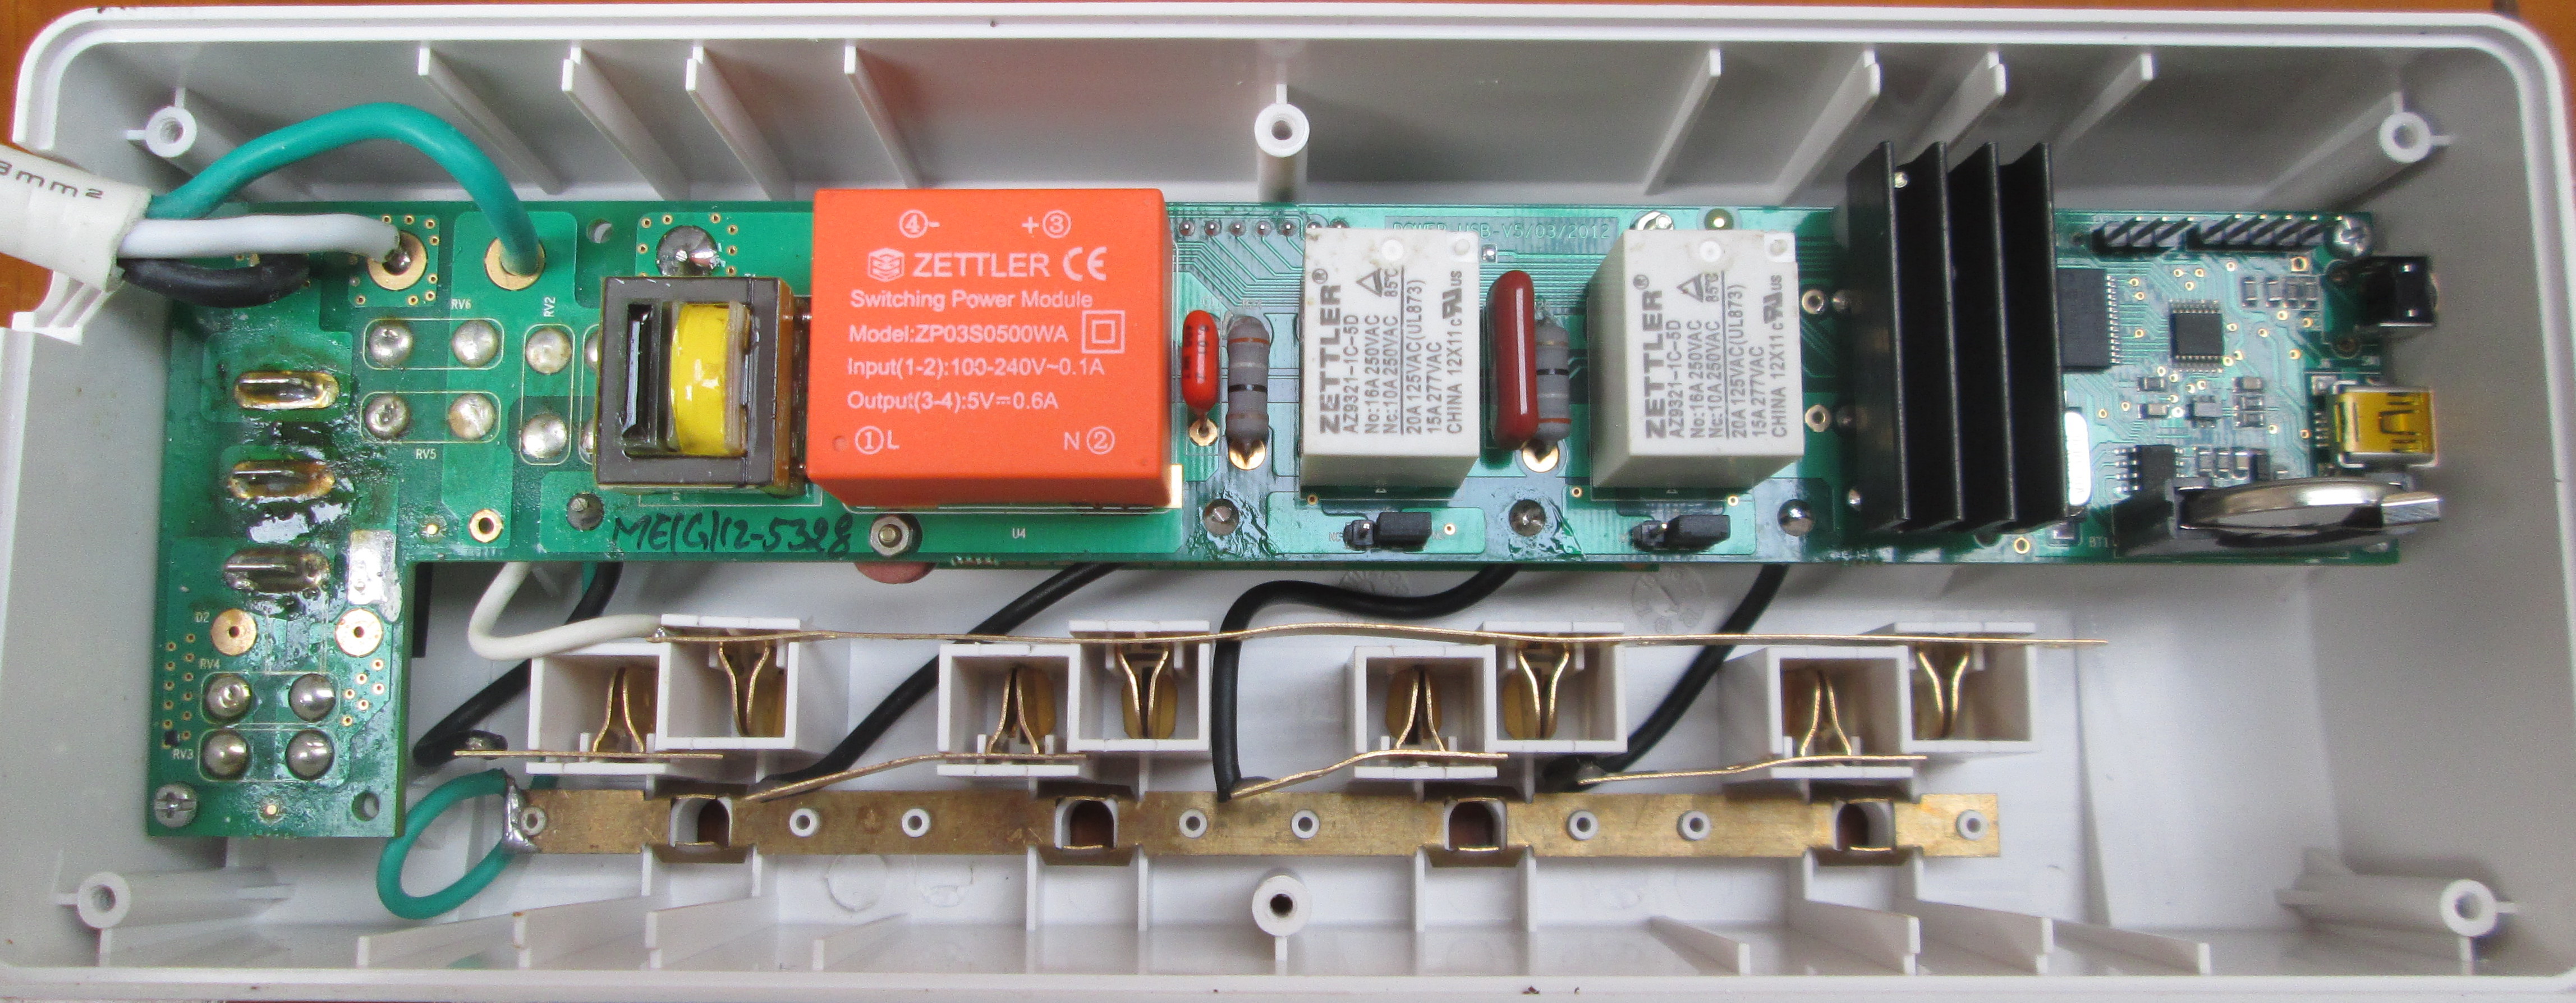
Update: Picture of PCB with Zetler relays.

Jean-Luc started CNX Software in 2010 as a part-time endeavor, before quitting his job as a software engineering manager, and starting to write daily news, and reviews full time later in 2011.
Support CNX Software! Donate via cryptocurrencies, become a Patron on Patreon, or purchase goods on Amazon or Aliexpress


This appears to be a very interesting product. I like the small size of the power strip. I use a similar featured device (but more bulky) called the UFO Power Center (reviewed here: http://www.anandtech.com/show/6413/visible-energy-ufo-power-center-smart-power-strip-review). Approximately same cost, but can update power consumption and other metrics every 1 second. Also, obviously, we have on-off control and scheduling.
I am very interested in the set of chips inside the unit. (Curious whether they are using the same AD chip that is inside the UFO). I think for the price point, the relays are going to be mechanical (do you hear a clicking sound when a particular outlet is turned on?).
@Ganesh @ AnandTech
The UFO Power Center is more expensive (If it’s still $130), but instead of USB, it uses Wi-Fi, and following your review and screenshot, the user interface appears to be much better, and it’s possible to measure power up to 0.01W resolution on each outlet.
I haven’t open the unit yet, but the relays must be mechanical since I hear a clicking sound when I switch the relay on or off. I can see the casing has just 6 screws, so I’ll try to open it tomorrow before powering on the computer.
I thought to make the same myself with a nanode and sone relays.
And use bitlash for controlling the relays via a simple URL:
https://github.com/Nanode/RESTbitlash
@Ganesh @ AnandTech
I’ve added a picture of the PCB at the bottom of the post. But I could only get the side with the transformer, relays and USB circuitry. There’s also what looks like a transistor under the heatsink.
@cnxsoft
Thanks for the shot of the board components. I wonder what is responsible for reporting current consumption back to the software in the host OS…
Btw, the UFO can be had for $100 on sale sometimes. I really like it, just wish it had a more practical industrial design (like that of the PowerUSB)..