I completed the review of MeLE PCG35 Apo with Windows 10 Home a few days ago, and as promised, I’ve now installed the freshly released Ubuntu 17.10 in the Intel Celeron J3455 “Apollo Lake” mini PC.
I’ll start by shortly explaining the step to install Ubuntu 17.10 in the M.2 slot, although you could also install it to the internal eMMC flash replacing Windows 10, then show what works and what does, and finally include a video reproducing the tests I usually do in Windows 10.
How to Install Linux in MeLE PCG35 Apo
This partially follows the procedure I used to run (not install) Ubuntu 16.04 on MeLE PCG03 Apo mini PC. First you’ll need to download the ISO of your choice (ubuntu-17.10-desktop-am64.iso in my case), and prepare a bootable USB flash drive with the software of your choice be it Rufus, Startup Disk Creator or others. I did mine with Startup Disk Creator in my Ubuntu 16.04 computer
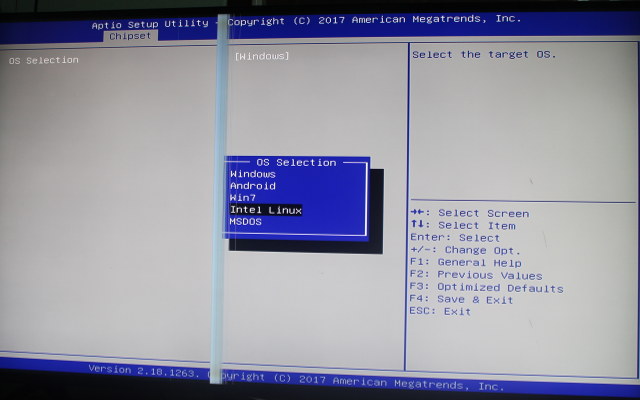
We can now plug the USB flash drive with Ubuntu 17.10 into one of the USB port of the mini PC, start it up and press ‘Esc’ key to enter Apio Setup Utility (aka “The BIOS”). By default, the system will use the “Windows boot method”, but we can change that by going to Chipset->South Bridge, then OS Selection and select Intel Linux.
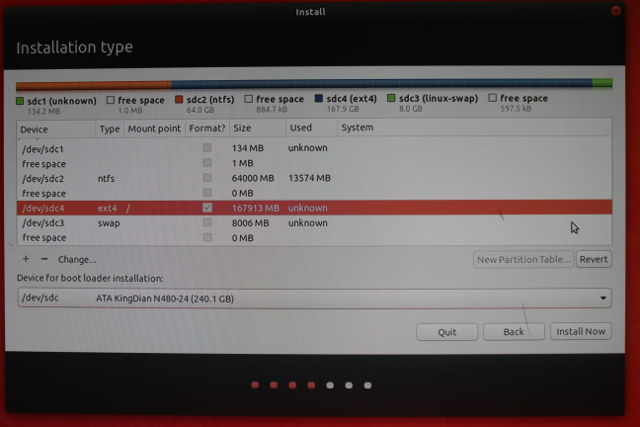
 Now go to the Boot menu and select our USB flash drive (I had to select “Partition 1”) to start Ubuntu installation. I did not want to remove Windows 10 (installed in the eMMC flash), nor wipe out the Program Files directory in the M.2 SSD, but still install Ubuntu 17.10 in the faster M.2 SSD, so I used a custom installation type.

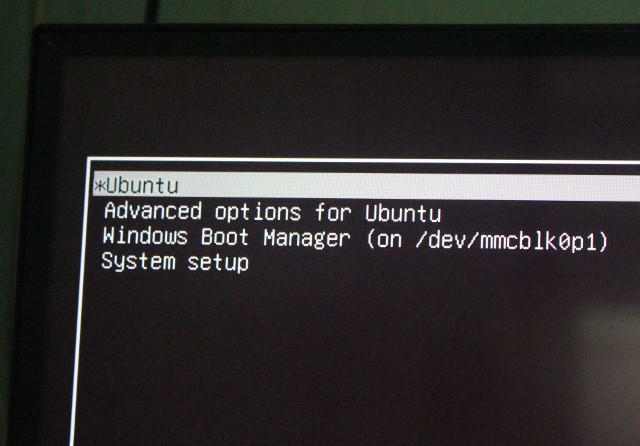
The eMMC flash, the M.2 SSD (/dev/sdc), SATA hard drive, and USB hard drive were all recognized by the system. I only modified the SSD partition by resizing the Windows’ “Program Files” partition to 64000 MB, and creating new partitions for the root file system (167913 MB) and swap (~8GB). Once the changes were all applied I clicked on Install Now to complete the installation, and a few minutes later reboot with Grub giving the option between Ubuntu (default) or Windows Boot Manager.
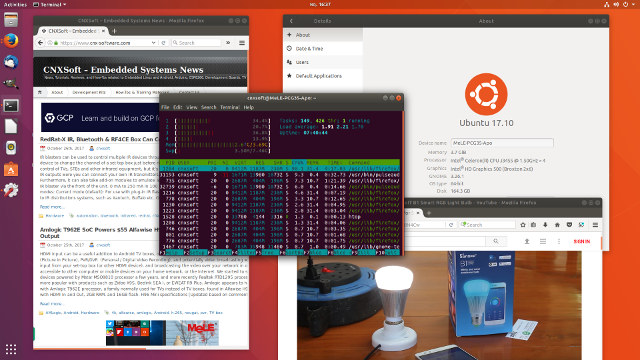
 So we have a dual boot Windows 10 / Ubuntu 17.10 systems here, I selected Ubuntu and within a few seconds I could login to Ubuntu 17.10 and access the GNOME desktop environment.

Canonical did a good job of making their GNOME implementation feels like Unity, but there are some obvious changes like the login prompt, different dash search location, and redesigned Settings menu.
Ubuntu 17.10 on MeLE PCG35 Apo – System Info and Hardware Features
Let’s run some command to check what we have:
|
1 2 3 4 5 6 7 8 9 10 11 12 13 14 15 16 17 18 19 20 21 22 23 24 |
cnxsoft@MeLE-PCG35-Apo:~$ uname -a Linux MeLE-PCG35-Apo 4.13.0-16-generic #19-Ubuntu SMP Wed Oct 11 18:35:14 UTC 2017 x86_64 x86_64 x86_64 GNU/Linux cnxsoft@NeLE-PCG35-Apo:~$ cat /etc/issue Ubuntu 17.10 \n \l cnxsoft@MeLE-PCG35-Apo:~$ df -h Filesystem Size Used Avail Use% Mounted on udev 1.9G 0 1.9G 0% /dev tmpfs 379M 6.7M 372M 2% /run /dev/sdc4 153G 3.7G 142G 3% / tmpfs 1.9G 0 1.9G 0% /dev/shm tmpfs 5.0M 4.0K 5.0M 1% /run/lock tmpfs 1.9G 0 1.9G 0% /sys/fs/cgroup /dev/mmcblk0p1 96M 71M 26M 74% /boot/efi tmpfs 379M 20K 379M 1% /run/user/121 tmpfs 379M 2.5M 376M 1% /run/user/1000 /dev/mmcblk0p3 29G 26G 3.0G 90% /media/cnxsoft/225C5FC45C5F9181 /dev/sda2 241G 163G 66G 72% /media/cnxsoft/USB3_EXT4 /dev/sda1 245G 152G 93G 63% /media/cnxsoft/USB3_NTFS /dev/sda4 200G 175G 24G 89% /media/cnxsoft/USB3_BTRFS cnxsoft@MeLE-PCG35-Apo:~$ free -m total used free shared buff/cache available Mem: 3781 824 1652 283 1305 2428 Swap: 7635 0 7635 |
Ubuntu 17.10 with Linux 4.13, around 4GB RAM, and 153 GB rootfs. The SATA drive (NTFS) was not mounted by default, but I could mount it manually later on. However the three of four partitions on the USB drive were mounted automatically (exFAT not supported?), and the Windows partitions was mounted too:
|
1 2 3 4 5 6 7 8 9 10 11 12 13 14 15 16 17 |
cnxsoft@NeLE-PCG35-Apo:~$ ls -l /media/cnxsoft/225C5FC45C5F9181/ total 2131828 drwxrwxrwx 1 cnxsoft cnxsoft 4096 ต.ค. 22 10:11 Config.Msi lrwxrwxrwx 2 cnxsoft cnxsoft 37 มิ.ย. 21 19:38 Documents and Settings -> /media/cnxsoft/225C5FC45C5F9181/Users -rwxrwxrwx 1 cnxsoft cnxsoft 823947264 ต.ค. 24 21:09 hiberfil.sys drwxrwxrwx 1 cnxsoft cnxsoft 0 มิ.ย. 21 19:08 Intel -rwxrwxrwx 1 cnxsoft cnxsoft 1342177280 ต.ค. 24 21:09 pagefile.sys drwxrwxrwx 1 cnxsoft cnxsoft 4096 ต.ค. 21 14:01 ProgramData drwxrwxrwx 1 cnxsoft cnxsoft 4096 ต.ค. 21 11:35 Program Files drwxrwxrwx 1 cnxsoft cnxsoft 4096 ต.ค. 23 14:04 Program Files (x86) drwxrwxrwx 1 cnxsoft cnxsoft 0 มิ.ย. 21 15:23 Recovery drwxrwxrwx 1 cnxsoft cnxsoft 4096 ต.ค. 21 11:10 $Recycle.Bin -rwxrwxrwx 1 cnxsoft cnxsoft 16777216 ต.ค. 24 21:09 swapfile.sys drwxrwxrwx 1 cnxsoft cnxsoft 4096 มิ.ย. 21 19:07 System Volume Information drwxrwxrwx 1 cnxsoft cnxsoft 32768 มิ.ย. 21 19:25 TEST_TOOL drwxrwxrwx 1 cnxsoft cnxsoft 4096 ต.ค. 21 11:28 Users drwxrwxrwx 1 cnxsoft cnxsoft 28672 ต.ค. 23 12:16 Windows |
Good news if you don’t plan to use an SSD, but want to install Ubuntu or other Linux distribution in the computer.
CPU information returned by lshw:
|
1 2 3 4 5 6 7 8 9 10 11 12 13 14 15 16 |
sudo lshw -C cpu *-cpu description: CPU product: Intel(R) Celeron(R) CPU J3455 @ 1.50GHz vendor: Intel Corp. physical id: 37 bus info: cpu@0 version: Intel(R) Celeron(R) CPU J3455 @ 1.50GHz slot: SOCKET 0 size: 540MHz capacity: 2400MHz width: 64 bits clock: 100MHz capabilities: x86-64 fpu fpu_exception wp vme de pse tsc msr pae mce cx8 apic sep mtrr pge mca cmov pat pse36 clflush dts acpi mmx fxsr sse sse2 ss ht tm pbe syscall nx pdpe1gb rdtscp constant_tsc art arch_perfmon pebs bts rep_good nopl xtopology tsc_reliable nonstop_tsc cpuid aperfmperf tsc_known_freq pni pclmulqdq dtes64 ds_cpl vmx est tm2 ssse3 sdbg cx16 xtpr pdcm sse4_1 sse4_2 x2apic movbe popcnt tsc_deadline_timer aes xsave rdrand lahf_lm 3dnowprefetch cpuid_fault cat_l2 intel_pt tpr_shadow vnmi flexpriority ept vpid fsgsbase tsc_adjust smep erms mpx rdt_a rdseed smap clflushopt sha_ni xsaveopt xsavec xgetbv1 xsaves dtherm ida arat pln pts cpufreq configuration: cores=4 enabledcores=4 threads=4 ... |
as well as BIOS, cache, & memory info:
|
1 2 3 4 5 6 7 8 9 10 11 12 13 14 15 16 17 18 19 20 21 22 23 24 25 26 27 28 29 30 31 32 33 34 35 36 37 38 39 40 41 42 43 44 45 46 47 48 49 50 51 52 53 54 55 56 57 58 59 60 61 62 63 64 65 |
sudo lshw -C memory *-firmware:0 description: BIOS vendor: American Megatrends Inc. physical id: 0 version: 5.12 date: 08/08/2017 size: 64KiB capacity: 5056KiB capabilities: pci upgrade shadowing cdboot bootselect socketedrom edd int13floppy1200 int13floppy720 int13floppy2880 int5printscreen int14serial int17printer acpi usb biosbootspecification uefi *-memory description: System Memory physical id: 2f slot: System board or motherboard size: 4GiB *-bank:0 description: DIMM DDR3 Synchronous 1600 MHz (0.6 ns) product: 123456789012345678 vendor: ABCD physical id: 0 serial: 1234 slot: ChannelA-DIMM0 size: 2GiB width: 16 bits clock: 1600MHz (0.6ns) *-bank:1 description: DIMM DDR3 Synchronous 1600 MHz (0.6 ns) product: 123456789012345678 vendor: ABCD physical id: 1 serial: 1234 slot: ChannelA-DIMM1 size: 2GiB width: 16 bits clock: 1600MHz (0.6ns) *-bank:2 description: DIMM [empty] physical id: 2 slot: ChannelB-DIMM0 *-firmware:1 description: BIOS physical id: 3200 size: 1MiB capacity: 2560KiB capabilities: isa mca bootselect socketedrom pcmciaboot edd int13floppytoshiba *-firmware:2 description: BIOS physical id: 3031 size: 863KiB *-cache:0 description: L1 cache physical id: 35 slot: CPU Internal L1 size: 224KiB capacity: 224KiB capabilities: synchronous internal write-back configuration: level=1 *-cache:1 description: L2 cache physical id: 36 slot: CPU Internal L2 size: 2MiB capacity: 2MiB capabilities: synchronous internal write-back unified configuration: level=2 |
Ethernet & WiFi were also detected:
|
1 2 3 4 5 6 7 8 9 10 11 12 13 14 15 16 17 18 19 20 21 22 23 24 25 26 27 28 29 30 31 |
sudo lshw -C network *-network description: Ethernet interface product: RTL8111/8168/8411 PCI Express Gigabit Ethernet Controller vendor: Realtek Semiconductor Co., Ltd. physical id: 0 bus info: pci@0000:01:00.0 logical name: enp1s0 version: 0c serial: 00:ce:39:cd:3f:e9 size: 1Gbit/s capacity: 1Gbit/s width: 64 bits clock: 33MHz capabilities: pm msi pciexpress msix vpd bus_master cap_list ethernet physical tp mii 10bt 10bt-fd 100bt 100bt-fd 1000bt 1000bt-fd autonegotiation configuration: autonegotiation=on broadcast=yes driver=r8169 driverversion=2.3LK-NAPI duplex=full firmware=rtl8168g-2_0.0.1 02/06/13 ip=192.168.0.116 latency=0 link=yes multicast=yes port=MII speed=1Gbit/s resources: irq:369 ioport:e000(size=256) memory:c1204000-c1204fff memory:c1200000-c1203fff *-network description: Wireless interface product: Wireless 3165 vendor: Intel Corporation physical id: 0 bus info: pci@0000:02:00.0 logical name: wlp2s0 version: 91 serial: b4:d5:bd:60:7c:1e width: 64 bits clock: 33MHz capabilities: pm msi pciexpress bus_master cap_list ethernet physical wireless configuration: broadcast=yes driver=iwlwifi driverversion=4.13.0-16-generic firmware=29.541020.0 latency=0 link=no multicast=yes wireless=IEEE 802.11 resources: irq:373 memory:c1100000-c1101fff |
I also tested all ports and networking options of the device, and everything worked just fine.
| Features | Results |
| HDMI video | OK |
| HDMI audio | OK |
| VGA | OK |
| Ethernet | OK |
| WiFi | OK |
| Bluetooth | OK. Tested with Bluetooth headset |
| USB 2.0 port | OK |
| USB 3.0 ports | OK |
| USB 3.0 type C port | OK. Mouse connected via adapters |
| SD slot | OK |
| eMMC flash | OK |
Ubuntu 17.10 User Experience on Apollo Lake
Finally I played with various apps, mirroring what I normally do on Windows 10, except I had to replace Asphalt 8 Airborne by Jet Racing Extreme which I installed from Steam:
- Multi-tasking – Launching and using Firefox, Thunderbird, LibreOffice, and Gimp at the same time
- Web Browsing with Firefox
- Loading multiple tabs with CNX Software blog, Facebook, YouTube
- Playing Candy Crush Saga
- Playing a 4K YouTube Videos (also tested with Chrome)
- Gaming with Steam (Jet Racing Extreme Demo)
- Kodi 4K videos and audio pass-through
The video is fairly long, and I did not edit it to show how some parts are rather slow to load, especially Jet Racing Extreme, and to a lesser extent Candy Crush Saga.
The Multi-tasking part is really fast, everything starts about as fast as on my much more powerful main computer (AMD FX8350 with 128 GB SSD + 16 GB RAM), ans for simple desktop tasks, even with multiple program, the system is really fast enough.
Multitab browsing goes well too, but Candy Crush Saga takes quite a while to start, so much that I decided to play YouTube videos will the game started. 1080p YouTube video playback works OK, but once we switch to 4K, it’s really sluggish. By default VP9 is used, so I installed h264ify, but in that case (AVC1), YouTube limits video to 1440p, and 2160p is not accessible. I switched to Chrome, and VP9 decoding was again incredibly slow.
Jet Racing Extreme Demo is playable – if we ignore the awful controls -, but it’s really slow to load. Once the reason could be that it requires a lot of RAM, and 4GB is not enough. Running htop while running the game showed that the RAM was fully utilized, and part of the swap was needed too (1GB+).
Kodi 17.3 (installed with apt) was also a disappointment with H.264, H.265 and VP9 all relying on software decoding despite VAAPI hardware video decoding being enabled in the settings. That means the systems is usable with 1080p videos, but not 4K videos. Automatic frame rate switching did not work either. Audio pass-through with PulseAudio worked fine as I could play videos with Dolby Digital 5.1 (AC3) and DTS 5.1.

Jean-Luc started CNX Software in 2010 as a part-time endeavor, before quitting his job as a software engineering manager, and starting to write daily news, and reviews full time later in 2011.
Support CNX Software! Donate via cryptocurrencies, become a Patron on Patreon, or purchase goods on Amazon or Aliexpress. We also use affiliate links in articles to earn commissions if you make a purchase after clicking on those links.


Nice review, what was the idle power consumption with DPMS in off state? Thanks!
Kodi runs very well with full hardware acceleration of H264 and H265 under LibreElec on my N3350 Up Squared board. Were you running the latest Intel drivers and a recent Kodi build with Apollo Lake support during your test?
@Steve
I installed Ubuntu 17.10, updated it, and installed Kodi with apt:
So everything is pretty recent. I’m been using Kodi with Apollo Lake on Ubuntu 16.04 before, and 4K H.265/H.264 video were playing normally. Maybe something has changed in Ubuntu 17.10.
@fse
I can’t disable DPMS:
I typed the command above while connected to HDMI, not in SSH terminal.