
Product development often occurs in different location over the world, there may be one team in Asia, and another in Europe and the US. At the beginning, the number of working samples for a board may be limited, so the project manager may have to decide who gets the boards since those may not be available to all teams.
So it would be great if somehow there was a way to do remote testing of boards, so maybe the team in Asia could setup the testbed, used it during there time, and once they are back home, the US team can take over remotely to carry on their own development work on the hardware. That’s exactly what MuxPi board is all about.

The solution provide remote access via the Ethernet port of a NanoPi NEO board, and connects to the DUT (Device under Test) via HDMI, Ethernet, USB and other interfaces. The (micro) SD card is muxed to either boot the DUT, or flash the firmware, the DUT can be turned on / off remotely, power consumption is measured by the board, and you can even send EDID data vor HDMI. In an upcoming talk at the Embedded Linux Conference Europe 2018, Krzysztof Opasiak working Samsung R&D Institute Poland will explain how to grab audio and video remotely by adding an HDMI extender to MuxPi.
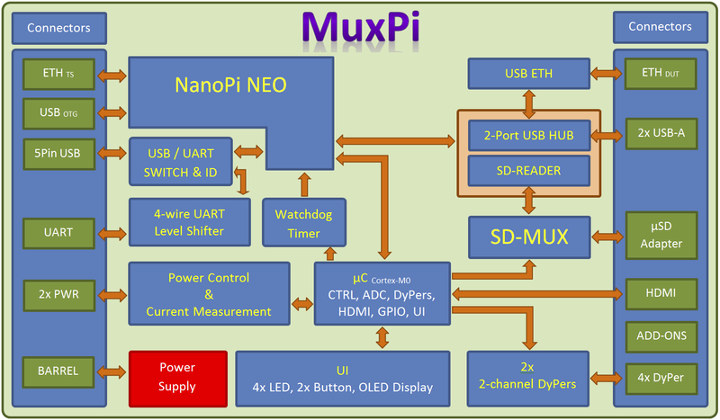 MuxPi hardware description / specifications:
- Based on NanoPi NEO Allwinner H3 board
- 4-wire UART level shifter for connecting to DUT’s UART;
- UART voltage generator to generate voltage in range from 0 to 5V.
- Watchdog Timer that allows to restart of NanoPi board
- Power Control & Current Measurement:
- Control power of a DUT using electromagnetic relay
- Measure DUTs current consumption using HAL effect current sensor
- MCU – Arm Cortex-M0 based module which supports NanoPi board with functions it can’t realize such as
- Controlling SD-MUX module
- Controlling DyPers
- Handling User Interface
- Writing EDID to DUT’s HDMI
- Measuring DUT’s current consumption
- Handling NanoPi’s watchdog
- Cooperating with add-ons – measuring analog signals, handling GPIOs, handling LEDs Display and keys
- USB-ETH – USB to Ethernet converter to connect MuxPi to DUT in order to eliminate need of external Ethernet switch
- 2-port USB HUB – USB hub with integrated microSD card reader
- SD-READER microSD card reader (part of HUB IC) connected to SD-MUX and NanoPi NEO in order to eliminate need of external one
- SD-MUX multiplexer of SD-MUX card which allows to connect the card either to microSD card reader or a DUT
- 2x 2-channel DyPers (Dynamic jumPer) – A simple switch intended to programmatically connect jumpers or push buttons on a DUT;
- USB/UART SWITCH & ID – a block of componnets with dedicated USB connector; the block allows to control USB Vbus and ID, and allows to redirect USB data lines either to NanoPi’s USB or UART
- Misc – Various status LEDs, 2x RGB LEDs, 128×32 OLED display, 2 push buttons
- Power Supply – 3.3V for internal need, enable/disable power supply for the main board
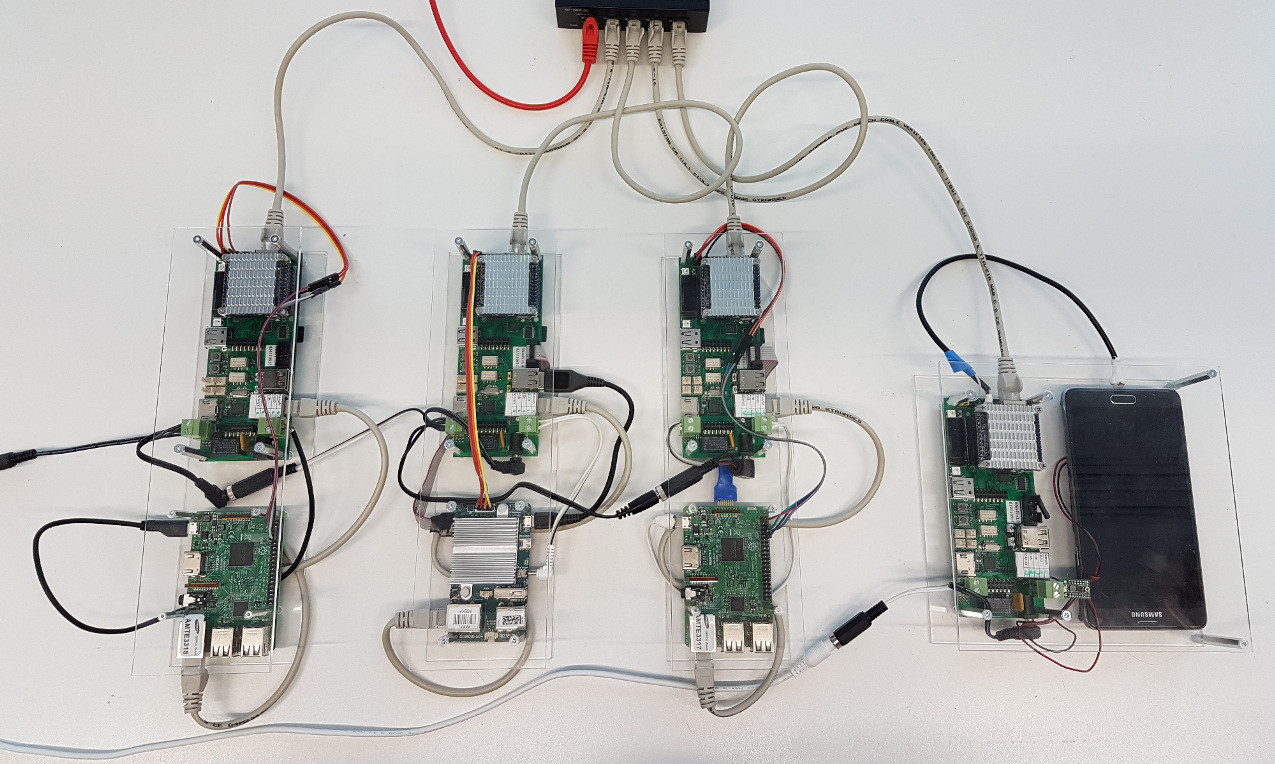
You can also build a board farm for remote testing as discussed in the introduction, or automated testing.
The MuxPi board was actually designed to aid automated testing system of Tizen binary images, but since everything is open source, you could obviously adapt the software to your own needs. More details about the hardware and software used can be found in the Wiki, Tizen git repository, as well as in a presentation made at FOSDEM 2018.
The cost of the board is around $80, but you can’t just buy it, you’d have to make it yourself using the provide KiCad files, and based on the presentation this requires some very good soldering skills. If you work for a company, you’ll probably find a few people able to put it together.

Jean-Luc started CNX Software in 2010 as a part-time endeavor, before quitting his job as a software engineering manager, and starting to write daily news, and reviews full time later in 2011.
Support CNX Software! Donate via cryptocurrencies, become a Patron on Patreon, or purchase goods on Amazon or Aliexpress. We also use affiliate links in articles to earn commissions if you make a purchase after clicking on those links.


I want to buy this board. Anybody willing to produce a few and sell them?
Contact me: upanie@interia.pl
SDWire devices have arrived and work well. Pretty cool thing that you’ve build there, thanks for making it available!
I’m glad you’re glad 🙂
Can this provide KVM access from a remote SBC board or an x86 server?
Sort of. There will be a talk about such functionality at the Embedded Linux Conference Europe 2018 in October.
“Grabbing Audio and Video on a Board Farm” by Krzysztof Opasiak. It will cover also keyboard and mouse.
I look forward to seeing that!
That’s awesome! Thx!
For home use it would be very useful SD-MUX multiplexer only. Is there anything like that?
Yes there is. Take a look at SDWire: https://wiki.tizen.org/SDWire
Thank you so much for this info!
This is really nice. I think it’s a must for every embedded development and production.
I’ve did a similar thing. At first I’ve also used nanopi neo2, because of the factor, but
because I was running Jenkins and java on it, it was quite slow. Later in my try to
evaluate other H3/H5 boards, I’ve ported the Armbian patches and patch scripts to
a Yocto meta layer and tried different boards. This is the meta-layer in case anyone
is interested (https://bitbucket.org/dimtass/meta-allwinner-hx/src). Not all boards
are tested, of course. Also, I’ve added support for an RT kernel, although is not needed
for this case.
For me next step was to create a peripheral expander for an STM32F103, which is
almost done here (https://bitbucket.org/dimtass/stm32f103-usb-periph-expander/src/master/)
and then use a USB connection between the stm32 and the allwinner board to control
via USB commands (and Jenkins) all the peripherals from the stm (gpios, uarts, I2C, SPI e.t.c).
It’s the same use with the cortex-M0 of this board.
It’s still a working progress, but for now it already does the full testing. I’ll have a further
look on this and especially the software and firmware side.
Anyway, automated tests are a very interesting topic and I think that there’s a lot of
headroom for opensource solutions. For example fuego testing framework was a nice
approach. Also t-bot from DenX is excellent and Heiko did a great work on it. Sadly,
none of those fit my case, so I’ve used Jenkins. Jenkins is fine, especially for master-slave
modes, but requires more resources.
I’m interested if you guys know more automation frameworks and post them here.
As a follow up, another SD-Card muxer is available now: https://linux-automation.com/en/blog/2019-10-25-launch.html