
I recently reviewed a Raspberry Pi 4 laptop with a custom interface that made it impractical to take screenshots directly on the device. So instead I had to take screenshots remotely over SSH. It’s quite easy to do. Most of the steps can be reproduced in other Linux systems, and are not specific to Raspberry Pi.
Enable SSH in Raspberry Pi
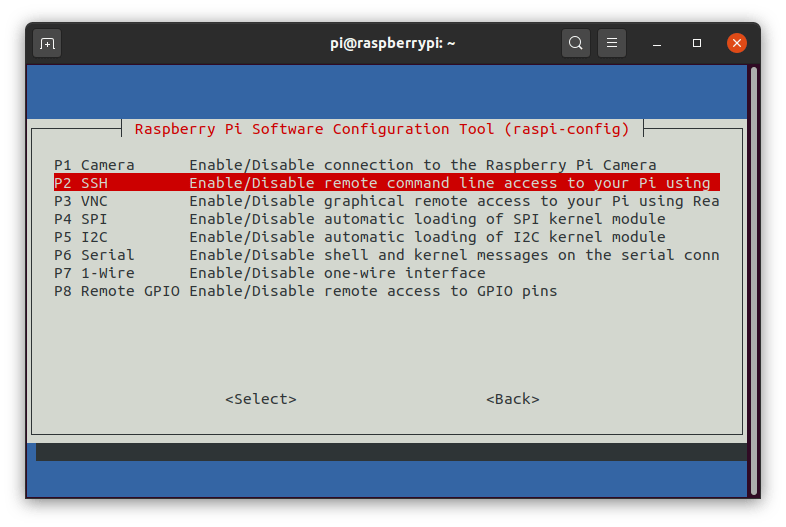
First, enable SSH either with sudo raspi-config in a terminal window and selecting 5. Interface Options, then P2 SSH…
 If for some reason, you don’t have access to the terminal, take out the MicroSD card from the Raspberry Pi board, and from a computer create a new empty file named “ssh” in the boot partition.
Now provided you have the username and password for your board, you can connect to SSH with the IP address from a terminal:
|
1 |
ssh <username>@<ip_address> |
or a program like Putty.
Taking a screenshot remotely
You’re now ready to take a screenshot as follows:
|
1 2 3 |
cd ~/Pictures sudo apt install scrot DISPLAY=:0 scrot screenshot.png |
scrot is the program taking the screenshot, DISPLAY defines the display to capture, and the third argument is the filename that can be with png, jpg, or gif extension.
You can take as many screenshots as you’d like with different filenames, then transfer them back to your computer over SSH either from the command line inside Raspberry Pi:
|
1 |
scp *.png <pc_username>@<pc_ip_address> |
or from your computer using Filezilla or other programs supporting SFTP (SSH File Transfer Protocol).
Save a Raspberry Pi Screenshot directly on Your Computer
If you’d like to be able to directly take a screenshot on Raspberry Pi with the image saved directly on your computer you can do by first setting up no password ssh using public/private keys in order to avoid having to input the password each time.
Once you’re done you should not be asked the password anymore when logging over SSH to your Raspberry Pi:
|
1 2 3 4 5 6 7 8 9 10 |
jaufranc@CNX-LAPTOP-4:~/.ssh$ ssh pi@192.168.1.9 Linux raspberrypi 4.19.97-v7l+ #1294 SMP Thu Jan 30 13:21:14 GMT 2020 armv7l The programs included with the Debian GNU/Linux system are free software; the exact distribution terms for each program are described in the individual files in /usr/share/doc/*/copyright. Debian GNU/Linux comes with ABSOLUTELY NO WARRANTY, to the extent permitted by applicable law. Last login: Thu Sep 10 10:57:06 2020 from 192.168.1.4 |
Then there are two ways to proceed from here either initiate the command from a Linux computer or from the Raspberry Pi board.
Initiate Command from a Linux Computer
Get back to the terminal window in your computer, and run the following command to take a screenshot remotely and save the file in your computer:
|
1 |
FILE="screenshot-001.png"; ssh pi@<pi_ip_address> 'DISPLAY=:0 scrot "'$FILE'"; scp "'$FILE'" <pc_user>@<pc_ip_address>:<remote_directory>; rm "'$FILE'"' |
For each new screenshot simply change the value of FILE variable. The command line connects to Raspberry Pi over SSH, takes a screenshot, transfers it to your computer, and deletes it from the Raspberry Pi board.
Alternative methods
Screenshotting with maim
As pointed out in the comments, using maim is a more elegant method as it outputs the screenshot to stdout allowing us to save the image to the local computer with a simple redirect.
First, install maim on Raspberry Pi:
|
1 |
sudo apt install maim |
Now we can capture a Raspberry Pi screenshot from our computer with a much simpler command:
|
1 |
ssh -t pi@<pi_ip_address> 'DISPLAY=:0 maim' > screenshot.png |
However, note that it leads to corrupted PNG files in my case, possibly because of different environment settings between the computer and the Raspberry Pi board. meaning YMMV.
Initiate Screenshoting from Raspberry Pi
If you don’t have a Linux computer, the method above will not work unless you use the Windows subsystem for Linux. Another way is to install an SSH server in Windows, and then run the following command inside Raspberry Pi:
|
1 2 |
pi@raspberrypi:~/Pictures $ FILE="screenshot-002.png"; DISPLAY=:0 scrot $FILE; scp $FILE <pc_user>@<pc_ip_address>:<remote_directory>; rm $FILE screenshot-002.png 100% 536KB 33.8MB/s 00:00 |
Upscrot
That’s it. In case you’d like a method that automatically uploads a screenshot after you select an area with your mouse, have a look at upscrot Python script.

Jean-Luc started CNX Software in 2010 as a part-time endeavor, before quitting his job as a software engineering manager, and starting to write daily news, and reviews full time later in 2011.
Support CNX Software! Donate via cryptocurrencies, become a Patron on Patreon, or purchase goods on Amazon or Aliexpress


You can redirect your stdout from ssh, so no need for scp. Simple
will do the trick.
Thanks. maim does the trick. I had never heard about it.
Edit: Oops. Sadly the file appears to be corrupted. 006 is with maim + stdout redirect, 007 is with scrot
If I take the capture with maim on Pi directly, it works fine:
Through SSH there seems to be some bits shifted that makes the file corrupted…
I’ve already made sure the locale on the host computer and raspberry pi are the same. It looks like a string vs binary output issue, but I’m sure how to fix it yet…
Have you already compared the output from env when logged in locally and via SSH?
Is it really possible to SSH into a Raspbian machine as unprivileged user ‘pi’ and do a screencapture?
If the screen is currently owned by user ‘pi’, then it should be. X11 apps will automatically use the .Xauthority cookie to authenticate with the disaplay server. I am not sure if you can do it with a display using fbdev. But I suppose permissions would be simply filesystem based like the rest of unix.
Well, I was thinking about something like this (quoting the screencapture manual page from macOS):
SECURITY CONSIDERATIONS
To capture screen content while logged in via ssh, you must launch
screencapture in the same mach bootstrap hierarchy as loginwindow:
PID=pid of loginwindow
sudo launchctl bsexec $PID screencapture [options]
I don’t do MacOS, sorry. I prefer to stick to unix and unix like operating systems.
Screenshot program that works with RPi GPU/VPU hardware buffers: https://github.com/GrazerComputerClub/raspi2png