
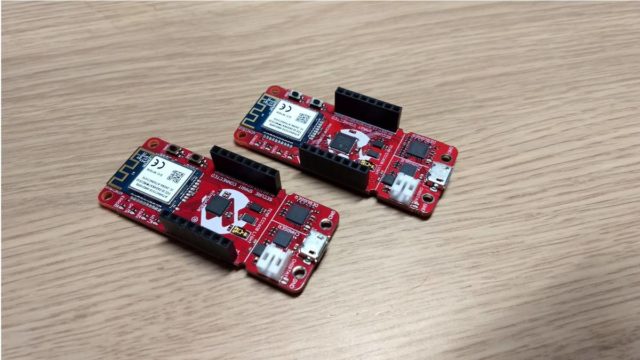
Microchip AVR-IoT and PIC-IoT development boards have AVR and PIC MCUs respectively, which enables a simple interface between embedded applications and the cloud. The IoT development boards can securely transfer data to Amazon Web Services (AWS) IoT platform with a WiFi connection. The IoT development boards also include an onboard debugger which can be used to program and debug the MCUs without any need for external hardware. The IoT development boards also have an integrated lithium battery charger, which makes it a rechargeable device and allows easier deployment for a “ready-to-go solution.”
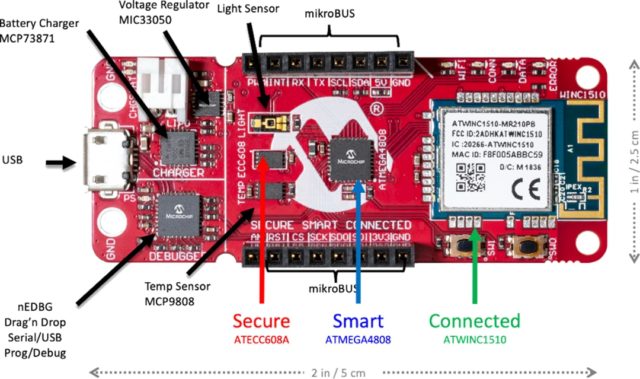
The AVR-IoT WA development board integrates the ATECC608A CryptoAuthentication chip for security protocols and the ATWINC1510 Wi-Fi network controller for connectivity. The development board combines the ATmega4808 MCU 8-bit AVR MCU running at up to 20 MHz and offers a wide range of flash sizes up to 48 KB. The unit uses a “flexible and low-power architecture, including Event System and SleepWalking, accurate analog features, and advanced peripherals.”
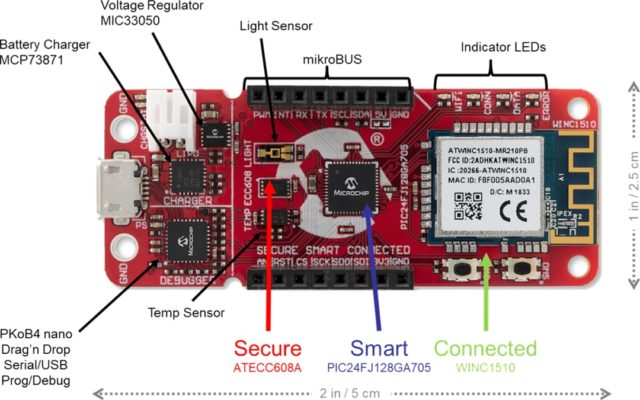
The PIC-IoT WA development board also integrates the same CryptoAuthentication chip as well as the Wi-Fi network controller. Mainly, the development board combines the PIC24FJ128GA705 MCU with up to 128KB of ECC Flash and 16KB of RAM. It enables low power features by selectively shutting down peripherals and/or core for substantial power reduction and fast wake-up using sleep and idle modes. It has more functionalities for low power features which can be found in the official datasheet.
Comparison of Development Boards
The major difference in the IoT development boards is due to different MCU, the one uses ATmega4808 MCU 8-bit AVR processor, and the other uses PIC24FJ128GA705 MCU with 16-bits architecture. PIC MCU provides more breakpoints in hardware for debugging the software and watchpoints of data with less efficient instructions per clock than the AVR MCU.
The PIC MCU has 128 KB of ECC Flash and 16 KB of RAM, whereas AVR MCU provides 48 KB of Flash and 6 KB of RAM. PIC MCU works at a frequency of 32 MHz and can achieve 16 MIPS(Million Instructions Per Second), on the contrary, AVR MCU works at 20 MHz and can offer up to 20 MIPS. PIC offers a good set of peripherals, also providing multiple low-power modes to optimize energy consumption. AVR MCU also provides an enhanced set of peripherals and optional power-saving capacity.
Also, the onboard mikroBUS connector allows the coherent integration of any MikroE Click boards such as motion detectors, heart rate monitors, and various other applications.
To get started with programming and using all the possible features of the IoT Development Boards, follow the official user guides of the AVR-IoT WA Development Board and PIC-IoT WA Development Board that you’ll find through the product pages linked below.
AVR-IoT and PIC-IoT development boards are available at $44.05 USD on Microchip Direct. For more information check out the official product page of AVR and PIC boards. Images have been taken from the Elektor store and Mouser Electronics website.

Saumitra Jagdale is a Backend Developer, Freelance Technical Author, Global AI Ambassador (SwissCognitive), Open-source Contributor in Python projects, Leader of Tensorflow Community India and Passionate AI/ML Enthusiast
Support CNX Software! Donate via cryptocurrencies, become a Patron on Patreon, or purchase goods on Amazon or Aliexpress. We also use affiliate links in articles to earn commissions if you make a purchase after clicking on those links.


i don’t get why people still wan’t to use there 8 or 16bit controllers, while there are so many nice arm boards
Outside of IoT 8 and 16 bit still make some sense. If you’re doing something that could be implemented with a 555 and some 74 logic it makes sense to reduce the parts count by replacing that with an attiny or something. The cheapest Cortex m is still too expensive there.
This looks like a throwback to the IoT generation that were existing PIC based products (things with character LCD displays and dip switches) that were respun into “Smart IoT cloud AI super great” products by adding a wifi module like this, sending some small bits of data and making graphs out of it. The wifi module is probably cortex m3 or m4 based.
Sorry microchip don’t have IDE on arm rpi in 2020, even i like good documentation on 16F and 32MX series
the easy way is to switch to mcu brand that support uart bootloading out the box with existing tools on arm
You can flash a PIC using a Raspberry Pi with Pickle (https://wiki.kewl.org/dokuwiki/projects:pickle). The ICSP programming pins on many PICs are also the serial port pins; if you choose the right pins on the Pi, you can flash the PIC then send and receive data over the same connection. These days I use a Pi as a complete PIC development environment–SSH into the Pi, write Great Cow BASIC code in vim, then compile and flash the PIC using a makefile script.
Ok if i understand you devellop your app on your x64 computer then send hex file to rpi in order to flash some pic mcu.
Sorry I wasn’t clear about this. I actually write and compile the code on the Pi, using vim as the text editor and the GCB command-line compiler (http://gcbasic.sourceforge.net/help/_overview_raspberry_pi.html).
I like using 8-bit PICs because you can get almost any PIC <= 40 pins in a DIP form factor, making it easy to breadboard. Simple one-off projects can be built on protoboard. There’s a huge variety of them with some unique feature sets (e.g., some 40-pin chips have 35 ADCs). PPS (Peripheral Pin Select) is also handy.
Yes, they are slow, and programming in BASIC instead of C seems backward these days. But they work well with a Pi for what they were originally intended–a Peripheral Interface Controller.
thks for GCB command-line compiler input