
Last December, we wrote about the inexpensive DIY Pi-KVM board to add KVM over IP to the Raspberry Pi board mentioning PiKVM v3 was in the works with extra features such as onboard ATX power control.
It turns out PiKVM v3 HAT has been on Kickstarter for about a month and raised close to $600,000 US from over 2,500 backers with just about two days to go at the time of writing.
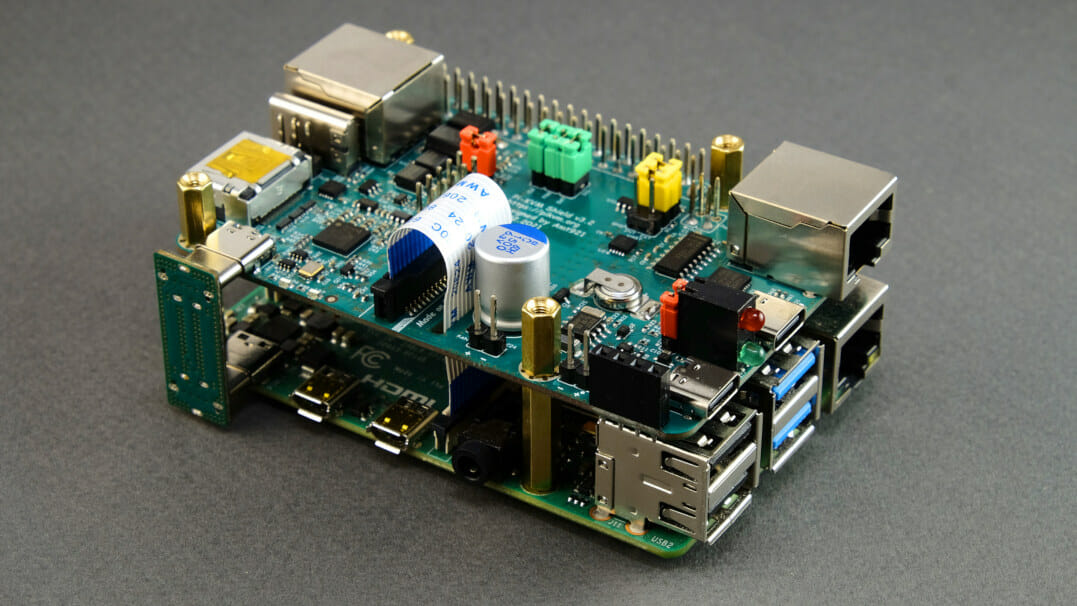
PiKVM v3 hardware features and specifications:
- Video & audio capture port – 1x HDMI input up to 1080p50
- MIPI CSI-2 interface to Pi to visualize HDMI input
- USB
- 1x USB-C console port
- 1x USB-C power input port
- USB-OTG pins
- USB-C OTG port doing the emulation of a USB keyboard, mouse, Virtual CD-ROM or USB Flash Drive, USB-Ethernet, USB-Serial port, etc…
- Console – RJ45 console port
- Debugging – UART access pins
- Expansion
- SPI and an extra GPIO for the custom extension boards
- I2C display connector
- Misc – Power and activity LED, HDMI reset jumper, Audio capture/GPIO selection jumpers, RTC + rechargeable supercapacitor, PWM fan connector, 1-Wire & Neo-pixel interface
- ATX controller interface (power on/off, reboot control, PWR and HDD ACT LEDs)
- Alternate +5V power input/output header pins
- Dimensions – Raspberry Pi HAT form factor
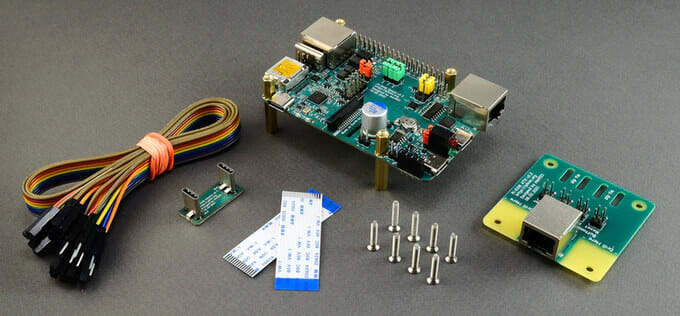
The Raspberry Pi HAT ships with an ATX controller adapter board and wiring to optionally connect the HAT to the motherboard, a USB-C bridge board to connect the HAT with a Raspberry Pi 4 over USB-C, as well as two flat CSI cables, screws, and brass standoffs. A PKVM OS image based on Arch Linux Arm should be installed on the Raspberry Pi 4 to provide the KVM over IP functionality. You’ll find instructions, other documentation, and GPLv3 licensed software on Github.
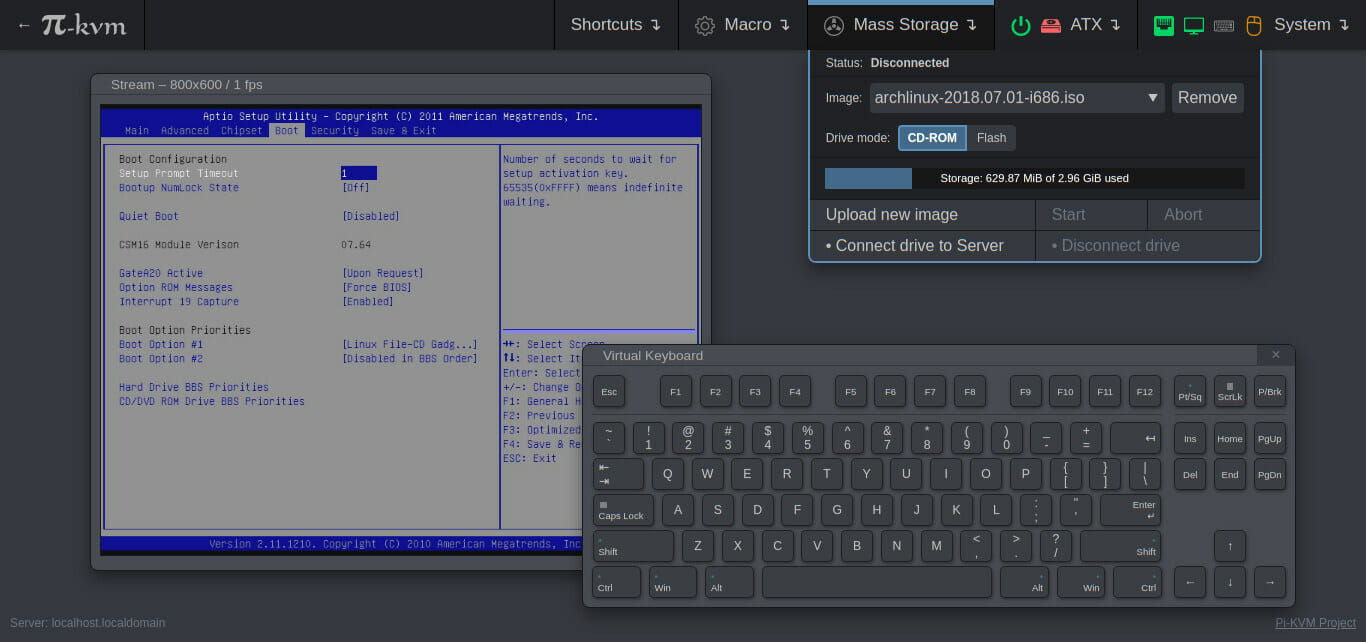
Once the connections are done, you’ll be able to control the motherboard or computer connected to the Raspberry Pi 4 over the Internet or local network using VNC or a Web UI. The video output is compressed with MJPEG or H.264/WebRTC up to 1080p 50Hz, and you’ll be able to simulate “insert & eject” for USB devices, turn on and off the motherboard (if the ATX adapter is connected), control GPIO ports and USB relays, access a CISCO-style and USB serial console port (to manage PKVM OS or to connect to the server), etc… It’s also possible to use IPMI BMC, IPMI SoL, Redfish, and Wake-on-LAN to control the server.
Commercial KVM over IP solutions are usually expensive, and one of the reasons PiKVM v3 has been so popular so far is its comparatively low price of just $145 including a steel case. Shipping adds $20 to the US, and $30 to the rest of the world, and backers will not have to wait for too long, as shipping is expected to start in October, a few weeks after the Kickstarter campaign ends. More details may also be found on the official website.

Via LinuxGizmos and Geeky Gadgets

Jean-Luc started CNX Software in 2010 as a part-time endeavor, before quitting his job as a software engineering manager, and starting to write daily news, and reviews full time later in 2011.
Support CNX Software! Donate via cryptocurrencies, become a Patron on Patreon, or purchase goods on Amazon or Aliexpress. We also use affiliate links in articles to earn commissions if you make a purchase after clicking on those links.


I wish this would have been a CM4 carrier board. Bolted on a Pi 4 just makes for such a chunky and unpractical unit.
I was similarly surprised and a bit confused, at first it was not really clear whether it was providing a KVM for the RPi4 itself or using an RPi4 to provide a KVM for another device. And even in the presentation it seems to be assumed that the user already knows but I can’t help but think that a full-blown RPi4 probably is so overkill for such a function that I’m probably wrong. It’s only when seeing the BIOS dumps that I realized that the purpose was indeed to propose a KVM to PC-type hardware. I’m also a bit confused by the presence of the RJ45 ports whose usage isn’t totally obvious to me :-/ Maybe having a carrier board for the CM4 could have cleared some questions.
The Ethernet port is probably used to simulate Ethernet cable insertion/unplugging from the target board.
Possibly. Or maybe for wake-on-lan injection.
The “Ethernet” port is likely a “RJ45 console” (serial) port according to the description.
Ah you’re right, I didn’t notice it was RJ45. But there’s a second one on the same face as the HDMI connector.
The second one looks to be the “ATX controller interface” used to connect the ATX controller adapter board.
There’s support for Wake-on-LAN in the list of features, so it might be Wake-on-LAN for Raspberry Pi 4 board that then wakes up the motherboard.
Sounds complicated. I think we’re speculating too much and should wait for them to provide more easily understandable descriptions for mere mortals like us (especially if they expect to sell to more than just rpi fanboys who just want to complete their collection of unused accessories). Overall it could possibly be a really good product with quite a comprehensive software support, it definitely deserves better marketing.
If you look at the Level1Techs review of it, about 8 minutes in they talk about the ATX connector. You basically put the card into an empty slot in the back of the case, then you run the front panel connections to the card, then another from the card to the motherboard, that allows you to remotely reset, poweron/off, and monitor the LEDs, then plug an ethernet cable from the board to the pikvm, so you can do full remote control of the system and any maintenance you might want to do.
It also emulates a USB thumb drive, allowing you to boot the machine off an installer disk that isn’t directly inserted, but is instead is on the Pi. It’s basically a full replacement for IPMI for systems that don’t have IPMI built in, or that have closed source IPMI systems that you can’t audit or don’t have the software for.
If you look at the videos linked from their site and from the kickstarter, there’s a wealth of information about how it works.
OK thanks for the info. I had watched the video above and didn’t find everything obvious at all. It’s important to let people imagine themselves using the device when trying to sell a product. Regardless I still think it’s really complete and can succeed.
>If you look at the Level1Techs review of it, about 8 minutes
Once I found out about idle consumption of this thing I became really interested. But it’s sad that we need to waste our time watching video reviews to get to the details.
I would guess a large part of the target audience are people who still are able and prefer to read. Especially since vast majority of video ‘tech reviews’ are crappy as hell targeting clueless consumers only.
The Ethernet port on the hat goes to the atx control board.
This basically uses a full Pi4 board because it was in development long before the CM4 was released. It takes time to develop a board like this when you’re a 1-2 person dev team, and shifting to using a CM4 would mean throwing away many months of work. Better to release it as it is, and perhaps make a version in the future that uses a CM4.
If it’s a matter of conflicting time frames, yes that does totally make sense.
I use a raspberry pi as a USB over IP for my home setup. By scripting USB/IP switching, I can pass any USB port to a device on the same network. Works with keyboards, mice, game controllers, and my spacemouse. The great thing about this, is that it replicated the port on the remote machine, so the device shows up to local drivers (space-time included)
I use a HDMI matrix to switch the video and audio directly to the correct display, using short HDMI cables, HDMI over IP extenders, or even wireless.
Would have been sweet if they made it a CM4 carrier board that mounts into a PCIe slot. Only need wires for the arc stuff. You can include all the USB, video, and audio on the PCIe card and connect it to the CM4 all on the same board.