Cytron has sent us a few of their MAKERDISK NVMe SSDs preloaded with Raspberry Pi OS so that we can test them on a Raspberry Pi 5 SBC, either with a GEEKWORM X1001 or Waveshare M.2 PCIe HAT+ add-on boards both of which were also provided by the company.
Ever since the first M.2 PCIe HATs for the Raspberry Pi 5 were released, we knew Raspberry Pi Limited was working on its own model, and based on some Twitter/X “rumors” (with photos) the launch of the official M.2 HAT+ should be just around the corner. So it’s the perfect timing to test some SSDs on the Raspberry Pi 5 even though I’ve yet to get the official HAT+
Cytron “MAKERDISK” package unboxing
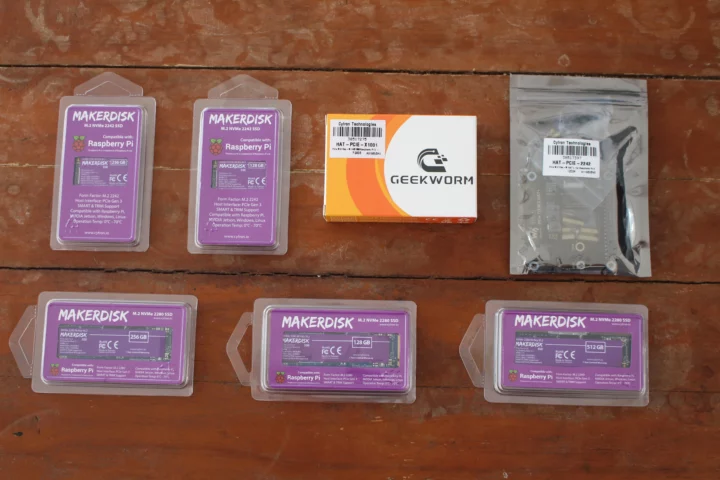
The Malaysian company sent me a kit with everything I needed to get started, minus the Raspberry Pi 5 I already owned.
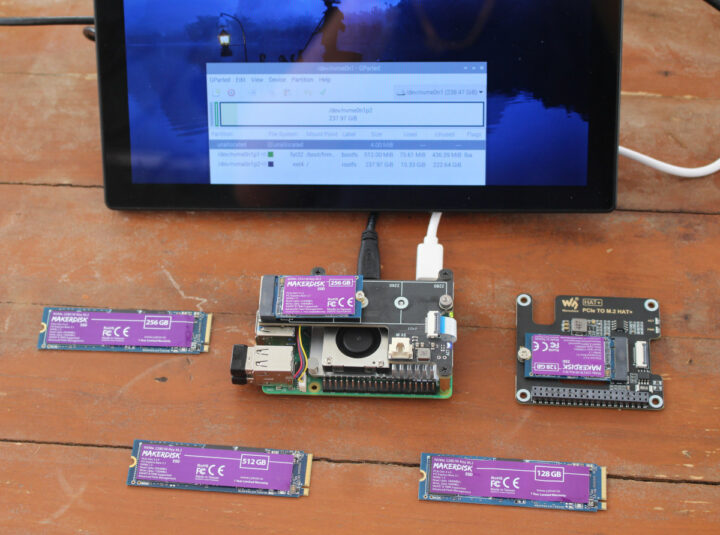
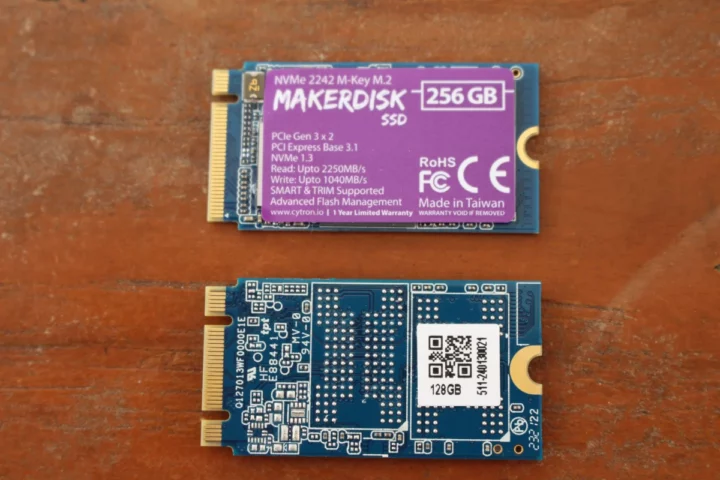
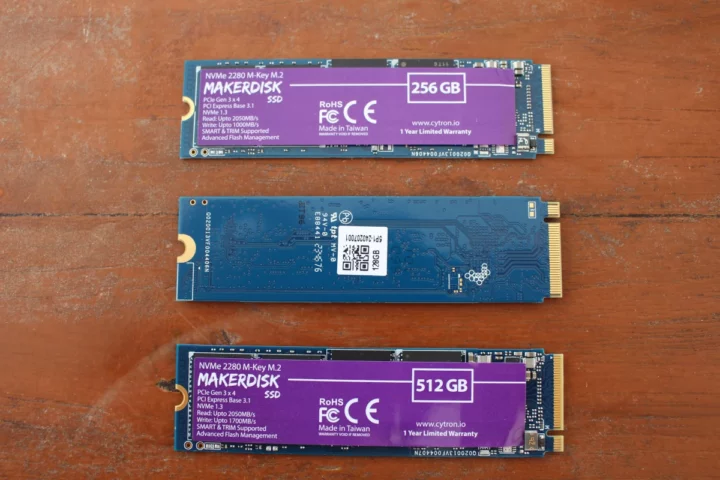
This includes 128GB or 256GB NVMe 2242 M-Key SSDs, 128GB, 256GB, and 512GB 2280 M-Key SSDs, the GEEKWORM X1001 HAT kit, and the Waveshare M.2 PCIe HAT+ kit.
The 128 GB 2240 M.2 SSD is rated 1700MB/s (read) and 600 MB/s (write), while the 256 GB can achieve up to 2250MB/s read and 1040MB/s write speeds.
The read and write speeds for the M.2 2280 SSDs are as follows:
- 128GB – 1,800 MB/s, 560 MB/s
- 256GB – 2,050 MB/s, 1,000 MB/s
- 512GB – 2,050 MB/s, 1,700MB/s
Since we’ll be connecting those to the PCIe Gen2 x1 or PCIe Gen3 x1 interface of the Raspberry Pi 5, those speeds won’t matter that much as the PCIe interface will be the bottleneck
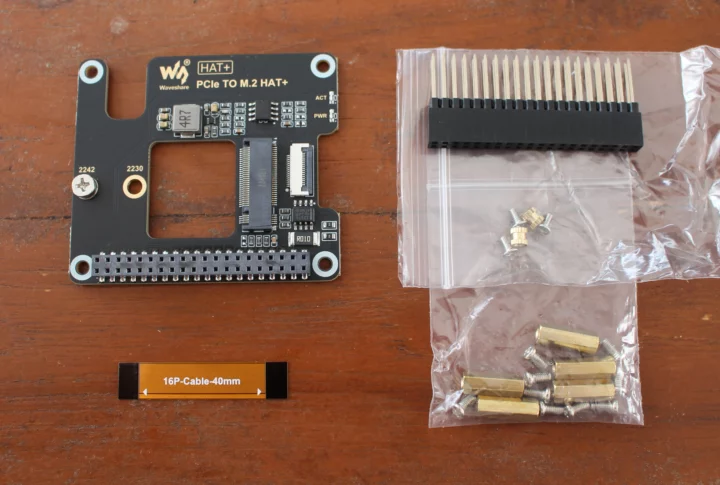
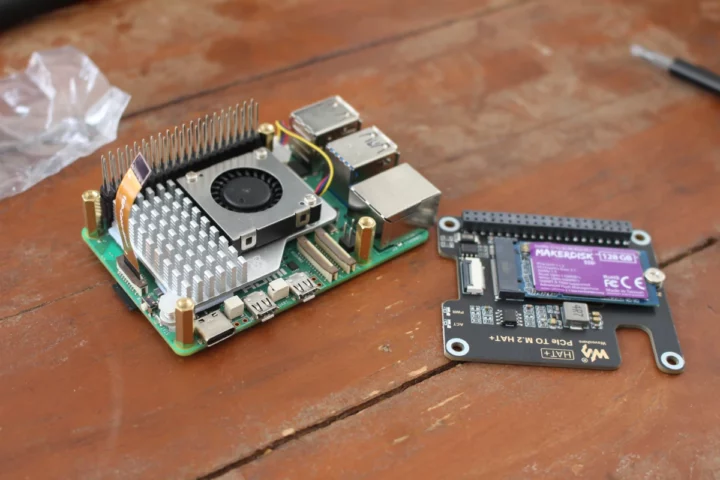
Waveshare’s PCIe to M.2 HAT+ board comes with a 40mm 16-pin PCIe FPC cable, a 40-pin female to male header, and some screws and standoffs, plus bits for people wanting to use a shorter 2230 SSD. You’ll find the hardware and software documentation in the Wiki.
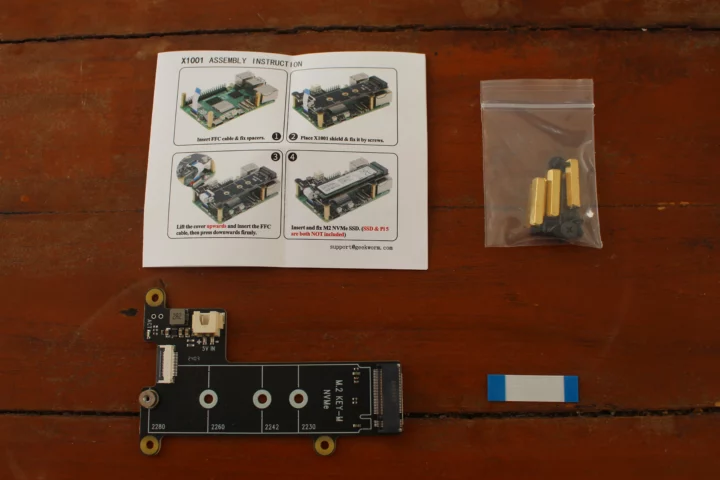
The more compact GEEKWORM X1001 board is more versatile as it can support 2230, 2242, 2260, and 2280 SSDs. The included PCIe FPC does not quite seem up to specs (but it does the job), and the package also comes with assembly instructions and a small bag with standoffs and screws. Again you’ll find the documentation on the company’s website.
HAT and SSD assembly with Raspberry Pi 5
I started with the assembly of the Waveshare PCIe to M.2 HAT+ without reading the documentation. It turns out it was not such a good idea.
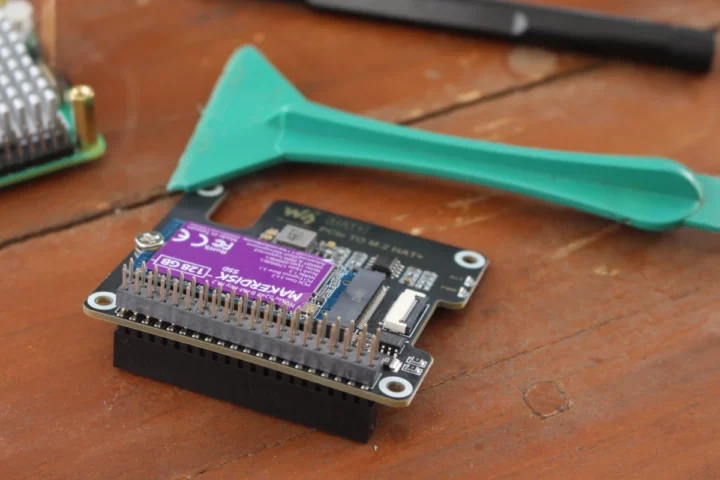
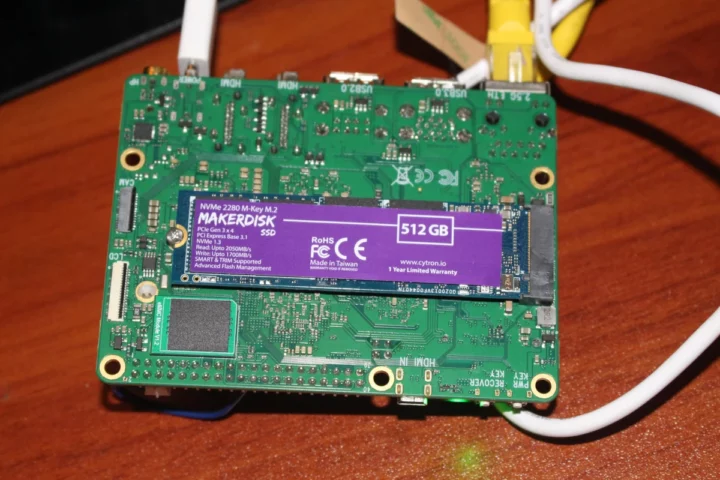
I initially installed the female-to-male header to the Raspberry Pi 5 which makes it really difficult to install the HAT especially since the pins on the header were not perfectly aligned. So I had to remove it, and instead insert it to the HAT before connecting it to the Pi. Installing the M.2 SSD was straightforward.
When installing the flat cable we must make sure that the black ends are oriented properly, and after assembly was complete it looks as shown below.
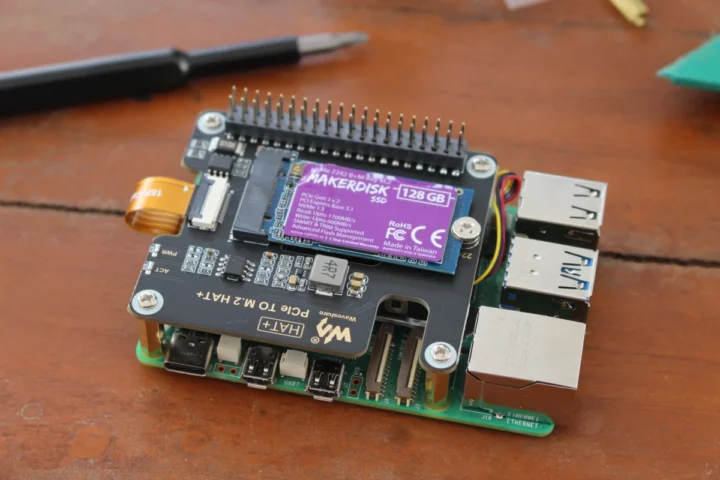
But that’s actually wrong, as users also have to make sure the white arrow is installed close to the PWR LED as shown below.
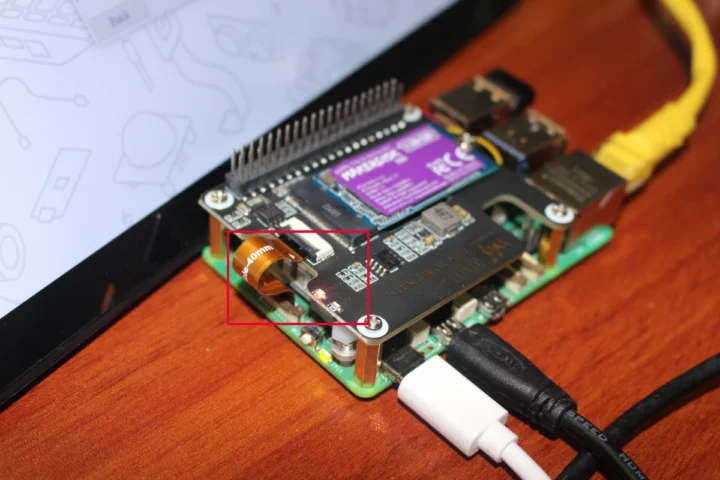
So I had to flip the cable as shown above and the SSD could be detected.
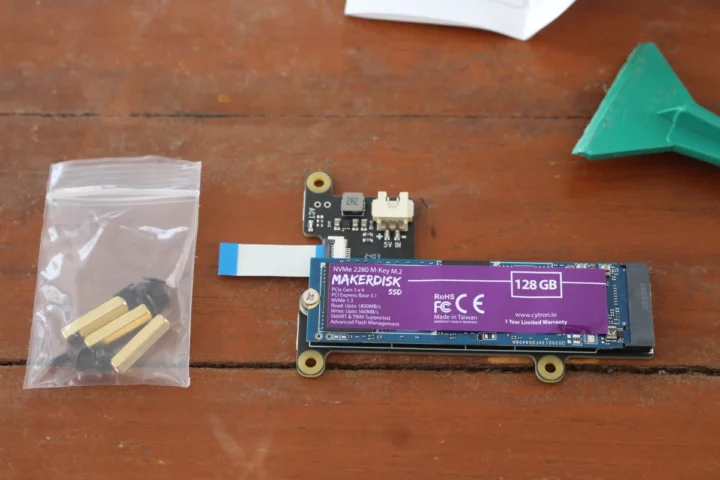
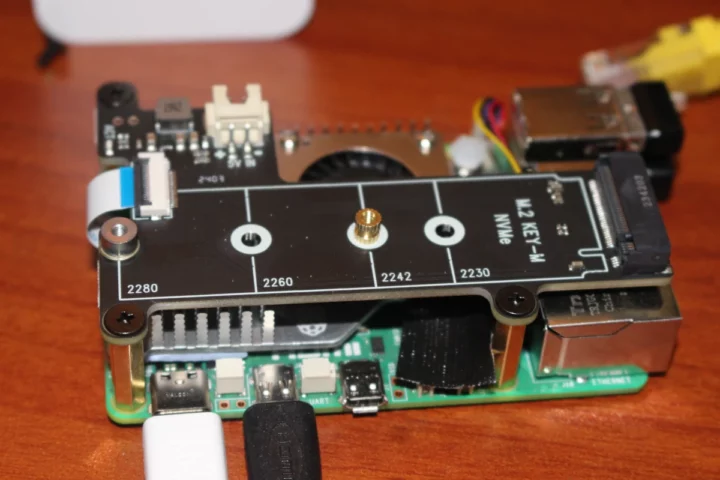
The GEEKWORM X1001 is much easier to install. Insert the SSD and the flat cable as shown below.
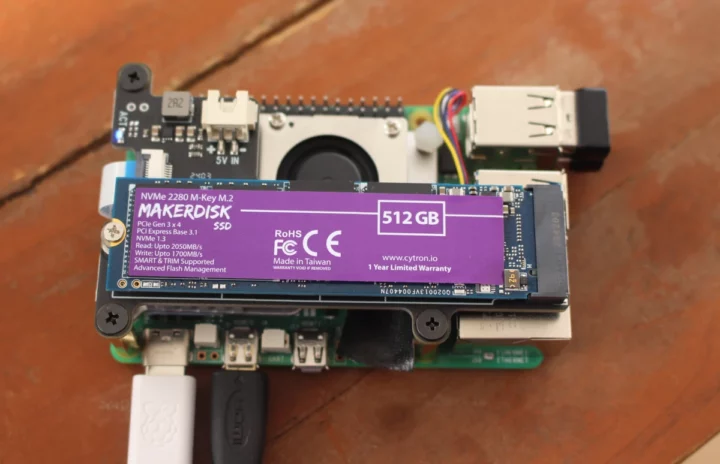
Finally install the three standoffs (note they are slightly higher than the ones provided for the Waveshare HAT), secure the board with three screws, and insert the other end of the cable to the PCIe connector on the Raspberry Pi 5.
It’s also much easier to remove than the Waveshare HAT+…
Booting Raspberry Pi OS from MAKERDISK SSD
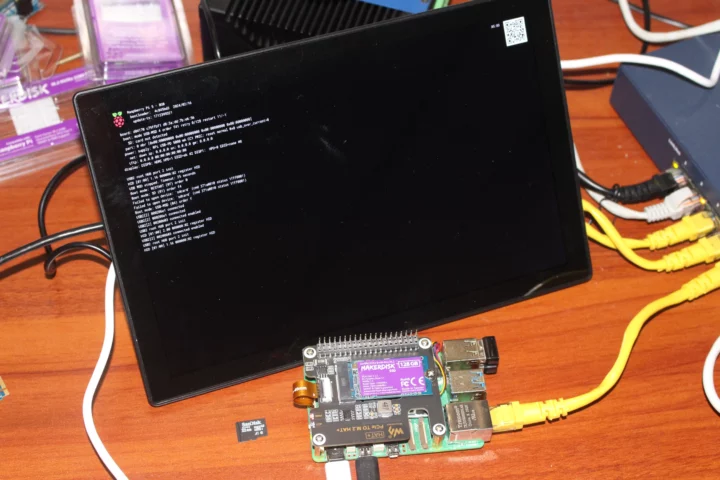
One advantage of MAKERDISK M.2 NVMe SSD is that they are preloaded with Raspberry Pi OS, so you can just connect the drive, and Raspberry Pi OS will automatically boot without having to configure anything. That’s the theory at least, as it did not work once it met CNX Software’s test environment…
That board was sent to us by Raspberry Pi Limited right after the Pi 5 was announced, and it had been a while since I had not used it, let alone upgraded it. So I thought the firmware might have been too old.
So I booted the board with a microSD card, and checked the firmware version.
|
1 2 3 4 |
pi@raspberrypi:~ $ vcgencmd version 2023/10/18 18:30:17 Copyright (c) 2012 Broadcom version c2da2ae7 (release) (embedded) |
then upgraded the system and firmware with a full upgrade:
|
1 2 3 |
sudo apt update sudo apt full-upgrade sudo reboot |
The firmware should now be the latest:
|
1 2 3 4 |
pi@raspberrypi:~ $ vcgencmd version 2024/02/16 15:28:41 Copyright (c) 2012 Broadcom version 4c845bd3 (release) (embedded) |
I took the opportunity to check the 128GB M.2 NVMe SSD was detected, and it was:
|
1 2 3 4 5 6 7 8 |
pi@raspberrypi:~ $ lsblk NAME MAJ:MIN RM SIZE RO TYPE MOUNTPOINTS mmcblk0 179:0 0 29.7G 0 disk |-mmcblk0p1 179:1 0 512M 0 part /boot/firmware `-mmcblk0p2 179:2 0 29.2G 0 part / nvme0n1 259:0 0 119.2G 0 disk |-nvme0n1p1 259:1 0 512M 0 part `-nvme0n1p2 259:2 0 13G 0 part |
But after shutting down the Raspberry Pi 5, and removing the microSD card, the boot would still not complete with the system unable to find any bootable device. So I contacted Cytron, and they told me they already had tested it with several Raspberry Pi 5 boards and it worked out of the box without having to set up anything.
The Raspberry Pi documentation is pretty much garbage since it’s unnecessarily made complicated, but I found a solution in the aforelinked Waveshare wiki that clearly explains we can enable SSD Boot mode by changing the BOOT_ORDER value to 0xf416 (it was set to 0xf41):
|
1 2 3 4 5 6 7 8 9 10 11 12 13 14 15 16 17 18 19 20 21 22 23 24 25 26 27 28 29 30 31 |
pi@raspberrypi:~ $ sudo rpi-eeprom-config --edit Updating bootloader EEPROM image: /lib/firmware/raspberrypi/bootloader-2712/default/pieeprom-2024-02-16.bin config_src: blconfig device config: /tmp/tmpb06wntkd/boot.conf ################################################################################ [all] BOOT_UART=1 WAKE_ON_GPIO=1 POWER_OFF_ON_HALT=0 BOOT_ORDER=0xf416 ################################################################################ *** To cancel this update run 'sudo rpi-eeprom-update -r' *** *** CREATED UPDATE /tmp/tmpb06wntkd/pieeprom.upd *** CURRENT: Fri Feb 16 03:28:41 PM UTC 2024 (1708097321) UPDATE: Fri Feb 16 03:28:41 PM UTC 2024 (1708097321) BOOTFS: /boot/firmware '/tmp/tmp.49kFFgS1eT' -> '/boot/firmware/pieeprom.upd' UPDATING bootloader. *** WARNING: Do not disconnect the power until the update is complete *** If a problem occurs then the Raspberry Pi Imager may be used to create a bootloader rescue SD card image which restores the default bootloader image. flashrom -p linux_spi:dev=/dev/spidev10.0,spispeed=16000 -w /boot/firmware/pieeprom.upd UPDATE SUCCESSFUL |
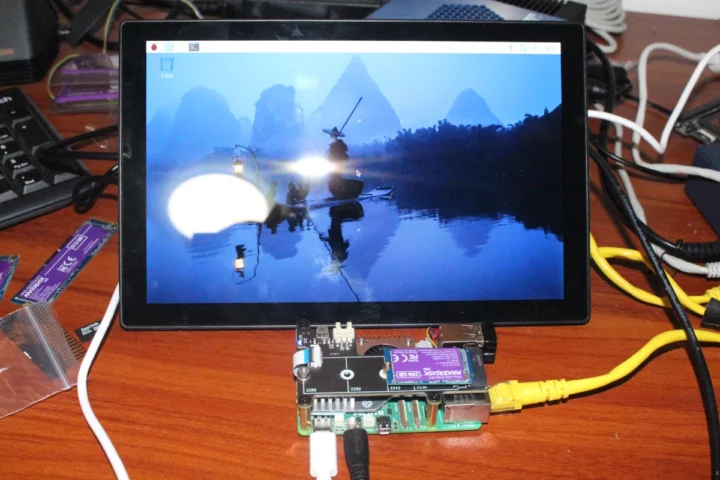
I could finally boot the system from the SSD, and go through the setup wizard to configure the language, set up a username and password, and let the system automatically update itself to the latest version. The command below shows the rootfs is in an NVMe device:
|
1 2 3 4 5 6 7 8 9 |
pi@raspberrypi:~ $ df -h Filesystem Size Used Avail Use% Mounted on udev 3.8G 0 3.8G 0% /dev tmpfs 805M 6.0M 799M 1% /run /dev/nvme0n1p2 117G 13G 99G 12% / tmpfs 4.0G 304K 4.0G 1% /dev/shm tmpfs 5.0M 48K 5.0M 1% /run/lock /dev/nvme0n1p1 510M 74M 437M 15% /boot/firmware tmpfs 805M 192K 805M 1% /run/user/1000 |
I guess that means if you have recently purchased a Raspberry Pi 5 SBC, it should work just fine without doing anything, but if you’ve got an older board, you may need to update the EEPROM config like I did above.
MAKERDISK NVMe SSD performance testing
We’ll need to compile iozone from source since iozone3 is not available as a package:
|
1 2 3 4 5 |
wget https://www.iozone.org/src/current/iozone3_506.tar tar xvf iozone3_506.tar cd iozone3_506/src/current make –j4 linux–arm sudo cp iozone /usr/local/bin/ |
I started testing the 2280 SSDs using SupTronics/GEEKWORK X1001 HAT.
M.2 2280 SSD 128GB:
|
1 2 3 4 5 6 7 8 9 10 11 12 13 14 |
pi@raspberrypi:~ $ iozone -e -I -a -s 100M -r 4k -r 16k -r 512k -r 1024k -r 16384k -i 0 -i 1 -i 2 Iozone: Performance Test of File I/O Version $Revision: 3.506 $ Compiled for 64 bit mode. Build: linux-arm random random bkwd record stride kB reclen write rewrite read reread read write read rewrite read fwrite frewrite fread freread 102400 4 177078 214439 109502 109580 53712 194819 102400 16 272381 297254 193798 193535 193298 295840 102400 512 388643 391268 424181 424188 424062 389699 102400 1024 391425 392993 429649 429607 429574 392660 102400 16384 395667 395301 434707 434721 434642 394242 iozone test complete. |
That’s 434 MB/s read speed and 395 MB/s write speed in PCIe Gen2 mode.
Let’s switch to the “not-certified-to-work” PCIe Gen3 mode by adding the following line to /boot/firmware/config.txt before the [cm4] section:
|
1 |
dtparam=pciex1_gen=3 |
and reboot the system.
It’s indeed faster than before
|
1 2 3 4 5 6 7 8 |
pi@raspberrypi:~ $ iozone -e -I -a -s 100M -r 4k -r 16k -r 512k -r 1024k -r 16384k -i 0 -i 1 -i 2 random random bkwd record stride kB reclen write rewrite read reread read write read rewrite read fwrite frewrite fread freread 102400 4 231339 299246 114129 113880 58080 290993 102400 16 416670 482286 206820 206493 205642 473977 102400 512 728126 731522 814851 816372 815786 738279 102400 1024 745975 733886 833495 834420 834454 751200 102400 16384 761527 762354 855845 856076 855026 756876 |
855 MB/s and 761 MB/s sequential read/write speeds respectively. It’s quite far from the theoretical performance of the SSD itself, but that’s the best the Raspberry Pi 5 can do.
We can check the link speed with the command lspci:
|
1 2 3 4 5 6 7 8 9 10 11 12 13 14 15 16 17 18 19 20 |
0000:01:00.0 Non-Volatile memory controller: Phison Electronics Corporation PS5013 E13 NVMe Controller (rev 01) (prog-if 02 [NVM Express]) Subsystem: Phison Electronics Corporation PS5013-E13 PCIe3 NVMe Controller (DRAM-less) Control: I/O- Mem+ BusMaster+ SpecCycle- MemWINV- VGASnoop- ParErr- Stepping- SERR- FastB2B- DisINTx+ Status: Cap+ 66MHz- UDF- FastB2B- ParErr- DEVSEL=fast >TAbort- <TAbort- <MAbort- >SERR- <PERR- INTx- Latency: 0 Interrupt: pin A routed to IRQ 38 Region 0: Memory at 1b00000000 (64-bit, non-prefetchable) [size=16K] Capabilities: [80] Express (v2) Endpoint, MSI 00 DevCap: MaxPayload 256 bytes, PhantFunc 0, Latency L0s unlimited, L1 unlimited ExtTag+ AttnBtn- AttnInd- PwrInd- RBE+ FLReset+ SlotPowerLimit 0W DevCtl: CorrErr+ NonFatalErr+ FatalErr+ UnsupReq+ RlxdOrd+ ExtTag+ PhantFunc- AuxPwr- NoSnoop+ FLReset- MaxPayload 256 bytes, MaxReadReq 512 bytes DevSta: CorrErr- NonFatalErr- FatalErr- UnsupReq- AuxPwr- TransPend- LnkCap: Port #1, Speed 8GT/s, Width x4, ASPM L1, Exit Latency L1 unlimited ClockPM- Surprise- LLActRep- BwNot- ASPMOptComp+ LnkCtl: ASPM L1 Enabled; RCB 64 bytes, Disabled- CommClk+ ExtSynch- ClockPM- AutWidDis- BWInt- AutBWInt- LnkSta: Speed 8GT/s, Width x1 (downgraded) TrErr- Train- SlotClk+ DLActive- BWMgmt- ABWMgmt- |
We can also double-check the PCIe link speed by looking at the kernel log:
|
1 2 3 4 |
pi@raspberrypi:~ $ dmesg | grep -i pcie | grep link [ 0.487374] brcm-pcie 1000110000.pcie: link up, 8.0 GT/s PCIe x1 (!SSC) [ 0.487549] pci 0000:01:00.0: 7.876 Gb/s available PCIe bandwidth, limited by 8.0 GT/s PCIe x1 link at 0000:00:00.0 (capable of 31.504 Gb/s with 8.0 GT/s PCIe x4 link) [ 0.635376] brcm-pcie 1000120000.pcie: link up, 5.0 GT/s PCIe x4 (!SSC) |
If I revert to PCIe Gen2, the log looks like this:
|
1 2 3 4 |
pi@raspberrypi:~ $ dmesg | grep -i pcie | grep link [ 0.487581] brcm-pcie 1000110000.pcie: link up, 5.0 GT/s PCIe x1 (!SSC) [ 0.487771] pci 0000:01:00.0: 4.000 Gb/s available PCIe bandwidth, limited by 5.0 GT/s PCIe x1 link at 0000:00:00.0 (capable of 31.504 Gb/s with 8.0 GT/s PCIe x4 link) [ 0.635582] brcm-pcie 1000120000.pcie: link up, 5.0 GT/s PCIe x4 (!SSC) |
Here are the results for the 256 GB M.2 2280 SSD
PCIe Gen2:
|
1 2 3 4 5 6 7 8 |
pi@raspberrypi:~ $ iozone -e -I -a -s 100M -r 4k -r 16k -r 512k -r 1024k -r 16384k -i 0 -i 1 -i 2 random random bkwd record stride kB reclen write rewrite read reread read write read rewrite read fwrite frewrite fread freread 102400 4 175291 214587 21008 20757 54679 191177 102400 16 272609 300254 78555 78507 197479 298423 102400 512 390747 394816 423257 423271 423126 379387 102400 1024 393753 397302 428654 428666 428591 395550 102400 16384 399095 399160 433655 433720 433691 385558 |
PCIe Gen3:
|
1 2 3 4 5 6 7 8 |
pi@raspberrypi:~ $ iozone -e -I -a -s 100M -r 4k -r 16k -r 512k -r 1024k -r 16384k -i 0 -i 1 -i 2 random random bkwd record stride kB reclen write rewrite read reread read write read rewrite read fwrite frewrite fread freread 102400 4 224660 286711 21283 21091 58135 276242 102400 16 449371 487981 83602 83605 216701 507843 102400 512 754122 750976 816619 816690 815786 747935 102400 1024 754606 714644 827274 824210 824669 752034 102400 16384 759437 775225 846389 846681 845516 756754 |
… and for the 512 GB M.2 2280 SSD
PCIe Gen2:
|
1 2 3 4 5 6 7 8 |
pi@raspberrypi:~ $ iozone -e -I -a -s 100M -r 4k -r 16k -r 512k -r 1024k -r 16384k -i 0 -i 1 -i 2 random random bkwd record stride kB reclen write rewrite read reread read write read rewrite read fwrite frewrite fread freread 102400 4 178776 216957 108218 108136 55116 196694 102400 16 274618 302873 77708 77670 193336 299906 102400 512 393167 395297 425418 425446 425254 397028 102400 1024 389464 399058 430907 430943 430862 398336 102400 16384 400709 401157 436125 436175 436158 397647 |
PCIe Gen3:
|
1 2 3 4 5 6 7 8 9 |
pi@raspberrypi:~ $ iozone -e -I -a -s 100M -r 4k -r 16k -r 512k -r 1024k -r 16384k -i 0 -i 1 -i 2 random random bkwd record stride kB reclen write rewrite read reread read write read rewrite read fwrite frewrite fread freread 102400 4 230504 295512 109110 109022 58657 291082 102400 16 417880 488738 80071 79670 205148 469188 102400 512 722607 735040 800119 801409 800907 707348 102400 1024 734993 742664 820165 821335 821605 738641 102400 16384 771841 744168 843413 844399 845247 752797 |
Since the Raspberry Pi 5 is the bottleneck here, I also installed the 512GB M.2 2280 NVMe SSD in the Rockchip RK3588-powered Radxa Rock 5B with a faster PCIe Gen 3 x4 interface.
It’s properly detected along with the eMMC flash that boots the OS:
|
1 2 3 4 5 6 7 8 9 10 |
rock@rock-5b:~$ lsblk NAME MAJ:MIN RM SIZE RO TYPE MOUNTPOINT mmcblk1 179:0 0 14.5G 0 disk |-mmcblk1p1 179:1 0 512M 0 part `-mmcblk1p2 179:2 0 13.9G 0 part / mmcblk1boot0 179:32 0 4M 1 disk mmcblk1boot1 179:64 0 4M 1 disk nvme0n1 259:0 0 476.9G 0 disk |-nvme0n1p1 259:1 0 512M 0 part `-nvme0n1p2 259:2 0 476.4G 0 part |
iozone3 results:
|
1 2 3 4 5 6 7 8 9 10 11 12 13 |
rock@rock-5b:~$ sudo iozone -f /media/nvme0n1p1/file.tmp -e -I -a -s 100M -r 4k -r 16k -r 512k -r 1024k -r 16384k -i 0 -i 1 -i 2 Iozone: Performance Test of File I/O Version $Revision: 3.489 $ Compiled for 64 bit mode. Build: linux random random bkwd record stride kB reclen write rewrite read reread read write read rewrite read fwrite frewrite fread freread 102400 4 65670 252160 73203 89475 36004 87266 102400 16 137954 604140 75677 74864 106718 245356 102400 512 159328 1227404 492284 486458 542272 687659 102400 1024 152588 1233750 756111 758580 756585 1068179 102400 16384 213432 1551808 1747128 1258226 1133252 1150386 |
The read performance is much better (1.74GB/s), but something is odd about the write performance (213 MB/s), and running iozone3 twice yields the same results. Random I/Os are also a bit slower. Maybe some settings need to be adjusted to extract more performance.
The table below summarizes the results for the M.2 2280 SSDs.
| Read | Write | Random Read (4K) | Random Write (4K) | |
|---|---|---|---|---|
| 128GB (Pi 5 - PCIe Gen2) | 434707 KB/s | 395667 KB/s | 53712 KB/s | 194819 KB/s |
| 128GB (Pi 5 - PCIe Gen3) | 855845 KB/s | 761527 KB/s | 58080 KB/s | 290993 KB/s |
| 256GB (Pi 5 - PCIe Gen2) | 433655 KB/s | 399095 KB/s | 54679 KB/s | 191177 KB/s |
| 256GB (Pi 5 - PCIe Gen3) | 846389 KB/s | 759437 KB/s | 58135 KB/s | 276242 KB/s |
| 512GB (Pi 5 - PCIe Gen2) | 436125 KB/s | 400709 KB/s | 55116 KB/s | 196694 KB/s |
| 512GB (Pi 5 - PCIe Gen3) | 843413 KB/s | 771841 KB/s | 58657 KB/s | 291082 KB/s |
| 512GB (Rock 5) | 1747128 KB/s | 213432 KB/s | 36004 KB/s | 87266 KB/s |
Let’s now switch the 2242 SSDs using the Waveshare HAT+ board, starting with the 128GB SSD
PCIe Gen2:
|
1 2 3 4 5 6 7 8 |
pi@raspberrypi:~ $ iozone -e -I -a -s 100M -r 4k -r 16k -r 512k -r 1024k -r 16384k -i 0 -i 1 -i 2 random random bkwd record stride kB reclen write rewrite read reread read write read rewrite read fwrite frewrite fread freread 102400 4 177594 213488 108869 108746 53614 196066 102400 16 272147 297934 195391 195196 194756 296892 102400 512 388166 389682 424183 424176 424082 388881 102400 1024 391253 391754 429660 429616 429569 383752 102400 16384 395229 397099 435071 435083 435056 397024 |
PCIe Gen3:
|
1 2 3 4 5 6 7 8 |
pi@raspberrypi:~ $ iozone -e -I -a -s 100M -r 4k -r 16k -r 512k -r 1024k -r 16384k -i 0 -i 1 -i 2 random random bkwd record stride kB reclen write rewrite read reread read write read rewrite read fwrite frewrite fread freread 102400 4 226105 286816 112200 112222 57310 282218 102400 16 409809 469240 204764 204922 204543 454785 102400 512 711773 709174 798180 800769 799718 713783 102400 1024 693400 732706 817981 818748 811641 718288 102400 16384 727805 735957 841788 841564 841219 742663 |
256GB 2242 SSD results
PCIe Gen2:
|
1 2 3 4 5 6 7 8 |
pi@raspberrypi:~ $ iozone -e -I -a -s 100M -r 4k -r 16k -r 512k -r 1024k -r 16384k -i 0 -i 1 -i 2 random random bkwd record stride kB reclen write rewrite read reread read write read rewrite read fwrite frewrite fread freread 102400 4 178410 215915 59748 59667 58163 194114 102400 16 272001 302279 212542 212381 211066 299529 102400 512 393519 389569 424688 424698 424482 395037 102400 1024 397103 398609 430002 430036 430022 391644 102400 16384 401627 400804 435175 435154 435040 394858 |
PCIe Gen3:
|
1 2 3 4 5 6 7 8 |
pi@raspberrypi:~ $ iozone -e -I -a -s 100M -r 4k -r 16k -r 512k -r 1024k -r 16384k -i 0 -i 1 -i 2 random random bkwd record stride kB reclen write rewrite read reread read write read rewrite read fwrite frewrite fread freread 102400 4 231919 298113 64182 62460 62199 276536 102400 16 452616 520986 237396 237004 235606 516006 102400 512 726571 769167 826219 826192 825785 763369 102400 1024 769391 738571 841662 841635 840874 774332 102400 16384 778522 783605 857734 857830 857717 743414 |
The 128GB and 256GB SSDs have about the same results due to the Raspberry Pi 5 PCIe interface being the bottleneck.
Raspberry Pi 5 temperature with GEEKWORM/Waveshare HATs.
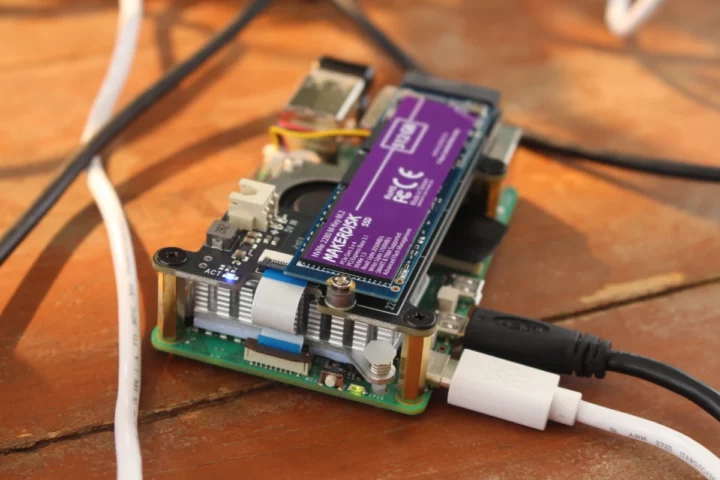
Both HATs can be installed on top of the Raspberry Pi 5 active cooler, but they do block the airflow to some extent, especially the Waveshare PCIe to M.2 HAT+, so I’ve decided to check the temperature while running a stress test on the CPU and SSD.
256GB SSD temperature test with Waveshare HAT+
I ran the following two commands at the same time…
|
1 2 |
stress -c 4 iozone -e -I -a -s 10000M -r 4k -r 16k -r 512k -r 1024k -r 16384k -i 0 -i 1 -i 2 |
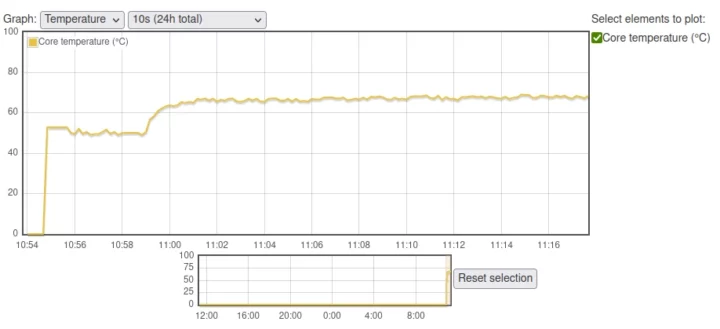
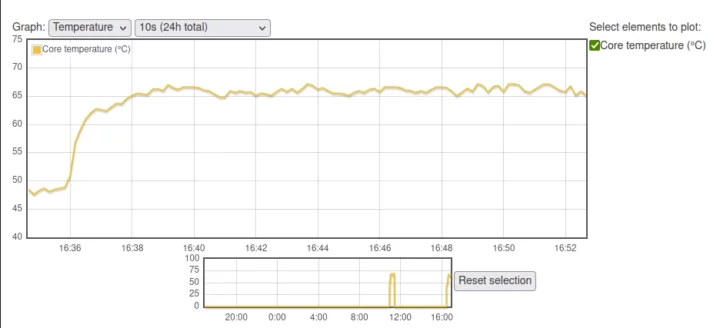
… and monitored the CPU temperature with the RPI-monitor program.
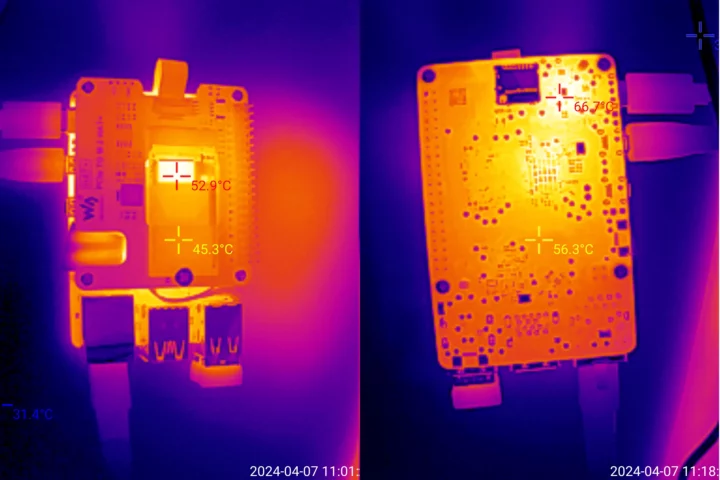
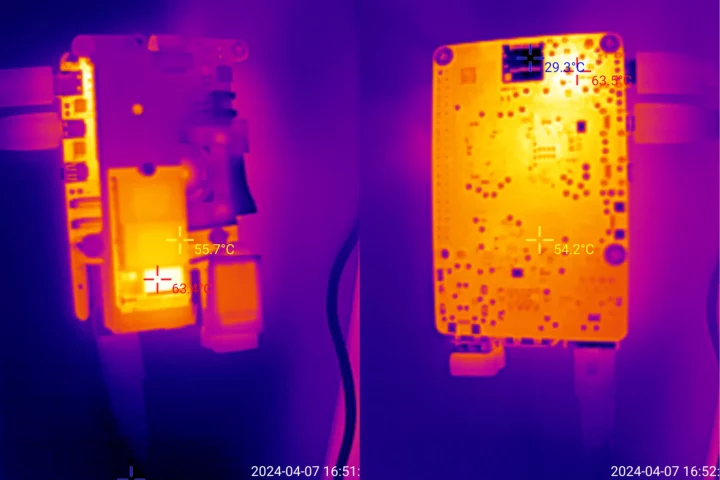
The maximum was around 67-69C. You’ll also find a thermal image taken with the Xtherm II TS2+ thermal imager for smartphones below. It shows the SSD’s highest temperature is 52.9°C after several minutes.
256GB SSD temperature with GEEKWORM X1001 HAT
I repeated the same test with the GEEKWORM X1001, but first I had to install 256GB M.2 2240 SSD. The FAQ in the aforelinked wiki explains:
How to fix the 2230/2242/2260 SSD?
A: The X1000 does not reserve the nut column to fix the 2230/2242/2260 SSD. Based on our test, you can secure the 2230/2242/2260 SSD using an M2*6mm screw and 2pcs M2 nuts. Place one M2 nut under the SSD, then use the M2*6mm screw and the other M2 nut to fasten the SSD.
That’s nice, but I don’t happen to have spare M.2 nuts with me, so instead I use the adapters and screws from the Waveshare kit, and it did the job.
Then I went ahead and ran the same stress and iozone commands.
The temperature was around 65-67°C. It’s cooler, but not significantly so. What’s good is that CPU throttling does not happen at all with either HAT and the active cooler does its job even when covered by a HAT. All tests were done in a room with an ambient temperature of around 30-32°C as my undersized air conditioner struggled to keep the room cool with an outdoor temperature of around 42°C… Here’s the thermal image with the GEEKWORM X1001 and the 256GB M.2 2242 SSD which shows the SSD is quite warmer at 63.4°C.
Conclusion
Cytron MAKERDISK M.2 NVMe SSDs work fine with the Raspberry Pi 5 using either GEEKWORM X1001 or Waveshare PCIE to M.2 HAT+ in PCIe Gen2 x1 (5GT/s) or PCIe Gen3 x1 (8GT/s) modes. The performance is about the same for all models since the Raspberry Pi 5’s PCIe interface is the bottleneck here even when configured as PCIe 3.0 x1.
The MAKERDISK NVMe SSDs are really convenient as they come pre-loaded with Raspberry Pi OS, so it will be a plug-and-play experience for most people. It was not quite the case for my board, probably because I got an early sample of the Raspberry Pi 5, and the EEPROM was not configured to boot NVMe by default, even after I upgraded the firmware.
Cytron is selling the M.2 NVMe 2280 M-Key MAKERDISK SSD for $37.25 to $81 depending on the selected capacity, and the M.2 NVMe 2242 MAKERDISK SSD for $32.50 (256GB). All come pre-loaded with a recent version of Raspberry Pi OS. Both HAT tested in the review can also be bought on Cytron, and alternatively, you’ll also find the GEEKWORM X1001 on Amazon ($15), and the Waveshare PCIe to M.2 HAT+ on Amazon ($14.60) or Aliexpress ($15.65).

Jean-Luc started CNX Software in 2010 as a part-time endeavor, before quitting his job as a software engineering manager, and starting to write daily news, and reviews full time later in 2011.
Support CNX Software! Donate via cryptocurrencies, become a Patron on Patreon, or purchase goods on Amazon or Aliexpress




> We’ll need to compile iozone from source since iozone3 is not available as a package
The package is in the ‘non-free’ repo that needs to be added first. And when testing PCIe on the RPi I would take care of the ASPM settings (that defaulted to powersave the last time I checked and harms performance)
I just used your link to pick up two of the Geekworm adapters. They should be here in a few days. I’ll try them with a few drives I have lying around. I have a 4GB and an 8GB Pi5. The 4 was purchased early on and the 8 just recently, so I’ll see if I can experience your issues with startup. I don’t think I’ve had the 4 online for a while, so it should still have relatively old firmware.
My older board had firmware “2023/10/30 16:45:10 30de0ba5 (release) (embedded)” and didn’t see the nvme. I updated it to “2024/02/16 15:28:41 4c845bd3 (release) (embedded)”
I did that too, but it would still not boot from the NVMe in my case. The SSD could be detected properly but was not part of the boot option until I also manually updated the EEPROM.
Ahh, I did not test that. I’m not interested in booting from NVME, but maybe I should be. It’ll free up some uSD cards–and I seem to be running low on them recently.
Raspberry Pi 5 can’t update EEPROM
you need restart every time