
After my review of the Wandboard Dual in February, I’ve now received Wanboard Quad development board powered by Freescale i.MX6 Quad Cortex A9 processor, with 2 GB RAM, HDMI output, Gigabit Ethernet, and SATA. The board is available from several distributors including Mouser ($139), DigiKey ($144.38) and FutureElectronics ($125). I’ll start by showing some unboxing pictures of the board, as well as pictures of Wandboard Dual and Quad side-by-side. Then I’ll explain how to install Android and Linux on the board, build the images from source, run some benchmarks, and test different features.
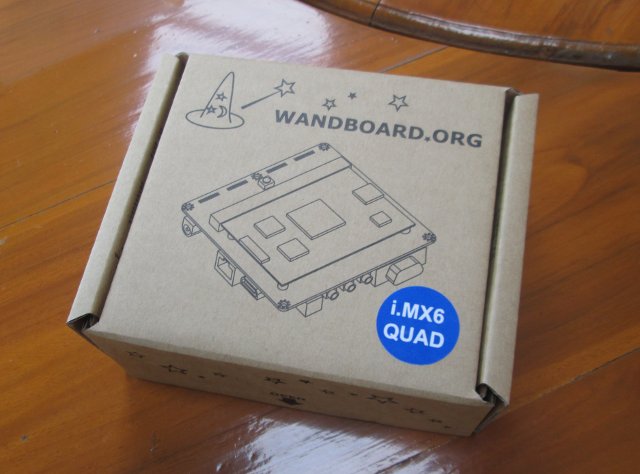
Wandboard Quad Unboxing
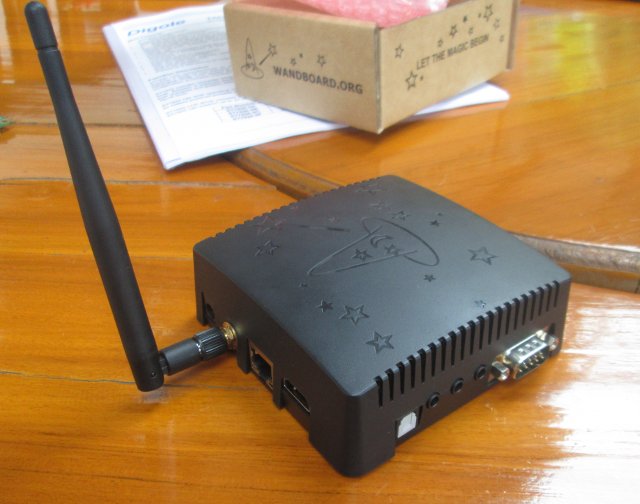
Ive received the board via UPS in a large box that contained the package below. This is exactly the same as Wandboard Dual, except for the sticker.
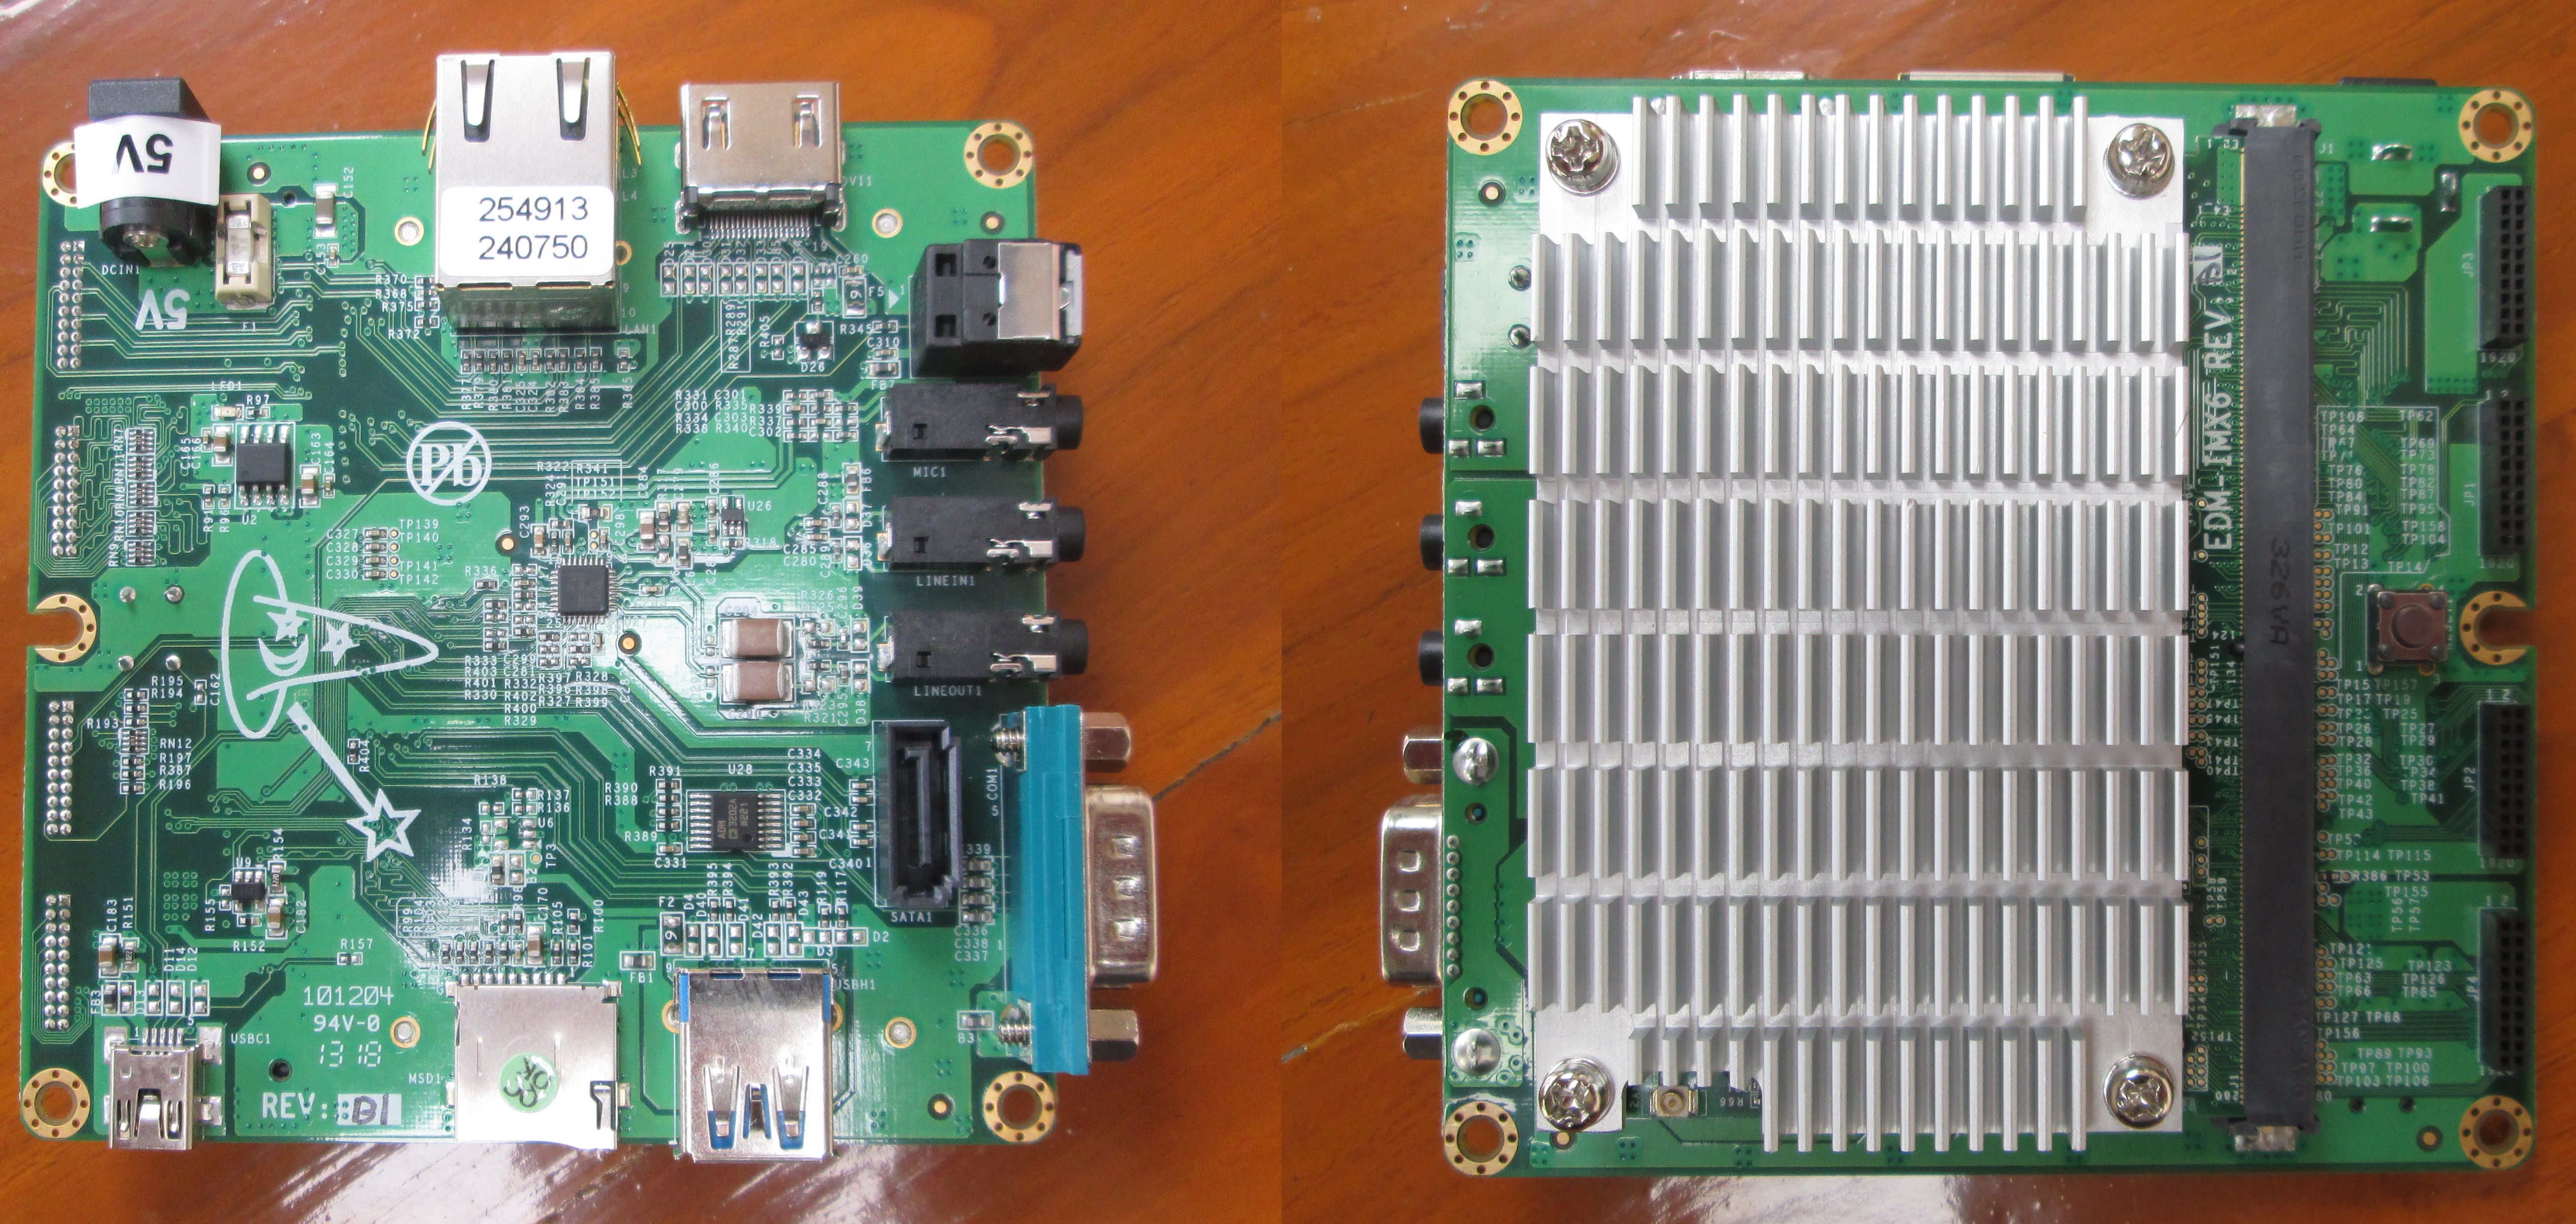
There’s just the board inside the package, and it would just look like Wandboard Dual with all connectors on the top, and the EDM module at the back, were it not for the massive heatsink to keep i.MX 6Quad cool. One other key difference is that the SATA connector is populated, and you can connect an hard drive. Since there’s no paper documentation, you may want to download and read Wandboard Quad user’s manual and schematics PDF for details.
I’ve taken a few picture with Wandboard Quad and Wandboard Dual side and side, and as expect both baseboards are virtually the same.
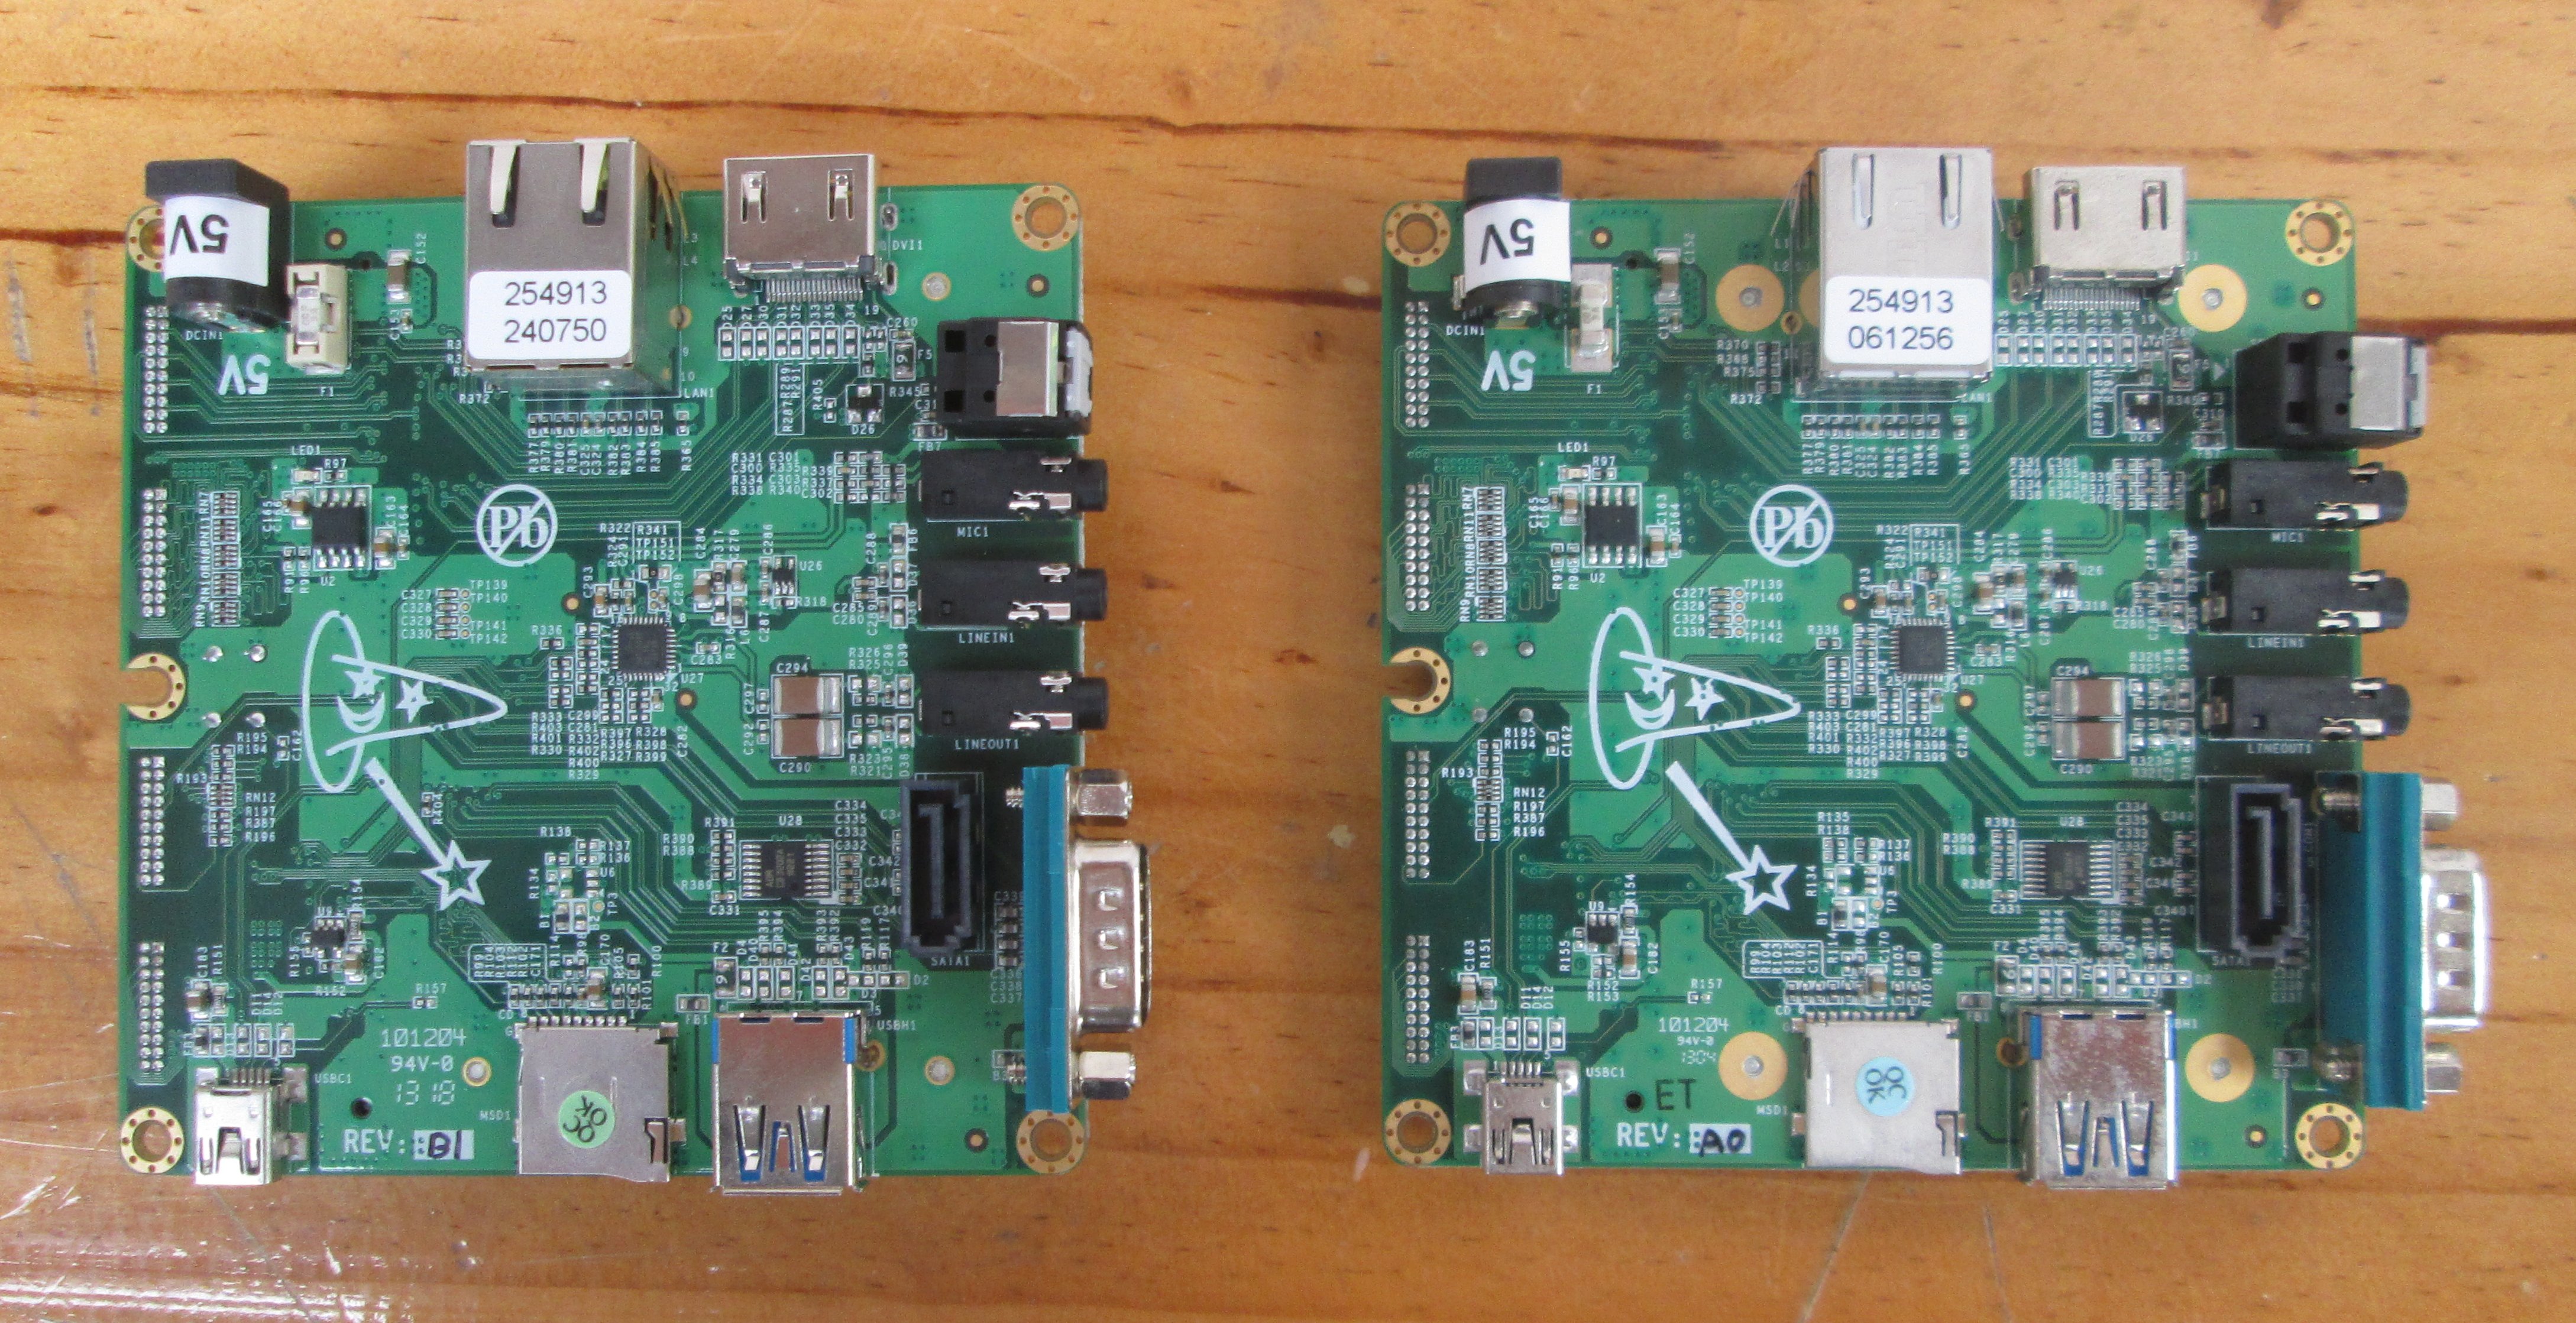
The older board (Revision A0) has been replaced with Revision B1 that fixes SPDIF wiring, updates MIPI voltage updated, slightly change USB circuitry, and adds an additional resistor pad option for playing with different I2C channels for audio/HDMI. Another difference is that the fuse is now easily replaceable without soldering involved. I assume all new Wandboard Solo/Dual/Quad now ship with Rev B1. Note that if you’ve got an older revision, there’s an hardware fix for SPDIF.
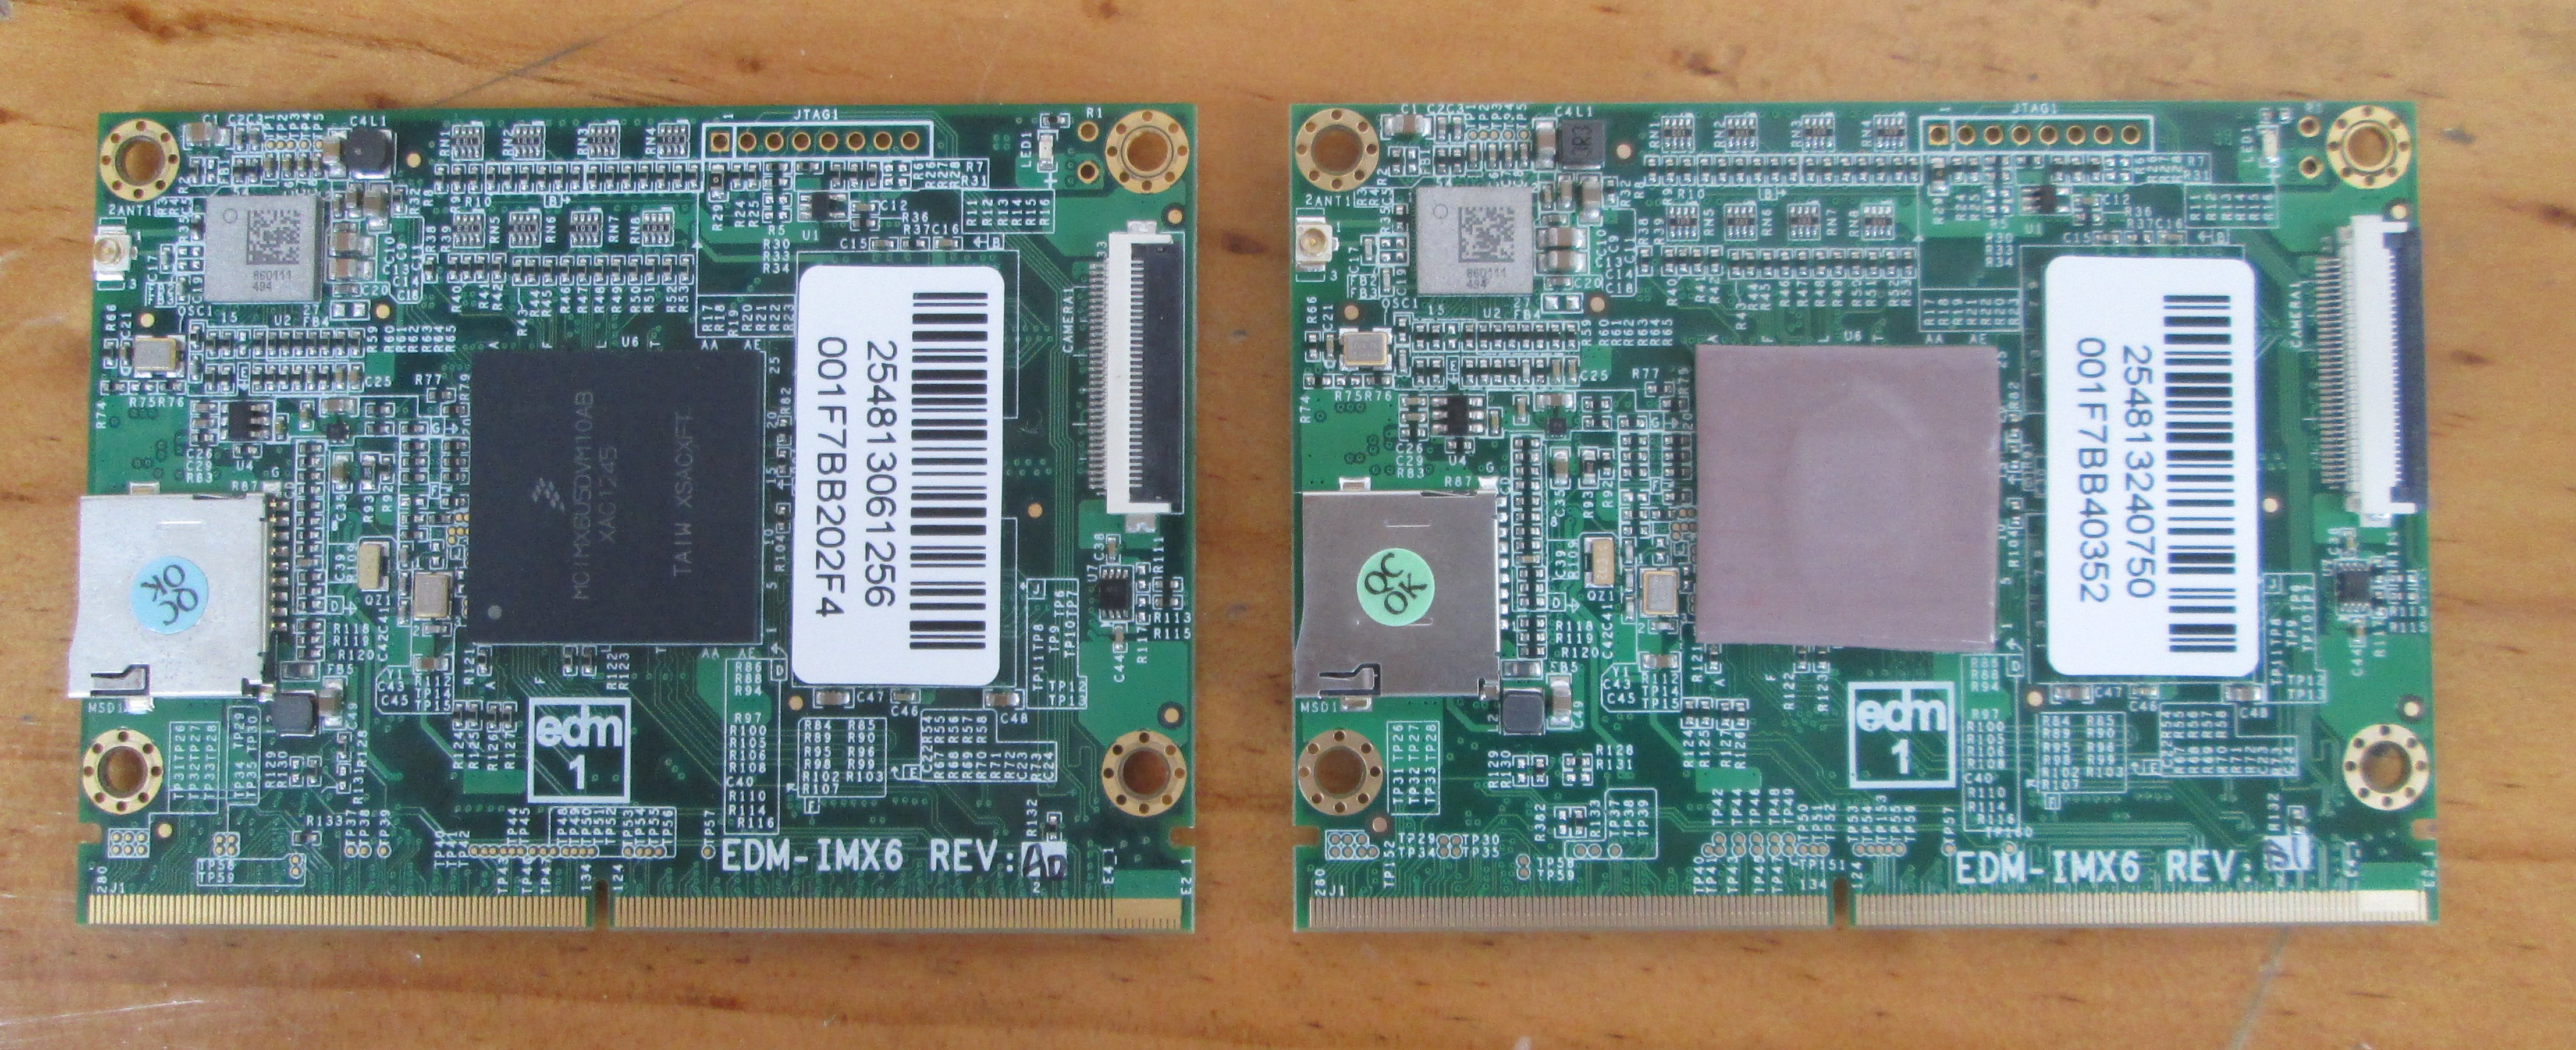
I’ve removed the heatsink, and taken the EDM module out of the baseboard, and there’s very little difference between the dual and quad modules.
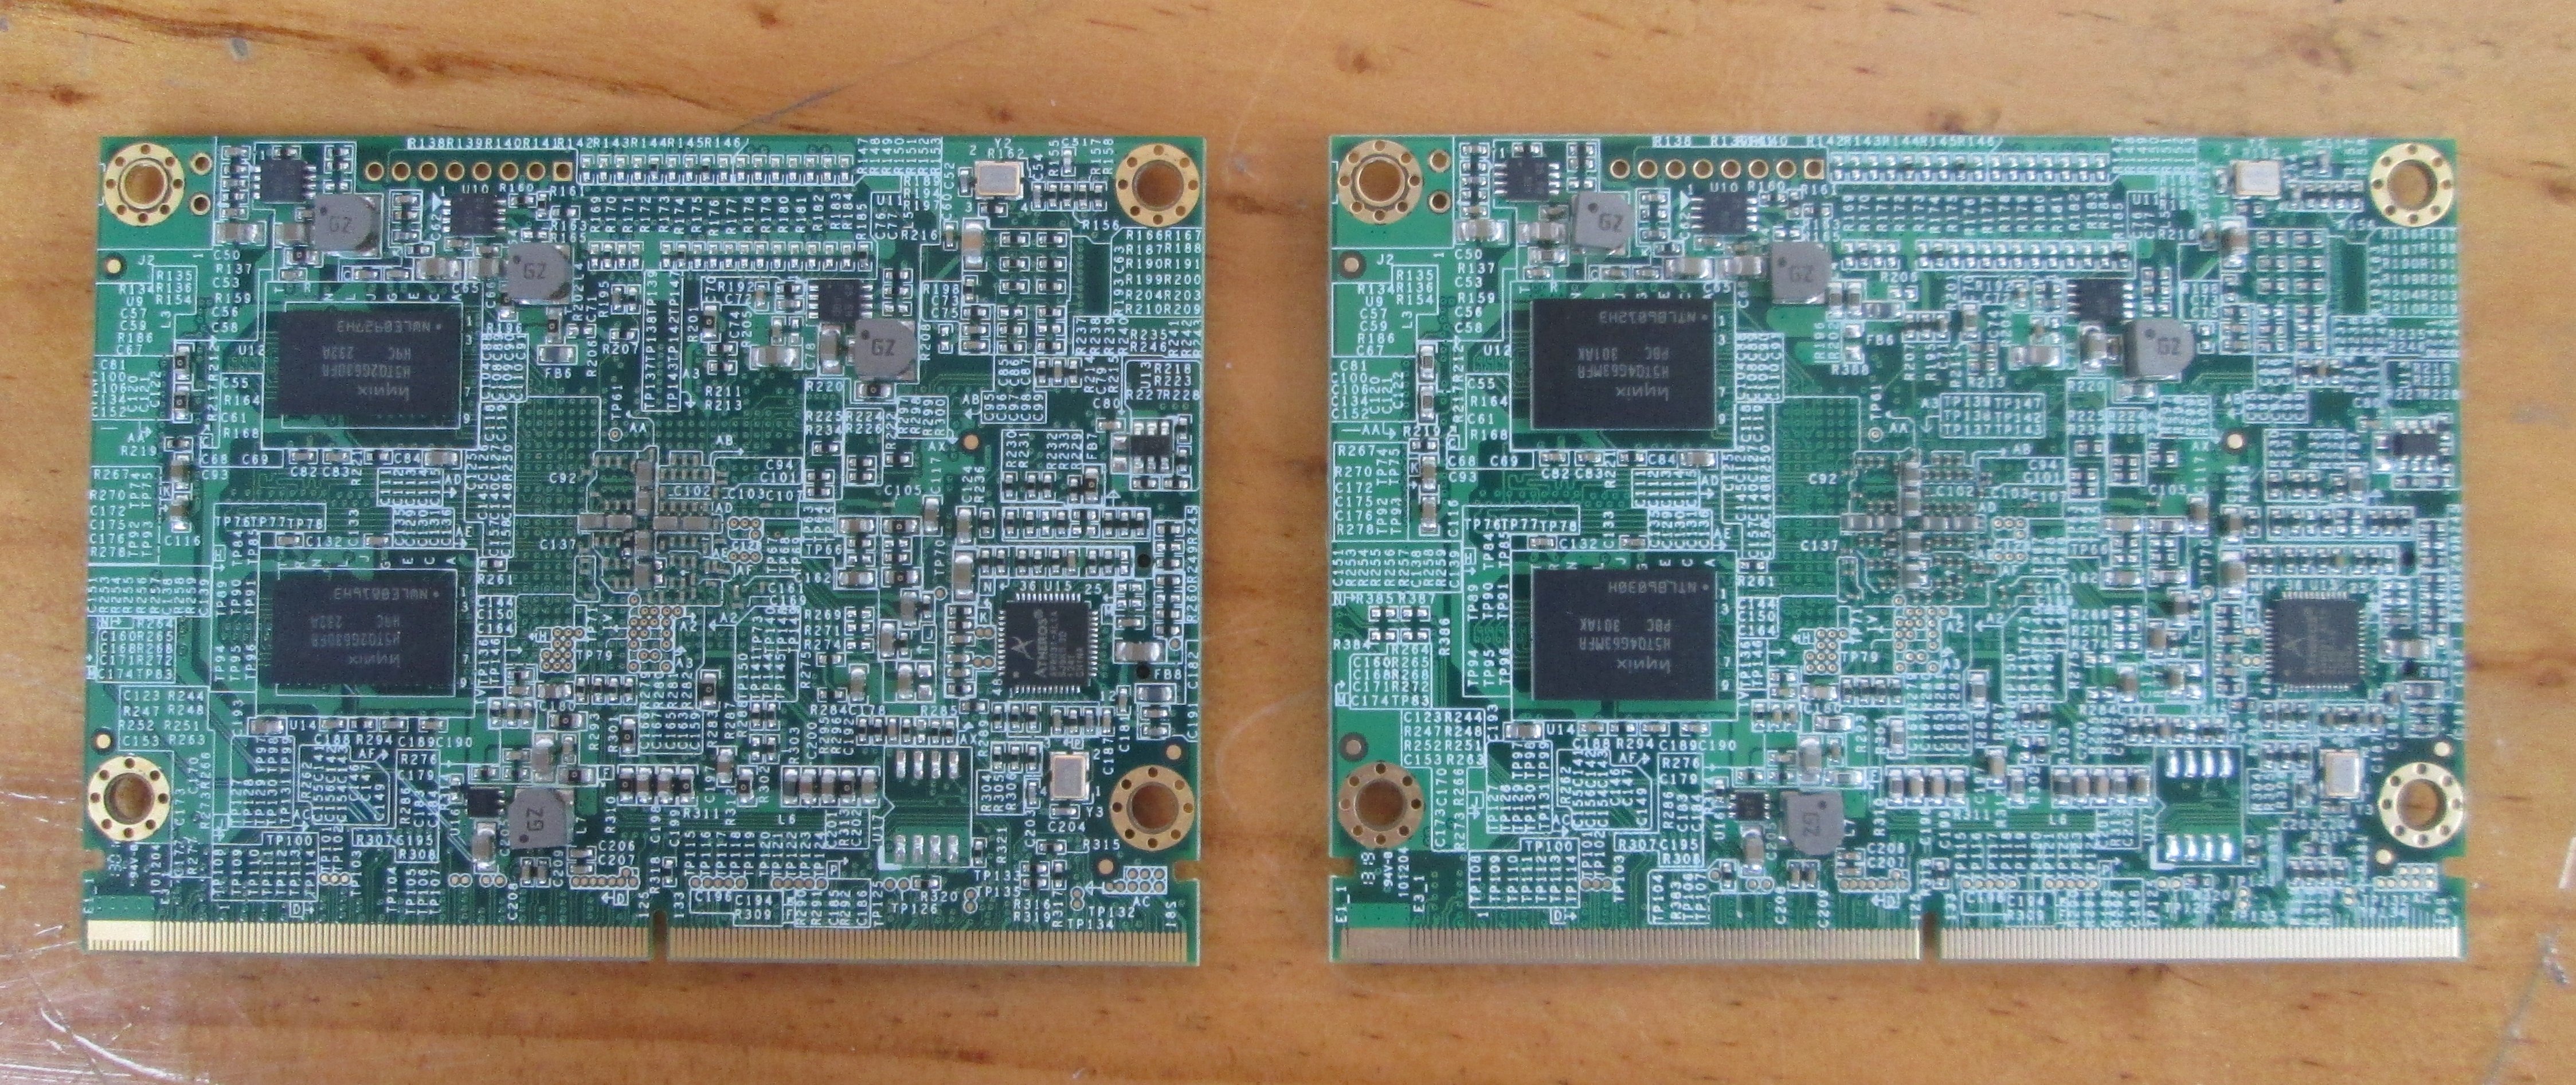
On the back of the module, the key differences are the memory chips: Hynix H5TQ4G63MFR (4Gbit) on the quad version, and Hynix H5TQ2G63BFR (2Gbit) on the dual version. On another note, I can often see people ask if they can buy the EDM module separately, and the answer is yes. The distributors I’ve mentioned at the top of the post sell the modules in pack of 10.
I also tried the casing and Wi-Fi antenna I got with my Wandboard Dual board, and assembly is not a problem despite the extra heatsink. The antenna cable will touch the heatsink, but I’ve been told it’s not an issue, as it’s isolated.
Installing Android 4.2.2 on Wandboard Quad
Let’s prepare a micro SD card with the latest Android 4.2.2 image. For optimal performance, make sure you use a Class 10 SD card (I’m using ADATA 16GB Class 10 micro SD for testing).
The installation is just the same as with Wandboard Dual, just a different image. Download and extract the file:
wget http://www.wandboard.org/images/downloads/android-4.2.2-wand-quad-20130621.zip
unzip android-4.2.2-wand-quad-20130621.zip
There are 4 files in the archive: The image itself, a short changelog, win32diskimager, and “Source_and_Build_Simple_Howtos.txt”, an how-to explaining how to build Android from source, install Google Play, and flash the image to an SD card.
Insert a micro SD card in your Linux PC (8GB or greater), umount the partition, and flash the image:
|
1 2 3 4 |
sudo umount /dev/sdc* sudo dd if=/dev/zero of=/dev/sdc sudo dd if=android-4.2.2-wand-quad-20130621.img of=/dev/sdc bs=1M sync |
The second line is optional, but I had to do this, or Ubuntu would just remount the partitions, and the final dd would fail. I just run “sudo dd if=/dev/zero…” for a few seconds and press control+C.
If you need Google Play, there are a few more steps. Remove and re-insert the micro SD card, download and extract gapps-jb-20130301-signed.zip, and copy Google Play to the micro SD:
|
1 2 3 4 5 6 |
cd ~/ mkdir gapps-jb cd gapps-jb unzip gapps-jb-20130301-signed.zip sudo cp ~/gapps-jb/system/* /media/system/ -rf sync |
If you’re using Windows, you can use Win32DiskImager to flash the image, and adb.exe to transfer Google Play framework to the board, but since you’re using a Linux based system, I really recommend you install Linux, either in dual boot configuration with Windows, or as a virtual machine (e.g. Virtual Box).
Create an Android 4.2.2 Image from source for Wandboard Quad
I haven’t tried this myself, but those are the steps mentioned in the How-to:
|
1 2 3 4 5 6 7 |
cd ~ mkdir -p wandboard/myandroid cd wandboard/myandroid curl https://dl-ssl.google.com/dl/googlesource/git-repo/repo > ./repo chmod a+x ./repo ./repo init -u git://www.wandboard.org/android/manifest.git -m default.xml ./repo sync -j4 |
Now copy google gapps-jb-20130301-signed.zip to ~/wandboard/Build, and start the build:
|
1 2 |
source build/envsetup.sh lunch wandboard-userdebug |
Lunch will take a while :), and once this is done you are ready to create an SD card with the right partitions:
|
1 2 |
cd ~/wandboard/myandroid/device/fsl/common/tools/ sudo ./fsl-sdcard-partition.sh /dev/sdX |
and copy the binaries:
|
1 2 3 4 5 6 7 8 9 10 11 |
chmod 6755 ~/wandboard/myandroid/out/target/product/wandboard/system/xbin/su sudo umount /dev/sdX* sudo dd if=~/wandboard/myandroid/out/target/product/wandboard/u-boot-6quad.bin of=/dev/sdX bs=1K seek=1 skip=1 sudo dd if=~/wandboard/myandroid/out/target/product/wandboard/boot.img of=/dev/sdX1 sudo dd if=~/wandboard/myandroid/out/target/product/wandboard/recover.img of=/dev/sdX2 sudo mount -t ext4 /dev/sdX5 /mnt sudo cp -a ~/wandboard/myandroid/out/target/product/wandboard/system/* /mnt/ sudo unzip ~/wandboard/gapps-jb-20130301-signed.zip -d /tmp/ sudo cp -a /tmp/system/* /mnt/ sudo sync sudo umount /dev/sdX |
You’ve now built and installed Android 4.2.2 image for Wandboard Quad from source all by yourself.
Android 4.2.2 in Wandboard Quad and Antutu & Quadrant Benchmarks
Let’s insert the micro SD in the EDM module slot (under the heatsink), connect an HDMI, Ethernet and serial NULL modem cable, some input device (Mele F10 receiver in the picture below), and the power supply. The most natural way may be to put the heatsink on the table, and have easy access to the connectors as shown below.
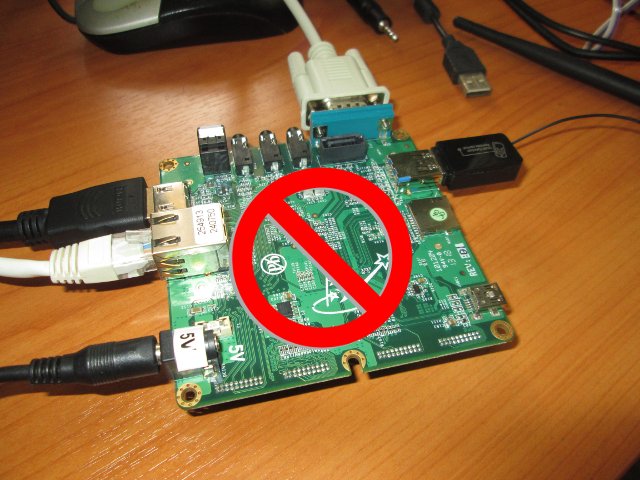
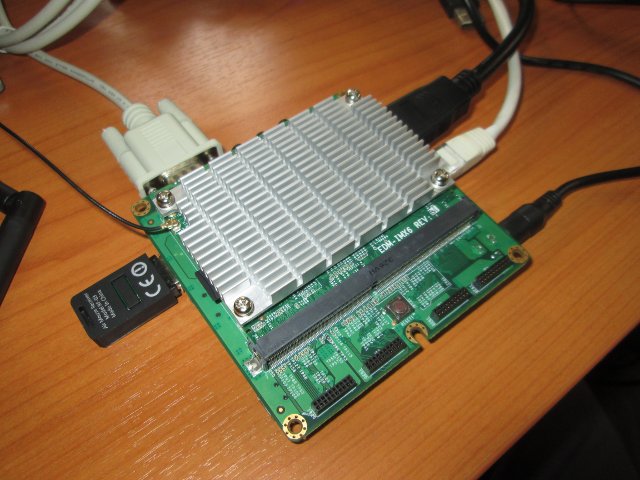
But don’t do that, it will prevent proper heat dissipation, and your board will overheat and hang. Instead make sure the heatsink points to the ceiling as shown below. In this configuration, I’ve measured 52 degrees Celcius at idle time, and 56 degrees Celcius during benchmarks by pointing an IR Thermometer to the heatsink.
If you don’t have a DB9 serial port on your PC, you’ll need an RS232 to USB converter to access the serial console. via programs such as Putty or Minicom. This is what the boot log looks like for Wandboard Quad.
|
1 2 3 4 5 6 7 8 9 10 11 12 13 14 15 16 17 18 19 20 21 22 23 24 25 26 27 28 29 30 31 32 33 34 35 36 37 38 39 40 41 42 43 44 45 46 47 48 49 50 51 52 53 54 55 56 57 58 59 60 61 62 63 64 65 66 67 68 69 70 71 72 73 74 75 76 77 78 79 80 81 82 83 84 85 86 87 88 89 90 91 92 93 94 95 96 97 98 99 100 101 102 103 104 105 106 107 108 109 110 111 112 113 114 115 116 117 118 119 120 121 122 123 124 125 126 127 128 129 130 131 132 133 134 135 136 137 138 139 140 141 142 143 144 145 146 147 148 149 150 151 152 153 154 155 156 157 158 159 160 161 162 163 164 165 166 167 168 169 170 171 172 173 174 175 176 177 178 179 180 181 182 183 184 185 186 187 188 189 190 191 192 193 194 195 196 197 198 199 200 201 202 203 204 205 206 207 208 209 210 211 212 213 214 215 216 217 218 219 220 221 222 223 224 225 226 227 228 229 230 231 232 233 234 235 236 237 238 239 240 241 242 243 244 245 246 247 248 249 250 251 252 253 254 255 256 257 258 259 260 261 262 263 264 265 266 267 268 269 270 271 272 273 274 275 276 277 278 279 280 281 282 283 284 285 286 287 288 289 290 291 292 293 294 295 296 297 298 299 300 301 302 303 304 305 306 307 308 309 310 311 312 313 314 315 316 317 318 319 320 321 322 323 324 325 326 327 328 329 330 331 332 333 334 335 336 337 338 339 340 341 342 343 344 345 346 347 348 349 350 351 352 353 354 355 356 357 358 |
U-Boot 2009.08-00680-g31492f7 (Jun 21 2013 - 15:01:11) CPU: Freescale i.MX6 family TO1.2 at 792 MHz Thermal sensor with ratio = 182 Temperature: 31 C, calibration data 0x5834f469 mx6q pll1: 792MHz mx6q pll2: 528MHz mx6q pll3: 480MHz mx6q pll8: 50MHz ipg clock : 66000000Hz ipg per clock : 66000000Hz uart clock : 80000000Hz cspi clock : 60000000Hz ahb clock : 132000000Hz axi clock : 264000000Hz emi_slow clock: 132000000Hz ddr clock : 528000000Hz usdhc1 clock : 198000000Hz usdhc2 clock : 198000000Hz usdhc3 clock : 198000000Hz usdhc4 clock : 198000000Hz nfc clock : 24000000Hz Board: i.MX6Q-WandBoard: unknown-board Board: 0x63012 [WDOG ] Boot Device: SD DRAM: 2 GB MMC: FSL_USDHC: 0,FSL_USDHC: 1,FSL_USDHC: 2 In: serial Out: serial Err: serial Gotr MAC = 00:1F:7B:B4:03:52 Net: got MAC address from IIM: 00:1f:7b:b4:03:52 FEC0 [PRIME] Hit any key to stop autoboot: 0 kernel @ 10808000 (2775196) ramdisk @ 11800000 (186440) kernel cmdline: use uboot command line: console=ttymxc0,115200 init=/init video=mxcfb0:dev=hdmi,1280x720M@60,if Starting kernel ... [ 0.000000] Linux version 3.0.35+ (root@lucid-q9650) (gcc version 4.6.x-goog3 [ 0.000000] CPU: ARMv7 Processor [412fc09a] revision 10 (ARMv7), cr=10c53c7d [ 0.000000] CPU: VIPT nonaliasing data cache, VIPT aliasing instruction cache [ 0.000000] Machine: Freescale i.MX 6Quad/DualLite/Solo Wandboard [ 0.000000] EDWARD : ram console init at phys 0x3ff00000 [ 0.000000] EDWARD : GPU_Reserved Memory equals to 184549376 [ 0.000000] EDWARD : gpumem init at phys 0x15000000 [ 0.000000] Memory policy: ECC disabled, Data cache writealloc [ 0.000000] CPU identified as i.MX6Q, silicon rev 1.2 [ 0.000000] PERCPU: Embedded 7 pages/cpu @816d8000 s5696 r8192 d14784 u32768 [ 0.000000] Built 1 zonelists in Zone order, mobility grouping on. Total pa2 [ 0.000000] Kernel command line: console=ttymxc0,115200 init=/init video=mxc0 [ 0.000000] PID hash table entries: 4096 (order: 2, 16384 bytes) [ 0.000000] Dentry cache hash table entries: 262144 (order: 8, 1048576 bytes) [ 0.000000] Inode-cache hash table entries: 131072 (order: 7, 524288 bytes) [ 0.000000] Memory: 80MB 511MB 980MB = 1571MB total [ 0.000000] Memory: 1583444k/1583444k available, 251564k reserved, 331776K hm [ 0.000000] Virtual kernel memory layout: [ 0.000000] vector : 0xffff0000 - 0xffff1000 ( 4 kB) [ 0.000000] fixmap : 0xfff00000 - 0xfffe0000 ( 896 kB) [ 0.000000] DMA : 0xfbe00000 - 0xffe00000 ( 64 MB) [ 0.000000] vmalloc : 0xd9800000 - 0xf2000000 ( 392 MB) [ 0.000000] lowmem : 0x80000000 - 0xd9000000 (1424 MB) [ 0.000000] pkmap : 0x7fe00000 - 0x80000000 ( 2 MB) [ 0.000000] modules : 0x7f000000 - 0x7fe00000 ( 14 MB) [ 0.000000] .init : 0x80008000 - 0x8003d000 ( 212 kB) [ 0.000000] .text : 0x8003d000 - 0x80731000 (7120 kB) [ 0.000000] .data : 0x80732000 - 0x8077f960 ( 311 kB) [ 0.000000] .bss : 0x8077f984 - 0x808ca628 (1324 kB) [ 0.000000] SLUB: Genslabs=13, HWalign=32, Order=0-3, MinObjects=0, CPUs=4, 1 [ 0.000000] Preemptible hierarchical RCU implementation. [ 0.000000] NR_IRQS:624 [ 0.000000] MXC GPIO hardware [ 0.000000] sched_clock: 32 bits at 3000kHz, resolution 333ns, wraps every 1s [ 0.000000] arm_max_freq=1GHz [ 0.000000] MXC_Early serial console at MMIO 0x2020000 (options '115200') [ 0.000000] bootconsole [ttymxc0] enabled [ 0.000000] Console: colour dummy device 80x30 [ 0.243222] Calibrating delay loop... 1581.05 BogoMIPS (lpj=7905280) [ 0.331568] pid_max: default: 32768 minimum: 301 [ 0.336467] Mount-cache hash table entries: 512 [ 0.341798] CPU: Testing write buffer coherency: ok [ 0.447483] CPU1: Booted secondary processor [ 0.527482] CPU2: Booted secondary processor [ 0.607489] CPU3: Booted secondary processor [ 0.646998] Brought up 4 CPUs [ 0.662829] SMP: Total of 4 processors activated (6324.22 BogoMIPS). [ 0.687305] print_constraints: dummy: [ 0.691296] NET: Registered protocol family 16 [ 0.699695] print_constraints: vddpu: 725 1300 mV at 700 mV fast normal [ 0.707187] print_constraints: vddcore: 725 1300 mV at 1150 mV fast nor [ 0.714891] print_constraints: vddsoc: 725 1300 mV at 1200 mV fast norm [ 0.722536] print_constraints: vdd2p5: 2000 2775 mV at 2400 mV fast nor [ 0.730287] print_constraints: vdd1p1: 800 1400 mV at 1100 mV fast norm [ 0.737942] print_constraints: vdd3p0: 2625 3400 mV at 3000 mV fast nor [ 0.747977] ram_console: got buffer at 3ff00000, size 100000 [ 0.753762] ram_console: found existing buffer, size 21339, start 21339 [ 0.818042] console [ram-1] enabled [ 0.901332] L310 cache controller enabled [ 0.905466] l2x0: 16 ways, CACHE_ID 0x410000c7, AUX_CTRL 0x02070000, Cache sB [ 0.949061] bio: create slab at 0 [ 0.956508] mxs-dma mxs-dma-apbh: initialized [ 0.961465] print_constraints: VDDA: 2500 mV [ 0.966145] print_constraints: VDDIO: 3300 mV [ 0.971684] SCSI subsystem initialized [ 0.976016] libata version 3.00 loaded. [ 0.980320] spi_imx imx6q-ecspi.0: probed [ 0.984703] spi_imx imx6q-ecspi.1: probed [ 0.989693] usbcore: registered new interface driver usbfs [ 0.995460] usbcore: registered new interface driver hub [ 1.001158] usbcore: registered new device driver usb [ 1.006324] Freescale USB OTG Driver loaded, $Revision: 1.55 $ [ 1.026995] imx-ipuv3 imx-ipuv3.0: IPU DMFC NORMAL mode: 1(0~1), 5B(4,5), 5F) [ 1.046992] imx-ipuv3 imx-ipuv3.1: IPU DMFC NORMAL mode: 1(0~1), 5B(4,5), 5F) [ 1.055056] Advanced Linux Sound Architecture Driver Version 1.0.24. [ 1.062464] Bluetooth: Core ver 2.16 [ 1.066342] NET: Registered protocol family 31 [ 1.070912] Bluetooth: HCI device and connection manager initialized [ 1.077475] Bluetooth: HCI socket layer initialized [ 1.082467] Bluetooth: L2CAP socket layer initialized [ 1.087726] Bluetooth: SCO socket layer initialized [ 1.093168] cfg80211: Calling CRDA to update world regulatory domain [ 1.100771] Switching to clocksource mxc_timer1 [ 1.118543] NET: Registered protocol family 2 [ 1.123255] IP route cache hash table entries: 65536 (order: 6, 262144 bytes) [ 1.131684] TCP established hash table entries: 262144 (order: 9, 2097152 by) [ 1.143019] TCP bind hash table entries: 65536 (order: 7, 786432 bytes) [ 1.150846] TCP: Hash tables configured (established 262144 bind 65536) [ 1.157669] TCP reno registered [ 1.160924] UDP hash table entries: 1024 (order: 3, 32768 bytes) [ 1.167192] UDP-Lite hash table entries: 1024 (order: 3, 32768 bytes) [ 1.174160] NET: Registered protocol family 1 [ 1.179025] RPC: Registered named UNIX socket transport module. [ 1.185066] RPC: Registered udp transport module. [ 1.189975] RPC: Registered tcp transport module. [ 1.194791] RPC: Registered tcp NFSv4.1 backchannel transport module. [ 1.201597] Unpacking initramfs... [ 1.219939] Freeing initrd memory: 180K [ 1.223935] _regulator_get: etb supply vcore not found, using dummy regulator [ 1.231794] _regulator_get: etm.0 supply vcore not found, using dummy regular [ 1.239313] _regulator_get: etm.1 supply vcore not found, using dummy regular [ 1.246906] _regulator_get: etm.2 supply vcore not found, using dummy regular [ 1.254477] _regulator_get: etm.3 supply vcore not found, using dummy regular [ 1.262258] Static Power Management for Freescale i.MX6 [ 1.267691] wait mode is disabled for i.MX6 [ 1.272156] cpaddr = d9880000 suspend_iram_base=d98f4000 [ 1.277764] PM driver module loaded [ 1.281590] IMX usb wakeup probe [ 1.284998] the wakeup pdata is 0xd614b000 [ 1.289678] add wake up source irq 75 [ 1.297067] IMX usb wakeup probe [ 1.300461] the wakeup pdata is 0xd6275080 [ 1.305174] rfkill: BT RF going to : on [ 1.309135] wandboard_bt_on [ 1.312042] mxc_bt_rfkill driver success loaded [ 1.316913] cpu regulator mode:ldo_enable [ 1.321287] i.MXC CPU frequency driver [ 1.344148] highmem bounce pool size: 64 pages [ 1.348976] ashmem: initialized [ 1.363024] NTFS driver 2.1.30 [Flags: R/O]. [ 1.367973] fuse init (API version 7.16) [ 1.372577] msgmni has been set to 2445 [ 1.377300] NET: Registered protocol family 38 [ 1.381995] cryptodev: driver loaded. [ 1.385842] io scheduler noop registered [ 1.389853] io scheduler deadline registered [ 1.394279] io scheduler cfq registered (default) [ 1.400306] mxc_sdc_fb mxc_sdc_fb.0: register mxc display driver hdmi [ 1.406915] mxc_hdmi mxc_hdmi: Detected HDMI controller 0x13:0xa:0xa0:0xc1 [ 1.413971] fbcvt: 1280x720@60: CVT Name - .921M9 [ 1.485514] imx-ipuv3 imx-ipuv3.1: IPU DMFC DP HIGH RESOLUTION: 1(0,1), 5B(2) [ 1.496398] mxc_sdc_fb mxc_sdc_fb.1: Can't get fb option for mxcfb1! [ 1.502937] mxc_sdc_fb mxc_sdc_fb.2: Can't get fb option for mxcfb2! [ 1.510055] imx-sdma imx-sdma: loaded firmware 1.1 [ 1.519332] imx-sdma imx-sdma: initialized [ 1.523846] Serial: IMX driver [ 1.527081] imx-uart.0: ttymxc0 at MMIO 0x2020000 (irq = 58) is a IMX [ 1.533706] console [ttymxc0] enabled, bootconsole disabled [ 1.533706] console [ttymxc0] enabled, bootconsole disabled [ 1.544972] fbcvt: 1280x720@60: CVT Name - .921M9 [ 1.545204] imx-uart.2: ttymxc2 at MMIO 0x21ec000 (irq = 60) is a IMX [ 1.556853] ion: failed to create debug files. [ 1.560133] loop: module loaded [ 1.603277] No sata disk. [ 1.603496] vcan: Virtual CAN interface driver [ 1.603507] CAN device driver interface [ 1.603524] FEC Ethernet Driver [ 1.605421] fec_enet_mii_bus: probed [ 1.606381] PPP generic driver version 2.4.2 [ 1.606651] PPP Deflate Compression module registered [ 1.606661] PPP BSD Compression module registered [ 1.607038] PPP MPPE Compression module registered [ 1.607049] NET: Registered protocol family 24 [ 1.607078] PPTP driver version 0.8.5 [ 1.607557] usbcore: registered new interface driver asix [ 1.607694] usbcore: registered new interface driver cdc_ether [ 1.607819] usbcore: registered new interface driver smsc75xx [ 1.607948] usbcore: registered new interface driver smsc95xx [ 1.608068] usbcore: registered new interface driver MOSCHIP usb-ethernet drr [ 1.608139] ehci_hcd: USB 2.0 'Enhanced' Host Controller (EHCI) Driver [ 1.608302] fsl-ehci fsl-ehci.0: Freescale On-Chip EHCI Host Controller [ 1.608407] fsl-ehci fsl-ehci.0: new USB bus registered, assigned bus number1 [ 1.635469] fsl-ehci fsl-ehci.0: irq 75, io base 0x02184000 [ 1.655457] fsl-ehci fsl-ehci.0: USB 2.0 started, EHCI 1.00 [ 1.656002] hub 1-0:1.0: USB hub found [ 1.656021] hub 1-0:1.0: 1 port detected [ 1.656233] add wake up source irq 72 [ 1.656281] fsl-ehci fsl-ehci.1: Freescale On-Chip EHCI Host Controller [ 1.656310] fsl-ehci fsl-ehci.1: new USB bus registered, assigned bus number2 [ 1.685466] fsl-ehci fsl-ehci.1: irq 72, io base 0x02184200 [ 1.705456] fsl-ehci fsl-ehci.1: USB 2.0 started, EHCI 1.00 [ 1.705949] hub 2-0:1.0: USB hub found [ 1.705965] hub 2-0:1.0: 1 port detected [ 1.706186] Initializing USB Mass Storage driver... [ 1.706369] usbcore: registered new interface driver usb-storage [ 1.706378] USB Mass Storage support registered. [ 1.706628] usbcore: registered new interface driver usbserial [ 1.706638] usbserial: USB Serial Driver core [ 1.706741] USB Serial support registered for GSM modem (1-port) [ 1.706940] usbcore: registered new interface driver option [ 1.706949] option: v0.7.2:USB Driver for GSM modems [ 1.707055] USB Serial support registered for Qualcomm USB modem [ 1.707196] usbcore: registered new interface driver qcserial [ 1.707206] ARC USBOTG Device Controller driver (1 August 2005) [ 1.852007] android_usb gadget: Mass Storage Function, version: 2009/09/11 [ 1.852022] android_usb gadget: Number of LUNs=1 [ 1.852031] lun0: LUN: removable file: (no medium) [ 1.852505] Gadget Android: controller 'fsl-usb2-udc' not recognized [ 1.852520] android_usb gadget: android_usb ready [ 1.852528] Suspend udc for OTG auto detect [ 1.852540] USB Host suspend begins [ 1.852546] will suspend roothub and its children [ 1.852567] ehci_fsl_bus_suspend begins, DR [ 1.852589] ehci_fsl_bus_suspend ends, DR [ 1.852604] host suspend ends [ 1.852614] USB Gadget resume begins [ 1.852620] fsl_udc_resume, Wait for wakeup thread finishes [ 1.865467] dr_controller_run: udc out low power mode [ 1.865478] USB Gadget resume ends [ 1.865486] fsl-usb2-udc: bind to driver android_usb [ 1.865779] mousedev: PS/2 mouse device common for all mice [ 1.866561] i2c /dev entries driver [ 1.867088] Linux video capture interface: v2.00 [ 1.867400] mxc_v4l2_output mxc_v4l2_output.0: V4L2 device registered as vid6 [ 1.867583] mxc_v4l2_output mxc_v4l2_output.0: V4L2 device registered as vid7 [ 1.867815] usbcore: registered new interface driver uvcvideo [ 1.867823] USB Video Class driver (v1.1.0) [ 1.868063] imx2-wdt imx2-wdt.0: IMX2+ Watchdog Timer enabled. timeout=60s () [ 1.868167] Bluetooth: Virtual HCI driver ver 1.3 [ 1.868313] Bluetooth: HCI UART driver ver 2.2 [ 1.868322] Bluetooth: HCI H4 protocol initialized [ 1.868330] Bluetooth: Generic Bluetooth USB driver ver 0.6 [ 1.868459] usbcore: registered new interface driver btusb [ 2.000029] cpuidle: using governor ladder [ 2.000037] cpuidle: using governor menu [ 2.000178] sdhci: Secure Digital Host Controller Interface driver [ 2.000187] sdhci: Copyright(c) Pierre Ossman [ 2.000325] _regulator_get: sdhci-esdhc-imx.2 supply vmmc not found, using dr [ 2.000539] mmc0: SDHCI controller on platform [sdhci-esdhc-imx.2] using DMA [ 2.001609] _regulator_get: sdhci-esdhc-imx.1 supply vmmc not found, using dr [ 2.003900] mmc1: SDHCI controller on platform [sdhci-esdhc-imx.1] using DMA [ 2.003957] sdhci sdhci-esdhc-imx.0: no write-protect pin available! [ 2.004996] _regulator_get: sdhci-esdhc-imx.0 supply vmmc not found, using dr [ 2.007207] mmc2: SDHCI controller on platform [sdhci-esdhc-imx.0] using DMA [ 2.007423] mxc_vdoa mxc_vdoa: i.MX Video Data Order Adapter(VDOA) driver prd [ 2.008055] VPU initialized [ 2.008950] mxc_asrc registered [ 2.028113] revserved_memory_account:viv_gpu registerd [ 2.028637] Thermal calibration data is 0x5834f469 [ 2.028646] Thermal sensor with ratio = 182 [ 2.045599] Anatop Thermal registered as thermal_zone0 [ 2.045761] anatop_thermal_probe: default cooling device is cpufreq! [ 2.047103] usbcore: registered new interface driver usbhid [ 2.047112] usbhid: USB HID core driver [ 2.047452] logger: created 256K log 'log_main' [ 2.047595] logger: created 256K log 'log_events' [ 2.047733] logger: created 256K log 'log_radio' [ 2.047876] logger: created 256K log 'log_system' [ 2.048097] zram: num_devices not specified. Using default: 1 [ 2.048106] zram: Creating 1 devices ... [ 2.049223] mxc_hdmi_soc mxc_hdmi_soc.0: MXC HDMI Audio [ 2.049375] mxc_spdif mxc_spdif.0: MXC SPDIF Audio [ 2.051340] _regulator_get: 1-000a supply VDDD not found, using dummy regular [ 2.052353] sgtl5000 1-000a: sgtl5000 revision 17 [ 2.052518] print_constraints: 1-000a: 850 1600 mV at 1200 mV normal [ 2.115469] usb 2-1: new full speed USB device number 2 using fsl-ehci [ 2.264122] asoc: sgtl5000 imx-ssi.1 mapping ok [ 2.270995] asoc: mxc-spdif imx-spdif-dai.0 mapping ok [ 2.278087] asoc: mxc-hdmi-soc imx-hdmi-soc-dai.0 mapping ok [ 2.284777] ALSA device list: [ 2.287891] #0: sgtl5000-audio [ 2.291304] #1: imx-spdif [ 2.294238] #2: imx-hdmi-soc [ 2.297488] GACT probability NOT on [ 2.301089] Mirror/redirect action on [ 2.304928] u32 classifier [ 2.307763] Actions configured [ 2.311289] Netfilter messages via NETLINK v0.30. [ 2.316214] nf_conntrack version 0.5.0 (16384 buckets, 65536 max) [ 2.323308] ctnetlink v0.93: registering with nfnetlink. [ 2.328838] NF_TPROXY: Transparent proxy support initialized, version 4.1.0 [ 2.335914] NF_TPROXY: Copyright (c) 2006-2007 BalaBit IT Ltd. [ 2.342486] xt_time: kernel timezone is -0000 [ 2.347853] IPv4 over IPv4 tunneling driver [ 2.353225] GRE over IPv4 demultiplexor driver [ 2.358434] ip_tables: (C) 2000-2006 Netfilter Core Team [ 2.364286] arp_tables: (C) 2002 David S. Miller [ 2.367196] mmc0: new high speed SDHC card at address 59b4 [ 2.374713] mmcblk0: mmc0:59b4 SD 14.7 GiB [ 2.374735] TCP cubic registered [ 2.375732] NET: Registered protocol family 10 [ 2.380337] Mobile IPv6 [ 2.380375] ip6_tables: (C) 2000-2006 Netfilter Core Team [ 2.380627] IPv6 over IPv4 tunneling driver [ 2.385549] NET: Registered protocol family 17 [ 2.385583] NET: Registered protocol family 15 [ 2.385591] can: controller area network core (rev 20090105 abi 8) [ 2.385692] NET: Registered protocol family 29 [ 2.385702] can: raw protocol (rev 20090105) [ 2.385709] can: broadcast manager protocol (rev 20090105 t) [ 2.385799] Bluetooth: RFCOMM TTY layer initialized [ 2.385810] Bluetooth: RFCOMM socket layer initialized [ 2.385817] Bluetooth: RFCOMM ver 1.11 [ 2.385825] Bluetooth: BNEP (Ethernet Emulation) ver 1.3 [ 2.385832] Bluetooth: BNEP filters: protocol multicast [ 2.385841] Bluetooth: HIDP (Human Interface Emulation) ver 1.2 [ 2.386018] L2TP core driver, V2.0 [ 2.386037] PPPoL2TP kernel driver, V2.0 [ 2.386043] L2TP IP encapsulation support (L2TPv3) [ 2.386246] L2TP netlink interface [ 2.386271] L2TP ethernet pseudowire support (L2TPv3) [ 2.386279] lib80211: common routines for IEEE802.11 drivers [ 2.386288] lib80211_crypt: registered algorithm 'NULL' [ 2.386295] Registering the dns_resolver key type [ 2.409277] input: 2.4G Wireless Receiver as /devices/platform/fsl-ehci.1/0 [ 2.409737] generic-usb 0003:1915:AF11.0001: input,hidraw0: USB HID v1.11 Ke0 [ 2.413382] input: 2.4G Wireless Receiver as /devices/platform/fsl-ehci.1/1 [ 2.414356] generic-usb 0003:1915:AF11.0002: input,hidraw1: USB HID v1.11 Mo1 [ 2.417676] generic-usb 0003:1915:AF11.0003: hidraw2: USB HID v1.11 Device [2 [ 2.552828] VFP support v0.3: implementor 41 architecture 3 part 30 variant 4 [ 2.560739] ThumbEE CPU extension supported. [ 2.569902] Bus freq driver module loaded [ 2.574049] Bus freq driver Enabled [ 2.577677] mxc_dvfs_core_probe [ 2.585161] DVFS driver module loaded [ 2.588987] mmcblk0: p1 p2 p3 < p5 p6 p7 p8 > p4 [ 2.589589] drivers/rtc/hctosys.c: unable to open rtc device (rtc0) [ 2.600390] Freeing init memory: 212K [ 2.605682] USB Gadget resume begins [ 2.609405] fsl_udc_resume, Wait for wakeup thread finishes [ 5.404922] init: cannot find '/system/etc/install-recovery.sh', disabling '' [ 5.775969] android_usb: already disabled [ 5.780231] android_usb: already disabled [ 5.784572] mtp_bind_config [ 5.787479] adb_bind_config [ 5.791834] adb_open root@android:/ # |
As with Wandboard Dual, Android is really smooth as long as you use a fast SD card, the system appears to be stable, but there’s still more work to make it a fully functional image, as I encountered a few issues:
- No HDMI audio on my system
- Bluetooth can be enabled, but it failed to find my smartphone, and the system is not currently compatible with Sixaxis (to connect PS3 controllers)
- Video hardware decoding does not work (at least for H.264 and MPEG2).
However, Antutu and Quadrant benchmarks show some impressive progress compared to other i.MX6 Quad / Android 4.0 solutions I tested a few months ago.
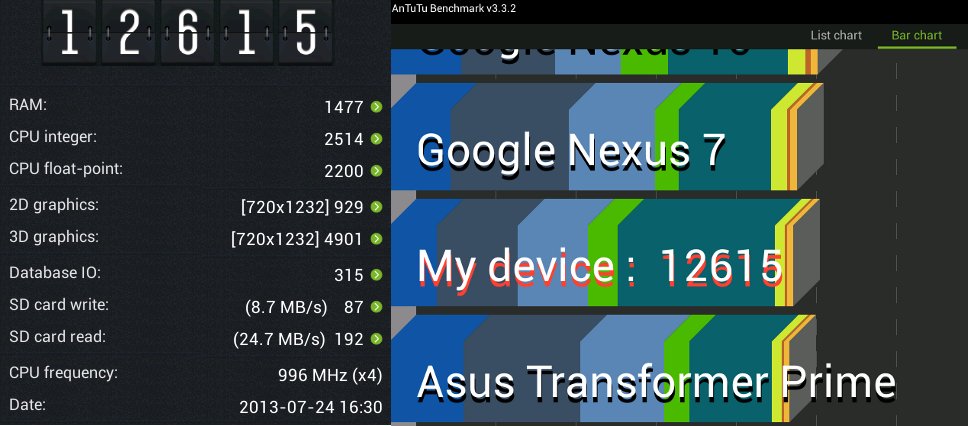
In this benchmark, Wandboard Quad is equivalent to Google Nexus 7 based on Tegra 3, and interestingly 3D performance is impressive, whereas it was dismal in Hi802/GK802 mini PC when I tested it, so there seems to have been some dramatic software improvements both with Android (4.0 vs 4.2), and Vivante drivers. The table below shows the performance difference between Wandboard Dual/Android 4.1.2, Hi802/Android 4.0.4 and Wandboard Quad/Android 4.2.2.
| Antutu 3.x Tests | Wandboard Dual Android 4.1.2 |
Hi802 Android 4.0.4 |
Wandboard Quad Android 4.2.2 |
| Total | 6190 | 8516 | 12615 |
| RAM | 1032 | 1619 | 1477 |
| CPU Integer | 1299 | 2490 | 2514 |
| CPU float-point | 1120 | 1838 | 2200 |
| 2D Graphics | [720×1232] 477 | [1280×672] 733 | [720×1232] 929 |
| 3D Graphics | [720×1232] 1771 | [1280×672] 1272 | [720×1232] 4901 |
| Database IO | 280 | 245 | 315 |
| SD card write | 97 | 115 | 87 |
| SD card read | 114 | 204 | 192 |
| CPU frequency | (x2) | (x4) | 996 MHz (x4) |
| Date | 2013-06-10 | 2013-01-18 | 2013-07-24 |
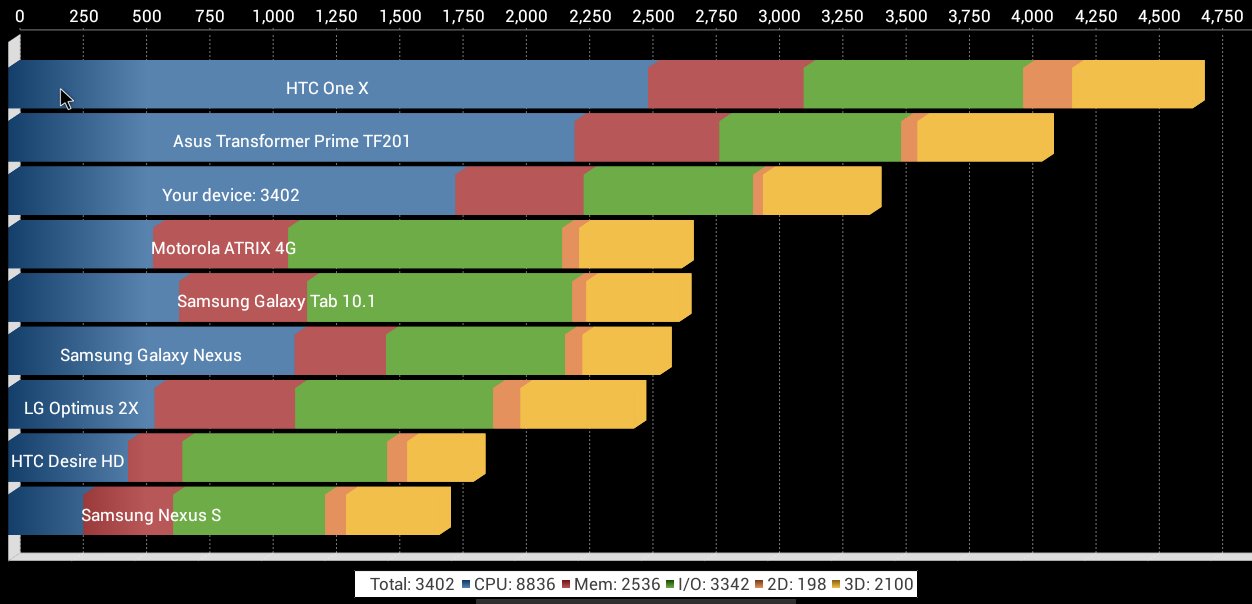
Quadrant benchmark shows Wandboard Quad (3402) to be a bit slower than Transformer Prime mainly due to the processor benchmark. Wandboard Dual got 2305 points.
Following the good GPU results, I tried a 3D game that may be challenging to render smoothly: Real Racing 3. The game is actually very smooth, and at first it looks much better than the RK3188 platforms I’ve tried, but closer inspection shows the game has decided to use a lower quality level… Nevertheless, 3D performance appears to be now much better than when i.MX6 Quad was first release with Android 4.0.4.
Building Linux with the Yocto Project on Wandboard Quad
There are now more and more Linux distributions for Wandboard (Quad): Ubuntu 11.10, Ubuntu 12.04, images built with the Yocto Project or buildroot, Timesys Linux (Wandboard Quad support is work in progress), and recently an XBMC Linux image has popped up. Wandboard boards are also part of mainline U-boot, and will be supported, at least partially, in Linux 3.12.
Since I have already shown how to install Ubuntu 11.10, and build the kernel from the SDK for Wandboard Dual, and using Ubuntu 11.10 or 12.04 on Wandboard Quad is basically the same with a different image, I’ll try something different today with the Yocto Project which allows you to build images fully customized for your project. I’ll mainly follow the instructions on elinux.org.
First let’s get the repo tool:
|
1 2 3 |
mkdir ~/bin curl https://dl-ssl.google.com/dl/googlesource/git-repo/repo > ~/bin/repo chmod a+x ~/bin/repo |
Add it to the path, and retrieve the source code from Freescale Yocto BSP on github.
|
1 2 3 4 5 |
PATH=${PATH}:~/bin mkdir fsl-community-bsp cd fsl-community-bsp repo init -u https://github.com/Freescale/fsl-community-bsp-platform -b master repo sync |
Note that we use the development branch (master), because Wandboard Quad was not available for Yocto 1.4 (dylan) release.
Now set the machine to Wandboard Quad, setup the environment, and start the build for a minimal image:
|
1 2 3 |
MACHINE=wandboard-quad . ./setup-environment build bitbake core-image-minimal |
Since all of the sources are downloaded from the Internet and built from scratch (including things like the toolchain), it may take a while depending on your Internet connection, and the performance of your build machine. The full process took three hours on my machine (AMD FX8350 with 16GB RAM). Subsequent builds are much faster.
Once the build is complete you can find the image in ./tmp/deploy/images/core-image-minimal-wandboard-quad.sdcard (28 MB). Just flash it to a micro SD card (32 MB or greater) to try it out:
|
1 2 3 |
sudo umount /dev/sdX* sudo dd.sh if=./tmp/deploy/images/core-image-minimal-wandboard-quad.sdcard of=/dev/sdX sync |
Replace /dev/sdX by your actual micro SD card device name, e.g. /dev/sdc. I have a USB hard drive attached to my build machine, so I always run lsblk, before running dd in order to double check the device, and avoid losing my precious data, and hating myself for the rest of my life… Once this is done, you probably want to resize the rootfs partition to make full use of your SD card storage capacity with tools such as gparted.
Finally insert the micro SD card into your Wandboard Quad, boot it up, and access the terminal via an HDMI monitor, or a serial console:
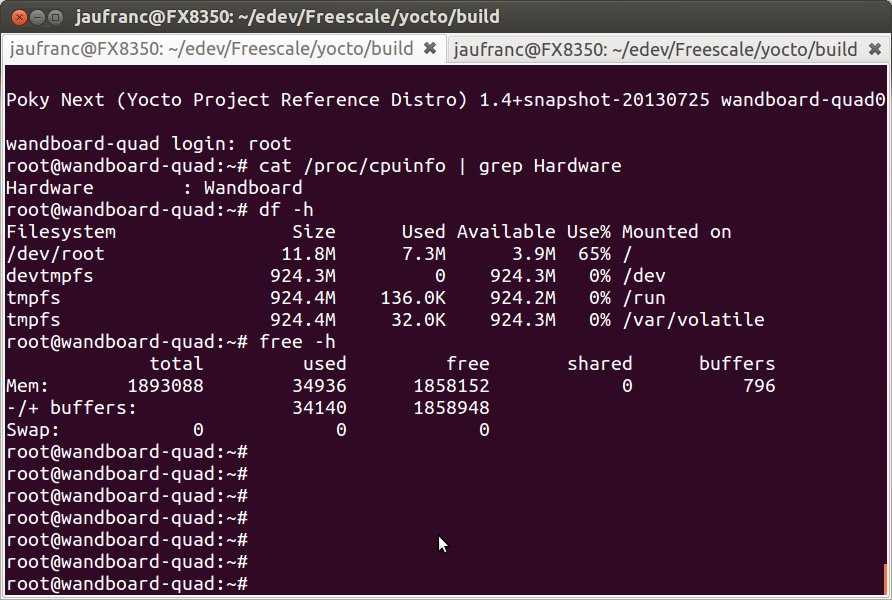
Here’s the boot log for the minimal image built with Yocto:
|
1 2 3 4 5 6 7 8 9 10 11 12 13 14 15 16 17 18 19 20 21 22 23 24 25 26 27 28 29 30 31 32 33 34 35 36 37 38 39 40 41 42 43 44 45 46 47 48 49 50 51 52 53 54 55 56 57 58 59 60 61 62 63 64 65 66 67 68 69 70 71 72 73 74 75 76 77 78 79 80 81 82 83 84 85 86 87 88 89 90 91 92 93 94 95 96 97 98 99 100 101 102 103 104 105 106 107 108 109 110 111 112 113 114 115 116 117 118 119 120 121 122 123 124 125 126 127 128 129 130 131 132 133 134 135 136 137 138 139 140 141 142 143 144 145 146 147 148 149 150 151 152 153 154 155 156 157 158 159 160 161 162 163 164 165 166 167 168 169 170 171 172 173 174 175 176 177 178 179 180 181 182 183 184 185 186 187 188 189 190 191 192 193 194 195 196 197 198 199 200 201 202 203 204 205 206 207 208 209 210 211 212 213 214 215 216 217 218 219 220 221 222 223 224 225 226 227 228 229 230 231 232 233 234 235 236 237 238 239 240 241 242 243 244 245 246 247 248 249 250 251 252 253 254 255 256 257 258 259 260 261 262 263 264 265 266 267 268 269 270 271 272 273 274 275 276 277 278 279 280 281 282 283 284 285 286 287 288 289 290 291 292 293 294 295 |
U-Boot 2013.07 (Jul 25 2013 - 16:46:15) CPU: Freescale i.MX6Q rev1.2 at 792 MHz Reset cause: WDOG Board: Wandboard DRAM: 2 GiB MMC: FSL_SDHC: 0, FSL_SDHC: 1 *** Warning - bad CRC, using default environment In: serial Out: serial Err: serial Net: FEC [PRIME] Warning: FEC using MAC address from net device Hit any key to stop autoboot: 0 mmc0 is current device reading boot.scr ** Unable to read file boot.scr ** reading uImage 2585532 bytes read in 130 ms (19 MiB/s) Booting from mmc ... reading imx6q-wandboard.dtb ** Unable to read file imx6q-wandboard.dtb ** ## Booting kernel from Legacy Image at 12000000 ... Image Name: Linux-3.0.35-4.0.0-wandboard+ge2 Image Type: ARM Linux Kernel Image (uncompressed) Data Size: 2585468 Bytes = 2.5 MiB Load Address: 10008000 Entry Point: 10008000 Verifying Checksum ... OK Loading Kernel Image ... OK Starting kernel ... [ 0.000000] Linux version 3.0.35-4.0.0-wandboard+ge259a0f (jaufranc@FX8350) 3 [ 0.000000] CPU: ARMv7 Processor [412fc09a] revision 10 (ARMv7), cr=10c53c7d [ 0.000000] CPU: VIPT nonaliasing data cache, VIPT aliasing instruction cache [ 0.000000] Machine: Wandboard [ 0.000000] Memory policy: ECC disabled, Data cache writealloc [ 0.000000] CPU identified as i.MX6Q, silicon rev 1.2 [ 0.000000] PERCPU: Embedded 7 pages/cpu @d100e000 s5248 r8192 d15232 u32768 [ 0.000000] Built 1 zonelists in Zone order, mobility grouping on. Total pa6 [ 0.000000] Kernel command line: console=ttymxc0,115200 root=/dev/mmcblk0p2 w [ 0.000000] PID hash table entries: 2048 (order: 1, 8192 bytes) [ 0.000000] Dentry cache hash table entries: 65536 (order: 6, 262144 bytes) [ 0.000000] Inode-cache hash table entries: 32768 (order: 5, 131072 bytes) [ 0.000000] Memory: 80MB 1792MB = 1872MB total [ 0.000000] Memory: 1892900k/1892900k available, 204252k reserved, 1409024K m [ 0.000000] Virtual kernel memory layout: [ 0.000000] vector : 0xffff0000 - 0xffff1000 ( 4 kB) [ 0.000000] fixmap : 0xfff00000 - 0xfffe0000 ( 896 kB) [ 0.000000] DMA : 0xf4600000 - 0xffe00000 ( 184 MB) [ 0.000000] vmalloc : 0xea800000 - 0xf2000000 ( 120 MB) [ 0.000000] lowmem : 0xc0000000 - 0xea000000 ( 672 MB) [ 0.000000] pkmap : 0xbfe00000 - 0xc0000000 ( 2 MB) [ 0.000000] modules : 0xbf000000 - 0xbfe00000 ( 14 MB) [ 0.000000] .init : 0xc0008000 - 0xc0037000 ( 188 kB) [ 0.000000] .text : 0xc0037000 - 0xc06521c0 (6253 kB) [ 0.000000] .data : 0xc0654000 - 0xc06a3620 ( 318 kB) [ 0.000000] .bss : 0xc06a3644 - 0xc06e59fc ( 265 kB) [ 0.000000] SLUB: Genslabs=13, HWalign=32, Order=0-3, MinObjects=0, CPUs=4, 1 [ 0.000000] Preemptible hierarchical RCU implementation. [ 0.000000] NR_IRQS:624 [ 0.000000] MXC GPIO hardware [ 0.000000] sched_clock: 32 bits at 3000kHz, resolution 333ns, wraps every 1s [ 0.000000] arm_max_freq=1GHz [ 0.000000] MXC_Early serial console at MMIO 0x2020000 (options '115200') [ 0.000000] bootconsole [ttymxc0] enabled [ 0.000000] Console: colour dummy device 80x30 [ 0.208392] Calibrating delay loop... 1581.05 BogoMIPS (lpj=7905280) [ 0.296694] pid_max: default: 32768 minimum: 301 [ 0.301671] Mount-cache hash table entries: 512 [ 0.307043] CPU: Testing write buffer coherency: ok [ 0.312215] hw perfevents: enabled with ARMv7 Cortex-A9 PMU driver, 7 countee [ 0.412833] CPU1: Booted secondary processor [ 0.492832] CPU2: Booted secondary processor [ 0.572845] CPU3: Booted secondary processor [ 0.612245] Brought up 4 CPUs [ 0.628068] SMP: Total of 4 processors activated (6324.22 BogoMIPS). [ 0.634972] devtmpfs: initialized [ 0.655918] print_constraints: dummy: [ 0.659934] NET: Registered protocol family 16 [ 0.668528] print_constraints: vddpu: 725 1300 mV at 1150 mV fast norma [ 0.676100] print_constraints: vddcore: 725 1300 mV at 1150 mV fast nor [ 0.683844] print_constraints: vddsoc: 725 1300 mV at 1200 mV fast norm [ 0.691499] print_constraints: vdd2p5: 2000 2775 mV at 2400 mV fast nor [ 0.699260] print_constraints: vdd1p1: 800 1400 mV at 1100 mV fast norm [ 0.706914] print_constraints: vdd3p0: 2625 3400 mV at 3000 mV fast nor [ 0.796780] hw-breakpoint: found 6 breakpoint and 1 watchpoint registers. [ 0.803612] hw-breakpoint: 1 breakpoint(s) reserved for watchpoint single-st. [ 0.810958] hw-breakpoint: maximum watchpoint size is 4 bytes. [ 0.816856] L310 cache controller enabled [ 0.820883] l2x0: 16 ways, CACHE_ID 0x410000c7, AUX_CTRL 0x02070000, Cache sB [ 0.851923] bio: create slab at 0 [ 0.856749] print_constraints: VDDA: 2500 mV [ 0.861314] print_constraints: VDDIO: 3300 mV [ 0.866226] vgaarb: loaded [ 0.869678] SCSI subsystem initialized [ 0.874045] spi_imx imx6q-ecspi.0: probed [ 0.878321] spi_imx imx6q-ecspi.1: probed [ 0.883084] usbcore: registered new interface driver usbfs [ 0.888730] usbcore: registered new interface driver hub [ 0.894218] usbcore: registered new device driver usb [ 0.912244] imx-ipuv3 imx-ipuv3.0: IPU DMFC NORMAL mode: 1(0~1), 5B(4,5), 5F) [ 0.920350] mxc_mipi_csi2 mxc_mipi_csi2: i.MX MIPI CSI2 driver probed [ 0.926827] mxc_mipi_csi2 mxc_mipi_csi2: i.MX MIPI CSI2 dphy version is 0x31a [ 0.934543] MIPI CSI2 driver module loaded [ 0.938781] Advanced Linux Sound Architecture Driver Version 1.0.24. [ 0.945994] Bluetooth: Core ver 2.16 [ 0.949695] NET: Registered protocol family 31 [ 0.954165] Bluetooth: HCI device and connection manager initialized [ 0.960539] Bluetooth: HCI socket layer initialized [ 0.965438] Bluetooth: L2CAP socket layer initialized [ 0.970564] Bluetooth: SCO socket layer initialized [ 0.975889] cfg80211: Calling CRDA to update world regulatory domain [ 0.982403] Switching to clocksource mxc_timer1 [ 1.000788] NET: Registered protocol family 2 [ 1.005376] IP route cache hash table entries: 16384 (order: 4, 65536 bytes) [ 1.013071] TCP established hash table entries: 65536 (order: 7, 524288 byte) [ 1.021352] TCP bind hash table entries: 65536 (order: 7, 786432 bytes) [ 1.029173] TCP: Hash tables configured (established 65536 bind 65536) [ 1.035722] TCP reno registered [ 1.038888] UDP hash table entries: 256 (order: 1, 8192 bytes) [ 1.044755] UDP-Lite hash table entries: 256 (order: 1, 8192 bytes) [ 1.051472] NET: Registered protocol family 1 [ 1.056122] RPC: Registered named UNIX socket transport module. [ 1.062078] RPC: Registered udp transport module. [ 1.066797] RPC: Registered tcp transport module. [ 1.071521] RPC: Registered tcp NFSv4.1 backchannel transport module. [ 1.078183] _regulator_get: etb supply vcore not found, using dummy regulator [ 1.085787] _regulator_get: etm.0 supply vcore not found, using dummy regular [ 1.093199] _regulator_get: etm.1 supply vcore not found, using dummy regular [ 1.100617] _regulator_get: etm.2 supply vcore not found, using dummy regular [ 1.108015] _regulator_get: etm.3 supply vcore not found, using dummy regular [ 1.115648] Static Power Management for Freescale i.MX6 [ 1.120900] wait mode is disabled for i.MX6 [ 1.125256] cpaddr = ea880000 suspend_iram_base=ea874000 [ 1.130676] PM driver module loaded [ 1.847958] link up failed, DB_R0:0x007b8000, DB_R1:0x08200000! [ 1.853896] IMX PCIe port: link down! [ 1.857976] IMX usb wakeup probe [ 1.861825] IMX usb wakeup probe [ 1.865314] cpu regulator mode:ldo_enable [ 1.869544] i.MXC CPU frequency driver [ 1.898814] highmem bounce pool size: 64 pages [ 1.916534] nfs4filelayout_init: NFSv4 File Layout Driver Registering... [ 1.923317] msgmni has been set to 945 [ 1.928582] alg: No test for stdrng (krng) [ 1.932822] io scheduler noop registered [ 1.936760] io scheduler deadline registered [ 1.941135] io scheduler cfq registered (default) [ 1.946603] mxc_sdc_fb mxc_sdc_fb.0: register mxc display driver hdmi [ 1.953113] mxc_hdmi mxc_hdmi: Detected HDMI controller 0x13:0xa:0xa0:0xc1 [ 1.997049] imx-ipuv3 imx-ipuv3.0: IPU DMFC DP HIGH RESOLUTION: 1(0,1), 5B(2) [ 2.076434] Console: switching to colour frame buffer device 240x67 [ 2.117314] mxc_sdc_fb mxc_sdc_fb.1: register mxc display driver ldb [ 2.123708] _regulator_get: get() with no identifier [ 2.148551] imx-sdma imx-sdma: loaded firmware 1.1 [ 2.157354] imx-sdma imx-sdma: initialized [ 2.284130] Serial: IMX driver [ 2.287319] imx-uart.0: ttymxc0 at MMIO 0x2020000 (irq = 58) is a IMX [ 2.293800] console [ttymxc0] enabled, bootconsole disabled [ 2.293800] console [ttymxc0] enabled, bootconsole disabled [ 2.305380] imx-uart.2: ttymxc2 at MMIO 0x21ec000 (irq = 60) is a IMX [ 2.315939] loop: module loaded [ 2.353035] No sata disk. [ 2.355864] FEC Ethernet Driver [ 2.360899] fec_enet_mii_bus: probed [ 2.365307] ehci_hcd: USB 2.0 'Enhanced' Host Controller (EHCI) Driver [ 2.371952] add wake up source irq 75 [ 2.378053] fsl-ehci fsl-ehci.0: Freescale On-Chip EHCI Host Controller [ 2.384756] fsl-ehci fsl-ehci.0: new USB bus registered, assigned bus number1 [ 2.417017] fsl-ehci fsl-ehci.0: irq 75, io base 0x02184000 [ 2.436998] fsl-ehci fsl-ehci.0: USB 2.0 started, EHCI 1.00 [ 2.443334] hub 1-0:1.0: USB hub found [ 2.447110] hub 1-0:1.0: 1 port detected [ 2.451236] add wake up source irq 72 [ 2.454935] fsl-ehci fsl-ehci.1: Freescale On-Chip EHCI Host Controller [ 2.461590] fsl-ehci fsl-ehci.1: new USB bus registered, assigned bus number2 [ 2.496993] fsl-ehci fsl-ehci.1: irq 72, io base 0x02184200 [ 2.516984] fsl-ehci fsl-ehci.1: USB 2.0 started, EHCI 1.00 [ 2.523151] hub 2-0:1.0: USB hub found [ 2.526914] hub 2-0:1.0: 1 port detected [ 2.531156] Initializing USB Mass Storage driver... [ 2.536175] usbcore: registered new interface driver usb-storage [ 2.542194] USB Mass Storage support registered. [ 2.547083] ARC USBOTG Device Controller driver (1 August 2005) [ 2.553047] udc: request mem region for fsl-usb2-udc failed [ 2.558733] fsl-usb2-udc: probe of fsl-usb2-udc failed with error -16 [ 2.565538] mousedev: PS/2 mouse device common for all mice [ 2.571351] i2c /dev entries driver [ 2.575533] Linux video capture interface: v2.00 [ 2.580525] mxc_v4l2_output mxc_v4l2_output.0: V4L2 device registered as vid6 [ 2.588139] mxc_v4l2_output mxc_v4l2_output.0: V4L2 device registered as vid7 [ 2.595739] mxc_v4l2_output mxc_v4l2_output.0: V4L2 device registered as vid8 [ 2.603419] Bluetooth: HCI UART driver ver 2.2 [ 2.607876] Bluetooth: HCI H4 protocol initialized [ 2.612807] sdhci: Secure Digital Host Controller Interface driver [ 2.618998] sdhci: Copyright(c) Pierre Ossman [ 2.623469] _regulator_get: sdhci-esdhc-imx.2 supply vmmc not found, using dr [ 2.631991] mmc0: SDHCI controller on platform [sdhci-esdhc-imx.2] using DMA [ 2.636985] mxc_hdmi mxc_hdmi: Read EDID again [ 2.644345] _regulator_get: sdhci-esdhc-imx.1 supply vmmc not found, using dr [ 2.654457] mmc1: SDHCI controller on platform [sdhci-esdhc-imx.1] using DMA [ 2.661558] sdhci sdhci-esdhc-imx.0: no write-protect pin available! [ 2.668745] _regulator_get: sdhci-esdhc-imx.0 supply vmmc not found, using dr [ 2.678811] mmc2: SDHCI controller on platform [sdhci-esdhc-imx.0] using DMA [ 2.686066] mxc_vdoa mxc_vdoa: i.MX Video Data Order Adapter(VDOA) driver prd [ 2.694185] VPU initialized [ 2.697965] mxc_asrc registered [ 2.716596] Thermal calibration data is 0x5834f469 [ 2.721402] Thermal sensor with ratio = 182 [ 2.736993] Anatop Thermal registered as thermal_zone0 [ 2.742277] anatop_thermal_probe: default cooling device is cpufreq! [ 2.749271] usbcore: registered new interface driver usbhid [ 2.750806] mmc0: new high speed SDHC card at address 1234 [ 2.760366] usbhid: USB HID core driver [ 2.764430] mmcblk0: mmc0:1234 SA04G 3.63 GiB [ 2.764657] usbcore: registered new interface driver snd-usb-audio [ 2.765125] mxc_hdmi_soc mxc_hdmi_soc.0: MXC HDMI Audio [ 2.765258] mxc_spdif mxc_spdif.0: MXC SPDIF Audio [ 2.767185] _regulator_get: 1-000a supply VDDD not found, using dummy regular [ 2.767473] sgtl5000 1-000a: sgtl5000 revision 17 [ 2.767643] print_constraints: 1-000a: 850 1600 mV at 1200 mV normal [ 2.787591] asoc: sgtl5000 imx-ssi.1 mapping ok [ 2.790847] asoc: mxc-spdif imx-spdif-dai.0 mapping ok [ 2.793461] asoc: mxc-hdmi-soc imx-hdmi-soc-dai.0 mapping ok [ 2.794075] ALSA device list: [ 2.794081] #0: sgtl5000-audio [ 2.794086] #1: imx-spdif [ 2.794090] #2: imx-hdmi-soc [ 2.794586] TCP cubic registered [ 2.794593] NET: Registered protocol family 17 [ 2.794667] Bluetooth: RFCOMM socket layer initialized [ 2.794673] Bluetooth: RFCOMM ver 1.11 [ 2.794678] Bluetooth: BNEP (Ethernet Emulation) ver 1.3 [ 2.794682] Bluetooth: BNEP filters: multicast [ 2.794689] Bluetooth: HIDP (Human Interface Emulation) ver 1.2 [ 2.794843] lib80211: common routines for IEEE802.11 drivers [ 2.794875] Registering the dns_resolver key type [ 2.874998] VFP support v0.3: implementor 41 architecture 3 part 30 variant 4 [ 2.882789] ThumbEE CPU extension supported. [ 2.884347] mmcblk0: p1 p2 [ 2.890346] Bus freq driver module loaded [ 2.894364] Bus freq driver Enabled [ 2.899781] mxc_dvfs_core_probe [ 2.903116] DVFS driver module loaded [ 2.907670] drivers/rtc/hctosys.c: unable to open rtc device (rtc0) [ 2.918368] EXT3-fs: barriers not enabled [ 2.923188] kjournald starting. Commit interval 5 seconds [ 2.926109] EXT3-fs (mmcblk0p2): using internal journal [ 2.926121] EXT3-fs (mmcblk0p2): mounted filesystem with writeback data mode [ 2.926150] VFS: Mounted root (ext3 filesystem) on device 179:2. [ 2.932361] devtmpfs: mounted [ 2.932419] Freeing init memory: 188K [ 2.953634] usb 2-1: new high speed USB device number 2 using fsl-ehci [ 2.970111] mmc1: queuing unknown CIS tuple 0x80 (50 bytes) [ 2.984096] mmc1: queuing unknown CIS tuple 0x80 (7 bytes) [ 2.991638] mmc1: queuing unknown CIS tuple 0x80 (4 bytes) [ 3.026019] mmc1: queuing unknown CIS tuple 0x02 (1 bytes) [ 3.042163] mmc1: new SDIO card at address 0001 INIT: [ 3.109731] hub 2-1:1.0: USB hub found [ 3.113576] hub 2-1:1.0: 4 ports detected version 2.88 booting[ 3.147331] mxc_hdmi mxc_hdmi: No modes read from edid [ 3.152473] mxc_hdmi mxc_hdmi: create default modelist [ 3.517416] input: 2.4G Wireless Receiver as /devices/platform/fsl-ehci.1/0 [ 3.528392] generic-usb 0003:1915:AF11.0001: input,hidraw0: USB HID v1.11 Ke0 [ 3.544186] input: 2.4G Wireless Receiver as /devices/platform/fsl-ehci.1/1 [ 3.556254] generic-usb 0003:1915:AF11.0002: input,hidraw1: USB HID v1.11 Mo1 [ 3.570923] generic-usb 0003:1915:AF11.0003: hidraw2: USB HID v1.11 Device [2 [ 3.658073] usb 2-1.3: new full speed USB device number 4 using fsl-ehci Starting udev [ 4.161586] udevd[1317]: starting version 182 Starting Bootlog daemon: bootlogd. Configuring network interfaces... [ 5.610861] eth0: Freescale FEC PHY driver) udhcpc (v1.21.1) started Sending discover... [ 8.607207] PHY: 1:01 - Link is Up - 100/Full Sending discover... Sending select for 192.168.0.106... Lease of 192.168.0.106 obtained, lease time 7200 /etc/udhcpc.d/50default: Adding DNS 192.168.0.1 done. hwclock: can't open '/dev/misc/rtc': No such file or directory Thu Jul 25 10:09:00 UTC 2013 INIT: Entering runlevel: 5misc/rt hwclock: can't open '/dev/misc/rtc': No such file or directory Starting syslogd/klogd: done Stopping Bootlog daemon: bootlogd. Poky Next (Yocto Project Reference Distro) 1.4+snapshot-20130725 wandboard-quad0 wandboard-quad login: |
If you want an image with a desktop environment, you can run bitbake core-image-sato instead (See SATO UI screenshot). In theory, It’s also possible to build a custom image with XFCE by adding sources/meta-openembedded/meta-xfce to the list of layers, as well as packagegroup-xfce-base, packagegroup-xfce-extended and packagegroup-xfce-multimedia to the list of package groups, either via the command line, or hob, Yocto’s graphical user interface, but for some reasons the build failed when I tried to build an XFCE image via hob for the Wandboard Dual a few weeks ago. I believe the pre-built Yocto image for Wandboard Quad does indeed include XFCE (TBC).

Jean-Luc started CNX Software in 2010 as a part-time endeavor, before quitting his job as a software engineering manager, and starting to write daily news, and reviews full time later in 2011.
Support CNX Software! Donate via cryptocurrencies, become a Patron on Patreon, or purchase goods on Amazon or Aliexpress


That’s some heatsink. The imx6 is a bit of a fail when it comes to heat. I’m yet to see a device that runs at the quote max speed of 1.2Ghz presumably due to heat.
Hi,
The heatsink is made this size to have an easy to assemble solution and avoid the creation of additional holes in the PCB. It therefore uses the identical holes as the EDM module.
Are there any imx6 quadcore soc for mobile phones?
Because soc from Wandboard is sooo big
Could somebody please benchmark the SATA connection with some serious SSD, all I have seen is people have tested those with some bargain-bin three+ generations old SSDs, that are not even close to the performance on the current generation stuff.
Yes, the i.MX6 SATA is only 3.0Gbps, but even so, do not use some lousy/ancient JMicron/SandForce crud that nobody should buy/use these days.
Have not found a single ARM SATA benchmark that uses any of the fast SSDs around these days, hard to get an mental image of the raw data bandwidth speeds that can be achieved with the ARM platform (and is the internal data busses the bottleneck). 🙁
ps. hopefully Samsung has fixed their incompatibilities between Exynos 5 series and Samsung 840 SSDs on Exynos 5420, that was a silly thing to not verify before putting it on sale. 🙂
Thanks for all the info about wandboard quad version. I just got the board and about to play with it myself and this article save me a lot of time.
@anon
Agreed, but it’d also be good to know this runs in a ‘nettop’ configuration with Linux on a SATA HDD? & how does it compare with low end Atom mini PCs, which are available in a similar price bracket, for various applications? Is there any prospect of getting a more recent mainstream distro going on it?
hi,
interesting board, but i would like to get more info about it.
– is this real SATA (not usb2sata) and as others already asked: what about a sata benchmark?
– it is also important to know anything about power consumtion. how much watts does the board consume in idle mode and how much under full load?
– can we run linaro as well on this board (i think we can, but may there be any problems with drivers?)
– what about using the gpu for transcoding (actually i am not aware of any arm soc that supports hardware accelerated transcoding under linux using ffmpeg – this would be great for a small htpc)
this said, i would really like to see a comparision table of all devices you test that contains infos about: power consumtion, cpu speed (benchmark), gpu speed (benchmark), disk speed (benchmark if sata connector is available), linux (linaro) support, linux drivers (what works and what does not work), connectors (vga,hdmi,sata,ethernet,wlan,…) – this would give an interesting overview, if you would update this table whenever you get a new device.
@mehre
1. Yes, it’s real SATA. You can also check the schematics so it’s easy to verify.
I don’t have spare SATA drives, let alone on the latest SSD…
2. I haven’t made the cable for measurement with a multimeter, so even though it’s not ideal (e.g. power supply dissipation) I’ve done a quick test using a “kill-a-watt” equivalent instead:
* Android Idle: 3.2 to 3.8 Watts
* Antutu CPU: 6.6 Watts
* Antutu RAM: 5 Watts
* Antutu 2D (Bouncing Androids): 5.2 Watts
* Antutu 3D – 7 to 8 Watts
3. Linaro rootfs should be easy, but you’ll lose GPU and VPU support without some extra work.
4. Trancoding: In theory it should be possible. In April, I started writing a post about gstreamer on i.MX6, but did not complete it, because some parts could not work. You may want to check at this post to see what’s possible with gstreamer at http://boundarydevices.com/gstreamer-camera-streaming-on-i-mx6/
A comparison table is always nice, but this can be very challenging to maintain and update in details. Just a post like the one above took me over 10 hours to complete.
@cnxsoft
thanks for the info!
yeah, i understand it’s hard to maintain such a comparision table. actually you could avoid the update challange if you just a column with date of your test and just fill in what you know for each new device. this table would be incomplete and outdatet, but i think it would be useful anyway. if specs of a device fits and a user is interested in the device he could search for this missing info and in best case he reports back to you 😉 – if not it saves time anyway for instance if i need a device with 1GB ethernet i could rule out many devices…
just think about it
@onebir
Unfortunately you cannot boot directly off the iMX6 SATA, but if you write the uboot on other devices (NAND/MMC/SD), then the rest can be on the SATA device, at least that is with the Boundary Device i.MX6 boards, and why would the Wandboard makers change that?
Of course you need to check it from them to be sure, personally I do not have any i.MX6 boards/devices.
About distros, of course you can install pretty much any of the distros on i.MX6 devices, all you want to do is find an armhf version (that pretty much all are currently), and i.MX6 platform is a lot more open for Linux community, so you can find all kind of help all over for them, much better than for those Asian ARM manufacturers.
Only major thing that is not so great thing going for the i.MX6 is of course the awful Vivante GPU that has no FLOSS drivers/support, just nasty binary hacks. 🙁
@anon
Thanks! Sounds like the days of a media capable ~$100 ARM-Linux nettop are not yet with us…
@anon
Some i.MX6 boards (e.g. Sabrelite) have a small 1 or 2MB SPI NOR Flash, and I guess you could boot from that to SATA. In some ways, it’s a little like the BIOS for x86.
You do mention that sound over HDM doesn’t work but were you able to get multi channel sound via SPDIF in android and/or linux?
@cnxsoft
Yes, you can indeed store the u-boot into that SPI NOR Flash (it uses SPI signaling, thus is the same thing as slow SD mode that uses 1-bit lanes to each way, not 4 parallel bits of normal SD usage, let alone 8-bit MMC), so it shows as an SD card to Linux kernel, so same difference from software’s point of view.
At least on those Boundary Device boards the u-boot location is determined with dip switches, have not looked up how it is done in Wandboard, but I would think the exact same way (there are actual physical signals for selecting that in the processor itself).
@anon
I think I’ve read you can do the same with Wandboard, but not with dip switches though, with a soldering iron…
@anon
Well there is some progress witch vivante open source drivers. Check https://github.com/laanwj/etna_viv and https://github.com/laanwj/mesa . There is even quake 1 demo on youtube 🙂
@Michal S
Maybe a periodic rundown on the status of the various open source ARM GPU drivers would be a worthwhile article here?
@Michal S
Oh wow, had not googled for anything Vivante-related for a while (maybe in 2012?), so did not even know about that one, very cool…
Still at pre-alpha it seems (and no GC2000 support for the i.MX6 Quad), so actually very close to what the limadriver was planning to do.
It is still pretty sad that the lima stuff is still not getting too much attention from others developers beyond Luc himself… Too bad I have no time for it either, maybe after I finish my clustering stuff, then I can start to really getting into driver coding again. 🙂
Of well, all those different framebuffer-based drivers sure would need to pull into a singular effort to get them pushed into the mainline kernel, that would certainly help things along a lot, no need for 3D acceleration at start, that could always come later on.
@anon
@onebir
If you want to check out the status for different “ARM” GPU (As of February), you can refer to http://www.cnx-software.com/2013/02/14/open-arm-gpu-drivers-fosdem-2013-video-and-call-to-arm-management/
@S
I haven’t check that, as I don’t have hardware. I’ve tried to buy a home theater system from Chinese websites once, but strangely I could not find any. Maybe it’s too large to ship, but somehow I expected to find a system with small speakers.
> In this configuration, I’ve measured 52 degrees Celcius at idle time,
> and 56 degrees Celcius during benchmarks by pointing an IR Thermometer to the heatsink.
That is a blank aluminium heatsink.
Due to reflection properties you don’t get proper readings with IR thermos!
Only works with BLACK heatsinks.
As a quick and dirty solution you might try to use some black isolation tape
and stick it flat onto large surfaces – but can be tricky with such a fin heatsink…
(note that the IR thermo takes AVERAGE of a rather large field of view so you better
put it very very close)
Another factor is WHERE at that large heatsink you pointed.
You should do it in the center.
Yeah tricky and complex 😉
@NoNoCat
Thanks. I had read about that, and tried some black tape. But the temperature readings were about the same. Obviously with this type of heatsink it’s difficult to properly transfer the heat to the black tape since it’s not in full contact.
I actually moved the thermometer over the heatsink, and could just see 1 or 2 degrees differences between different places. And 55 degrees looked like OK, based on “hand” measurements 🙂
The thing I don’t know is if bright surfaces over or under report the temperature readings.
@cnxsoft
There are some home theatre setups on Aliex now, but like you say often the shipping is v expensive:
http://www.aliexpress.com/premium/home-theater.html?g=y&SearchText=home%2Btheater&CatId=635&isrefine=y
Well that is weird that this does not change – maybe the heatsink is coated somehow and not actually a blank one? Is it conductive when you measure resistance with a multimeter (without pushing too hard!)?
I get lower readings with the IR thermo I have here on blank type of heatsinks and it rises drastically when I use tape on a small flat(!) area. Not on top of the fins of course.
Maybe you can try to check the internal temp sensor of the chip to see if it is reasonable. It is a file somewhere in /sys/devices/virtual/thermal … or so that you can cat.
The die temp should be higher than heatsink temp of course.
@cnxsoft
after all i think i will buy this board even i wanted to wait for the CompuLab Utilite because of it’s better connectivity and it’s nicer design, but checking prices of other CompuLab devices i think the price will be much higher as i guess the base version for 99$ will be only single core with 512MB or 1GB RAM.
after some research i think the i.mx6 boards will be the first arm-boards that can be used for vpu transcoding on linux and i hope it really works – fingers crossed
i still have some questions:
you said “Linaro rootfs should be easy, but you’ll lose GPU and VPU support without some extra work”
shouldn’t it work if i use the kernel+kernel modules provided by freescale together with linaro rootfs to get VPU support? or do i need anything else compiled for linaro in order to get VPU support?
actually they provide an Ubuntu 12.04 LTS preview image, with 3D multimedia enabled, so i assume VPU transcoding should work with this image (would be nice, maybe you can test this?)
there seems to be only a sata data connector on board, so an externel power supply for the sata device is required?
@mehere
I don’t really know how to get GPU and VPU support.
If it’s just 3D multimedia in Ubuntu 12.04, then it does not look like VPU is enabled, so no transcoding yet.
I think there’s a discussion on the mailing list about powering up the hard drive.
IMO adding GC2000 could be quick. It differs from 800 and 880 by few registers and extra pixel. GC880 even worked with GC800 driver because there is backward compatibility in hardware! I don’t have GC2000 and laanwj is working on other stuff. Finish your clustering stuff and join 🙂
@cnxsoft
well, i just read this:
http://www.wandboard.org/index.php/downloads
The following images are marked as preview and use Freescale latest LTIB-4.0.0 drivers. 3D, multimedia have been enabled. Performance on WBSOLO is quite nice compared with the older image.
Ubuntu 12.04 LTS images.
and according to this
http://boundarydevices.com/ltib-4-0-0-images/
vpu and gpu support should work with ltib drivers…
i just don’t know if they user the X-Windows drivers for the ubuntu preview image or the version without x-windows support
maybe you can test the preview image and write an article about it or even better record a nice video and show us how powerfull (or not) ubuntu is running on this nice board – i did not found any videos so you can be the first… 😉 and testing if gstreamer transcoding works, would be a nice bonus for your readers 😉
at least it looks very promising!
@NoNoCat
The other day, I did put the black tape on top of the fins (there’s no large enough flat zone), and waited a few minutes for heat to transfer… It’s probably not a good idea…
The heastsink is definitely conductive (Multimeter shows 0 Ohm)
I measure temperature again today with the IR thermometer without tape (38 degree Celsius), and also checked the value in /sys/devices/virtual/thermal/thermal_zone0/temp which strangely is also 38. I wonder if that number is in Celsius or we need to convert it.
There are actually 4 more temperature “points” in the directory:
cat /sys/devices/virtual/thermal/thermal_zone0/*temp
38
100
90
80
temp (38), as well as trip_point_0_temp, trip_point_1_temp, and trip_point_2_temp, but those last 3 never change。
What is the Ambient temp in your area?
The deviation should get larger with higher heatsink temp – lower temps are usually fine as the ambient is reflected in the aluminium!
Maybe your IR Thermo is calibrated for aluminium reflectivity (better models allow for adjusting that) – but that would make most other materials readings wrong 😉
May I know which type it is?
Yep that temp reading is in Celsius.
trip_point_* are the thresholds when thermal throttling takes place and it clocks down to reduce heat and protect itself. All modern CPUs do that (which btw. may affect benchmarks especially on mobile devices without good heatsinks).
Ah forget it I just saw that you put a link to the thermometer model you used.
Hmmm
Emissivity: 0.95 (pre-set)
Aluminium is in the 0.07 – 0.7 range depending on surface treatment.
Very strange that you get good readings with that thing.
@NoNoCat
Just as reference, when I point the device to my head it read 35 degrees, boiling water: 97 degrees, freezer: -14 degrees. So it may not be extremely accurate, but I guess it give a good range.
We’ve got “cool” weather today, about 26 degrees C in the room.
Arch Linux ARM is now available too – http://archlinuxarm.org/platforms/armv7/freescale/wandboard
There is as well XBMC support upcoming in the wandboard forums.
@anon
It’s not exactly want you want, but ODROID-XU board has been benchmarked with OCZ’s Vertex3 128GB SSD via a USB3 to SATA adapter. Command lines and results:
Test Root File System : Linaro Ubuntu with Linux Kernel 3.4.5
Read Test Command : dd if=./test of=/dev/null bs=1M count=1000 iflag=nocache oflag=nocache
Write Test Command : dd if=/dev/zero of=./test bs=1M count=1000 iflag=nocache oflag=nocache conv=fdatasync
Test result
Write Speed : 190 MB/S
Read Speed : 151 MB/S
Source: http://com.odroid.com/sigong/blog/blog_list.php?bid=153
Hi!
I added sources/meta-openembedded/meta-xfce to sources/base/conf/bblayers.conf.
Where do i need to add the package groups: packagegroup-xfce-base, packagegroup-xfce-extended and packagegroup-xfce-multimedia ? so that bitbake core-image-minimal includes it?
thx
@wakko
I’m not exactly sure as I used hob when I tried. I later found out hob is not supported for wandboard yet (via Wandboard mailing list).
Hi, cnxsoft,
Thanks for this post.
I’m about to buy a WBQUAD for fun, very excited.
One more question I’m wondering.
The retailer tells me there is no power supply adapter shipped together with the wbquad box, so I must buy a power supply by myself.
But I do not know what kind to buy? I know it should be 10W 5V, but how many pins should be? 2-pin? or 3-pin adapter?
Could you give me some guidance on this to help me out ?
Thank you, thank you so much in advance.
BR,
Shawn
@shawnbai
Check http://wiki.wandboard.org/index.php/UnofficialFAQ#What_type_of_power_supply_should_I_use.3F
“or power, you will need a regulated 5V 2A DC power supply with a positive center pin. The barrel connector should be 5.5 mm outer diameter with greater than 2.1mm inner diameter. ”
2 or 3 pin (with ground) probably does not matter. I don’t have ground in my mains sockets.
@cnxsoft
Thank you for your reply.
Actually, I’ve checked that website out a few days ago.
I’m puzzled about the “power supply with a positive center pin”.
Does that mean only 3-pin power supply should be used instead of 2-pin?
Also, it seems the barrel connector’s diameter shold meet that requirement too, doesn’t it ?
From what you said, it seems both 2-pin and 3-pin are OK, could you share me with a website for your power supply please?
Thank you.
@shawnbai
They told about the jack you connect into the board. The outside should be ground, and inside +5V. I guess most power supply are like that, but you can check with a multimeter to make sure. The important part is the diameter of the jack, although you should also be able to use an adapter.
I did not buy my power supply online. It’s shown in the list @ http://www.cnx-software.com/2013/02/14/electronics-shop-in-thailand-what-will-33-buy/
Hi, cnxsoft,
Do you think power supple on this website http://www.futureelectronics.com/en/Search.aspx?dsNav=Ntk:PlainTextSearch|Power+Supply|3|,Ny:True,Ro:0,Nea:True,N:573-4294927817-4294894815-4294881365 is enough for WBQUAD please?
Thank you.
I’m in China Mainland, as you know, the power supply used in China is not the same with the ones in Europe or America, So, I think I should take care of this issue, or, the board may be smoked …
@cnxsoft
Ok, I see.
I misunderstood just now.
You mean you do the power supply by yourself with the cost $33.
That sounds great.
Maybe I also could do it, right?
@shawnbai
No. That’s not what I meant. In that page you can scroll down and see the $10 power supply I used (Viper something).
You could probably buy the board first, then go to the shop with the board to find and try the power supply before purchase. Just make sure the ground is outside first.
@cnxsoft
Yes, I have noticed that.
Since only the jack and 5V2W must be ensured, I have found the website to buy the power supply adapter.
On that website, 2.5 x 5.5 pin connector specification of the power supply adapter is beging sold, outer(V-), Inner(+5V), so I guss, this one is what I need.
Thank you again, cnxsoft.