
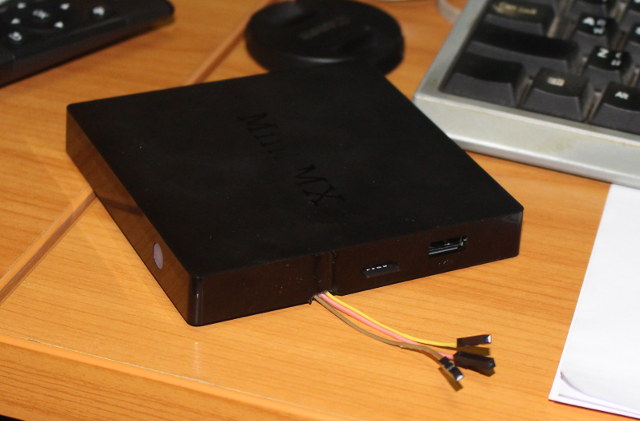
A few week ago, I had been informed that Amlogic S905 U-boot and Linux source code was released, and one person use the code and other resources to load a minimal Ubuntu 14.04 image to his K1 Plus TV box and released the installation instructions and the image (Thanks olin!). I also have K1 Plus here, but since I’ve just finished reviewing Beelink MINI MX, I decided to use the latter instead. The instructions below boot Linux from the (micro) SD card, and can still boot Android if you remove the SD card.
Modifying U-boot environment
The instructions include opening the box, and connecting or soldering a USB to TTL debug board to access U-boot and change some parameters. But later once an image with network is working, you could also build and load fw_setenv and fw_saveenv, and do the same steps with an Android shell and without the need to open the device.
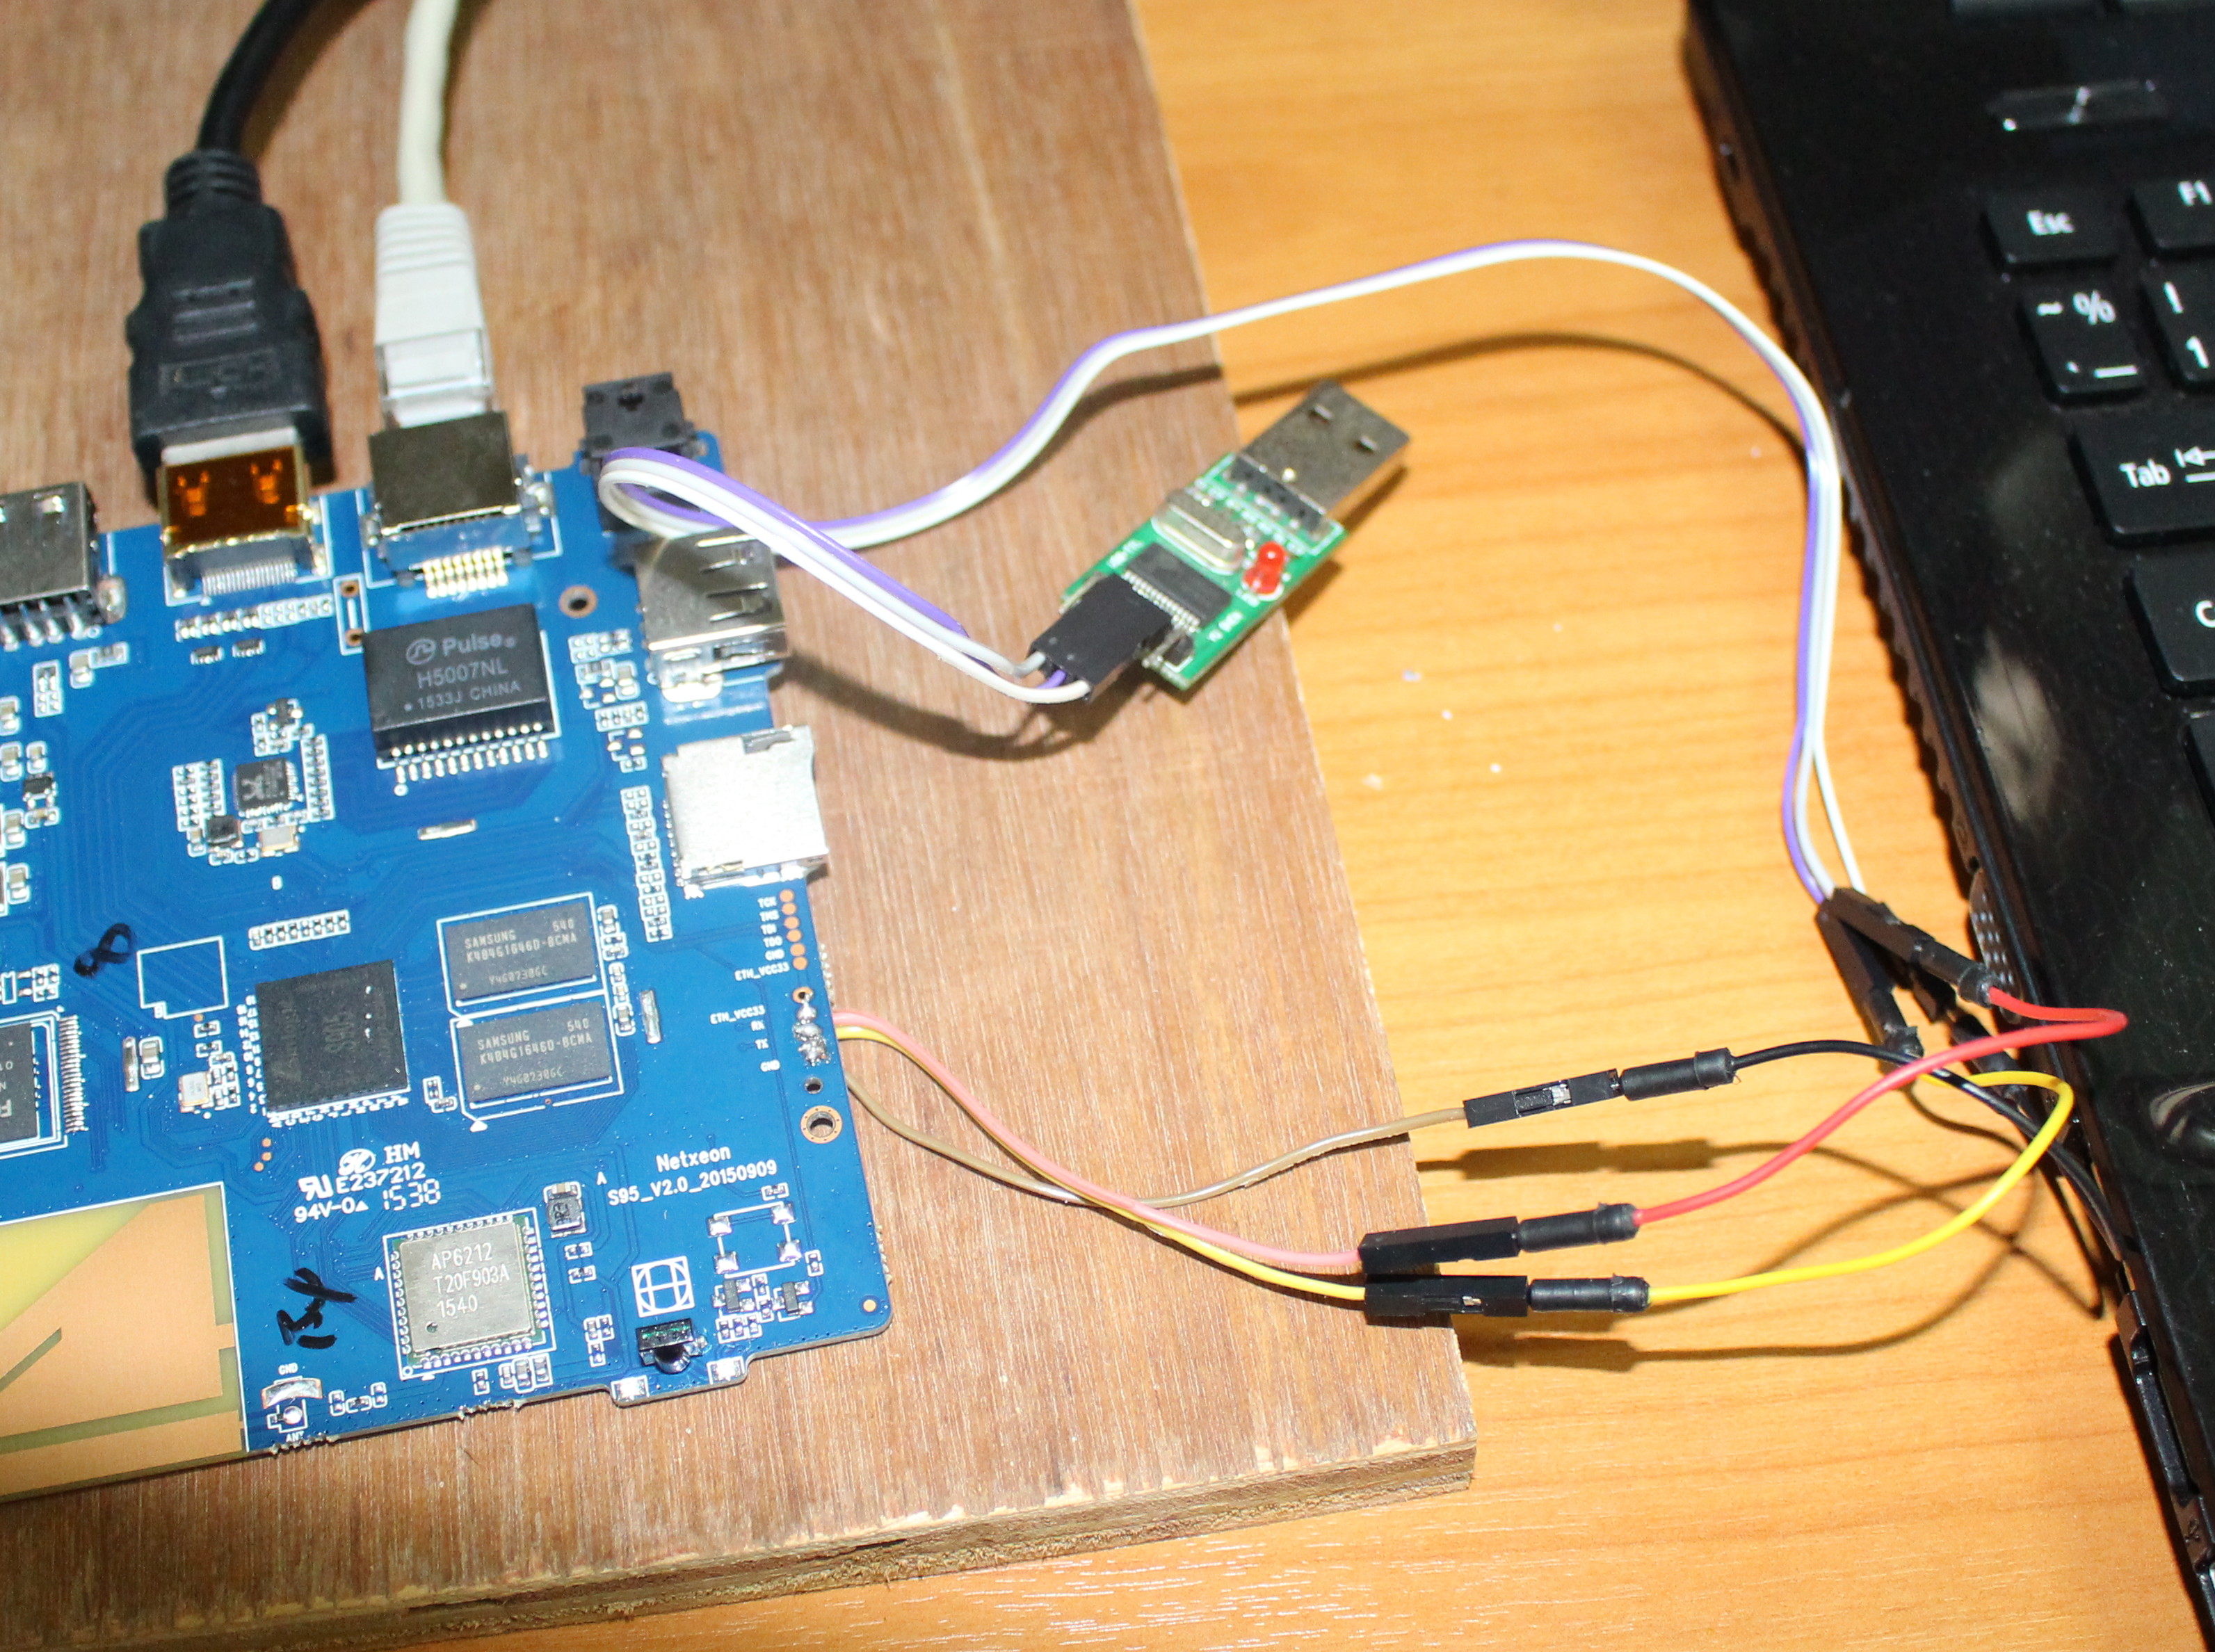
K1 Plus has the UART headers populated so you don’t have to solder anything, but MINI MX requires a little bit a soldering on the clearly marked Tx, Rx, GND pins.
Connect your USB to TTL debug board to your computer, configure minicom / putty / screen to 115200 8N1, start the board, and press the space bar to interrupt the boot:
|
1 2 3 4 |
Enter USB burn Try connect time out 701, 700, 834 Hit any key to stop autoboot: 0 gxb_p200_v1# |
You may want to run printenv in order to back the default settings:
|
1 2 3 4 5 6 7 8 9 10 11 12 13 14 15 16 17 18 19 20 21 22 23 24 25 26 27 28 29 30 31 32 33 34 35 36 37 38 39 40 41 42 43 44 45 46 47 48 49 50 51 52 53 54 55 56 57 58 59 60 61 62 63 64 |
baudrate=115200 bootargs=rootfstype=ramfs init=/init console=ttyS0,115200 no_console_suspend earlyprintk=aml-uart,0xc81004c0 ramoops.mem_address=0x20000000 ramoops.mem_size=0x100000 ramoops.record_size=0x8000 ramoops.conf bootcmd=run storeboot bootdelay=1 bootmode_check=get_rebootmode; echo reboot_mode=${reboot_mode};if test ${reboot_mode} = factory_reset; then defenv_reserv aml_dt;setenv upgrade_step 2; save;fi; bootup_offset=0x10ac270 bootup_size=0x5eec36 cmdline_keys=if keyman init 0x1234; then if keyman read usid ${loadaddr} str; then setenv bootargs ${bootargs} androidboot.serialno=${usid};fi;if keyman read mac ${loadaddr} str; then setenv bootargs ${bo; cvbsmode=576cvbs digitaudiooutput=PCM display_bpp=24 display_color_bg=0 display_color_fg=0xffff display_color_index=24 display_height=2160 display_layer=osd1 display_width=3840 dtb_mem_addr=0x1000000 edid.crcvalue=0xa62c0000 ethact=Meson_Ethernet ethaddr=00:15:18:01:81:31 factory_reset_poweroff_protect=echo wipe_data=${wipe_data}; echo wipe_cache=${wipe_cache};if test ${wipe_data} = failed; then run init_display; run storeargs;if mmcinfo; then run recovery_from_sdcard;fi;i fb_addr=0x3f800000 fb_height=1080 fb_width=1920 fdt_high=0x20000000 firstboot=0 gatewayip=10.18.9.1 hdmimode=2160p60hz420 hostname=arm_gxbb init_display=hdmitx hpd;osd open;osd clear;vout output ${outputmode};imgread pic logo bootup $loadaddr;bmp display $bootup_offset;bmp scale initargs=rootfstype=ramfs init=/init console=ttyS0,115200 no_console_suspend earlyprintk=aml-uart,0xc81004c0 ramoops.mem_address=0x20000000 ramoops.mem_size=0x100000 ramoops.record_size=0x8000 ramoops.cone ipaddr=10.18.9.97 irremote_update=if irkey 0xe31cfb04 0xb748fb04 2500000; then echo read irkey ok!; if itest ${irkey_value} == 0xe31cfb04; then run update;else if itest ${irkey_value} == 0xb748fb04; then run update;\ fi;fi;fi; is.bestmode=false loadaddr=1080000 mac=da:7b:db:4e:28:af netmask=255.255.255.0 outputmode=2160p60hz420 preboot=run factory_reset_poweroff_protect;run upgrade_check;run bootmode_check;run init_display;run storeargs;run upgrade_key;run switch_bootmode; reboot_mode=normal recovery_from_flash=if imgread kernel recovery ${loadaddr}; then bootm ${loadaddr}; fi recovery_from_sdcard=if fatload mmc 0 ${loadaddr} aml_autoscript; then autoscr ${loadaddr}; fi;if fatload mmc 0 ${loadaddr} recovery.img; then if fatload mmc 0 ${dtb_mem_addr} dtb.img; then echo sd dtb.im; recovery_from_udisk=if fatload usb 0 ${loadaddr} aml_autoscript; then autoscr ${loadaddr}; fi;if fatload usb 0 ${loadaddr} recovery.img; then if fatload usb 0 ${dtb_mem_addr} dtb.img; then echo udisk dtb.; sdc_burning=sdc_burn ${sdcburncfg} sdcburncfg=aml_sdc_burn.ini serverip=10.18.9.113 stderr=serial stdin=serial stdout=serial storeargs=setenv bootargs ${initargs} logo=${display_layer},loaded,${fb_addr},${outputmode} hdmimode=${hdmimode} cvbsmode=${cvbsmode} hdmitx=${cecconfig} androidboot.firstboot=${firstboot}; run cmdline_ke; storeboot=if imgread kernel boot ${loadaddr}; then store dtb read $dtb_mem_addr; bootm ${loadaddr}; fi;run update; switch_bootmode=get_rebootmode;if test ${reboot_mode} = factory_reset; then run recovery_from_flash;else if test ${reboot_mode} = update; then run update;else if test ${reboot_mode} = cold_boot; then run ; try_auto_burn=update 700 750; update=run usb_burning; run sdc_burning; if mmcinfo; then run recovery_from_sdcard;fi;if usb start 0; then run recovery_from_udisk;fi;run recovery_from_flash; upgrade_check=echo upgrade_step=${upgrade_step}; if itest ${upgrade_step} == 3; then run init_display; run storeargs; run update;else if itest ${upgrade_step} == 1; then defenv_reserv; setenv upgrade_step; upgrade_key=saradc open 0; if saradc get_in_range 0x0 0x50; then echo detect upgrade key; run update;fi; upgrade_step=2 usb_burning=update 1000 wipe_cache=successful wipe_data=successful Environment size: 4777/65532 bytes |
Now you can change some settings in U-boot in order to allow for Linux to boot from SD card. If you are doing so directly in Android terminal via adb, you can replace setenv and saveenv by fw_setenv and fw_saveenv (no present in MINI MX firmware):
|
1 2 3 4 |
setenv preboot "run factory_reset_poweroff_protect;run upgrade_check;run bootmode_check;run init_display;run storeargs;run update_key;run irremote_update;run user_start;run switch_bootmode;" setenv user_start "if mmcinfo; then run linux_start_mmc;fi;" setenv linux_start_mmc "if fatload mmc 0 1080000 kernel.img; then if fatload mmc 0 0x1000000 dtb.img; then echo sd dtb.img loaded; fi;echo ===[LINUX START from mmc]===; bootm 1080000;fi;" saveenv |
Flash Ubuntu image to the SD card
First download the Ubuntu image: ubuntu-14.04-headless-arm64.7z.
I’ve done this step in an Ubuntu computer, but you could also perform the same steps in Windows with 7pzip and Win32DiskImager. Install required tools and uncompress the image.
|
1 2 |
sudo apt-get install p7zip-full pv 7z x ubuntu-14.04-headless-arm64.7z |
Insert the micro SD card (2GB or greater) in your computer, check the device with lsblk, and flash the image to your SD card by replacing /dev/sdX in the command below by your actual device.
|
1 2 |
sudo dd if=ubuntu-14.04-headless-arm64.img | pv | sudo dd of=/dev/sdX bs=16M sync |
Get the Device Tree File for Your device
If you are trying this on K1 Plus, you can skip that step, but if you are using another device, in my case Beelink MINI MX replacing the device tree file in /boot/dtb.img might be a good idea. For example, MINI MX would only get a Fast Ethernet connection with K1 Plus device tree file, but once I extracted the one from the Android firmware I got an Gigabit Ethernet connection.
If you’ll need to get boot.img either from some firmware update file, or directly from the NAND flash. I don’t have firmwre for MINI NX, so I dumped the boot partition with an adb shell:
|
1 |
dd if=/dev/block/boot of=<sdcard_path>/boot.img |
Then I followed the instructions to extract a device tree file from Android, until I get boot.img-second.gz file, which I copied to the boot partition in the SD card with Ubuntu
|
1 |
cp boot.img-second.gz /media/jaufranc/boot/dtb.img |
Run Ubuntu in MINI MX
You may want to extend the rootfs partition in the SD card with gparted, or you’ll only have a small part of your SD card used. Now insert the SD into your Amlogic S905 TV box, and connect the power.
After some time getting wasted waiting for the network, you should be able to access to command line by logging in with user debian and password temppwd:
|
1 2 3 4 5 6 7 8 9 |
Ubuntu 14.04 LTS koneplus ttyS0 koneplus login: debian Password: Last login: Thu Jan 1 00:02:46 UTC 2015 on ttyS0 Welcome to Ubuntu 14.04 LTS (GNU/Linux 3.14.29 aarch64) * Documentation: https://help.ubuntu.com/ debian@koneplus:~$ |
That’s a minimal image so there’s plenty of free space and memory:
|
1 2 3 4 5 6 7 8 9 10 11 12 13 14 15 |
debian@koneplus:~$ df -h Filesystem Size Used Avail Use% Mounted on /dev/mmcblk0p2 29G 462M 28G 2% / devtmpfs 280M 4.0K 280M 1% /dev none 4.0K 0 4.0K 0% /sys/fs/cgroup tmpfs 404M 0 404M 0% /tmp none 81M 252K 81M 1% /run none 5.0M 0 5.0M 0% /run/lock none 404M 0 404M 0% /run/shm none 100M 0 100M 0% /run/user debian@koneplus:~$ free -h total used free shared buffers cached Mem: 807M 125M 681M 256K 3.1M 22M -/+ buffers/cache: 99M 707M Swap: 0B 0B 0B |
All four cores are shown when I check the cpuinfo:
|
1 2 3 4 5 6 7 8 9 10 11 12 13 14 |
cat /proc/cpuinfo Processor : AArch64 Processor rev 4 (aarch64) processor : 0 processor : 1 processor : 2 processor : 3 Features : fp asimd crc32 CPU implementer : 0x41 CPU architecture: AArch64 CPU variant : 0x0 CPU part : 0xd03 CPU revision : 4 Hardware : Amlogic |
The kernel is build with Android’s option “CONFIG_ANDROID_PARANOID_NETWORK“, so all network configuration must be done with root:
|
1 2 3 4 5 6 7 8 9 10 11 12 13 14 15 16 17 18 19 20 21 22 23 24 25 |
ifconfig eth0 eth0 Link encap:Ethernet HWaddr da:7b:db:4e:28:af inet6 addr: fe80::d87b:dbff:fe4e:28af/64 Scope:Link UP BROADCAST RUNNING MULTICAST MTU:1500 Metric:1 RX packets:1788 errors:0 dropped:0 overruns:0 frame:0 TX packets:178 errors:0 dropped:0 overruns:0 carrier:0 collisions:0 txqueuelen:1000 RX bytes:265549 (265.5 KB) TX bytes:14810 (14.8 KB) Interrupt:40 ifconfig eth0 192.168.0.201 up No support for INET on this system. sudo ifconfig eth0 192.168.0.201 up sudo ifconfig sudo: unable to resolve host koneplus eth0 Link encap:Ethernet HWaddr da:7b:db:4e:28:af inet addr:192.168.0.201 Bcast:192.168.0.255 Mask:255.255.255.0 inet6 addr: fe80::d87b:dbff:fe4e:28af/64 Scope:Link UP BROADCAST RUNNING MULTICAST MTU:1500 Metric:1 RX packets:2570 errors:0 dropped:0 overruns:0 frame:0 TX packets:248 errors:0 dropped:0 overruns:0 carrier:0 collisions:0 txqueuelen:1000 RX bytes:384945 (384.9 KB) TX bytes:19904 (19.9 KB) Interrupt:40 |
So there’s some work to be done, but at least that’s a start.
[Update: It’s easy to put the case together with the serial wires by cutting the plastic case a little.
 ]
]

Jean-Luc started CNX Software in 2010 as a part-time endeavor, before quitting his job as a software engineering manager, and starting to write daily news, and reviews full time later in 2011.
Support CNX Software! Donate via cryptocurrencies, become a Patron on Patreon, or purchase goods on Amazon or Aliexpress


“Only one core is shown when I check the CPU however”
One core? You definitely have 4 being up here. It is just an ancient kernel with a deprecated format for /proc/cpuinfo.
@maz
Oops. You’re right. I saw so few lines i thought it was only showing 1 core. But 4 processors are shown…
Thanks for the write-up.
Regarded the CPU – the kernel config (meson64) has the hot-plug cpu governor set as default (which I was not aware of) so the ‘top’ utility really displayed only one core (after presing key ‘1’) – the rest of the cores was disabled. This also casued issues with installation of cpufreq tools (basically the apt-get install hanged), so I changed the default CPU governor to ondemand in my kernel build, which fixed the installation issue and hopefully might be more convenient for benchmarking purposes etc.
Excellent work Olin, nice to see Linux running on the S905!
@olin
So I don’t need anything except original amlogic kernel + device tree file
to boot kernel on amlogic device ??
@m][sko
Correct. You also need a way how to start the kernel from the memory card – that’s what the u-boot scripts are for.
Headless or can we run an Ubuntu with a desktop manager (LXDE or MATE or similar) ??
@cnxsoft, i have the usb-to-ttl i bought a while back, but where did you get the wiring that’s soldered into the board from? I need to buy it.
@fossxplorer
These are standard 2.54mm dupont cables with female connectors:
http://www.dx.com/p/1-pin-dupont-wire-connector-cables-40-pcs-20cm-151537
I also used male cables for extension, just like you would use with a breadboard:
http://www.dx.com/p/universal-male-to-male-male-to-female-female-to-female-arduino-dupont-cables-set-multicolored-268610
@cnxsoft
Awesome. Placing order now! Thx a lot.
Btw, is there a place to buy cheap soldering equips from? 🙂
Never soldered before though.
@cnxsoft
Can it run OpenElec or KodiBuntu?
@cnxsoft
good work!
Is it possible to write the device’s bootenv with booting a modified recovery SDcard?
There is a set_bootloader_env() function in the updater-script.
@gcsuri
It might be but I haven’t tried it yet.
Should be able to place uboot autoscript commands into “aml_autoscript” on a fat partitioned sdcard or usb, when you hit the physical upgrade button (or IR codes?) while booting It’ll try “usb burning > sd burning > sd recovery > usb recovery” in that order.
Does the S/PDIF output work? What about bluetooth?
Thanks.
@Whiterat @gcsuri
thats a good idea. there is a way how to trigger upgrade from mmc by pressing menu (hamburger) button on the remote during boot, which loads the recovery.img kernel. the only issue right now is the framebuffer doesn’t seem to be working correctly, so virtual console and terminal doesn’t work (nothing is displayed on the screen connected via hdmi) – but maybe it’s just a matter of reconfiguring kernel. so for now ony serial console or ssh works.
Where to get firmware for Mini MX? I would like to buy that device and run Ubuntu with correct Device Tree File. So I need firmware image to extract it.
ODROID-C2 with Amlogic S905 coming soon -> http://www.cnx-software.com/2015/07/22/odroid-c1-board-is-an-upcoming-upgrade-to-odroid-c1-board/#comment-520642
So Linux on Amlogic S905 should soon become a reality.
@cnxsoft
I sent you message on hangouts yesterday… 🙂
Amlogic released Linux SDK (Buildroot based) for S905 yesterday with updated kernel and drivers along with fb and x11 arm64 mali libs – http://openlinux.amlogic.com:8000/download/ARM/
@olin
I’ve just got my MXQ and Mini MX.
On MXQ I can use “setprop ubootenv.var.something val” command to change uboot variables from userspace.
It doesn’t work on MiniMX 🙁 – Is there any built-in utility in MiniMX to write /dev/block/env ?
@olin , @cnxsoft
OK, I got the solution to read/write the bootenv without jtag…
dumpsys system_control -b [ set | get ] bootenv [value]
for example:
dumpsys system_control -b get ubootenv.var.bootdelay
I’d love to see some noob friendly instructions to get Linux with desktop running on S905 boxes. Yes, Kodi would be great but for other uses. Or some dual boot instructions?
@Methanoid
That is very optimistic thinking I must say 🙂
One solution is to wait for Odroid C2 board and their emmc with preinstalled Lubuntu 🙂
@Stane1983
Now amlogic have release a updated sdk
Does this mean we may see a openelec build for the mini mx soon?
Amlogic has worst display, mali GPU and video decoder drivers
they can’t fix v-sync mali drivers problem since they first release buildroot/kernel
only android drivers are fine
Erm ok, so is that big up amlogic?
@Number 63
If someone is working on it then yes.
Thanks @Stane1983 i will keep my fingers and toes crossed. Not a lover of android.
Do you know if anyone is working on it stane?
@cnxsoft
How did you open MiniMX box? 🙂
Its just clipped in underneath
@gcsuri
@Number 63 it’s quite easy to open.
I explain how I did it in the teardown section @ http://www.cnx-software.com/2015/11/23/mini-mx-4k-android-media-player-unboxing-and-teardown/
You just need to slide a sharp plastic tool.
very nice tutorial i’ll test that on my s802/s812 boxes, both run openelec images but i’d like to have regular distros.
I’ve located the unpopulated rs232 headers on both boards, looks like most of them will have those debug pins.
I wanted to know if you had a chance to test the gigabit performance (iperf) with that kernel on your mini mx box, and if you noticed the same duplex behavior as in your review.
Also you mention the Android / Linux kernel, i’m a bit confused as to what amlogic actually released and if there’s a difference between the two. I assuming that to run a linux root fs i should only be interested in using a linux kernel, if i’m wrong about that please let me know.
@mdel
Amlogic S812 should even be worse. Expect 200 to 300 Mbps max.
Both Android and Linux kernel are based on the same source tree, but the Linux kernel for Android has some extra options. You can still use linux rootfs with an Android kernel, but you’ll get some funny behaviors, like the need to be root to access the network. Usually, it’s just a matter of disabled the Android option with make menuconfig to get a kernel better suited for a “Linux” rootfs.
@cnxsoft
i believe my s812 M8S box only has 100Mbit eth, but i’m quite familiar with those “usb gigabit” boards (pcduino), which are limited to usb bandwidth so 480Mbps at best, usually 300Mbps.
I was going to buy an M8S+ box (s812 with “GBe”) but i can’t find the s812 block diagram to see if it has hardware GBe interface, apparently the S805 diagram has GBe.
Thx for the kernel info, i’ll try building one for my S8xx boards and serial u-boot them over the weekend.
A couple of questions more on topic :
if a box can already boot a linux image from SD Card (beelink MXQ), is it simply because the existing nand uboot has the same configuration as the one you set through serial as described above ?
Also are there TTL voltage considerations to be careful about when plugin an adapter on those boards ?
i’m mentioning this because that’s something you need to know about when doing the same thing on a raspberry pi which has 3.3v GPIO, including its serial interface, and some (most?) USB/Serial TTL adapters use 5V signals..
Could any “distro” run X in this box?
My knowledge on the matter is quite limited, so @cnxsoft will probably tell you more.
There are gpu drivers in the amlogic tarballs, so X should be able to run with some 2D acceleration, but “running” X does necessarily mean much, some basic use case could be barely functional (videos).
But so far i was able to boot and ubuntu (lxde) filesystem, using an openelec 6 kernel, on an s805 box and the desktop was running “fine”. It also works on similar platforms like raspberry pi, odroid, orange pi boards.
Advanced (3D) window managers, unity, gnome shell and so on, would require 3D acceleration and i have no idea what’s the state of the mali X driver in that regard..
I do believe Kodi uses 3D accel to work but i’m not sure it uses an X server, at least in standalone mode in openelec.
@mdel
Some people tend to overestimate my skills… as I’ve spent my time reading and write in the last 5 years, rather than doing any projects, so I mostly rely on others. But with the latest source, I assume it should be possible to run X. I’ve been told both the framebuffer and X11 GPU drivers were available, so some form of GPU acceleration should be possible too. The easiest way is to sit and relax until ODROID-C2 comes out. Now Hardkernel is taking their time before launching because many Ubuntu packages are still not working/available for ARM64, one of them being Chromium if I remember correctly.
ok, I got X and LXDE run on my MiniMX. X uses fbdev. There are some graphic error around fonts and window frames but it works. 🙂
I’ve just made a simple network perf test with nc.
nc 10.1.0.55 3333|dd of=/dev/null bs=1024 count=1024000
1 GB copied, 10.6484s, 98.4MB/s
I think the eth interface works on full bandwidth 😉
my SDcard reading speed is about 10MB/sec
internal mmc is around 40MB/s
@gcsuri
most impressive gigabit stats.
too bad s805 boxes don’t make use of the chip gigabit capabilities (according to hardkernel datasheet).
Concerning your X test, did you build a kernel with the gpu driver or use the image provided by olin ?
Not sure which module X should load with a working gpu driver but fbdev is not accelerated so..
I’m using fbdev on X. Windows moving fast enough. There is a bug in the amlogic fb code so 32bpp doesn’t work well (there are a lot of black area in the screen). I had to define 24bpp in x.conf and changed the kernel driver to 24bit init to get fbcon work perfectly.
Now I’m working on the USB boot because it’s 4x faster than cardreader…
@gcsuri
You can use following u-boot command to boot from usb.
usb start
fatload usb 0 0x1080000 kernel.img
fatload usb 0 0x1000000 dtb.img
boots 0x1080000
@gcsuri
Can you tell me how to get fbcon working?
I already compile kernel with fbcon.
I only see the boot logo after “echo 0 > /sys/class/graphics/fb0/blank”.
You need to map the console. fbcon=map:0
hi,
can it be possible to make the mini mx dual boot so we can launch openelec from SD card ?
Hi,
I am newbie, trying to run headless Ubuntu server on MQX (s805) with Odroid c1 Ubuntu release.
I used the above procedure with minor changes according to the Odroid boot.ini.
The MQX boots from the SD but I get some errors and it get stuck after 3 seconds.
Can anyone help?
Ok so I managed to boot the Ubuntu 16.04 from the ODROID C2 on an MXQ Pro. I can ssh to it fine but X11 doesn’t show up on the screen. Only the boot logo stays. I’ll release the image for people to test.
Hi, I’ve a geniatech box ATV495 with S905. Last night i used this doc(http://openlinux.amlogic.com:8000/download/doc/linux-3.14-buildroot-pkg-201512-release-v1.0.pdf) to flash buildroot linux from on nand. Its working fine. But now I want to test ubuntu on this box like u did.
Here is what I found on ubuntu-14.04-headless-arm64.img
$ fdisk -l ubuntu-14.04-headless-arm64.img
Disk ubuntu-14.04-headless-arm64.img: 2002 MB, 2002780160 bytes
255 heads, 63 sectors/track, 243 cylinders, total 3911680 sectors
Units = sectors of 1 * 512 = 512 bytes
Sector size (logical/physical): 512 bytes / 512 bytes
I/O size (minimum/optimal): 512 bytes / 512 bytes
Disk identifier: 0x000857db
Device Boot Start End Blocks Id System
ubuntu-14.04-headless-arm64.img1 2048 143359 70656 6 FAT16
ubuntu-14.04-headless-arm64.img2 143360 3829759 1843200 83 Linux
$ sudo mount -o loop,offset=1048576 ubuntu-14.04-headless-arm64.img kern/
$ ls kern/
dtb.img kernel.img
Can I use these files as dtb.img and boot.img on sdcard?
@ss
You need to replace the dtb file with the one for ATV495.
Hi
I manged to install ubuntu on the S905 with the above instructions. Thank you!!
It seems like Wifi is not detected. Can it be that the Wifi drivers wasn’t compiled?
You can use two scripts, the first is making a universal change to the settings of u-boot, the second uses the personal settings for each version OS of the system.
The first stage – change settings via the launch of the first script in update mode :
aml_autoscript
for example with this content :
echo Start script update env aml_autoscript
setenv preboot “run factory_reset_poweroff_protect;run upgrade_check;run bootmode_check;run init_display;run storeargs;run update_key;run irremote_update;run start_autoscript;run switch_bootmode;”
setenv start_autoscript “if mmcinfo; then run start_mmc_autoscript;fi;if usb start; then run start_usb_autoscript;fi;”
setenv start_mmc_autoscript “if fatload mmc 0 1020000 s905_autoscript; then autoscr 1020000; fi”
setenv start_usb_autoscript “if fatload usb 0 1020000 s905_autoscript; then autoscr 1020000; fi”
saveenv
echo END script update env aml_autoscript
reboot
the second stage, for each version of your script s905_autoscript
for example to run the USB flash image Odroid C2 on Vega S95 Telos
setenv m “720p60hz”
setenv mbpp “32”
setenv bootargs “root=LABEL=rootfs rootwait rw console=ttyS0,115200n8 console=tty0 no_console_suspend hdmimode=${m} m_bpp=${mbpp} net.ifnames=0”
fatload usb 0:1 0x13000000 uInitrd
fatload usb 0:1 0x11000000 Image
fatload usb 0:1 0x1000000 img.dtb
booti 0x11000000 0x13000000 0x1000000
for example to run the SD image Odroid C2 on Vega S95 Telos
setenv m “720p60hz”
setenv mbpp “32”
setenv bootargs “root=LABEL=rootfs rootwait rw console=ttyS0,115200n8 console=tty0 no_console_suspend hdmimode=${m} m_bpp=${mbpp} net.ifnames=0”
fatload mmc 0:1 0x13000000 uInitrd
fatload mmc 0:1 0x11000000 Image
fatload mmc 0:1 0x1000000 img.dtb
booti 0x11000000 0x13000000 0x1000000
Detailed description here
http://forum.russ2.com/index.php?s=&showtopic=4273&view=findpost&p=46287
Sorry for my computer translation
Script s905_autoscript for Ubuntu to run an image from this theme
fatload mmc 0:1 0x10800000 kernel.img
fatload mmc 0:1 0x1000000 img.dtb
bootm 0x10800000
The command to build the necessary scripts
mkimage -A arm -O linux -T script -C none -d s905_autoscript.txt s905_autoscript
Can anyone send the device tree file to me?
Check out the catalog dtb_files
https://yadi.sk/d/gZW-PXc7qU4v7
Anyone who managed to set up ubuntu with X would like to share the steps or the images/rootfs?
My tv box is a KI Plus.
I’ve already followed these instructions without sucess: http://openlinux.amlogic.com:8000/download/doc/linux-3.14-buildroot-pkg-201512-release-v1.0.pdf
I only managed to get burn on the nand a the newly compiled u-boot and a bare filesystem (no apt-get,… etc), although the “release” build configurations do build the X…
Be aware that if you install the C2’s uboot on the nand it will brick the box and you will have to flash it shorting some nand pins: http://mbox.co.za/forum/viewtopic.php?f=62&t=182&start=20#p3748
You can try this option. But if something goes wrong, you will need a UART.
The method is universal and can work on all devices based on Amlogic S905.
http://freaktab.com/forum/tv-player-support/amlogic-based-tv-players/s905/tronsmart-ac/firmware-roms-tools-at/565449-running-linux-from-sd-card-or-usb-flash-drive-using-balbes150-method-and-files
If damaged, the boot loader image from Odroid C2.
Easily restored.
Prepare the SD card with the file with the firmware update for Your device.
Assemble u-boot for your device.
Make u-boot for your device to get the files u-boot.bin.bin.sd.bin and u-boot.bin.
Or download the finished files from the site at the link.
In Linux, run the commands :
dd if=u-boot.bin.sd.bin of=/dev/mmcblk0 bs=1 count=442
dd if=u-boot.bin.sd.bin of=/dev/mmcblk0 bs=512 skip=1 seek=1
dd if=u-boot.bin of=/dev/mmcblk0 bs=512 seek=97
Insert the SD card into the device and turn it on.
The device will boot from internal memory.
Perform the standard firmware update. As a result, the boot loader will be restored.
@balbes150
Ok, thanks. Last morning I tried the Telos Odroid C2 Ubuntu mate image (copied to an sd card with dd: https://github.com/150balbes/Amlogic_s905/wiki/Openelec-for-Tronsmart-Vega-S95-Telos-(English) ), with my device’s dtb and modified u-boot, and it worked.
However, what I want to do is flash the internal nand. The telos odroid C2 image doesn’t include the nand drivers module, so it won’t detect the filesystem.
What I’ve managed so far is to build the sources following this guide http://openlinux.amlogic.com:8000/download/doc/linux-3.14-buildroot-pkg-201512-release-v1.0.pdf (with some tweaks) and include the nand memory driver into the kernel (in the built rootfs: lib64/modules/3.14.29/kernel/amlogic/nand/aml_nftl_dev.ko).
The guide shows also how to burn the system into the nand flash.
With that what a I get is a bare system as the one explained here: http://odroid.us/mediawiki/index.php?title=Step-by-step_Buildroot/Busybox_Root_File_System.
I will keep trying to build and burn an Ubuntu mate system but with the nand module included in the kernel.
P.S.: a useful way to compare several device’s dtb’s is to conver them to dts wit this command:
dtc -I dtb -O dts -o
Another useful information… one of the ways to change the telos ubuntu language from russian to english:
Edit /etc/default/locale and change all ru_RU to en_US
Edit ~/.pam_environment and change all ru_RU to en_US
reboot
(info found here: http://askubuntu.com/questions/132347/gnome-classic-language-turned-into-chinese-how-do-i-change-it-back-to-english)
Hi,
could you please share the MiniMx dtb.img ?
It would be awesome to boot the Minimx on Linux :p
Hi.
What version MiniMx ? Have seen information that there are options. Therefore, for each variant it is better to use your file dtb.img . This file can be taken from a firmware image file for Your device.
By the way, i make a new version of the script aml_autoscript. Changed the point of call. Now works fine, stop function in UART download in the presence of media s905_autoscript. In the first version, if there is a script s905_autoscript, you cannot stop booting to the console UART.
Hi, I have been trying the identify and use the WiFi chip of an Acemax K3 board I have been dealing with. I managed to install Debian for Odroid C2 on it, using the Telos method.
Once Debian was installed I tried to identify the hardware using dmesg, lshw, lsusb, lsmod but nothing came across.
Then I booted the device in Android and downloaded a couple of hardware detection apps and nothing.
I opened the device. To my surprise, the device has 2 antennas but one of them is connected to nothing! They are just using the 2 antennas to sell more devices!
Then I downloaded the kernel for Odroid C2 and recompiled it with ALL the WiFi devices I could come across, including the Amlogic WiFi devices. After installing it I got some info in dmesg:
[ 0.214418] 1 bcmdhd_init_wlan_mem: wlan_static_skb[0]=ffffffc06161ed00, size=3760
[ 0.214424] 1 bcmdhd_init_wlan_mem: wlan_static_skb[1]=ffffffc06161ee00, size=3760
[ 0.214430] 1 bcmdhd_init_wlan_mem: wlan_static_skb[2]=ffffffc06161ef00, size=3760
[ 0.214443] 1 bcmdhd_init_wlan_mem: wlan_static_skb[3]=ffffffc06165e000, size=3760
[ 0.214450] 1 bcmdhd_init_wlan_mem: wlan_static_skb[4]=ffffffc06165e100, size=3760
[ 0.214456] 1 bcmdhd_init_wlan_mem: wlan_static_skb[5]=ffffffc06165e200, size=3760
[ 0.214462] 1 bcmdhd_init_wlan_mem: wlan_static_skb[6]=ffffffc06165e300, size=3760
[ 0.214468] 1 bcmdhd_init_wlan_mem: wlan_static_skb[7]=ffffffc06165e400, size=3760
[ 0.214474] 2 bcmdhd_init_wlan_mem: wlan_static_skb[8]=ffffffc06165e500, size=7856
[ 0.214481] 2 bcmdhd_init_wlan_mem: wlan_static_skb[9]=ffffffc06165e600, size=7856
[ 0.214486] 2 bcmdhd_init_wlan_mem: wlan_static_skb[10]=ffffffc06165e700, size=7856
[ 0.214492] 2 bcmdhd_init_wlan_mem: wlan_static_skb[11]=ffffffc06165e800, size=7856
[ 0.214497] 2 bcmdhd_init_wlan_mem: wlan_static_skb[12]=ffffffc06165e900, size=7856
[ 0.214504] 2 bcmdhd_init_wlan_mem: wlan_static_skb[13]=ffffffc06165ea00, size=7856
[ 0.214510] 2 bcmdhd_init_wlan_mem: wlan_static_skb[14]=ffffffc06165eb00, size=7856
[ 0.214515] 2 bcmdhd_init_wlan_mem: wlan_static_skb[15]=ffffffc06165ec00, size=7856
[ 0.214521] 3 bcmdhd_init_wlan_mem: wlan_static_skb[16]=ffffffc06165ed00, size=16048
[ 0.214527] 4 bcmdhd_init_wlan_mem: wlan_mem_array[0]=ffffffc06161ed00, size=20504
[ 0.214532] 4 bcmdhd_init_wlan_mem: wlan_mem_array[1]=ffffffc06161ee00, size=20504
[ 0.214539] 4 bcmdhd_init_wlan_mem: wlan_mem_array[2]=ffffffc06161ef00, size=81944
[ 0.214548] 4 bcmdhd_init_wlan_mem: wlan_mem_array[3]=ffffffc06165e000, size=163864
[ 0.214553] 4 bcmdhd_init_wlan_mem: wlan_mem_array[4]=ffffffc06165e100, size=20504
[ 0.214561] 4 bcmdhd_init_wlan_mem: wlan_mem_array[5]=ffffffc06165e200, size=81944
[ 0.214567] 5 bcmdhd_init_wlan_mem: wlan_static_scan_buf0=ffffffc061770000, size=65536
[ 0.214572] 6 bcmdhd_init_wlan_mem: wlan_static_scan_buf1=ffffffc0617e0000, size=65536
[ 0.214576] bcmdhd_init_wlan_mem: WIFI MEM Allocated
Then the command:
cat /proc/device-tree/wifi/dev_name
returns: aml_broadcm_wifi
Can anybody give me some guidelines on what to do next to make it work?
Thank you for your great work.
Here is some useful information:
http://freaktab.com/forum/tv-player-support/amlogic-based-tv-players/s905/beelink-ac/562425-lubuntu-possible-on-s905/page2
Else is here :
http://freaktab.com/forum/tv-player-support/amlogic-based-tv-players/s905/tronsmart-ac/firmware-roms-tools-at/565449-running-linux-from-sd-card-or-usb-flash-drive-using-balbes150-method-and-files
Thanks balbes150, I imagined it involved adding something to the kernel related to this:
http://openlinux.amlogic.com:8000/download/ARM/wifi/
I’ll have a look to those openelec images to figure out what drivers need to be added to the 3.14.29 odroid C2 kernel so audio, bluetooth and wifi work.
It would be nice finding a kernel that is ready for these TV devices, maybe I should build one and upload it to github.
Thanks for the information, I’ll have a play with it.
If your sd card is mounted at /dev/mmcblkXpY
flash the ubuntu to sd card with
sudo dd if=ubuntu-14.04-headless-arm64.img of=/dev/mmcblkX bs=16M
Hi again.
I have been reading the freaktab forums but still haven’t had any luck with the broadcom driver. I managed to merge the wifi sources of bcmdhd_1_201_59_x listed in http://openlinux.amlogic.com:8000/download/ARM/wifi/ with the Odroid C2 kernel and got an operating version of the dhd module, but when I load it, it doesn’t seem to try to search the nvram.txt or firmware from the directory I set. dhd seems to load ok with no errors, but I still don’t have a usable wlan0 interface.
Do I need to load another module after dhd?
Does anybody know if there is a 3.14.29 kernel with the missing amlogic broadcom and realtek sources?
These are my logs
[ 134.562037] cfg80211: Calling CRDA to update world regulatory domain
[ 134.679574] cfg80211: World regulatory domain updated:
[ 134.679591] cfg80211: DFS Master region: unset
[ 134.679595] cfg80211: (start_freq – end_freq @ bandwidth), (max_antenna_gain, max_eirp)
[ 134.679600] cfg80211: (2402000 KHz – 2472000 KHz @ 40000 KHz), (N/A, 2000 mBm)
[ 134.679604] cfg80211: (2457000 KHz – 2482000 KHz @ 40000 KHz), (N/A, 2000 mBm)
[ 134.679609] cfg80211: (2474000 KHz – 2494000 KHz @ 20000 KHz), (N/A, 2000 mBm)
[ 134.679613] cfg80211: (5170000 KHz – 5250000 KHz @ 80000 KHz), (N/A, 2000 mBm)
[ 134.679617] cfg80211: (5250000 KHz – 5330000 KHz @ 80000 KHz), (N/A, 2000 mBm)
[ 134.679621] cfg80211: (5490000 KHz – 5730000 KHz @ 160000 KHz), (N/A, 2000 mBm)
[ 134.679625] cfg80211: (5735000 KHz – 5835000 KHz @ 80000 KHz), (N/A, 2000 mBm)
[ 134.679629] cfg80211: (57240000 KHz – 63720000 KHz @ 2160000 KHz), (N/A, 0 mBm)
[ 134.680706] dhd_module_init: in
[ 134.680795] [wifi_setup_dt] wifi_setup_dt
[ 134.680830] [wifi_setup_dt] interrupt_pin(235)
[ 134.680842] [wifi_setup_dt] power_on_pin(234)
[ 134.680849] ======== bcm_wlan_set_plat_data ========
[ 134.683201] host_oob_irq: 100
[ 134.686305] host_oob_irq_flags=1044
[ 134.689790] dhd_wifi_platform_load: Enter
[ 134.693742] Power-up adapter ‘DHD generic adapter’
[ 134.698480] wifi_platform_set_power = 1
[ 134.702262] ======== PULL WL_REG_ON HIGH! ========
[ 134.707011] [extern_wifi_set_enable] WIFI Disable! 234
[ 134.907046] [extern_wifi_set_enable] WIFI Enable! 234
[ 135.408030] wifi_platform_bus_enumerate device present 1
[ 135.408148] ======== Card detection to detect SDIO card! ========
[ 135.414882] [aml_sd_emmc_irq] sdio: resp_timeout,vstat:0x2800,virqc:3fff
[ 135.414908] aml_sd_emmc_data_thread 2211 sdio: cmd:52
[ 135.415880] [aml_sd_emmc_irq] sdio: resp_timeout,vstat:0x2800,virqc:3fff
[ 135.415889] aml_sd_emmc_data_thread 2211 sdio: cmd:52
[ 135.420351] [aml_sd_emmc_irq] sdio: resp_timeout,vstat:0x2800,virqc:3fff
[ 135.420367] aml_sd_emmc_data_thread 2211 sdio: cmd:8
[ 135.453253] sdio: queuing unknown CIS tuple 0x80 (2 bytes)
[ 135.457540] sdio: queuing unknown CIS tuple 0x80 (7 bytes)
[ 135.460958] sdio: queuing unknown CIS tuple 0x80 (3 bytes)
[ 135.548872] sdio: clk 200000000 SDR mode tuning start
[ 135.549048] rx_tuning_result[0][0] = 10
[ 135.549214] rx_tuning_result[0][1] = 10
[ 135.549391] rx_tuning_result[0][3] = 10
[ 135.549555] rx_tuning_result[0][4] = 10
[ 135.549559] best_win_start =3, best_win_size =4
[ 135.549564] sd_emmc_regs->gclock =0x1000245, sd_emmc_regs->gadjust =0x42000
[ 135.549570] sdio: gclock =0x1000245, gdelay=0x0
[ 135.549574] gadjust=0x42000
[ 135.551997] sdio: queuing unknown CIS tuple 0x91 (3 bytes)
[ 135.552134] sdio: new ultra high speed SDR104 SDIO card at address 0001
[ 135.552140] sdio: clock 200000000, 4-bit-bus-width
[ 135.552383] [sdio_reinit] finish
[ 135.568592] bcmsdh_register: register client driver
[ 135.568790] bcmsdh_sdmmc: bcmsdh_sdmmc_probe Enter
[ 135.572748] bcmsdh_sdmmc: bcmsdh_sdmmc_probe Enter
[ 135.577415] bus num (host idx)=0, slot num (rca)=1
[ 135.582187] found adapter info ‘DHD generic adapter’
[ 135.587084] 7 bcmdhd_mem_prealloc: wlan_mem_array[section].mem_ptr=ffffffc001bb6638, size=139264
[ 135.587090] success alloc section 3, size 139264
[ 135.591765] alloc static buf at ffffffc062b40000!
[ 135.596306] 1 bcmdhd_mem_prealloc: section=4, wlan_static_skb=ffffffc001ed4e00
[ 135.596311] success alloc section 4, size 0
[ 135.600792] dhdsdio_probe : no mutex held. set lock
[ 135.605350] F1 signature read @0x18000000=0x16014335
[ 135.612882] F1 signature OK, socitype:0x1 chip:0x4335 rev:0x1 pkg:0x0
[ 135.617077] DHD: dongle ram size is set to 786432(orig 786432) at 0x180000
[ 135.623482] 4 bcmdhd_mem_prealloc: section=7, wlan_mem_array[4]=ffffffc062b18000
[ 135.623490] success alloc section 7, size 26160
[ 135.627905] dhd_conf_set_chiprev: chip=0x4335, chiprev=1
[ 135.633208] dhd_conf_set_conf_path_by_nv_path: config_path=/lib/firmware/brcm/config.txt
[ 135.637001] Bluetooth: Generic Bluetooth SDIO driver ver 0.1
[ 135.655708] dhd_conf_read_config: Ignore config file /lib/firmware/brcm/config.txt
[ 135.657788] 7 bcmdhd_mem_prealloc: wlan_mem_array[section].mem_ptr=ffffffc001bb6608, size=10416
[ 135.657792] success alloc section 0, size 10416
[ 135.662554] 2 bcmdhd_mem_prealloc: section=5, wlan_static_scan_buf0=ffffffc062ba0000
[ 135.662561] success alloc section 5, size 65536
[ 135.666850] wl_create_event_handler(): thread:wl_event_handler:220 started
[ 135.666855] tsk Enter, tsk = 0xffffff800167daa8
[ 135.678213] dhd_attach(): thread:dhd_watchdog_thread:221 started
[ 135.684016] dhd_attach(): thread:dhd_dpc:222 started
[ 135.684031] dhd_dpc_thread: set dpc_cpucore 0 from config.txt
[ 135.694641] dhd_attach(): thread:dhd_rxf:223 started
[ 135.699525] dhd_deferred_work_init: work queue initialized
[ 135.705031] 7 bcmdhd_mem_prealloc: wlan_mem_array[section].mem_ptr=ffffffc001bb6618, size=10396
[ 135.705035] success alloc section 1, size 10396
[ 135.709527] 7 bcmdhd_mem_prealloc: wlan_mem_array[section].mem_ptr=ffffffc001bb6628, size=65536
[ 135.709532] success alloc section 2, size 65536
[ 135.714173] dhdsdio_probe_init: set use_rxchain 1 from config.txt
[ 135.728866] Dongle Host Driver, version 1.201.59.5 (r506368)
Compiled in drivers/net/wireless/bcmdhd
[ 135.740301] Register interface [wlan0] MAC: 5c:f8:a1:50:82:fd
[ 135.747745] dhd_prot_ioctl : bus is down. we have nothing to do
[ 135.753684] bcmsdh_oob_intr_unregister: Enter
[ 135.757919] bcmsdh_oob_intr_unregister: irq is not registered
[ 135.763633] dhd_txglom_enable: enable 0
[ 135.767407] dhd_bus_devreset: WLAN OFF DONE
[ 135.771697] wifi_platform_set_power = 0
[ 135.775427] ======== PULL WL_REG_ON LOW! ========
[ 135.780102] dhdsdio_probe : the lock is released.
[ 135.784840] dhd_module_init: Exit err=0
[ 135.784927] usbcore: registered new interface driver brcmfmac
Any ideas on what to do next?
Thanks fory our help guys.
I found the answer to my own question:
The firmware and nvram get loaded with this command:
ifconfig wlan0 up
It tried to load a firmware and nvram but they were not the right ones for the adapter.
I needed to find the right ones for this adapter. With the log of dhd I had some clues, with this line:
F1 signature OK, socitype:0x1 chip:0x4335 rev:0x1 pkg:0x0
Then I went to this page https://wireless.wiki.kernel.org/en/users/drivers/brcm80211 and found out that the chip: 0x4335 corresponds to the Broadcom BCM4335 (The page says that it also belongs to BCM4338).
The easiest way to find the right right firmware, nvram.txt and config.txt files, was by getting the original ones that came with the device. So I booted it in android. The connected to it using adb. The files were located in /system/etc/wifi/4335/
Then it was just a matter of renaming the files nvram_bcm4335.txt to nvram.txt and the file fw_bcm43438a0.bin to fw_bcmdhd.bin. Then copying nvram.txt, fw_bcmdhd.bin and config.txt to the folder /lib/firmware/brcm/ (those file names and path were entered by me when I setup up the kernel with menuconfig).
Finally when I did another ifconfig wlan0 up, got the following:
[ 238.519239] dhd_open: Enter ffffffc061c79000
[ 238.522172]
Dongle Host Driver, version 1.201.59.5 (r506368)
Compiled in drivers/net/wireless/bcmdhd
[ 238.537525] wl_android_wifi_on in 1
[ 238.540818] wl_android_wifi_on in 2: g_wifi_on=0
[ 238.545303] wifi_platform_set_power = 1
[ 238.549137] ======== PULL WL_REG_ON HIGH! ========
[ 238.553853] [extern_wifi_set_enable] WIFI Disable! 234
[ 238.753864] [extern_wifi_set_enable] WIFI Enable! 234
[ 239.258439] sdio_reset_comm():
[ 239.297484] sdio: queuing unknown CIS tuple 0x80 (2 bytes)
[ 239.304711] sdio: queuing unknown CIS tuple 0x80 (7 bytes)
[ 239.310046] sdio: queuing unknown CIS tuple 0x80 (3 bytes)
[ 239.397870] sdio: clk 200000000 SDR mode tuning start
[ 239.398040] rx_tuning_result[0][0] = 10
[ 239.398206] rx_tuning_result[0][1] = 10
[ 239.398387] rx_tuning_result[0][3] = 10
[ 239.398714] rx_tuning_result[0][4] = 10
[ 239.398718] best_win_start =3, best_win_size =4
[ 239.398723] sd_emmc_regs->gclock =0x1000245, sd_emmc_regs->gadjust =0x42000
[ 239.398729] sdio: gclock =0x1000245, gdelay=0x0
[ 239.398732] gadjust=0x42000
[ 239.399005]
dhd_bus_devreset: == WLAN ON ==
[ 239.409149] F1 signature read @0x18000000=0x16014335
[ 239.416143] F1 signature OK, socitype:0x1 chip:0x4335 rev:0x1 pkg:0x0
[ 239.420689] DHD: dongle ram size is set to 786432(orig 786432) at 0x180000
[ 239.427143] dhdsdio_probe_init: set use_rxchain 1 from config.txt
[ 239.433224] dhd_conf_read_config: kso_enable = 0
[ 239.437633] dhd_conf_set_fw_name_by_chip: firmware_path=/lib/firmware/brcm/fw_bcmdhd.bin
[ 239.445664] Final fw_path=/lib/firmware/brcm/fw_bcmdhd.bin
[ 239.451087] Final nv_path=/lib/firmware/brcm/nvram.txt
[ 239.456156] Final conf_path=/lib/firmware/brcm/config.txt
[ 239.514269] NVRAM version: bcm94335wlcspMS_ES50_RC171p24p23_04052013_AM_mdfy_PAparam.txt — 4/5/2013 by Murata, based on bcm94335wlcspMS_ES50_RC171p24p20_04022013_AM.txt, changed PA parameters and txidxcap parameters and ccode.
[ 239.532028] dhdsdio_write_vars: Download, Upload and compare of NVRAM succeeded.
[ 239.671374] dhd_bus_init: enable 0x06, ready 0x06 (waited 0us)
[ 239.674922] bcmsdh_oob_intr_register: Enter
[ 239.679040] bcmsdh_oob_intr_register: HW_OOB enabled
[ 239.683812] bcmsdh_oob_intr_register OOB irq=100 flags=414
[ 239.689416] bcmsdh_oob_intr_register: enable_irq_wake
[ 239.694250] bcmsdh_oob_intr_register: enable_irq_wake failed with -6
[ 239.701638] dhd_conf_set_band: Set band 0
[ 239.704901] dhd_preinit_ioctls: Set tcpack_sup_mode 0
[ 239.719395] Firmware up: op_mode=0x0015, MAC=5c:f8:a1:50:82:fd
[ 239.722713] dhd_conf_set_country: Set country XS, revision 38
[ 239.728930] dhd_conf_set_country: country code setting failed -2
[ 239.735128] Country code: XS (XS/0)
[ 239.738593] dhd_conf_set_roam: Set roam_off 1
[ 239.756436] Firmware version = wl0: May 18 2014 16:56:54 version 6.34.171.58.2
[ 239.761256] Driver: 1.201.59.5 (r506368)
Firmware: wl0: May 18 2014 16:56:54 version 6.34.171.58.2
[ 239.773051] dhd_txglom_enable: enable 1
[ 239.776601] dhd_conf_set_disable_proptx: set disable_proptx 0
[ 239.782889] dhd_preinit_ioctls wl ampdu_hostreorder failed -23
[ 239.788462] wl_android_wifi_on: Success
[ 239.857154] dhd_open: Exit ret=0
Even though there are a couple of failures, it seems to be working ok.
Hope this can help someone.
Hi,
I’ve got myself an M8S mini in the hope it could run the Odroid C2’s Linux image.
Has anyone tried that mod yet?
Thx.
Hi again, now I have been dealing with a different device: a MXQ PRO 4K P200 TV Box.
I have been trying to modify the bottloader environment to be able to boot other operating systems from the sdcard or usb ports as explained in the Telos method.
The way the bootloader saves it environment in this box seems to be different to traditional bootloaders, where you can edit and save environment using fw_printenv or fw_saveenv.
If I try to run fw_printenv, it says: Cannot access MTD device /dev/block/env: No such file or directory
Then with the command:
adb logcat –d | grep boot
I get something like this:
I/SystemControl( 2821): [ubootenv] using /dev/nand_env with size(65536)(65532)
I/SystemControl( 2821): [ubootenv] set property ro.ubootenv.varible.prefix: ubootenv.var
I/SystemControl( 2821): [ubootenv] ubootenv varible prefix is: ubootenv.var
I/SystemControl( 2821): [ubootenv] key: [ubootenv.var.bootcmd] value: [(null)]
I/SystemControl( 2821): [ubootenv] set property count: 0
I/SystemControl( 2821): [ubootenv] update_bootenv_varible name [ubootenv.var.hdmimode]: value [1080p60hz]
I/SystemControl( 2821): [ubootenv] update_bootenv_varible name [ubootenv.var.outputmode]: value [1080p60hz]
……..
So I guess the bootloader environment is located in /dev/nand_env and the bootloader itself is in /dev/bootloader
I then symbolic linked /dev/nand_env to /dev/block/env and when I ran fw_printenv it said Cannot get MTD information for /dev/block/env
Are there any tools I can use like fw_printenv/fw_saveenv that will allow me to alter the bootloader environment of these boxes?
I’m not familiar at all with dealing with a nand instead of a block device. I guess the answer is that fw_printenv can read and write the nand, but I’m not sure that’s possible.
I don’t think the aml_autoload method will work in these boxes as the environment seems to be slightly different.
Here’s a dump of /dev/nand_end http://pastebin.com/DEmEgQHB
Con someone guide me into the right direction?
Thanks in advance.
Judging by this fragment :
firecovery_from_sdcard=if fatload mmc 0 ${loadaddr} aml_autoscript; then autoscr ${loadaddr}; fi;if fatload mmc 0 ${loadaddr} recovery.img; then if fatload mmc 0 ${dtb_mem_addr} dtb.img; then echo sd dtb.img loaded; fi;bootm ${loadaddr};fi;recovery_from_udisk=if fatload usb 0 ${loadaddr} aml_autoscript; then autoscr ${loadaddr}; fi;if fatload usb 0 ${loadaddr} recovery.img; then if fatload usb 0 ${dtb_mem_addr} dtb.img; then echo udisk dtb.img loaded; fi;bootm ${loadaddr};fi;
Activation multi-boot should work.
The script uses native u-boot resources aml_autoscript. It does not depend on the type of NAND or eMMC. I know that the users Trebor of the website http://www.FreakTab.com successfully used multiboot on the device KI Plus (it uses NAND).
Thanks balbes150. I have tried activating multi-boot with the aml_autoscript, but I don’t know why it is not working.
If I try to reboot the system in recovery mode, then when I try to install the aml_autoscript.zip, the system complains it is not a signed package. If I use OTA Updater to install unsigned packages from within android, I get the boot splash screen for 45 seconds or so (and I can’t see what’s going on) then the system reboots but the changes don’t get saved into the nand.
I’m using a fat32 formatted sd card with these files inside it:
aml_autoscript
aml_autoscript.zip
The file aml_autoscript.zip just has aml_autoscript inside it.
This is the content of my aml_autoscript.txt:
echo Start script update env aml_autoscript
sleep 5
setenv preboot “run factory_reset_poweroff_protect;run upgrade_check;run bootmode_check;run init_display;run storeargs;run update_key;run irremote_update;run start_autoscript;run switch_bootmode;”
setenv start_autoscript “if mmcinfo; then run start_mmc_autoscript;fi;if usb start; then run start_usb_autoscript;fi;”
setenv start_mmc_autoscript “if fatload mmc 0 1020000 s905_autoscript; then autoscr 1020000; fi”
setenv start_usb_autoscript “if fatload usb 0 1020000 s905_autoscript; then autoscr 1020000; fi”
sleep 5
echo END script update env aml_autoscript
sleep 5
printenv
sleep 30
reboot
Then I make the aml_autoscript by running:
mkimage -A arm -O linux -T script -C none -d aml_autoscript.txt aml_autoscript
Judging by the time the system is taking to reboot, the script is running. Does anyone know how to send the output to a file (maybe something like printenv > /dev/sdcard) instead of the the screen that is covered with a splash screen, or maybe how to get rid of the splash screen?
Alternatively I need to sign the package so it gets installed by the normal android recovery script. Does anyone know how to sign an android update package?
Thanks again.
You used test aml_autoscript. Is no save command parameters. Instead of printenv should be the command saveenv. It was the first script is for those who have a UART, is to see the result. Not all versions of u-boot supports output redirection. You can try to write a test script to test this possibility.
Thank you balbes150. Sometimes we have the answer in front of us but we just don’t see it.
I replaced printenv with saveenv and it worked. So now I have a wonderful MXQ Pro 4Q running debian from SD Card. I’m using my “adapted” Odroid C2 kernel and even the WiFi with the 8089es module is working perfectly.
Below is the new aml_autoscript
Thanks again
echo Start script update env aml_autoscript
sleep 5
setenv preboot “run factory_reset_poweroff_protect;run upgrade_check;run bootmode_check;run init_display;run storeargs;run update_key;run start_autoscript;run switch_bootmode;”
setenv start_autoscript “if mmcinfo; then run start_mmc_autoscript;fi;if usb start; then run start_usb_autoscript;fi;”
setenv start_mmc_autoscript “if fatload mmc 0 1020000 s905_autoscript; then autoscr 1020000; fi”
setenv start_usb_autoscript “if fatload usb 0 1020000 s905_autoscript; then autoscr 1020000; fi”
sleep 5
echo END script update env aml_autoscript
sleep 5
saveenv
sleep 30
reboot
I recommend to use the new version of the script. It works correctly the ability to stop start process from console UART. In the first version of the script, if the detected file s905_autoscript, you can’t stop the download in console. In the new version it works correctly.
https://github.com/150balbes/Amlogic_s905/tree/master/script/s905_uboot
Where can I see the config file for the kernel You are using ?
Can I add MXQ 4Q Pro in the list on the WiKi ?
Thanks balbes150, I’ll correct the script.
The kernel I’m using is a merge of the Odroid C2 kernel and some Amlogic drivers I downloaded from here: http://openlinux.amlogic.com:8000/download/ARM/
The config file is here:
https://github.com/episani/amlogic_s905_kernel_merges/blob/master/linux/.config
Basically I replaced the files Kconfig and Makefile in the drivers/amlogic folder with new ones I created myself, you can find them here:
https://github.com/episani/amlogic_s905_kernel_merges/tree/master/linux/drivers/amlogic
When I tried to compile those drivers I got a few errors with the Linaro toolchain I was using. I edited the WiFi drivers one one one to stop the errors. They seem to be working ok, but I haven’t done extensive tests yet.
I also uploaded the dtb files for the MXQ Pro 4K and the Acemax K3, you can find them here:
https://github.com/episani/amlogic_s905_kernel_merges/tree/master/dtb_file
I have read there’s a few different versions of the MXQ Pro 4K though, the one I’m using is based on p200 and Rtlink WiFi 8189es. It says in the board AM95AXQ V1.0. I haven’t been able to find the UART pins of that board anywhere.
The Acemax K3 is a much better board, but it is also more expensive. It has 2GB of RAM, the Broadcom WiFi also has Bluetooth and it has a power switch. It also has UART pins. As I mentioned before, the second WiFi Antenna is fake, as it is not connected to anything!
I guess you can add anything you want to the WiKi. I haven’t seen the WiKi, what’s the address of the WiKi?
@Edgar
Could you kindly release your sdard image backup?I have a same board.
@Cango which image are you talking about? The Debian one?
Yes please.Boot+rootfs partition backup i need.At least kernel+modules.
@Edgar
Does gbit LAN work with Acemax K3 in Linux image you got?
Add for Wiki
https://github.com/150balbes/Amlogic_s905/wiki
@Cango here’s the Debian image for the MXQ Pro 4K. By changing the dtb file it can be used with other devices. I compiled all the amlogic wifi devices as modules in the kernel, so it should literally work with any board as long as you have the firmware. There are a few firmwares in /lib/firmware/wifi. The username is root and the password is odroid.
https://mega.nz/#!VcYVzL6T!3sKJQbUYis6_10VlQ432_ZMfkCdy3Q2OUBbb-da_BbA
@balbes150 Nice Wiki in Russian 🙂 It would be great to detect the board in u-boot and select a dtb file accordingly, that way a single image could be used for multiple devices.
@Fossxplorer I don’t have the Acemax K3 at the moment but in the MXQ Pro 4K doesn’t seem to be working. I’ll check with another dtb file.
This is the result of ethtool eth0 (eth0 is connected to a gbit LAN)
Settings for eth0:
Supported ports: [ TP MII ]
Supported link modes: 10baseT/Half 10baseT/Full
100baseT/Half 100baseT/Full
Supported pause frame use: Symmetric Receive-only
Supports auto-negotiation: Yes
Advertised link modes: 10baseT/Half 10baseT/Full
100baseT/Half 100baseT/Full
Advertised pause frame use: Symmetric Receive-only
Advertised auto-negotiation: Yes
Link partner advertised link modes: 10baseT/Half 10baseT/Full
100baseT/Half 100baseT/Full
Link partner advertised pause frame use: Symmetric Receive-only
Link partner advertised auto-negotiation: Yes
Speed: 100Mb/s
Duplex: Full
Port: MII
PHYAD: 0
Transceiver: external
Auto-negotiation: on
Supports Wake-on: ug
Wake-on: d
Current message level: 0x0000003f (63)
drv probe link timer ifdown ifup
Link detected: yes
Thanks friend.
Hi guys,
Do you know of a Smart TV device (currently available or coming soon) that could run X? What are the chances the described devices could start running it?
For those interested in running Linux on the Amlogic S905. Maybe this will be interesting.
http://freaktab.com/forum/tv-player-support/amlogic-based-tv-players/s905/inphic/firmware-roms-tools-bi/572413-inphic-spot-i7-running-linux-from-an-sd-card-usb-card-reader-or-flash-drive-using-balbes150-s-method-and-files?p=574906#post574906
@Edgar, Speed: 100Mb/s : so they are lying about 1gbit when it’s 100mbits.
I just got Beelink mini MXIII, let’see what it can do.
@Fossxplorer I double checked the specs of the page where I got the MXQ Pro 4K and it actually says 100Mb/s so it was my mistake. The Acemax KII has 1000Mb/s Ethernet and bluetooth. I ordered an MXQ Pro (without the 4K) that claims it has 1000Mb/s and bluetooth and is only about $5 more the the MXQ Pro 4K. I’m still waiting for it. I will post the results as soon as I get it.
Can anybody guide me in how to install Linux in the internal memory of these devices? When I boot the MXQ Pro from external SD card, the system gets mounted on /dev/mmcblk1. I can see there is a /dev/mmcblk0, /dev/mmcblk1boot0 and /dev/mmcblk1boot1. I’d like to be able to boot from /dev/mmcblk0, is that possible?
Thanks for your help guys.
Possible. There are several options. 1. To use an existing breakdown of the sections. To replace existing sections in the file need. Add or change u-boot the boot line. This will require to change the kernel built for Linux. Taking into account the root partition in the internal memory. 2. To change sections. This will require a change u-boot. To create a new table and new teams.
@Edgar
Hello, I apologize for my ignorance, but how can I update my mxqpro 4k with debian, thank you.
Hi, thank you for your how to, I successfully run Armbian on a Mini M8S ( S905 with 2GB Ram).
More Details see here http://forum.armbian.com/index.php/topic/1143-armbian-for-amlogic-s905/?p=11236
Thanks for your support.
Hi, I hope someone can help me. I am trying to flash my mk808b plus (armlogic m805) with Ubuntu. But I can’t boot from sdcard. For some reason the reset button doesn’t work. I tried pressing the reset button while booting but the device keep booting normally.
Is there anyway to force booting from sdcard programmatically (via adb)?
I know this post is about another product but I am running out of ideas. Thanks
@Peuw
Maybe check on Freaktab, I can see people have run Linux (OpenELEC) on a similar device @ http://freaktab.com/forum/tv-player-support/amlogic-based-tv-players/s805/others-ab/525892-mxv-with-mk808b-plus-firmware
Thanks for your response. I am following instructions from freaktab but I can’t make my device boot from sdcard
@Peuw
You may have to connect a USB to TTL debug board to the device to check what’s going at boot time, and why it’s ignoring your SD card. Otherwise maybe try another SD card, possibly with lower capacity.
@cnxsoft
I have tried another SD card with the same result. I don’t have and never use TTL debug board before.
So there is no config on the Android that can be altered to force it to boot from SD Card?
@Peuw Did you use the multiboot script on Android followed by replacing dtb.img with the dtb file from your own device?
Also, try Armbian, I’ve just discovered frequency scaling works. (unlike Ubuntu)
@Peuw
You have TV box for Amlogic S805 ?
@balbes150
This is exactly what I have http://www.gearbest.com/tv-box/pp_126894.html It says Armlogic M805. I am not sure what’s the difference between M805 and S805
@Shimon
I was following this instruction: http://freaktab.com/forum/tv-player-support/amlogic-based-tv-players/s805/others-ab/520884-ubuntu-14-04-and-15-04-on-mk808b-plus
Could you please point me to more information about multiboot script on Android?
According to the instruction above, the device should just boot from SD Card if I press the reset button while powering it on. I have tried different SD Card too but no avail.
Ah, sorry, didn’t notice you were on S805, same hardware as in Odroid C1. (this thread is about S905 based devices)
I looked at the relevant freaktab thread and it’s supposed to work OTB.
Either the image you’re trying to flash is corrupt or your SDcards are not liked by the device or the button simply doesn’t work.
I have no idea if a software solution (like the multiboot script for S905) exists. Hopefully @balbes150 will tell you more.
I am running Olin’s 14.04 Headless Ubuntu on K1 Plus S905. Runs very well.
I need to get the K1 Plus built-in (S2/T2) tuner to work. Has anyone managed it to get it to work in the Ubuntu image?
I know with Amlimux Media K1 and Vitmod OS OpenElec versions have drivers, but it is not opensource.
@Dasaki
Hi, could you tell me how do you got the aml_nftl_dev.ko. Do you compiled the driver from the amlogic nand driver source code or you take the module directly?. I’m having some problem copmpiling the aml_ntfl_new. Thank you.
@Edgar
Got the new board?
@Fossxplorer, yes got the MXQ Pro (without the 4K) and works beautifully. I has GB Ethernet which is what I wanted. There seem to be millions of S905 based TV boxes. So far my favorite is the Acemax KIII, but this one is a pretty good one too: http://www.aliexpress.com/item/MXQ-Pro-With-New-Chip-Amlogic-S905-Quad-Core-Andorid-5-1-TV-BOX-BT4-0/32565877807.html
@Luis sorry for the late reply, but if you read the comments here I guess you’ll find the way. First you need to prepare an SD card that will alter the u-boot environment variables and will allow your device to boot from SD card instead of the internal memory. Once you prepare that SD card using the @balbes150 method, you have to boot your device in Android, put the SD card in your device (that will have a zip file) and run a software upgrade from and app called OTAUpgrade, selecteing the zip file in the SD card. OTAUpgrade allows you to run an Android upgrade with software that is not Android certified.
Then you can use images for the Odroid C2. In most cases you might have to use a different kernel though to be able to use internal wifi cards, bluetooth or other hardware.
Sorry for the short reply, but I guess the process requires a fair bit of knowledge of working with images, compiling kernels and so on.
@balbes150 has written excellent tutorials about it, have a look at this one:
http://freaktab.com/forum/tv-player-support/amlogic-based-tv-players/s905/tronsmart-ac/firmware-roms-tools-at/565449-running-linux-from-sd-card-or-usb-flash-drive-using-balbes150-method-and-files
This manual was written by RISCy Dude.
@meteorza
I thought driver could be found here?
http://openlinux.amlogic.com:8000/download/ARM/modules/
here’s another tool to extract your dtb from the android /dev/block/boot partition.
It’s in C so you don’t need perl or python :
https://github.com/csimmonds/boot-extract
Also a small tip to check your uboot configuration directly in android adb, at least on one of my s905 boxes :
“strings /dev/block/env”
You can also cat /dev/block/env directly but it won’t have proper line returns.
That’s was useful for checking uboot configuration after applying some boot patch that didn’t work and couldn’t connect a serial to the board.
@cnxsoft
Hi,
W.R.T comments #49 & #50
I had some spare time last night and followed your instructions finally.
1. Extracted dtb for my board using android upgrade image (if anyone needs it I can send)
2. Formatted SD card with one FAT partition conatining dtb and kernal images and other with rootfs
My board bootsup properly but it fails on chroot …
bootlog attached http://pastie.org/10920345
Has anyone managed to get K1 Plus built-in (S2/T2) tuner to work in a headless Linux (ubuntu)?
@meteorza
Check this post and subsequent comments -> http://www.cnx-software.com/2016/03/28/openelec-vitmos-os-for-videostrongvenz-k1-plus-android-dvb-receiver/
That’s not Ubuntu, but still Linux with OpenELEC, and they can control the tuner, so you’d be able to run a live TV streaming server if that’s what you want to do.
@cnxsoft
Thanks for the reply.
However we re-purpose the K1 Plus to receive IP data over DVB. We tried Vitmod RC3, 5 and 6. All of them have problems creating a virtual DVB network interface and receiving data on them. This works well on the Wetek Play running Ubuntu with AVL6211 built-in tuner for example.
The problems we experience could be related to the Vitmod Openelec kernel and not really specific to S2/T2 itself. So basically I am after the S2/T2 kernel module so that we can use it for Ubuntu. But this does not seem to exist or is not open source. Ubuntu on K1 Plus S905 works well, except we can not get the tuner enabled.
@meteorza
I’m not aware of anybody who’s done what you’re trying to achieve. You could try to contact Vitmod and/or see how to integrate the DVB tuner drivers inside your own kernel, or if your project is big enough, see if you can work directly with Videostrong.
I have an MX Plus with S905 1GB Ram and 8 GB eMMC.
I would like to run Ubuntu LXDE or another lightweight GUI Linux over it. Does anyone have it working. Please share steps.
So far I’ve been able to modify uboot using UART and boot Ubuntu headless but when it boots linux, it does not report any network adapters. While in android the gigabit ethernet adapater works just fine.
@Methanoid
Hi, I’m trying to do the same with my MX Plus (S905 with 1GB RAM). Were you able to get a lightweight GUI desktop working ? If yes, can you share the steps please. Thanks.
I wonder it this would work on leelbox M9S
clr h-ram
DRAM: 2 GiB
relocation Offset is: 2feb4000
show partition table:
part: 0, name : logo, size : 2000000
part: 1, name : recovery, size : 2000000
part: 2, name : misc, size : 2000000
part: 3, name : boot, size : 2000000
part: 4, name : system, size : 40000000
part: 5, name : cache, size : 20000000
part: 6, name : data, size : end
aml_card_type=0x100
MMC: [mmc_register] add mmc dev_num=0, port=1, if_type=6
[mmc_register] add mmc dev_num=1, port=2, if_type=6
SDIO Port B: 0, SDIO Port C: 1
register usb cfg[0][1] = 3ff67fcc
register usb cfg[2][0] = 3ff6b988
NAND: EMMC BOOT: not init nand
do not init nand : cause boot_device_flag without nand
get_boot_device_flag: init_ret -1
get_boot_device_flag EMMC BOOT:
Emmckey: Access range is illegal!
[mmc_init] SDIO Port C:1, if_type=6, initialized OK!
[mmc_get_partition_table] skip cache partition.
Partition table get from SPL is :
name offset size flag
===================================================================================
0: bootloader 0 400000 0
1: reserved 2400000 4000000 0
2: cache 6c00000 20000000 2
3: env 27400000 800000 0
4: logo 28400000 2000000 1
5: recovery 2ac00000 2000000 1
6: misc 2d400000 2000000 1
7: boot 2fc00000 2000000 1
8: system 32400000 40000000 1
9: data 72c00000 32a400000 4
mmc read lba=0x12000, blocks=0x1
mmc read lba=0x12001, blocks=0x1
mmc_read_partition_tbl: mmc read partition OK!
eMMC/TSD partition table have been checked OK!
i=0,register — emmc_key
MMC BOOT, emmc_env_relocate_spec : env_relocate_spec 59
set_storage_device_flag: store 2
vpu driver detect cpu type: m8m2
vpu clk_level in dts: 7
set vpu clk: 364000000Hz, readback: 364000000Hz(0x700)
Net: Meson_Ethernet
init suspend firmware done. (ret:0)
cvbs trimming.1.v5: 0xa0, 0x0
TV mode 576cvbs selected.
cvbs performance type = 2, table = 0
vdac open.1 = 0x1, 0x0
config HPLL
config HPLL done
reboot_mode=charging
Hit Enter key to stop autoboot — : 1 tstc enter
exit abortboot: 1
m8m2_n200C_v1#printenv
baudrate=115200
boardname=m8_board
bootargs=init=/init console=ttyS0,115200n8 no_console_suspend ramoops.mem_address=0x04e00000 ramoops.mem_size=0x100000 ramoops.record_size=0x8000 ramoops.console_size=0x4000 storage=2 cvbsdrv=0 vdaccfg=0xa000 logo=osd1,loaded,0x15100000,576cvbs,full hdmimode=1080i cvbsmode=576cvbs androidboot.firstboot=0 hdmitx=
bootcmd=run storeboot
bootdelay=1
bootfile=boot.img
bootm_low=0x00000000
bootm_size=0x80000000
bootpath=u-boot.bin
bootsize=100000
bootstart=0
bootup_offset=0x13000240
bootup_size=0x3f4846
chipname=8726m8
console=ttyS0,115200n8
cvbs_drv=0
cvbsmode=576cvbs
digitaudiooutput=PCM
display_bpp=16
display_color_bg=0
display_color_fg=0xffff
display_color_format_index=16
display_height=576
display_layer=osd2
display_width=720
ethact=Meson_Ethernet
ethaddr=c4:4a:ac:da:2c:00
fb_addr=0x15100000
fb_height=1080
fb_width=1920
firstboot=0
gatewayip=10.18.9.1
get_dt=checkhw
has.accelerometer=false
hdmimode=1080i
hostname=arm_m8
initargs=init=/init console=ttyS0,115200n8 no_console_suspend ramoops.mem_address=0x04e00000 ramoops.mem_size=0x100000 ramoops.record_size=0x8000 ramoops.console_size=0x4000 storage=2
initrd_high=60000000
ipaddr=10.18.9.97
loadaddr=0x12000000
loadaddr_logo=0x13000000
netmask=255.255.255.0
normalsize=400000
normalstart=1000000
outputmode=576cvbs
p0path=uImage
p0size=400000
p0start=1000000
p1path=android.rootfs
p1size=8000000
p1start=1400000
partnum=2
preboot=if itest ${upgrade_step} == 3; then run prepare; run storeargs; run update; fi; if itest ${upgrade_step} == 1; then defenv_reserve_env; setenv upgrade_step 2; saveenv;fi; run prepare;run storeargs;get_rebootmode; clear_rebootmode; echo reboot_mode=${reboot_mode};run update_key; run switch_bootmode
preloaddtb=imgread dtb boot ${loadaddr}
prepare=logo size ${outputmode}; video open; video clear; video dev open ${outputmode};imgread pic logo bootup ${loadaddr_logo}; bmp display ${bootup_offset}; bmp scale;
reboot_mode=charging
recovery=echo enter recovery;if mmcinfo; then if fatload mmc 0 ${loadaddr} recovery.img; then bootm;fi;fi; if usb start 0; then if fatload usb 0 ${loadaddr} recovery.img; then bootm; fi;fi;if imgread kernel recovery ${loadaddr}; then bootm; else echo no recovery in flash; fi;
sdc_burning=sdc_burn ${sdcburncfg}
sdcburncfg=aml_sdc_burn.ini
serverip=10.18.9.113
stderr=serial
stdin=serial
stdout=serial
store=2
storeargs=setenv bootargs ${initargs} cvbsdrv=${cvbs_drv} vdaccfg=${vdac_config} logo=osd1,loaded,${fb_addr},${outputmode},full hdmimode=${hdmimode} cvbsmode=${cvbsmode} androidboot.firstboot=${firstboot} hdmitx=${cecconfig}
storeboot=secukey auto;secukey write keyexample 1234567890; echo Booting…; if unifykey get usid; then setenv bootargs ${bootargs} androidboot.serialno=${usid};fi;imgread kernel boot ${loadaddr};bootm;run recovery
switch_bootmode=if test ${reboot_mode} = factory_reset; then run recovery;else if test ${reboot_mode} = update; then run update;else if test ${reboot_mode} = usb_burning; then run usb_burning;else if test ${wipe_data} = failed; then echo wipe_data=${wipe_data}; run recovery;else fi;fi;fi;fi
testaddr=0x12400000
update=run usb_burning; if mmcinfo; then if fatexist mmc 0 ${sdcburncfg}; then run sdc_burning; else if fatload mmc 0 ${loadaddr} aml_autoscript; then autoscr ${loadaddr}; fi;run recovery;fi;else run recovery;fi;
update_key=saradc open 0; if saradc get_in_range 0 0x50; then msleep 50; if saradc get_in_range 0 0x50; then echo update by key…; run update; fi;fi
upgrade_step=2
us_delay_step=1
usb_burning=update 1000
vdac_config=0xa000
video_dev=tvout
wipe_data=successful
Environment size: 3753/65532 bytes
m8m2_n200C_v1#