
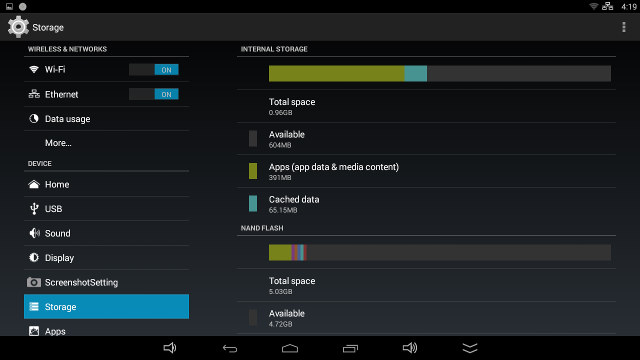
Since I’ve received MXQ-4K Android TV box yesterday, I have started to play with it, and so far I can’t say I’m impressed, as while the device automatically detected the maximum resolution (3840×2160 @ 60 Hz) for my television, I could not play any of my 4K samples smoothly with either the pre-installed Kodi 15.2, Video and Video Player apps, there’s no power off mode (only standby), and the “internal partition” is only 0.96GB large which can quickly become an issue if you plan on installing several apps.
Since GeekBuying has released the stock firmware, I decided to try to adapt the method to resize the partitions for GeekBox (RK3368) to MXQ-4K.
Rockchip RK3229 Firmware Modding
I’ve used a computer running Ubuntu 14.04, and assume you have most tools pre-installed. The first step is to download the firmware (MXQ-4K_ota_ok_20160127.img update.img), and install the tools to extract it :
|
1 2 3 4 |
git clone https://github.com/geekboxzone/utils cd utils/rockdev mv MXQ-4K_ota_ok_20160127.img update.img ./unpack.sh |
The last step will do the job, and the output should look like:
|
1 2 3 4 5 6 7 8 9 10 11 12 13 14 15 16 17 18 19 20 21 22 23 |
start to unpack update.img... ********RKImageMaker ver 1.63******** Unpacking image, please wait... Exporting boot.bin Exporting firmware.img Unpacking image success. Android Firmware Package Tool v1.62 Check file... OK ------- UNPACK ------ package-file 0x0000000000000800 0x00000000000002B9 RK322XMiniLoaderAll_V2.29.bin 0x0000000000001000 0x000000000001F94E parameter-rk322x-trust 0x0000000000021000 0x0000000000000317 trust.img 0x0000000000021800 0x0000000000400000 Image/uboot.img 0x0000000000422000 0x0000000000400000 Image/misc.img 0x0000000000822800 0x000000000000C000 Image/kernel.img 0x000000000082F000 0x00000000006E71FC Image/resource.img 0x0000000000F16800 0x00000000005EE600 Image/boot.img 0x0000000001505000 0x0000000000E14000 Image/recovery.img 0x0000000002319800 0x0000000001144000 Image/system.img 0x000000000345E000 0x00000000341BA000 Unpack firmware OK! ------ OK ------ Unpacking update.img OK. |
You’ll need to download and run RK_ParamEd.exe. It’s a windows program, but it runs just fine in Ubuntu with wine :
|
1 |
wine RK_ParamEd.exe |
Now open output/parameter-rk322x-trust in the program, and change userdata partition size to a value larger than currently, and to be safe I increased the size to 4096 MB.
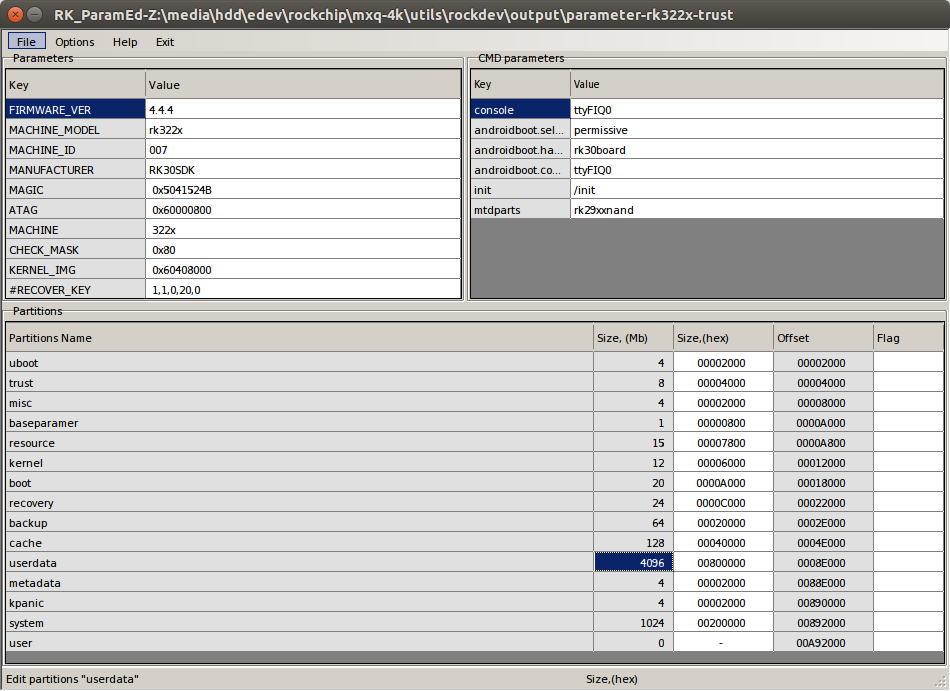
Now save the file overwriting parameter-rk322x-trust.
Now you are supposed to us mkupdate.sh script to create the firmware file, but remember the tools we have installed are for Rockchip RK3368 based Geekbox device, so we have to make a few modifications. First edit mkupdate.sh and replace the line:
|
1 |
./rkImageMaker -RK330A Loader.bin Image/update.img update.img -os_type:androidos || pause |
with:
|
1 |
./rkImageMaker -RK322A Loader.bin Image/update.img update.img -os_type:androidos || pause |
We can also see Loader.bin is linked to RK3368 bootloader, and it’s probably a good way to brick your device if you don’t change this:
|
1 2 |
ls -l Loader.bin lrwxrwxrwx 1 jaufranc jaufranc 29 Mar 8 17:34 Loader.bin -> RK3368MiniLoaderAll_V2.40.bin |
So let’s do use RK3229 bootloader instead
|
1 2 3 |
mv output/* . rm Loader.bin ln -s RK322XMiniLoaderAll_V2.29.bin Loader.bin |
Copy one more file and run the script:
|
1 2 |
cp Image/trust.img . ./mkupdate.sh |
That’s the output of the script:
|
1 2 3 4 5 6 7 8 9 10 11 12 13 14 15 16 17 18 19 20 21 22 23 24 25 26 |
start to make update.img... Android Firmware Package Tool v1.62 ------ PACKAGE ------ Add file: ./package-file Add file: ./RK322XMiniLoaderAll_V2.29.bin Add file: ./parameter-rk322x-trust Add file: ./trust.img Add file: ./Image/uboot.img Add file: ./Image/misc.img Add file: ./Image/kernel.img Add file: ./Image/resource.img Add file: ./Image/boot.img Add file: ./Image/recovery.img Add file: ./Image/system.img Add CRC... Make firmware OK! ------ OK ------ ********RKImageMaker ver 1.63******** Generating new image, please wait... Writing head info... Writing boot file... Writing firmware... Generating MD5 data... MD5 data generated successfully! New image generated successfully! Making update.img OK. |
So now our new update.img should have a cool 4096MB partitions. Let’s check this by flashing the firmware.
Flashing MXQ-4K (Rockchip RK3229) Firmware
You’ll need a toothpick or other non-conductive sharp object, and a USB type A to USB type A cable.
Make sure MXQ-4K is turned off, insert the toothpick in the S/PDIF connector until you press the button, and keeping pressing while you power on the device, and release the button after a few seconds. If nothing shows on the HDMI screen, it’s probably a good sign.
Now connect the USB cable between the USB port on the rear panel of MXQ-4K and your computer, and the following upgrade_tool command if you are using Linux:
|
1 2 |
cd.. ./upgrade_tool uf rockdev/update.img |
If successful, the output should look like:
|
1 2 3 4 |
Loading firmware... Support Type:RK322A FW Ver:4.4.04 FW Time:2016-03-08 19:55:13 Loader ver:2.29 Loader Time:2016-01-26 20:19:51 Upgrade firmware ok. |
The complete process will take a while, and the system will automatically boot to Android with the very first boot taking a little longer than usual. I could then get to the Android launcher, so at least I did not brick the device. But what about the partition size?
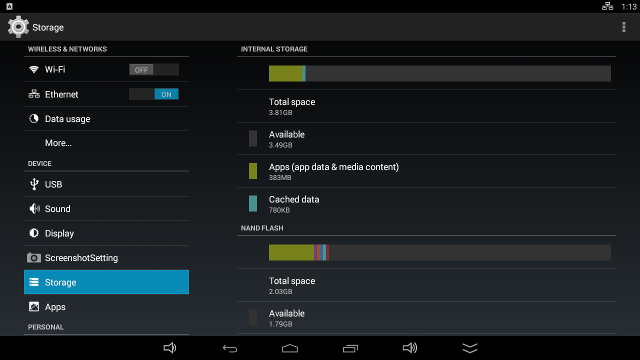 Not quite the 4GB space I expected, but 3.81GB is still good to me. Missing accomplished. I’ll share my image (887 MB) if somebody is interested.
If you are using Windows, you should be able to upgrade the firmware by using RKBatchTool 1.8, and following these instructions.
If you want other tips and tricks for MXQ-4K, you may want to check out Carlos Garcés’ Blog where you’ll find how to root the device, and enter recovery mode.

Jean-Luc started CNX Software in 2010 as a part-time endeavor, before quitting his job as a software engineering manager, and starting to write daily news, and reviews full time later in 2011.
Support CNX Software! Donate via cryptocurrencies, become a Patron on Patreon, or purchase goods on Amazon or Aliexpress. We also use affiliate links in articles to earn commissions if you make a purchase after clicking on those links.


Great work, can you share the image? Can I flash this from SD?
@marchi
No. To flash from SD you need to create a signed update.zip package.
wine RK_ParamEd.exe is mandatory?
Can be used resize.sh that is also at geekboxzone utils?
@marchi
OK. I’ll upload it, it will take a few hours. You’ll need to use use upgrade_tool in Linux, or one of the Windows based Android tool (RKbatchTool I think).
@CGarces
It’s not mandatory, and actually you can edit the parameter file with any text editor, it’s just safer to use RK_ParamEd.exe. I did not know about resize.sh script, and if it does the same then it’s a better option.
@marchi
Here’s the image: https://mega.nz/#!2sYHUSbK!08f4uQsi2pgh5q45jHlvE0HvkD-GiP0f71gXujv78sI
MXQ-4K March firmware @ http://www.mediafire.com/download/rbcxvybc5jfukf4/MXQ-4K_ota_20160308.zip
@cnxsoft
Do you know if the March stock rom has the same partitions size than february version? If it has the same, it will be in your mind in the future to make the same partitions size changes and update your image? Thanks!
@Marko_vl
I’ve tested it. They’ve increased the size to 1.44GB. I don’t plan to provide the firmware each time, as I’ve already posted the instructions, and I hope somebody else with thee box will be motivated to do it, and share the file.
MozOpenHard CHIRIMEN project is a good place to get the latest Rockchip firmware tools: https://github.com/MozOpenHard/CHIRIMEN-tools
@cnxsoft
Ok, thanks for the work!!!
cnxsoft
can we use external SD card as internal memory as rk3229 working on kitkat
@Hany
I don’t think SD cards can be used as “internal storage” partition in Android, can they? That is unless you boot Android from the SD card, but I don’t think there’s an image yet.
if can give me the link for custom firmware ? pls upload the edit room here or send it to my email
hello, I can not do this tutorial with Windows 10, anyone could make me the procedure to 4GB on my firmware. thanks for the help
my firmware : http://uptobox.com/8c3o0hho71e5
@olivier
You can install VirtuboxBox on Windows 10, and run Ubuntu from there.
Alternatively, a Windows 10 “Anniversary update” is coming by the beginning of next month with “Windows Subsystem for Linux”, so you’d be able to run the command above right within Windows.
Hello and thank you for your answer. unfortunately I do not know .I do ‘m going back to 4.4 because no other solution . thank you
@olivier
resolved ! use RK3xxx_firmware_tools_5.78.35.00 in windows10
hi,How to open xz file?
@zhunggg
7-zip can do that.
thx for you reply