
There are already various options to add a (touscheen) display to Arduino board with software support including TFTLibrary for Arduino, and recently I tried Nextion serial touchscreen displays that are supported by a WYSIWYG editor, but the latter is only supported in Windows and not exactly user-friendly, and I found the few provided tutorials would only work with a specific resolution incompatible with the displays I had been sent. So I gave up on the idea of interfacing the display with Arduino or ESP8266 as it would be too time-consuming. FTDI CleO project might be faster and easier to get started, as their CleO35 touchscreen display for Arduino UNO will come with a 20 chapter tutorial covering over 80 topics, and 20 projects to get started.
 Some of the key features and specs of Cleo35 display include:
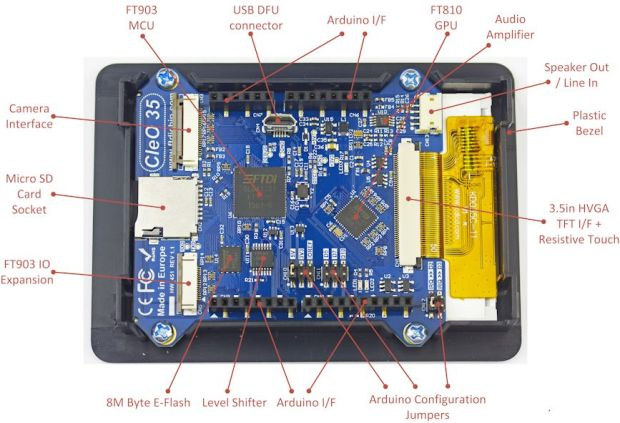
- MCU – FTDI FT903 32-bit FT32 core @ 100MHz with 256kB on-chip Flash memory, 256kB on-chip shadow program memory, and 64kB on-chip data memory
- Display and Touch Controller – FTDI FT810 IC with 18-bit RGB, resistive touch support
- Storage – 8MB E-Flash, micro SD slot. Fast direct file transfers between micro-SD/eFlash and the Graphics subsystem without using Arduino UNO resources.
- Display
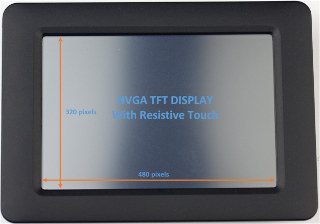
- 3.5″ resistive touch HVGA (480×320) TFT display
- Anti-Aliased graphics
- Smooth animations at up to 60 frames/second.
- Portrait and Landscape modes supported
- Audio – Audio amplifier, built-in PWM audio, and speaker out/Line In interface
- USB – micro USB DFU (Device Firmware Upgrade) socket
- Expansion
- Camera interface
- I/O expander interface with SPI, UART, I2C and GPIOs
- Arduino UNO headers
- Misc – Configuration jumpers
- Power – 5V from Arduino headers
- Dimensions – 101.4 x 73.0 mm including bezels; Screen only: 75.4 x 51 mm
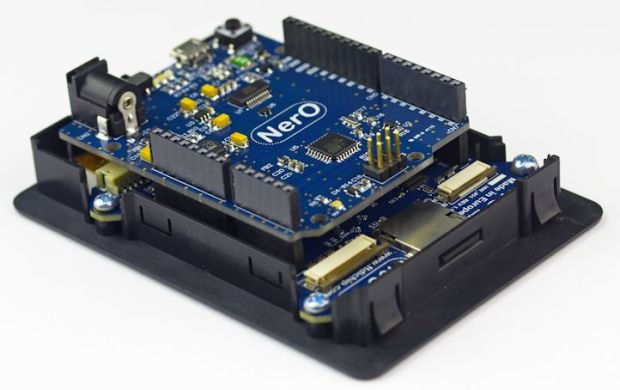
The display board is connected to Arduino UNO using SPI, one interrupt pin (INT0 or INT1), one Slave Select pin (D10, D6 or D7), 5V, IOREF and RESET and GND. If you are going to use Arduino shields or the camera module, you may need an Arduino UNO clone with a power-efficient regulator as used in the FTDI NeRO board, or some Arduino compatible boards made by Olimex. The design of NerO board (header with long pins) allows to connect it with the TFT display board, and still access Arduino headers.
There’s very little information explaining how the user interface is created however, although the company claims that “CleO comes complete with a set of professional utility widgets” such as a color picker, set DateTime , AlphaNumeric Keyboard Input, Numeric KeyPad Input, and Sketch Pad Input. I assume there’s no WYSIWYG drag and drop UI editor like for Nextion display , and that you may have to code the user interface manually. Some of the examples are showcased in the promo video (You can turn off audio if the music annoys you, as there aren’t any explanations…)

FTDI launched the project on Indiegogo, and they’ve reached the funding target ($7,000) with 6 days to go. You’ll need to pledge $49 for Cleo35, $63 for a NerO + Cleo35 bundle, or $97 for a bundle adding a camera module, a speaker and a 9V power supply. Shipping is not included, and adds $10 to $14 worldwide, with delivery scheduled on May 2016.

Jean-Luc started CNX Software in 2010 as a part-time endeavor, before quitting his job as a software engineering manager, and starting to write daily news, and reviews full time later in 2011.
Support CNX Software! Donate via cryptocurrencies, become a Patron on Patreon, or purchase goods on Amazon or Aliexpress. We also use affiliate links in articles to earn commissions if you make a purchase after clicking on those links.

