
It’s not that easy to describe PocketC.H.I.P in a couple of words, as it’s so versatile. It’s a Debian based portable Linux computer with a resistive touchscreen and battery, but also a retro gaming console thanks to PICO-8, as well as a hardware development platform for IoT application with expansion header providing access to I/Os including GPIOs, I2C, SPI, UART…, and WiFi and Bluetooth connectivity. Furthermore you can easily dismantle the device, in order to use the CHIP board, based on Allwinner R8 Cortex A8 processor, for a different project.
So when Next Thing asked me if I was interested in reviewing Pocket CHIP, I was pretty excited, but when I received it, I scratched my head as there are so many ways to review the item, and it works out of the box with the firmware pre-loaded inside the internal flash, so a getting starting guide would have been too short: “press the power button, and have fun”. So finally, I decided to take a few pictures of hardware, show most of the features, and then go through the different options in the user’s interface.
PocketC.H.I.P Unboxing
I’ve received the device in a black retail package plus a micro USB to USB cable for charging.
 The other side of the package has a quick start guide, including a link to PocketCHIP documentation.
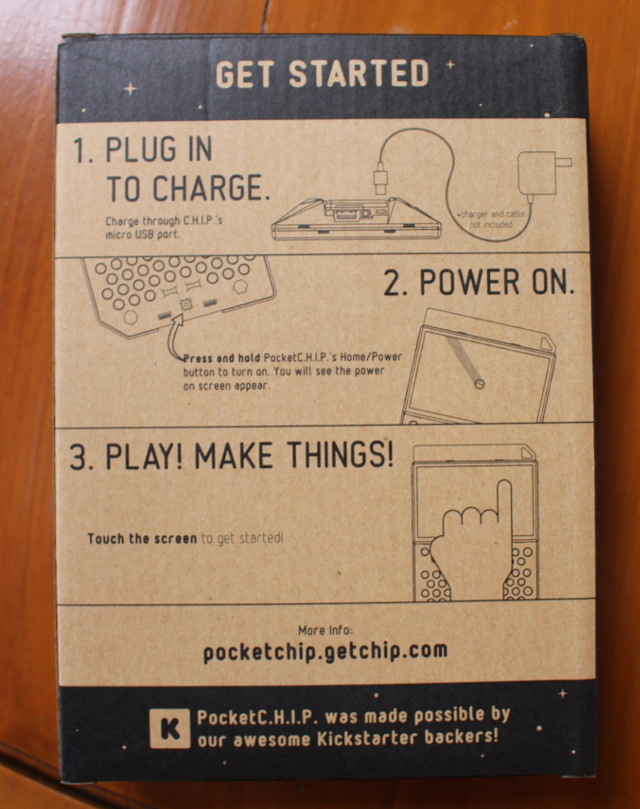 But if you can’t wait, you can most likely jump to step 2, as the device’s battery already has some charge, at least it was the case for me.
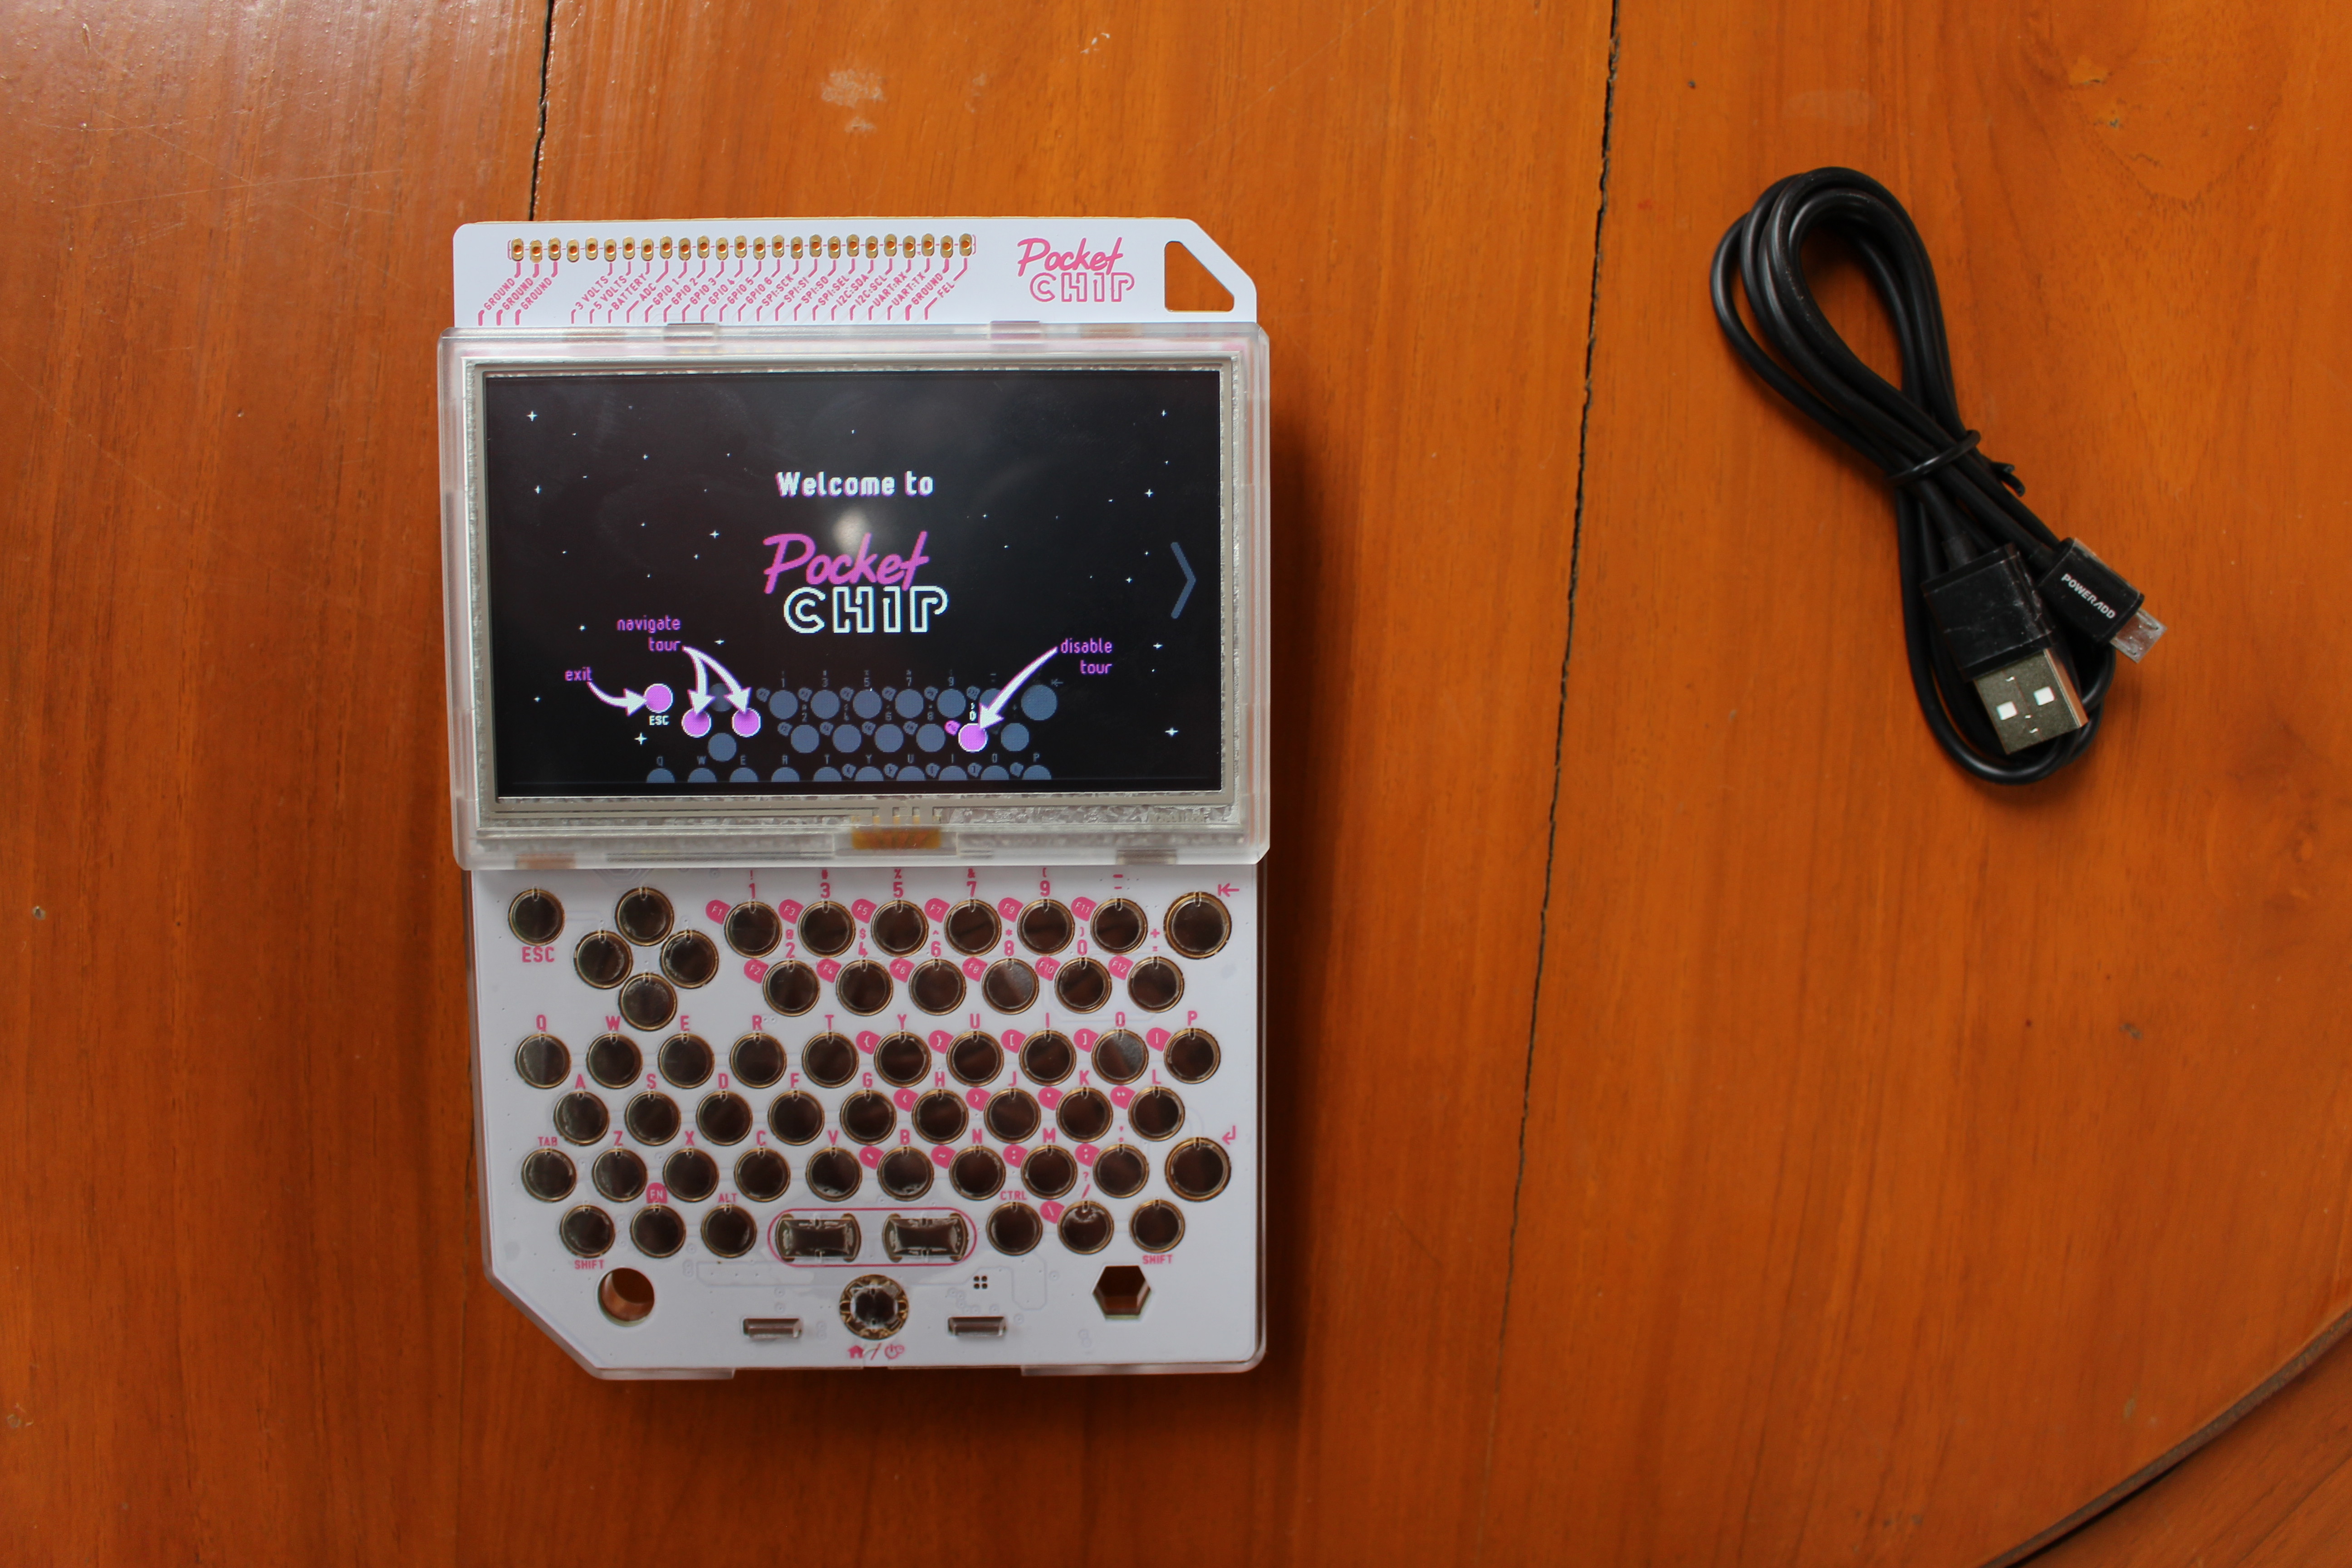
The QWERTY keyboard is quite standard, except the number keys are on two rows, and the arrow keys are located on the top left corner. The display is using resistive touch, so can use both your finger or a stylus for better accurate. You’ll go through a short tutorial during the first boot. The top has through holes for the I/Os, and at first, they look to be arranged in an undulated way, but I had no problem inserting headers, so that’s just a visual effect. The hole on the top right is likely use to add a necklace, although you could use it as a huge keyring too 🙂
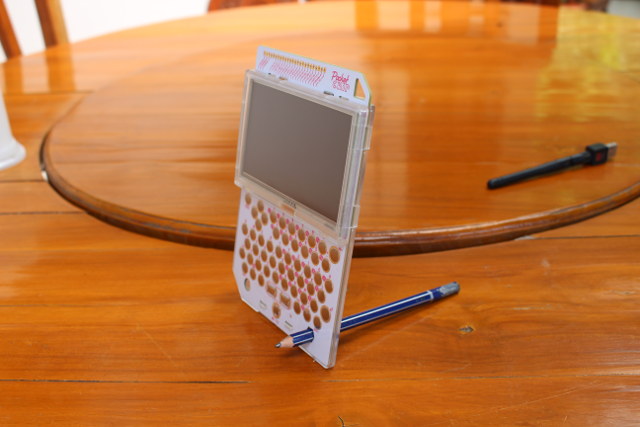 The two holes on each side on the bottom can be used to keep the display straight with the left hole for pens (I also use an old USB WiFi dongle with antenna), and the right hole for pencils. I also ended up using mine as the stylus for the screen.
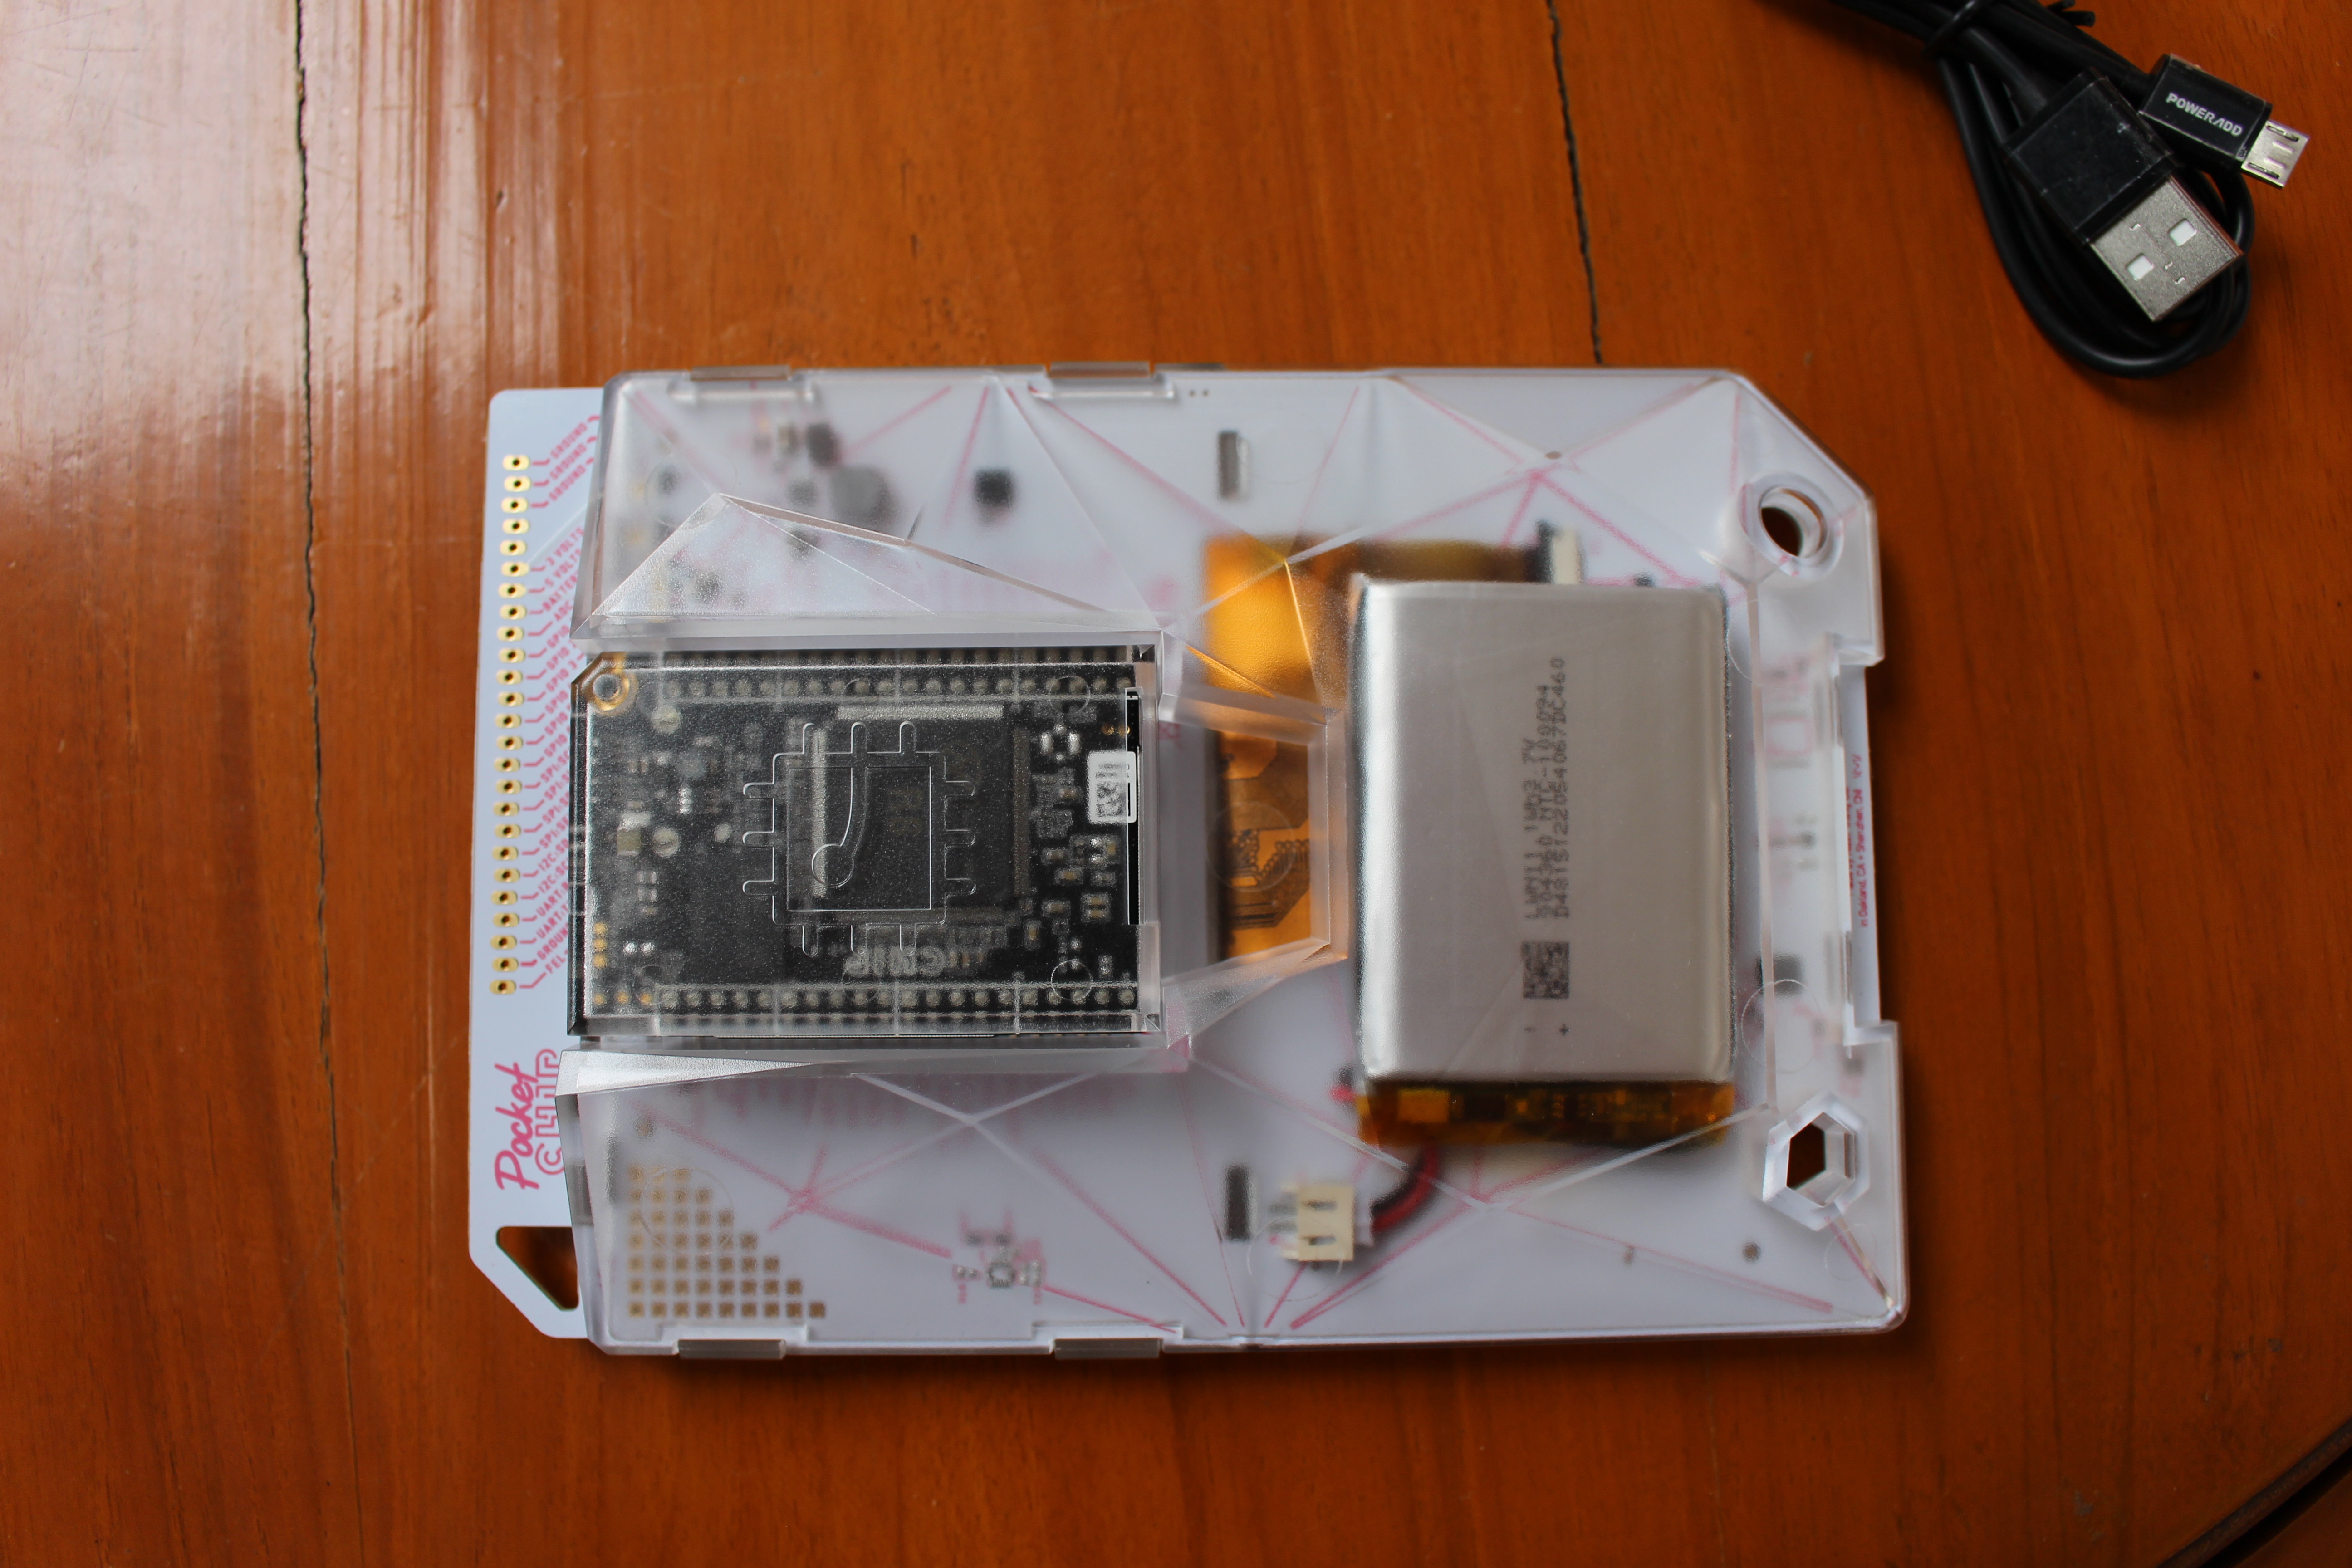
The back of the device has a clear cover revealing CHIP board and the battery (11.1Wh @ 3.7V). You can completely disassemble the unit if you want, but I only pulled out the board with my little green tool. You can watch the video review at the end of this review in case you are unsure how to do.

The top of the board has the USB port, a 3.5mm audio jack, a micro USB port, a battery connector, a 4GB NAND flash, Realtek RTL8723BS WiFi and Bluetooth 4.0 LE module, AXP209 PMIC, and the expansion headers. The power button is located on the top left. Note that if you want to output to HDMI you’ll need to purchase an extra HDMI adapter. You may also have to reflash the board with a different firmware (TBC).

The back of the board is protected with a plastic cover tightened with a single screw, and features Allwinner R8 Cortex A8 processor @ 1 GHz, as well as 512MB Samsung DDR3 memory.
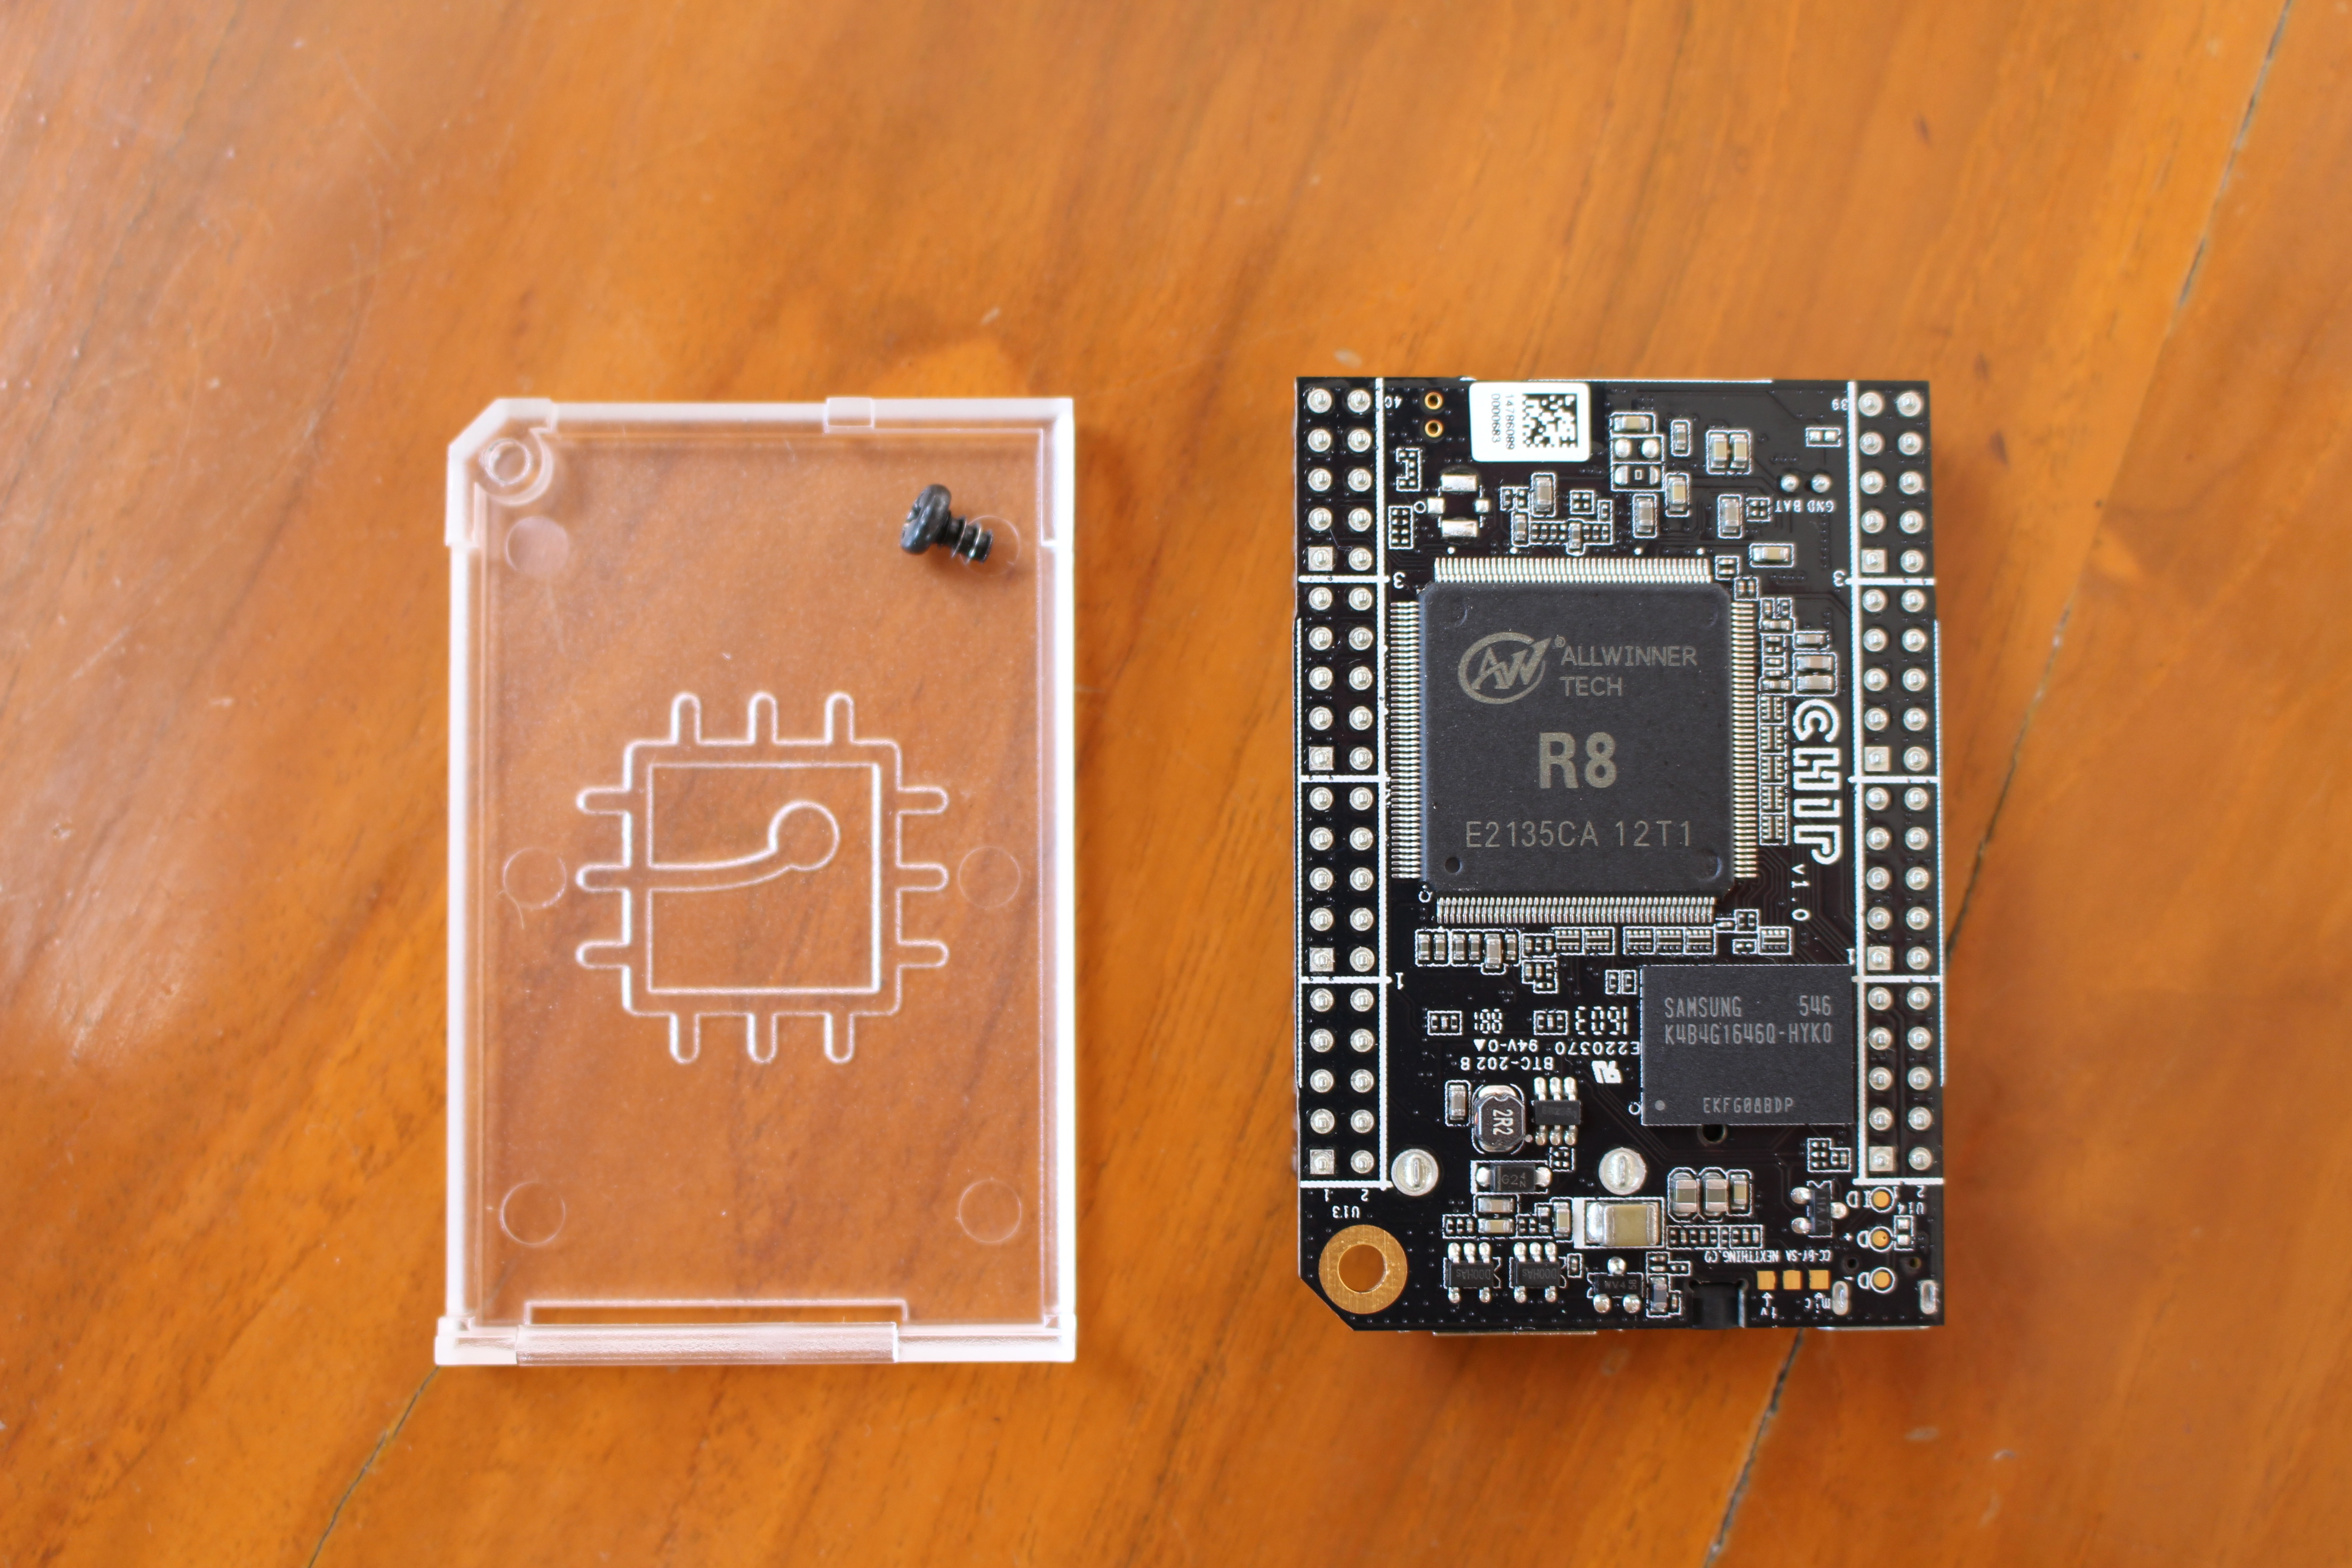
The CHIP board is sold for $9 + reasonable shipping, and should be about twice as fast as the original Raspberry Pi Model B board CPU wise. I wrote a comparison of ultra cheap boards’ features pitting CHIP with Raspberry Pi Zero and Orange Pi One if you want to find more details.
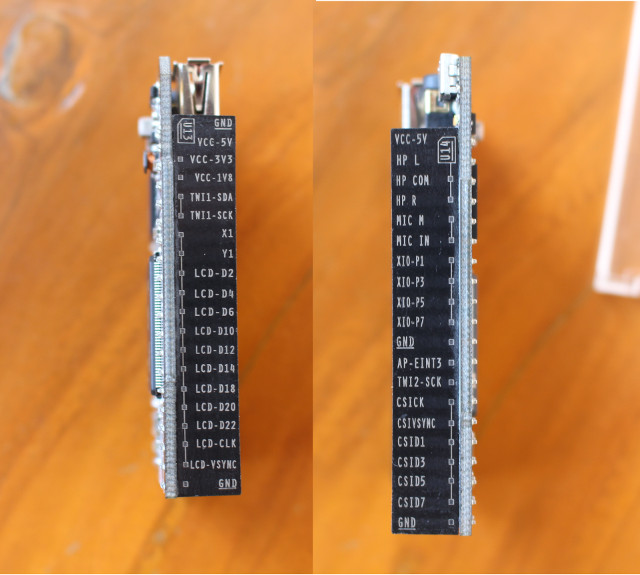 I also appreciate the markings written on the side of the headers, which makes life a little easier when wiring, as you don’t need to consult the pinout diagram.
What can you do with PocketC.H.I.P?
So after going through the hardware, I’ll show some of the things you do with the pre-installed firmware. Let’s get started by pressing the power button for one or two seconds. The boot will take a little less than one minute during which you’ll be shown several boot logos, and eventually you’ll be greeted by a short tutorial.


You can browse the tour with the left and right arrow key, it’s simply explains you can use the touchscheen with your fingers or a stylus, and the various tings you can do such as playing games, making music. Once we are done with the tour, we get into the main menu with four icons: Terminal, PICO-8 games, Make Music (SunVox), Get Help, Write, and Browse Files.
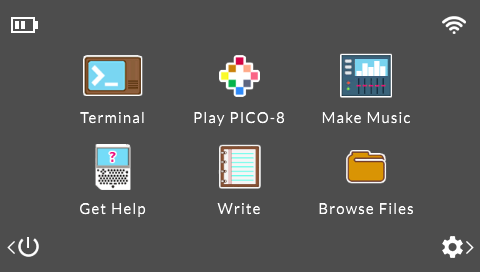
There are also four icons on the edges of the screen showing battery life and WiFi connectivity, setup and power options.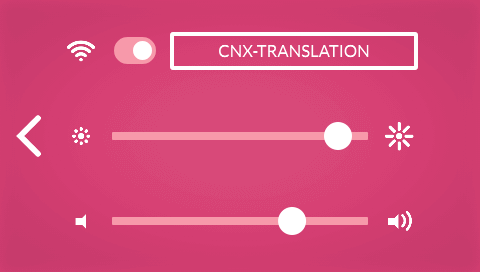
Let’s go inside the setup options since it’s one of the first things you’ll want to do if you plan to access the Internet, as this is where you can connect to your WiFi router, and I had no problem doing so, but note that only 2.4 GHz WiFi is supported, and 5GHz access points won’t be shown. You can also adjust brightness and volume for the audio jack, since there aren’t any speakers.
If you wonder how I took the screenshot for this review, I ran the following command in the terminal which gives me five second to go to what ever menu:
|
1 |
gnome-screenshot -d 5 |
but eventually I did so in an SSH sessions with:
|
1 |
gnome-screenshot --display=:0 |
…and found the pictures inside ~/Pictures directory despite the following error showing each time as gnome is not install:
|
1 |
** Message: Unable to use GNOME Shell's builtin screenshot interface, resorting to fallback X11. |
The company latter told me they used “xfce4-screenshooter” for their screenshots, so it should be a better option.
Anyway, time to play with the command line:
Some command to see system info first:
|
1 2 3 4 5 6 7 8 9 10 11 12 13 14 15 16 17 18 19 20 21 22 23 24 25 26 27 28 29 30 31 32 |
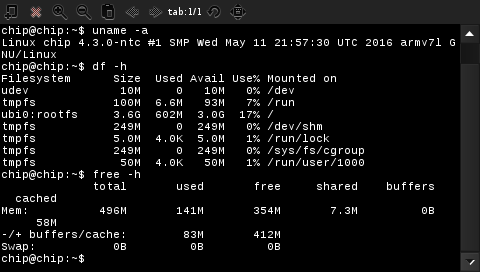
chip@chip:~$ cat /etc/issue Debian GNU/Linux 8 \n \l chip@chip:~$ uname -a Linux chip 4.3.0-ntc #1 SMP Wed May 11 21:57:30 UTC 2016 armv7l GNU/Linux chip@chip:~$ df -h Filesystem Size Used Avail Use% Mounted on udev 10M 0 10M 0% /dev tmpfs 100M 6.6M 93M 7% /run ubi0:rootfs 3.6G 606M 3.0G 17% / tmpfs 249M 0 249M 0% /dev/shm tmpfs 5.0M 4.0K 5.0M 1% /run/lock tmpfs 249M 0 249M 0% /sys/fs/cgroup tmpfs 50M 0 50M 0% /run/user/1000 chip@chip:~$ free -h total used free shared buffers cached Mem: 496M 185M 310M 7.7M 0B 84M -/+ buffers/cache: 101M 394M Swap: 0B 0B 0B chip@chip:~$ cat /proc/cpuinfo processor : 0 model name : ARMv7 Processor rev 2 (v7l) BogoMIPS : 100.24 Features : half thumb fastmult vfp edsp neon vfpv3 tls vfpd32 CPU implementer : 0x41 CPU architecture: 7 CPU variant : 0x3 CPU part : 0xc08 CPU revision : 2 Hardware : Allwinner sun4i/sun5i Families Revision : 0000 Serial : 16254212050232bc |
So the device runs Debian 8 with recent Linux kernel (4.3), the rootfs partition is 3.6GB with 3.0GB free (after installing a few apps), there’s 496MB RAM available to Linux, and the processor is indeed a single core Cortex A8 processor made by Allwinner.
Linux 4.6 will start to support lsgpio to list all GPIOs, but in the meantime, we can still check this with sysfs:
|
1 2 3 4 5 6 |
ls -l /sys/class/gpio/ total 0 --w------- 1 root root 4096 Jun 25 05:37 export lrwxrwxrwx 1 root root 0 Jun 25 07:47 gpiochip0 -> ../../devices/platform/soc@01c00000/1c20800.pinctrl/gpio/gpiochip0 lrwxrwxrwx 1 root root 0 Jun 25 07:47 gpiochip408 -> ../../devices/platform/soc@01c00000/1c2b400.i2c/i2c-2/2-0038/gpio/gpiochip408 --w------- 1 root root 4096 Jun 25 05:37 unexport |
With Linux 3.4 legacy kernel, all the GPIOs would show after loading gpio-sunxi module, but since we are using a more recent kernel, the instructions have changed, and you need to export the GPIOs you want to use as explained on linux-sunxi wiki.
The other good news is that apt is working fine, so you install most of the program that work on Debian. One of the first thing I did was to install openssh-server, because while typing on the device might be fun, it’s also slow, so I found it more convenient to access it via an SSH session from my main computer with the username / password combination being both “chip” (without quotes). I also found instructions to install doom on Adafruit, so I tried it:
|
1 2 3 |
sudo apt-get update sudo apt-get install prboom sudo apt-get install doom-wad-shareware |
It worked flawlessly, and I tried the game by simply typing doom,… and success!
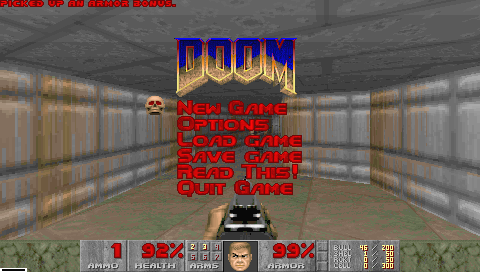 You’ll need to connect headphone or speaker to get audio, and playing the game with the keyboard is not that easy as beside the WASD keys, you also need to the left and right keys placed just above. So it might be better to connect a USB keyboard to the USB port of CHIP board, or re-assign the keys if possible. Apart from that, the games runs perfectly smoothly.
Let’s go back to the main menu to try PICO-8 retro games, and again you’ll go through a short tour explaining how to use the app to play or edit games with your own sprites.

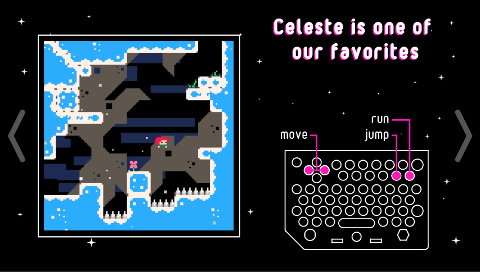 After the tour, you’ll be presented by a selection of 4 “favorites” games: Celeste, Frog Home, Hug Arena, and Tower of Archeos, but you have access to many others games too. I tried Celeste, and no problem, except I need to practice more 🙂
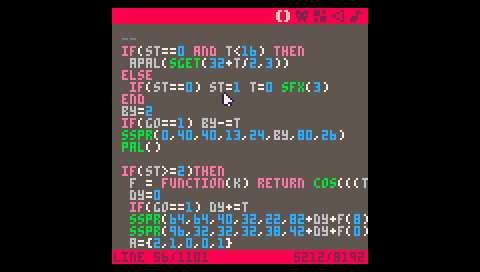
 The option to “edit this cart” will bring you to the games code, which you can edit as your wish.
 There’s also PICO-8 terminal to perform various actions such as loading files, creating directories, and so on.
Next up the Make Music app (SunVox) will also take you through a tour first.
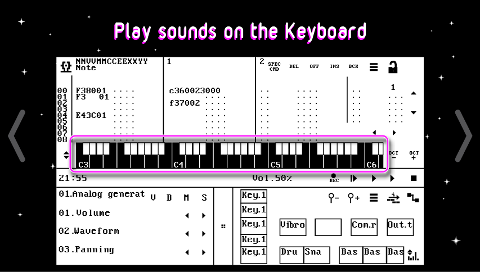
After connecting headphone or speaker, you’ll be able to compose and play music on a MIDI keyboard.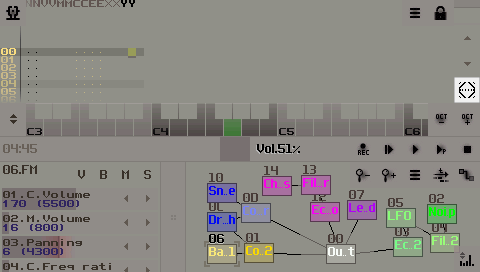
The application definitely requires a stylus – a pencil will do – especially the top menu options, and even kids’ fingers will be too big.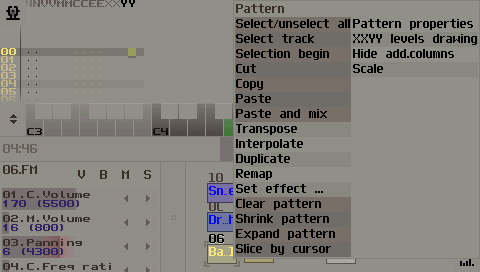
The four icon in the main menu starts an help section with a scrolling bar. So much to say about this one.
The “Write” icon is a text edit, which turns out to be Leafpad 0.8.0.1. It could be your text editor to write Python or other languages programs, before running them in the command line.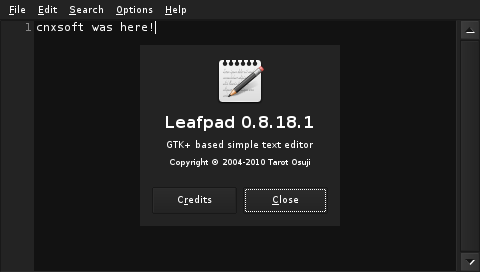
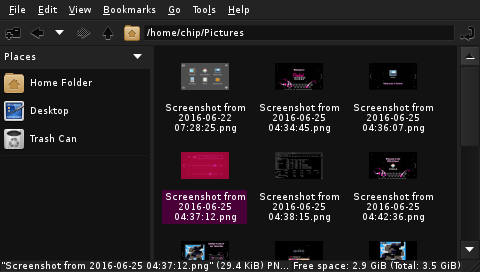
Finally the File Browser is the commonly used PCManFM 1.2.3, and allows to copy, delete, move, or create files or directories.
So I’ve gone through all options provided on the pre-loaded firmware, so it’s time to turn it off. You can click on the bottom right corner to select Shutdown, Sleep, or Reboot options, as well as “Flash firmware” to reboot into software flashing mode. You can then follow the firmware flashing instructions @ http://pcflash.getchip.com (Chrome browser required).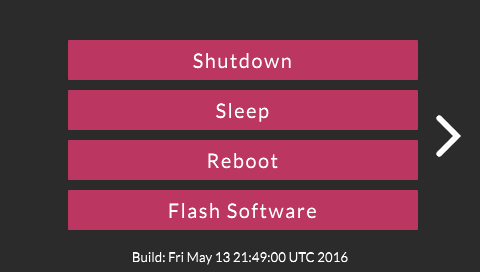 If you prefer a video review, and I’ve embedded mine below. I checkout the hardware until 3:05, before starting the device, and showing it action.
So overall, PocketC.H.I.P is a fun device to use, and should be particularly interesting for kids, as they can play games, compose music, and learn about Linux, programming and/or hardware hacking with this inexpensive all-in-one device. PocketC.H.I.P is currently available for pre-order for $49 + shipping for a limited time, after which it will sell for $69.

Jean-Luc started CNX Software in 2010 as a part-time endeavor, before quitting his job as a software engineering manager, and starting to write daily news, and reviews full time later in 2011.
Support CNX Software! Donate via cryptocurrencies, become a Patron on Patreon, or purchase goods on Amazon or Aliexpress. We also use affiliate links in articles to earn commissions if you make a purchase after clicking on those links.

