
This post was initially supposed to be part 2 of Sonoff B1 light bulb review, where I would have explained how easy it was to use OTA mechanism to update to Sonoff-Tasmota open source firmware, and shortly show about its features and capabilities. However, it took me over 10 hours to make that work, mostly due to misunderstand in the documentation, and time spent to configure routers. I also failed the first time with Sonoff B1, so I used the serial console method, and instead managed to use SonOTA method with Sonoff POW switching from stock firmware to Sonoff-Tasmota without having to solder or tear down anything.
Updating software with a USB to Serial Board
Using a USB to serial board is the most common method to switch from stock firmware to open source firmware such as ESPurna or Sonoff-Tasmota in Sonoff devices or other ESP8266 based devices. It’s quite straightforward with Sonoff switches like Sonoff TH16.
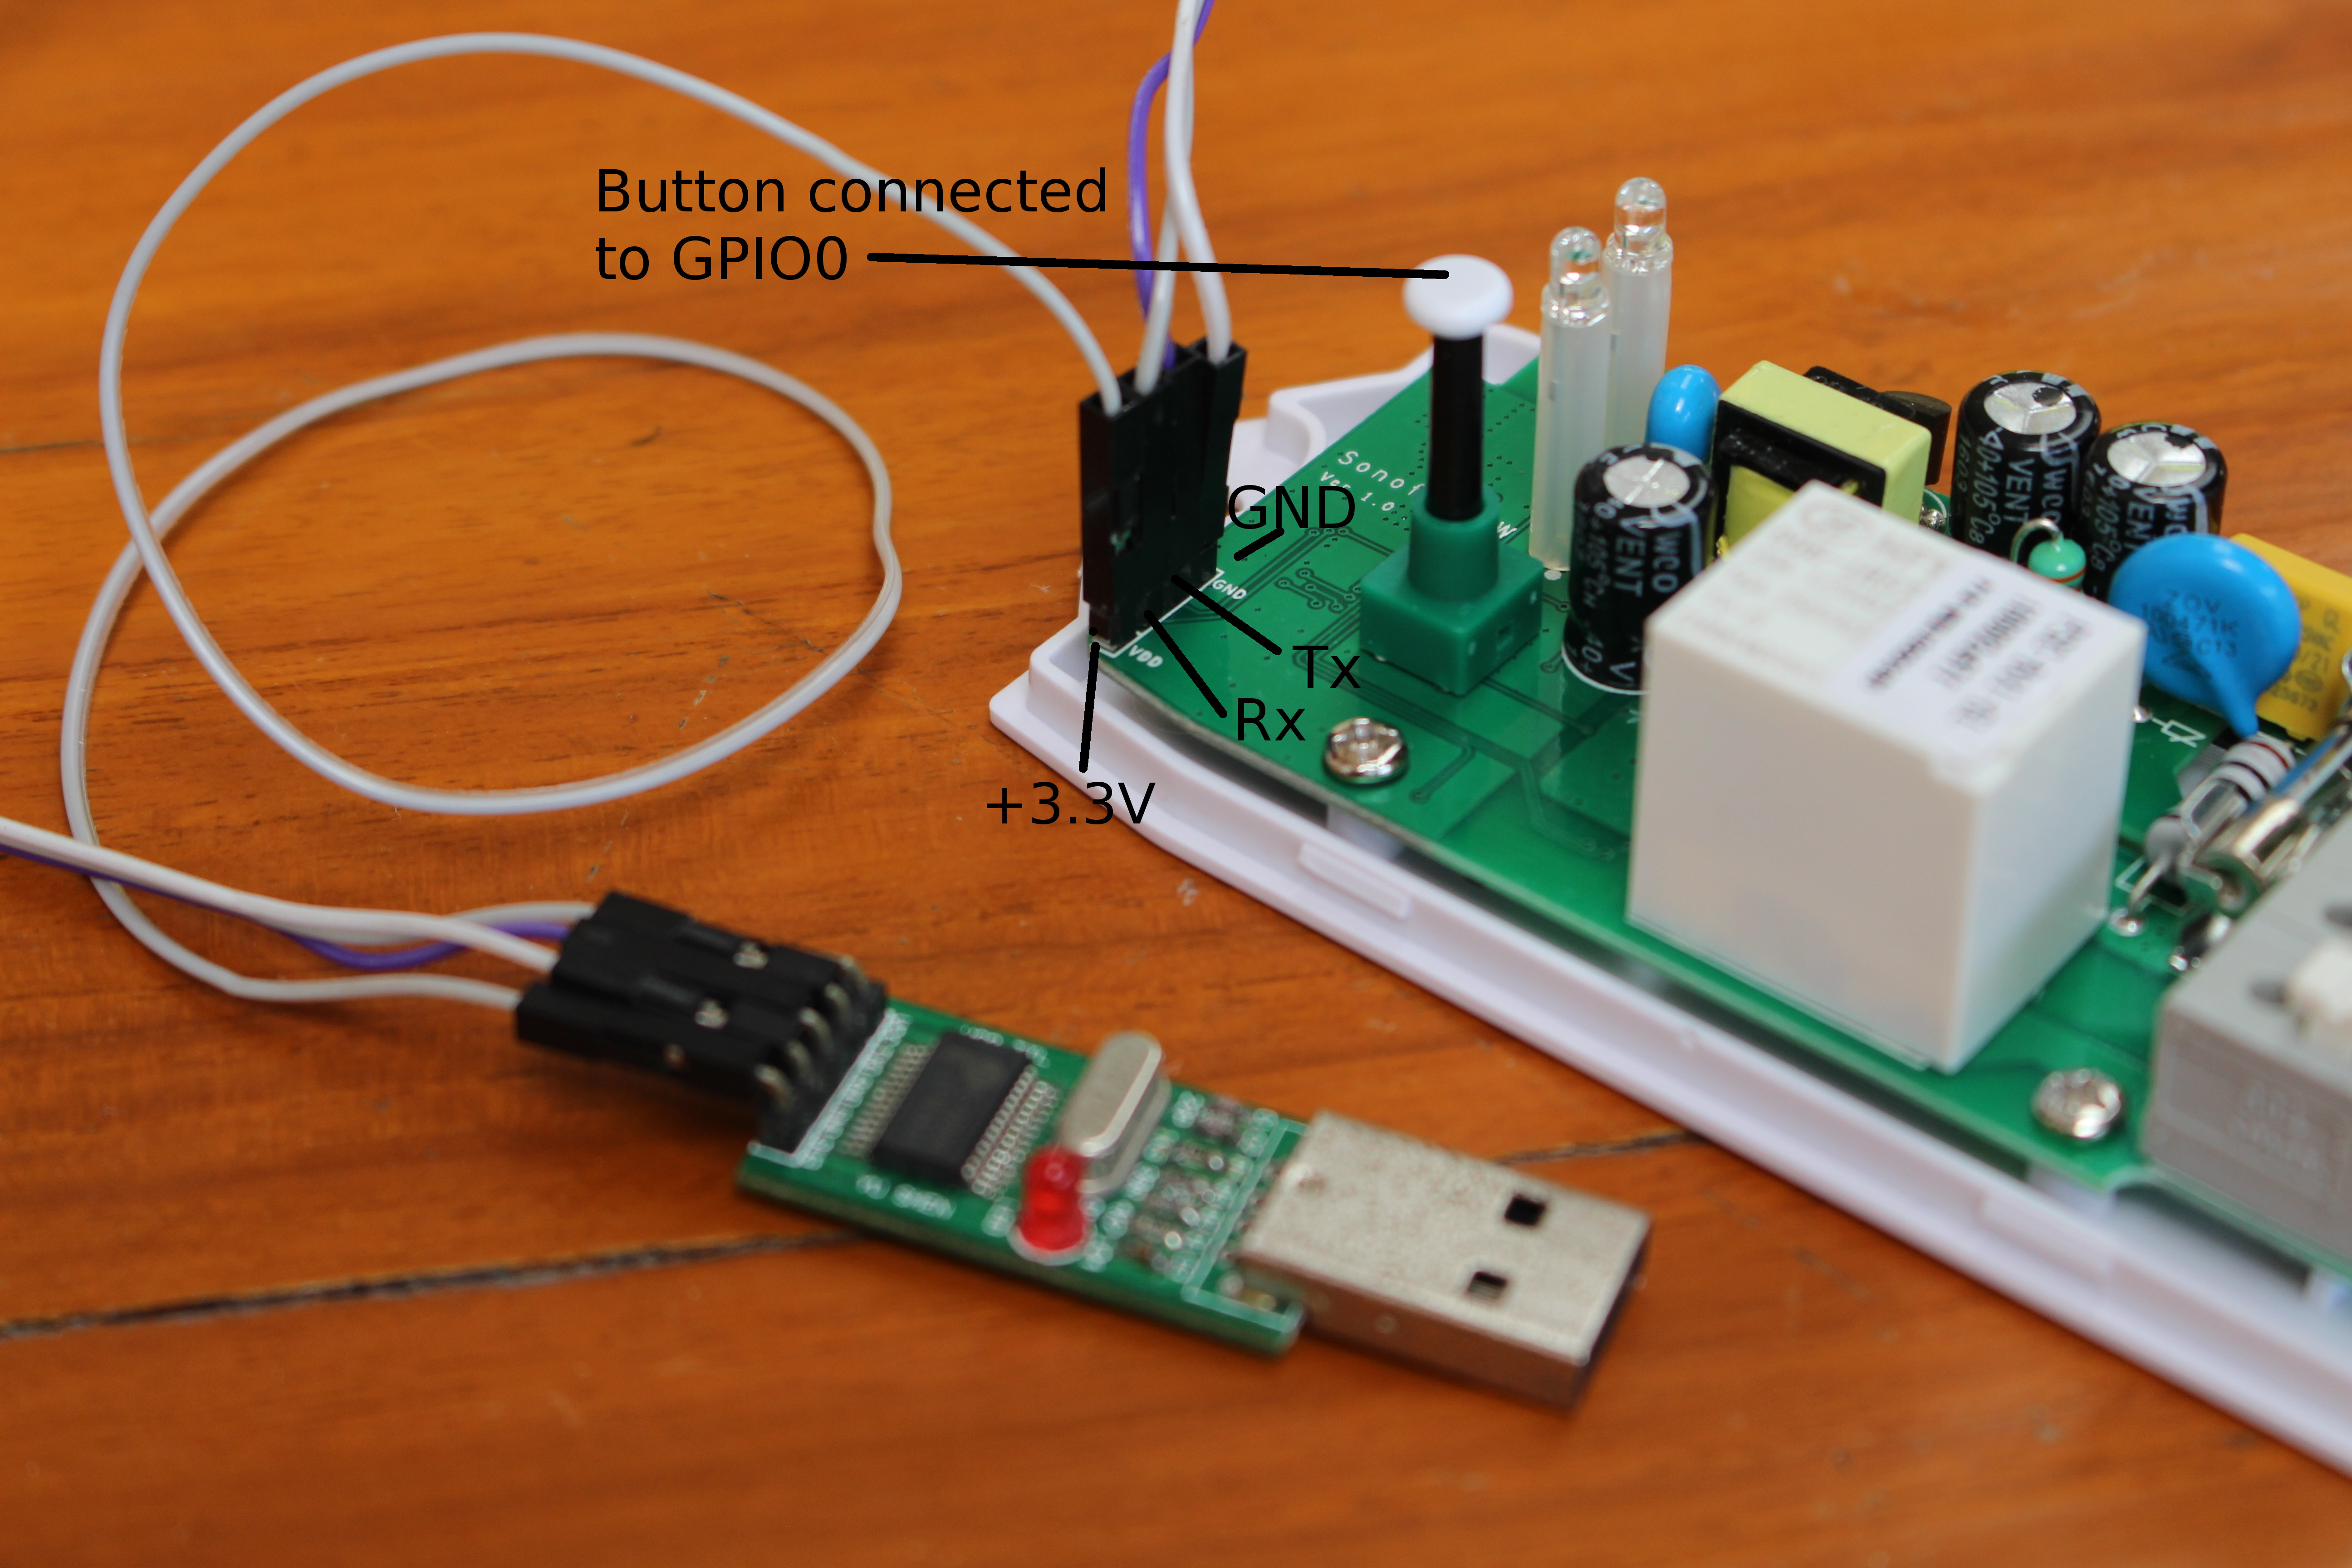
You just need to solder a 4-pin 2.54mm pitch header, connect the board, and use esptool to flash the image. One it’s done you can simply remove the wire, leave the header in place, and put the case back in place. But with Sonoff B1 light bulb, it’s not quite as easy. First there are no through holes in the board, and you need to solder up to 6 wires on small solder pads.
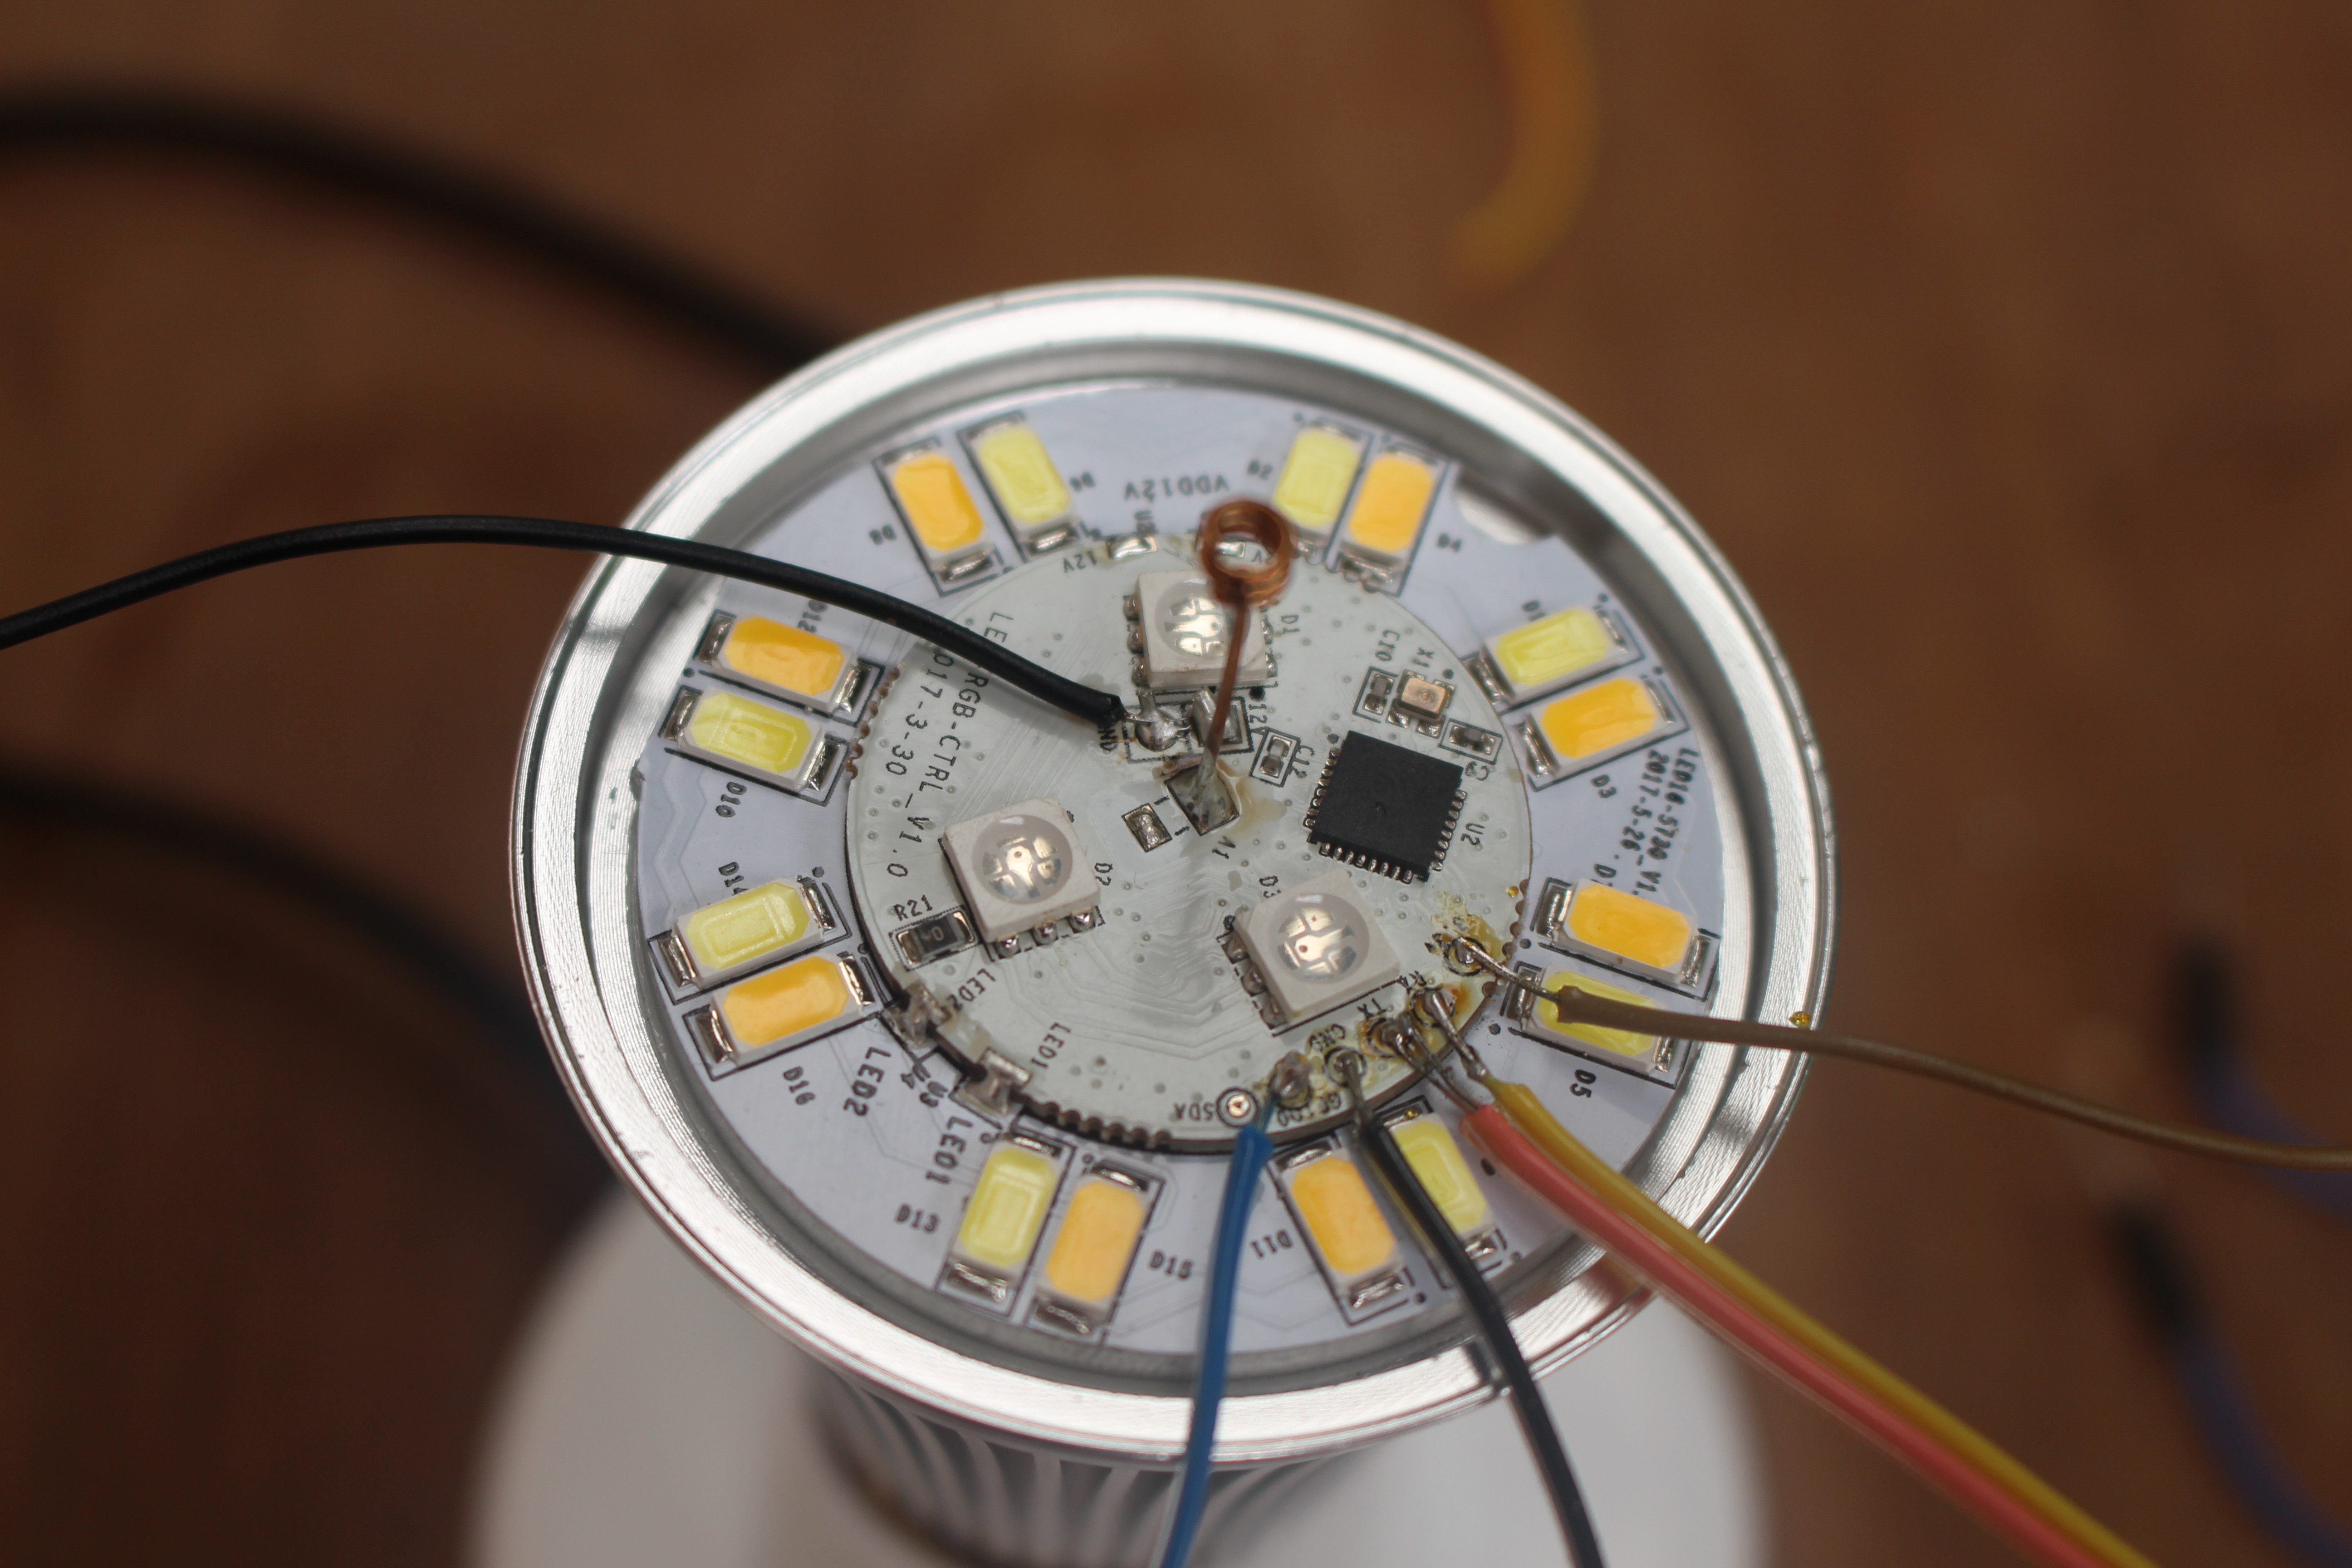
The GND, Tx, Rx, and 3.3V must be soldered and connected to the USB to serial board, while GPIO0 must be shorted to enter programming mode, so I also added two more wires for GPIO0, and an extra GND pin.

Important warning: Never connect the serial board and AC/mains at the same time. Your equipment and life may be at risk.
Now we can download the latest version of the firmware, install esptool, connect the USB to serial board to your computer – which will also provide powered to the board -, and run esptool to flash the firmware:
|
1 2 3 |
wget https://github.com/arendst/Sonoff-Tasmota/releases/download/v5.8.0/sonoff.bin sudo pip install --upgrade esptool esptool.py --port /dev/ttyUSB0 write_flash -fs 1MB -fm dout 0x0 sonoff.bin |
That’s pretty straightforward, and the output should look as below if everything runs normally:
|
1 2 3 4 5 6 7 8 9 10 11 12 13 14 |
esptool.py v2.1 Connecting.... Detecting chip type... ESP8266 Chip is ESP8266 Uploading stub... Running stub... Stub running... Configuring flash size... Compressed 481136 bytes to 329618... Wrote 481136 bytes (329618 compressed) at 0x00000000 in 29.1 seconds (effective 132.3 kbit/s)... Hash of data verified. Leaving... Hard resetting... |
Most products on the market defaults to access point mode when they are first booted, but Sonoff-Tasmota’s developer have instead decided to provide pre-built image in client mode connecting to a default access point with SSID: indebuurt1 ; password: VnsqrtnrsddbrN. That’s a bit of a pain, as you need to configure another router with those credentials, before changing it to your home router. An alternative way is to build some source, and change the default AP settings, so the device can connect right away after flashing. Still, I’d wish an image that default to AP mode would be nice. It’s actually not a problem for most Sonoff devices, as you can switch to AP mode with the button (4 short presses), but Sonoff B1 does not have one.
Now imagine you have a dozen or more of Sonoff B1 light bulbs that need to be update to Sonoff-Tasmota. That would be a real pain to solder and unsolder the required wires for each bulbs. One solution is to create a jig with pogo pins for firmware update, as the one shown below specifically designed for AI Light. You just need to pop out the bulb, click the jig, flash over serial, remove the jib, refit the bulb, and you’re done.
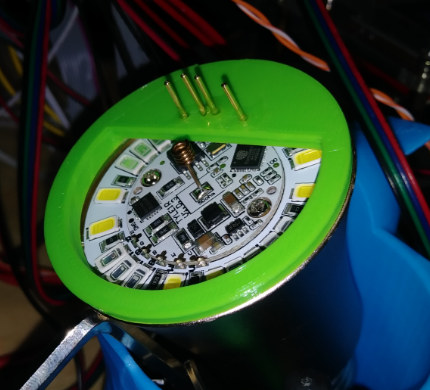
I don’t know if one exists for Sonoff B1, but the jig above could certainly be customized to work with it.
SonOTA – Sonoff OTA Firmware Update Method
However, in an ideal world you’d prefer not to mess with the hardware at all. If only ITEAD Studio provided a way to upload custom firmware with their stock firmware that’d be ideal, but it’s not the case right now. Luckily, the OTA mechanism was reverse-engineered, and SonOTA is an (experimental) implementation that allow to flash alternative firmware to Sonoff devices without altering the hardware or needing special jigs.
The method on Sonoff-Tasmota wiki does not work on Sonoff B1 because there SSID is not advertised in pairing mode, but somebody in github had managed to update one light bulb using DNS spoofing. Since I used the first method with Sonoff B1, but only partially managed to make it work, I switched to Sonoff POW, and succesfully tested the DNS spoofing method. Several items are required, so I’ve drawn a diagram showing how those interact.
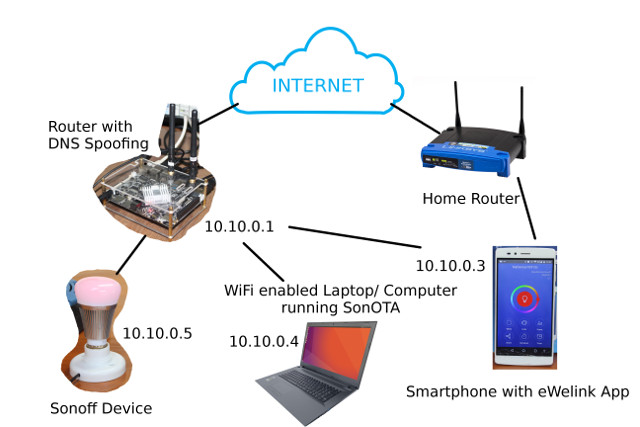
- The Home Router is just the WiFi router you’d normally use to access the Internet
- The smartphone with eWelink is requirement to configure WiFI on the Sonoff device, and update it to the latest stock firmware version. It can also be used to easily check access points.
- The WiFi laptop runs SonOTA, and will act as ITEAD Studio firmware update server located at xx-disp.coolkit.cc (for example cn-disp.coolkit.cc, eu-disp.coolkit.cc, etc…)
- “Temporary” Router with DNS spoofing will make sure xx-disp.coolkit.cc redirect to your laptop/computer running SonOTA, so it takes over when Sonoff device tries to update the firmware. It still needs to be connected to the Internet.
- Sonoff device – The device we want to update
Potentially, you could combine the router, router with DNS spoofing, and WiFi laptop into one device, if you have a Debian based router, but I still separate all three in my case, since home router does not support DNS spoofing, and I failed to install SonOTA on the temporary router.
The very first step is to pair the Sonoff device with eWelink app, connect it to your home router, and update the firmware to the latest version, in my case 2.0.4.
Now you can configure your temporary router to use DNS spoofing. I did not have any spare router with such feature, so I instead used VS-RK3399 board with Debian, and configured it as a router with hostapd, and isc-dhcp-server using those instructions. This part will heavily depend on your router, and whether you use Debian, or other Linux distributions. For reference, here are some of the main configuration files I used:
- /etc/hostapd/hostapd.conf
|
1 2 3 4 5 6 7 8 9 |
interface=wlan0 driver=nl80211 ssid=VS-RK3399 channel=1 wpa=3 wpa_passphrase=1234567890 wpa_key_mgmt=WPA-PSK wpa_pairwise=TKIP rsn_pairwise=CCMP |
- /etc/network/interfaces
|
1 2 3 4 5 6 7 8 |
# interfaces(5) file used by ifup(8) and ifdown(8) # Include files from /etc/network/interfaces.d: source-directory /etc/network/interfaces.d auto wlan0 iface wlan0 inet static address 10.10.0.1 netmask 255.255.255.0 |
- /etc/dhcp/dhcpd.conf
|
1 2 3 4 5 |
subnet 10.10.0.0 netmask 255.255.255.0 { range 10.10.0.2 10.10.0.16; option domain-name-servers 10.10.0.1, 208.67.222.222; option routers 10.10.0.1; } |
The next step was to configure DNS spoofing. I first went with dnsmasq, and I could successfully confirm it worked with dig, but for whatever reason Sonoff B1/POW would still connect the ITEAD server. Finally I tried with dnsspoof, and it worked OK. Installation in Debian:
|
1 |
sudo apt install dsniff |
/etc/dnsspoof.conf configuration file to redirect traffic to ITEAD / eWelink update servers to my WiFi laptop:
|
1 |
10.10.0.4 *-disp.coolkit.cc |
You can run it as follows:
|
1 2 3 4 |
sudo dnsspoof -i wlan0 -f /etc/dnsspoof.conf dnsspoof: listening on wlan0 [udp dst port 53 and not src 10.10.0.1] 10.10.0.3.4096 > 8.8.4.4.53: 33432+ A? cn-disp.coolkit.cc 10.10.0.2.34067 > 8.8.4.4.53: 42715+ A? cn-disp.coolkit.cc |
DNS spoofing took me the most time, as beside restarting service in the router itself, you have to restart the devices connected to it to reflects the changes. I also messed with /etc/hosts file in the router and laptop, but it should not be necessary, as the important is to fool the Sonoff device.
Let’s switch the WiFi laptop configuration. It should work with both Linux and Windows, but mine is running Ubuntu 16.04, so that’s what I used. Let’s create a working directory, get SonOTA code, and install all required libraries and tools.
|
1 2 3 4 5 6 7 |
mkdir sonoff cd sonoff git clone https://github.com/mirko/SonOTA.git cd SonOTA sudo apt install python3-pip sudo pip3 install --upgrade pip sudo pip3 install -r requirements.txt |
Now we’re ready for the update. Launch SonOTA script in legacy and no provision modes:
|
1 |
sudo ./sonota.py --legacy --no-prov |
This will first ask you to select the WiFi interface, and enter your SSID and password, and start probing for the Sonoff device:
|
1 2 3 4 5 6 7 8 9 10 11 12 13 14 15 16 17 18 19 20 21 22 |
Select IP address of the WiFi interface: 0: 10.10.0.4 Select IP address [0]: WiFi SSID: VS-RK3399 WiFi Password: 12345667890 Using the following configuration: Server IP Address: 10.10.0.4 WiFi SSID: VS-RK3399 WiFi Password: 12345667890 Starting stage2... ~~ Starting web server (HTTP port: 8080, HTTPS port 443) ~~ Waiting for device to connect *** IMPORTANT! *** ** AFTER the first download is COMPLETE, with in a minute or so you should connect to the new SSID "FinalStage" to finish the process. ** ONLY disconnect when the new "FinalStage" SSID is visible as an available WiFi network. This server should automatically be allocated the IP address: 192.168.4.2. If you have successfully connected to "FinalStage" and this is not the IP Address you were allocated, please ensure no other device has connected, and reboot your Sonoff. .......... |
Delete your Sonoff device in eWelink app, and restart pairing, this time connecting it to your temporary router with DNS spoofing enabled, and shortly after the SonOTA script should start to transfer the image to the device:
|
1 2 3 4 5 6 7 8 9 10 11 12 13 14 15 16 17 18 19 20 21 22 23 24 25 26 27 28 29 30 31 32 33 34 35 36 37 38 39 40 41 42 43 44 45 46 47 48 49 50 51 52 53 54 55 56 57 58 59 60 61 62 63 64 65 66 67 68 69 70 71 72 73 74 75 76 77 78 79 80 81 82 83 84 85 86 87 88 89 90 91 92 93 94 95 96 97 98 99 100 101 102 103 104 105 106 107 108 109 110 111 112 113 114 115 116 117 118 119 120 121 122 123 124 125 126 127 128 129 130 131 132 133 134 135 136 137 138 139 140 141 142 143 144 145 146 147 148 149 150 151 152 153 154 155 156 157 158 159 160 161 162 163 164 165 166 167 168 169 170 171 172 173 174 175 176 177 178 179 180 181 182 183 184 185 186 187 188 189 190 191 192 193 194 195 196 197 198 199 200 201 202 203 204 205 206 207 208 209 210 211 212 213 214 215 216 217 218 219 220 221 222 223 224 225 226 227 228 229 230 231 232 233 234 235 236 237 238 239 240 241 242 243 244 245 246 247 248 249 250 251 252 253 254 255 256 257 258 259 260 261 262 263 264 265 266 267 268 269 270 271 272 273 274 275 276 277 278 279 280 281 282 283 284 285 286 287 288 289 290 291 292 293 294 295 296 297 298 299 300 301 302 303 304 305 306 307 308 309 310 311 312 313 314 315 316 317 318 319 320 321 322 323 324 325 326 327 328 329 330 331 332 333 334 335 336 337 338 339 340 341 342 343 344 345 346 347 348 349 350 351 352 353 354 355 356 357 358 359 360 361 362 363 364 365 366 367 368 369 370 371 372 373 374 375 376 377 378 379 380 381 382 383 384 385 386 387 388 389 390 391 392 393 394 395 396 397 398 399 |
*** IMPORTANT! *** ** AFTER the first download is COMPLETE, with in a minute or so you should connect to the new SSID "FinalStage" to finish the process. ** ONLY disconnect when the new "FinalStage" SSID is visible as an available WiFi network. This server should automatically be allocated the IP address: 192.168.4.2. If you have successfully connected to "FinalStage" and this is not the IP Address you were allocated, please ensure no other device has connected, and reboot your Sonoff. ....<< HTTP POST /dispatch/device >> /dispatch/device >> { "IP": "10.10.0.4", "reason": "ok", "port": 443, "error": 0 } 2017-10-03 19:42:23,718 (INFO) 200 POST /dispatch/device (10.10.0.5) 2.49ms 2017-10-03 19:42:23,899 (INFO) 101 GET /api/ws (10.10.0.5) 2.26ms 2017-10-03 19:42:23,900 (DEBUG) << WEBSOCKET OPEN 2017-10-03 19:42:23,907 (DEBUG) << WEBSOCKET INPUT 2017-10-03 19:42:23,907 (DEBUG) << { "model": "PSC-B01-GL", "apikey": "760af2ff-d31f-40e2-88da-ae940c70a7ab", "romVersion": "2.0.4", "ts": 511, "userAgent": "device", "action": "register", "version": 2, "deviceid": "100002e69a" } ~~~ device sent action request, acknowledging / answering... 2017-10-03 19:42:23,908 (INFO) We are dealing with a PSC-B01-GL model. ~~~~ register >> { "config": { "hbInterval": 145, "hb": 1 }, "apikey": "07c5f29c-ffe2-4f71-b556-e95c2549a985", "deviceid": "100002e69a", "error": 0 } 2017-10-03 19:42:23,916 (DEBUG) << WEBSOCKET INPUT 2017-10-03 19:42:23,916 (DEBUG) << { "userAgent": "device", "action": "date", "apikey": "07c5f29c-ffe2-4f71-b556-e95c2549a985", "deviceid": "100002e69a" } ~~~ device sent action request, acknowledging / answering... ~~~~ date >> { "date": "2017-10-03T19:42:23.917Z", "apikey": "07c5f29c-ffe2-4f71-b556-e95c2549a985", "deviceid": "100002e69a", "error": 0 } 2017-10-03 19:42:23,926 (DEBUG) << WEBSOCKET INPUT 2017-10-03 19:42:23,926 (DEBUG) << { "userAgent": "device", "action": "update", "params": { "switch": "off", "power": "0", "startup": "off", "staMac": "5C:CF:7F:20:DA:5B", "fwVersion": "2.0.4", "rssi": -60 }, "apikey": "07c5f29c-ffe2-4f71-b556-e95c2549a985", "deviceid": "100002e69a" } ~~~ device sent action request, acknowledging / answering... ~~~~ update >> { "apikey": "07c5f29c-ffe2-4f71-b556-e95c2549a985", "deviceid": "100002e69a", "error": 0 } >> { "params": { "switch": "off" }, "apikey": "07c5f29c-ffe2-4f71-b556-e95c2549a985", "from": "hackepeter", "ts": 0, "userAgent": "app", "action": "update", "sequence": "1507034543928", "deviceid": "100002e69a" } >> { "params": { "switch": "on" }, "apikey": "07c5f29c-ffe2-4f71-b556-e95c2549a985", "from": "hackepeter", "ts": 0, "userAgent": "app", "action": "update", "sequence": "1507034543928", "deviceid": "100002e69a" } >> { "params": { "switch": "off" }, "apikey": "07c5f29c-ffe2-4f71-b556-e95c2549a985", "from": "hackepeter", "ts": 0, "userAgent": "app", "action": "update", "sequence": "1507034543929", "deviceid": "100002e69a" } >> { "params": { "switch": "on" }, "apikey": "07c5f29c-ffe2-4f71-b556-e95c2549a985", "from": "hackepeter", "ts": 0, "userAgent": "app", "action": "update", "sequence": "1507034543929", "deviceid": "100002e69a" } >> { "params": { "switch": "off" }, "apikey": "07c5f29c-ffe2-4f71-b556-e95c2549a985", "from": "hackepeter", "ts": 0, "userAgent": "app", "action": "update", "sequence": "1507034543929", "deviceid": "100002e69a" } >> { "params": { "model": "PSC-B01-GL", "binList": [ { "downloadUrl": "http://10.10.0.4:8080/ota/image_user1-0x01000.bin", "name": "user1.bin", "digest": "97fe70d737390bbde7b8d208c79d590e29fc76962623c7bd198ee210210ea616" }, { "downloadUrl": "http://10.10.0.4:8080/ota/image_user2-0x81000.bin", "name": "user2.bin", "digest": "e6d0cbb641542bd0a27e6c4628fc9331f1f5d3ac3afa42c9307569cf4d70fcdc" } ], "version": "23.42.5" }, "apikey": "07c5f29c-ffe2-4f71-b556-e95c2549a985", "ts": 0, "userAgent": "app", "action": "upgrade", "sequence": "1507034543936", "deviceid": "100002e69a" } ...<< HTTP POST /dispatch/device >> /dispatch/device >> { "IP": "10.10.0.4", "reason": "ok", "port": 443, "error": 0 } 2017-10-03 19:42:30,162 (INFO) 200 POST /dispatch/device (10.10.0.5) 2.14ms 2017-10-03 19:42:30,338 (INFO) 101 GET /api/ws (10.10.0.5) 1.78ms 2017-10-03 19:42:30,338 (DEBUG) << WEBSOCKET OPEN 2017-10-03 19:42:30,346 (DEBUG) << WEBSOCKET INPUT 2017-10-03 19:42:30,347 (DEBUG) << { "model": "PSC-B01-GL", "apikey": "760af2ff-d31f-40e2-88da-ae940c70a7ab", "romVersion": "2.0.4", "ts": 744, "userAgent": "device", "action": "register", "version": 2, "deviceid": "100002e69a" } ~~~ device sent action request, acknowledging / answering... 2017-10-03 19:42:30,347 (INFO) We are dealing with a PSC-B01-GL model. ~~~~ register >> { "config": { "hbInterval": 145, "hb": 1 }, "apikey": "516a6939-be2e-4494-8ad9-94d836df2a64", "deviceid": "100002e69a", "error": 0 } 2017-10-03 19:42:30,357 (DEBUG) << WEBSOCKET INPUT 2017-10-03 19:42:30,357 (DEBUG) << { "userAgent": "device", "action": "date", "apikey": "516a6939-be2e-4494-8ad9-94d836df2a64", "deviceid": "100002e69a" } ~~~ device sent action request, acknowledging / answering... ~~~~ date >> { "date": "2017-10-03T19:42:30.358Z", "apikey": "516a6939-be2e-4494-8ad9-94d836df2a64", "deviceid": "100002e69a", "error": 0 } 2017-10-03 19:42:30,367 (DEBUG) << WEBSOCKET INPUT 2017-10-03 19:42:30,369 (DEBUG) << { "userAgent": "device", "action": "update", "params": { "switch": "off", "power": "0", "startup": "off", "staMac": "5C:CF:7F:20:DA:5B", "fwVersion": "2.0.4", "rssi": -65 }, "apikey": "516a6939-be2e-4494-8ad9-94d836df2a64", "deviceid": "100002e69a" } ~~~ device sent action request, acknowledging / answering... ~~~~ update >> { "apikey": "516a6939-be2e-4494-8ad9-94d836df2a64", "deviceid": "100002e69a", "error": 0 } >> { "params": { "switch": "off" }, "apikey": "516a6939-be2e-4494-8ad9-94d836df2a64", "from": "hackepeter", "ts": 0, "userAgent": "app", "action": "update", "sequence": "1507034550370", "deviceid": "100002e69a" } >> { "params": { "switch": "on" }, "apikey": "516a6939-be2e-4494-8ad9-94d836df2a64", "from": "hackepeter", "ts": 0, "userAgent": "app", "action": "update", "sequence": "1507034550370", "deviceid": "100002e69a" } >> { "params": { "switch": "off" }, "apikey": "516a6939-be2e-4494-8ad9-94d836df2a64", "from": "hackepeter", "ts": 0, "userAgent": "app", "action": "update", "sequence": "1507034550370", "deviceid": "100002e69a" } >> { "params": { "switch": "on" }, "apikey": "516a6939-be2e-4494-8ad9-94d836df2a64", "from": "hackepeter", "ts": 0, "userAgent": "app", "action": "update", "sequence": "1507034550371", "deviceid": "100002e69a" } >> { "params": { "switch": "off" }, "apikey": "516a6939-be2e-4494-8ad9-94d836df2a64", "from": "hackepeter", "ts": 0, "userAgent": "app", "action": "update", "sequence": "1507034550371", "deviceid": "100002e69a" } >> { "params": { "model": "PSC-B01-GL", "binList": [ { "downloadUrl": "http://10.10.0.4:8080/ota/image_user1-0x01000.bin", "name": "user1.bin", "digest": "97fe70d737390bbde7b8d208c79d590e29fc76962623c7bd198ee210210ea616" }, { "downloadUrl": "http://10.10.0.4:8080/ota/image_user2-0x81000.bin", "name": "user2.bin", "digest": "e6d0cbb641542bd0a27e6c4628fc9331f1f5d3ac3afa42c9307569cf4d70fcdc" } ], "version": "23.42.5" }, "apikey": "516a6939-be2e-4494-8ad9-94d836df2a64", "ts": 0, "userAgent": "app", "action": "upgrade", "sequence": "1507034550378", "deviceid": "100002e69a" } 2017-10-03 19:42:30,953 (INFO) 206 GET /ota/image_user1-0x01000.bin?deviceid=100002e69a&ts=1270216262&sign=fd10a78457d4291cff343d52f3098bb04f029a2572867add32d45276f09f1d29 (10.10.0.5) 61.97ms 2017-10-03 19:42:31,047 (INFO) 206 GET /ota/image_user1-0x01000.bin?deviceid=100002e69a&ts=1191391529&sign=311c4ccf9977775ff83dcece17b60fc258e40d5d96ee7540f0e0421da230891f (10.10.0.5) 2.32ms 2017-10-03 19:42:31,158 (INFO) 206 GET /ota/image_user1-0x01000.bin?deviceid=100002e69a&ts=812669700&sign=578e7b03bdace2d81335e15552590eeb13e77983a119eda4d8a11618319e4162 (10.10.0.5) 2.31ms 2017-10-03 19:42:31,264 (INFO) 206 GET /ota/image_user1-0x01000.bin?deviceid=100002e69a&ts=553475508&sign=18e911f94392e98f04af16df743bfa0668aa590da176dc3ef0aa89632002875a (10.10.0.5) 2.63ms 2017-10-03 19:42:31,357 (DEBUG) ~~ websocket close 2017-10-03 19:42:31,361 (INFO) 206 GET /ota/image_user1-0x01000.bin?deviceid=100002e69a&ts=445349752&sign=013ff6ac7ced459e8028788b8ef302ec105e94bfc8e2de17166b01931742232e (10.10.0.5) 2.77ms 2017-10-03 19:42:31,452 (INFO) 206 GET /ota/image_user1-0x01000.bin?deviceid=100002e69a&ts=1344887256&sign=308c88598f4ad10eaa89d241620555e02395a83ce28780d80cdac4814d3d1660 (10.10.0.5) 2.35ms 2017-10-03 19:42:31,543 (INFO) 206 GET /ota/image_user1-0x01000.bin?deviceid=100002e69a&ts=730417256&sign=dd877ce498dfc1980c606e98b71680ad8ab361e3d47b2e4b01ebbe5659f62c28 (10.10.0.5) 2.23ms .2017-10-03 19:42:31,640 (INFO) 206 GET /ota/image_user1-0x01000.bin?deviceid=100002e69a&ts=1812158119&sign=d09e14bc168e2aca11903f6a0681b26fb091d938b80675dba2e5cb2f5e66d098 (10.10.0.5) 2.28ms 2017-10-03 19:42:31,735 (INFO) 206 GET /ota/image_user1-0x01000.bin?deviceid=100002e69a&ts=147699711&sign=e066d2ae4bf68722a33790bdcbc061c82f35935810a30f11292b6229aeb216e9 (10.10.0.5) 2.52ms 2017-10-03 19:42:31,832 (INFO) 206 GET /ota/image_user1-0x01000.bin?deviceid=100002e69a&ts=880268351&sign=f36fc681e71e091efeadaa41806ec817bb7bd01023a255650508f3000fc31d77 (10.10.0.5) 2.26ms 2017-10-03 19:42:31,926 (INFO) 206 GET /ota/image_user1-0x01000.bin?deviceid=100002e69a&ts=1889772843&sign=07572f87914c114fb9db13fad29df1efeefb60ba8942862b265e7d37f1b8a101 (10.10.0.5) 2.60ms 2017-10-03 19:42:32,022 (INFO) 206 GET /ota/image_user1-0x01000.bin?deviceid=100002e69a&ts=686078705&sign=8c11145f2d51fc1547c61270a9497b56c7ffe1d833a2cd95f7430a701d99f68b (10.10.0.5) 2.20ms 2017-10-03 19:42:32,116 (INFO) 206 GET /ota/image_user1-0x01000.bin?deviceid=100002e69a&ts=2105754108&sign=88742a243b1a654c7eabaff54f2aaa59dd91f6c60d742c7d23e57dcd817f96b2 (10.10.0.5) 2.54ms 2017-10-03 19:42:32,207 (INFO) 206 GET /ota/image_user1-0x01000.bin?deviceid=100002e69a&ts=182546393&sign=12d09040c83d9c44ab9657506ca04cdccd444824343adc354b0e2414b06cd051 (10.10.0.5) 2.90ms 2017-10-03 19:42:32,303 (INFO) 206 GET /ota/image_user1-0x01000.bin?deviceid=100002e69a&ts=1949118330&sign=f69eafb34d3aa14b16271542be62cb4aec14b8e0f5fe0405ecb5260cf94521ae (10.10.0.5) 2.52ms 2017-10-03 19:42:32,396 (INFO) 206 GET /ota/image_user1-0x01000.bin?deviceid=100002e69a&ts=220137366&sign=bda83212d9cfe5cfaf06a3aced36d660897e64c106d2acfa49ce4784a4e29d35 (10.10.0.5) 2.58ms 2017-10-03 19:42:32,487 (INFO) 206 GET /ota/image_user1-0x01000.bin?deviceid=100002e69a&ts=1979932169&sign=8d755de4b206ec57b0327e8311e39e545d9fda29ddb72da97ce39876e02dc24c (10.10.0.5) 2.45ms 2017-10-03 19:42:32,575 (INFO) 206 GET /ota/image_user1-0x01000.bin?deviceid=100002e69a&ts=1089957932&sign=f2a0ef1e42420b726e0b43c11807c9336962d7b36d80d01ed95ebad73ae8b37b (10.10.0.5) 2.71ms 2017-10-03 19:42:32,669 (INFO) 206 GET /ota/image_user1-0x01000.bin?deviceid=100002e69a&ts=1873226917&sign=f14a027a43c9c883639cb646daeac70bda54fbf56be71f693e7ca42f76659ef7 (10.10.0.5) 2.70ms 2017-10-03 19:42:32,758 (INFO) 206 GET /ota/image_user1-0x01000.bin?deviceid=100002e69a&ts=715669847&sign=0a008860196ebe960d7b2f716764aa37575a637958cf144f9638cee0de93351f (10.10.0.5) 2.39ms 2017-10-03 19:42:32,851 (INFO) 206 GET /ota/image_user1-0x01000.bin?deviceid=100002e69a&ts=1486937972&sign=60bf9980ff26178994a32c4f33592a63bd374cf891b7562d88bd6642f4fc3cb4 (10.10.0.5) 2.57ms 2017-10-03 19:42:32,945 (INFO) 206 GET /ota/image_user1-0x01000.bin?deviceid=100002e69a&ts=1196032868&sign=c6903c40d5748803f80ee2766166572740a6e3c59ea93b3ed9bdd97968905408 (10.10.0.5) 2.75ms 2017-10-03 19:42:33,039 (INFO) 206 GET /ota/image_user1-0x01000.bin?deviceid=100002e69a&ts=777206980&sign=1af0646cd2ed8a6ca2c3cf9333b88f82cbcc5e47578f285c56e34a279d5a38a9 (10.10.0.5) 2.16ms 2017-10-03 19:42:33,128 (INFO) 206 GET /ota/image_user1-0x01000.bin?deviceid=100002e69a&ts=68706223&sign=164ba73dc79e33154a58c98946852e5658ebff5b5ac437444d5ceb12f0f2523a (10.10.0.5) 2.27ms 2017-10-03 19:42:33,227 (INFO) 206 GET /ota/image_user1-0x01000.bin?deviceid=100002e69a&ts=1843638549&sign=1b8ec3ae3aec180efe751f3d33701b5a0635c698a9817aa03654e73910d16e32 (10.10.0.5) 2.25ms 2017-10-03 19:42:33,318 (INFO) 206 GET /ota/image_user1-0x01000.bin?deviceid=100002e69a&ts=212567592&sign=78e1db477c421d42bce44ac9b0b6693891c8333c9545f17df05fd21aef8aac05 (10.10.0.5) 2.20ms 2017-10-03 19:42:33,412 (INFO) 206 GET /ota/image_user1-0x01000.bin?deviceid=100002e69a&ts=1883488164&sign=a81127ce132efbc36b18f1089f063930fe6d7114686d2e9e33532a241a432795 (10.10.0.5) 2.32ms 2017-10-03 19:42:33,502 (INFO) 206 GET /ota/image_user1-0x01000.bin?deviceid=100002e69a&ts=964776169&sign=199b22e0fafbb45325d858cb850a7b853e98d28c02d01f6edb1c8818d893b2e4 (10.10.0.5) 2.20ms 2017-10-03 19:42:33,592 (INFO) 206 GET /ota/image_user1-0x01000.bin?deviceid=100002e69a&ts=928126551&sign=525ce5b6c498be10a81e03bc2186d6517be1a05cb0c701213c1384ff45e47312 (10.10.0.5) 2.28ms .2017-10-03 19:42:33,699 (INFO) 206 GET /ota/image_user1-0x01000.bin?deviceid=100002e69a&ts=1301950427&sign=5419687f4dda79ce7657a59c2fc06e3e63bff509be34fe86a26e02adb38d48b4 (10.10.0.5) 2.38ms 2017-10-03 19:42:33,791 (INFO) 206 GET /ota/image_user1-0x01000.bin?deviceid=100002e69a&ts=1992516190&sign=48b22a2ee09e002ec218b8942a95ec5b07c906abf6bf120e0e65e07ddbfd7bd4 (10.10.0.5) 2.31ms 2017-10-03 19:42:33,887 (INFO) 206 GET /ota/image_user1-0x01000.bin?deviceid=100002e69a&ts=1426542624&sign=1354ed17f7fc03bf13f02715c5fd96ac90594de7fbcf831a6a4cb1fdca759910 (10.10.0.5) 2.80ms 2017-10-03 19:42:33,980 (INFO) 206 GET /ota/image_user1-0x01000.bin?deviceid=100002e69a&ts=849040635&sign=0a7c403918b963e8bf55a899276e4df6fee7a8a27f550db6fda51bb9d2530506 (10.10.0.5) 2.52ms 2017-10-03 19:42:34,073 (INFO) 206 GET /ota/image_user1-0x01000.bin?deviceid=100002e69a&ts=941604920&sign=e18cc14bfa95072333622786adcbcc99ceb0f646c0897c52bcba0ad69eb47b0c (10.10.0.5) 2.92ms 2017-10-03 19:42:34,161 (INFO) 206 GET /ota/image_user1-0x01000.bin?deviceid=100002e69a&ts=1400427944&sign=bae86156e1d5ba790e45b6e2062eb9f2f5af68e9b8489e282ac9e45bf7d730b1 (10.10.0.5) 2.36ms 2017-10-03 19:42:34,254 (INFO) 206 GET /ota/image_user1-0x01000.bin?deviceid=100002e69a&ts=1994719310&sign=a481dd46c0f67febaa3e946c5e217a575434f80aec3c69e009c54d3952fdf06d (10.10.0.5) 2.63ms 2017-10-03 19:42:34,343 (INFO) 206 GET /ota/image_user1-0x01000.bin?deviceid=100002e69a&ts=2038269862&sign=94cdcbefba7cddeb788c9a1c024b5f31db3f952c928f569d1ed4d1f1da25c91c (10.10.0.5) 2.66ms 2017-10-03 19:42:34,436 (INFO) 206 GET /ota/image_user1-0x01000.bin?deviceid=100002e69a&ts=659998484&sign=a8545965acffd89b9c3f69370f8d7e87236b903b02cfe0b706b600ad686bac6c (10.10.0.5) 2.76ms 2017-10-03 19:42:34,525 (INFO) 206 GET /ota/image_user1-0x01000.bin?deviceid=100002e69a&ts=1280937363&sign=21606617cb026ce8c27bfacb5e2b53a6c469c74c6b56b0e08edc9980a4c85654 (10.10.0.5) 2.49ms 2017-10-03 19:42:34,617 (INFO) 206 GET /ota/image_user1-0x01000.bin?deviceid=100002e69a&ts=1681643301&sign=bd3d994d818b33608cbd0d3e0c2d508c5fb2b71db9bf50825a8d35aeb24cd0f3 (10.10.0.5) 2.73ms 2017-10-03 19:42:34,705 (INFO) 206 GET /ota/image_user1-0x01000.bin?deviceid=100002e69a&ts=725914710&sign=578b30170d6ae20f72711f5b13d833c47f2279291f1b3a024ccb2af12eca3ff3 (10.10.0.5) 2.59ms 2017-10-03 19:42:34,796 (INFO) 206 GET /ota/image_user1-0x01000.bin?deviceid=100002e69a&ts=1729267236&sign=088233ab0ea18893351fe9a8b14f2bb64a0d02c673a729cebd48c97d6ef02848 (10.10.0.5) 2.24ms 2017-10-03 19:42:34,888 (INFO) 206 GET /ota/image_user1-0x01000.bin?deviceid=100002e69a&ts=2023351876&sign=b960e05fa79a44a64ebac14c7adb57a99d61f2779a8817a07d92063dd31b0884 (10.10.0.5) 2.86ms 2017-10-03 19:42:34,978 (INFO) 206 GET /ota/image_user1-0x01000.bin?deviceid=100002e69a&ts=142750431&sign=51cbb8f929dec3f309ddae1781faea7fc7bf3536f856eff33bd9502875e7fd33 (10.10.0.5) 2.23ms 2017-10-03 19:42:35,066 (INFO) 206 GET /ota/image_user1-0x01000.bin?deviceid=100002e69a&ts=1840579929&sign=fe073216817dbb2e8fc236aee730920c96ac12acdf3c642b4fd5ea7735436355 (10.10.0.5) 2.45ms 2017-10-03 19:42:35,156 (INFO) 206 GET /ota/image_user1-0x01000.bin?deviceid=100002e69a&ts=2098560397&sign=112e857648f0138b8ef706020f8e5d9b58890b01cbd6e95eeb996e00ca935c96 (10.10.0.5) 2.60ms 2017-10-03 19:42:35,247 (INFO) 206 GET /ota/image_user1-0x01000.bin?deviceid=100002e69a&ts=1910500675&sign=c5e9096dfef0258b09faeb2d8c27fab95b2c8dde6420dc13bbd435f36706df82 (10.10.0.5) 2.17ms 2017-10-03 19:42:35,340 (INFO) 206 GET /ota/image_user1-0x01000.bin?deviceid=100002e69a&ts=1170970491&sign=b5da238a364456a64091ef971ac58177fb7973678306e28fb507381487d1f5b2 (10.10.0.5) 2.14ms 2017-10-03 19:42:35,433 (INFO) 206 GET /ota/image_user1-0x01000.bin?deviceid=100002e69a&ts=1856224190&sign=8350eb9bd126db03bf588a80012c924d0b79dc2a38110e868101e97b54311ccd (10.10.0.5) 2.95ms 2017-10-03 19:42:35,519 (INFO) 206 GET /ota/image_user1-0x01000.bin?deviceid=100002e69a&ts=983059344&sign=da6be0445944a1ca02f06b21292915e0398458a65d5b4adabf9da2b41b1b7c86 (10.10.0.5) 2.22ms 2017-10-03 19:42:35,610 (INFO) 206 GET /ota/image_user1-0x01000.bin?deviceid=100002e69a&ts=1718458134&sign=3426190f48bd7618191c2e17ca2ae8d5cc635cce19f46b905d9c6bd7d82402f3 (10.10.0.5) 2.31ms . *** IMPORTANT! *** ** AFTER the first download is COMPLETE, with in a minute or so you should connect to the new SSID "FinalStage" to finish the process. ** ONLY disconnect when the new "FinalStage" SSID is visible as an available WiFi network. This server should automatically be allocated the IP address: 192.168.4.2. If you have successfully connected to "FinalStage" and this is not the IP Address you were allocated, please ensure no other device has connected, and reboot your Sonoff. 2017-10-03 19:42:35,701 (INFO) 206 GET /ota/image_user1-0x01000.bin?deviceid=100002e69a&ts=1876268425&sign=a6fc5367e9521377a21cb52ed1b2286e8f500e007ac9b02be9657a988b6eb170 (10.10.0.5) 2.63ms 2017-10-03 19:42:35,793 (INFO) 206 GET /ota/image_user1-0x01000.bin?deviceid=100002e69a&ts=1764841629&sign=0a8a4f9fb04191b5bc12891a6f328cebe108e8da1c954b26fe2e08c0e46223c3 (10.10.0.5) 2.30ms 2017-10-03 19:42:35,882 (INFO) 206 GET /ota/image_user1-0x01000.bin?deviceid=100002e69a&ts=398844030&sign=3937f8347368d122cdd14d62739c17ef82885df5c690f20c143531cccafb1d92 (10.10.0.5) 2.22ms 2017-10-03 19:42:35,972 (INFO) 206 GET /ota/image_user1-0x01000.bin?deviceid=100002e69a&ts=185252727&sign=926c8244244b6254391b3b5305f6848b1db80621ec7f33e5296c1408bb076fa2 (10.10.0.5) 2.18ms 2017-10-03 19:42:36,063 (INFO) 206 GET /ota/image_user1-0x01000.bin?deviceid=100002e69a&ts=1370429126&sign=7a97d84de3d6dba62e92e3d974abc39be286789772fb22c23d52f9bd86b47302 (10.10.0.5) 2.92ms 2017-10-03 19:42:36,156 (INFO) 206 GET /ota/image_user1-0x01000.bin?deviceid=100002e69a&ts=502141743&sign=30837581215c075b85fb86ad6dbf69f3757597874f454460ce63d69c976a6bf1 (10.10.0.5) 2.34ms 2017-10-03 19:42:36,242 (INFO) 206 GET /ota/image_user1-0x01000.bin?deviceid=100002e69a&ts=993687334&sign=ecdfca3b109d906c75b8204df48d5b9d61bffb62e9e570eafb047b497dc39e8c (10.10.0.5) 2.37ms 2017-10-03 19:42:36,331 (INFO) 206 GET /ota/image_user1-0x01000.bin?deviceid=100002e69a&ts=15934104&sign=29b916c6e9f45e9e1e35c22862732de0202682f88197ff76309916ef57e1ef88 (10.10.0.5) 2.07ms 2017-10-03 19:42:36,670 (DEBUG) << WEBSOCKET INPUT 2017-10-03 19:42:36,670 (DEBUG) << { "userAgent": "device", "sequence": "1507034550378", "apikey": "516a6939-be2e-4494-8ad9-94d836df2a64", "deviceid": "100002e69a", "error": 0 } 2017-10-03 19:42:36,670 (DEBUG) ~~~ device acknowledged our action request (seq 1507034550378) with error code 0 .......... *** IMPORTANT! *** ** AFTER the first download is COMPLETE, with in a minute or so you should connect to the new SSID "FinalStage" to finish the process. ** ONLY disconnect when the new "FinalStage" SSID is visible as an available WiFi network. This server should automatically be allocated the IP address: 192.168.4.2. If you have successfully connected to "FinalStage" and this is not the IP Address you were allocated, please ensure no other device has connected, and reboot your Sonoff. .......... |
Now you should be able to use your smartphone or the laptop to connect to FinalStage access point, start a browser to access http://192.168.4.2. You should see the interface below, click on scan for Wifi network, and select the one you want to replace indebuurt1 SSID, in order to connect to your “home router”.
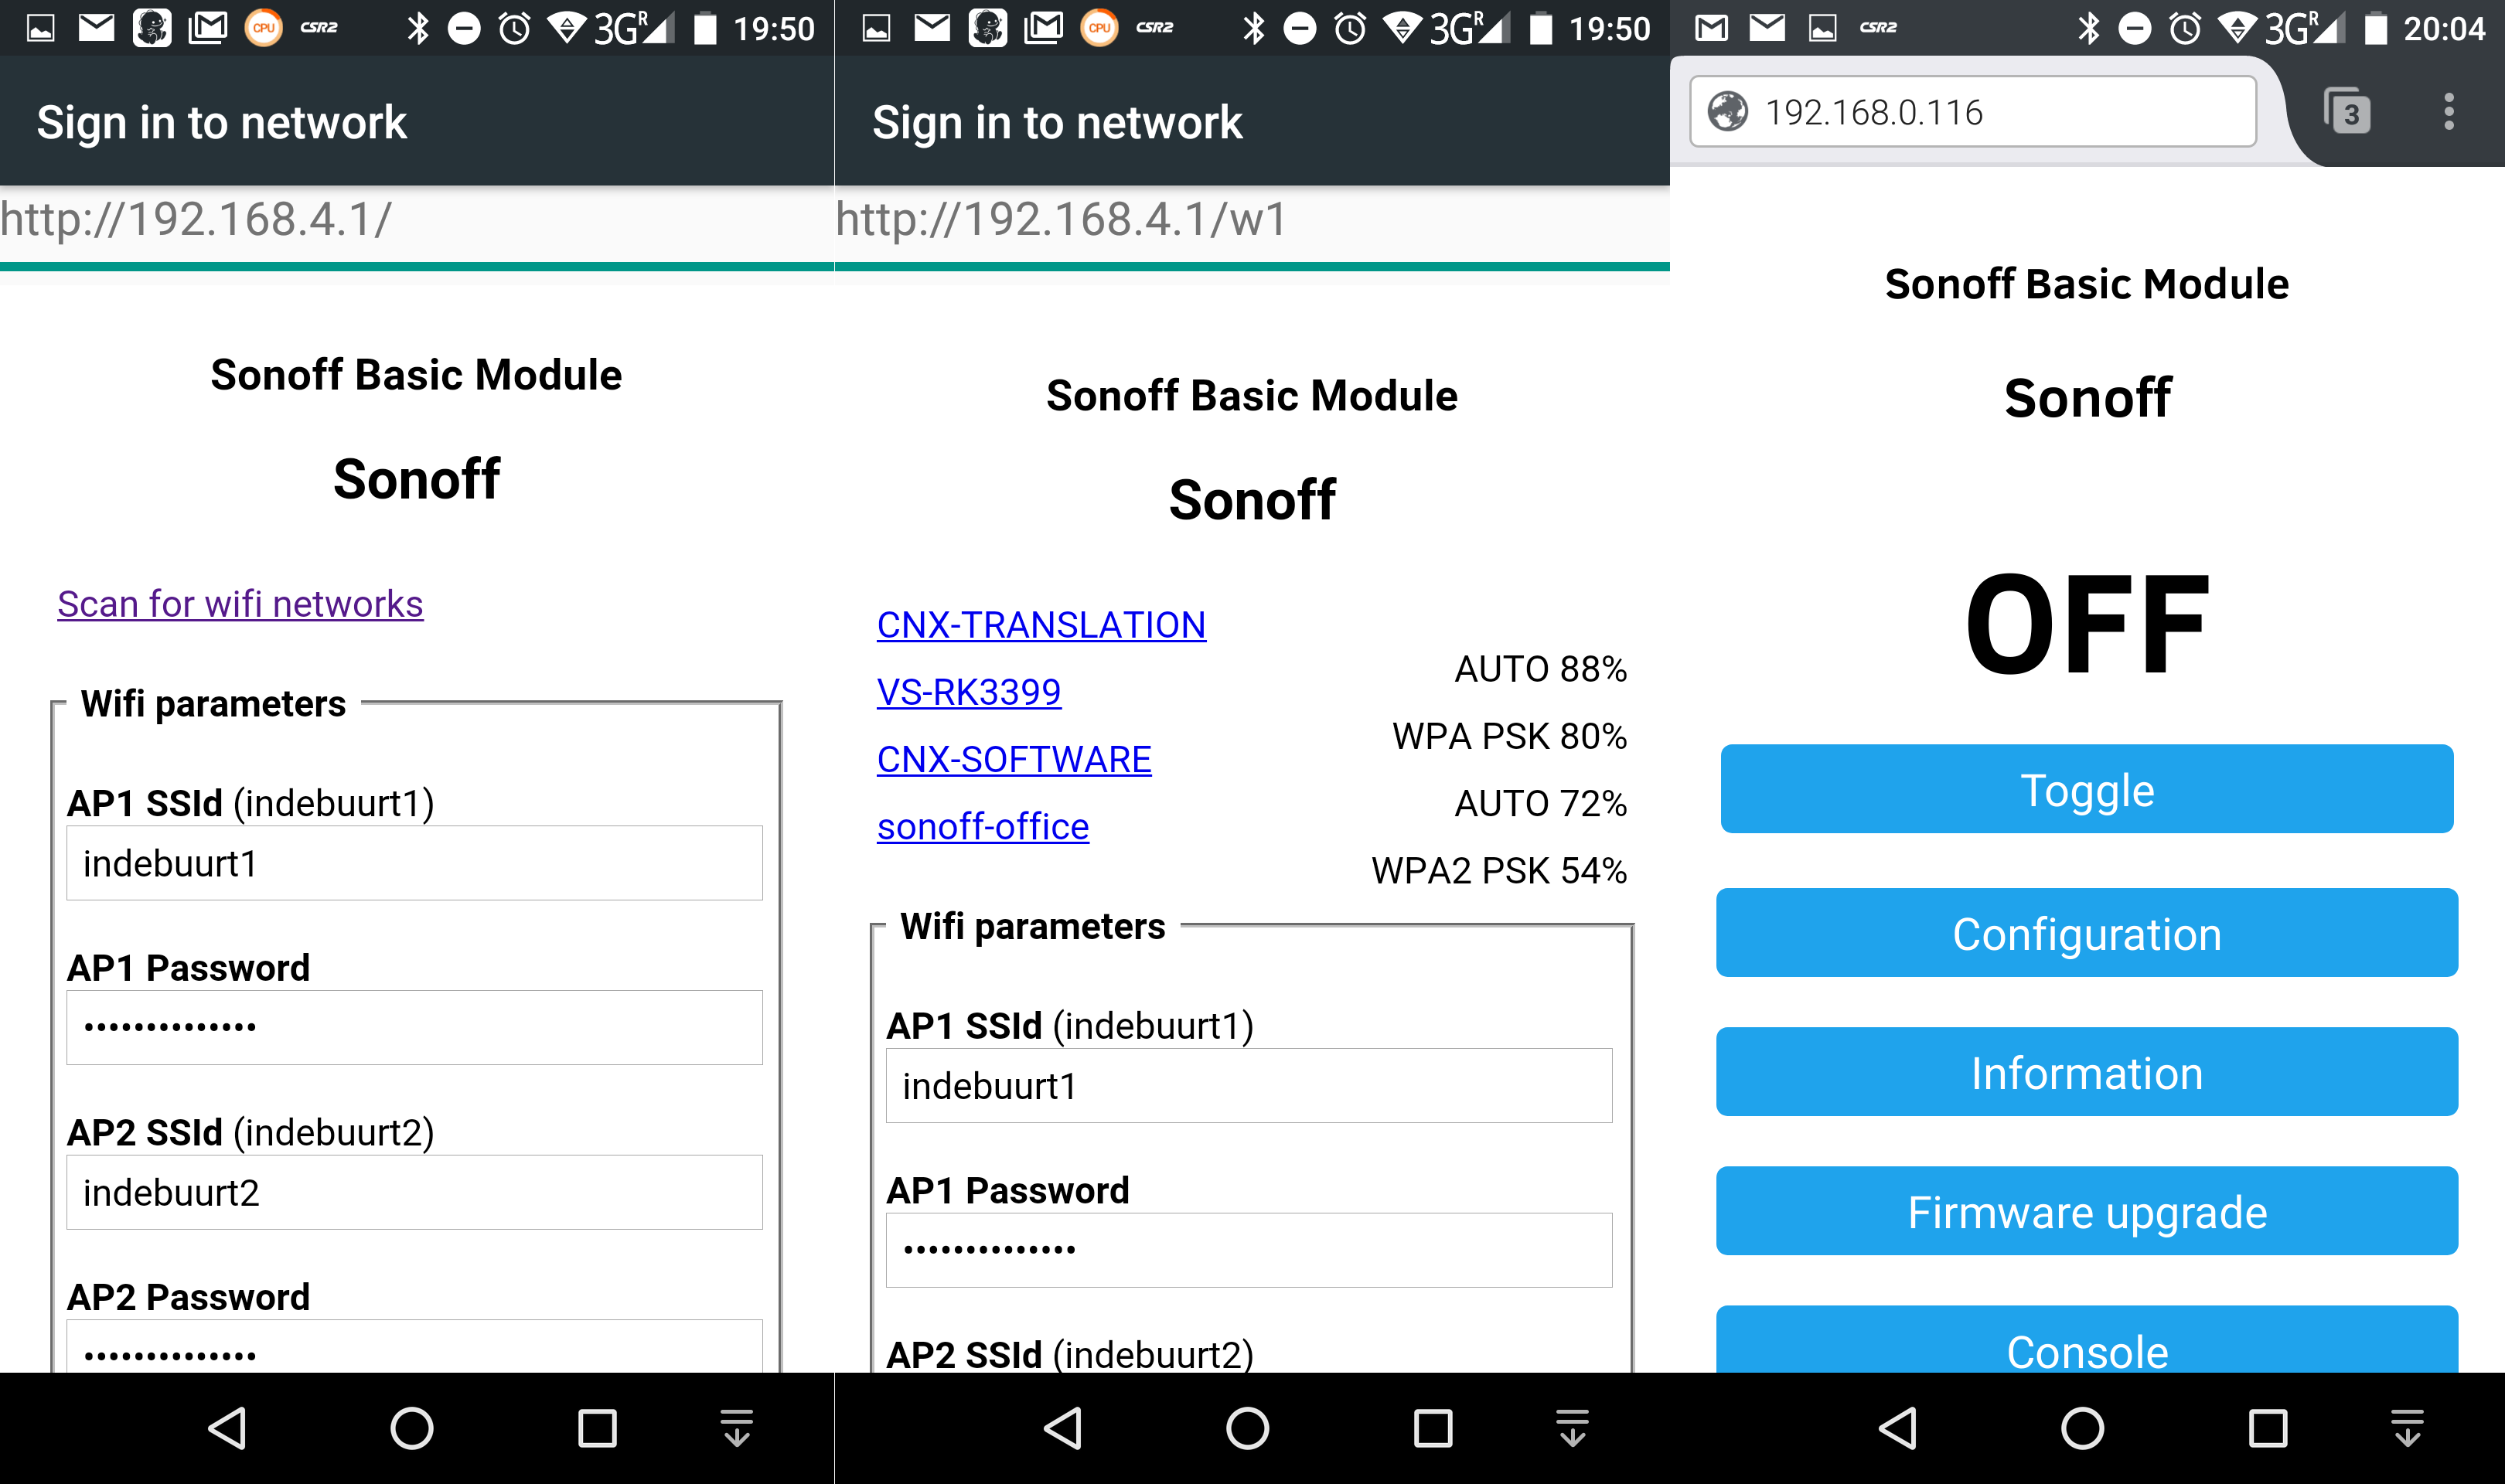
Click on the button Save on the bottom of that page, and after a while you should be able to access Sonoff web interface into your home network
Output log of SonOTA.py script for that last step:
|
1 2 3 4 5 6 7 8 9 10 11 12 13 14 15 16 17 18 19 20 |
*** IMPORTANT! *** ** AFTER the first download is COMPLETE, with in a minute or so you should connect to the new SSID "FinalStage" to finish the process. ** ONLY disconnect when the new "FinalStage" SSID is visible as an available WiFi network. This server should automatically be allocated the IP address: 192.168.4.2. If you have successfully connected to "FinalStage" and this is not the IP Address you were allocated, please ensure no other device has connected, and reboot your Sonoff. ...... The "FinalStage" SSID will disappear when the device has been fully flashed and image_arduino.bin has been installed Once "FinalStage" has gone away, you can stop this program 2017-10-03 19:45:33,896 (INFO) 200 GET /ota/image_user2-0x81000.bin (192.168.4.1) 7982.32ms 2017-10-03 19:45:54,344 (INFO) 200 GET /ota/image_arduino.bin (192.168.4.1) 9377.57ms The "FinalStage" SSID will disappear when the device has been fully flashed and image_arduino.bin has been installed Once "FinalStage" has gone away, you can stop this program No longer on "FinalStage" SSID, all done! 2017-10-03 19:46:27,920 (INFO) Quitting. |
Success! Finally… Now you can configure Sonoff-Tasmota to use your actual device – in my case Sonoff POW – instead of Sonoff Basic. I’ll show a bit more about that while testing Sonoff B1 with Sonoff-Tasmota in an upcoming post. Whether you choose between the serial or OTA method will depend on the number of devices you have to update, and/or whether you prefer soldering or messing around with network settings. If you are after maximum efficiency for a large number of Sonoff B1 light bulbs, then a jig with pogo pins should be by far the fastest way to reflash them all.

Jean-Luc started CNX Software in 2010 as a part-time endeavor, before quitting his job as a software engineering manager, and starting to write daily news, and reviews full time later in 2011.
Support CNX Software! Donate via cryptocurrencies, become a Patron on Patreon, or purchase goods on Amazon or Aliexpress


Great news! Please tell us when this will also work with your Sonoff POW! 🙂 Tks!
May be i’m utterly stupid, but using something like an orangepi PC+armbian+pi-hole(as dns server) + Sonota ; linked by ethernet with Router could have been and easier setup ? Did I miss something ?
You just need to pop out the bulb, click the jig, flash over serial, remove the jib, refit the bulb, and you’re done.
Yar! Ye be late for International Talk Like a Pirate Day, there, matey!
I found upgrading firmware once tasmoto is installed is 2 step when i tried. Had to do a minimal upgrade then upgrade to final.
@Gaetano
I used it with the Sonoff POW in the article, as it failed with Sonoff B1 with my first attempt. But the method i used will also work for Sonoff B1.
@tmunzer
It’s a long article, so maybe you missed the part where I explain you could combine the router, temporary router and laptop into one.
IMHO, the easiest & cheapest way if you’re going to use the OTA method and already have a laptop, is to get an openWrt router and enable DNS spoofing.
@Karl Johnson
Those are the instructions for Stock to Sonoff-Tasmota. Once it’s already installed it’s much easier.