
As far as I know NanoPi Duo is the only quad core ARM Linux development board that can fit on a breadboard. We’ve already seen it’s much smaller than Raspberry Pi Zero, and the company offer a mini shield exposing USB ports, Ethernet, a few I/Os, and an mSATA slot in in NanoPi Duo Starter Kit Review – Part 1: Unboxing and Assembly.
I’ve finally played with it this week-end, and will report what I had to do to blink a LED when connected to breadboard, and my experience using the mini shield with an mSATA SSD, WiFi connectivity, and cooling under load.
Flashing Ubuntu 16.04.2 firmware image to NanoPi Duo
As with many other Allwinner development boards, you should first check if Armbian is available for the board. NanoPi Duo is not supported, but it’s said to work with Orange Pi Zero image minus support for WiFi. Since the latter is rather important if you’re going to use the board standalone, I instead went with FriendlyELEC’s Ubuntu Xenial image (nanopi-duo_ubuntu-core-xenial_4.11.2_20170908.img.zip) shared on the company’s Wiki.
I flashed the (compressed) image with Etcher – available for Windows, Linux, Mac OS, on a 8GB micro SD card (Sandisk Ultra).
Using NanoPi Duo as a Breadboard-friendly Development Board
Once this is done, insert the micro SD into the board, insert it into a breadboard, and connect your circuit (in my case a 5V LED connected to GPIOG11 via a transistor). Most other breadboard-friendly WiFi boards include either a USB to TLL chip allowing to access the board’ serial console over USB (e.g. ESP32 boards), or firmware that setups the board as an access point for initial configuration (e.g. LinkIt Smart 7688 Duo). So you just need to connect power and you’re good to go.
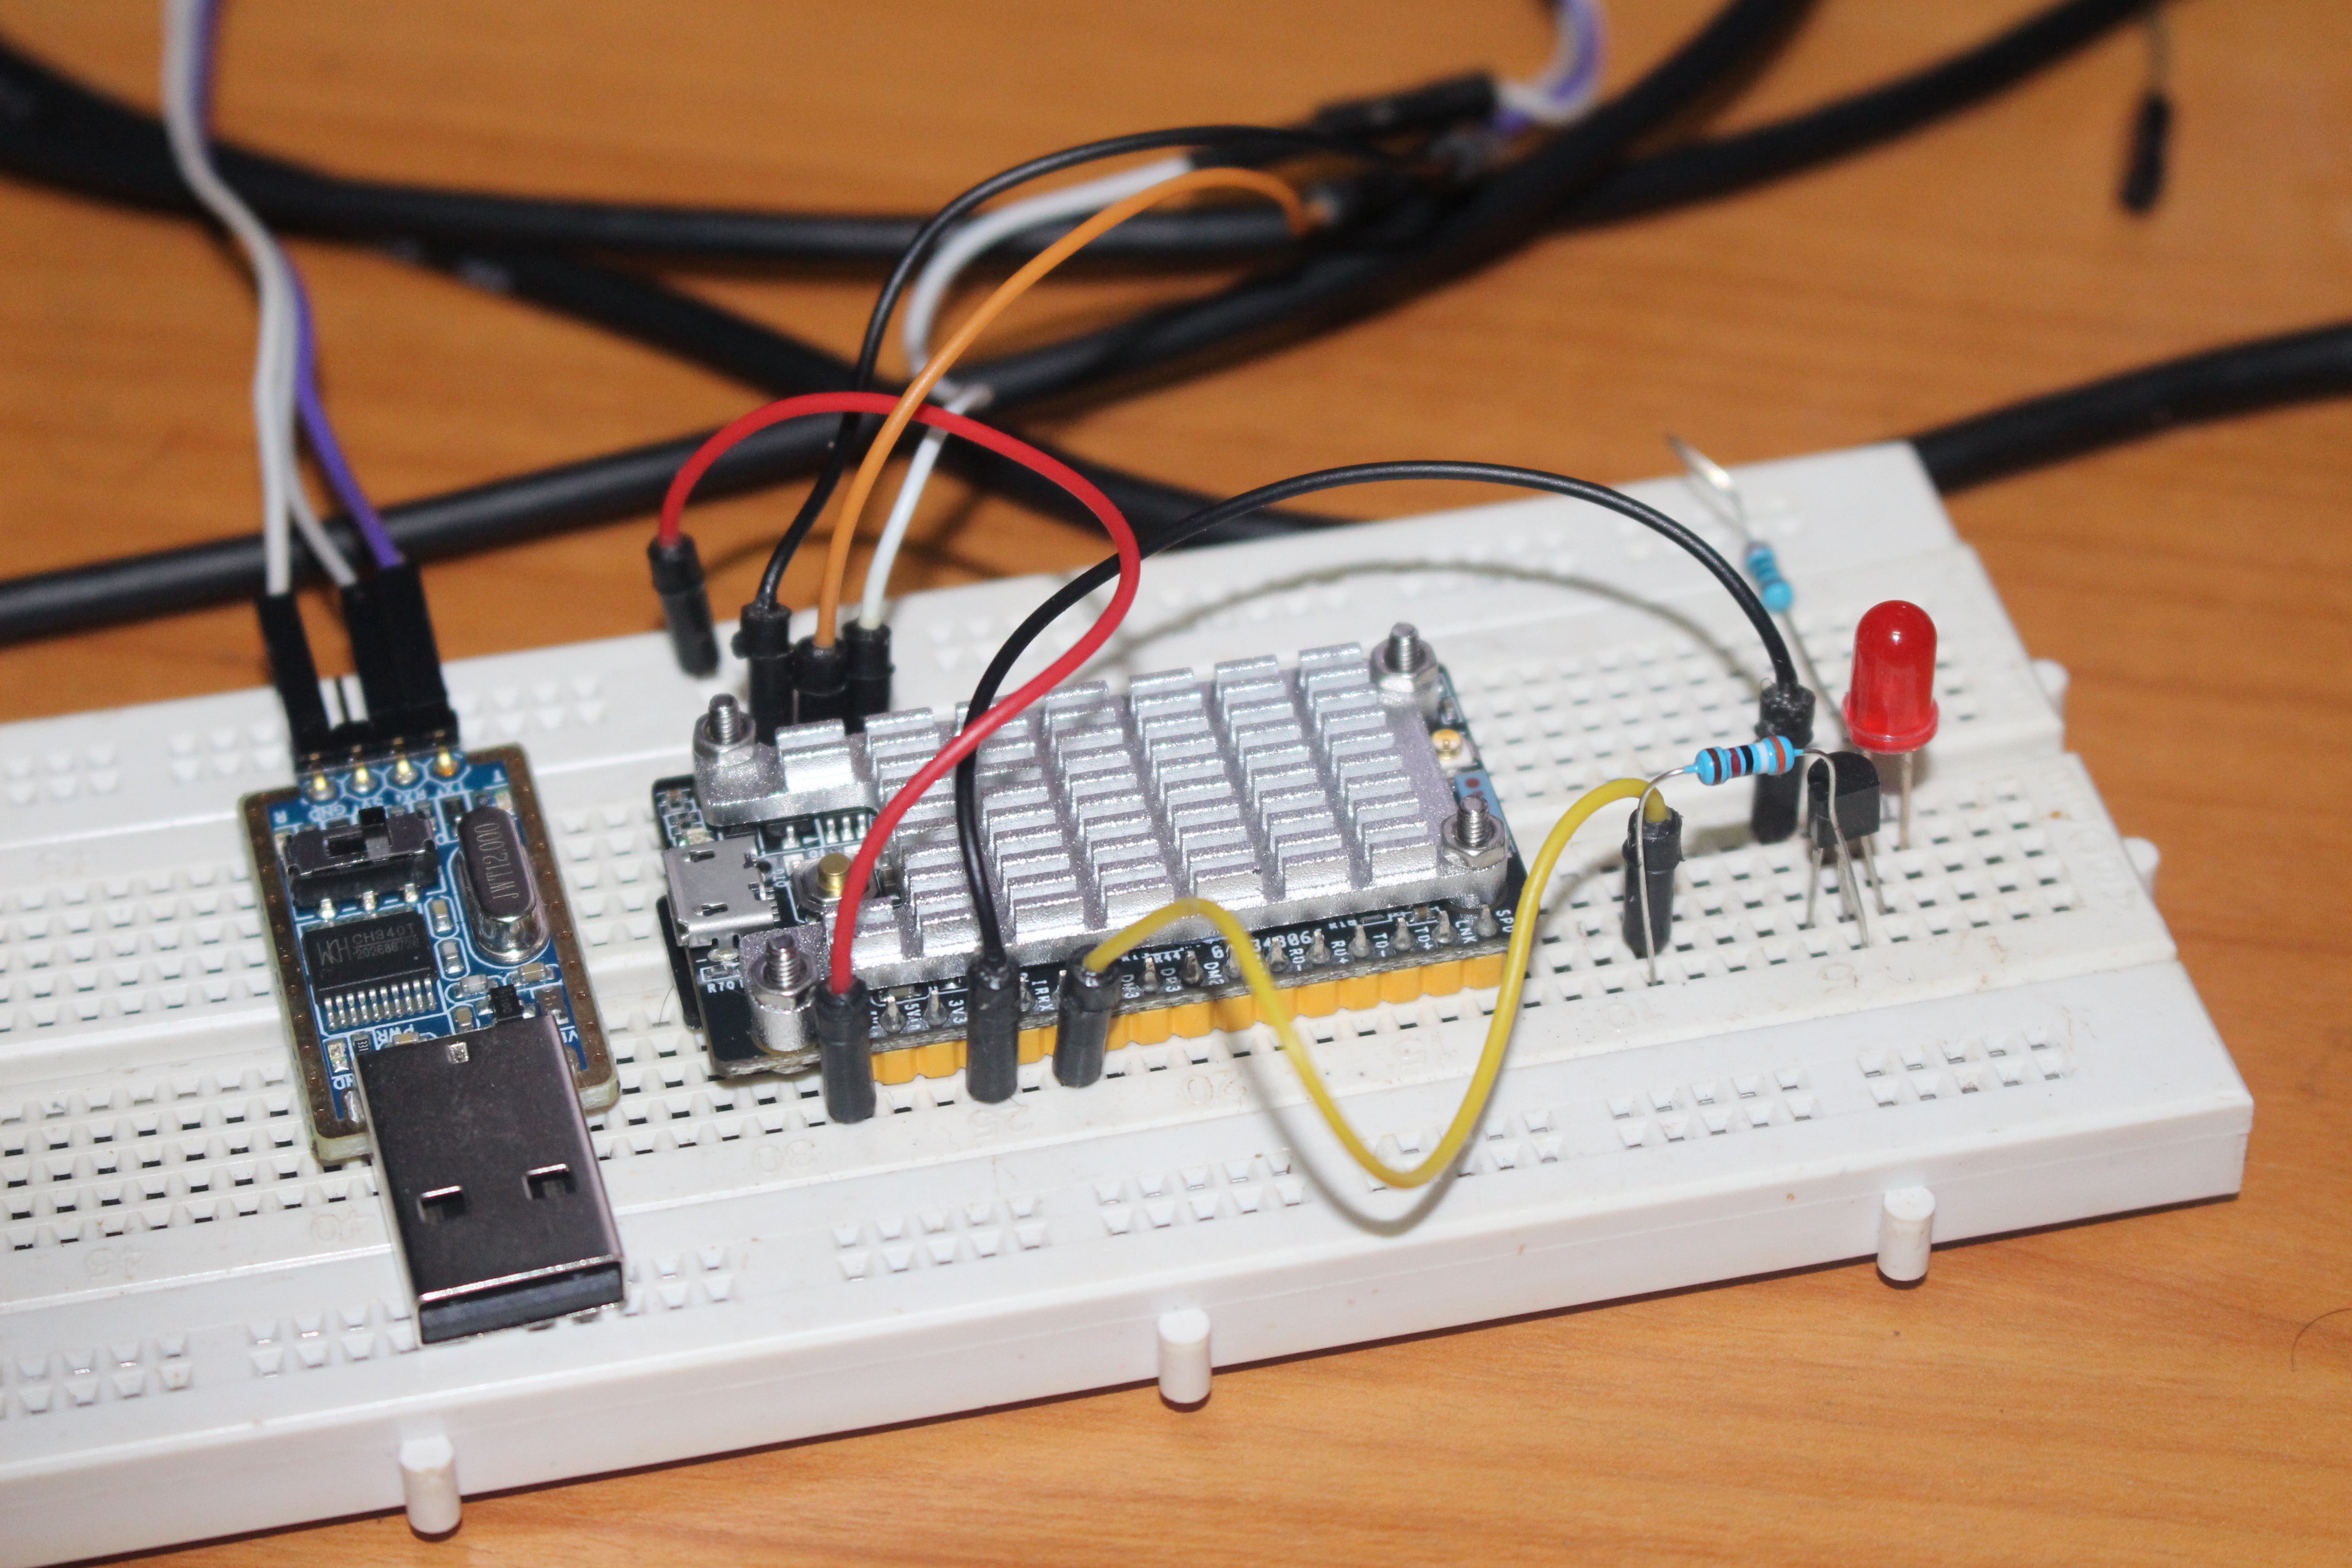
But NanoPi Duo’s board has no serial to USB chip, and the current firmware does not setup an access point by default, so I’ll need to connect a USB to TLL debug board too, as shown above. I then started minicom with 115200 8N1 configuration, and connected the board to one of the USB port of my computer for power, and the boot worked just fine. See complete boot log for reference:
|
1 2 3 4 5 6 7 8 9 10 11 12 13 14 15 16 17 18 19 20 21 22 23 24 25 26 27 28 29 30 31 32 33 34 35 36 37 38 39 40 41 42 43 44 45 46 47 48 49 50 51 52 53 54 55 56 57 58 59 60 61 62 63 64 65 66 67 68 69 70 71 72 73 74 75 76 77 78 79 80 81 82 83 84 85 86 87 88 89 90 91 92 93 94 95 96 97 98 99 100 101 102 103 104 105 106 107 108 109 110 111 112 113 114 115 116 117 118 119 120 121 122 123 124 125 126 127 128 129 130 131 132 133 134 135 136 137 138 139 140 141 142 143 144 145 146 147 148 149 150 151 152 153 154 155 156 157 158 159 160 161 162 163 164 165 166 167 168 169 170 171 172 173 174 175 176 177 178 179 180 181 182 183 184 185 186 187 188 189 190 191 192 193 194 195 196 197 198 199 200 201 202 203 204 205 206 207 208 209 210 211 212 213 214 215 216 217 218 219 220 221 222 223 224 225 226 227 228 229 230 231 232 233 234 235 236 237 238 239 240 241 242 243 244 245 246 247 248 249 250 251 252 253 254 255 256 257 258 259 260 261 262 263 264 265 266 267 268 269 270 271 272 273 274 275 276 277 278 279 280 281 282 283 284 285 286 287 288 289 290 291 292 293 294 295 296 297 298 299 300 301 302 303 304 305 306 307 308 309 310 311 312 313 314 315 316 317 318 319 320 321 322 323 324 325 326 327 328 329 330 331 332 333 334 335 336 337 338 339 340 341 342 343 344 345 346 347 348 349 350 351 352 353 354 355 356 357 358 359 360 361 362 363 364 365 366 367 368 369 370 371 372 373 374 375 376 377 378 379 380 381 382 383 384 385 386 387 388 389 390 391 392 393 394 395 396 397 398 399 400 401 402 403 404 405 406 407 408 409 410 411 412 413 414 415 416 417 418 419 420 421 422 423 424 425 426 427 428 429 430 431 432 433 434 435 436 437 438 439 440 441 442 443 444 445 446 447 |
U-Boot SPL 2017.05 (Jul 10 2017 - 11:16:21) BOARD: Nanopi Duo id=4 DRAM: 512 MiB Trying to boot from MMC1 U-Boot 2017.05 (Jul 10 2017 - 11:16:21 +0800) Allwinner Technology CPU: Allwinner H3 (SUN8I 1680) Model: NanoPi H3 DRAM: 512 MiB MMC: SUNXI SD/MMC: 0, SUNXI SD/MMC: 1 *** Warning - bad CRC, using default environment In: serial Out: serial Err: serial Net: phy interface0 eth0: ethernet@1c30000 cputype is 0x42 starting USB... USB0: USB EHCI 1.00 USB1: USB OHCI 1.0 scanning bus 0 for devices... 1 USB Device(s) found scanning usb for storage devices... 0 Storage Device(s) found Hit any key to stop autoboot: 0 switch to partitions #0, OK mmc0 is current device Scanning mmc 0:1... Found U-Boot script /boot.scr reading /boot.scr 854 bytes read in 18 ms (45.9 KiB/s) ## Executing script at 43100000 reading zImage 4507296 bytes read in 240 ms (17.9 MiB/s) reading rootfs.cpio.gz 2845838 bytes read in 150 ms (18.1 MiB/s) reading sun8i-h2-plus-nanopi-duo.dtb 22913 bytes read in 25 ms (894.5 KiB/s) ## Flattened Device Tree blob at 48000000 Booting using the fdt blob at 0x48000000 Loading Ramdisk to 49b00000, end 4a000000 ... OK Loading Device Tree to 49af7000, end 49aff980 ... OK Starting kernel ... [ 0.000000] Booting Linux on physical CPU 0x0 [ 0.000000] Linux version 4.11.2 (root@wwd) (gcc version 4.9.3 (ctng-1.21.0-7 [ 0.000000] CPU: ARMv7 Processor [410fc075] revision 5 (ARMv7), cr=10c5387d [ 0.000000] CPU: div instructions available: patching division code [ 0.000000] CPU: PIPT / VIPT nonaliasing data cache, VIPT aliasing instructie [ 0.000000] OF: fdt: Machine model: FriendlyElec NanoPi-Duo [ 0.000000] cma: Reserved 16 MiB at 0x5ec00000 [ 0.000000] Memory policy: Data cache writealloc [ 0.000000] psci: probing for conduit method from DT. [ 0.000000] psci: Using PSCI v0.1 Function IDs from DT [ 0.000000] percpu: Embedded 16 pages/cpu @dff60000 s33152 r8192 d24192 u6556 [ 0.000000] Built 1 zonelists in Zone order, mobility grouping on. Total pa8 [ 0.000000] Kernel command line: console=ttyS0,115200 earlyprintk root=/dev/0 [ 0.000000] PID hash table entries: 2048 (order: 1, 8192 bytes) [ 0.000000] Dentry cache hash table entries: 65536 (order: 6, 262144 bytes) [ 0.000000] Inode-cache hash table entries: 32768 (order: 5, 131072 bytes) [ 0.000000] Memory: 486956K/524288K available (7168K kernel code, 366K rwdat) [ 0.000000] Virtual kernel memory layout: [ 0.000000] vector : 0xffff0000 - 0xffff1000 ( 4 kB) [ 0.000000] fixmap : 0xffc00000 - 0xfff00000 (3072 kB) [ 0.000000] vmalloc : 0xe0800000 - 0xff800000 ( 496 MB) [ 0.000000] lowmem : 0xc0000000 - 0xe0000000 ( 512 MB) [ 0.000000] pkmap : 0xbfe00000 - 0xc0000000 ( 2 MB) [ 0.000000] modules : 0xbf000000 - 0xbfe00000 ( 14 MB) [ 0.000000] .text : 0xc0008000 - 0xc0800000 (8160 kB) [ 0.000000] .init : 0xc0a00000 - 0xc0b00000 (1024 kB) [ 0.000000] .data : 0xc0b00000 - 0xc0b5ba80 ( 367 kB) [ 0.000000] .bss : 0xc0b5d000 - 0xc0ba5060 ( 289 kB) [ 0.000000] SLUB: HWalign=64, Order=0-3, MinObjects=0, CPUs=4, Nodes=1 [ 0.000000] Hierarchical RCU implementation. [ 0.000000] Build-time adjustment of leaf fanout to 32. [ 0.000000] RCU restricting CPUs from NR_CPUS=8 to nr_cpu_ids=4. [ 0.000000] RCU: Adjusting geometry for rcu_fanout_leaf=32, nr_cpu_ids=4 [ 0.000000] NR_IRQS:16 nr_irqs:16 16 [ 0.000000] GIC: Using split EOI/Deactivate mode [ 0.000000] clocksource: timer: mask: 0xffffffff max_cycles: 0xffffffff, maxs [ 0.000000] arm_arch_timer: Architected cp15 timer(s) running at 24.00MHz (p. [ 0.000000] clocksource: arch_sys_counter: mask: 0xffffffffffffff max_cycless [ 0.000006] sched_clock: 56 bits at 24MHz, resolution 41ns, wraps every 4398s [ 0.000017] Switching to timer-based delay loop, resolution 41ns [ 0.000189] Console: colour dummy device 80x30 [ 0.000221] Calibrating delay loop (skipped), value calculated using timer f) [ 0.000235] pid_max: default: 32768 minimum: 301 [ 0.000351] Mount-cache hash table entries: 1024 (order: 0, 4096 bytes) [ 0.000361] Mountpoint-cache hash table entries: 1024 (order: 0, 4096 bytes) [ 0.000912] CPU: Testing write buffer coherency: ok [ 0.001299] CPU0: update cpu_capacity 1024 [ 0.001310] CPU0: thread -1, cpu 0, socket 0, mpidr 80000000 [ 0.001624] Setting up static identity map for 0x40100000 - 0x40100058 [ 0.002230] smp: Bringing up secondary CPUs ... [ 0.012912] CPU1: update cpu_capacity 1024 [ 0.012918] CPU1: thread -1, cpu 1, socket 0, mpidr 80000001 [ 0.023639] CPU2: update cpu_capacity 1024 [ 0.023644] CPU2: thread -1, cpu 2, socket 0, mpidr 80000002 [ 0.034330] CPU3: update cpu_capacity 1024 [ 0.034335] CPU3: thread -1, cpu 3, socket 0, mpidr 80000003 [ 0.034391] smp: Brought up 1 node, 4 CPUs [ 0.034418] SMP: Total of 4 processors activated (192.00 BogoMIPS). [ 0.034424] CPU: All CPU(s) started in HYP mode. [ 0.034430] CPU: Virtualization extensions available. [ 0.035161] devtmpfs: initialized [ 0.040320] VFP support v0.3: implementor 41 architecture 2 part 30 variant 5 [ 0.040550] clocksource: jiffies: mask: 0xffffffff max_cycles: 0xffffffff, ms [ 0.040572] futex hash table entries: 1024 (order: 4, 65536 bytes) [ 0.041317] pinctrl core: initialized pinctrl subsystem [ 0.042295] NET: Registered protocol family 16 [ 0.043725] DMA: preallocated 256 KiB pool for atomic coherent allocations [ 0.045000] hw-breakpoint: found 5 (+1 reserved) breakpoint and 4 watchpoint. [ 0.045012] hw-breakpoint: maximum watchpoint size is 8 bytes. [ 0.060137] gpio-regulator gpio-regulator: could not find pctldev for node /e [ 0.060465] SCSI subsystem initialized [ 0.060952] usbcore: registered new interface driver usbfs [ 0.061009] usbcore: registered new interface driver hub [ 0.061069] usbcore: registered new device driver usb [ 0.061268] pps_core: LinuxPPS API ver. 1 registered [ 0.061276] pps_core: Software ver. 5.3.6 - Copyright 2005-2007 Rodolfo Giom> [ 0.061297] PTP clock support registered [ 0.061518] Advanced Linux Sound Architecture Driver Initialized. [ 0.063045] clocksource: Switched to clocksource arch_sys_counter [ 0.063148] VFS: Disk quotas dquot_6.6.0 [ 0.063220] VFS: Dquot-cache hash table entries: 1024 (order 0, 4096 bytes) [ 0.071882] NET: Registered protocol family 2 [ 0.072507] TCP established hash table entries: 4096 (order: 2, 16384 bytes) [ 0.072564] TCP bind hash table entries: 4096 (order: 3, 32768 bytes) [ 0.072627] TCP: Hash tables configured (established 4096 bind 4096) [ 0.072717] UDP hash table entries: 256 (order: 1, 8192 bytes) [ 0.072758] UDP-Lite hash table entries: 256 (order: 1, 8192 bytes) [ 0.072956] NET: Registered protocol family 1 [ 0.073354] RPC: Registered named UNIX socket transport module. [ 0.073366] RPC: Registered udp transport module. [ 0.073372] RPC: Registered tcp transport module. [ 0.073378] RPC: Registered tcp NFSv4.1 backchannel transport module. [ 0.073624] Unpacking initramfs... [ 0.223720] Initramfs unpacking failed: junk in compressed archive [ 0.228558] Freeing initrd memory: 5120K [ 0.230635] workingset: timestamp_bits=30 max_order=17 bucket_order=0 [ 0.239255] NFS: Registering the id_resolver key type [ 0.239296] Key type id_resolver registered [ 0.239303] Key type id_legacy registered [ 0.239318] nfs4filelayout_init: NFSv4 File Layout Driver Registering... [ 0.239325] Installing knfsd (copyright (C) 1996 okir@monad.swb.de). [ 0.240326] fuse init (API version 7.26) [ 0.244060] Block layer SCSI generic (bsg) driver version 0.4 loaded (major ) [ 0.244074] io scheduler noop registered [ 0.244082] io scheduler deadline registered [ 0.244237] io scheduler cfq registered (default) [ 0.244245] io scheduler mq-deadline registered [ 0.249609] sun8i-h3-pinctrl 1c20800.pinctrl: initialized sunXi PIO driver [ 0.251431] sun8i-h3-r-pinctrl 1f02c00.pinctrl: initialized sunXi PIO driver [ 0.304709] Serial: 8250/16550 driver, 8 ports, IRQ sharing disabled [ 0.307577] console [ttyS0] disabled [ 0.327912] 1c28000.serial: ttyS0 at MMIO 0x1c28000 (irq = 44, base_baud = 1A [ 0.999148] console [ttyS0] enabled [ 1.025651] 1c28400.serial: ttyS1 at MMIO 0x1c28400 (irq = 45, base_baud = 1A [ 1.036754] sun8i-de2 1000000.de-controller: bound 1c0c000.lcd-controller (o) [ 1.203074] sun8i-de2 1000000.de-controller: bound 1ee0000.hdmi (ops 0xc0843) [ 1.210463] [drm] Supports vblank timestamp caching Rev 2 (21.10.2013). [ 1.217083] [drm] No driver support for vblank timestamp query. [ 1.223045] [drm] Cannot find any crtc or sizes - going 1024x768 [ 1.242562] Console: switching to colour frame buffer device 128x48 [ 1.258820] sun8i-de2 1000000.de-controller: fb0: frame buffer device [ 1.265729] [drm] Initialized sun8i-de2 1.0.0 20161101 for 1000000.de-contro0 [ 1.277450] libphy: Fixed MDIO Bus: probed [ 1.281556] CAN device driver interface [ 1.286754] ehci_hcd: USB 2.0 'Enhanced' Host Controller (EHCI) Driver [ 1.293304] ehci-platform: EHCI generic platform driver [ 1.298696] ehci-platform 1c1a000.usb: EHCI Host Controller [ 1.304308] ehci-platform 1c1a000.usb: new USB bus registered, assigned bus 1 [ 1.312394] ehci-platform 1c1a000.usb: irq 27, io mem 0x01c1a000 [ 1.343047] ehci-platform 1c1a000.usb: USB 2.0 started, EHCI 1.00 [ 1.349976] hub 1-0:1.0: USB hub found [ 1.353777] hub 1-0:1.0: 1 port detected [ 1.358194] ehci-platform 1c1b000.usb: EHCI Host Controller [ 1.363798] ehci-platform 1c1b000.usb: new USB bus registered, assigned bus 2 [ 1.371822] ehci-platform 1c1b000.usb: irq 29, io mem 0x01c1b000 [ 1.403040] ehci-platform 1c1b000.usb: USB 2.0 started, EHCI 1.00 [ 1.409835] hub 2-0:1.0: USB hub found [ 1.413636] hub 2-0:1.0: 1 port detected [ 1.418023] ehci-platform 1c1c000.usb: EHCI Host Controller [ 1.423627] ehci-platform 1c1c000.usb: new USB bus registered, assigned bus 3 [ 1.431577] ehci-platform 1c1c000.usb: irq 31, io mem 0x01c1c000 [ 1.465402] ehci-platform 1c1c000.usb: USB 2.0 started, EHCI 1.00 [ 1.472214] hub 3-0:1.0: USB hub found [ 1.476004] hub 3-0:1.0: 1 port detected [ 1.480383] ehci-platform 1c1d000.usb: EHCI Host Controller [ 1.485987] ehci-platform 1c1d000.usb: new USB bus registered, assigned bus 4 [ 1.493951] ehci-platform 1c1d000.usb: irq 33, io mem 0x01c1d000 [ 1.523860] ehci-platform 1c1d000.usb: USB 2.0 started, EHCI 1.00 [ 1.530679] hub 4-0:1.0: USB hub found [ 1.534472] hub 4-0:1.0: 1 port detected [ 1.538832] ohci_hcd: USB 1.1 'Open' Host Controller (OHCI) Driver [ 1.545040] ohci-platform: OHCI generic platform driver [ 1.550445] ohci-platform 1c1a400.usb: Generic Platform OHCI controller [ 1.557095] ohci-platform 1c1a400.usb: new USB bus registered, assigned bus 5 [ 1.565038] ohci-platform 1c1a400.usb: irq 28, io mem 0x01c1a400 [ 1.637725] hub 5-0:1.0: USB hub found [ 1.641502] hub 5-0:1.0: 1 port detected [ 1.646350] ohci-platform 1c1b400.usb: Generic Platform OHCI controller [ 1.652977] ohci-platform 1c1b400.usb: new USB bus registered, assigned bus 6 [ 1.660906] ohci-platform 1c1b400.usb: irq 30, io mem 0x01c1b400 [ 1.737693] hub 6-0:1.0: USB hub found [ 1.741472] hub 6-0:1.0: 1 port detected [ 1.745811] ohci-platform 1c1c400.usb: Generic Platform OHCI controller [ 1.752438] ohci-platform 1c1c400.usb: new USB bus registered, assigned bus 7 [ 1.760441] ohci-platform 1c1c400.usb: irq 32, io mem 0x01c1c400 [ 1.837670] hub 7-0:1.0: USB hub found [ 1.841444] hub 7-0:1.0: 1 port detected [ 1.845787] ohci-platform 1c1d400.usb: Generic Platform OHCI controller [ 1.852412] ohci-platform 1c1d400.usb: new USB bus registered, assigned bus 8 [ 1.860452] ohci-platform 1c1d400.usb: irq 34, io mem 0x01c1d400 [ 1.937670] hub 8-0:1.0: USB hub found [ 1.941445] hub 8-0:1.0: 1 port detected [ 1.945934] usbcore: registered new interface driver usb-storage [ 1.952369] mousedev: PS/2 mouse device common for all mice [ 1.958395] ads7846 spi0.1: spi0.1 supply vcc not found, using dummy regulatr [ 1.966111] ads7846 spi0.1: touchscreen, irq 91 [ 1.971178] input: ADS7846 Touchscreen as /devices/platform/soc/1c68000.spi/0 [ 1.982162] sun6i-rtc 1f00000.rtc: rtc core: registered rtc-sun6i as rtc0 [ 1.988964] sun6i-rtc 1f00000.rtc: RTC enabled [ 1.993589] i2c /dev entries driver [ 1.998355] thermal thermal_zone0: failed to read out thermal zone (-16) [ 2.005591] sunxi-wdt 1c20ca0.watchdog: Watchdog enabled (timeout=16 sec, no) [ 2.015009] sunxi-mmc 1c0f000.mmc: Got CD GPIO [ 2.073052] sunxi-mmc 1c0f000.mmc: base:0xe0871000 irq:25 [ 2.080231] usbcore: registered new interface driver usbhid [ 2.085855] usbhid: USB HID core driver [ 2.089746] fbtft_of_value: buswidth = 8 [ 2.093686] fbtft_of_value: debug = 0 [ 2.097343] fbtft_of_value: rotate = 90 [ 2.101173] fbtft_of_value: fps = 33 [ 2.231334] random: fast init done [ 2.272008] mmc0: host does not support reading read-only switch, assuming we [ 2.283501] mmc0: new high speed SDHC card at address aaaa [ 2.289565] mmcblk0: mmc0:aaaa SL08G 7.40 GiB [ 2.295485] mmcblk0: p1 p2 [ 2.298330] graphics fb1: fb_st7789v frame buffer, 320x240, 150 KiB video mez [ 2.311252] sun4i-codec 1c22c00.codec: ASoC: /soc/codec-analog@01f015c0 not d [ 2.319197] sun4i-codec 1c22c00.codec: Failed to register our card [ 2.326272] Initializing XFRM netlink socket [ 2.330559] NET: Registered protocol family 17 [ 2.335040] can: controller area network core (rev 20120528 abi 9) [ 2.341282] NET: Registered protocol family 29 [ 2.345750] can: raw protocol (rev 20120528) [ 2.350016] can: broadcast manager protocol (rev 20161123 t) [ 2.355689] can: netlink gateway (rev 20130117) max_hops=1 [ 2.361532] Key type dns_resolver registered [ 2.366015] Registering SWP/SWPB emulation handler [ 2.377477] thermal thermal_zone0: failed to read out thermal zone (-16) [ 2.385512] sunxi-mmc 1c10000.mmc: allocated mmc-pwrseq [ 2.603049] sunxi-mmc 1c10000.mmc: base:0xe0ca8000 irq:26 [ 2.610984] sun4i-codec 1c22c00.codec: Codec <-> 1c22c00.codec mapping ok [ 2.620180] sun6i-rtc 1f00000.rtc: setting system clock to 1970-01-01 00:00:) [ 2.628422] vcc3v0: disabling [ 2.631391] vcc5v0: disabling [ 2.634386] ALSA device list: [ 2.637350] #0: H3 Audio Codec [ 2.644284] Freeing unused kernel memory: 1024K [ 2.659014] mmc2: new high speed SDIO card at address 0001 Loading, please wait... starting version 225 Begin: Loading essential drivers ... done. Begin: Running /scripts/init-premount ... done. Begin: Mounting root file system ... Begin: Running /scripts/local-top ... done. Begin: Running /scripts/local-premount ... done. Begin: Will now check root file system ... fsck from util-linux 2.26.2 [/sbin/fsck.ext4 (1) -- /dev/mmcblk0p2] fsck.ext4 -y /dev/mmcblk0p2 e2fsck 1.42.12 (29-Aug-2014) rootfs: recovering journal Setting free inodes count to 387544 (was 387547) Setting free blocks count to 1534992 (was 1534996) rootfs: clean, 65576/453120 files, 389104/1924096 blocks done. [ 3.573560] EXT4-fs (mmcblk0p2): mounted filesystem with ordered data mode. ) [ 3.590887] EXT4-fs (mmcblk0p2): re-mounted. Opts: data=ordered done. Begin: Running /scripts/local-bottom ... done. Begin: Running /scripts/init-bottom ... done. [ 3.882569] systemd[1]: System time before build time, advancing clock. [ 3.956257] NET: Registered protocol family 10 [ 3.991358] Segment Routing with IPv6 [ 4.026104] systemd[1]: systemd 229 running in system mode. (+PAM +AUDIT +SE) [ 4.044765] systemd[1]: Detected architecture arm. Welcome to Ubuntu 16.04.2 LTS! [ 4.093852] systemd[1]: Set hostname to <NanoPi-Duo>. [ 4.383503] systemd[1]: Listening on Journal Socket. [ OK ] Listening on Journal Socket. [ 4.423284] systemd[1]: Reached target Encrypted Volumes. [ OK ] Reached target Encrypted Volumes. [ 4.463373] systemd[1]: Started Forward Password Requests to Wall Directory . [ OK ] Started Forward Password Requests to Wall Directory Watch. [ 4.503281] systemd[1]: Listening on /dev/initctl Compatibility Named Pipe. [ OK ] Listening on /dev/initctl Compatibility Named Pipe. [ 4.543374] systemd[1]: Created slice User and Session Slice. [ OK ] Created slice User and Session Slice. [ 4.583270] systemd[1]: Created slice System Slice. [ OK ] Created slice System Slice. [ 4.615267] systemd[1]: Mounting POSIX Message Queue File System... Mounting POSIX Message Queue File System... [ OK ] Reached target Slices. [ OK ] Created slice system-serial\x2dgetty.slice. Starting Load Kernel Modules... [ 4.740042] udc-core: couldn't find an available UDC - added [g_mass_storages Mounting Debug File System... [ OK ] Reached target Remote File Systems (Pre). [ OK ] Reached target Remote File Systems. [ OK ] Started Dispatch Password Requests to Console Directory Watch. Starting Create list of required st... nodes for the current kernel... [ OK ] Listening on Journal Socket (/dev/log). Starting Journal Service... [ OK ] Listening on udev Kernel Socket. [ OK ] Listening on udev Control Socket. Starting Set console keymap... Starting Remount Root and Kernel File Systems... [ OK ] Reached target Swap. [ OK ] Reached target Paths. [ OK ] Mounted Debug File System. [ OK ] Mounted POSIX Message Queue File System. [ OK ] Started Journal Service. [ OK ] Started Load Kernel Modules. [ OK ] Started Create list of required sta...ce nodes for the current kernel. [ OK ] Started Set console keymap. [ OK ] Started Remount Root and Kernel File Systems. Starting udev Coldplug all Devices... Starting Load/Save Random Seed... Starting Create Static Device Nodes in /dev... Mounting Configuration File System... Mounting FUSE Control File System... Starting Apply Kernel Variables... Starting Flush Journal to Persistent Storage... [ OK ] Mounted Configuration File System. [ OK ] Mounted FUSE Control File System. [ OK ] Started Load/Save Random Seed. [ OK ] Started Create Static Device Nodes in /dev. [ OK ] Started Apply Kernel Variables. [ OK ] Started Flush Journal to Persistent Storage. [ OK ] Reached target Local File Systems (Pre). Starting udev Kernel Device Manager... [ OK ] Started udev Coldplug all Devices. [ OK ] Started udev Kernel Device Manager. [ OK ] Reached target Sound Card. [ OK ] Found device /dev/ttyS0. [ OK ] Listening on Load/Save RF Kill Switch Status /dev/rfkill Watch. [ OK ] Found device /dev/mmcblk0p1. Mounting /boot... [ OK ] Mounted /boot. [ OK ] Reached target Local File Systems. Starting Create Volatile Files and Directories... Starting Raise network interfaces... Starting Set console font and keymap... Starting Load/Save RF Kill Switch Status... [ OK ] Started Create Volatile Files and Directories. [ OK ] Started Load/Save RF Kill Switch Status. [ OK ] Started Raise network interfaces. [ OK ] Started Set console font and keymap. [ OK ] Created slice system-getty.slice. Starting Network Time Synchronization... Starting Update UTMP about System Boot/Shutdown... [ OK ] Started Network Time Synchronization. [ OK ] Reached target System Time Synchronized. [ OK ] Started Update UTMP about System Boot/Shutdown. [ OK ] Reached target System Initialization. [ OK ] Started Daily apt activities. [ OK ] Listening on D-Bus System Message Bus Socket. [ OK ] Reached target Sockets. [ OK ] Reached target Basic System. Starting LSB: Set the CPU Frequency Scaling governor to "ondemand"... Starting Login Service... [ OK ] Started D-Bus System Message Bus. Starting Network Manager... Starting Restore /etc/resolv.conf i...re the ppp link was shut down... Starting LSB: RPi-Monitor daemon... [ OK ] Started Daily Cleanup of Temporary Directories. [ OK ] Reached target Timers. Starting Permit User Sessions... Starting Save/Restore Sound Card State... Starting Modem Manager... Starting brcm_patchram_plus... [ OK ] Started Restore /etc/resolv.conf if...fore the ppp link was shut down. [ OK ] Started Permit User Sessions. [ OK ] Started Save/Restore Sound Card State. [ OK ] Started brcm_patchram_plus. [ OK ] Started LSB: Set the CPU Frequency Scaling governor to "ondemand". [ OK ] Started Network Manager. [ OK ] Started Login Service. Starting Network Manager Script Dispatcher Service... Starting Network Manager Wait Online... [ OK ] Reached target Network. Starting OpenBSD Secure Shell server... Starting Authenticate and Authorize Users to Run Privileged Tasks... Starting Set console scheme... [ OK ] Started Set console scheme. [ OK ] Started Network Manager Script Dispatcher Service. [ OK ] Started OpenBSD Secure Shell server. [ OK ] Started Authenticate and Authorize Users to Run Privileged Tasks. Starting Hostname Service... [ OK ] Started Modem Manager. [ OK ] Started Hostname Service. [ 11.163523] sun8i-emac 1c30000.ethernet: EMAC reset timeout Starting WPA supplicant... [ OK ] Started WPA supplicant. [ OK ] Started LSB: RPi-Monitor daemon. [FAILED] Failed to start Network Manager Wait Online. See 'systemctl status NetworkManager-wait-online.service' for details. [ OK ] Reached target Network is Online. Starting LSB: disk temperature monitoring daemon... Starting /etc/rc.local Compatibility... [ 42.097790] rc.local[530]: ctp = 0 [ OK ] Started /etc/rc.local Compatibility. [ OK ] Started Serial Getty on ttyS0. [ OK ] Started Getty on tty1. [ OK ] Reached target Login Prompts. [ OK ] Started LSB: disk temperature monitoring daemon. [ OK ] Reached target Multi-User System. [ OK ] Reached target Graphical Interface. Starting Update UTMP about System Runlevel Changes... [ OK ] Started Update UTMP about System Runlevel Changes. Ubuntu 16.04.2 LTS NanoPi-Duo ttyS0 NanoPi-Duo login: pi (automatic login) Last login: Thu Mar 23 04:22:06 UTC 2017 on tty1 _____ _ _ _ _____ _ _____ ____ | ___| __(_) ___ _ __ __| | |_ _| ____| | | ____/ ___| | |_ | '__| |/ _ \ '_ \ / _` | | | | | _| | | | _|| | | _|| | | | __/ | | | (_| | | |_| | |___| |___| |__| |___ |_| |_| |_|\___|_| |_|\__,_|_|\__, |_____|_____|_____\____| |___/ Welcome to Ubuntu 16.04.2 LTS 4.11.2 System load: 0.24 Up time: 45 sec Memory usage: 6 % of 497Mb IP: CPU temp: 42�°C Usage of /: 19% of 7.3G * Documentation: http://wiki.friendlyarm.com/ * Forum: http://www.friendlyarm.com/Forum/ pi@NanoPi-Duo:~$ |
The system will autologin, and show a welcome boot message similar to what is found in Armbian build.
Let’s check some of the relevant info:
|
1 2 3 4 5 6 7 8 9 10 11 12 13 14 15 16 17 18 19 |
uname -a Linux NanoPi-Duo 4.11.2 #1 SMP Mon Jul 10 11:06:36 CST 2017 armv7l armv7l armv7l GNU/Linux pi@NanoPi-Duo:~$ cat /etc/issue Ubuntu 16.04.2 LTS \n \l pi@NanoPi-Duo:~$ df -h Filesystem Size Used Avail Use% Mounted on udev 238M 0 238M 0% /dev tmpfs 50M 4.6M 46M 10% /run /dev/mmcblk0p2 7.3G 1.4G 5.9G 19% / tmpfs 249M 0 249M 0% /dev/shm tmpfs 5.0M 4.0K 5.0M 1% /run/lock tmpfs 249M 0 249M 0% /sys/fs/cgroup /dev/mmcblk0p1 40M 7.2M 33M 18% /boot tmpfs 50M 0 50M 0% /run/user/1000 pi@NanoPi-Duo:~$ free -mh total used free shared buff/cache available Mem: 497M 32M 353M 4.6M 111M 404M Swap: 0B 0B 0B |
The image is based on Ubuntu 16.04.2 with a recent Linux 4.11.2 although apparently not updated with the latest patchsets found in Linux 4.11.12. The rootfs has been automatically resized at boot time so I have 5.9GB free on the partition, and 497MB RAM is accessible from Linux.
There are some useful pre-loaded modules for WiFi, USB mass storage, and IPv6:
|
1 2 3 4 5 6 7 |
lsmod Module Size Used by xradio_wlan 110592 1 g_mass_storage 16384 0 usb_f_mass_storage 32768 1 g_mass_storage libcomposite 40960 2 g_mass_storage,usb_f_mass_storage ipv6 348160 20 |
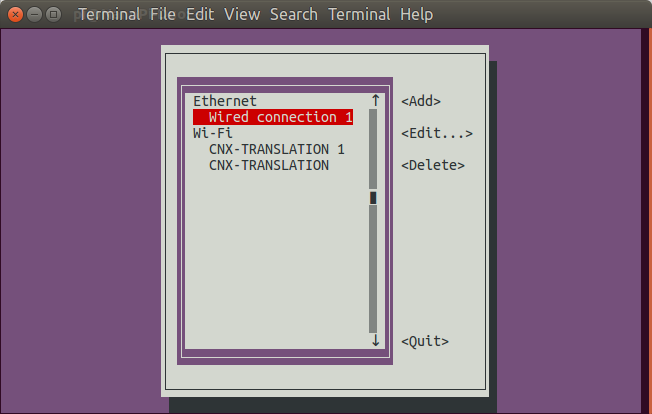
Most people will want to use WiFi in this configuration (breadboard use), and nmtui text user interface is normally recommended, but the UI was really messy in the serial console, so I reverted to use nmcli instead as explained in the Wiki. First let’s list the network devices:
|
1 2 3 4 5 |
sudo nmcli dev DEVICE TYPE STATE CONNECTION eth0 ethernet disconnected -- wlan0 wifi disconnected -- lo loopback unmanaged -- |
WiFi is disabled, so we’ll enable it and scan nearby routers:
|
1 2 3 4 5 |
sudo nmcli r dev wifi sudo nmcli dev wifi * SSID MODE CHAN RATE SIGNAL BARS SECURITY CNX-SOFTWARE Infra 11 54 Mbit/s 42 ��▂��▄__ WPA1 WPA2 sonoff-office Infra 1 54 Mbit/s 14 ��▂___ WPA2 |
I repeated the last command three times, but my main (2.4 GHz) router was not listed. So let’s attach a u.FL antenna…
… to see if I can get a stronger signal for the already detected access points, and find my main router (CNX-TRANSLATION):
|
1 2 3 4 |
sudo nmcli dev wifi * SSID MODE CHAN RATE SIGNAL BARS SECURITY CNX-TRANSLATION Infra 1 54 Mbit/s 100 ��▂��▄��▆��█ WPA1 WPA2 CNX-SOFTWARE Infra 11 54 Mbit/s 82 ��▂��▄��▆��█ WPA1 WPA2 |
Success! I can now see CNX-TRANSLATION SSID, and CNX-SOFTWARE SSID signal is much stronger. However, I lost sonoff-office (which I did not plan to use). We can connect to the access point of your choice as follows:
|
1 2 |
sudo nmcli dev wifi connect CNX-TRANSLATION password "your-password" Error: No network with SSID 'CNX-TRANSLATION' found. |
Oops. I did not work out as expected. Listing the access points again:
|
1 2 3 |
sudo nmcli dev wifi * SSID MODE CHAN RATE SIGNAL BARS SECURITY PAploy1999 Infra 4 54 Mbit/s 19 ��▂___ WPA1 WPA2 |
That’s crazy… All my APs are gone! But after persevering a few more times, I was finally able to connect and get an IP address:
|
1 2 3 4 5 6 7 8 9 |
ifconfig wlan0 wlan0 Link encap:Ethernet HWaddr dc:44:6d:c0:ff:ee inet addr:192.168.0.115 Bcast:192.168.0.255 Mask:255.255.255.0 inet6 addr: fe80::345f:e48a:c7ad:a7bc/64 Scope:Link UP BROADCAST RUNNING MULTICAST MTU:1500 Metric:1 RX packets:120 errors:0 dropped:0 overruns:0 frame:0 TX packets:19 errors:0 dropped:0 overruns:0 carrier:0 collisions:0 txqueuelen:1000 RX bytes:24388 (24.3 KB) TX bytes:2637 (2.6 KB) |
We can now update the system to make sure it has the latest packages:
|
1 2 |
sudo apt update sudo apt upgrade |
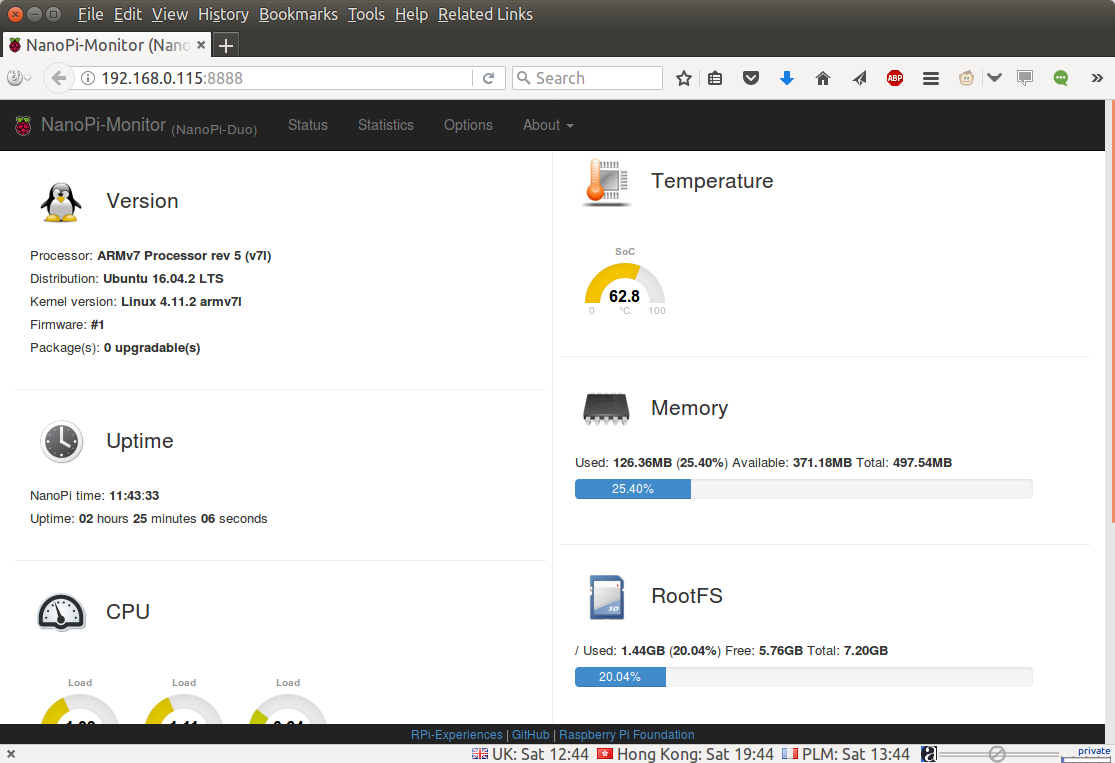
The board could download all the ~150 packages without issues, so once the connection is up it looks fairly stable. The update will take a while, so you may want to try a few other features of the firmware. For example, the company pre-installed NanoPi-Monitor, a fork of RPi-monitor, which allows you to monitor CPU and memory usage, temperature, up time, etc.. directly from a web browser via http://board_IP:8888.
I was also be able to connect via SSH using either pi/pi or root/fa username and password.
The last step of this section of our tutorial is to control GPIOs. Since the board runs Linux 4.11, we may have hoped the new GPIO subsystem might be implemented, but lsgpio is not installed, and instead the company recommends to use WiringNP, a fork a WiringPi. It’s pre-installed, so we can use it right away to list GPIOs:
|
1 2 3 4 5 6 7 8 9 10 11 12 13 14 15 16 17 18 19 20 21 22 23 |
gpio readall +-----+-----+----------+------+---+-NanoPi-Duo--+------+----------+-----+-----+ | BCM | wPi | Name | Mode | V | Physical | V | Mode | Name | wPi | BCM | +-----+-----+----------+------+---+----++----+---+------+----------+-----+-----+ | | | MIC_N | | | 1 || 2 | | | EPhySPD | | | | | | MIC_P | | | 3 || 4 | | | EPhyLinK | | | | | | LineOutR | | | 5 || 6 | | | EPhyTXP | | | | | | LineOutL | | | 7 || 8 | | | EPhyTXN | | | | | | CVBS | | | 9 || 10 | | | EPhyRXP | | | | 198 | 8 | GPIOG6 | ALT5 | 0 | 11 || 12 | | | EPhyRXN | | | | 199 | 9 | GPIOG7 | ALT5 | 0 | 13 || 14 | | | USB-DP2 | | | | 15 | 7 | GPIOA15 | ALT5 | 0 | 15 || 16 | | | USB-DM2 | | | | 16 | 0 | GPIOA16 | ALT5 | 0 | 17 || 18 | | | USB-DP3 | | | | 14 | 2 | GPIOA14 | ALT5 | 0 | 19 || 20 | | | USB-DM3 | | | | 13 | 3 | GPIOA13 | ALT5 | 0 | 21 || 22 | 1 | OUT | GPIOG11 | 16 | 203 | | 12 | 12 | GPIOA12 | ALT5 | 0 | 23 || 24 | | | IR-RX | | | | 11 | 13 | GPIOA11 | ALT5 | 0 | 25 || 26 | | | 0v | | | | | | 0v | | | 27 || 28 | | | 3.3v | | | | 4 | 14 | GPIOA4 | ALT5 | 0 | 29 || 30 | | | 5v | | | | 5 | 15 | GPIOA5 | ALT5 | 0 | 31 || 32 | | | 5v | | | +-----+-----+----------+------+---+----++----+---+------+----------+-----+-----+ | BCM | wPi | Name | Mode | V | Physical | V | Mode | Name | wPi | BCM | +-----+-----+----------+------+---+-NanoPi-Duo--+------+----------+-----+-----+ |
I’ve connected the LED to GPIOG11 (mapped to pin 16 in WiringNP), and it’s on by default, so let’s pull it down:
|
1 |
gpio write 16 0 |
The LED turns off, and we can turn it back on with:
|
1 |
gpio write 16 1 |
Let’s write blink.c to blink our LED every 500 ms:
|
1 2 3 4 5 6 7 8 9 10 11 12 13 |
#include <wiringPi.h> int main(void) { wiringPiSetup() ; pinMode (16, OUTPUT) ; for(;;) { digitalWrite(16, HIGH) ; delay (500) ; digitalWrite(16, LOW) ; delay (500) ; } } |
We can now build and run it, and the LED will blink as expected:
|
1 2 |
gcc -Wall -o blink blink.c -lwiringPi -lpthread sudo ./blink |
You need to run blink as root as it is required by wiringPiSetup() function: “wiringPiSetup: Must be root. (Did you forget sudo?)”, but there are workarounds roughly explained in the Wiki. The user key/switch on NanoPi Duo board is connected to “GPIOL3/K1” pin, but is not listed by gpio readall command, so this would have to be looked into.
Other modes such as PWM, I2C, SPI, UART, PWM should also be supported, but out of the scope of this quick start guide.
 Beside “GPIOs”, Ethernet, USB, composite video, and various audio signal are also exposed, so it can make for some very interesting DIY projects.
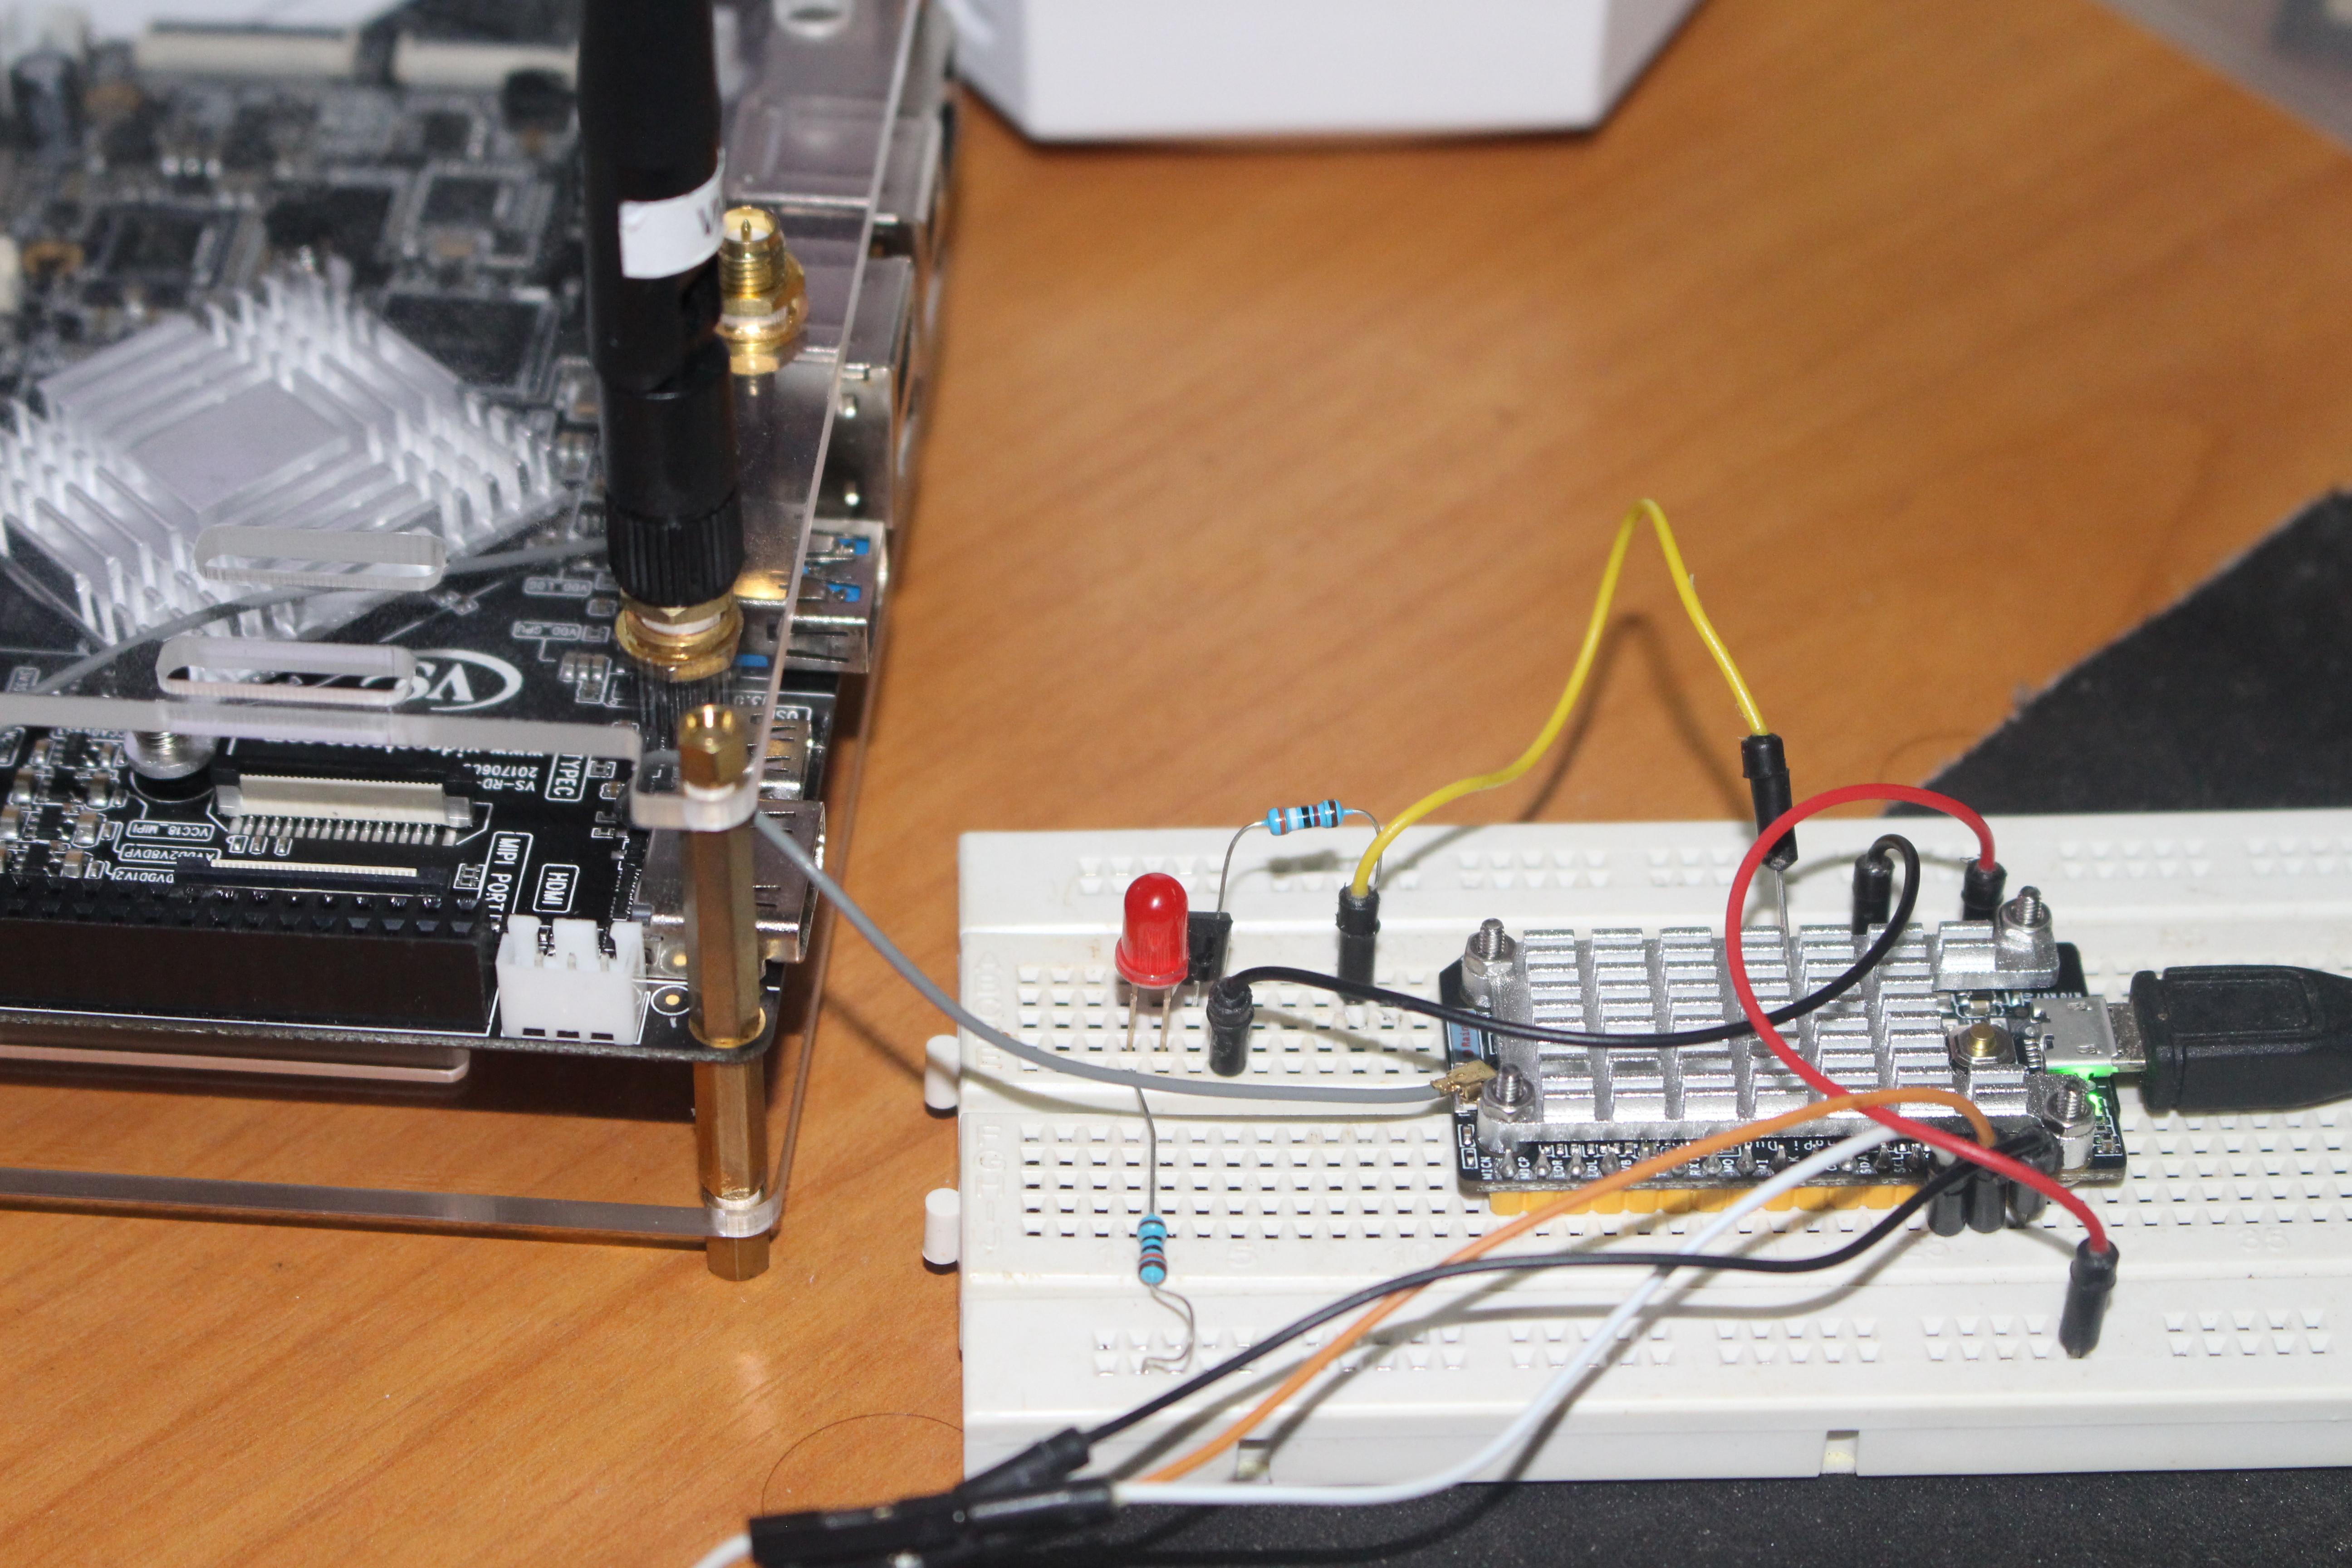
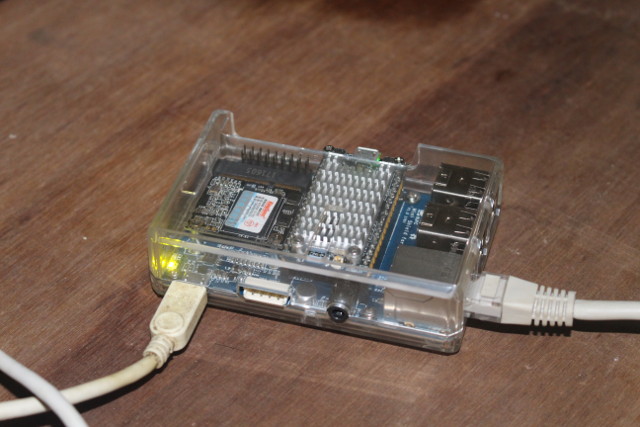
NanoPi Duo with mini Shield and SSD
I took out the micro SD card, and inserted in my other NanoPi Duo board connected to the mini shield with an mSATA SSD. This time I connected the board through a 5V/2A power supply, and added an Ethernet cable.
Getting started is much easier since we are using Ethernet here. Just find your board IP address in your router’s DHCP client list, or via tools like arp-scan, and connect over SSH with pi user:
|
1 2 3 4 5 6 7 8 9 10 11 12 13 14 15 16 17 18 19 20 |
ssh pi@192.168.0.110 pi@192.168.0.110's password: _____ _ _ _ _____ _ _____ ____ | ___| __(_) ___ _ __ __| | |_ _| ____| | | ____/ ___| | |_ | '__| |/ _ \ '_ \ / _` | | | | | _| | | | _|| | | _|| | | | __/ | | | (_| | | |_| | |___| |___| |__| |___ |_| |_| |_|\___|_| |_|\__,_|_|\__, |_____|_____|_____\____| |___/ Welcome to Ubuntu 16.04.3 LTS 4.11.2 System load: 0.48 Up time: 1 min Local users: 2 Memory usage: 7 % of 497Mb IP: 192.168.0.110,192.168.0.115 CPU temp: 29°C Usage of /: 19% of 7.3G * Documentation: http://wiki.friendlyarm.com/ * Forum: http://www.friendlyarm.com/Forum/ Last login: Sat Oct 28 12:49:04 2017 from 192.168.0.104 pi@NanoPi-Duo:~$ |
We can see the SSD is detected (sda – 59GB):
|
1 2 3 4 5 6 |
pi@NanoPi-Duo:~$ lsblk NAME MAJ:MIN RM SIZE RO TYPE MOUNTPOINT sda 8:0 0 59G 0 disk mmcblk0 179:0 0 7.4G 0 disk ├─mmcblk0p2 179:2 0 7.3G 0 part / └─mmcblk0p1 179:1 0 40M 0 part /boot |
but not mounted:
|
1 2 3 4 5 6 7 8 9 10 |
pi@NanoPi-Duo:~$ df -h Filesystem Size Used Avail Use% Mounted on udev 238M 0 238M 0% /dev tmpfs 50M 4.0M 46M 8% /run /dev/mmcblk0p2 7.3G 1.4G 5.9G 19% / tmpfs 249M 0 249M 0% /dev/shm tmpfs 5.0M 4.0K 5.0M 1% /run/lock tmpfs 249M 0 249M 0% /sys/fs/cgroup /dev/mmcblk0p1 40M 7.2M 33M 18% /boot tmpfs 50M 0 50M 0% /run/user/1000 |
So I formatted the drive with EXT-4…
|
1 2 3 4 |
sudo mkfs.ext4 /dev/sda mke2fs 1.42.13 (17-May-2015) Found a dos partition table in /dev/sda Proceed anyway? (y,n) y |
and mounted it in a temporary directory to check it out:
|
1 2 3 4 |
mkdir mnt sudo mount -t ext4 /dev/sda mnt df -h | grep mnt /dev/sda 58G 52M 55G 1% /home/pi/mnt |
In theory the SSD should have much better performance than the micro SD card, even though it’;s connected through a USB to SATA chip. But let’s no assume anything, and first run iozone on the 8GB micro SD provided by FriendlyELEC:
|
1 2 3 4 5 6 7 8 9 10 11 12 13 14 15 16 17 |
sudo apt install iozone3 iozone -e -I -a -s 100M -r 4k -r 16k -r 512k -r 1024k -r 16384k -i 0 -i 1 -i 2 Iozone: Performance Test of File I/O Version $Revision: 3.429 $ Compiled for 32 bit mode. Build: linux File stride size set to 17 * record size. random random bkwd record stride kB reclen write rewrite read reread read write read rewrite read fwrite frewrite fread freread 102400 4 2145 2207 6534 6108 5422 699 102400 16 6117 6607 13784 12456 12197 90 102400 512 7106 7930 20696 20143 20836 2234 102400 1024 7020 9946 20408 16559 20713 3884 102400 16384 9394 10387 22433 21412 21925 8475 iozone test complete. |
and repeat the same test on the SSD:
|
1 2 3 4 5 6 7 8 9 10 11 12 13 |
cd mnt sudo iozone -e -I -a -s 100M -r 4k -r 16k -r 512k -r 1024k -r 16384k -i 0 -i 1 -i 2 Iozone: Performance Test of File I/O Version $Revision: 3.429 $ Compiled for 32 bit mode. Build: linux random random bkwd record stride kB reclen write rewrite read reread read write read rewrite read fwrite frewrite fread freread 102400 4 5522 5755 5813 5810 5559 5661 102400 16 14304 15585 15824 15935 13465 15514 102400 512 29764 29014 30335 30515 30059 29883 102400 1024 29214 29343 31787 31711 30976 29852 102400 16384 29469 33760 32919 33051 33072 33205 |
We can see that both sequential performance, and especially random I/O are much better on the SSD drive, so it would make perfect sense to move the rootfs from the micro SD card to the SSD.
But before going there, I’ve been asked to check run smartctl on the drive:
|
1 2 3 4 5 6 7 8 9 10 11 12 13 14 15 16 17 18 19 20 21 22 23 24 25 26 27 28 29 30 31 32 33 34 35 36 37 38 39 40 41 42 43 44 45 46 47 48 49 50 51 52 53 54 55 56 57 58 59 60 61 62 63 64 65 66 67 68 69 70 71 72 73 74 75 76 77 78 79 80 81 82 83 84 85 86 87 88 89 90 91 92 93 94 95 96 97 98 99 100 101 102 103 104 105 106 107 108 109 110 111 112 113 114 115 116 117 118 119 120 121 122 123 124 125 126 127 128 129 130 131 132 133 134 135 136 137 138 139 140 141 142 143 144 145 146 147 148 149 150 151 152 153 154 155 156 157 158 159 160 161 162 163 164 165 166 167 168 169 170 171 172 |
sudo apt install smartmontools sudo smartctl -x /dev/sda -d sat smartctl 6.5 2016-01-24 r4214 [armv7l-linux-4.11.2] (local build) Copyright (C) 2002-16, Bruce Allen, Christian Franke, www.smartmontools.org === START OF INFORMATION SECTION === Device Model: MSH-64 Serial Number: 687071470128 LU WWN Device Id: 0 000000 000000000 Firmware Version: Q0111A User Capacity: 63,350,767,616 bytes [63.3 GB] Sector Size: 512 bytes logical/physical Rotation Rate: Solid State Device Form Factor: 2.5 inches Device is: Not in smartctl database [for details use: -P showall] ATA Version is: ACS-2 (minor revision not indicated) SATA Version is: SATA 3.1, 6.0 Gb/s (current: 6.0 Gb/s) Local Time is: Sun Oct 29 08:00:13 2017 UTC SMART support is: Available - device has SMART capability. SMART support is: Enabled AAM feature is: Unavailable APM feature is: Disabled Rd look-ahead is: Disabled Write cache is: Enabled ATA Security is: Disabled, NOT FROZEN [SEC1] Wt Cache Reorder: Unavailable === START OF READ SMART DATA SECTION === SMART Status not supported: Incomplete response, ATA output registers missing SMART overall-health self-assessment test result: PASSED Warning: This result is based on an Attribute check. General SMART Values: Offline data collection status: (0x00) Offline data collection activity was never started. Auto Offline Data Collection: Disabled. Self-test execution status: ( 0) The previous self-test routine completed without error or no self-test has ever been run. Total time to complete Offline data collection: ( 0) seconds. Offline data collection capabilities: (0x11) SMART execute Offline immediate. No Auto Offline data collection support. Suspend Offline collection upon new command. No Offline surface scan supported. Self-test supported. No Conveyance Self-test supported. No Selective Self-test supported. SMART capabilities: (0x0002) Does not save SMART data before entering power-saving mode. Supports SMART auto save timer. Error logging capability: (0x01) Error logging supported. General Purpose Logging supported. Short self-test routine recommended polling time: ( 1) minutes. Extended self-test routine recommended polling time: ( 1) minutes. SMART Attributes Data Structure revision number: 1 Vendor Specific SMART Attributes with Thresholds: ID# ATTRIBUTE_NAME FLAGS VALUE WORST THRESH FAIL RAW_VALUE 1 Raw_Read_Error_Rate ------ 100 100 050 - 0 5 Reallocated_Sector_Ct -O---- 100 100 050 - 0 9 Power_On_Hours ------ 100 100 050 - 5 12 Power_Cycle_Count ------ 100 100 050 - 6 160 Unknown_Attribute ------ 100 100 050 - 0 161 Unknown_Attribute ------ 100 100 050 - 57 162 Unknown_Attribute ------ 100 100 050 - 1 163 Unknown_Attribute ------ 100 100 050 - 11 164 Unknown_Attribute ------ 100 100 050 - 53 165 Unknown_Attribute ------ 100 100 050 - 1 166 Unknown_Attribute ------ 100 100 050 - 0 167 Unknown_Attribute ------ 100 100 050 - 0 168 Unknown_Attribute ------ 100 100 050 - 3000 169 Unknown_Attribute ------ 100 100 050 - 100 192 Power-Off_Retract_Count ------ 100 100 050 - 5 194 Temperature_Celsius ------ 100 100 050 - 45 195 Hardware_ECC_Recovered ------ 100 100 050 - 0 196 Reallocated_Event_Count ------ 100 100 050 - 0 199 UDMA_CRC_Error_Count ------ 100 100 050 - 0 241 Total_LBAs_Written ------ 100 100 050 - 130 242 Total_LBAs_Read ------ 100 100 050 - 161 245 Unknown_Attribute ------ 100 100 050 - 130 ||||||_ K auto-keep |||||__ C event count ||||___ R error rate |||____ S speed/performance ||_____ O updated online |______ P prefailure warning General Purpose Log Directory Version 1 SMART Log Directory Version 1 [multi-sector log support] Address Access R/W Size Description 0x00 GPL,SL R/O 1 Log Directory 0x01 SL R/O 1 Summary SMART error log 0x02 SL R/O 1 Comprehensive SMART error log 0x03 GPL R/O 1 Ext. Comprehensive SMART error log 0x04 GPL,SL R/O 8 Device Statistics log 0x06 SL R/O 1 SMART self-test log 0x07 GPL R/O 1 Extended self-test log 0x09 SL R/W 1 Selective self-test log 0x10 GPL R/O 1 SATA NCQ Queued Error log 0x11 GPL R/O 1 SATA Phy Event Counters log 0x30 GPL,SL R/O 9 IDENTIFY DEVICE data log 0x31 GPL - 4 Reserved 0x80-0x9f GPL,SL R/W 16 Host vendor specific log SMART Extended Comprehensive Error Log Version: 1 (1 sectors) No Errors Logged SMART Extended Self-test Log Version: 1 (1 sectors) No self-tests have been logged. [To run self-tests, use: smartctl -t] Selective Self-tests/Logging not supported SCT Commands not supported Device Statistics (GP Log 0x04) Page Offset Size Value Flags Description 0x01 ===== = = === == General Statistics (rev 1) == 0x01 0x008 4 6 --- Lifetime Power-On Resets 0x01 0x010 4 5 --- Power-on Hours 0x01 0x018 6 8538106 --- Logical Sectors Written 0x01 0x020 6 128813 --- Number of Write Commands 0x01 0x028 6 10560834 --- Logical Sectors Read 0x01 0x030 6 135144 --- Number of Read Commands 0x04 ===== = = === == General Errors Statistics (rev 1) == 0x04 0x008 4 0 --- Number of Reported Uncorrectable Errors 0x04 0x010 4 0 --- Resets Between Cmd Acceptance and Completion 0x05 ===== = = === == Temperature Statistics (rev 1) == 0x05 0x008 1 45 --- Current Temperature 0x05 0x010 1 10 --- Average Short Term Temperature 0x05 0x018 1 39 --- Average Long Term Temperature 0x05 0x020 1 52 --- Highest Temperature 0x05 0x028 1 19 --- Lowest Temperature 0x05 0x030 1 26 --- Highest Average Short Term Temperature 0x05 0x038 1 0 --- Lowest Average Short Term Temperature 0x05 0x040 1 39 --- Highest Average Long Term Temperature 0x05 0x048 1 1 --- Lowest Average Long Term Temperature 0x05 0x050 4 0 --- Time in Over-Temperature 0x05 0x058 1 100 --- Specified Maximum Operating Temperature 0x05 0x060 4 0 --- Time in Under-Temperature 0x05 0x068 1 0 --- Specified Minimum Operating Temperature 0x06 ===== = = === == Transport Statistics (rev 1) == 0x06 0x008 4 7 --- Number of Hardware Resets 0x06 0x018 4 0 --- Number of Interface CRC Errors 0x07 ===== = = === == Solid State Device Statistics (rev 1) == 0x07 0x008 1 0 --- Percentage Used Endurance Indicator |||_ C monitored condition met ||__ D supports DSN |___ N normalized value SATA Phy Event Counters (GP Log 0x11) ID Size Value Description 0x0001 2 0 Command failed due to ICRC error 0x0002 2 0 R_ERR response for data FIS 0x0003 2 0 R_ERR response for device-to-host data FIS 0x0004 2 0 R_ERR response for host-to-device data FIS 0x0005 2 0 R_ERR response for non-data FIS 0x0006 2 0 R_ERR response for device-to-host non-data FIS 0x0007 2 0 R_ERR response for host-to-device non-data FIS 0x0008 2 0 Device-to-host non-data FIS retries 0x0009 2 0 Transition from drive PhyRdy to drive PhyNRdy 0x000a 2 3 Device-to-host register FISes sent due to a COMRESET 0x000b 2 0 CRC errors within host-to-device FIS 0x000d 2 0 Non-CRC errors within host-to-device FIS 0x000f 2 0 R_ERR response for host-to-device data FIS, CRC 0x0010 2 0 R_ERR response for host-to-device data FIS, non-CRC 0x0012 2 0 R_ERR response for host-to-device non-data FIS, CRC 0x0013 2 0 R_ERR response for host-to-device non-data FIS, non-CRC |
There are many parameters reported, and one of them is the drive temperature which apparently went up to 52°C, and as low as 19°C. The latter could not have happened my location, since temperature never went below 24°C.
Time to move the rootfs to the SSD, and to do so I’ll adapt the instructions for CubieTruck, another Allwinner development board.
As we’ve seen above, the roofs is mounted to /dev/mmbblk0p2, so let’s mount it in another directory, and copy the content to the SSD:
|
1 2 3 4 |
mkdir rootfs sudo mount -t ext4 /dev/mmcblk0p2 rootfs sudo cp -a rootfs/* mnt/ sudo umount rootfs |
We need to let the boot partition know our rootfs has moved. Let’s go to /boot directory, and edit boot.cmd text file (used to be uEnv.txt in CubieTruck) by changing root from /dev/mmcblk0p2 to /dev/sda in the bootargs with all other parameters unchanged:
|
1 |
setenv bootargs console=ttyS0,115200 earlyprintk root=/dev/sda rootfstype=ext4 rw rootwait fsck.repair=${fsck.repair} panic=10 ${extra} fbcon=${fbcon} |
The final step to create boot.scr binary file using the command below, and reboot.
|
1 2 |
sudo mkimage -C none -A arm -T script -d boot.cmd boot.scr sudo reboot |
After a few seconds, we should be able to use login and verify the rootfs has now moved to sda.
|
1 2 3 4 5 6 7 8 9 10 |
df -h Filesystem Size Used Avail Use% Mounted on udev 238M 0 238M 0% /dev tmpfs 50M 4.0M 46M 9% /run /dev/sda 58G 1.4G 54G 3% / tmpfs 249M 0 249M 0% /dev/shm tmpfs 5.0M 4.0K 5.0M 1% /run/lock tmpfs 249M 0 249M 0% /sys/fs/cgroup /dev/mmcblk0p1 40M 7.2M 33M 18% /boot tmpfs 50M 0 50M 0% /run/user/1000 |
Success! The boot partition is still in the micro SD card since Allwinner platform can’t boot from USB. You can reclaim mmcblk0p2 partition on the SD card to do something else. Eventually we should be able to do away completely with the micro SD card by booting from the SPI flash in the board, but I think this is still work in progress (TBC).
Stress Testing & WiFi Performance
Such small board is not designed for heavy load, as even with an heatsink, heat dissipation does not work as well as on larger boards (with a large ground plane). To demonstrate that I ran stress on all 4 cores, and monitored temperature and CPU with NanoPi-Monitor.
|
1 2 |
sudo apt install stress stress -c 4 |
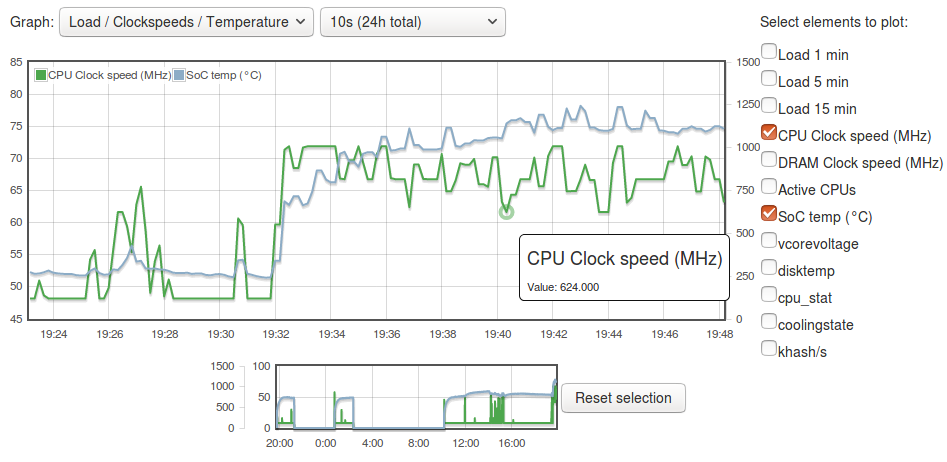
Stress was started at 19:32, on based on the chart above the CPU cores ran at 1008 MHz for about two minutes with the CPU temperature quickly increasing from around 50 to 70°C, and after the CPU frequency oscillates between 624 MHz and 1008 MHz to keep the temperature in check. Ticking “active CPUs” would show 4 cores are used at all times during stress. Performance does not completely collapses but the system cannot run at 1008 MHz at all times without additional cooling. Whether this is an issue or not depends on your specific load/use case.
NanoPi Duo relies on Allwinner XR819 WiFi module, and while it’s working decently on my Orange Pi Zero, I had reports of poor peformance and issues in the past, and as we’ve seen above I had some troubles finding and accessing my access points with NanoPi Duo. So it might be good to have a look at WiFi performance too.
As a side note, nmtui is usable while connecting via SSH instead of minicom / serial connection, so if you prefer a user interface you may want to use this tool instead of nmcli when using the mini shield.
That time I could also list all my local access points even with no external antenna attached:
|
1 2 3 4 5 |
sudo nmcli dev wifi * SSID MODE CHAN RATE SIGNAL BARS SECURITY CNX-SOFTWARE Infra 6 54 Mbit/s 55 ▂▄__ WPA1 WPA2 sonoff-office Infra 1 54 Mbit/s 52 ▂▄__ WPA2 * CNX-TRANSLATION Infra 1 54 Mbit/s 48 ▂▄__ WPA1 WPA2 |
But I could not ssh to the board via the WiFi interface (192.168.0.115) from my computer:
|
1 2 |
ssh pi@192.168.0.115 ssh: connect to host 192.168.0.115 port 22: Connection timed out |
So I rebooted the board, and could login again. All good, so I ran iperf with chip antenna (only):
- upload:
|
1 2 3 4 5 6 |
Server listening on TCP port 5001 TCP window size: 85.3 KByte (default) ------------------------------------------------------------ [ 4] local 192.168.0.104 port 5001 connected with 192.168.0.115 port 45832 [ ID] Interval Transfer Bandwidth [ 4] 0.0-60.0 sec 29.8 MBytes 4.16 Mbits/sec |
- download:
|
1 2 3 4 5 6 |
Client connecting to 192.168.0.115, TCP port 5001 TCP window size: 85.0 KByte (default) ------------------------------------------------------------ [ 3] local 192.168.0.104 port 50928 connected with 192.168.0.115 port 5001 [ ID] Interval Transfer Bandwidth [ 3] 0.0-60.1 sec 55.5 MBytes 7.75 Mbits/sec |
The board was located in my usual (TV box, development board) test location about 4 meters from the router (+ wall), and results are rather poor, so I tried again with an external antenna:
- upload:
|
1 2 3 4 5 6 |
Server listening on TCP port 5001 TCP window size: 85.3 KByte (default) ------------------------------------------------------------ [ 4] local 192.168.0.104 port 5001 connected with 192.168.0.115 port 55738 [ ID] Interval Transfer Bandwidth [ 4] 0.0-60.3 sec 52.9 MBytes 7.35 Mbits/sec |
- download:
|
1 2 3 4 5 6 |
Client connecting to 192.168.0.115, TCP port 5001 TCP window size: 85.0 KByte (default) ------------------------------------------------------------ [ 3] local 192.168.0.104 port 51350 connected with 192.168.0.115 port 5001 [ ID] Interval Transfer Bandwidth [ 3] 0.0-60.3 sec 97.8 MBytes 13.6 Mbits/sec |
Not fantastic, but still about twice as fast, and with much better signal strength so loss of connection should be less likely improving reliability.

Jean-Luc started CNX Software in 2010 as a part-time endeavor, before quitting his job as a software engineering manager, and starting to write daily news, and reviews full time later in 2011.
Support CNX Software! Donate via cryptocurrencies, become a Patron on Patreon, or purchase goods on Amazon or Aliexpress


Just a few notes: – by putting something like this to /etc/rc.local the SSD will perform better (both in benchmarks and real world) – nmtui and serial console: Have you checked how $TERM env is defined or tried to set export TERM=linux for example? – ‘Active CPUs’ in RPi-Monitor is useless here since mainline kernel throttling strategies differ from Allwinner’s legacy Android kernel (no idea why FriendlyELEC did a 1:1 copy&paste of my template that was developed to understand thermal behaviour of this platform 1.5 years ago). At least your testing shows that there is a huge need to improve… Read more »
And I forgot to ask: Is there a SPI NOR flash chip already soldered on the lower PCB side next to DRAM?
@tkaiser
Yes, see first part of review.
@tkaiser
About terminal:
changed that to linux:
But the result is the same.

@Jean-Luc Aufranc (CNXSoft)
Misunderstanding. I meant checking how $TERM is set when you’re connected through SSH (eg. this will read ‘xterm’) and then use exactly this over the serial connection either by telling your tool of choice or defining $TERM later on the remote host (there the ‘export TERM=’ should happen). Maybe this already works:
@tkaiser
OK.. Got it… But still not luck.
I can see serial is only black & white, while connecting over ssh is in color.
I think I may have to change some settings in minicom too.
BTW: On those boards with low amounts of DRAM using zram (instead of swap) is always a good idea. In Ubuntu it’s just an
followed by a reboot and then half of the physical DRAM will be used as zram. In which situations depends on vm.swappiness setting (can be checked with sysctl command) so to activate zram only for emergency situations the following would be sufficient:
@Jean-Luc Aufranc (CNXSoft)
Thanks for testing the poor WiFi performance, which sadly even with external antenna is no better than for ESP32 modules, or in previous boards that use XR819 chip. I look forward to when you test some SBC’s with WiFi able to reliably transfer 30 Mbits/sec to their Ethernet port.
@Jean-Luc Aufranc (CNXSoft)
Yesterday a user submitted NanoPi Duo bits to Armbian’s build system as pull request, we switched to ‘officially supported’ status and a Debian Stretch image has been generated: https://forum.armbian.com/topic/5430-armbian-for-nanopi-duo/?do=findComment&comment=42503
Wi-Fi ‘performance’ is said to be +20 Mbits/sec over a short distance but I’m more curious how mSATA performance would look like comparing Armbian’s settings with the one from the official OS image 🙂
When I type following code:
setenv bootargs console=ttyS0,115200 earlyprintk root=/dev/sda rootfstype=ext4 rw rootwait fsck.repair=${fsck.repair} panic=10 ${extra} fbcon=${fbcon}
Bash returns the following error:
fsck.repair=${fsck.repair}: bad substitution
What’s wrong here?
Trying to execute u-boot code (bootscript) in a Linux shell.
@Ext4
Maybe some spaces or other character issue?
Try to only modify the part with root= from the original file.
No serial interface needed to configure wifi. Just do it on the SD before first boot. It works for OEM image and Armbian. See https://bbs.nextthing.co/t/nanopi-duo-as-a-chip-replacement/18569/55