
Until today, I only knew of two authentication methods for SSH: the traditional username/password and key-based login with private/public keys with the latter being more secure and not requiring any password.
But I’ve just found out it’s also possible to login to SSH using two-factor authentication relying on your smartphone to get an OTP code like you would to access some banking services as it can easily be enabled in Armbian.
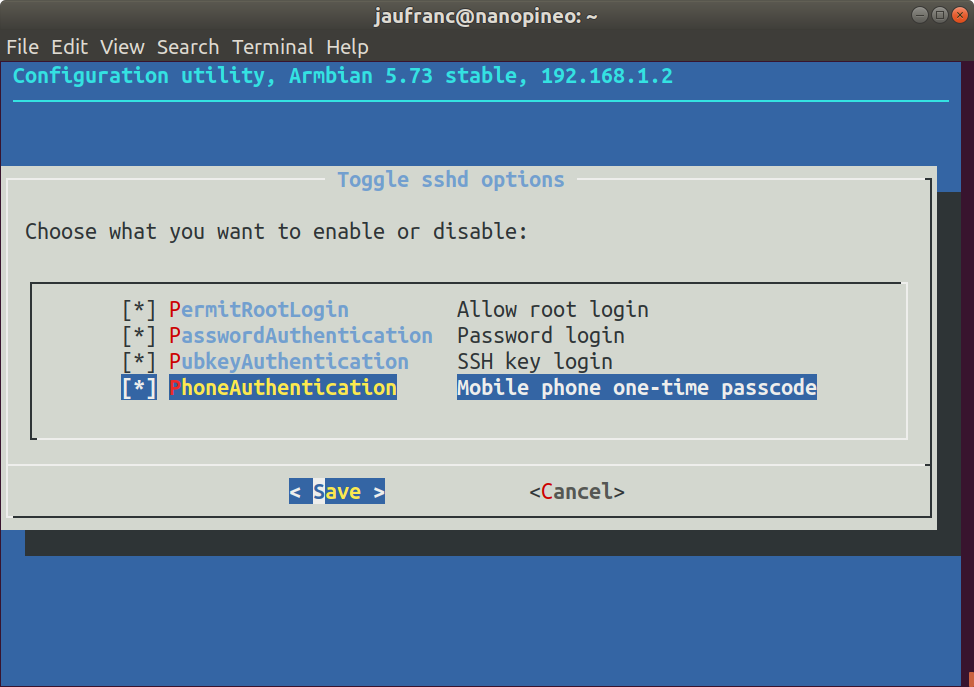
First you’ll want to enable key-based login with private/public keys, or you won’t be able to access your board anymore after enabling 2FA except via the serial console. Now simply start armbian-config, and go to System Settings->Reconfigure SSH daemon to enable PhoneAuthentication “mobile phone one-time passcode”. We’re not done yet, so don’t close Armbian-config
You’d then need an Android or iOS phone running Google Authenticator app to receive the OTP (one-time password). After enabling PhoneAuthenticator in armbian-config, you’ll see a new option to generate token select it, and it should show a QR core. Open Google Authenticator and scan the QR core to register the app. The app will then generate a code every 60 second for “test” device which you can use to login.
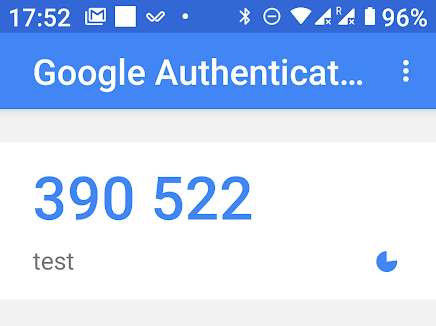
You can obviously rename the device to something more relevant. But next time you login through SSH, you should be asked for the code showing in your phone. For some reasons it did not work for me, even after I disable all SSH methods except for “PhoneAuthentication”, I can just login without any password to my NanoPi NEO board running the latest version of Armbian.
If you’re not running Armbian, instructions to setup 2FA authentication in Debian 9 can be found here.

Jean-Luc started CNX Software in 2010 as a part-time endeavor, before quitting his job as a software engineering manager, and starting to write daily news, and reviews full time later in 2011.
Support CNX Software! Donate via cryptocurrencies, become a Patron on Patreon, or purchase goods on Amazon or Aliexpress. We also use affiliate links in articles to earn commissions if you make a purchase after clicking on those links.


I really recommend doing this. I use Google Authenticator for 2FA on all of my accounts. For even more security there is a dedicated hardware version of this available from Google.
https://cloud.google.com/titan-security-key/
The hardware in the security key is similar to the Microchip ATECC608A which is used to securely log into IOT on Google, AWS, Azure and Baidu. It is also similar to the hardware in smart cards.
The hardware key is very secure. To break into someone’s account you’d need to steal both their password and the physical key. And that is very hard to do. Of course this assumes their SSL implementation is secure.
>To break into someone’s account you’d need to steal both their password
Does anyone that cares enough about security to have a hardware token use passwords to login to SSH?
Hmm… ask Tesla who had $12M stolen because someone got into their AWS SSH and used all of AWS to mine bitcoins.
>Hmm… ask Tesla who had $12M stolen
>because someone got into their AWS SSH and used all of AWS to mine bitcoins.
There are scripts crawling google for unpatched wordpress installs that install miners too. Aside from securing SSH properly they should have really been monitoring for unusual activity because if it wasn’t SSH they will get in some other way.
These hardware tokens work by storing the private key in protected memory that can’t be read. My IOT hardware has the private key in plaintext inside of the crypto chip so if you steal the hardware it continues to work unless I disable it at the server.
There is another mode on these chips where the private key is encrypted. You enter a password which the chip uses to decrypt the private key which is then used for SSL. The decryption happens locally inside the crypto chip so there is no way to get the private key. Now if someone steals the hardware it won’t work because they don’t know the password to decrypt the private key.
You could probably convince the password ring on Unbuntu to store this password but I have not tried doing that. Then you wouldn’t have to enter it all of the time. Of course that is less secure than entering it at the start of each session.
>decryption happens locally inside the crypto chip so there is no way to get the private key.
You really shouldn’t need an extra chip for this stuff though. The whole point of having stuff like trustzone is to isolate keys and such from the rest of the system. I don’t think there are any IoT stacks for MCU platforms that actually do that though.
For desktop/server applications take a look at the nitrokey HSM: https://shop.nitrokey.com/shop/product/nitrokey-hsm-2-7
This is the “proper” way of doing it as the key generation, signing etc are all done in the HSM and tempering with it or trying to brute force it destroys the keys.
None of the IOT class CPUs have SSL capable Trustzone. It is all the old DES stuff.
ATECC608A works with Google, AWS, Baidu, Azure, etc. It is a tiny I2C device, $0.52. Plus it works like an EEPROM so you can stick your MAC addresses into it.
Yep. The IoT platforms are a mess. Vendors can’t manage not putting hilarious unfixable exploits in their bootroms so you shouldn’t expect them to do anything higher up the stack properly.. I wouldn’t trust microchips secure elements* all that much either.
*I think we shipped 50 thousand or so of them.
The microchip one is the only one with open source support. Everything else needs NDAs to use and you can’t ship the source.
It is fine for our purposes. We just don’t want people cloning our hardware and then attaching to our AWS services. If they clone our hardware they can pay their own AWS bills.
>It is fine for our purposes. We just don’t want people cloning our
>hardware and then attaching to our AWS services.
x509 device certs work fine for that*. The microchip thing, Apple’s MFI chip etc depend on the supply chain not being what it is. I.e. to get MFI chips you have to do Apple’s MFI approval process and redo it if you change contract manufacturer etc. But anyone can go on taobao and order a reel of them so the whole thing is pointless.
*Have been using AWS IoT since before it was announced to the public with x509 certs.
We use our own Root Certificate Authority on AWS. Each IOT device has a unique certificate. So if someone clones the hardware they can’t make more keys. If they try to reuse a key we immediately see that and ban the key. Our devices are connected to AWS 24/7 so it is obvious if you are cloning a key. But since the key is inside the ATECC608 no one can clone it, so no one has tried.
We can put procedures in place that would stop the factory from making grey market devices but we haven’t needed to do that yet. The factory has an Intermediate Certificate Authority device that lets them generate certificates. Since we have control of the Root CA we could make a new Intermediate CA device and block new registrations from the old Intermediate CA device.
Basically we are just storing the x509 cert inside the ATECC608 to keep it from being cloned.
$DAYJOB does exactly the same but we don’t use the ATECC608. The factory requests the encrypted blob for a board that’s being tested and loads it into the encrypted flash where the firmware etc is. They can’t request the blob for devices that haven’t be configured for a production run, they can’t create their own certs.. Same benefits, $.50 less BoM.
Cloning is pretty worthless with AWS IoT anyhow as if a client connects with the same client cert it disconnects any existing connection.
We’ve been looking at dropping the ATECC608 in cheaper products. Is there an app note for the procedure you use available, I’d like to compare it to what we are doing. For example each of your update images is uniquely generated, right?
>Is there an app note for the procedure you use available,
There is for the device encryption stuff but it’s behind one of those NDA vendor portals. Security by obscurity. 😀
The manufacturing process is custom. Basically batch creation of the device blobs with stuff like serial numbers, certs etc before a run. When a board rolls out of the oven the factory pull a serial number and the associated blob via https, flash the blob via JTAG. There’s no way for the factory to create blobs for ghost runs.
>For example each of your update images is uniquely generated,
For firmware images the same build output is signed for the target that is trying to do an OTA update. Device specific public/private keys are written to OTP flash at the factory. Once that is done the device is in secure mode and will only ever boot firmware images signed by us for that specific device. I’m not sure what that adds to the costs (Sticking up a single signed image up on S3 or whatever vs signing hundreds of thousands of images) but I’d like to think it’d take a while to get up to $.50 for a single device.
Our new CPU is Cortex A35 with Trustzone. So I went searching for a TA that implements PKCS 11 with ECC support. Linaro is working on one but it is not released yet.
https://github.com/etienne-lms/optee_os/tree/sks/ta/secure_key_services
This TA should behave just like an external ATECC608 assuming it is finished enough to do what I need. Now I just need to figure out how to run it….
I guess the SKS stuff will take another few months before it is released. While waiting, MS’s fTPM might be worth a look: https://github.com/Microsoft/ms-tpm-20-ref/tree/master/Samples/ARM32-FirmwareTPM
What about the Cortex-M23/M33? I thought those were made specifically for this.
>What about the Cortex-M23/M33? I thought those were made specifically for this.
That seems to be the idea and why ARM has introduced their security stack/certification process. The problem is that a lot of applications don’t need the sort of computational power, memory etc that those newer chips have so it’s hard to justify the added price.
Jon was talking about using an OP-TEE TA, which currently only is supported with a Linux REE, so only Cortex-A, no Cortex-M for this use case.
Sadly Google dropped their hardware key a few months ago. So far there has not been indication of a replacement.
You can also use something like andOTP which is available from F-Droid.
So … CNX, did it work for you?
I tried again this morning, and I’m still not being asked for the OTP… So not working for me.
After enabling this, do you need the 2FA on each login? Or is there some trust after you do the login once from a certain system?
2FA each time I login from my laptop over my LAN onto my armbian on 192.168.1.3 would be a bit annoying.
I would prefer it like gmail remembers my specific browser. So with a fresh browser, gmail prompts me the 2FA, which is then valid forever.
>private/public keys with the latter being more secure and not requiring any password.
If your private keys are stored in plain text you should probably fix that before adding 2 factor auth.
The reason all the oligarchs want you to use 2fa … is because then they can claim any hack is ALL YOUR FAULT. Check the EULAs, they absolutely put ALL the liability on you once you start using 2fa.
I can’t believe you lot are so thick as to think it’s yourselves that are benefiting from this (rather inconvenient) security theatre.
Just say ney, to two-f-aye!
What’s a good alternative to Google Authenticator? (Maybe it’s not too much trouble to run your own authentication server?) Google services don’t work in China, nor do we want to let the friendly Google overlords know each time I log into a device/service 🙂
Google Authenticator doesn’t know when you log into something. The authenticator just generates a new code every 30 seconds and displays it on the screen. It has no way of knowing if you used it.
Here is hardware implementing the same algorithm, $29
https://www.protectimus.com/protectimus-slim-mini
if you are really this paranoid, then just use normal password authentication, then make a small script that changes the password every minute like this:
while true;do echo $(md5sum <<<$(date -u +"%y%m%d%MiAmPaRaNoId")|cut -c 3-8);sleep 60;done
(instead of echo you change the password)
Jus saying…
I kind of love this, amazed I had never heard of this!
nice trick.
I would add a %H to your date string, otherwise you’re using the same password 24 times per day.
And you may want to display the date/time on the screen, otherwise if the time on your device is wrong or off then you’ll try with a wrong password every time.