A preview release of Google Assistant SDK working with Raspberry Pi 3 and other ARMv7 boards was released in May, and soon after, AIY Projects Voice Kit was offered for free with Raspberry Pi Magazine in order to a complete smart speaker kit working with RPi 3. I wanted to try it on one of FriendlyELEC or Shenzhen Xunlong Allwinner board, since all we need is audio input and output, and an Internet connection. Earlier this month, I came across Orange Pi Zero Set 6 Kit that had all I needed: Orange Pi Zero ARM Linux board, an expansion board with built-in microphone and audio output jack, and a cute and small case to neatly put everything together.
Orange Pi Zero Set 6 Kit Unboxing and Assembly
Shenzhen Xunlong sent me the kit so that I can try it out.
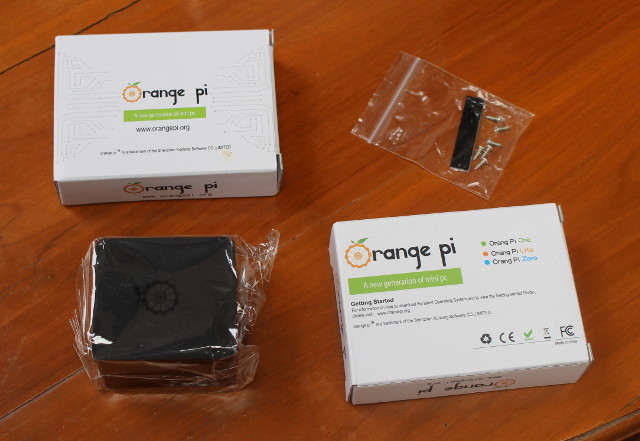
The package includes two Orange Pi packages, the plastic case, some a bag with screws and rubber pads.
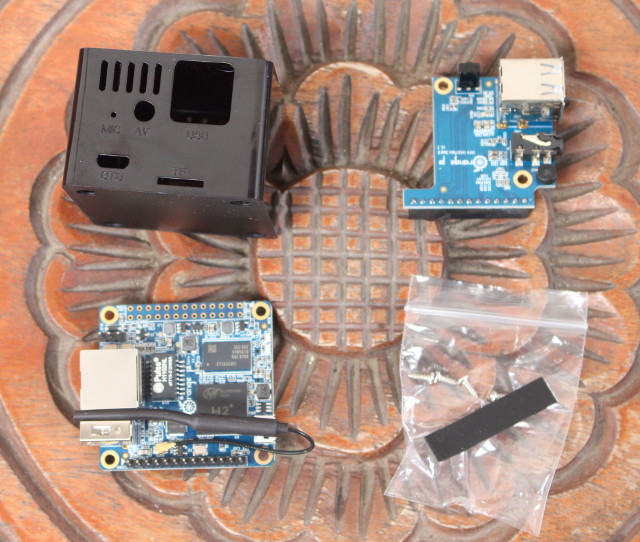
One of the package comes with Orange Pi Zero board powered by Allwinner H2+ quad core processor with 512 MB RAM, micro USB for power, 10/100M Ethernet, a USB port, a WiFi antenna, and expansion headers on the top…
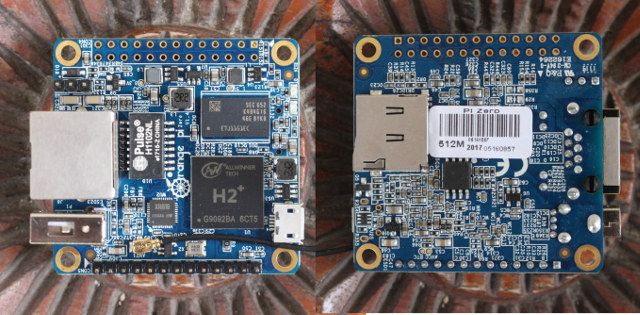
.. and a micro SD card slot on the bottom, which we’ll use to boot the operating system.
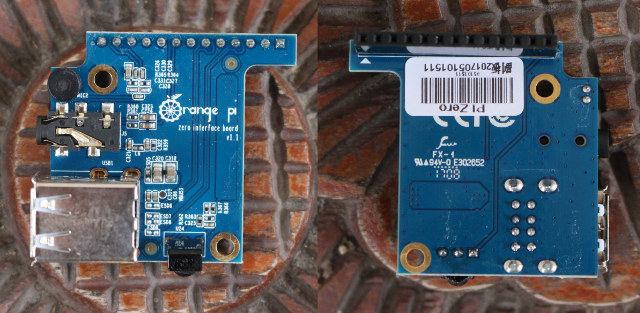
The second package is for Orange Pi Zero Interface board v1.1 with two more USB port, an IR receiver, a 3.5mm audio jack, and a built-in microphone (top right).
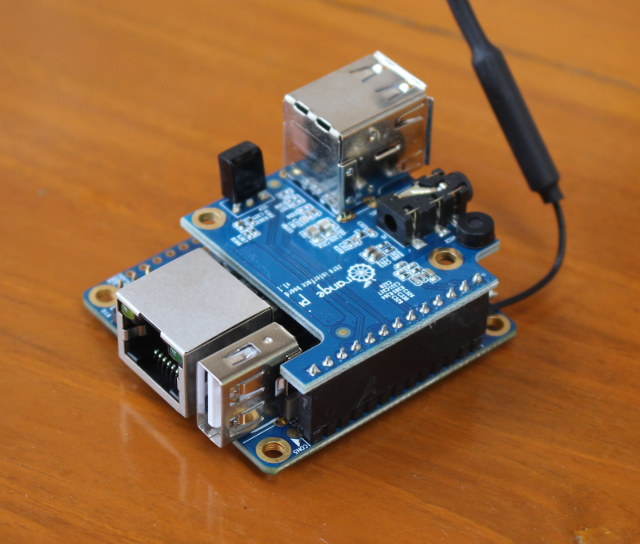
The next step is just to plug the interface board into Orange Pi Zero board, bending the WiFi antenna between the two boards…
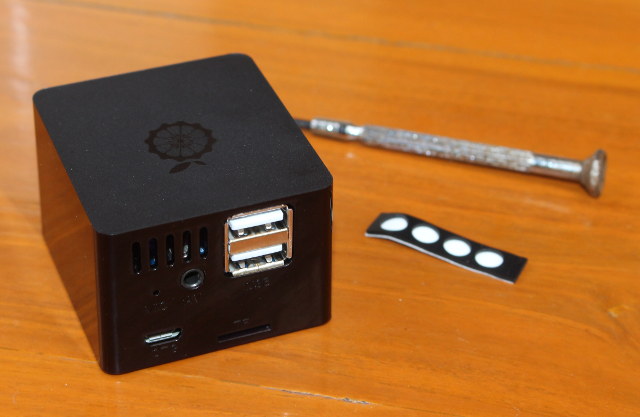
… before pushing the board from the bottom of the enclosure, tightened the cover with the 4 screws, and adding the 4 rubber pads.
Installing Ubuntu on Orange Pi Zero & Configuring Networking and Audio Input & Output
Google Assistant SDK requires Ubuntu or Debian operating system, so I downloaded Ubuntu server legacy image on Armbian website, since the mainline image does not support XR819 WiFi module at all. I then extracted Armbian_5.30_Orangepizero_Ubuntu_xenial_default_3.4.113.7z and flashed Armbian_5.30_Orangepizero_Ubuntu_xenial_default_3.4.113.img with Etcher on a micro SD card using my main computer.
Once it was done, I took the micro SD card to Orange Pi Zero board, connected my own speakers to the 3.5mm audio jack and USB for power, as well as a 5V/2A USB charger to power the system.
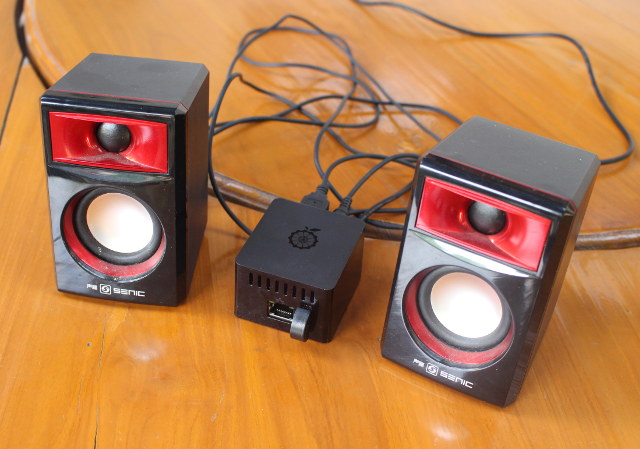
You may notice an extra USB dongle on the picture above, but we’ll talk about that later.
I’ll use WiFi to test Google Assistant, but I also connected an Ethernet cable to make it easier for first time setup. If you don’t have Ethernet, you could also connect the board via a USB to TTL board to access the serial console.
After looking up the IP address of the board in my router, I connected with SSH using root (password: 1234):
|
1 2 3 4 5 6 7 8 9 10 11 12 13 14 15 16 17 18 19 20 21 22 23 24 25 26 27 28 29 |
ssh root@192.168.0.113 root@192.168.0.113's password: You are required to change your password immediately (root enforced) ___ ____ _ _____ / _ \ _ __ __ _ _ __ __ _ ___ | _ \(_) |__ /___ _ __ ___ | | | | '__/ _` | '_ \ / _` |/ _ \ | |_) | | / // _ \ '__/ _ \ | |_| | | | (_| | | | | (_| | __/ | __/| | / /| __/ | | (_) | \___/|_| \__,_|_| |_|\__, |\___| |_| |_| /____\___|_| \___/ |___/ Welcome to ARMBIAN 5.30 stable Ubuntu 16.04.2 LTS 3.4.113-sun8i System load: 0.21 0.06 0.06 Up time: 1:08 hour Memory usage: 5 % of 494MB IP: 192.168.0.113 CPU temp: 79°C Usage of /: 81% of 1.4G [ General system configuration: armbian-config ] Last login: Sat Jul 29 04:56:32 2017 from 192.168.0.104 Changing password for root. (current) UNIX password: Enter new UNIX password: Retype new UNIX password: Thank you for choosing Armbian! Support: www.armbian.com Creating a new user account. Press <Ctrl-C> to abort Please provide a username (eg. your forename): ... |
The very first boot it will ask your to change the root password, and create a new user. You may want to create “pi” user at this stage. We should not be able to access the command, and run the following command to configure Orange Pi Zero board:
|
1 |
armbian-config |
I first changed the timezone.
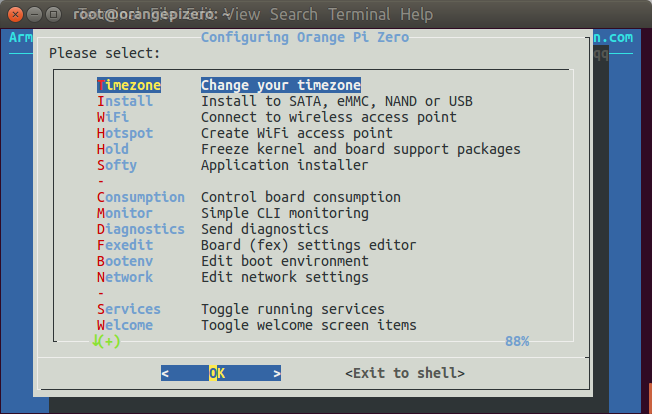 Then selected WiFi – Connect to wireless access point to connect to my WiFi router.
 We can quit armbian-config, and optionally disconnect the Ethernet cable, and reconnect SSH over WiFi, which I did.
Back in the command line, I tested audio recording & playback with the built-in microphone and speakers using the same commands as in ReSpeaker guide:
|
1 2 |
arecord -M -f S16_LE -r 16000 -c 1 --buffer-size=204800 -v /tmp/sample.wav aplay -M /tmp/sample.wav --buffer-size=204800 -v |
The first command recorded my voice, and then I pressed Ctrl+C to stop, and play it back with the second command. I worked fine for me. If you wish you can adjust the playback and recording volume with:
|
1 |
alsamixer |
We’ll also need to create .asoundrc file for Google Assistant to work with ALSA. For we need to note the microphone card and device number (0,0):
|
1 2 3 4 5 6 7 8 |
root@orangepizero:~# arecord -l **** List of CAPTURE Hardware Devices **** card 0: audiocodec [audiocodec], device 0: SUNXI-CODEC sndcodec-0 [] Subdevices: 1/1 Subdevice #0: subdevice #0 card 1: sndhdmi [sndhdmi], device 0: SUNXI-HDMIAUDIO sndhdmi-0 [] Subdevices: 1/1 Subdevice #0: subdevice #0 |
as well as speaker card and device number (0,0):
|
1 2 3 4 5 6 7 8 |
aplay -l **** List of PLAYBACK Hardware Devices **** card 0: audiocodec [audiocodec], device 0: SUNXI-CODEC sndcodec-0 [] Subdevices: 1/1 Subdevice #0: subdevice #0 card 1: sndhdmi [sndhdmi], device 0: SUNXI-HDMIAUDIO sndhdmi-0 [] Subdevices: 1/1 Subdevice #0: subdevice #0 |
If you want to use your TV as speaker, you’d use Card 1, device: 0.
If you have not created a pi or other user yet, you’ll want to add one belonging to sudoers and audio groups, and go the home directory:
|
1 2 3 4 5 |
adduser pi adduser pi sudo adduser pi audio su pi cd ~ |
Now create a ~/.asoundrc with the following match the card and device for our mic and speaker:
|
1 2 3 4 5 6 7 8 9 10 11 12 13 14 15 16 17 |
pcm.!default { type asym capture.pcm "mic" playback.pcm "speaker" } pcm.mic { type plug slave { pcm "hw:0,0" } } pcm.speaker { type plug slave { pcm "hw:0,0" } } |
[Update: As we’ll see below this won’t work with the built-in microphone, but as indicated in the comments below, this can be fixed by changing pcm.mic section with:
|
1 2 3 4 5 6 7 |
pcm.mic { type plug slave { pcm "hw:0,0" format S16_LE } } |
I have not changed the rest of the post, but the built-in microphone on Orange Pi Zero does work now]
Setting Up Google Assistant on Orange Pi Zero
Now that audio and networking are both setup and working, we can carry on with the instructions to install Google Assistant SDK and demo. Those are the same for all boards, and I’ll describe them below in details.
We need to configure a Google Developer Project.
Go to the Project page in Google Platform Console, and click on Create Project.

I called it Orange Pi Zero Smart Speaker, and clicked on Create.

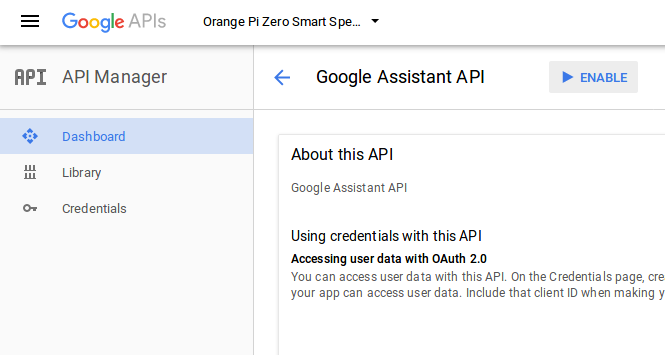
Next, we’ll need to enable Google Assistant API for our project. Simply click on Enable on that page. The “Orange Pi Zero Smart Speaker” project was already selected in my case.
We’re then being asked to create an OAuth Client ID. I only filled my email address, and a product name before clicking on Save.
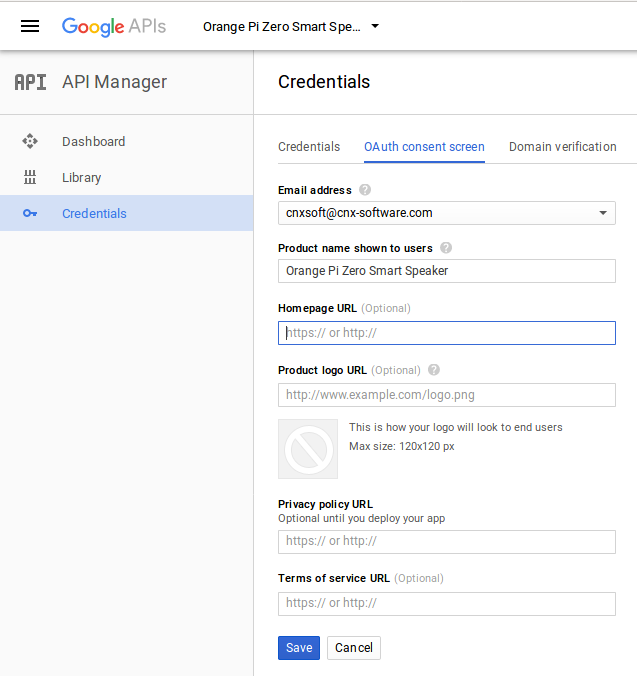
Select Other in the next page, and give another name – I used “Linux Thingy” – before clicking on Create.

You should now see an OAuth client pop-up window with your client ID and secret. You can just click OK, no need to copy or save either.

Instead we’ll download client_secret_[your_client_id].json file on the next page by clicking on the arrow circled in red.
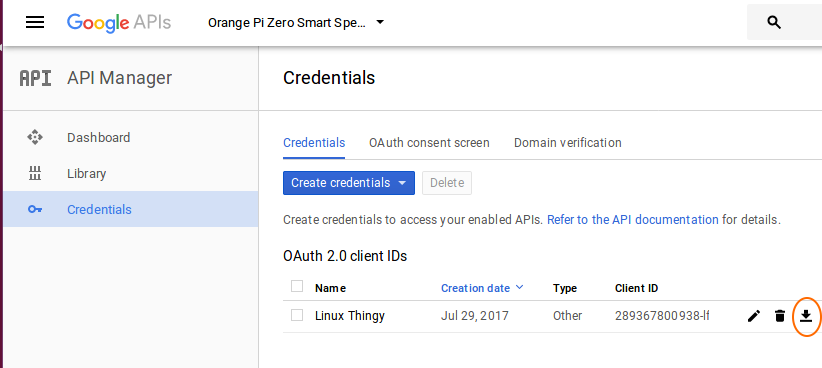
I then copied that file to Orange Pi Zero board using scp (change [your_client_id] with your actual client ID):
|
1 |
scp client_secret_[your_client_id].json pi@192.168.0.114:~ |
Now that we have configured most options we need in Google Cloud platform, let’s install Python 3 and dependencies:
|
1 2 3 4 5 |
sudo apt-get update sudo apt-get install python3-dev python3-venv python3 -m venv env env/bin/python -m pip install --upgrade pip setuptools source env/bin/activate |
At this stage to need to make sure “Web & App Activity” with “Include Chrome browsing history and activity from websites and apps that use Google services” checked, Device Information and Voice & Audio Activity are enabled in the Activity Controls page. All options were already enabled for me by default.
We can now install Google Assistant SDK package including library and sample code:
|
1 |
python -m pip install --upgrade google-assistant-library |
and the authorization tool:
|
1 |
python -m pip install --upgrade google-auth-oauthlib[tool] |
Run the authorization tool:
|
1 |
google-oauthlib-tool --client-secrets ~/client_secret_xxxx.apps.googleusercontent.com.json --scope https://www.googleapis.com/auth/assistant-sdk-prototype --save --headless |
This should show a text reading “Please visit this URL to authorize this application: https://….”. Select the URL and open it in a web browser, and copy/paste the authorization code you see in the web browser back into the terminal.
We can now start the demo
|
1 |
google-assistant-demo |
That’s the initial output
|
1 2 3 |
ON_MUTED_CHANGED: {'is_muted': False} ON_START_FINISHED |
I went to say “OK Google” and “Hey Google”, and… nothing. No answer, and no info in the terminal window either. I tried several times, and also played with:
|
1 |
export ASSISTANT_MIC_SENSITIVITY=-6 |
as explained in the troubleshooting section in Google Assistant documentation, incrementing the value by 6 until I reached -60, before running the demo, and no luck. So I thought maybe my “American accent” could have been the problem, so I launched Google Translate in my phone, and make it say “OK Google”. Same disappointing result. I went to Google Cloud Console, and good see some activity, but with 100% errors.
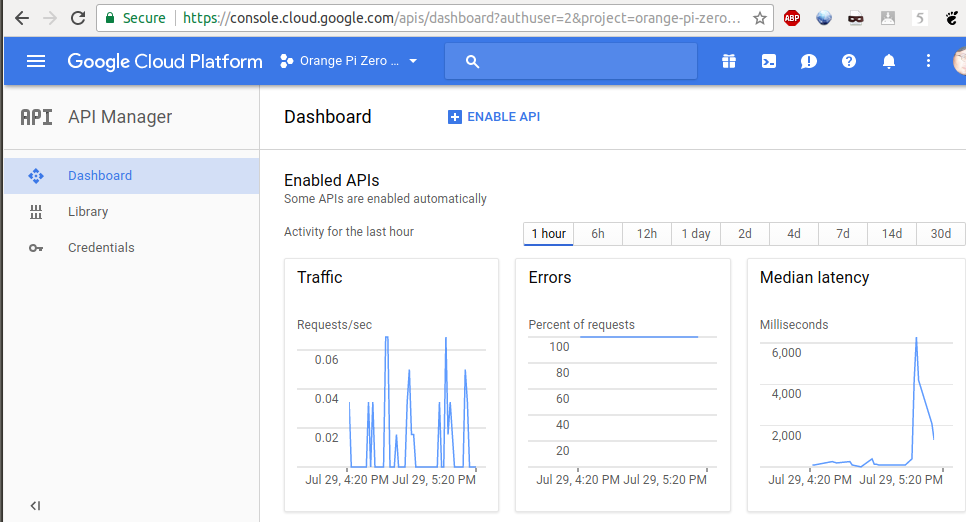
So I did some searching on the web, I could find one person changing the .asoundrc file, but I did not work for me with the file generating plenty of sound related errors when running the demo, and another fix a similar problem by changing the microphone. Which reminded me, I had bought a cheap USB microphone on eBay for $1.45. So I connected it to Orange Pi Zero board, and that’s the extra USB dongle in the photo with the speakers higher in this guide, and check the card and device number:
|
1 2 3 4 5 6 7 8 9 10 11 |
arecord -l **** List of CAPTURE Hardware Devices **** card 0: audiocodec [audiocodec], device 0: SUNXI-CODEC sndcodec-0 [] Subdevices: 1/1 Subdevice #0: subdevice #0 card 1: sndhdmi [sndhdmi], device 0: SUNXI-HDMIAUDIO sndhdmi-0 [] Subdevices: 1/1 Subdevice #0: subdevice #0 card 2: Device [USB PnP Sound Device], device 0: USB Audio [USB Audio] Subdevices: 1/1 Subdevice #0: subdevice #0 |
We can see the USB card 2, device 0, so I update the relevant line in pcm.mic section in .asoundrc:
|
1 |
pcm "hw:2,0" |
and ran the demo again. Success! The device would reply to make “OK Google” request, and tell me the time, my name, the weather for tomorrow, sing a song, do some calculus and so on.

This is what the output looks like when the demo works:
|
1 2 3 4 5 6 7 8 9 10 11 12 13 14 15 16 17 18 19 20 21 22 23 24 |
google-assistant-demo ON_MUTED_CHANGED: {'is_muted': False} ON_START_FINISHED ON_CONVERSATION_TURN_STARTED ON_END_OF_UTTERANCE ON_RECOGNIZING_SPEECH_FINISHED: {'text': 'what do you want'} ON_RESPONDING_STARTED: {'is_error_response': False} ON_RESPONDING_FINISHED ON_CONVERSATION_TURN_FINISHED: {'with_follow_on_turn': False} ON_CONVERSATION_TURN_STARTED ON_END_OF_UTTERANCE ON_RECOGNIZING_SPEECH_FINISHED: {'text': 'I will be back'} ON_RESPONDING_STARTED: {'is_error_response': False} ON_RESPONDING_FINISHED ON_CONVERSATION_TURN_FINISHED: {'with_follow_on_turn': False} |
Bear in mind that Google Assistant SDK is in preview mode right now, and it’s mainly aimed at developers. First, I understand you can’t do automation tasks, or play music like you can on an actual Google Home. The good news is that you can roll you own implementation, and for example, somebody made his AIY Project Voice Kit work with Google Music, something you should be able to reproduce on other boards. Google Home also includes a microphone array, which will make hot word detection more reliable even in noisy environment. Orange Pi Zero + USB microphone did a decent job though, as I could use it 5 or more meters away.
Next time you boot the board, you can login as pi user, and run the following commands to run the demo:
|
1 2 |
source env/bin/activate google-assistant-demo |
You could also use systemd to automatically start the demo, or your own implementation, and I did so with instructions adapted from Nordic Semi’s Google Assistant Wiki.
First, create /etc/systemd/system/google-assistant-demo.service file with the following content:
|
1 2 3 4 5 6 7 8 9 10 11 12 13 14 15 16 17 18 |
[Unit] Description=google assistant service After=network.target ntpdate.service [Service] Type = idle Environment=VIRTUAL_ENV=/home/pi/env/ Environment=PATH=/home/pi/env/bin:/usr/local/sbin:/usr/local ExecStart=/home/pi/env/bin/google-assistant-demo WorkingDirectory=/home/pi StandardOutput=inherit StandardError=inherit Restart=always User=pi [Install] WantedBy=multi-user.target Alias=google-assistant.service |
I add “Type = idle” as other the app would not run, possibly because it would start after the audio was enable. I did not find any audio specific services handled by systemd, so “type = ilde” will make sure the service starts after other are loaded.
Now we can enable the service, and start it:
|
1 2 |
sudo systemctl enable google-assistant-demo.service sudo systemctl start google-assistant-demo.service |
The demo will run at this point, and it will start automatically each time your boot the board. I played with it for several hours and it seemed stable. Some people have however expressed concered about WiFi on Orange Pi Zero, so if you encountered some instability issues, you may want to switch to Ethernet instead, or use a WiFi USB dongle, or use another Orange Pi or NanoPi board with a time-proven WiFi module.
I’d like to thank Shenzhen Xunlong Software for sending the kit my way. If you are interested, you can purchase it for $12.95 + shipping.

Jean-Luc started CNX Software in 2010 as a part-time endeavor, before quitting his job as a software engineering manager, and starting to write daily news, and reviews full time later in 2011.
Support CNX Software! Donate via cryptocurrencies, become a Patron on Patreon, or purchase goods on Amazon or Aliexpress. We also use affiliate links in articles to earn commissions if you make a purchase after clicking on those links.




Array mics are the defining piece of the smart speaker category since they allow it to work from more than a couple of feet away. Does the Google SDK support multiple mic inputs?
Array mics work by detecting the hot word in the input stream. Once the hot word is located the phase difference between the multiple copies of the hot word is measured (one copy per mic). Then do some math magic and all input that does not have that same phase delay is removed from the input stream. So you could have a TV sitting off at a different angle and the mic array will remove it from the audio input and only focus on the person speaking. With a single mic there is no noise removal.
ESP32 has ability to have 2 mics. With some code it can be turned into a cheap array mic chip. Dedicated array mic chips are about $7.
Does this work on a Orange Pi Lite?
Can i take risk of ordering 32GB Samsung Evo card or do i need to have it smaller?
Following the above instructions this will work on every SBC supported by Armbian.
I’ve the 256mb model doing nothing on the bench, would it be enough? Thanks
@Jon Smirl
Don’t know about multiple mic support.
“OK Google” works even 10 meters away with that setup. Maybe the microphone being outside the box helps too. I think it picks up 95% of my “OK Google” requests.
I did not have a TV playing at the same time, or much of other audio at the same time, as you explain that’s when the noise cancellation helps the most.
@Fossxplorer
All you need is audio input and output, and network connectivity.
With Orange Pi Lite, you’d still need a USB sound card with output for your speaker, and maybe including a microphone too, since I’m not sure the mic on Orange Pi Lite will work, as I had troubles with the one in Orange Pi Zero.
I’m using a 32GB micro SD card in my setup. You can get something smaller if you want too.
I followed the instructions on your previous blog. And modified to give it a response sound. It works great.
The Wifi on the opi zero is my biggest problem. It’s often unreliable, google simply tells me ‘there was a glitch, please try again’. And i didn’t get the expansion board so I’m reserving the usb port for a Samson Go Mic. My only option is ethernet which IMO is not very usable. I may have to look into that expansion board for usb ethernet.
Try to insert “format S16_LE” within mic.slave section in ~/.asoundrc file. This solved “OK Google” recognition problem in my case.
@Squalazzo
Memory usage on mine with the demo running:
It should be no problem with 256MB RAM.
@Kaiyoti
WiFi is pretty stable on mine. I can use it all day.
However, yesterday I lost ssh access at one point, and when pinging the host seems down. But I was still able to use Google Assistant. Very odd problem. A reboot fixed that.
Thank you @aquilegia !
It works perfectly with the built-in microphone now. I’ll update the post accordingly.
Whew, seems like a lot of work though it would be cool if this was available to people who didn’t know coding and Linux well. I’ll just buy the Google home.
@Paul
It’s not that bad. I was just expecting less steps in the Google Cloud console.
@cnxsoft
Wrt Wi-Fi on OPi Zero according to Xunlong PCB rev 1.4 (that’s the one you have) should ‘fix’ Wi-Fi issues. At least they changed something power related (a web search for ‘New OPi Zero – Yet another high temperature issue…’ should be sufficient, in post 3 there are some close-ups of PCB differences). PCB rev 1.4 also has for whatever reasons higher internal temperature readouts — more details also at the end of the aforementioned thread.
The other issue you ran into — no SSH access through Wi-Fi after some time — seems to be related to network manager. At least we had several reports affecting various boards reporting the same and establishing Wi-Fi the old way with wpa_supplicant seems to fix it. Some users reported they would be only locked out from Windows boxes while with Linux they would still be able to SSH in. I was never able to reproduce (all my productive hosts running macOS and I didn’t extensively test). Also issue seemed to be gone with mainline kernel –> Bottom of ‘Orange Pi Lite SSH Problems’ thread in Armbian forum.
@tkaiser
A lot of the issues with the xr819 seem to be broken frames so if they fixed the antenna or power supplies for it that might actually improve it. The driver for the chip is still a bag of poo though. 😉
Also you can install and test alexa through https://github.com/alexa-pi/AlexaPi. This software can trigger following voice command by “alexa” voice (using by pocketsphinx) or GPIO button. Then, it needs delayed voice input, nevertheless having not good recognized result, i guess, partly by worse performance compared to RPi 3.
Of course. But what puzzles me is: people talk since months about OPI Zero PCB rev 1.4 overheating (which is mostly wrong temperature readout and not really overheating… which is a real problem due to throttling jumping in too early based on the temperatures being reported way too high). Xunlong’s explanation that this is due to ‘fixed Wi-Fi’ is also known since at least a month. And literally no one having an OPi Zero 1.4 in his hands is going to test this. It’s so f*cking easy: put your OPi Zero 2 m away from the AP and use ‘iperf3 -s’ on a wired host connected to the same AP/router, use ‘iperf3 -c’ and ‘iperf3 -c -R’ to test TCP/IP bandwidth, done. Takes 5 minutes max but no one spends this amount of time. I already though about ordering another OPi Zero but it feels somewhat stupid trying this on my own since everyone can contribute that easy.
Hmm… I just looked into my archives. With code that makes use of NEON I see RPi 3 being approx. three times faster than an H3/H2+ device running at the same clockspeed with same amount of CPU cores active. When talking about usual integer performance RPi 3 has an advantage of maybe 130%-140% compared to H3/H2+ devices running also at 1.2GHz. Applications that depend on memory bandwidth/latency are more affected since RPi 3 memory is a lot faster compared to H2+/H3 devices with single bank DRAM configuration (especially when using Armbian since we chose by default to use ‘IoT settings’ on those small H3 devices focusing on low consumption and underclock DRAM massively).
Which OS image are you currently using on your Zero? Just asking since still some vendor OS images for H2+/H3 devices use Allwinner’s crappy thermal/throttling settings leading to killed CPU cores once throttling occured the first time. In case you’re not using Armbian better check from time to time with
@tkaiser
Back 3/2016 you debunked claims about RPi3 being faster than OPi PC/+ by 4-6x and said RPi3 can’t even do H265 HW acceleration:
https://forum.armbian.com/index.php?/topic/789-breaking-news-choosing-armbian-speeds-up-your-orange-pi-multiple-times/
Now NEON code has upset the situation?
Can’t NEON also be run on H3, as it is on CHIP with 1080p?
@Athar
NEON is neither related to HW accelerated video decoding nor to shitty Allwinner default thermal/throttling settings (that’s all what the above article in Armbian forum was about).
Why not looking up first what NEON is (a web search for ‘Advanced SIMD (NEON)’ should be sufficient)?
NEON code on ARMv8 platforms (like RPi 3) can run much faster than on older ARM architectures (like ARMv7 on an OPi Zero). Since @aquilegia talked about ‘worse performance’ maybe he already looked into code and has an idea whether these ‘spy on people in their home’ APIs from Google or Alexa make use of NEON or not.
If we’re talking about NEON then ARMv6/ARMv7 CPU cores have a clear disadvantage and moving from an OPi Zero or NanoPi NEO to an ‘OPi Zero Plus 2 H5’ or ‘NanoPi NEO 2′ or NanoPi NEO Plus 2’ (how I hate these stupid names!) could solve performance issues simply by switching from ARMv7 (H2+/H3/BCM2386) to ARMv8 (H5/BCM2387).
@tkaiser
Ok thanks. I was always confused about V7 vs V8 code advantage.
So V8 is far superior, and CHIP A13/R8 is V8?
@Jon Smirl
@Jon Smirl, You said, “Dedicated array mic chips are about $7”.
Can you post a link please? I’ve seen cheap single I2S MEMS mics on a chip before, but never a mic array on a chip, much less one for $7.
Here is a small mic array board with an XMOS commutating multi-core micro-controller capable of doing parallel DSP. But it’s not an array on a chip, and it certainly costs more than $7 (I think it goes for around $80-$100).
https://www.xmos.com/support/boards?product=20258
Another device using the same approach is the $79 ReSpeaker by Seeed Studio.
https://www.seeedstudio.com/ReSpeaker-Mic-Array-Far-field-w%2F-7-PDM-Microphones-p-2719.html
Note, I’ve used the XMOS xCore chips that are used on these array mic boards before, but for other applications. The XMOS chips are nice once you get familiar with programming a commutating parallel processor, but the bad XMOS documentation and user-hostile implementation of their Eclipse-based IDE made working with the XMOS parts painful (in my opinion). BTW, if I remember correctly XMOS is based in the UK.
Thanks & Regards, David
@tkaiser
In my setup (About 3 meters away + thin wall):
@cnxsoft
and Tx direction:
@cnxsoft
Thank you for the numbers. Given that for whatever reason every second wireless frame gets dropped/retransmitted the performance would be on par with the other usual suspects when we’re talking about 1T1R/2.4GHz Wi-Fi once the driver could be fixed (which would require Allwinner providing real documentation which most likely will never happen).
Hi.
when i try to run the demo, i get the following error:
[2375:2391:ERROR:audio_input_processor.cc(755)] Input error
any advice?
thx
@Jens
There must be an error in .asoundrc configuration file. Double check the output of
arecord -lmatches the content of your config file.@Jon Smirl
cheap array mic chip – I’m interested too, Jon can you add more info please?
Hello.
I’m trying to scp my client ID into my Orange Pi Zero, but it returns with ‘No such file or directory’,
even though I’ve downloaded the client_secret_[your_client_id].json file onto my computer.
Any suggestions? Thanks.
@OrangePro
That just means one of the path in the command line is incorrect, either the source file in your host PC, or the destination directory in Orange Pi Zero.
Another possibly is some special characters in your_ client_id in which case you need to escape the file name
^ I mean when I’m trying to run the authorization tool..
@OrangePro
So you’ve already copied the file to Orange Pi Zero successfully, and it’s just not finding the file when you run the command with google-oauthlib-tool? It should just be client_secret_xxxxx.json path/filename is wrong then.
To get the beep back you can change the __main__.py file in /env/lib/python3.5/site-packages/google/assistant/
i added the following lines
Actually it can be anything you want. I have the original beep from my phone.
not working
@cnxsoft
So… this is what I’m typing into PuTTY;
scp client_secret_921851349903-ib5ek21thvcn2fel3fm5rm54j1h7r4ar.apps.googleusercontent.com.json root@10.1.1.6:~
^ client_secret_921851349903-ib5ek21thvcn2fel3fm5rm54j1h7r4ar.apps.googleusercontent.com.json < this is what the downloaded .json file is called, which is in my Downloads folder.
And this is what it results in;
root@10.1.1.6's password:
client_secret_921851349903-ib5ek21thvcn2fel3fm5rm54j1h7r4ar.apps.googleusercontent.com.json: No such file or directory
root@orangepizero:~#
Thanks for any step by step help to this problem.
@Orange
Are you running that command in Orange Pi Zero?
You need to run it in the computer where you downloaded the file. If you are using Windows, then using Windows Susb-system for Linux to type the command, or maybe simpler, WinSCP.
@Jorg Muskens
Thanks useful tip!
@cnxsoft
I finally got the Google Assistant working thanks to your WinSCP suggestion. I really want to be able to use Google Assistant, as soon as the power adapter is plugged into the Orange Pi Zero, while connected to the internet via an ethernet cable.
I followed the last set of instructions, and was able to use Google Assistant without typing source env/bin/activate and google-assistant-demo, while on the client program. I then tested to see whether I could forgo the client program, but got no reply. So I went back on the client program to see whether it still worked without source env/bin/activate and google-assistant-demo, but got no reply.
So, I thought I’d re-type sudo systemctl enable google-assistant-demo.service and sudo systemctl start google-assistant-demo.service on the client program, but it now results in this:
Failed to start google-assistant-demo.service: Unit google-assistant-demo.service is not loaded properly: Invalid argument. See system logs and ‘systemctl status google-assistant-demo.service’ for details.
So, I thought I’d delete the /etc/systemd/system/google-assistant-demo.service file on WinSCP and re-do everything again, before I asked you guys for help, but I’m not able to do this because:
General failure (server should provide error description).
Error code: 4
Error message from server: Failure
Common reasons for the Error code 4 are:
– Renaming a file to a name of already existing file.
– Creating a directory that already exists.
– Moving a remote file to a different filesystem (HDD).
– Uploading a file to a full filesystem (HDD).
– Exceeding a user disk quota.
I also tried removing it via command, but can’t because:
/root$ rm /etc/systemd/system/google-assistant-demo.service
rm: cannot remove ‘/etc/systemd/system/google-assistant-demo.service’: Read-only file system
How do I change access permission to the file, so that I can delete it (chmod 7, chmod 777 doesn’t do anything)?
Thanks for any help.
@Orange
Better only use WinSCP for the transfer of the file from your PC, and use the terminal for everything.
As for you need error it looks like the file system may be mounted read-only due to corruption.
mount command with no option should show the list of mounts with the mount status (ro = read-only, rw = readwrite).
I want to include led like voicekit but I get this error
I use “http://www.instructables.com/id/Orange-Pi-One-Python-GPIO-basic/”
“root@orangepizero:/home/pi# source env/bin/activate
(env) root@orangepizero:/home/pi# google-assistant-demo
Traceback (most recent call last):
File “/home/pi/env/bin/google-assistant-demo”, line 7, in
from google.assistant.__main__ import main
File “/home/pi/env/lib/python3.5/site-packages/google/assistant/__main__.py”, line 22, in
from pyA20.gpio import gpio
ImportError: No module named ‘pyA20’
@abel
You may need to install pyA20 module. Something like
pip install pyA20First, thanks for the detailed instruction! Based on that I was able to install and run google assistant. However I run into a problem: As soon as I plug in my speaker into the AV out there is a constant and loud static noise in one of the two speakers. Changing speakers do not help, and I got the same noise even if I just plug in the headphone. The other speaker has no noise at all and gives the proper sound (in fact the noisy speaker produces no usable audio output).
I tried several power cables and power supply to no avail. I even tried to power the unit with a battery powerbank and I still got the static noise.
Any suggestion on how to fix this, or is this a hardware problem? Or maybe it is mono only? I’m afraid that it would cost more to return my unit then to get a new one 🙁
@saon

I’ve just tried again myself, and I can confirm I have audio on both speakers.
One reason could be the type of plugs you use. This is the one i use:
@cnxsoft
Thanks. Newbie question: What’s the difference between the plug you used vs the ones in a (standard?) 3.5mm headphone jack?
@saon
That one is standard too, but the number of “rings” may differ between different plugs.
If you have pushed it all the way, try to pull it out a little and see what happens. Maybe play music through the speaker, and adjust the plug position step by step to check if both speakers output audio.
@cnxsoft
Thanks for your suggestion. Turns out the circle board was not sitting properly inside the case — not by much, but just enough that the AV jack could not be inserted all the way. Following your suggestion, I resembled the whole thing and it now works. THANKS!
Another unrelated question: I’d like to put the OP speaker in my office where I have access to wifi but not the router. How would I enter the wifi connection’s name and password?
@SaOn
Several solutions to your last point:
1. Connect a USB to TLL debug to access the serial console in your location
2. Connect the board to a TV via the AV port
3. Setup an access point with armbian-config, then use your phone or PC in your office to connect to the board, and connect to your router
4. Manually edit to configuration files before moving to office (not sure where that is yet)
Excellent work. Fortunately, I didn’t face the mic issue and is working fine for me from a maximum distance of 5 feet. Beyond that it does not work. Thanks for sharing the detailed instructions. Next for me is:
1. Connect orange pi to a bluetooth speaker
2. Connect to WIFI using /etc/network/interfaces and /etc/wpa_supplicant/wpa_supplicant.conf. This is something, I am still not able to achieve. I get error when I try to do this. Finally, I used armbian-config as mentioned in your tutorials.
ERROR: run-parts: /etc/network/if-pre-up.d/wpasupplicant exited with return code 1
Following is what I am doing =================OrangePi Zero and Armbian Ubuntu
Open Wifi Configuration file
1. sudo nano /etc/network/interfaces
#Paste the following lines
auto lo
iface lo inet loopback
auto eth0
allow-hotplug eth0
iface eth0 inet dhcp
allow-hotplug wlan0
iface wlan0 inet manual
wpa-roam /etc/wpa_supplicant/wpa_supplicant.conf
iface default inet dhcp
#Open WIFI Config File
2. sudo nano /etc/wpa_supplicant/wpa_supplicant.conf
# Copy and paste the following and set your SSID and PASSWORD
network={
ssid=”Your_Wifi_SSID”
psk=”Your_wifi_password”
}
#Turn Wifi ON
3. sudo ifup wlan0
#Update Time Zone
4. sudo dpkg-reconfigure tzdata
Regards…
Hello, thank you very much for the tutorial, I worked at the first shot!
I am now wondering, is there any way to change the lang (to another one supported by Google Home/Google Assistant app)? I have searched a bit, without success 🙁
@Flo
When I ask it whether I can speak other languages, it just says something similar to “I’m learning”.
However, it might be possible to set the language as mentioned @ https://stackoverflow.com/questions/44192475/does-google-assistant-sdk-support-for-other-languages?answertab=active#tab-top
It tells me the same thing when I ask…
I noticed that, but this seems to be only for custom actions, switching languages might be implemented in next releases (I hope so)… I also searched for a way to change regional settings (units, date formats) without more success.
Thanks for your reply!
@Flo
I could not change the imperial system to metric, but could change °F to °C. Just tell it to use Celsius after asking for the weather for example.
Hi there and thank you for this tutorial.
Unfortunately, I am stuck.
At “source env/bin/activate” it tells me “Permission denied” with sudo prefix it tells me “command not found”.
If i run this command as root, instead of the pi user, it works, but then again, in the next step “python -m pip install –upgrade google-assistant-library” it gives me this error: “no module named pip”.
Do you have any advice for me, how to make this work? Thank you kindly.
@Fleder
You’d need to check the content of “env/bin/activate” script to find out why permission may be denied, and change the permissions.
@cnxsoft
Thank you for your reply. But I do not know how to check the content of it? nano? Or how to change the permissions. Is it the CHMOD Command?
Thank you for your time.
@Fleder
Yes and yes. If you can not find a clue of the permission issue with error message and checking the content of the script, you may want to run it with strace: https://www.cnx-software.com/2012/07/06/quick-binary-debugging-on-linux-with-strace-system-call-tracer/
Did anybody try to use google assistant on Orange PI android?
if i paste the code in the terminal will it automatically create a .asoundrc file? and do i need to install winscp to copy the file in orange pi zero or just pasting the code above will work?
@Hanzala
You’d need to use a tool to create a file. You may want to use “nano” in the command line:
Then copy/paste the code, press “Ctrl” and x keys, and select yes to save.
Good luck.
@cnxsoft
if i use a analog mic where should i put it in?
@cnxsoft
i am not able to get the expansion board. but i have a female mic socket. so where should i connect its pins on the pi?
@Hanzala
You’d need to study the schematics to get where the built-in microphone is connected on the Orange Pi Zero, then remove it, and somehow connect your female mic socket there.
Can I do something like “Ok Google, turn on/off the LED”?
What file to edit?
@gungsukma
The real Google Home can be used with IFTTT. But the Google Assistant SDK not. You’d have to dig into the source code and your device API to enable this.
@cnxsoft
can i use a sound card for speaker and microphone?
@Hanzala
Yes using a USB sound card will be easier.
will the respeaker code work with an external usb mic?
I’ve followed this twice now on two Orange Pi Zero’s and I am really pleased to say it works perfectly – I am using the built in mic and added a non-powered speaker. All good. There have been, I think, slight changes in the way Google shows the web pages when you are configuring the API, but not too tricky to work out!
However, one of my two Orange Pi Zero’s runs very hot when running this – so hot in fact that the case is barely touchable. It doesn’t seem to affect responsiveness of the “Ok Google” prompt but I am reluctant to leave it plugged in less it melts. The other one, gets warm but not overly.
What could be wrong – the two were bought about 6 months apart, and it is the newer one that gets roasting hot. It can’t be a configuration thing can it? The only difference is their proximity to the WiFi router – the cool one is only a few feet away, the hot one is one floor and several walls away. Could that have a bearing? I can see the far away one does time out on PING every now and then.
Bill.
@Bungalow Bill
Most probably on the hot OPi Zero you can read ‘Rev 1.4’ while the colder one is an older PCB revision? Even if that’s not a software/settings issue there’s more than one thread discussing these temperature problems in Armbian forum so that would be the first place to look…
everything works fine but when i try to install google assistant library using the code above it shows lots of erros in red colour and the library does not downloads.is it because of my internet connection or something else?plz help
@Hanzala
Without seeing the error messages it’s hard to say. If it’s not too long show them in comments, otherwise paste them into pastebin, and share the link.
ok thats solved but i am not able to copy the client secret file.how to do it?
@Hanzala
Please read other comments about scp/winscp.
(env) pi@orangepizero:~$ google-assistant-demo
usage: google-assistant-demo [-h] [–credentials OAUTH2_CREDENTIALS_FILE]
google-assistant-demo: error: argument –credentials: No such file or directory: “/home/pi/.config/google-oauthlib-tool/credentials.json”
i am getting this error.what do i do????plz help
@Hanzala
Probably because of the steps before that failed.
@cnxsoft
so do i have to install new copy of armbian and start from start?
@Hanzala
You can try to re-run the commands about Google OAuth..
Hi @cnxsoft
I’m trying to do this project on a Orange Pi PC, google assistant recognizes my voice pretty good but apparently there is a problem with my speakers, I keep getting ‘ ALSA lib pcm.c:7963:(snd_pcm_recover) underrun occurred ‘
Any idea how to solve this?
@TomSp
For that one you’d need to use a search engine. I can see many people have this issue.
(env) pi@orangepizeroplus2:~$ python -m pip install –upgrade google-assistant-library
Collecting google-assistant-library
Could not find a version that satisfies the requirement google-assistant-library (from versions: )
No matching distribution found for google-assistant-library
(env) pi@orangepizeroplus2:
I am getting above error. Not able to install google-assistant-library
I am using orange pi zero plus 2 H5 with following config
Welcome to ARMBIAN 5.27.170614 nightly Ubuntu 16.04.2 LTS 4.11.1-sun50iw2
@Sam
For some reasons the package is missing. You need to find out why.
Hello to all, i hope you are doing well.
Great tutorial, good job 😉
I lunch my assistant and work perfectly fine on cubieboard A10 a.k.a (1) with Armbian_5.31_Cubieboard_Debian_jessie_next_4.11.6 🙂
Now i want when i say “OK Google” or “Hey Google” some indication whether she hears, led or sound … something that let me know she is ready for me 😀
Try this :
”
August 17th, 2017 at 06:11 | #33
Reply | Quote
To get the beep back you can change the __main__.py file in /env/lib/python3.5/site-packages/google/assistant/
i added the following lines
import os
if event.type == EventType.ON_CONVERSATION_TURN_STARTED:
os.system(‘/usr/bin/aplay google_now_voice.wav &’)
print()
Actually it can be anything you want. I have the original beep from my phone.
”
But everything burn down to hell ;s
How i can accomplish that ?
@Alexander
You need to copy the wav file into your board, but use the full path in the Python code to avoid any problem, and the line that call aplay it the right location in the file.
The Google Assistant SDK can be used with IFTTT, too
(https://developers.google.com/assistant/sdk/develop/python/next-steps#device-control)
but I guess I can just use the text transcript by adding something on /env/lib/python3.5/site-packages/google/assistant/__main__.py
”
Get the transcript of the user request
The Google Assistant SDK gives you a text transcript of the user request. Use this to provide feedback to the user by rendering the text to a display, or even for something more creative such as performing some local actions on the device.
The transcript is located in a Python string object in the ON_RECOGNIZING_SPEECH_FINISHED event.
”
(https://developers.google.com/assistant/sdk/develop/python/next-steps#custom-interaction)
”
ON_RECOGNIZING_SPEECH_FINISHED = 5
The Assistant has determined the final recognized speech.
Args:
text(str): The final text interpretation of a user’s query.
”
(https://developers.google.com/assistant/sdk/reference/library/python/#google.assistant.library.event.EventType.ON_RECOGNIZING_SPEECH_FINISHED)
jarvis@orangepizero:~$ sudo systemctl enable google-assistant-demo.service
Failed to execute operation: No such file or directory
jarvis@orangepizero:~$ sudo systemctl start google-assistant-demo.service
Failed to start google-assistant-demo.service: Unit google-assistant-demo.service not found.
i am getting this error
@Hanzala
The error message says it all. The file does not exist. You probably saved it in the wrong location, or it failed to save due to permission issues.
@cnxsoft
Hi cnxsoft,
Can you please explain in details. I cannot make the sound feedback working.
Where and how can I call aplay. What is the “right location” ? And how can I know the full path of a file ?
Thank you !
@Yuyu
Sorry, I can’t, as I’ve not looked into it in details.
You need to learn about “Linux command line” and “Python programming basics”, and then you’ll be equipped to solve those very common issues.
Hi cnxsoft,
Thanks for your fast reply.
My problem was having the assistant running automatically from reboot. When I disabled this option and ran the assistant manually, the .wav worked.
By the way, do you have any idea how to automatically run google assistant at each reboot, but still being able to open wav files ?
@Yuyu
Full path is something like /home/pi/sound/ga.wav
If it does not work, check the permissions.
Thanks for your post!
But what about built-in microphone? Can anybody use it with built-in microphone?
What is the content of .asoundrc in this way?
@Yuriy Karpovv
Please read the review again. Both internal microphone or USB microphone cases are covered.
i cant really get the client_secret to work, i always get an error message, it was posted a couple of times in the comments already but i cant figure it out. I downloaded the file and what do i do now? (ive downloaded winSCP aswell but dont know where to put the file). It would be nice if you guys helped me out a bit.
Thanks!
Google Assistant can use either male or female voice now.
installed latest armbian 5.35 xenial on orange pi zero, i was going to setup this, but something seems missing… i’ve the addon board, with mic and 3.5 jack output
root@orangepizero:~# arecord -l
arecord: device_list:268: no soundcards found…
root@orangepizero:~# lspci
pcilib: Cannot open /proc/bus/pci
lspci: Cannot find any working access method.
root@orangepizero:~# alsamixer
cannot open mixer: No such file or directory
@mrshark
If ‘latest Armbian’ involves also mainline/4.13 kernel then you need to look here: docs.armbian.com/Hardware_Allwinner_overlays/
worked great on my orangepi useing Armbian_5.35_Orangepizero_Ubuntu_xenial_default_3.4.113 .just followed your guide and bingo .. cheers
Great tutorial, thank you!
Almost at the end I’m running into a problem though: when issuing google-assistant demo I get this
“the following arguments are required: –device-model-id”
I have tried to find out how to specify this but in doing so I encounter another problem: the command google-assistant-devicetool gives me “command not found” and that is the one, if I get understand it correctly, I should use to set device model.
I don’t see device model anywhere in your tutorial so I’m a bit mystified – what am I missing?
Answers, suggestions, ideas are all very welcome 🙂
regards,
Dag
@Dag Hovden
Google released a new version of the Assistant SDK on December 20th, so maybe that’s why. I have not looked into details yet.
I understand you may now need to register your device with googlesamples-assistant-devicetool: https://developers.google.com/assistant/sdk/reference/device-registration/device-tool
@Jorg Muskens Where abouts in the script would this be added?
@Dag Hovden
Add it to the end of the start command, i.e:
From what I can ascertain, it doesn’t matter what you call it.
thank for this, but now:
(env) fran@pihome:~$ google-assistant-demo –device_model_id=”Orange_Pi_Lite_Smart_Speaker”
Segmentation fault
yes, segmentation fault…..
@cnxsoft
Hello a newbie question
I intent to make and use this for home automation(control a few sonoff or something similar) can I use google home app with this? what happens if I cut the power? Will I have to SSH into it and start it again or is just plug and play?
@Akki
The app will automatically start at boot time, so no need to SSH to it to restart the app after a power failure.
The previous SDK did not work with Google Home app, but it might be different with the December release which I have not tried yet.
Hi, I’m having a problem. Where does Run the authorization tool (google-oauthlib-tool –client-secrets ~ / client_secret_xxxx.) Client secret_xxx be clien id on both sites? I hope someone resolves a greeting if you also know a vido tutorial please send it.
That command needs to be run inside your Orange Pi board.
nothing happened after
sudo systemctl enable google-assistant-demo.service
sudo systemctl start google-assistant-demo.service
If you’ve gotten so far, that means google-assistant-demo is working, and you can use it when starting it manually.
So your problem is likely an issue with your systemctl config file. There should be some error messages shown.
Thank you for your quick response.It does not show any error messages. As per your tutorial Google assistant demo will start after
sudo systemctl enable google-assistant-demo.service
sudo systemctl start google-assistant-demo.service
But in my case it did not start.
Should I have to add –device_model_id =”xxxx” at anywhere in the code?
As I had writeen
Google-assistant-demo –device_model_id =”xxxx”
When I am starting it manually.
Thanks.
when I disconnect the putty, the device does not respond. Also unable to automatically start the google assistant. Any help please.
You’d need to change that line in google-assistant-demo.service:
to add your device_module_id to the command line.
The following line may work:
If it does not, it’s probably because ExecStart does not access parameters. in that case create a script with the working command, and append it to ExecStart.
I’ve not tried to make Orange Pi Zero work with the latest Google Assistant SDK yet. If you manage to make it work, I’d appreciate your report what you did differently, so I can update the post for others.
Thanks for your reply.
I had changed that line in google-assistant-demo.service:
ExecStart=/home/pi/env/bin/google-assistant-demo
to add my device_module_id to the command line.
The following line:
ExecStart=/home/pi/env/bin/google-assistant-demo –device_model_id =”xxxx”
But it does not work, can u guide me to create a script with the working command, and append it to ExecStart.
Thanks a lot
OK. Let’s try to do it that way. Create a script named assistant-start.sh in /home/pi/env/bin with:
Make sure it is executable with
and test it from the command line.
If it works runs fine, add replace the ExecStart line in google-assistant-demo.service with:
and see how it goes.
not working
Try to check systemctl log. I can’t remember exactly how to do that, but there’s plenty of info on the web.
I can run assistant-start.sh from command line, and it worked. But did not work after reboot.
systemctl log
**********************
pi@orangepizero:~$ sudo systemctl start google-assistant-demo.service
pi@orangepizero:~$ systemctl –no-pager -l status start google-assistant-demo
● start.service
Loaded: not-found (Reason: No such file or directory)
Active: inactive (dead)
● google-assistant-demo.service – google assistant service
Loaded: loaded (/etc/systemd/system/google-assistant-demo.service; enabled; vendor preset: enabled)
Active: inactive (dead) (Result: exit-code) since Fri 2018-05-25 18:27:30 IST; 1min 1s ago
Process: 2359 ExecStart=/home/pi/env/bin/assistant-start.sh (code=exited, status=203/EXEC)
Main PID: 2359 (code=exited, status=203/EXEC)
pi@orangepizero:~$
BINGO! Now it’s working….
assistant-start.sh will be
the “#” and “-” were missing
Thanks a lot for your support.
Good to know you got it working, and thanks for reporting the fix.
now I want to play music from google play music in this device. How to do this?
ANY IDEA TO PLAY MUSIC FROM IT.
PLS GUIDE.
i can’t make a feedback sound like ‘ding’ on google assistant sdk. Can you help me?
hello, i have a small probem when i launch google assistant demo :
Traceback (most recent call last):
File “/home/fran/env/bin/google-assistant-demo”, line 10, in
sys.exit(main())
File “/home/fran/env/lib/python3.5/site-packages/google/assistant/library/__main__.py”, line 119, in main
raise Exception(‘Missing –device-model-id option’)
Exception: Missing –device-model-id option
But, all is fine…. wtf ?
Google changed their API a bit it seems. This comment may help: https://www.cnx-software.com/2017/07/30/how-to-setup-an-orange-pi-zero-diy-smart-speaker-with-google-assistant-sdk/#comment-551151