
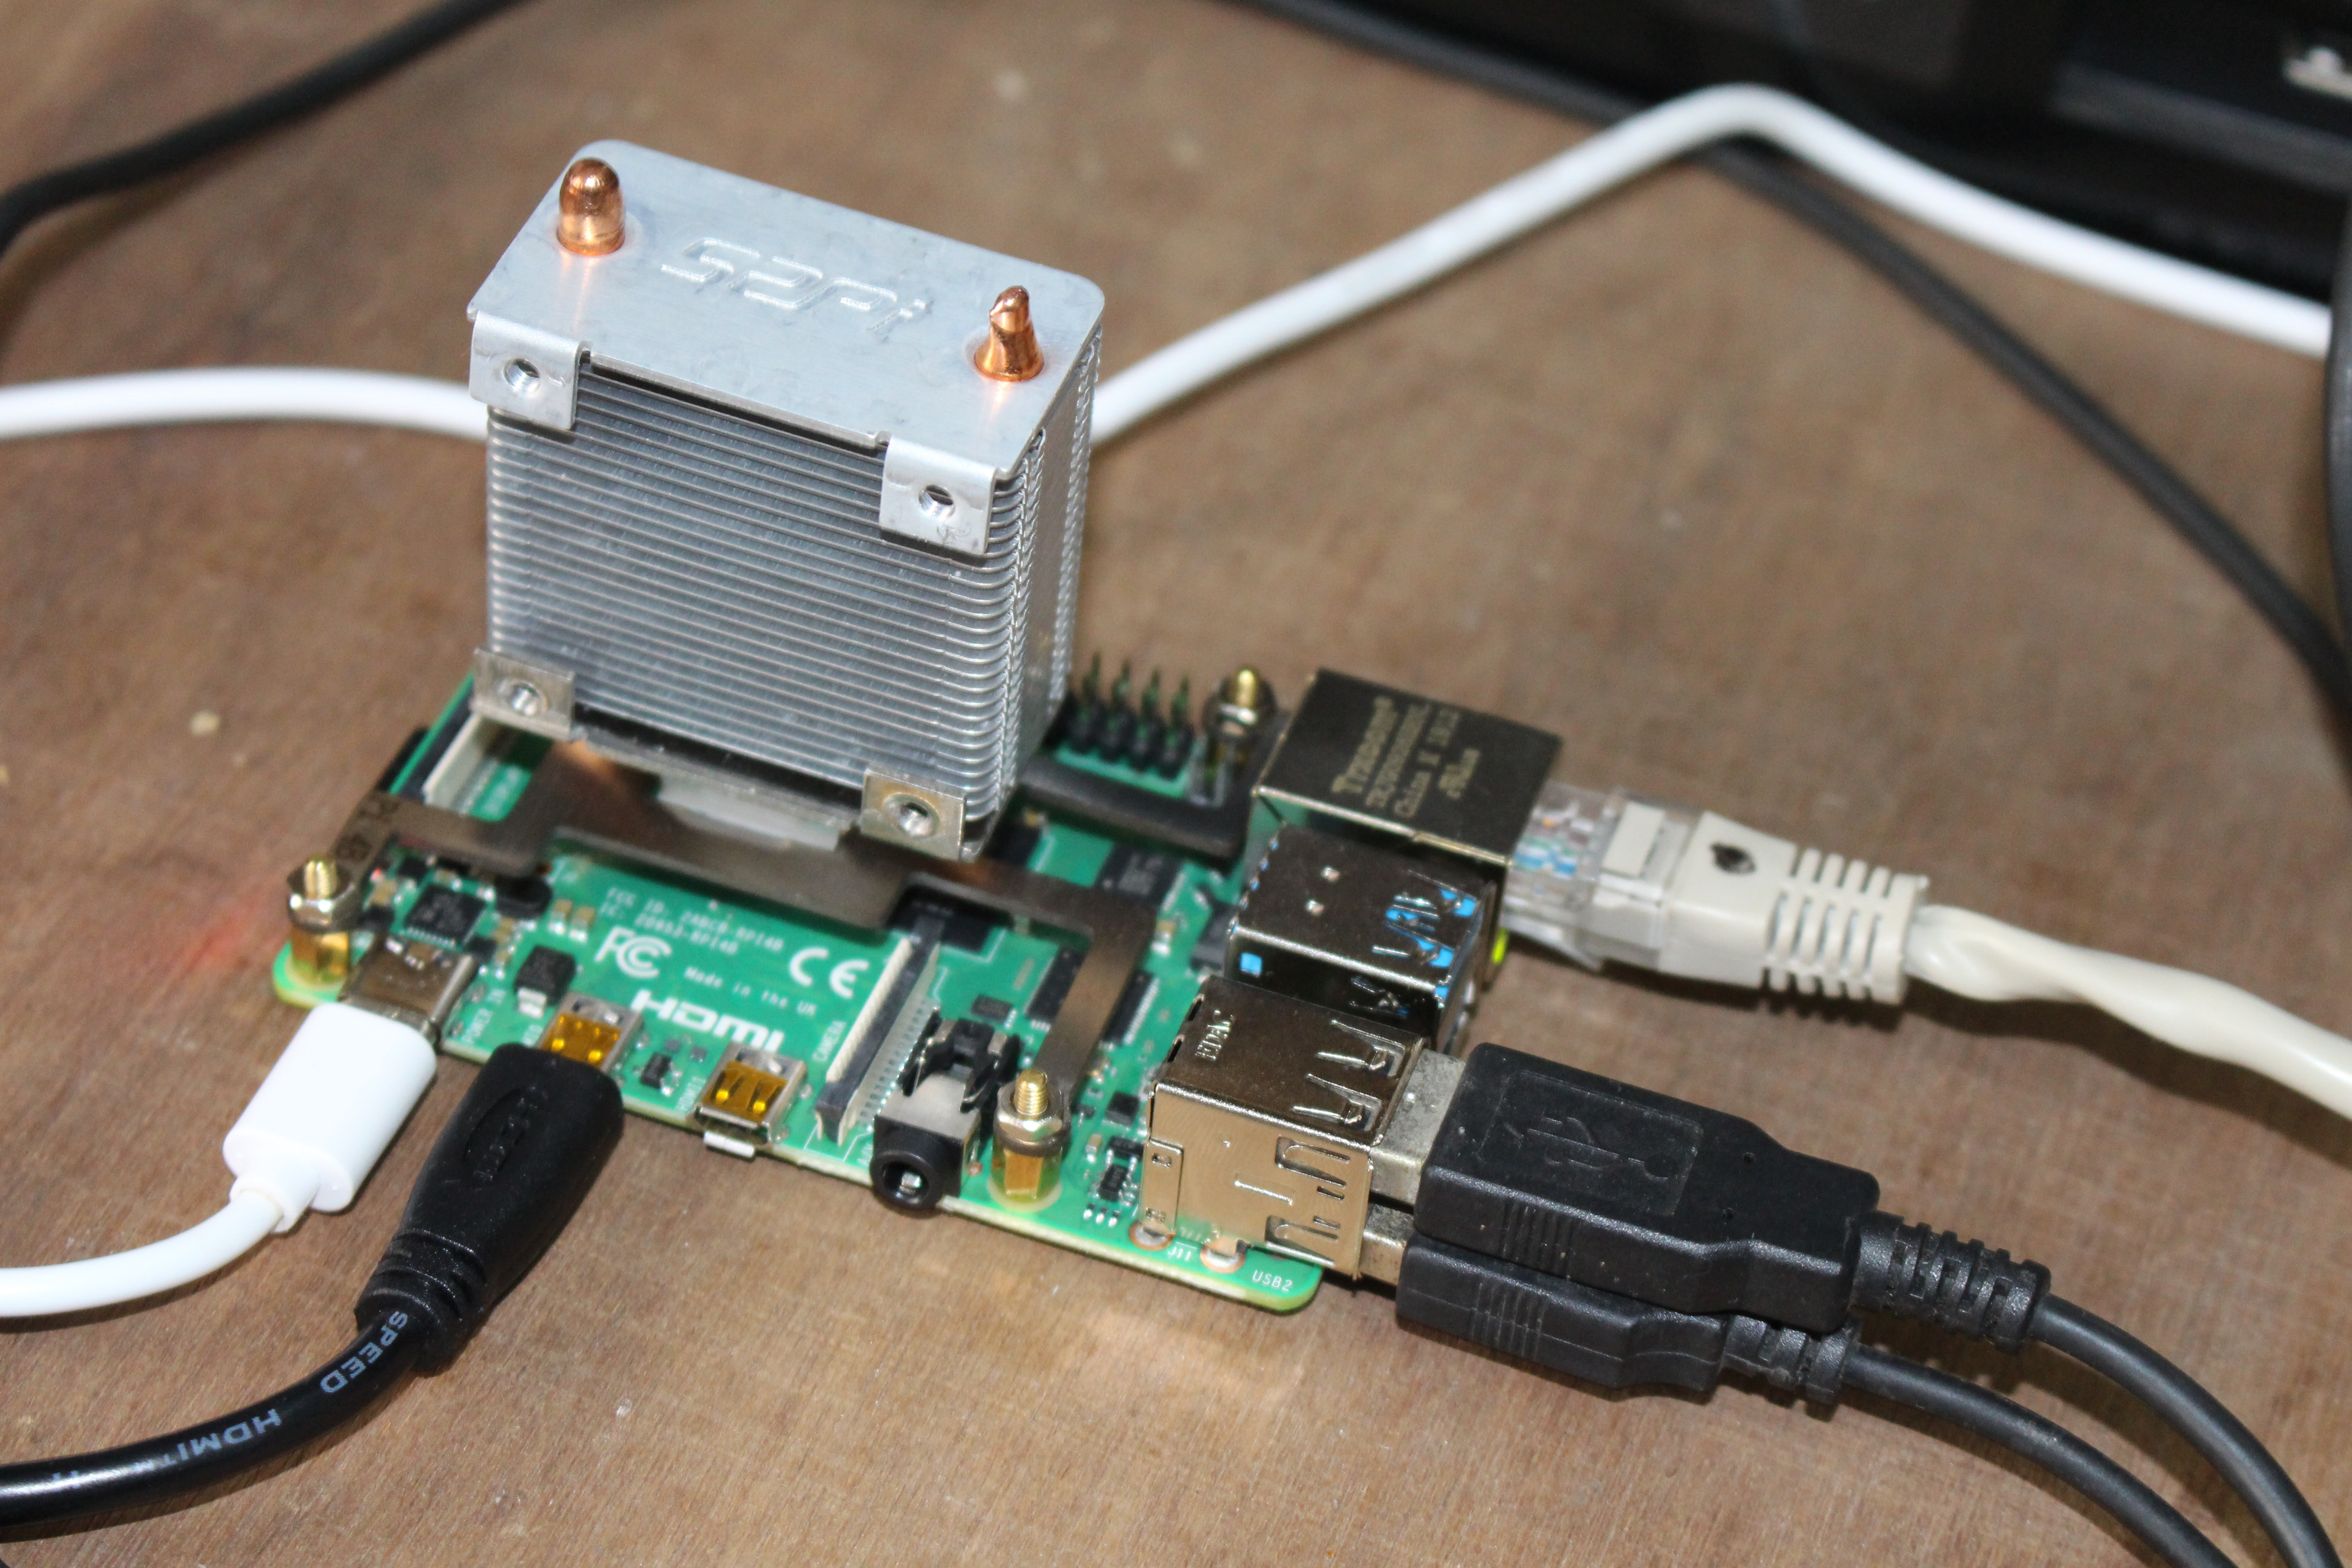
Most of us know the Raspberry Pi 4 can get pretty hot, and a heatsink is required if you intend to get the maximum performance out of your board under heavy loads and/or high ambient room temperature.
Some even designed a large fansink for Raspberry Pi 4 to prevent the board from throttling. It’s actually a bit over the top, but Seeed Studio sent me a sample of their “ICE Tower CPU cooling fan”, so I’ve had the chance to test it.
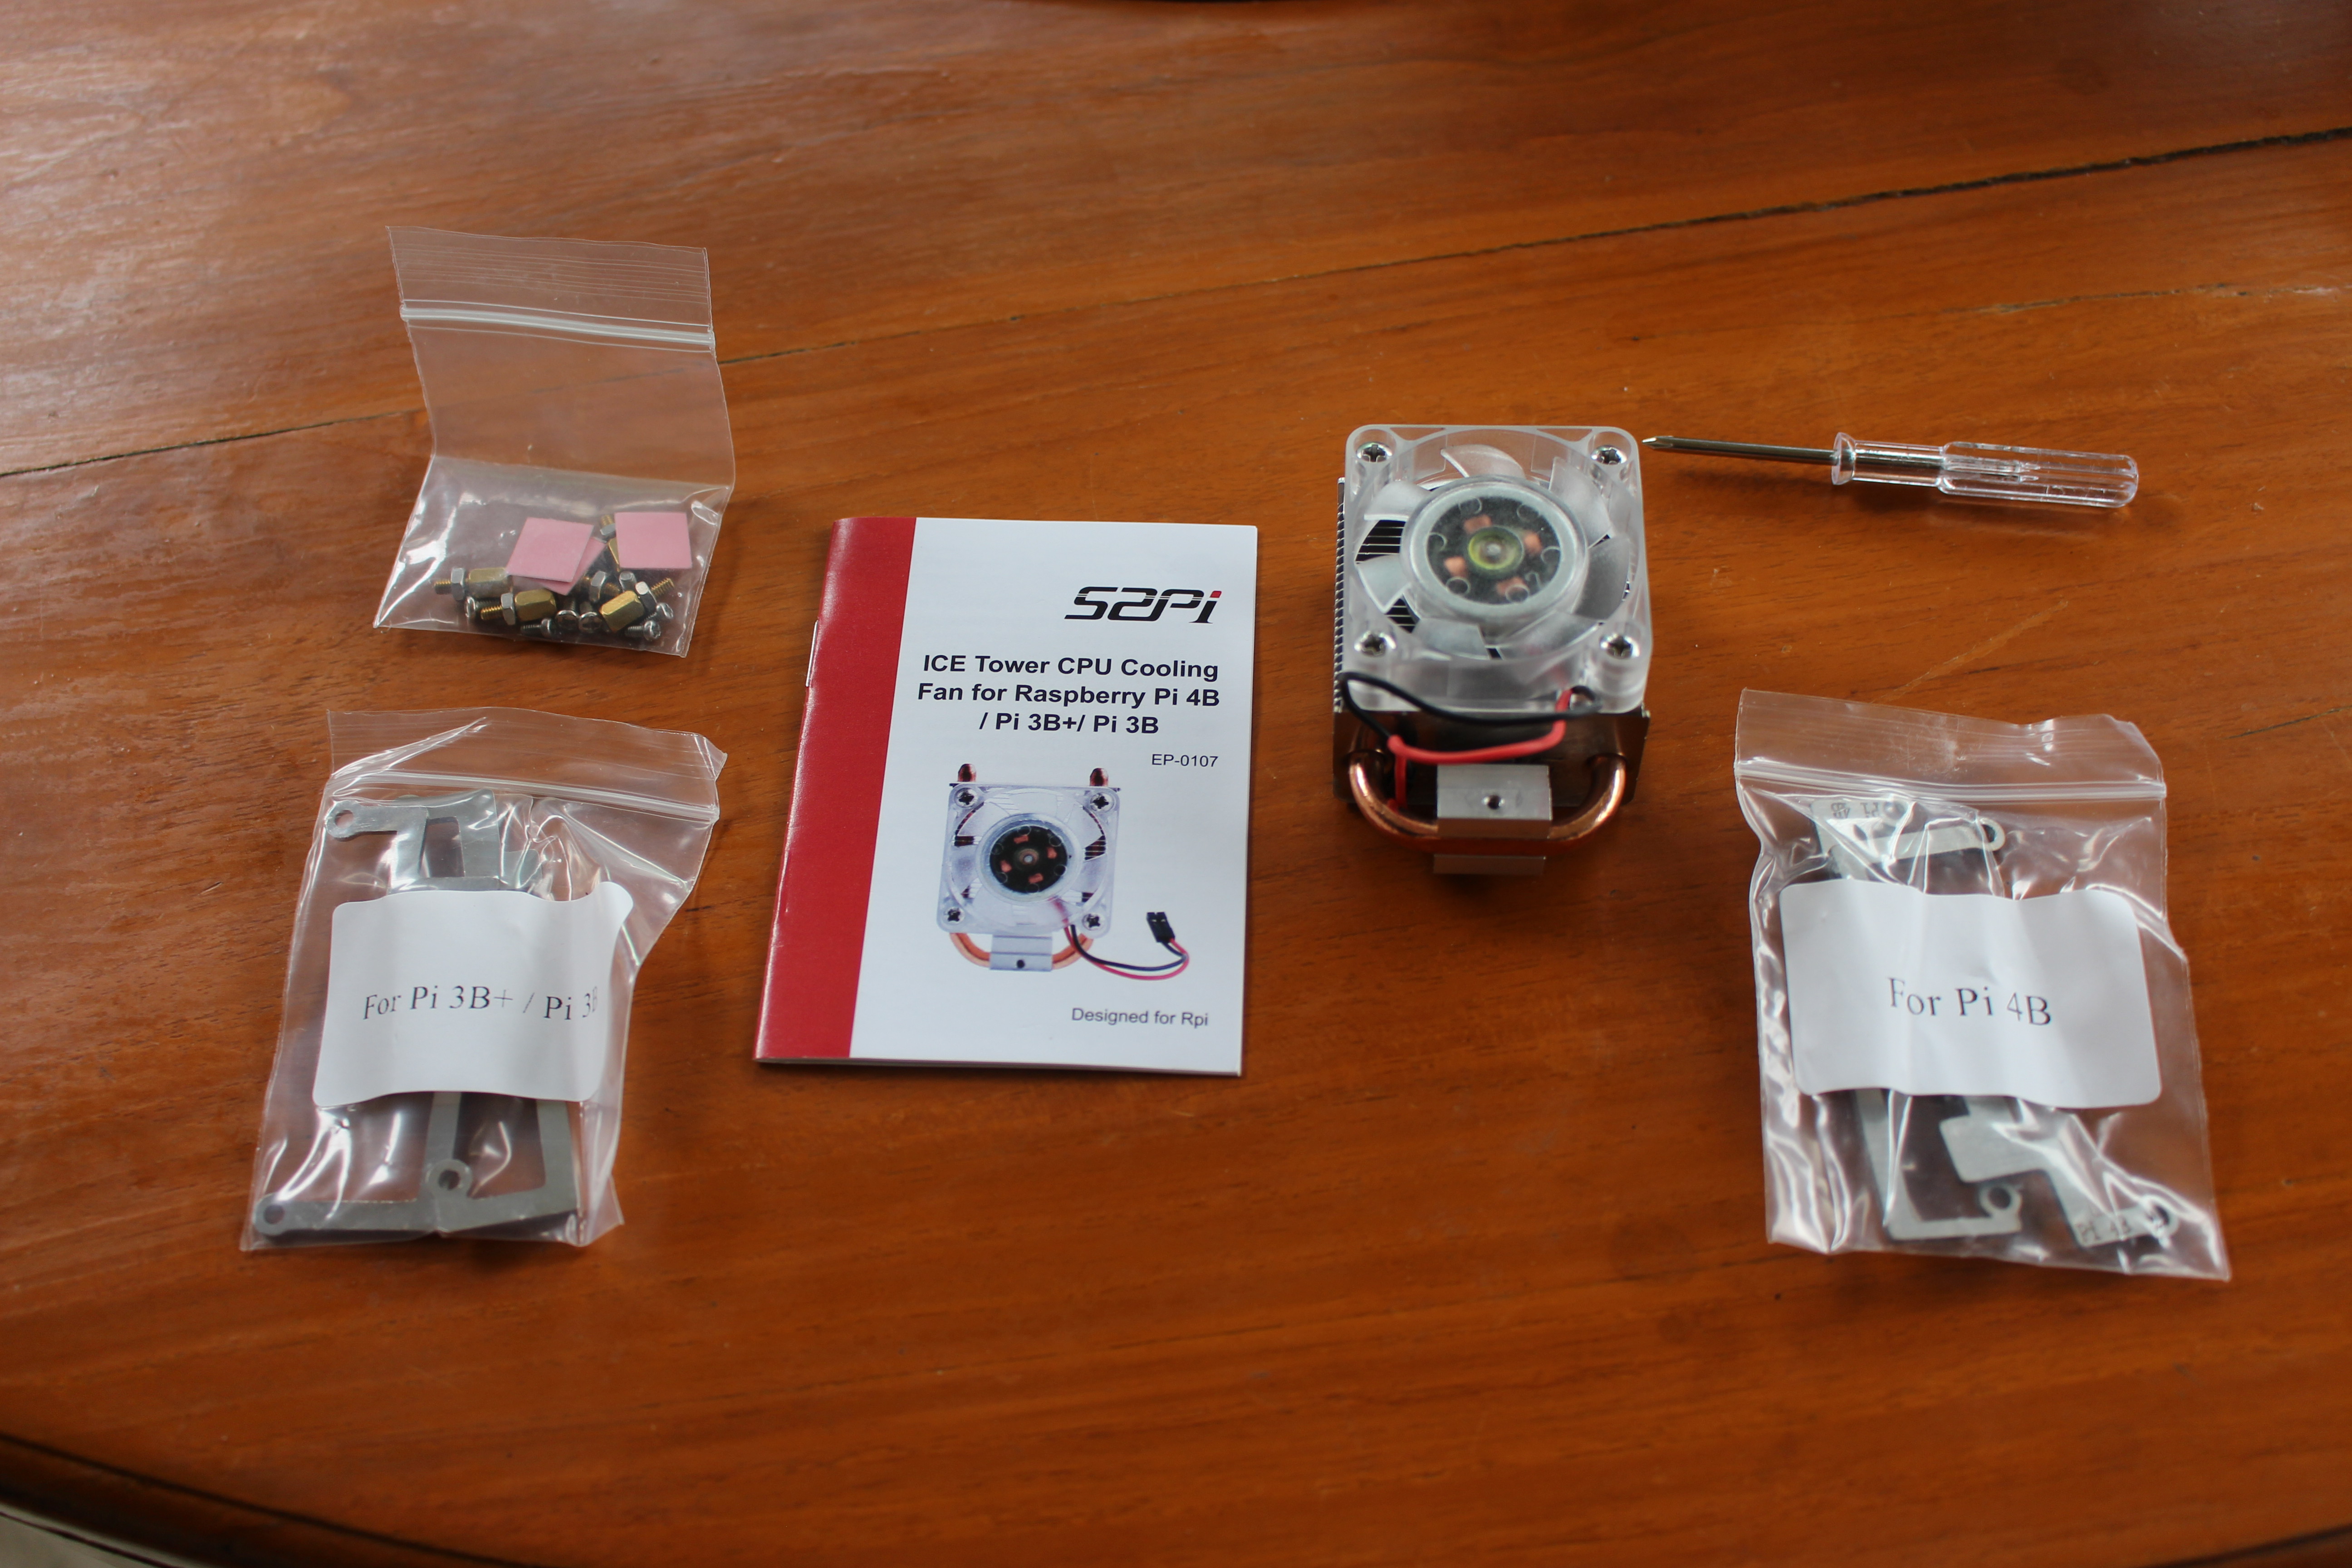
ICE Tower Cooling Fan Unboxing & Assembly with Raspberry Pi 4
The package tells us it’s made by 52Pi and design specifically for Raspberry Pi 4B/3B+/3B SBC’s. It’s probably not that useful for the last two.
 The package contains the heatsink with fan attached, screw sets, a screwdrivers, mounting brackets for Raspberry Pi 3/3B+ and RPi 4, as well as a useful user manual.
Raspberry Pi 3 and 4 are almost the same mechanically, so I wonder what may be the differences between the two backets.
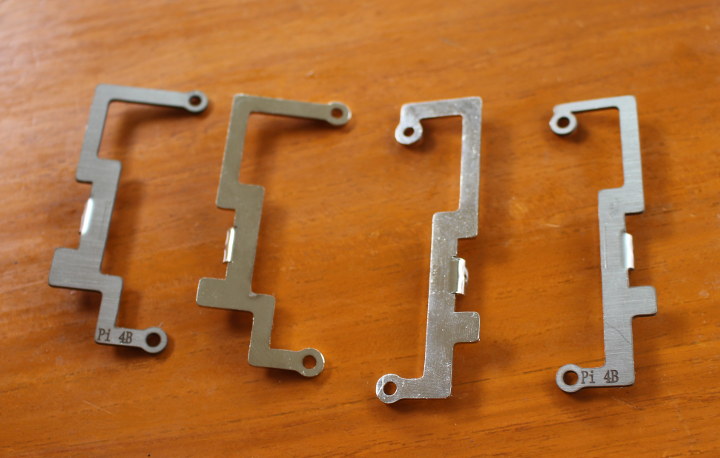
There are just some small differences in terms of thickness due to different positions of headers on the new board.
.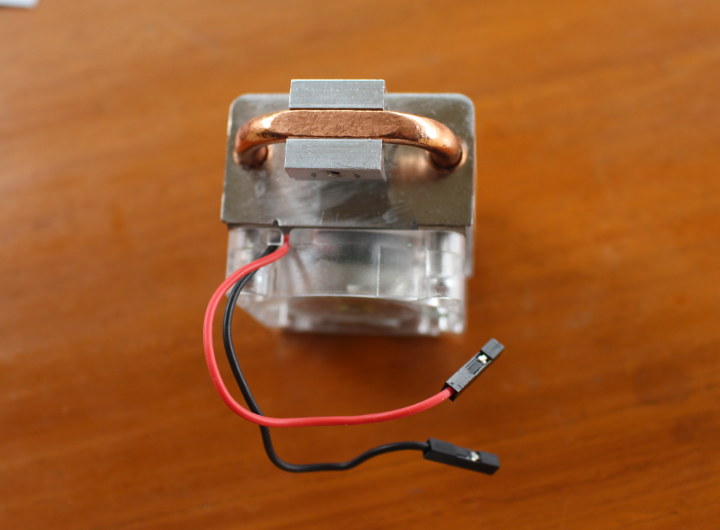
We’ll have plenty of photos of the sides and top of the heatsink latter on, but here’s a shot that shows the side that will be in contact with the processor through a thermal pad.

Let’s start the assembly. We’ll be asked to place the thermal pad on top of the processor (after having peel the protective films), and install the first bracket with an M2 screw as shown above.
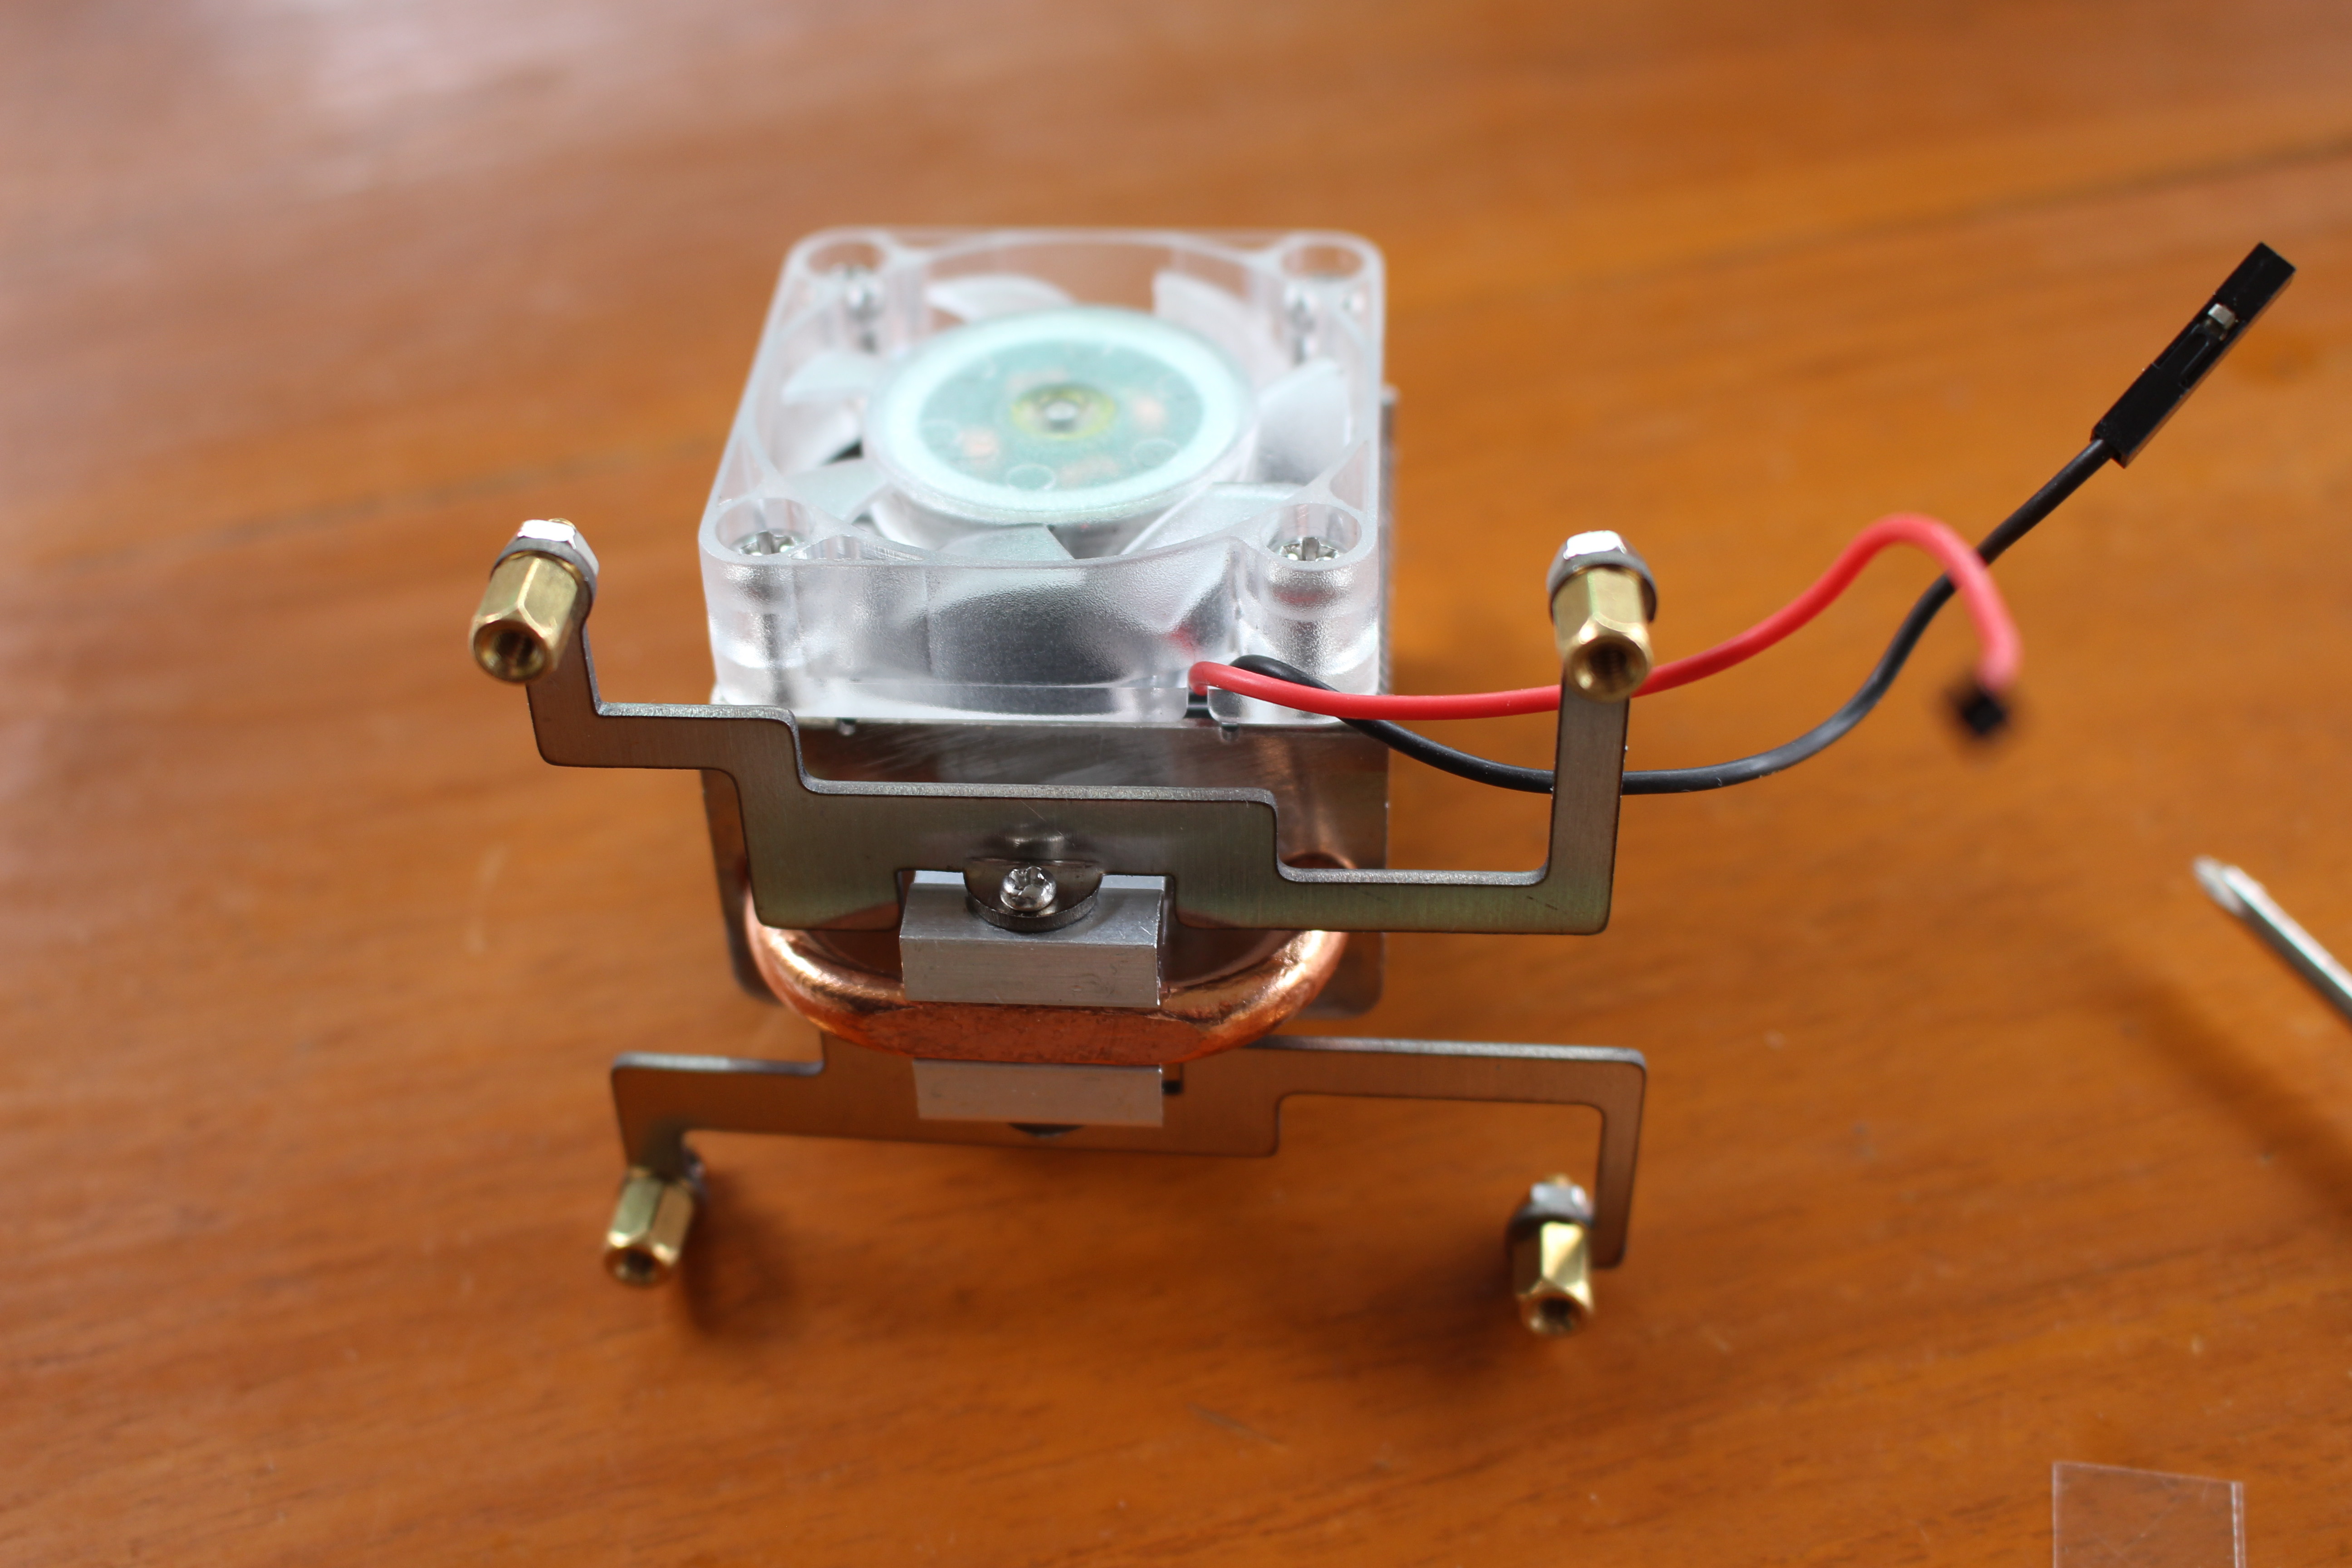
We can then install the second bracket, as well as the four spacers secured with nuts.
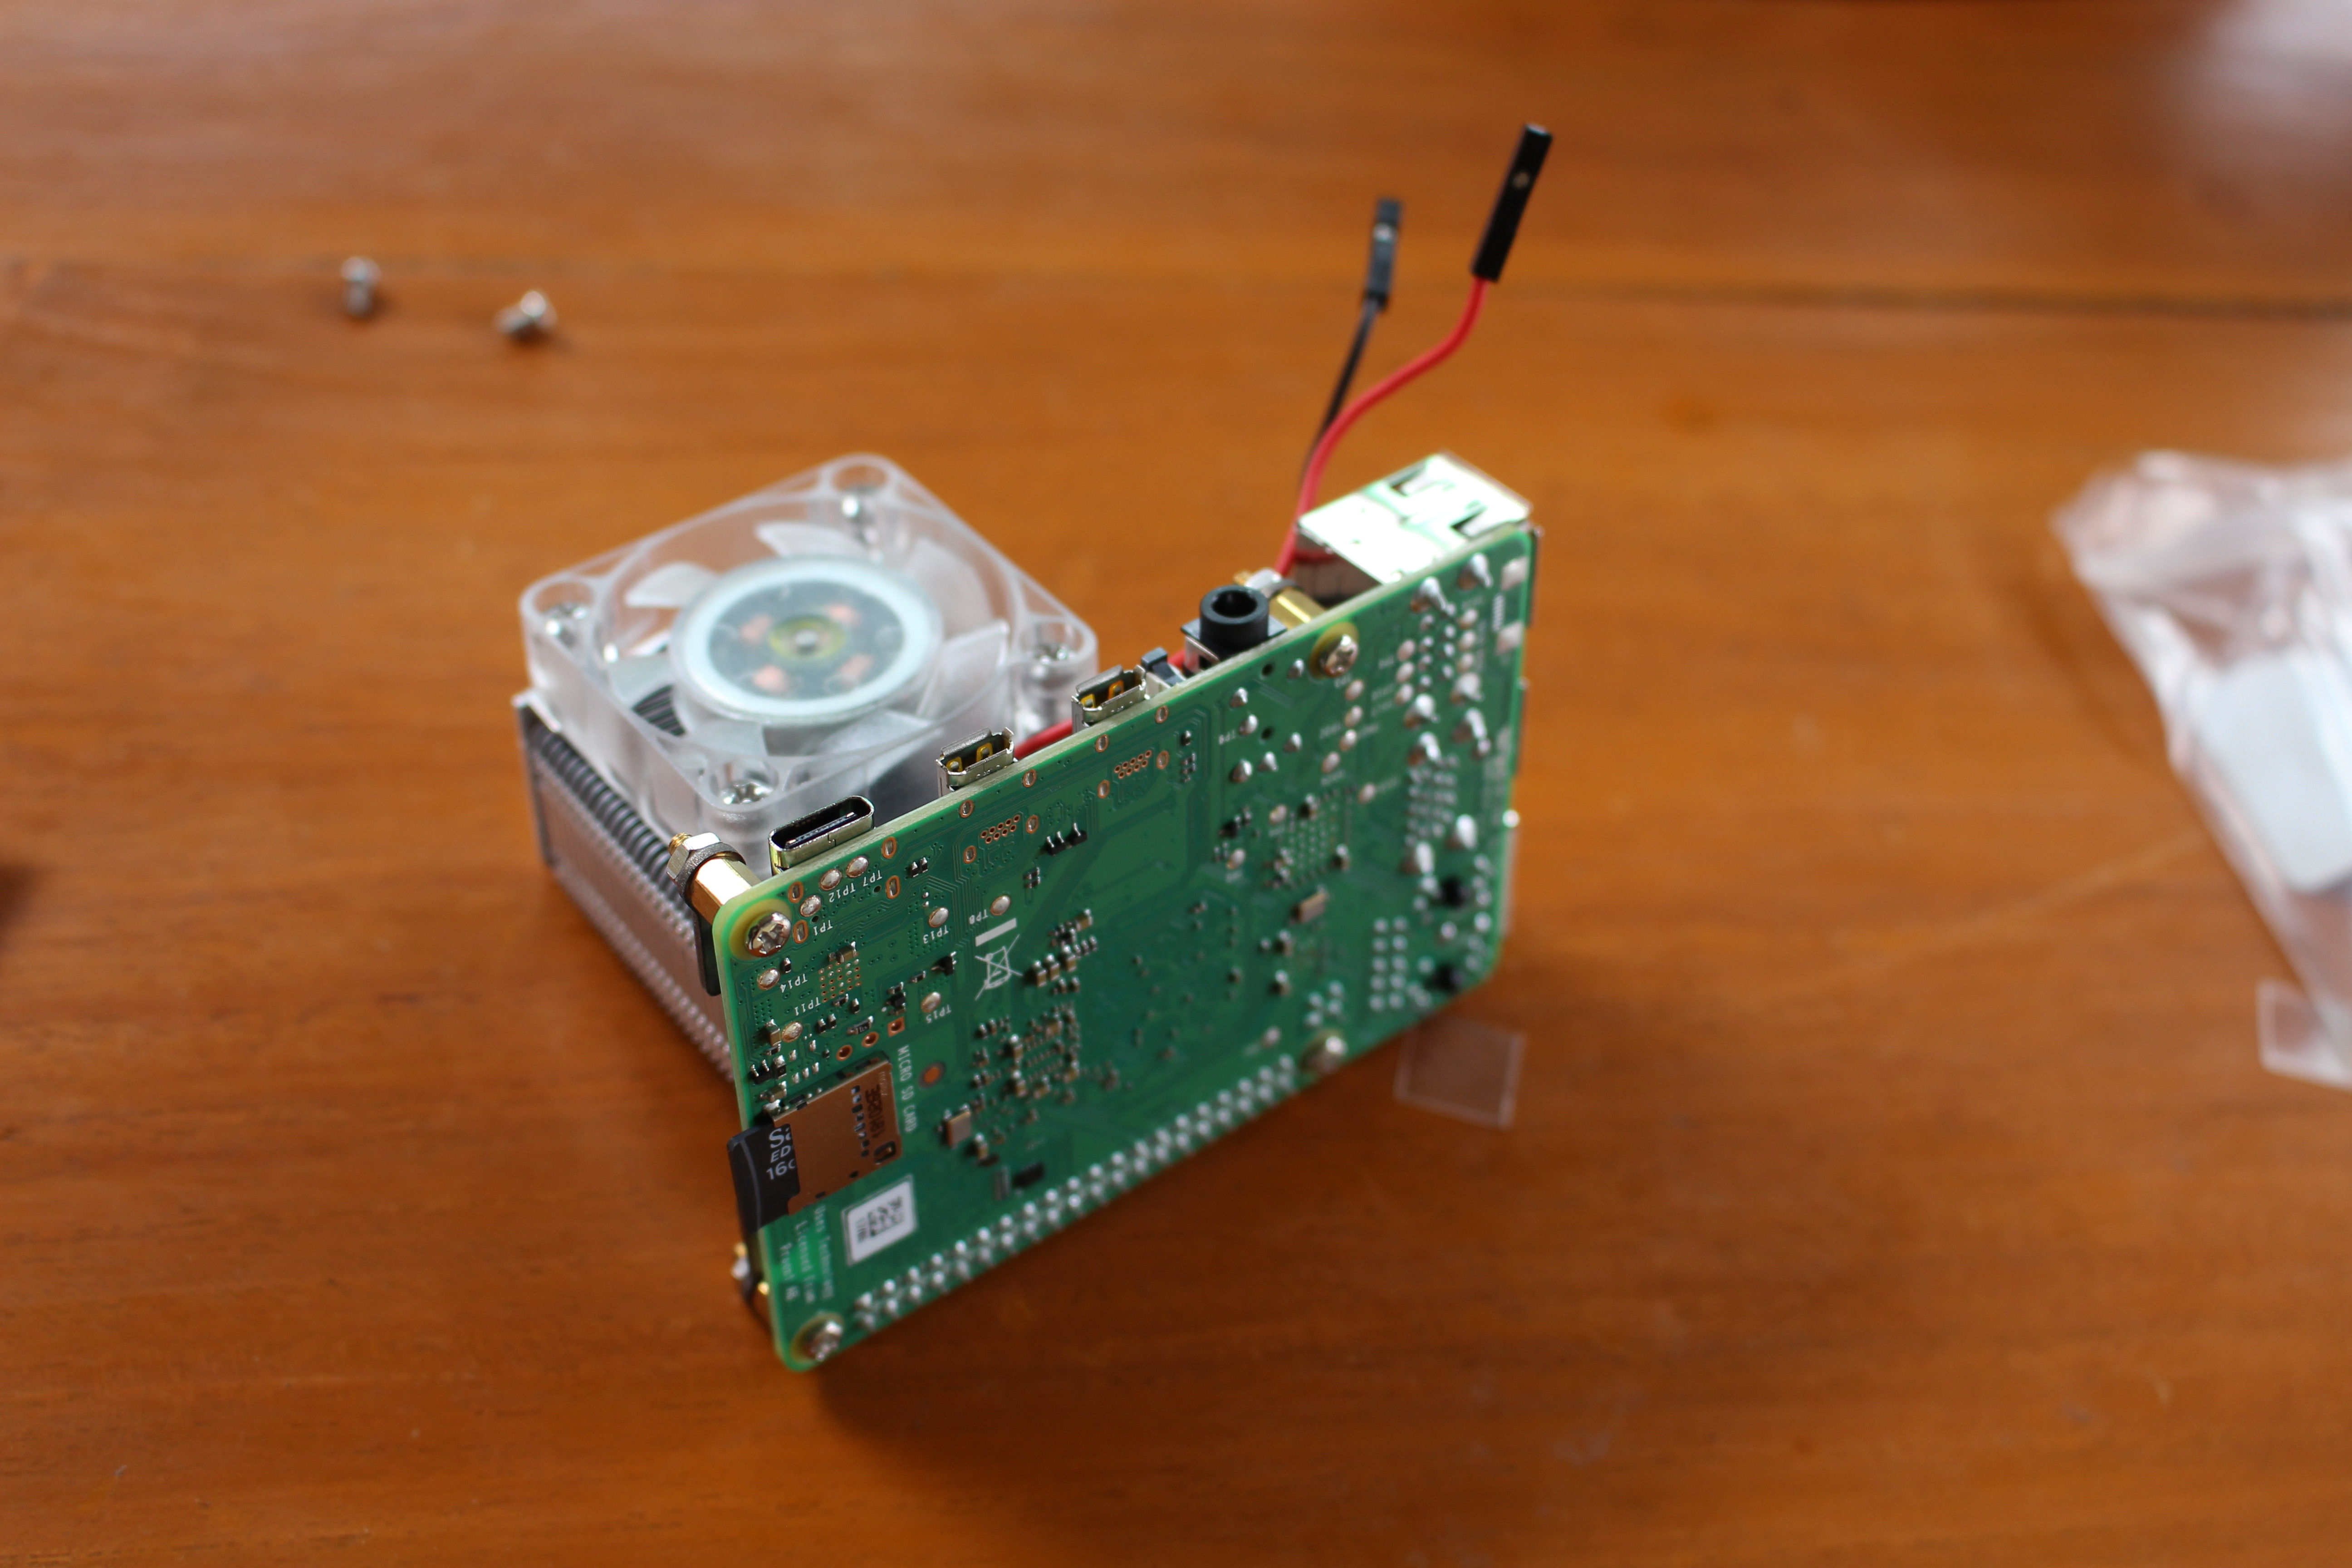
The next step is to place the ICE tower CPU cooling fan on the board with the fan facing the micro HDMI ports, and tighten everything with M2.5 screws. Note that you may have two M2 screws left over, so if if somehow you find out you can’t tighten the heatsink… have a second look in the zip bag looking for M2.5 screws.
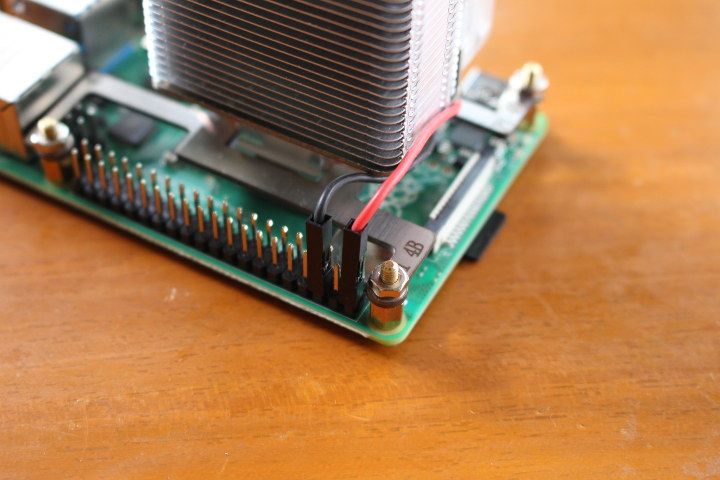 The final step is to connect the fan to the 5V and GND pins on Raspberry Pi header, and we’re good to go.
Temperature Tests
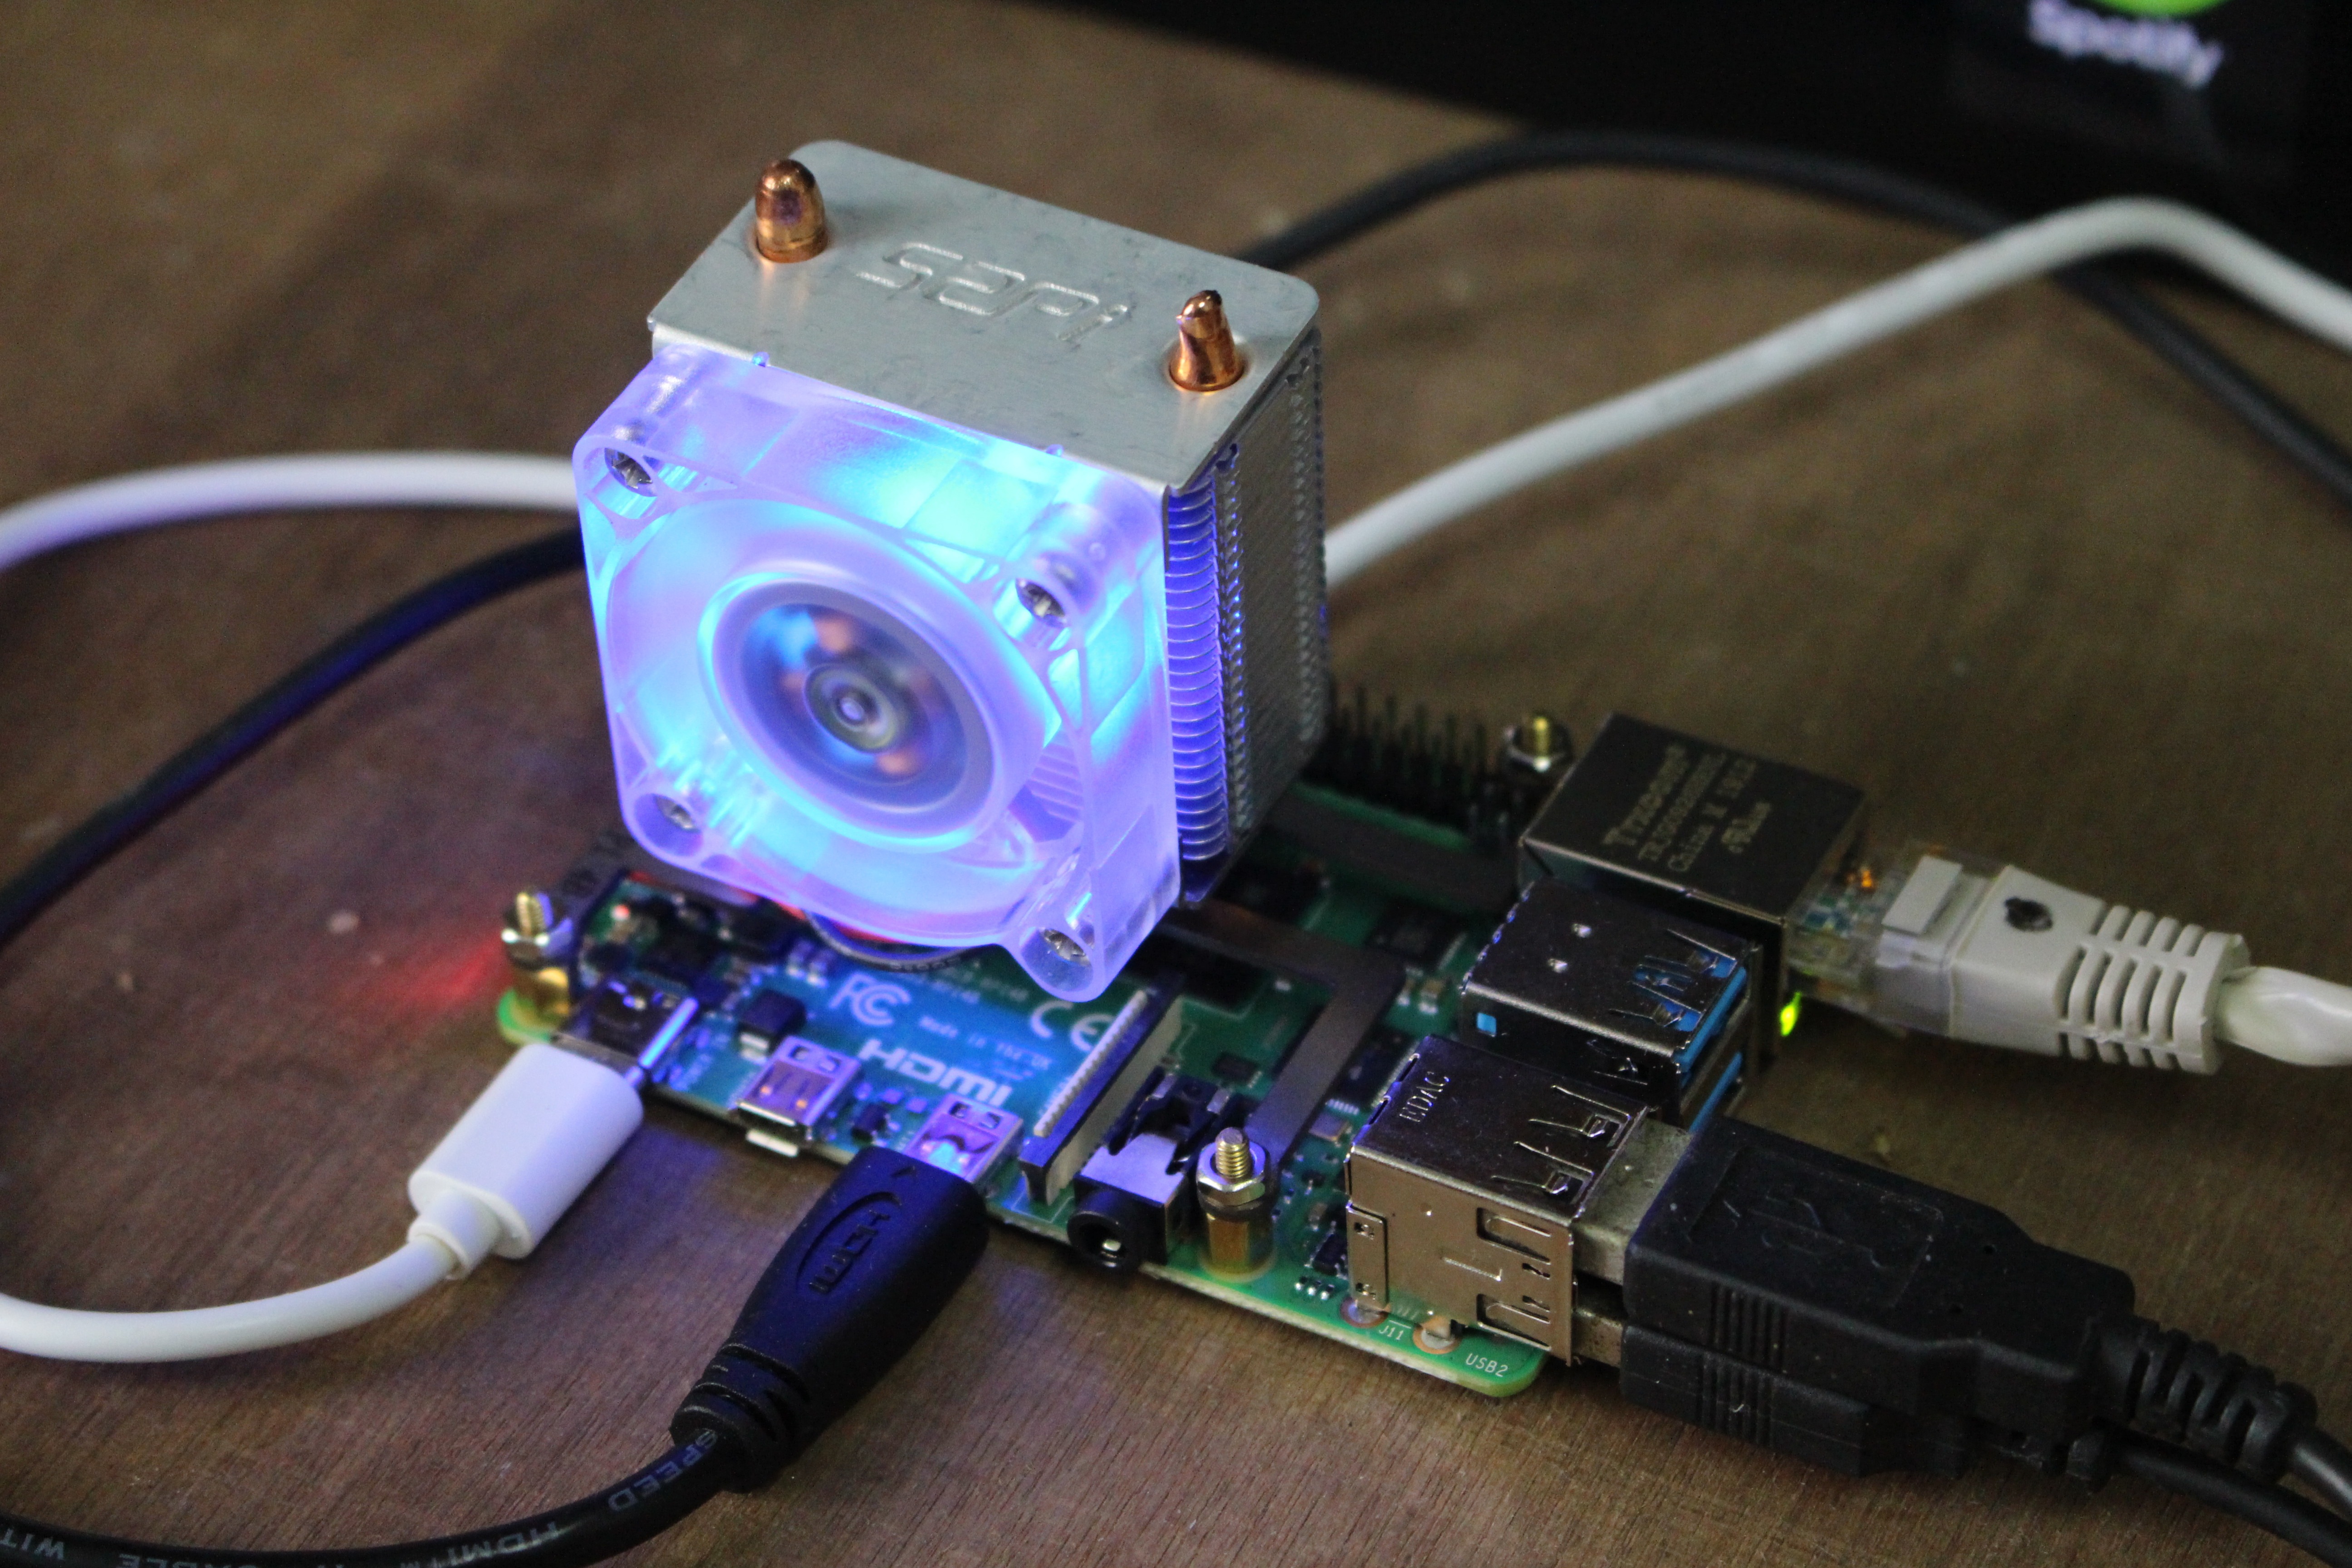
Time to connect the power, and oh…. pretty blue LEDs are included in the fan 🙂
You may remember I installed a new VLI firmware (PCIe USB controller firmware) that lowers temperature of the board, but sadly messes up with USB performance and stability, so I revert to the old firmware before the tests. I also enabled ZRAM on the board to avoid using swap.
Heatsink and Fan
I’ve run SBC Bench benchmark as I did previously.
|
1 2 3 4 5 6 7 8 9 10 11 12 13 14 15 16 17 18 19 20 21 22 23 24 25 26 27 28 29 30 31 32 33 34 35 36 37 38 39 40 |
sudo /bin/bash ./sbc-bench.sh -c WARNING: this tool is meant to run only on Debian Stretch or Ubuntu Bionic. When running on other distros results are partially meaningless or can't be collected. Press [ctrl]-[c] to stop or [enter] to continue. Average load is 0.1 or higher (way too much background activity). Waiting... sbc-bench v0.6.7 Installing needed tools. This may take some time... Done. Checking cpufreq OPP... Done. Executing tinymembench. This will take a long time... Done. Executing OpenSSL benchmark. This will take 3 minutes... Done. Executing 7-zip benchmark. This will take a long time..../sbc-bench.sh: line 600: 4899 Killed taskset -c 0 "${SevenZip}" b -mmt 1 >> ${TempLog} ./sbc-bench.sh: line 600: 5166 Killed "${SevenZip}" b >> ${TempLog} ./sbc-bench.sh: line 600: 5328 Killed "${SevenZip}" b >> ${TempLog} ./sbc-bench.sh: line 600: 5467 Killed "${SevenZip}" b >> ${TempLog} Done. Checking cpufreq OPP... Done. It seems neither throttling nor frequency capping has occured. Memory performance: memcpy: 2432.8 MB/s memset: 3676.2 MB/s (0.5%) 7-zip total scores (3 consecutive runs): OpenSSL results: type 16 bytes 64 bytes 256 bytes 1024 bytes 8192 bytes 16384 bytes aes-128-cbc 55707.06k 73550.23k 82137.43k 84408.32k 85240.49k 85289.64k aes-128-cbc 62474.97k 76502.66k 83107.93k 84614.14k 85144.92k 85284.18k aes-192-cbc 56188.73k 67307.50k 72079.96k 73335.81k 73572.35k 73684.31k aes-192-cbc 56289.17k 67400.87k 71970.90k 73364.14k 73708.89k 73657.00k aes-256-cbc 51019.48k 60064.62k 63479.98k 64658.77k 64929.79k 64913.41k aes-256-cbc 45727.39k 58163.75k 63111.68k 64359.77k 64921.60k 64902.49k Full results uploaded to http://ix.io/1Po0. Please check the log for anomalies (e.g. swapping or throttling happenend) and otherwise share this URL. |
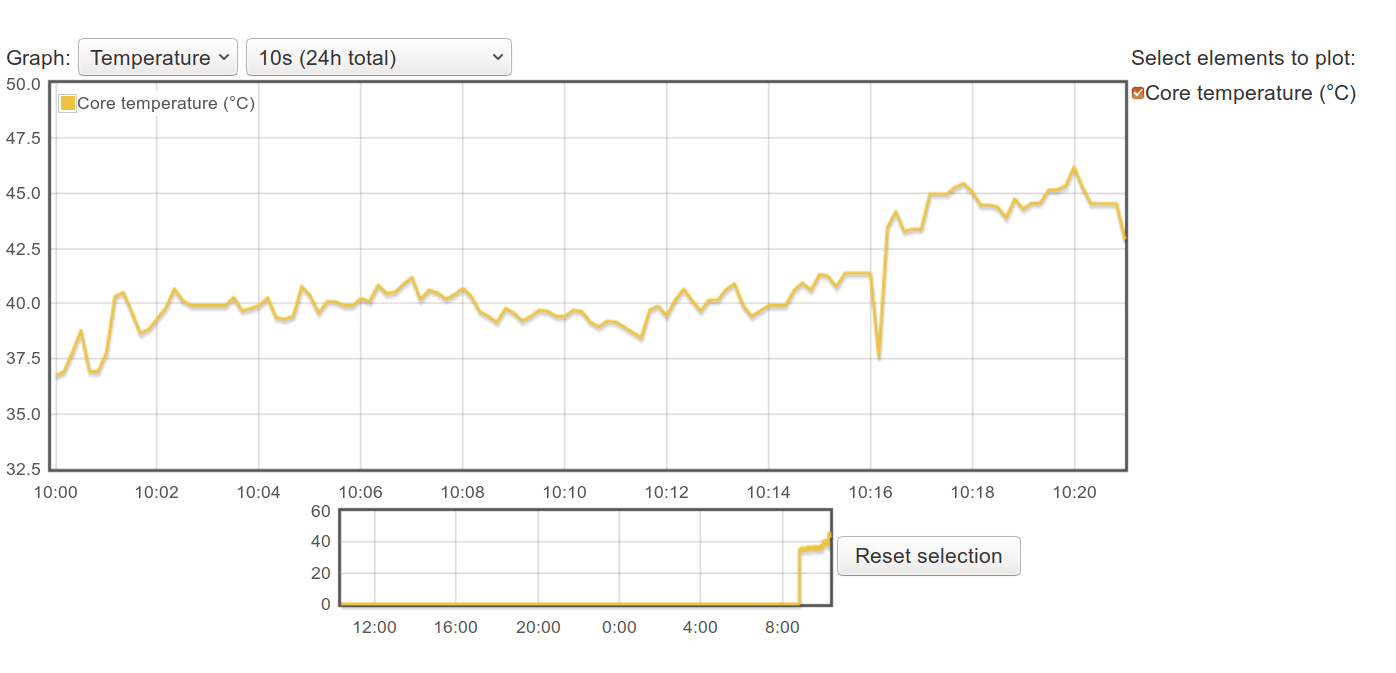
7-zip ran out of memory during testing, but we still get our data. With the heatsink the Raspberry Pi 4 will idle at around 37°C, and tops at 46.2°C when all four cores are used (7-zip multi-threaded compression/decompression). Note: room temperature was 27-28°C
Compare this to running the same benchmark without any heatsink at all, although at 28°C room temperature.
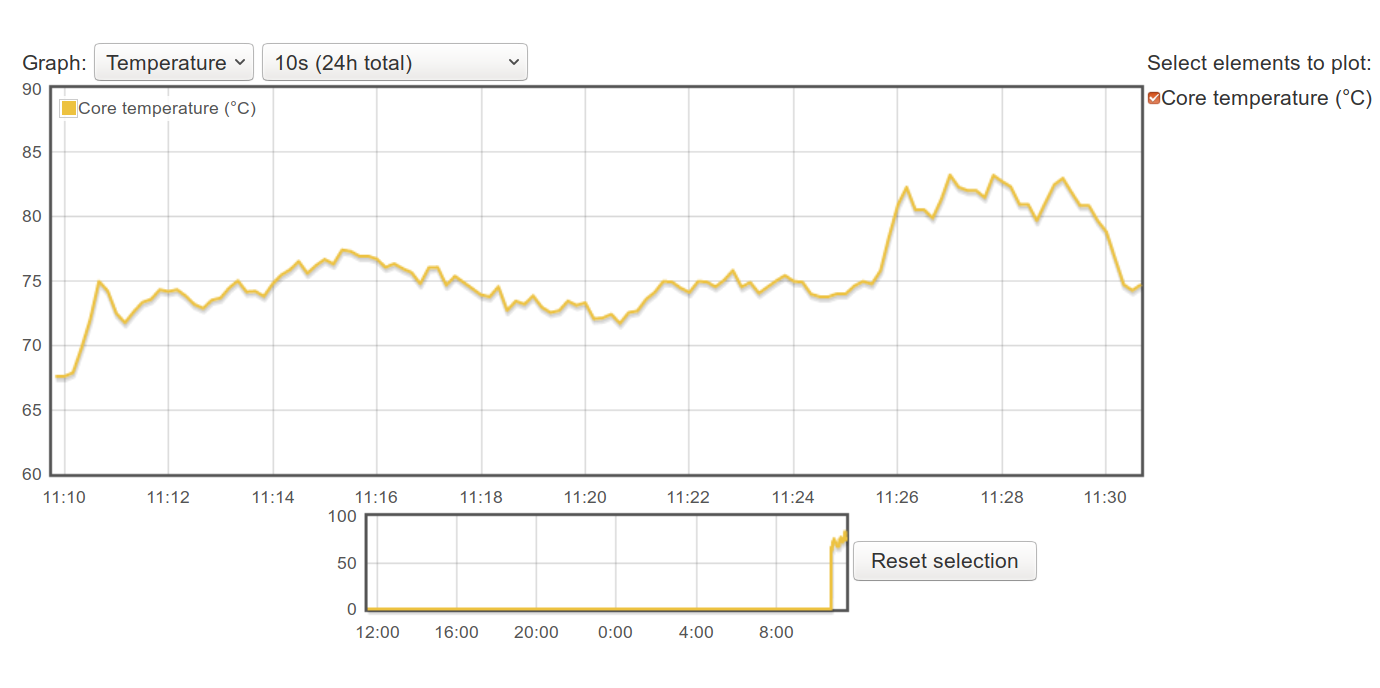
The board would idle at around 65°C going up to well above 80°C, and frequently throttling, as Broadcom BCM2711 processor will throttle if the temperature reaches 85°C.
So the fansink clearly does the job, but I hear some say they did not buy a Raspberry Pi 4 to install a noisy fan on top, and it also increases power consumption (by 0.4W).
Heatsink only
No problem.. We can disconnect the wires, and even completely remove the fan since it’s simply fastened with four screws.. We’ll lose the pretty LED light, but gain silence.
Let’s repeat the test… [Update: This section has been updated, as the first time I did not wait long enough for the idle temperature to stabilize]
|
1 2 3 4 5 6 7 8 9 10 11 12 13 14 15 16 17 18 19 20 21 22 23 24 25 26 27 28 29 30 31 32 33 34 35 36 37 |
sudo /bin/bash ./sbc-bench.sh -c WARNING: this tool is meant to run only on Debian Stretch or Ubuntu Bionic. When running on other distros results are partially meaningless or can't be collected. Press [ctrl]-[c] to stop or [enter] to continue. sbc-bench v0.6.7 Installing needed tools. This may take some time... Done. Checking cpufreq OPP... Done. Executing tinymembench. This will take a long time... Done. Executing OpenSSL benchmark. This will take 3 minutes... Done. Executing 7-zip benchmark. This will take a long time..../sbc-bench.sh: line 600: 17426 Killed taskset -c 0 "${SevenZip}" b -mmt 1 >> ${TempLog} ./sbc-bench.sh: line 600: 17678 Killed "${SevenZip}" b >> ${TempLog} ./sbc-bench.sh: line 600: 17991 Killed "${SevenZip}" b >> ${TempLog} Done. Checking cpufreq OPP... Done. It seems neither throttling nor frequency capping has occured. Memory performance: memcpy: 2636.2 MB/s (0.5%) memset: 3707.9 MB/s (0.5%) 7-zip total scores (3 consecutive runs): 5454 OpenSSL results: type 16 bytes 64 bytes 256 bytes 1024 bytes 8192 bytes 16384 bytes aes-128-cbc 62640.67k 76617.19k 83103.74k 84619.61k 85256.87k 85153.11k aes-128-cbc 62581.94k 76663.19k 83075.16k 84637.35k 85144.92k 85207.72k aes-192-cbc 56280.12k 67309.10k 72107.01k 73197.91k 73607.85k 73618.77k aes-192-cbc 56254.31k 67503.72k 71990.95k 73212.93k 73031.68k 73575.08k aes-256-cbc 51016.31k 60022.59k 63578.20k 64652.63k 64913.41k 64940.71k aes-256-cbc 50874.54k 60039.40k 63685.72k 64490.84k 64569.34k 64744.11k Full results uploaded to http://ix.io/1PoN. Please check the log for anomalies (e.g. swapping or throttling happenend) and otherwise share this URL. |
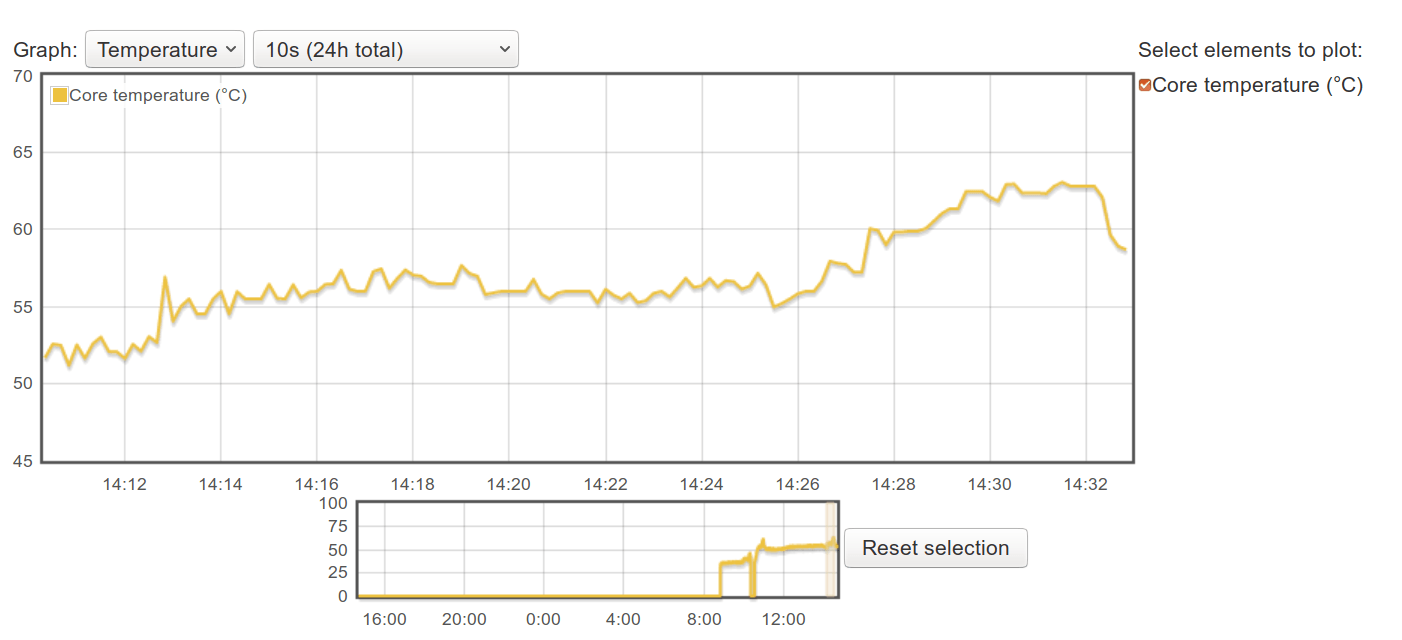
Temperature is higher, but still fairly cool with idle at ~42°C 52°C and the maximum being 61.2 around 63°C.
Conclusion
That means the heatsink itself is more than sufficient, and for most people use cases it’s even too big as a much smaller heatsink should be enough. The fansink can still have its use if you’re going to run the board in very high ambient temperature (60°C and up), but I don’t have an oven to test that part… Laughs and giggles is another proper use case for the ICE tower…
Seeed Studio sells the ICE Tower CPU cooling fan kit reviewed above for $20 plus shipping.

Jean-Luc started CNX Software in 2010 as a part-time endeavor, before quitting his job as a software engineering manager, and starting to write daily news, and reviews full time later in 2011.
Support CNX Software! Donate via cryptocurrencies, become a Patron on Patreon, or purchase goods on Amazon or Aliexpress. We also use affiliate links in articles to earn commissions if you make a purchase after clicking on those links.


Well, that heatsink design is not meant for passive cooling (see the latest odroids for that). In order to test it properly, you should leave it running at TDP until the temperature of the heatsink/SoC stabilizes.
BTW, what an awkward thing to have on your desktop.
Yes, it did not think about that… The fins are horizontal so something must blow air for cooling to work well. I’ll try to place the Raspberry Pi vertically to see if cooling improves that way.
I made a mistake… I waiting a few minutes but obviously not long enough. Idle temperature is now around 52C.
> Temperature is higher, but still idle at ~42°C with the maximum being 61.2°C
According to detailed sbc-bench output you started the benchmark at around 10:41:25 and here the thermal graph was already at above 48°C so I would assume idle temperatures without fan will be more in the +50°C range given that the board’s ground plane acts as a huge heatsink itself and it takes a few minutes for the whole board heating up to ‘idle level’.
BTW: How thick is the thermal pad that came with the set?
Yes, it’s now around 52C at idle. I should have waited for a longer time.
The thermal pad is not thick at all. They have three in the package, so I checked again an its less than 1mm thick.
Can fan be run at +3.3V, how is noise.
The fan is not exactly quiet. Connecting to 3.3V is not recommended as it can damage the Pi. Instead a resistor can be used to lower the fan speed.
According to ‘jamesh’ from RPi Trading Ltd. setting ‘hdmi_enable_4k=0’ might also reduce temperatures a bit.
While in a different (Foundation unsanctioned) universe an odroid does 4K @ 60fps GLES without exceeding 55C with passive cooling and ambs of 26C. Oh well.
‘jamesh’ the bouncer on the User Forums is the only person on this planet who doesn’t have overheating problems with a Pi4B as he runs headless with mini load in an AC room: quite a “typical user”.
>‘jamesh’ the bouncer on the User Forums
Not just there. He seems to spend all of his day on various sites looking for any bad press about the pi so he can shut it down. He threatened to sue me once when I questioned the quality of his opinions considering who’s paying his bills.
Fuck Raspberry Pi. The first thing you boot is a Microsoft binary blob, which controls the CPU throttling/temperature. Welcome to the wonderful world of binary blobs.
> The first thing you boot is a Microsoft binary blob
There’s a lot to be concerned of wrt the proprietary nature of every RPi but this is simply not true. Microsoft just recently aquired Express Logic, the company behind ThreadX. But those Raspberries still run a very old and outdated ThreadX version BroadCom licensed ages ago.
Early 2000s microsoft hate is alive and well. Better not use Linux anymore because they are up there on the list of contributors recently.
Lipstick on a pig?
The RPi company has to come out with a much Cooler Pi4C and stop acting as if all is well. They shouldn’t even sell the present model without a heat sink on it: as they make good money it can come from the profits to keep their $35 magic.
this looks nice I think
http://raspberrypiwiki.com/index.php/Armor_Case
there is version for Pi 4 already on ebay
And maybe Pi4 don’t need bottom play as here isn’t ram on that side
I have this case and it really lowers the temperature, I always about 50*C while in usage and 40something in idle. I use it as a pi-hole WIFI hotspot.
But the fans are really noisy so I separated the 2 pin connector and connected them differently.
Another downside is that is covering the WIFI chip and I’m not having enough coverage in the house.
/me is waiting for Jerry to come and blow all your nasty comments away with a sick burn
Also worth a try is just using a fan alone without a heatsink. (12cm one placed along the side of the board)
Just to compare how much the expensive heatsink with heatpipes even matters. The chip is already thermally connected to the board, and you should be able to cool it significantly just by moving the air. And undervolted 12V/12cm fan will have the same awkwardness factor and be more silent than that small fan.
a fan without exchange points is almost useless. Even the varnish on the board does a good thermal insulation, so in practice the air flow will mostly act on solder joints and components. Better add a very small 4cm*4cm heatsink for $0.50 and have a much slower and quieter fan.
> a fan without exchange points is almost useless
While I agree in general I tried weeks ago exactly what @megi suggested and it worked pretty well since the RPi 4 efficiently uses the PCB’s ground plane to dissipate the heat away from the SoC. A laterally blowing 90mm fan with the PCB on some spacers worked pretty well. I might repeat the test and post a thermal graph as above once I find my RPi 4 again.
I asked, because I had a similar experience with Orange Pi 3. Under full load, the board would throttle at 75°C without a heatsink. With 12cm fan undervolted to 7V, it would not throttle even if CPU is slightly overvolted and clocked to the max (1.8GHz) and it would keep the temp around 65°C max. And on that board, the SoC is not even using a heatspreader.
Btw, I also have spacers on the bottom, so that air can blow above and below.
A regular poster on YouTube had the Pi 4 in official red and white case, no heatsink, reach 90°c under testing. Also there several cooling solutions with case on Aliexpress already. If of help.
For the down voter
https://www.aliexpress.com/item/4000008128520.html?
Sellers went pretty fast to manufacture some heatsinks, this one looks better design than the rp4 itself:
https://www.aliexpress.com/item/33060867969.html
I guess they must have seen a market for them?
I saw them earlier and my exact thoughts were how thoughtful the design was.
Videos on YouTube have shown designs with less heatsink and fan are better
Yes, of course, no doubt about it, if we are talking cooling performance. If we are talking noise or reliability, a passive heatsink is better (as loong as it keeps junction temperature below limits, it is).
There is no way I’m going to buy this rpi in its current format.
If you wanted a slim package, that’s a miss.
I did, for a test. Never even tried to boot it, as I only discovered later that they still don’t have a 64-bit kernel ready, all they ship is a recycled pitiful 32-bit image… For an A72! They entirely rely on the community to do all their job. It’s not even laughable anymore at this point. This board in its current form and with current software makes strictly no sense.
The great sakaki is maybe the best source for 64-bit efforts around RPi 4: https://github.com/sakaki-/bcm2711-kernel-bis — IIRC she also provides a complete Gentoo 64-bit image for RPi 4.
Alas, the 1GB limit rears its ugly head /crosses fingers for sakaki’s victory over the monster
btw anybody did try to remove that broadcom metal soc cover?
As it should be much better to get heat directly from silicon.
video
https://www.youtube.com/watch?v=4LtL9e7JqxE
but no benchmarks 🙁
This happened to me by accident when removing a heatsink from a MiQi board (RK3288). There the chip was 100% flat plastic under the metal lid, it would allow to better place a heatsink. But I couldn’t run tests though as during the accident two RAM chips died.
In the early days of WiFi, guys in spain were putting the PC motherboards in olive oil to cool it down.
Mineral oil cooling here:
https://www.youtube.com/watch?v=v2FPcB_uryc
I’ve got an FPGA sitting right next to its JTAG programming header that makes using a large heatsink impossible! Anyone know of some kind solid aluminium/copper block that can mount to the chip (20mm x 20mm) that can provide just enough height spacing (10mm) to then attach a heatsink/fan?
No but you can emulate that using two 2cm heat sinks fitted into each other with thermal silicon glue between the two. The contact surface will still be very high between them and you’ll have your centimeter-high 2cm-wide aluminum block on top of which you can install a larger heat sink and fan. Yeah I know, that’s totally ugly 🙂
The next thing we’re going to see is liquid cooling setups. (Seriously…someone did it with a Pi 2 of all things… X-D)
As an American, I almost feel obligated to say “Hold my beer.”
Look on YouTube liquid cooling of pi 4 already done.
I ordered one a couple weeks ago…mostly for the “laughs and giggles”.
Also ordered a Pimoroni fan SHIM, which looks more sensible.
btw raspberry pi 4 is overclockable to 2GHz without problem
like this (force_trubo=0 is important)
force_turbo=0
arm_freq=2000
over_voltage=6
2GHz is firmware limit(with latest firmware ) use rpi-update to get latest
1,75GHz is limit on firmware from raspbian
I did benchmarks with x264 encoding
provided enough cooling, 4xA72 at 2GHz would be really great. That’s what I have in the mcbin and it really rocks.
Thanks. I’ve given it a try. It works well: https://www.cnx-software.com/2019/07/26/how-to-overclock-raspberry-pi-4/
When I shutdown my Raspberry Pi 4, 5V is still on, so the fan is working at all times unless I also disconnect the power supply…
They have a new version called “Blink Blink ICE Tower CPU Cooling Fan”. That’s actually the same but with RGB LEDs.
https://www.seeedstudio.com/Blink-Blink-ICE-Tower-CPU-Cooling-Fan-for-Raspberry-Pi-Support-Pi-4-p-4215.html