
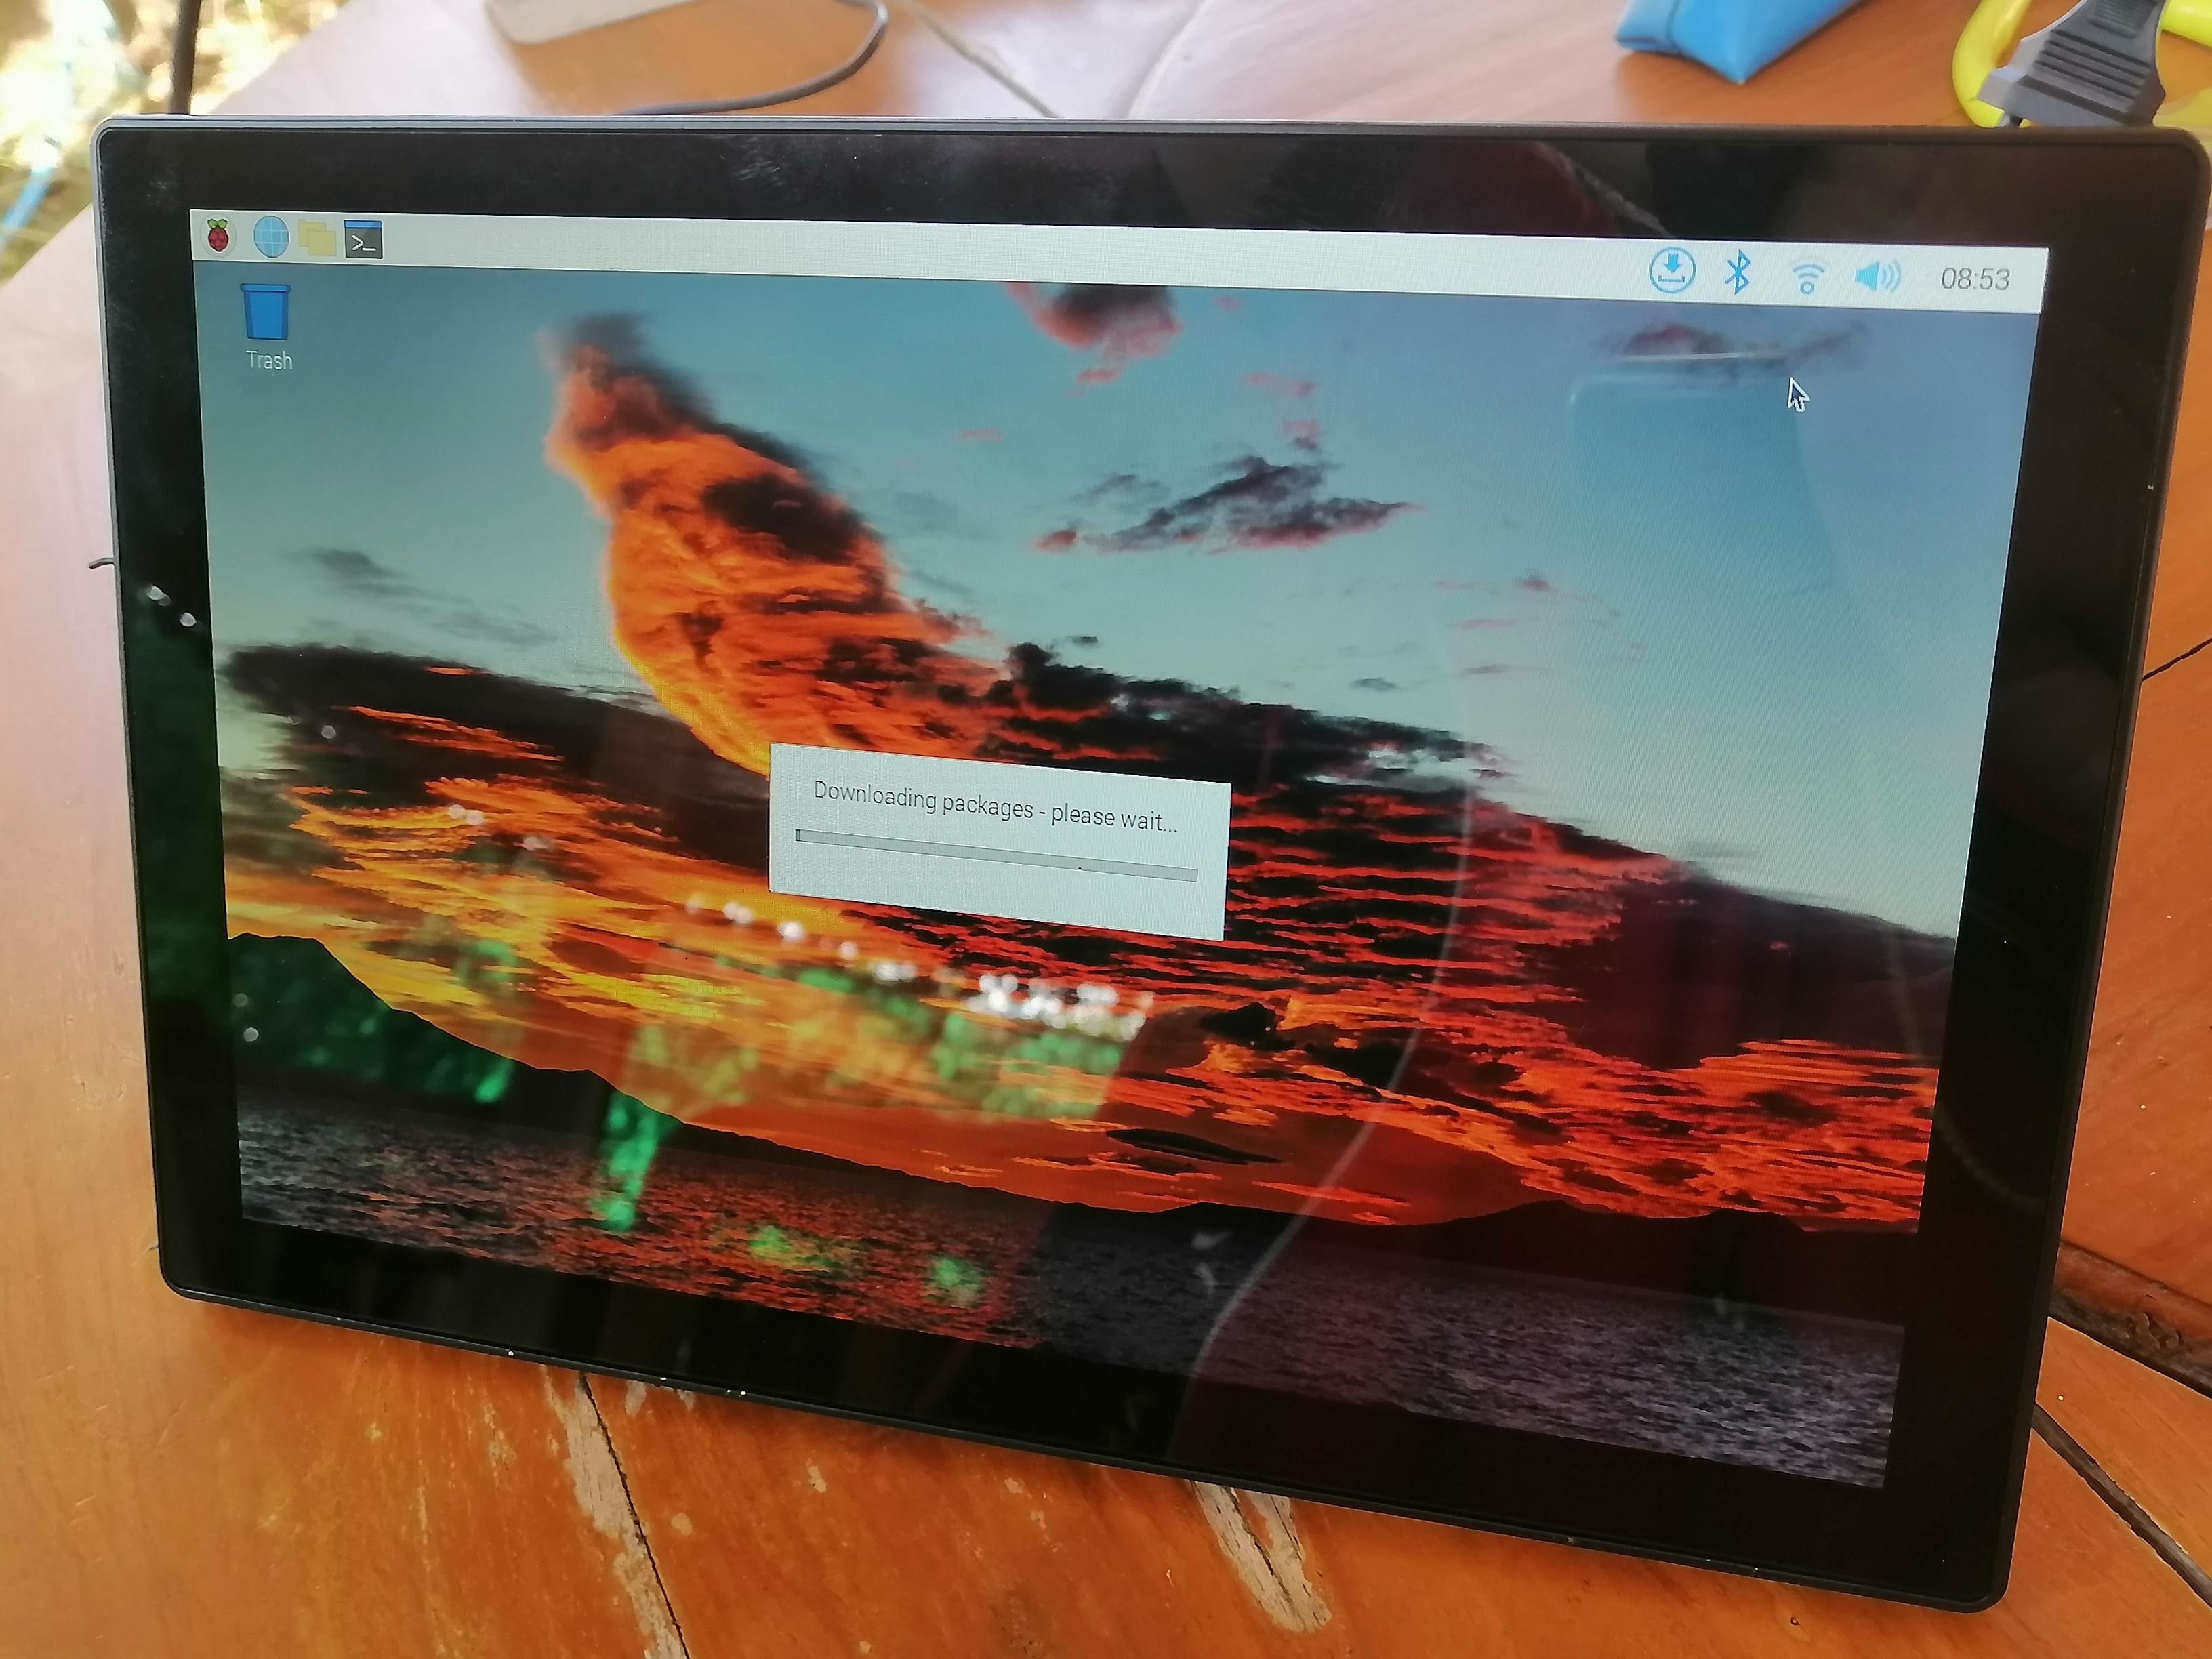
A couple of months ago I received “RPI All-in-One”, a 10.1-inch touchscreen display for Raspberry Pi boards, listed the specifications, checked out the package content, installed a Raspberry Pi 4 inside the display before booting my new all-in-one (AiO) PC successfully.
I’ve now had time to spend more time with the PC/display and see how it performs under various conditions. I also tested HDMI and USB-C input features with a laptop and mini PC.
Fan or fanless operation?
After updating Raspberry Pi OS, I ran sbc-bench.sh script together with rpi-monitor to see how the Raspberry Pi 4 with 1GB RAM would perform under load with the (noisy) fan enabled.
|
1 2 3 4 5 6 7 8 9 10 11 12 13 14 15 16 17 18 19 20 21 22 23 24 25 26 27 28 29 30 31 32 33 34 35 36 37 38 39 40 41 42 43 44 45 46 47 |
sbc-bench v0.9.1 Installing needed tools. This may take some time. Done. Checking cpufreq OPP. Done (results will be available in 11-15 minutes). Executing tinymembench. Done. Executing OpenSSL benchmark. Done. Executing 7-zip benchmark. Done. Checking cpufreq OPP. Done (17 minutes elapsed). perl: warning: Setting locale failed. perl: warning: Please check that your locale settings: LANGUAGE = (unset), LC_ALL = (unset), LC_ADDRESS = "en_GB.UTF-8", LC_NAME = "en_GB.UTF-8", LC_MONETARY = "en_GB.UTF-8", LC_PAPER = "en_GB.UTF-8", LC_IDENTIFICATION = "en_GB.UTF-8", LC_TELEPHONE = "en_GB.UTF-8", LC_MEASUREMENT = "en_GB.UTF-8", LC_TIME = "en_GB.UTF-8", LC_NUMERIC = "en_GB.UTF-8", LANG = (unset) are supported and installed on your system. perl: warning: Falling back to the standard locale ("C"). It seems neither throttling nor frequency capping has occured. Memory performance: memcpy: 2595.9 MB/s (0.8%) memset: 3398.3 MB/s (2.7%) 7-zip total scores (3 consecutive runs): 5556,5650,5565 OpenSSL results: type 16 bytes 64 bytes 256 bytes 1024 bytes 8192 bytes 16384 bytes aes-128-cbc 61981.49k 76335.40k 82773.25k 84199.42k 84355.75k 84393.98k aes-128-cbc 62224.25k 76254.36k 82779.39k 84461.91k 84757.16k 84825.43k aes-192-cbc 55900.34k 67052.89k 71500.80k 73121.11k 73362.09k 73203.71k aes-192-cbc 55869.41k 66963.52k 71835.14k 72934.74k 73471.32k 73465.86k aes-256-cbc 50541.63k 59834.26k 63387.14k 64413.70k 64634.88k 64760.49k aes-256-cbc 50646.47k 59735.02k 63384.92k 64461.14k 64648.53k 64629.42k Full results uploaded to http://ix.io/3MfY. In case this device is not already represented in official sbc-bench results list then please consider submitting it at https://github.com/ThomasKaiser/sbc-bench/issues with this line: | RPi 4 Model B Rev 1.1 / BCM2711 rev B0 | 1500 MHz | 5.10 | Bullseye armhf | 5590 | 62100 | 64690 | 2600 | 3400 | - | [http://ix.io/3MfY](http://ix.io/3MfY) | |
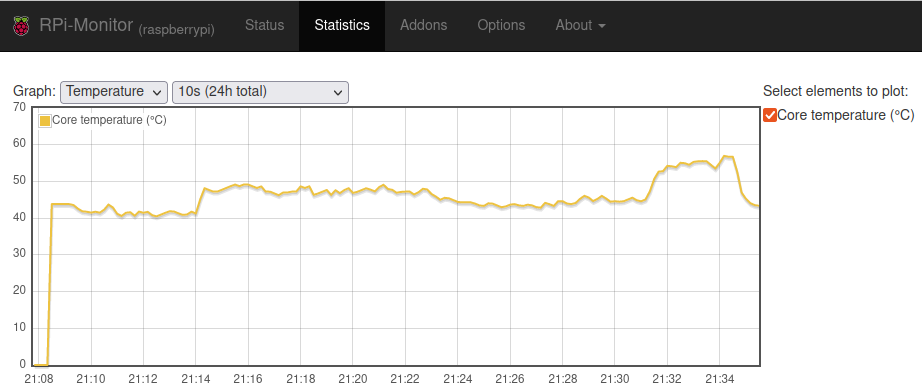
No throttling was detected, and the temperature never exceeded 56°C in a room with an ambient temperature of 26°C.
I then disconnect the fan, but it turns out the fan can also be easily disabled in the OSD menu without having to open the back cover. I re-ran the test without a fan and a heatsink-less Raspberry Pi 4 board:
|
1 2 3 4 5 6 7 8 9 10 11 12 13 14 15 16 17 18 19 20 21 22 23 24 25 26 27 28 29 30 31 32 33 34 35 36 37 38 39 40 41 42 43 44 |
sbc-bench v0.9.1 Installing needed tools. This may take some time. Done. Checking cpufreq OPP. Done (results will be available in 11-15 minutes). Executing tinymembench. Done. Executing OpenSSL benchmark. Done. Executing 7-zip benchmark. Done. Checking cpufreq OPP. Done (17 minutes elapsed). perl: warning: Setting locale failed. perl: warning: Please check that your locale settings: LANGUAGE = (unset), LC_ALL = (unset), LC_ADDRESS = "en_GB.UTF-8", LC_NAME = "en_GB.UTF-8", LC_MONETARY = "en_GB.UTF-8", LC_PAPER = "en_GB.UTF-8", LC_IDENTIFICATION = "en_GB.UTF-8", LC_TELEPHONE = "en_GB.UTF-8", LC_MEASUREMENT = "en_GB.UTF-8", LC_TIME = "en_GB.UTF-8", LC_NUMERIC = "en_GB.UTF-8", LANG = (unset) are supported and installed on your system. perl: warning: Falling back to the standard locale ("C"). ATTENTION: Frequency capping to 600 MHz has occured. Check the log for details. Memory performance: memcpy: 2491.6 MB/s (0.5%) memset: 3327.9 MB/s (0.5%) 7-zip total scores (3 consecutive runs): 5614,5601,5552 OpenSSL results: type 16 bytes 64 bytes 256 bytes 1024 bytes 8192 bytes 16384 bytes aes-128-cbc 61931.34k 76231.89k 82751.74k 84418.56k 84893.70k 84716.20k aes-128-cbc 62285.30k 75651.41k 82747.82k 84458.84k 84148.22k 84492.29k aes-192-cbc 55898.98k 66881.37k 71781.03k 73139.54k 73403.05k 73433.09k aes-192-cbc 55865.07k 66974.36k 71860.14k 72966.83k 73506.82k 73433.09k aes-256-cbc 50125.51k 59826.07k 63358.21k 64482.65k 64566.61k 64787.80k aes-256-cbc 50870.97k 59094.73k 63383.21k 64484.69k 64757.76k 64126.98k Full results uploaded to http://ix.io/3MgG. Please check the log for anomalies (e.g. swapping or throttling happenend). |
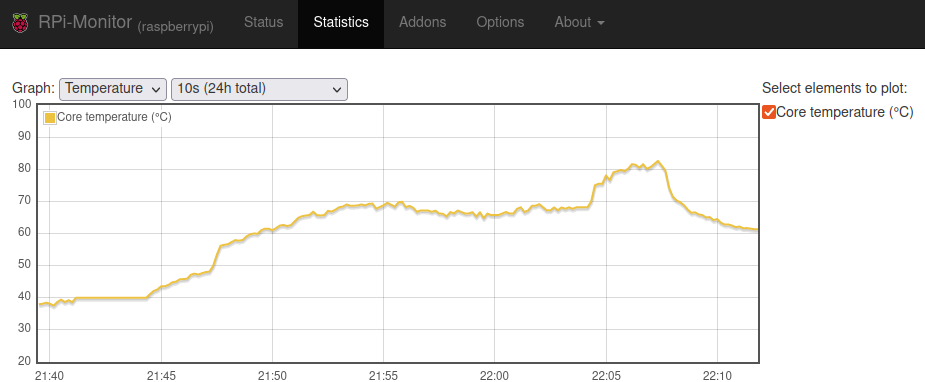
Unsurprisingly, the temperature is much higher, especially during the 7-zip multi-thread test, but throttling did not occur. I’d still recommend putting a heatsink on top of the processor to keep it cool if you’d like to disable the fan. I don’t have access to one at this time, but I’ll try it out later with another board.
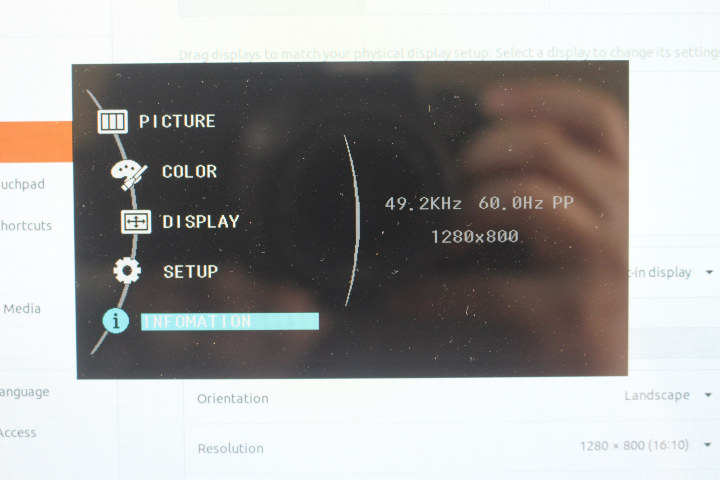
RPI All-in-One OSD menu
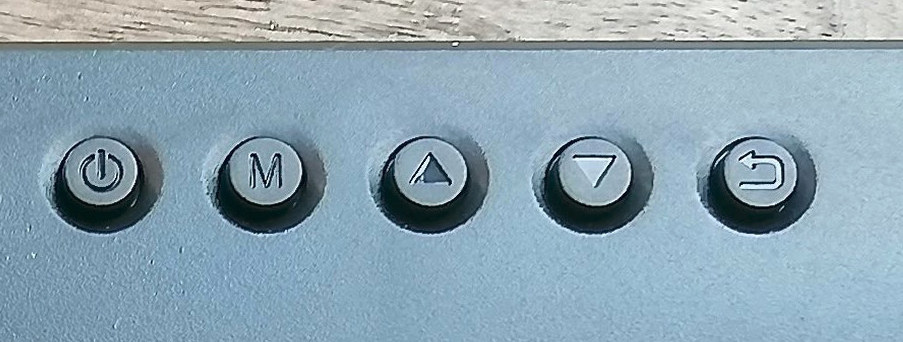
There are size buttons on the back of the display with the power button (hardware power off only, no clean software power off), the menu button, and associated up/down and back buttons for navigation. So let’s go through it…
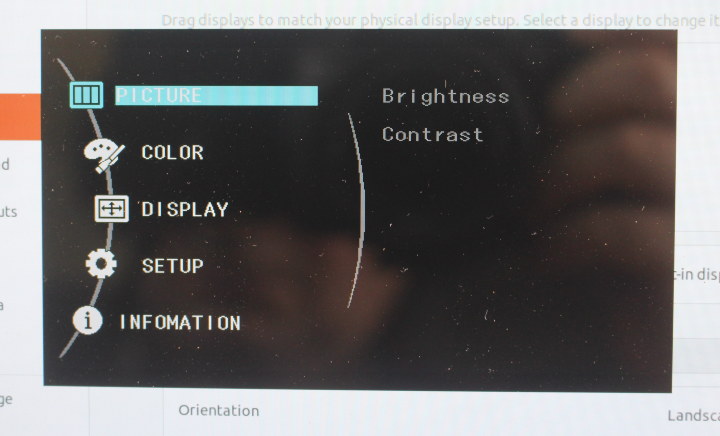
The Picture section allows us to adjust brightness and contrast.

The color temperature, as well as red, green, and blue can be changed in the Color section.

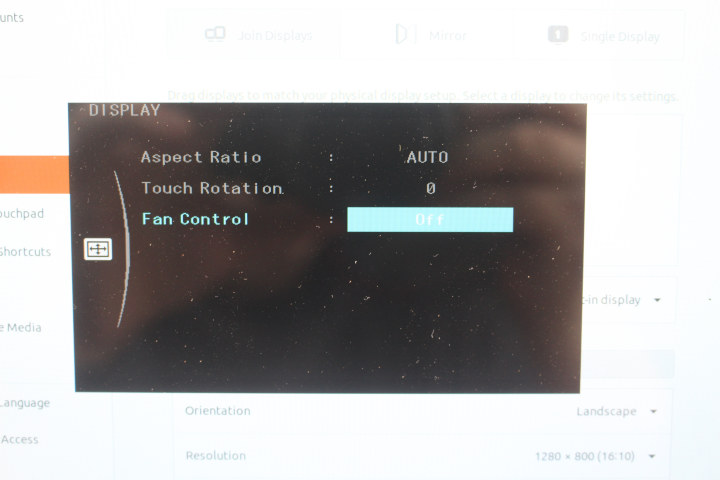
The Display menu is used for Aspect ratio, touch rotation (more on that later), and fan control to either turn on or off the (noisy) fan.
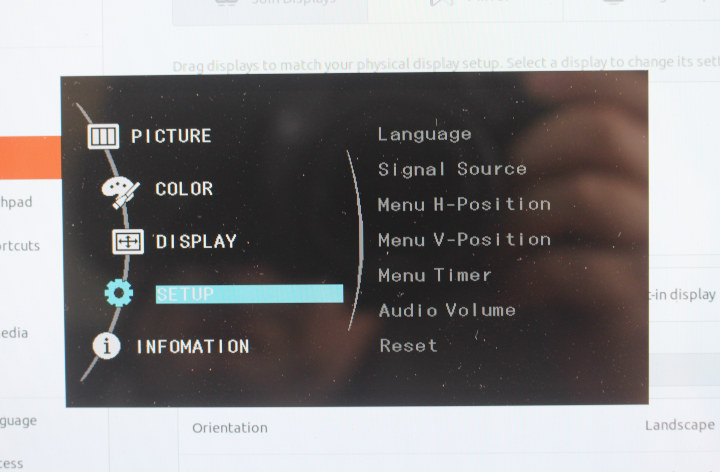
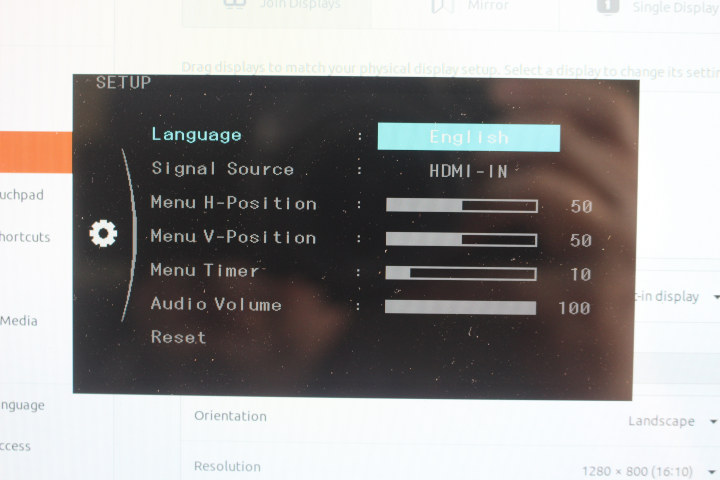
The Setup menu allows us to select one of the 12 OSD languages (English, simplified Chinese, traditional Chinese, Japanese, Korean, Germany, French, Spanish, Italian, Portuguese, and Russian), signal source (HDMI-RPI, HDMI-IN, or USB-C), configure the position and timer of the on-screen menu, as well as the audio volume. There’s also an option to Reset the display.
The misspelled “Infomation” section provides details about the resolution (1280×800) and the refresh rate (60Hz). Not quite sure what 49.2 KHz is…
User experience, tips with Raspberry Pi 4
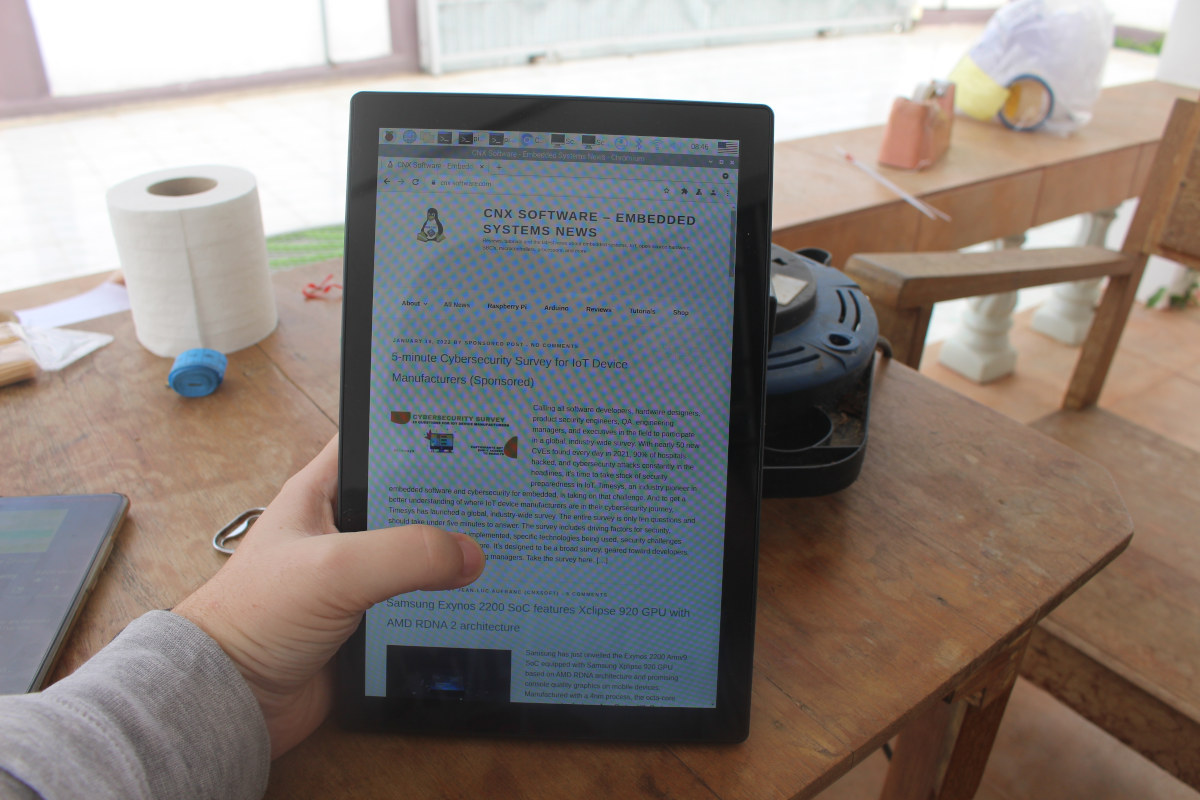
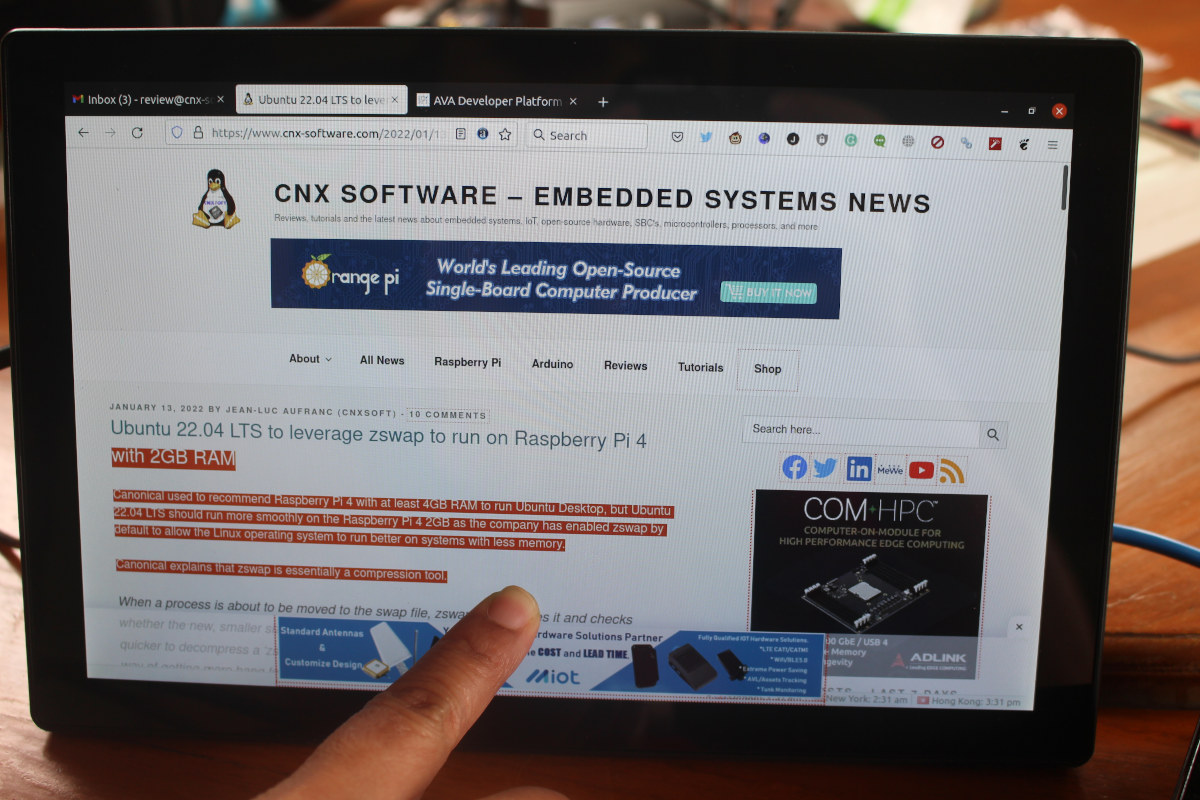
I’ve been using the AIO PC to browse the web with Chromium, and it does the job. But bear in mind the user experience is quite different from what you’d get with a tablet. First, there’s no battery, so RPI All-in-One PC is designed for desktop use or mounted with a VESA mount with access to the mains. There’s also no sensor to automatically switch between portrait and landscape mode.
Portrait mode is still possible, but it must be configured manually, first by changing the screen orientation in Raspberry Pi OS, or through the terminal as explained on Linuxhints:
|
1 |
DISPLAY=:0 xrandr --output HDMI-1 --rotate right |
and then in the OSD menu, by going to Display->Touch rotation and change the value to 270 (if rotate right) or 90 (if rotate left) degrees.
If the router is a bit far, WiFi will disconnect easily, so better place the device close to the router or use an Ethernet cable. I don’t usually have connection troubles over WiFi with my phone in the same location.
You’d expect a software keyboard on a touchscreen display, so I installed matchbox-keyboard:
|
1 |
sudo apt install matchbox-keyboard |
It kinds of works, but some characters are missing probably due to missing fonts that can be installed, but more importantly, since I’ve received the model with 1280×800 resolution the software keyboard would often cover the terminal windows, so I’d have to resize it. I ended up using a wireless keyboard with a USB dongle since it’s more convenient.
Note it’s possible to change the layout and parameters of the keyboard by changing keyboard.xml, but it’s out of the scope of this review.
Using RPI All-in-One as an HDMI (touchscreen) display
The display can also be used as a standard HDMI display. Simply connect an HDMI cable between your host (e.g. a laptop) and the HDMI input of the display, then change the input to HDMI-IN, and you’re good. Just like any TV or monitor. I’d always make sure to turn off the fan in that case, since it’s not needed.
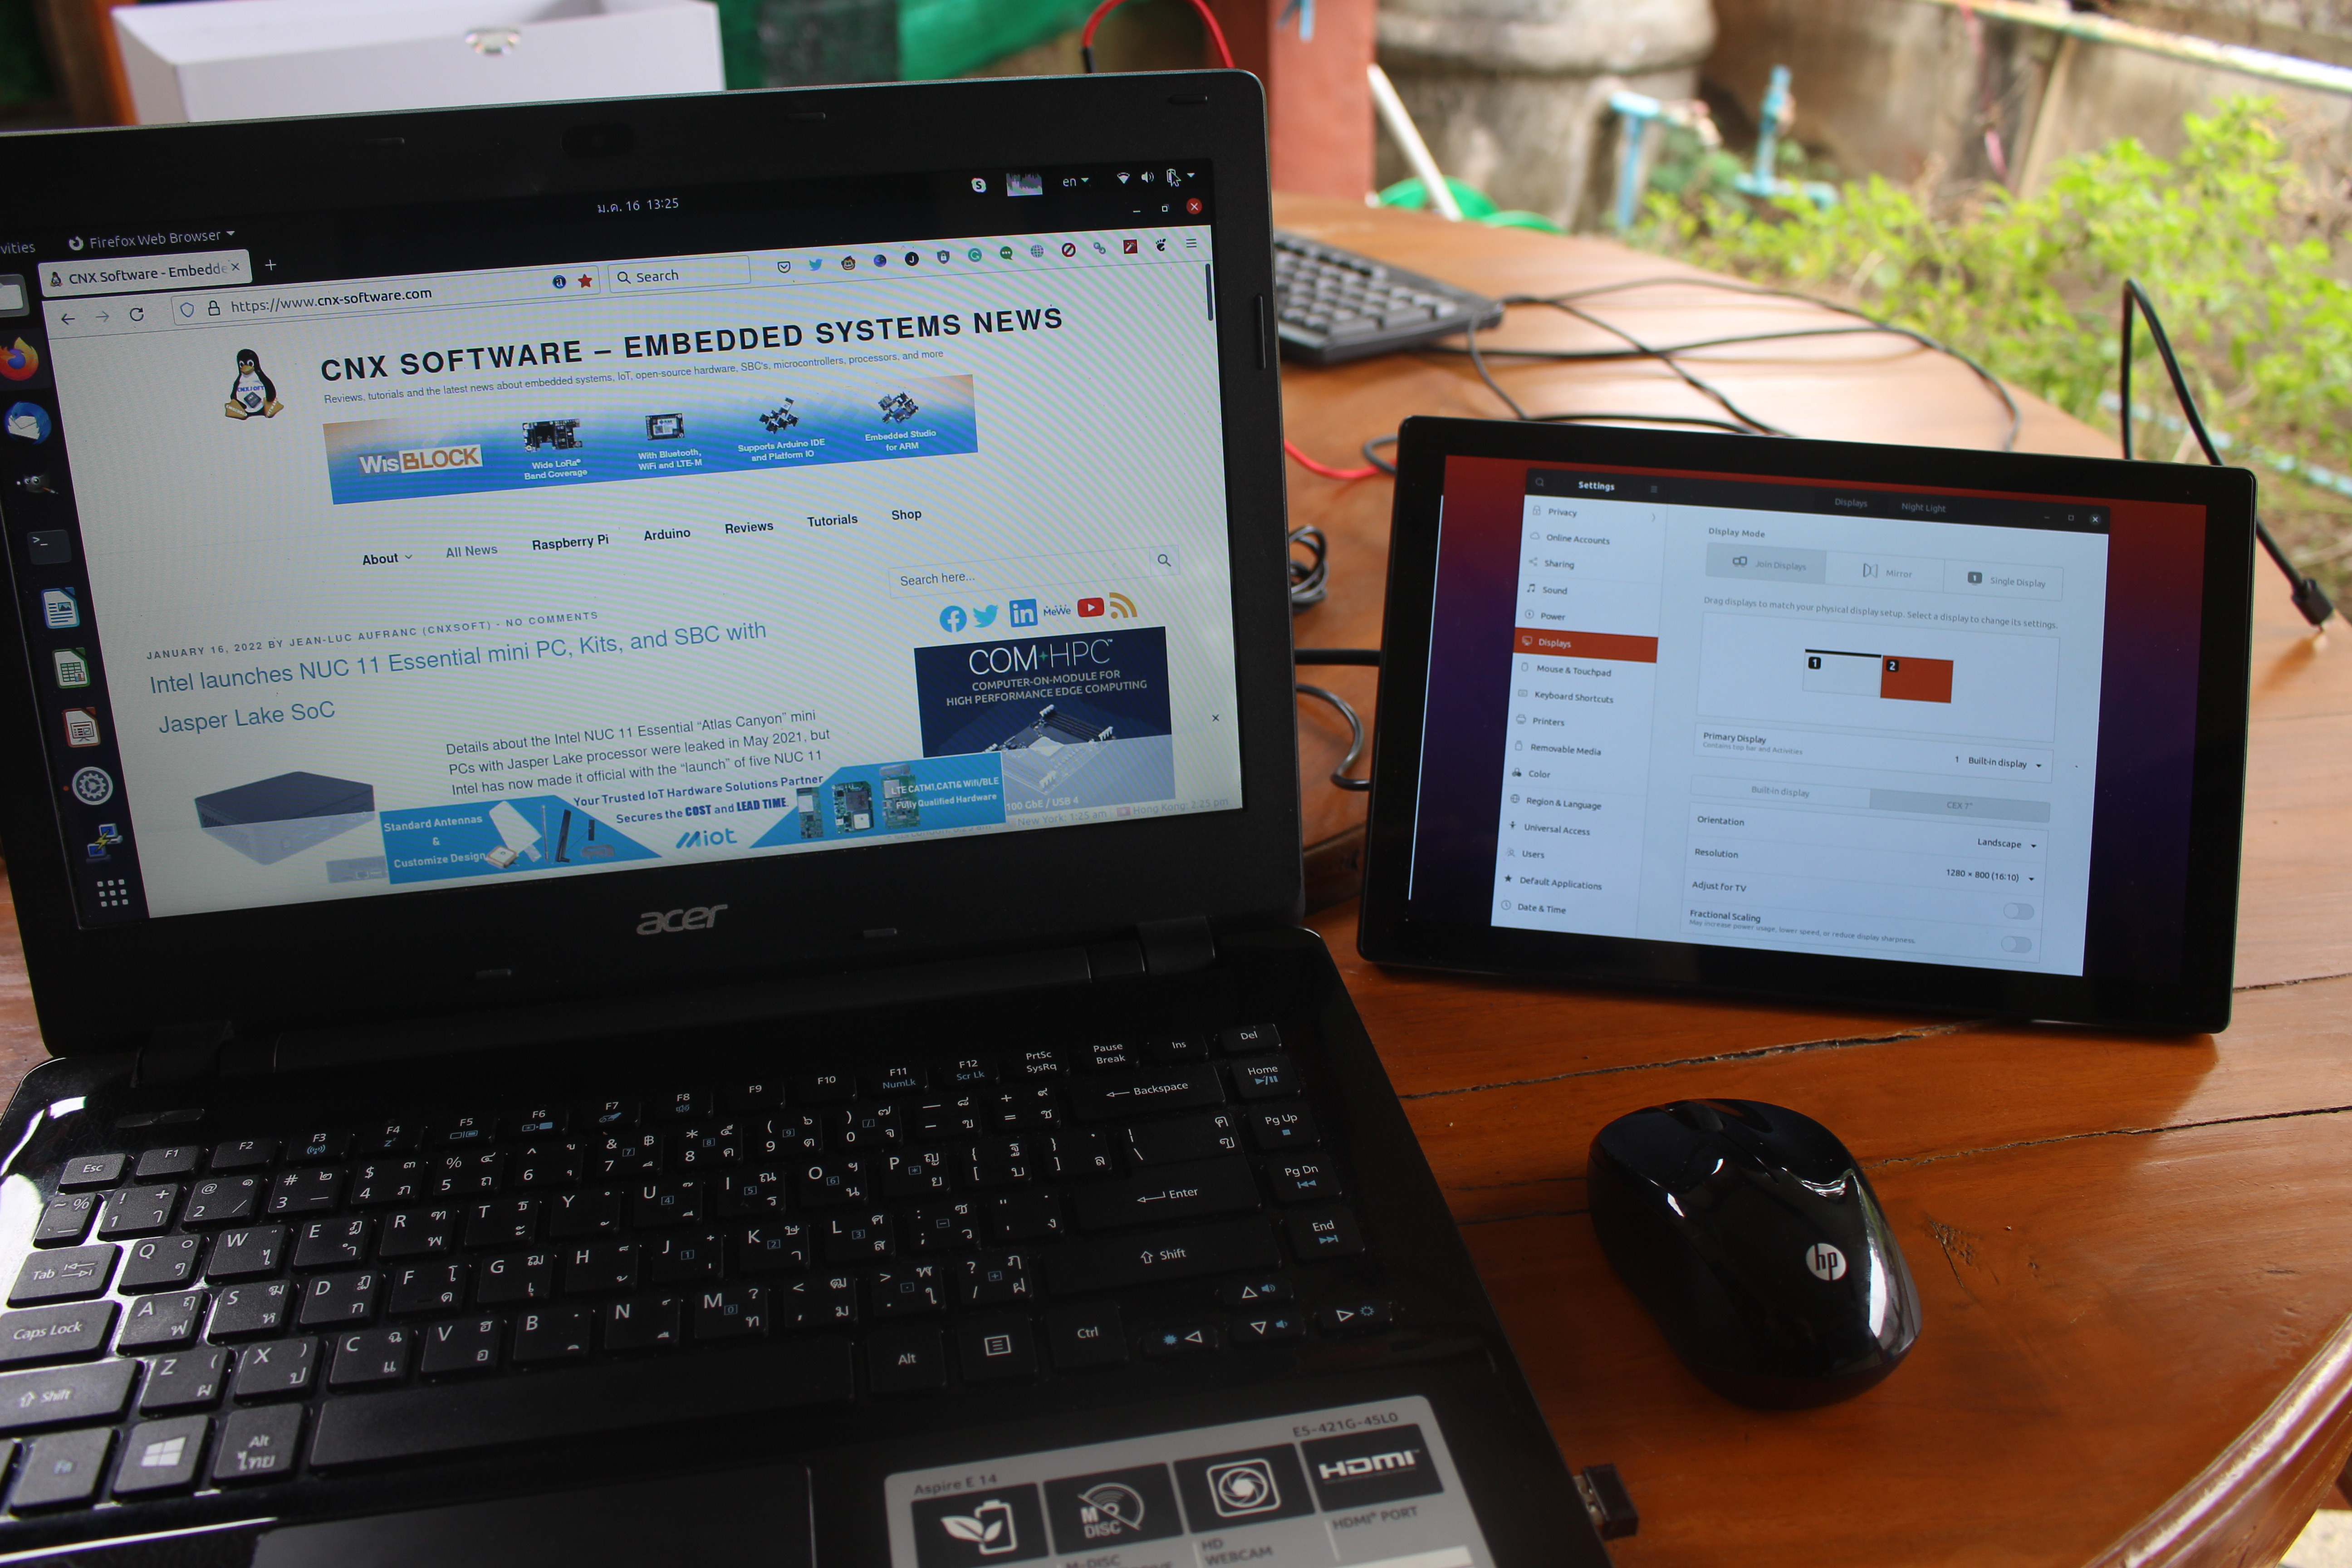
The resolution is confirmed to be 1280×800, and I find the display to be much sharper than the 1366×768 laptop screen I used for testing.
 The display shows up as CEX 7″, another touchscreen display for Raspberry Pi, so I assume RPI All-in-One simply used the same chip.
If you need the touchscreen function, you’ll need to connect the USB Type-C to USB Typa-A cable provided in the package. The kernel output for the USB touchscreen reports it as TSTP MTouch model:
|
1 2 3 4 5 6 7 8 |
[58905.815909] usb 3-1: New USB device strings: Mfr=1, Product=2, SerialNumber=3 [58905.815912] usb 3-1: Product: MTouch [58905.815915] usb 3-1: Manufacturer: TSTP [58905.815918] usb 3-1: SerialNumber: CMTP_1.0 [58905.854099] input: TSTP MTouch as /devices/pci0000:00/0000:00:10.0/usb3/3-1/3-1:1.0/0003:0416:C168.000A/input/input43 [58905.912569] hid-multitouch 0003:0416:C168.000A: input,hidraw3: USB HID v1.11 Device [TSTP MTouch] on usb-0000:00:10.0-1/input0 [58905.921581] input: TSTP MTouch as /devices/pci0000:00/0000:00:10.0/usb3/3-1/3-1:1.1/0003:0416:C168.000B/input/input44 [58905.982051] hid-generic 0003:0416:C168.000B: input,hidraw4: USB HID v1.11 Keyboard [TSTP MTouch] on usb-0000:00:10.0-1/input1 |
And it works without doing anything, except for a little detail…
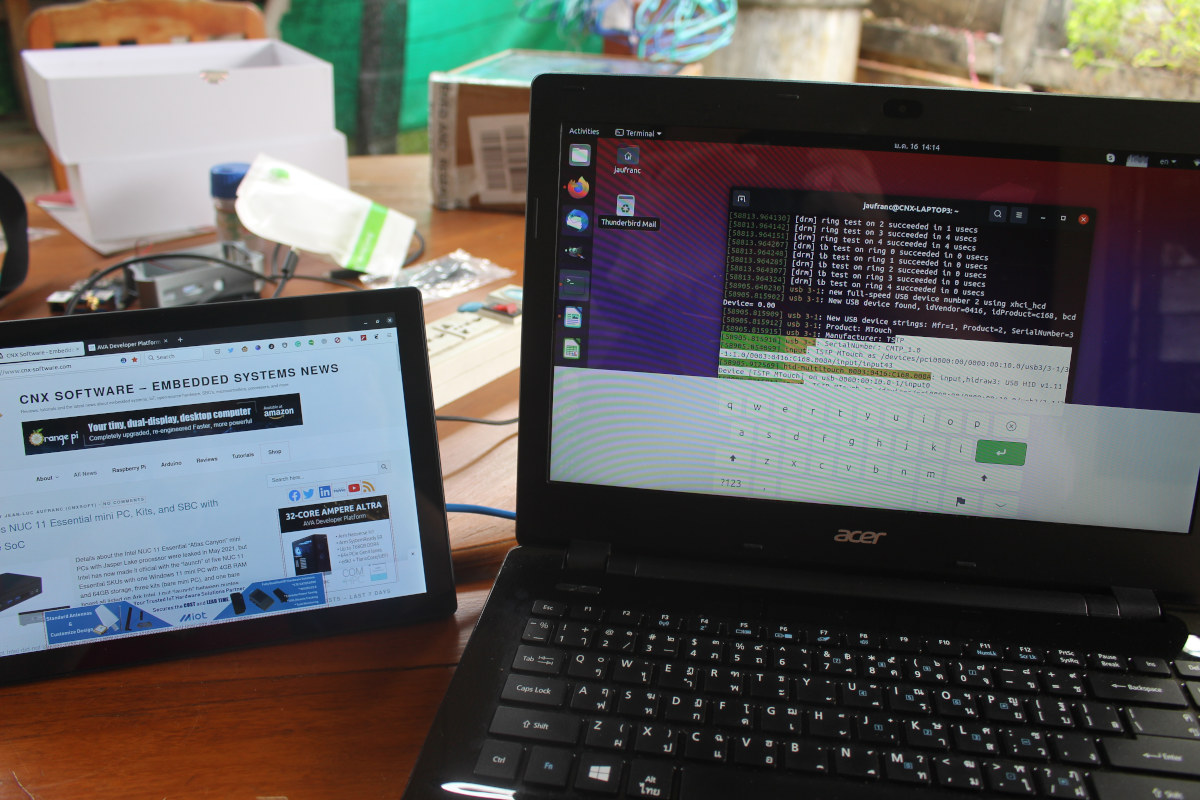
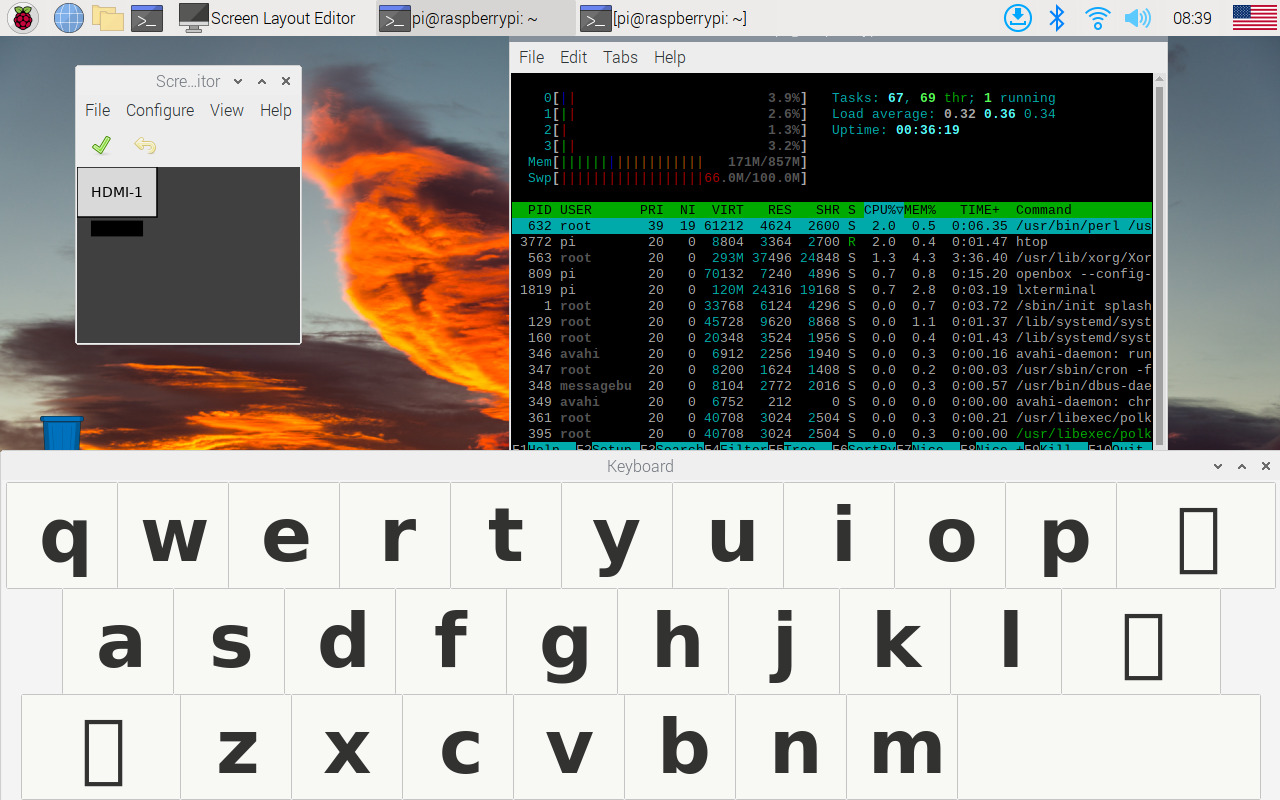
You can see the software keyboard shown on the main display, and that’s because the touchscreen is mapped to the wrong display… So If I tap on the actual touchscreen display the pointer will be shown on the laptop display. There’s an easy fix via Askubuntu:
We should find out the name of the display with xrandr:
|
1 2 3 4 5 6 7 8 9 10 11 12 13 14 15 16 17 18 19 20 21 22 23 |
xrandr Screen 0: minimum 320 x 200, current 2646 x 800, maximum 16384 x 16384 eDP connected primary 1366x768+1280+0 (normal left inverted right x axis y axis) 309mm x 173mm 1366x768 60.00*+ 1280x720 59.97 1152x768 59.95 1024x768 59.95 800x600 59.96 848x480 59.94 720x480 59.94 640x480 59.94 HDMI-0 connected 1280x800+0+0 (normal left inverted right x axis y axis) 150mm x 94mm 1280x800 59.96*+ 1920x1080 60.00 50.00 59.94 1280x1024 60.02 1280x960 60.00 1280x768 59.87 1280x720 60.00 50.00 59.94 1024x768 60.00 800x600 60.32 720x480 60.00 59.94 640x480 60.00 59.94 VGA-0 disconnected (normal left inverted right x axis y axis) |
So that would be HDMI-0.
Then we can look up the device ID for the USB touchscreen with xinput:
|
1 2 3 4 5 6 7 8 9 10 11 12 13 14 15 16 17 18 19 20 21 22 |
xinput --list ⎡ Virtual core pointer id=2 [master pointer (3)] ⎜ ↳ Virtual core XTEST pointer id=4 [slave pointer (2)] ⎜ ↳ MOSART Semi. 2.4G RF Keyboard & Mouse id=12 [slave pointer (2)] ⎜ ↳ MOSART Semi. 2.4G RF Keyboard & Mouse Consumer Control id=13 [slave pointer (2)] ⎜ ↳ Mouse id=16 [slave pointer (2)] ⎜ ↳ Touchpad id=17 [slave pointer (2)] ⎜ ↳ TSTP MTouch id=22 [slave pointer (2)] ⎣ Virtual core keyboard id=3 [master keyboard (2)] ↳ Virtual core XTEST keyboard id=5 [slave keyboard (3)] ↳ Power Button id=6 [slave keyboard (3)] ↳ Video Bus id=7 [slave keyboard (3)] ↳ Video Bus id=8 [slave keyboard (3)] ↳ Power Button id=9 [slave keyboard (3)] ↳ Sleep Button id=10 [slave keyboard (3)] ↳ MOSART Semi. 2.4G RF Keyboard & Mouse id=11 [slave keyboard (3)] ↳ MOSART Semi. 2.4G RF Keyboard & Mouse System Control id=14 [slave keyboard (3)] ↳ HD WebCam: HD WebCam id=15 [slave keyboard (3)] ↳ AT Translated Set 2 keyboard id=18 [slave keyboard (3)] ↳ Acer WMI hotkeys id=19 [slave keyboard (3)] ↳ MOSART Semi. 2.4G RF Keyboard & Mouse Consumer Control id=20 [slave keyboard (3)] ↳ TSTP MTouch id=21 [slave keyboard (3)] |
Now let’s map TSTP Mtouch (device id 22) to HDMI-0 display:
|
1 |
xinput --map-to-output 22 HDMI-0 |
It works!
USB-C display function
If you own a device with a USB Type-C port supporting DisplayPort Alt Mode, you can do the same over a single cable. I tried it with UP Xtreme i11 mini PC equipped with a USB 4.0/Thunderbolt port. At first, it did not seem to work at all and each time I selected USB-C input I was redirected to HDMI-RPI after a few seconds. So I made sure the DisplayPort Alt Mode functioning the mini PC worked using a USB-C dock connected to the HDMI input of the display.
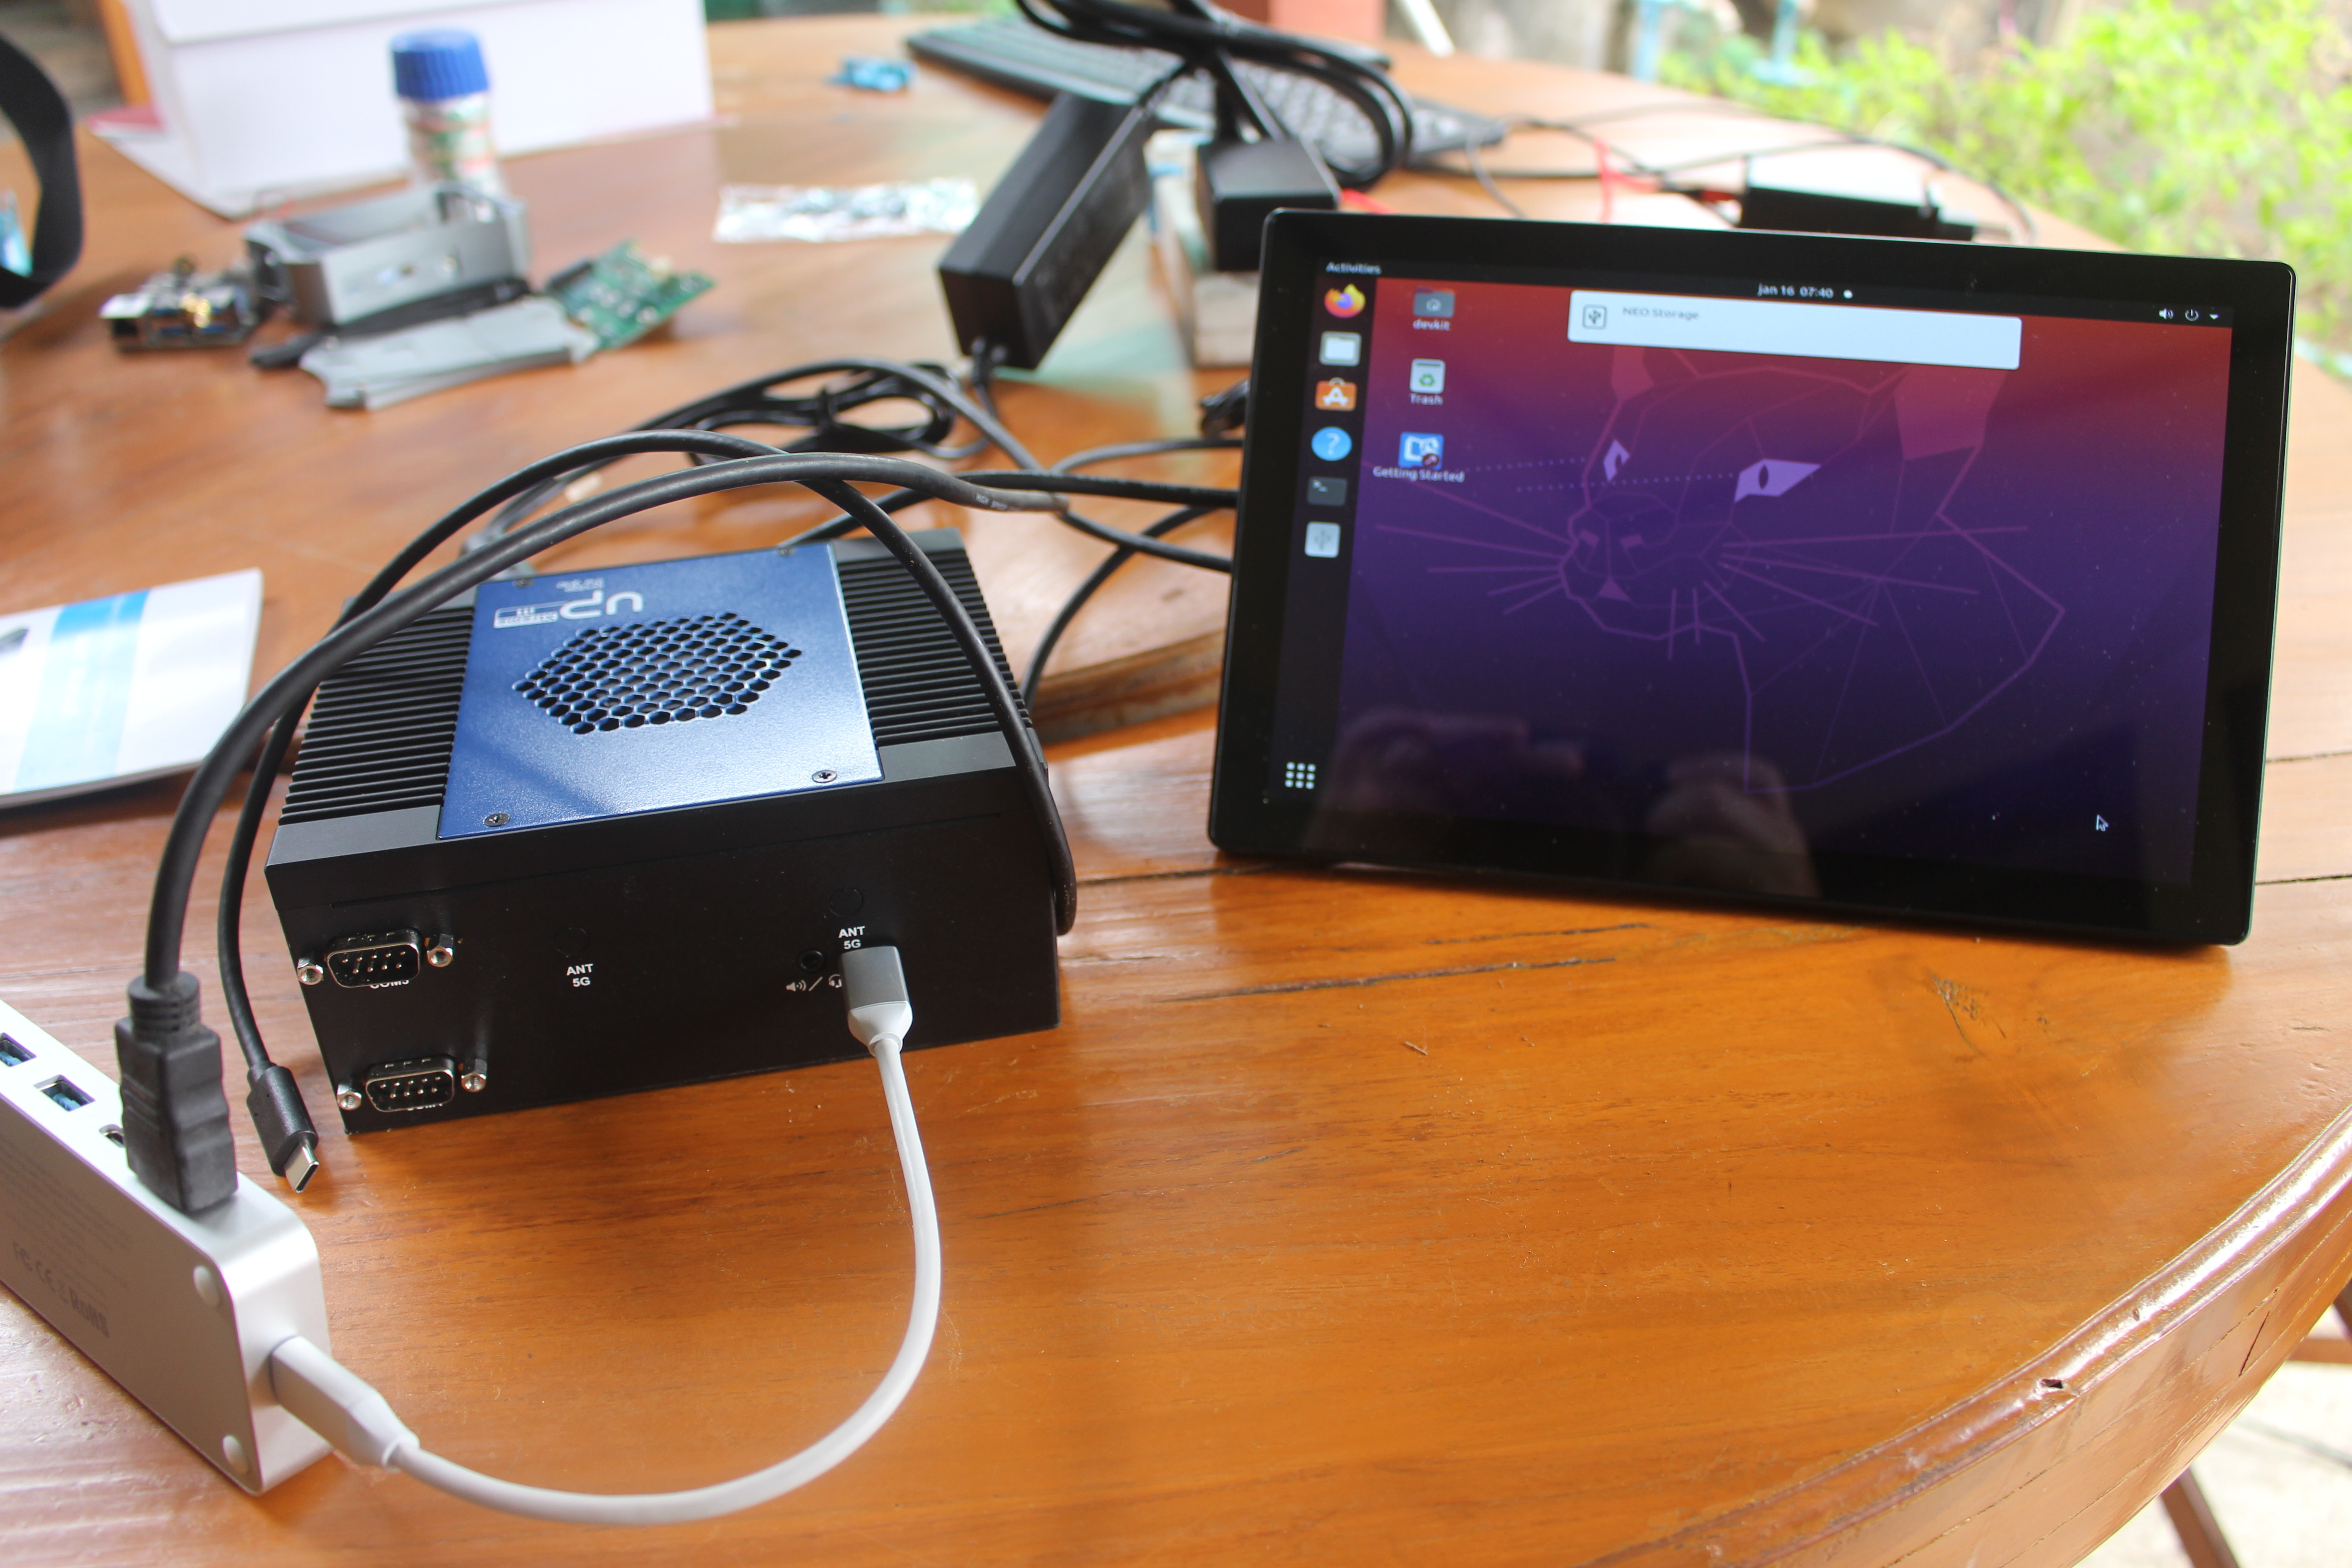
I tried again connecting the USB-C cable between the mini PC and display, and the display got dark for a while, and eventually, we could access Ubuntu 20.04 with the touchscreen function over a single cable. Please note that the power supply still needs to be connected in that case, as the USB-C interface of the display does not support power, only data and DisplayPort.

Can RPI All-in-One PC work with another SBC?
The display should work with any hardware equipped with HDMI and USB ports, but finding a board that fits into the enclosure like Raspberry Pi 4 does it more of a challenge. I’ve tried other Raspberry Pi compatible boards in RPi accessories in the past, and there’s always a problem with the board not fitting. I still tried Rockchip RK3399 based NanoPi M4V2 board with low confidence, especially since the ports are different (USB-C + Full-size HDMI).
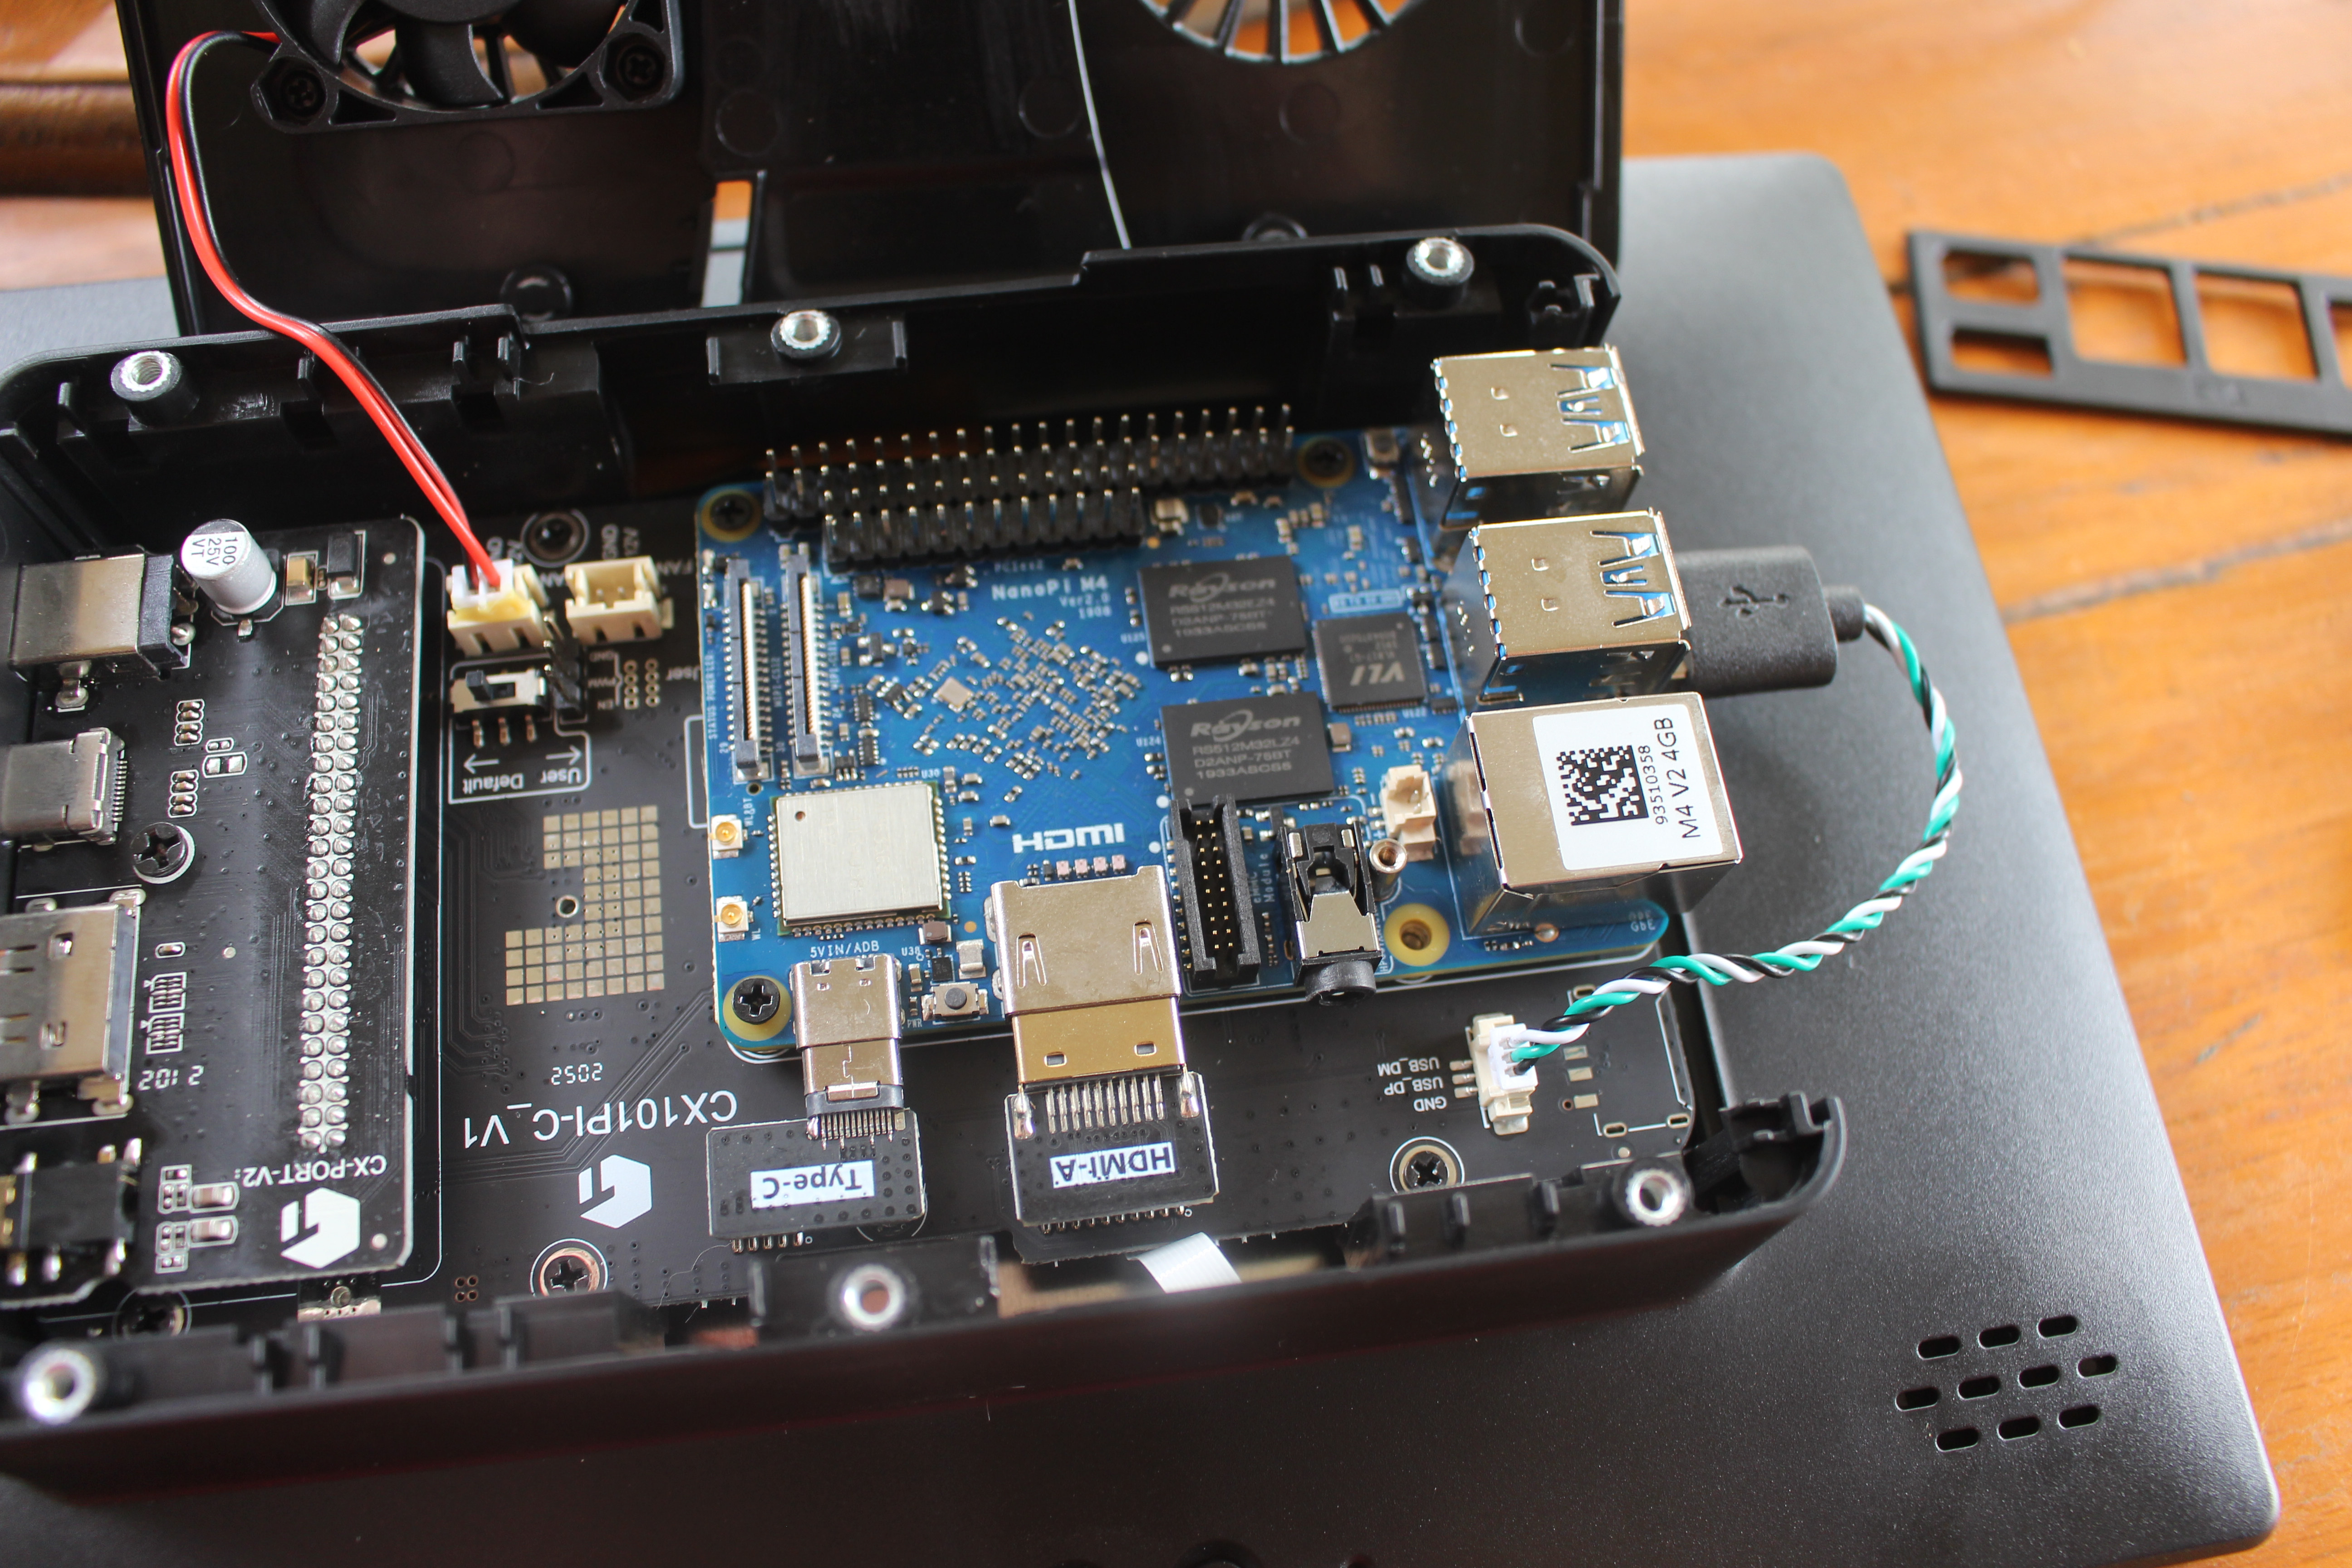
To my surprise, NanoPi M4V2 fit inside after pushing a bit and hearing some cracking noises… But I can see I get power, and the HDMI port looks to be inserted properly. I think that deserves another post, as I’ll have to flash an image, configure it, and drill some holes for the WiFi and Bluetooth to make a NanoPi M4V2 All-in-One PC. [Update: I’ve tested it already: Building a NanoPi M4V2 based All-in-One Linux PC running Armbian (Ubuntu/Debian)]
Video demo
Conclusion
RPI All-in-One is an interesting display that can be used as both a Raspberry PI All-in-One PC or an external display connected over HDMI + USB, or USB-C. The fan is quite noisy, but if you place a low-profile heatsink on top of your board, it can be easily disabled through the OSD menu. There’s also no reason at all to use the fan when use as an external display.
The display is mostly designed for fixed operation on a desk or VESA mounted, as it lacks a battery and requires connection to the mains at all times. Both landscape and portrait modes are possible by require changing some settings in the OSD menu and/or operating system of the host device.
I’d like to thank EVICIV for sending a review sample. If you are interested you can purchase the 10.1-inch 1280×800 version for $159.99 on Amazon, or even $149.99 since there’s $10 coupon at this time. The 1366×768 and 1920×1200 versions of the touchscreen display are also sold on Aliexpress,

Jean-Luc started CNX Software in 2010 as a part-time endeavor, before quitting his job as a software engineering manager, and starting to write daily news, and reviews full time later in 2011.
Support CNX Software! Donate via cryptocurrencies, become a Patron on Patreon, or purchase goods on Amazon or Aliexpress


> Unsurprisingly throttling occurred, but only for a short time during 7-zip multi-thread test
According to the output it wasn’t throttling but frequency capping as the result of supply voltage dropping below 4.6V or something like that. Also it happened ‘since last reboot’ and not during benchmark execution (since then it would’ve been mentioned in dmesg output).
Yeah, I’m generally skittish about trusting the sometimes-voracious model 4 to a cheap or possibly sketchy power supply.
This is interesting.
When people tried to install Linux on their
slim and quiet Android tablet.
When people tried to install a full size raspberry Pi 4 to the RPI all-in-one.
I’d love something like that which instead used a CM4 inside the tablet case with max 1cm thick. As much as the Hack-a-Day design with the RPi slapped on the back in its own box gives it a warm geeky vibe, its both impractical for travel (way more likely to damage) and not very comfortable in the lap. The benefit of using an RPi4 instead of CM4 is that in future the ports may be upgraded. The benefit of the CM4 is that there’s a hope in hell of making it into an actual tablet form-factor, and perhaps even a… Read more »
CutiePi is the closest to what you are asking, but 1.4cm thick.
https://www.cnx-software.com/2021/03/22/cutiepi-raspberry-pi-cm4-tablet/
The 49.2kHz is almost certainly the line-rate of the signal being fed to the monitor (i.e. how many total lines per second – including blanking) 49.2kHz as a line rate at 1280×800 60Hz suggests that the signal being fed to the display is 49200/60 = 820 lines per second, so the 800 line active signal is sent as 820 total Iines (with 20 lines of vertical blanking period) Conventional SDTV 625/50 PAL has a line rate of 15.625kHz (625 x 25), conventional 525/59.94 NTSC has a line rate of 15.734kHZ (525×29.97) (50->25 and 59.94->29.97 because of 2:1 interlace being used… Read more »
Would be interesting the same one but with Russian ARM CPU “Baikal”
Is there a Baikal board with Raspberry Pi form factor?
Have you measured the power consumption with the cpu idle? I am wondering about the practicality of battery power for short periods. Not for travel or real portability, but to temporarily unplug it to bring it over to another part of the room. That is unfortunate if the included power cube can’t deliver enough power to run the pi 4. Even worse if the problem is the internal dc-dc converter making 5 volts from 12. Your other post said it was a 12 volt 2 amp supply, so 24 watts, though some of it must go to the screen. Unfortunately… Read more »
I have not tested power consumption. My power meter is broken. If you have a 12V power bank connected to the display then it should certainly be enough for your use case.
For reference, I’m using Maxoak K2 power bank with my laptop since my battery is dead, and I had to remove it from my laptop, or it would not boot. I can use it for hours that way when not connected to the mains.
Hello,
Do you know where to find a replacement for the hdmi-d adapter for raspberry 4? Thanks
I can’t find any. It’s going to be tough because it’s a custom board. Your best bet would be to ask the EVICIV shop on Amazon or Aliexpress.
Thanks Jean-Luc for your answer. One year ago I followed your guide 🙂 Now I tried to switch to RPI4 and the adapter seems not working; I don’t get signal. While for RPI3 with HDMI-A adapter everything works. Also with external HDMI connector it’s fine. I’ll try to ask to Eviciv shop on both platforms