I had seen the Edge Impulse development platform for machine learning on edge devices being used by several boards, but I hadn’t had an opportunity to try it out so far. So when Seeed Studio asked me whether I’d be interested to test the nRF52840-powered XIAO BLE Sense board, I thought it might be a good idea to review it with Edge Impulse as I had seen a motion/gesture recognition demo on the board.
It was quite a challenge as it took me four months to complete the review from the time Seeed Studio first contacted me, mostly due to poor communications from DHL causing the first boards to go to customs’ heaven, then wasting time with some of the worse instructions I had seen in a long time (now fixed), and other reviews getting in the way. But I finally managed to get it working (sort of), so let’s have a look.
XIAO BLE (Sense) and OLED display unboxing
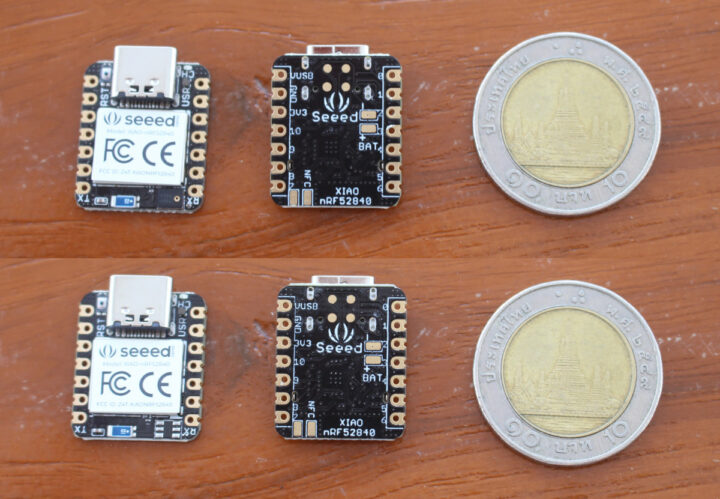
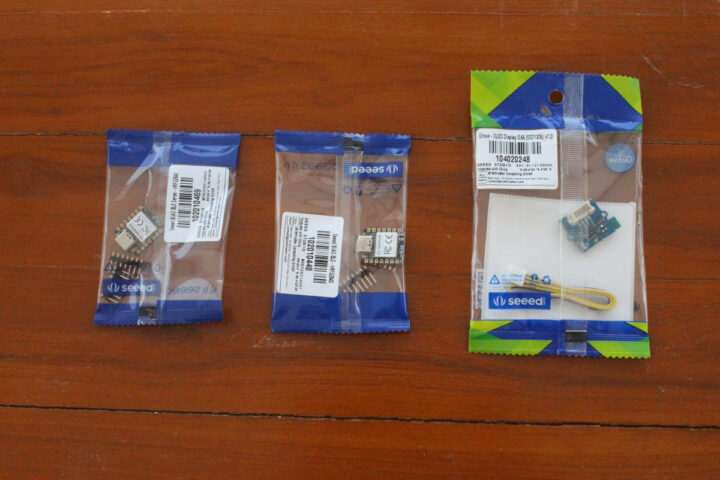
Since the gesture recognition demo used an OLED display, I also asked for it and I received the XIAO BLE board (without sensor), the XIAO BLE Sense board, and the Grove OLED Display 0.66″.
Both boards are extremely tiny, and exactly the same except the XIAO BLE lacks the LSM6DS3TR onboard 6-axis IMU (bottom left side).
Some soldering…
Before loading firmware on the board, I had to solder the display to the board. I just cut the Grove cable and soldered the black and red wires to the power, and the white and yellow wires to I2C.
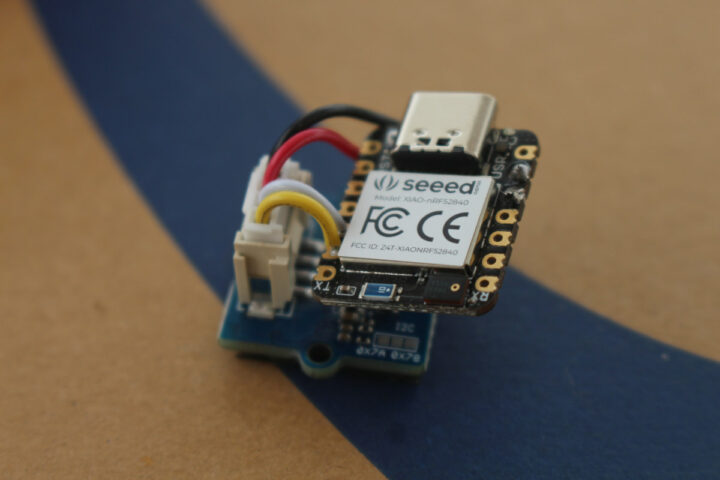
I do not have a 3D printer (another customs story, but I digress), so instead I used several layers of dual-sided sticky tape to attach the two boards together, but that’s really optional.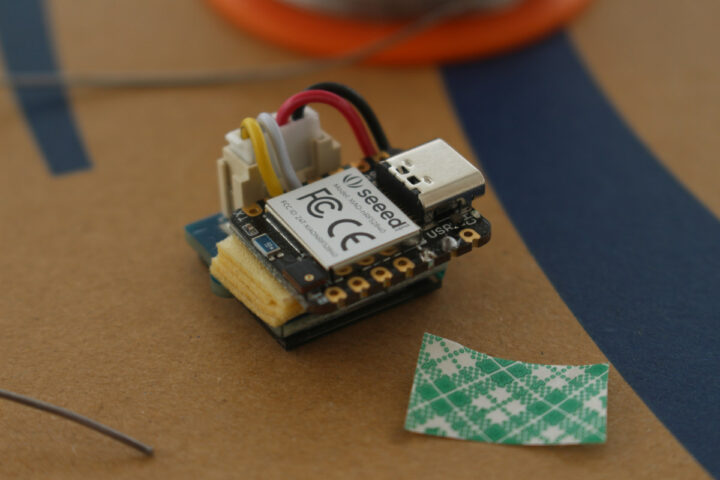
Arduino sketches for XIAO BLE Sense’s OLED display and accelerometer
It took me a while to find the instructions for the gesture recognition demo, as those were not listed in the video description, and I could not find anything about it in Seeed Studio wiki. Eventually I was given the link to the instructions, and the company modified the website to make it easier to find.
Before playing with Edge Impulse, we’ll run two Arduino sketches to check the OLED display and the accelerometer work as expected.
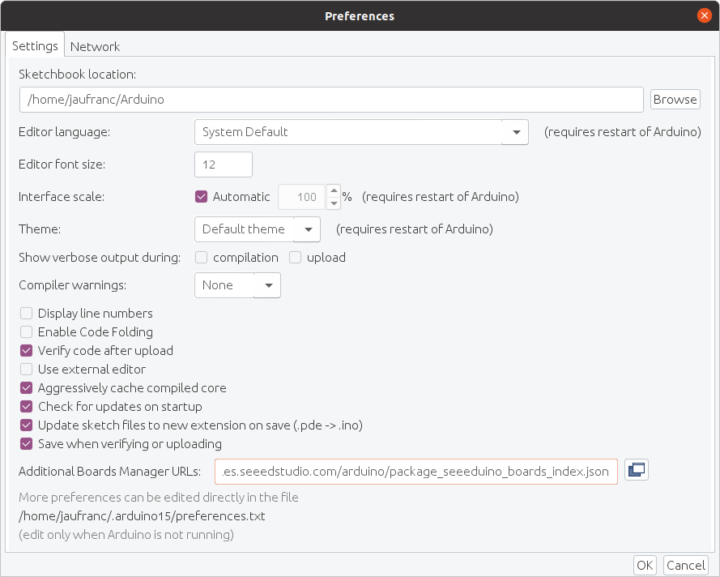
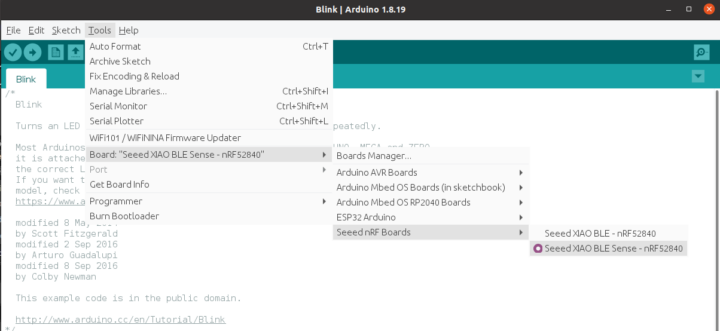
The first step is to add the board manager URL for Seeed Studio boards: https://files.seeedstudio.com/arduino/package_seeeduino_boards_index.json
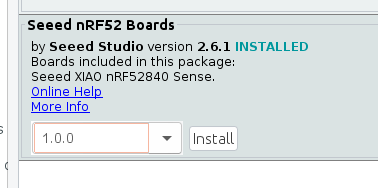
Now we can install the package to support Seeed nRF52 Boards…
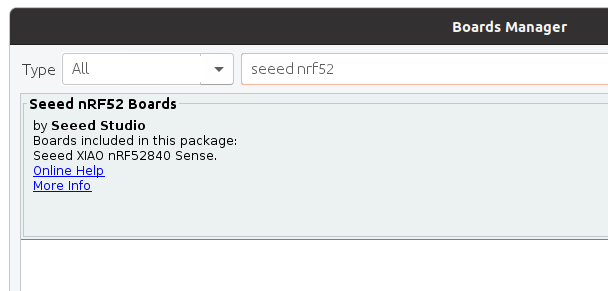
… and once it’s done, let’s connect the board with a USB-C cable to our computer, and select “Seeed XIAO BLE Sense – nRF52840” board with default settings.
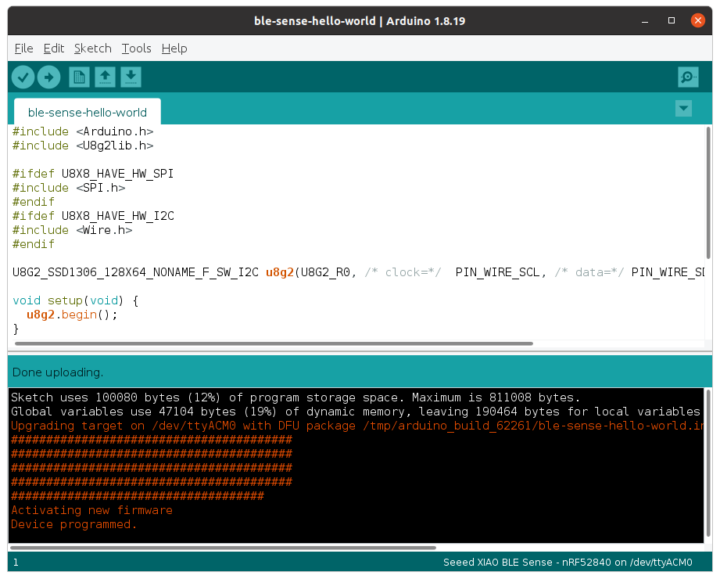
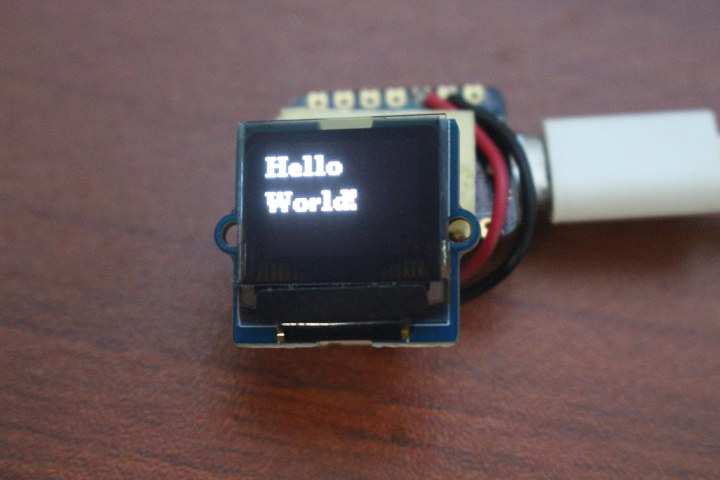
Let’s try a “Hello World” program to make sure our board works and the connection to the OLED display is fine.
|
1 2 3 4 5 6 7 8 9 10 11 12 13 14 15 16 17 18 19 20 21 22 23 24 |
#include <Arduino.h> #include <U8g2lib.h> #ifdef U8X8_HAVE_HW_SPI #include <SPI.h> #endif #ifdef U8X8_HAVE_HW_I2C #include <Wire.h> #endif U8G2_SSD1306_128X64_NONAME_F_SW_I2C u8g2(U8G2_R0, /* clock=*/ PIN_WIRE_SCL, /* data=*/ PIN_WIRE_SDA, /* reset=*/ U8X8_PIN_NONE); void setup(void) { u8g2.begin(); } void loop(void) { u8g2.clearBuffer(); // clear the internal memory u8g2.setFont(u8g2_font_ncenB08_tr); // choose a suitable font u8g2.drawStr(32,30,"Hello"); // write something to the internal memory u8g2.drawStr(32,45,"Seeed!"); u8g2.sendBuffer(); // transfer internal memory to the display delay(1000); } |
But I did not work as expected, and I got an error at compile time:
|
1 2 |
exec: "adafruit-nrfutil": executable file not found in $PATH Error compiling for board Seeed XIAO BLE Sense - nRF52840. |
The answer is on Adafruit website where we learn two important details:
- nRF52 requires Arduino 1.8.15 or greater, so you may have to upgrade to the latest version
- Linux requires the installation of adafruit-nrfutil
Since I’m using Ubuntu 20.04, I had to run:
|
1 2 |
pip3 install --user adafruit-nrfutil export PATH=:$PATH:$HOME/.local/bin |
Note this is NOT needed if you are using the Arduino IDE in Windows or MacOS. The utility was installed in $HOME/.local/bin, so you’ll need to add it to your path, and restart the Arduino IDE. This can be done temporarily in the command line:
|
1 |
export PATH=:$PATH:$HOME/.local/bin |
Or you can change /etc/environment or ~/.bashrc file for permanently adding the folder to your PATH. The sketch could build fine, and the binary was flashed to the board without issue.
But nothing showed on the display. I added a serial.println debug message in the main loop to check it was indeed running, double-checked the connections with a multimeter, and I could not find any obvious solution. Seeed Studio told me to downgrade to version 1.0.0 of the Seeed nRF52 Boards package.
Note that you won’t need to downgrade to version 1.0.0 anymore in the rest of the review, and it is recommended you use 2.6.1 and greater. The new “Hello World” sample looks like this:
|
1 2 3 4 5 6 7 8 9 10 11 12 13 14 15 16 |
#include <Arduino.h> #include <U8x8lib.h> U8X8_SSD1306_64X48_ER_HW_I2C u8x8(/* reset=*/ U8X8_PIN_NONE); void setup(void) { u8x8.begin(); } void loop(void) { u8x8.setFont(u8x8_font_amstrad_cpc_extended_r); u8x8.drawString(0,0,"idle"); u8x8.drawString(0,1,"left"); u8x8.drawString(0,2,"right"); u8x8.drawString(0,3,"up&down"); } |
Time to switch to testing the accelerometer demo. First, we’ll need to install LSM6DS3 Arduino library from Seeed Studio.
Note there’s also an official Arduino_LSM6DS3 which you may need to uninstall to avoid conflicts. Here’s the code:
|
1 2 3 4 5 6 7 8 9 10 11 12 13 14 15 16 17 18 19 20 21 22 23 24 25 26 27 28 29 30 31 32 33 34 35 36 |
#include "LSM6DS3.h" #include "Wire.h" //Create a instance of class LSM6DS3 LSM6DS3 myIMU(I2C_MODE, 0x6A); //I2C device address 0x6A #define CONVERT_G_TO_MS2 9.80665f #define FREQUENCY_HZ 50 #define INTERVAL_MS (1000 / (FREQUENCY_HZ + 1)) static unsigned long last_interval_ms = 0; void setup() { // put your setup code here, to run once: Serial.begin(115200); while (!Serial); //Call .begin() to configure the IMUs if (myIMU.begin() != 0) { Serial.println("Device error"); } else { Serial.println("Device OK!"); } } void loop() { if (millis() > last_interval_ms + INTERVAL_MS) { last_interval_ms = millis(); Serial.print(myIMU.readFloatGyroX() * CONVERT_G_TO_MS2,4); Serial.print('\t'); Serial.print(myIMU.readFloatGyroY() * CONVERT_G_TO_MS2,4); Serial.print('\t'); Serial.println(myIMU.readFloatGyroZ() * CONVERT_G_TO_MS2,4); } } |
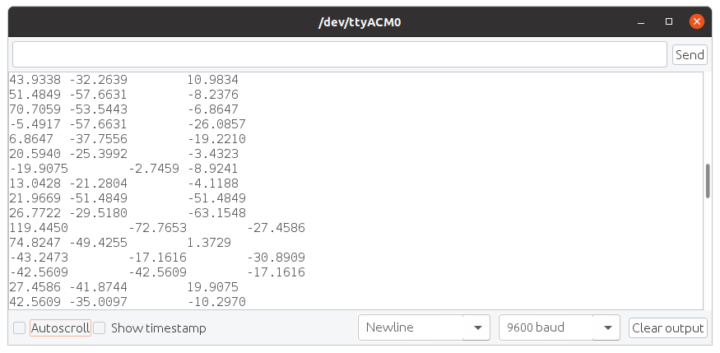
Note that when I used Seeed nRF52 Boards v1.0.0 with that sample, I would get “decode error” messages, which went away with version 2.6.1. We’ll need to open the Serial monitor to check X, Y, Z values are showing up.
Important: we’ll still need the accelerator demo running for the next step. So if you play with other samples first, make sure the accelerator demo is running before switching to Edge Impulse.
Edge Impulse on XIAO BLE Sense
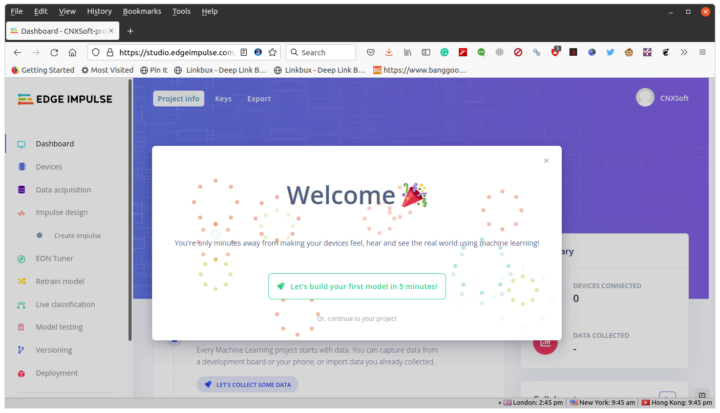
Now that we know our hardware is working as expected, let’s go to Edge Impulse Studio to get started. Let’s register, and build our first project.
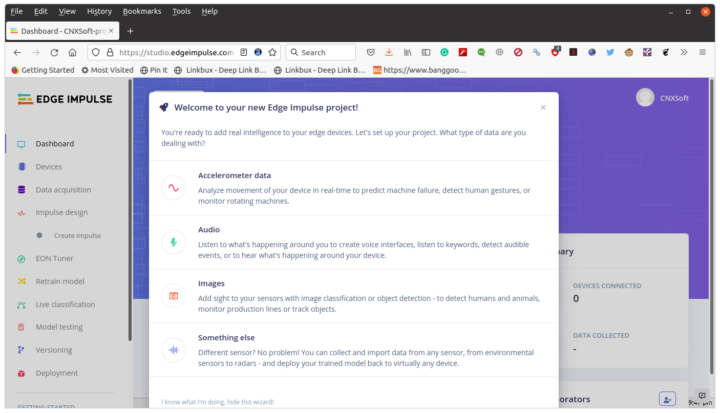
We’ll select Accelerometer data.
We’ll also need to install Edge Impulse CLI in Linux (Ubuntu 20.04 for this review). This first requires installing NodeJS 14.x:
|
1 2 |
curl -sL https://deb.nodesource.com/setup_14.x | sudo -E bash - sudo apt install -y nodejs |
The default directory will be in /usr accessible by root, let’s change that to a user’s directory which we’ll also add to our path:
|
1 2 3 |
mkdir ~/.npm-global npm config set prefix '~/.npm-global' echo 'export PATH=~/.npm-global/bin:$PATH' >> ~/.bashrc |
Now we can install Edge Impulse CLI:
|
1 |
npm install -g edge-impulse-cli |
You may have to exit the terminal and restart it for the new PATH to apply. Now we can launch the edge-impulse-data-forwarder used for boards that are not officially supported by Edge Impulse (like XIAO BLE Sense):
|
1 2 3 4 5 6 7 8 9 10 11 12 13 14 15 16 17 18 19 |
$ edge-impulse-data-forwarder Edge Impulse data forwarder v1.14.12 Endpoints: Websocket: wss://remote-mgmt.edgeimpulse.com API: https://studio.edgeimpulse.com/v1 Ingestion: https://ingestion.edgeimpulse.com [SER] Connecting to /dev/ttyACM0 [SER] Serial is connected (5B:5B:83:F3:C6:0A:0C:DD) [WS ] Connecting to wss://remote-mgmt.edgeimpulse.com [WS ] Connected to wss://remote-mgmt.edgeimpulse.com [SER] Detecting data frequency... [SER] Detected data frequency: 50Hz ? 3 sensor axes detected (example values: [10.9834,-15.7887,-4.8053]). What do y ou want to call them? Separate the names with ',': Ax, Ay, Az ? What name do you want to give this device? XIAO BLE SENSE [WS ] Device "XIAO BLE SENSE" is now connected to project "XIAO BLE Sense motion detection" [WS ] Go to https://studio.edgeimpulse.com/studio/91558/acquisition/training to build your machine learning model! |
The very first time the command is running, you’ll need to enter your username and password (not shown above). The utility scans serial devices, connects to edge impulse, tries to detect data from the serial port, and once done, asks us to name data fields (Ax, Ay, Az), the device (XIAO BLE SENSE), and will automatically attach it to the project we have just created. If there is more than one project in Edge Impulse, you’ll be asked to select the project first. That means it’s basically hardware agnostic, and as long as your board output accelerometer data to the serial interface it should work.
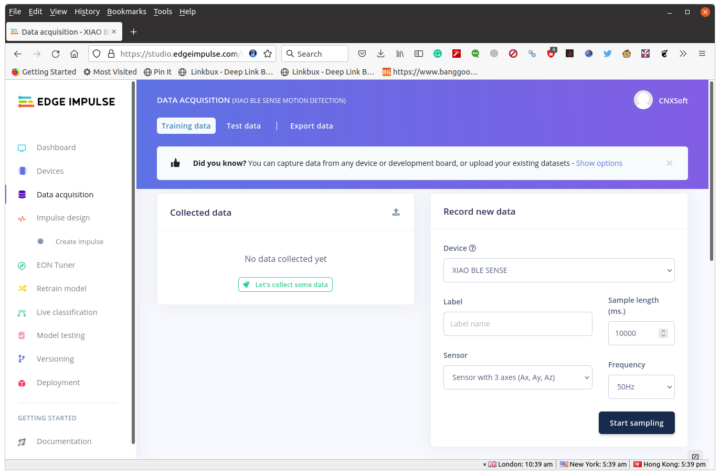
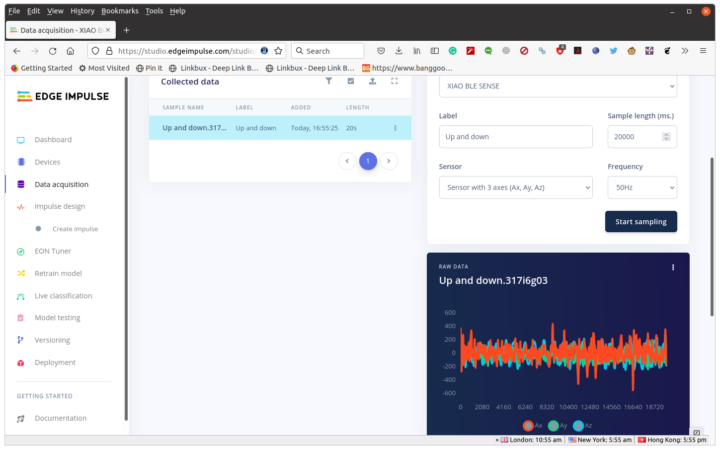
Let’s go back to Edge Impulse, click on Data acquisition, and we’ll see our device together with sensor parameters and data frequency settings.
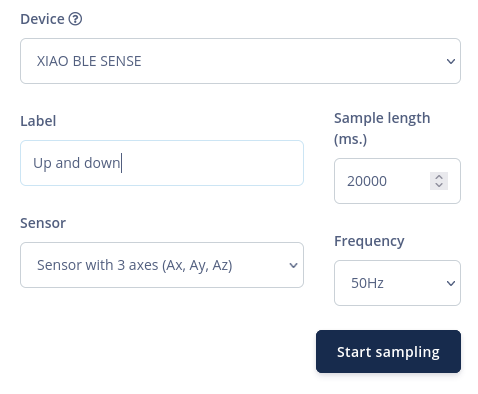
Let’s set the sample size to 20,000 ms, define a label, click on Start Sampling, and move the board up and down with about 1 second internal for 20 seconds to acquire the data.
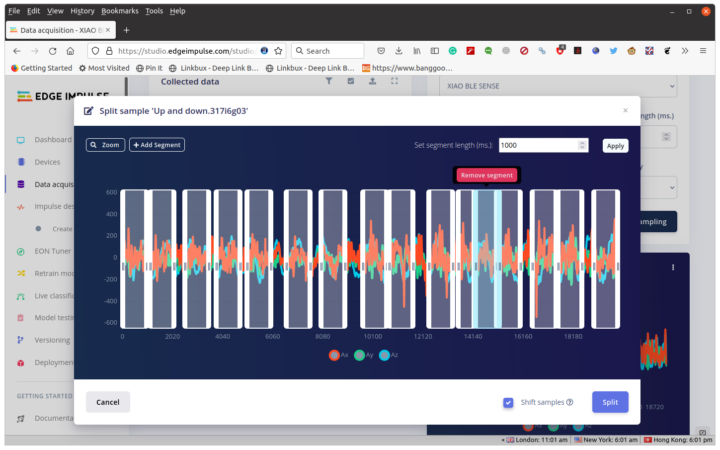
We’ll then need to split the data by clicking on the three dots in the raw section and choosing “Split Sample”. Click “+Add Segment” to add more section. We should repeat it until we’ve got around 20 segments representing the up and down movement. If you moved slower or faster than 1s adjust the time in “Set segment length (ms.)”.
I’m using Firefox, and I had a weird bug where I could add a segment, but when I selected it to move it, it would jump by an offset to the right, sometimes outside of the screen. But if I kept pressing on the mouse button, and moving it left, it could bring it back in view. It was not exactly the most convenient, and I can’t zoom in too much or the box will get too much out of the display. Using Chrome or Microsoft Edge with Edge Impulse might be better.
Once we click on Split and we’ll see the 1-second data sample we’ve selected. 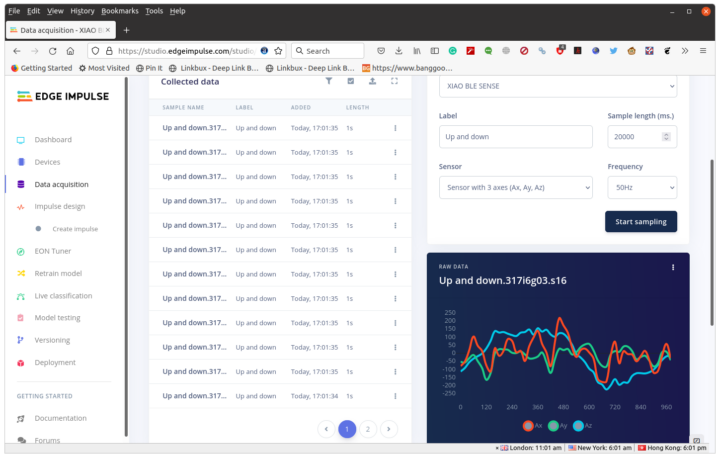
We can repeat data acquisition and splitting for other gestures such as left and right, clockwise circle, and anti-clockwise circle. But I’d recommend keeping it simple first, as we’ll see below.
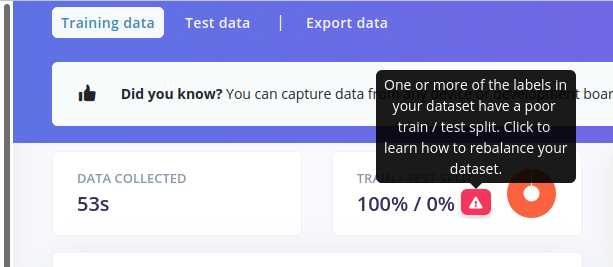
At this point, you may see what looks like a problem with the data with the warning:
One or more of the labels in your dataset have a poor train/test split
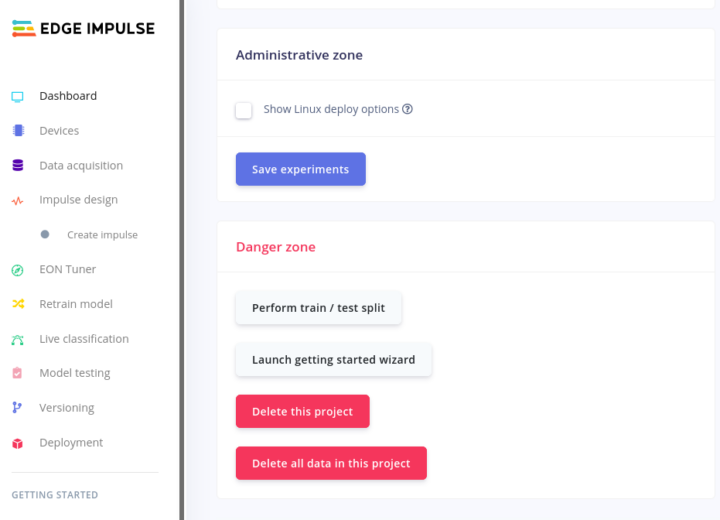
To fix this, you can either capture test data for a shorter period (e.g. 2 seconds), or rebalance the dataset, by clicking on “Dashboard” in the left menu, and scroll down to find the “Perform train / test split” button.
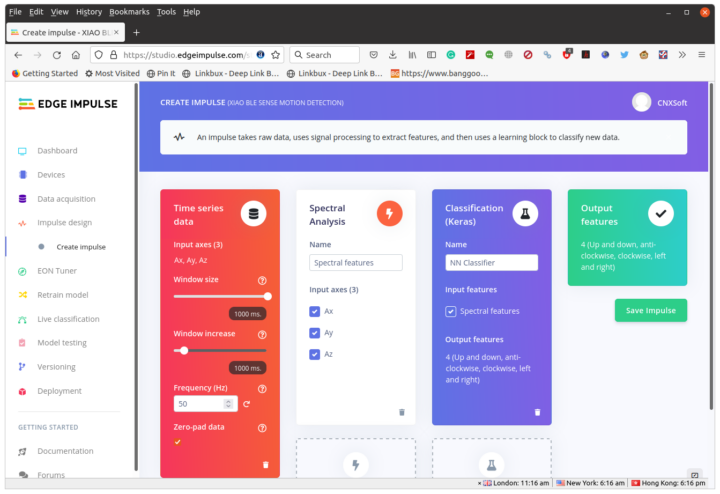
We are now ready to create an impulse. Click on Create impulse -> Add a processing block -> Choose Spectral Analysis -> Add a learning block -> Choose Classification (Keras) -> Save Impulse
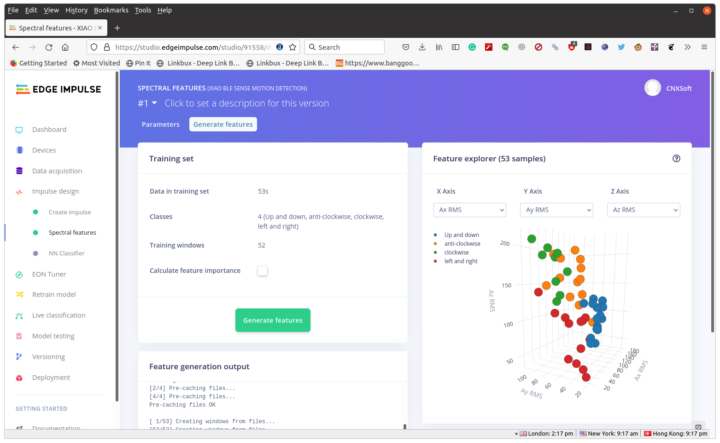
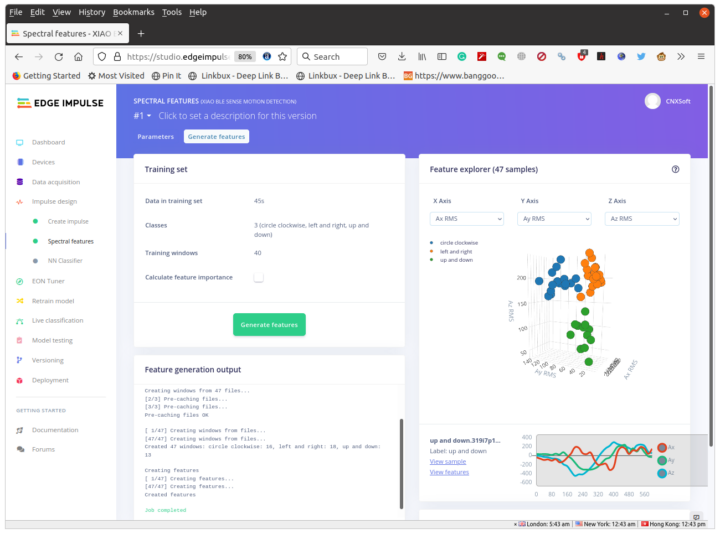
Click on Spectral features in the Spectral Analysis, then Save parameters and Generate features.
You’d expect the data to be cleanly separated, but there’s clearly some overlap, so the trained data is not ideal. I’ll try to go ahead nevertheless.
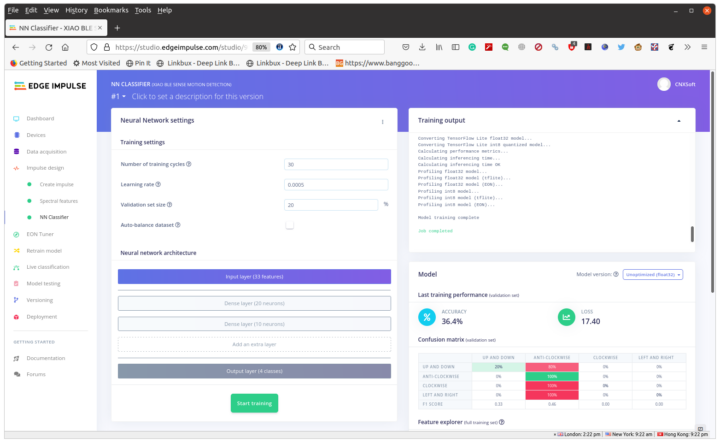
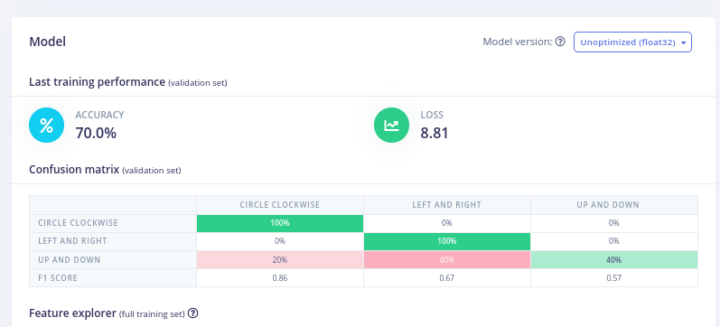
Click NN Classifier, then “Start training” which will take about one minute to process. We can then choose Unoptimized (float32)
There’s indeed low accuracy and the model is basically unusable with only the “anti-clockwise” sample being detected properly.
Let’s try again, but only with up and down, left and right, and circle (clockwise) and trying to keep each motion within one second.
The Features explorer chart looks much better with Blue, Orange, and Green dots in their own areas. It’s also possible to delete some samples that may cause issues. After training the results are not perfect, but we may still give it a try.
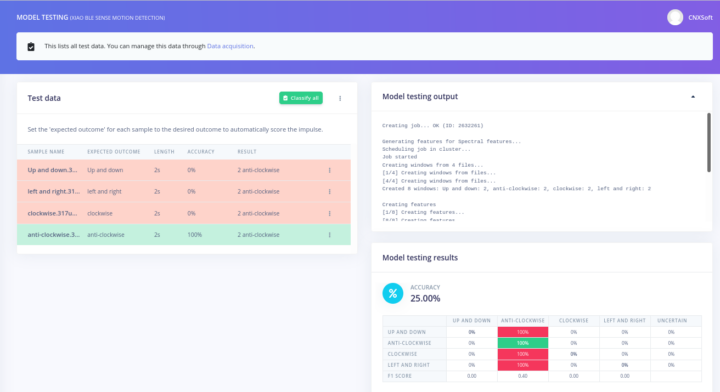
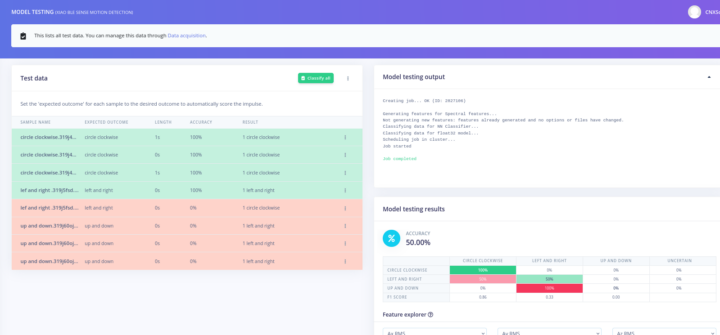
Let’s go through “Model testing” in the left menu.
That’s disappointing as only Circle clockwise works well, while “left and right” can be detected about half the time, and “up and down” being wrongly detected as left and right. So besides training the data, the operator must also be trained.
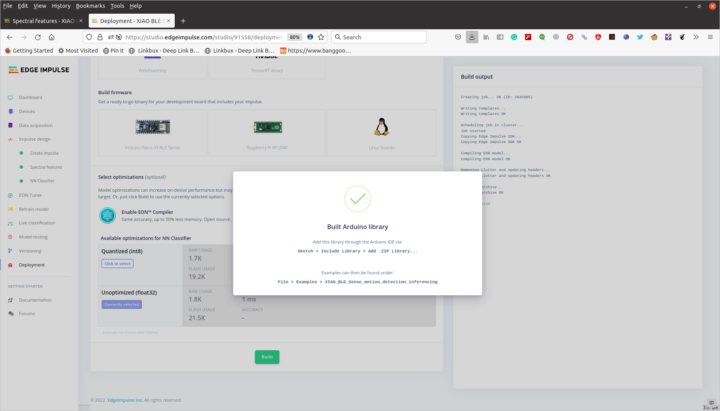
The important part is the method to create an Impulse, and over time we should e able to create better data. Let’s build an Arduino library by clicking on Deployment in the left menu, then Arduino Library, Build, and finally download the .ZIP file.
Back to the Arduino IDE. Download the Arduino sample provided by Seeed Studio, which has gone through many revisions over the last few months. Change the edge impulse header file (line 24 in the sample below) to match your own, and I also had to comment out the line with U8X8lib.h library. I also slightly modified the code, as I had not trained for “idle” as in their demo:
|
1 2 3 4 5 6 7 8 9 10 11 12 13 14 15 16 17 18 19 20 21 22 23 24 25 26 27 28 29 30 31 32 33 34 35 36 37 38 39 40 41 42 43 44 45 46 47 48 49 50 51 52 53 54 55 56 57 58 59 60 61 62 63 64 65 66 67 68 69 70 71 72 73 74 75 76 77 78 79 80 81 82 83 84 85 86 87 88 89 90 91 92 93 94 95 96 97 98 99 100 101 102 103 104 105 106 107 108 109 110 111 112 113 114 115 116 117 118 119 120 121 122 123 124 125 126 127 128 129 130 131 132 133 134 135 136 137 138 139 140 141 142 143 144 145 146 147 148 149 150 151 152 153 154 155 156 157 158 159 160 161 162 163 164 165 166 167 168 169 170 171 172 173 174 175 176 177 178 179 180 181 182 183 184 185 186 187 188 189 190 191 192 193 194 195 196 197 |
/* Edge Impulse Arduino examples * Copyright (c) 2021 EdgeImpulse Inc. * * Permission is hereby granted, free of charge, to any person obtaining a copy * of this software and associated documentation files (the "Software"), to deal * in the Software without restriction, including without limitation the rights * to use, copy, modify, merge, publish, distribute, sublicense, and/or sell * copies of the Software, and to permit persons to whom the Software is * furnished to do so, subject to the following conditions: * * The above copyright notice and this permission notice shall be included in * all copies or substantial portions of the Software. * * THE SOFTWARE IS PROVIDED "AS IS", WITHOUT WARRANTY OF ANY KIND, EXPRESS OR * IMPLIED, INCLUDING BUT NOT LIMITED TO THE WARRANTIES OF MERCHANTABILITY, * FITNESS FOR A PARTICULAR PURPOSE AND NONINFRINGEMENT. IN NO EVENT SHALL THE * AUTHORS OR COPYRIGHT HOLDERS BE LIABLE FOR ANY CLAIM, DAMAGES OR OTHER * LIABILITY, WHETHER IN AN ACTION OF CONTRACT, TORT OR OTHERWISE, ARISING FROM, * OUT OF OR IN CONNECTION WITH THE SOFTWARE OR THE USE OR OTHER DEALINGS IN THE * SOFTWARE. */ /* Includes ---------------------------------------------------------------- */ #include <XIAO_BLE_Sense_motion_detection_inferencing.h> #include <LSM6DS3.h> #include <U8g2lib.h> // #include <U8X8lib.h> #include <Wire.h> /* Constant defines -------------------------------------------------------- */ #define CONVERT_G_TO_MS2 9.80665f #define MAX_ACCEPTED_RANGE 2.0f // starting 03/2022, models are generated setting range to +-2, but this example use Arudino library which set range to +-4g. If you are using an older model, ignore this value and use 4.0f instead /* ** NOTE: If you run into TFLite arena allocation issue. ** ** This may be due to may dynamic memory fragmentation. ** Try defining "-DEI_CLASSIFIER_ALLOCATION_STATIC" in boards.local.txt (create ** if it doesn't exist) and copy this file to ** `<ARDUINO_CORE_INSTALL_PATH>/arduino/hardware/<mbed_core>/<core_version>/`. ** ** See ** (https://support.arduino.cc/hc/en-us/articles/360012076960-Where-are-the-installed-cores-located-) ** to find where Arduino installs cores on your machine. ** ** If the problem persists then there's not enough memory for this model and application. */ U8X8_SSD1306_64X48_ER_HW_I2C u8x8(/* reset=*/ U8X8_PIN_NONE); /* Private variables ------------------------------------------------------- */ static bool debug_nn = false; // Set this to true to see e.g. features generated from the raw signal LSM6DS3 myIMU(I2C_MODE, 0x6A); /** * @brief Arduino setup function */ const int RED_ledPin = 11; const int BLUE_ledPin = 12; const int GREEN_ledPin = 13; void setup() { // put your setup code here, to run once: Serial.begin(115200); //u8g2.begin(); u8x8.begin(); Serial.println("Edge Impulse Inferencing Demo"); //if (!IMU.begin()) { if (!myIMU.begin()) { ei_printf("Failed to initialize IMU!\r\n"); } else { ei_printf("IMU initialized\r\n"); } if (EI_CLASSIFIER_RAW_SAMPLES_PER_FRAME != 3) { ei_printf("ERR: EI_CLASSIFIER_RAW_SAMPLES_PER_FRAME should be equal to 3 (the 3 sensor axes)\n"); return; } } /** * @brief Return the sign of the number * * @param number * @return int 1 if positive (or 0) -1 if negative */ float ei_get_sign(float number) { return (number >= 0.0) ? 1.0 : -1.0; } /** * @brief Get data and run inferencing * * @param[in] debug Get debug info if true */ void loop() { u8x8.clear(); u8x8.setFont(u8g2_font_ncenB08_tr); ei_printf("\nStarting inferencing in 2 seconds...\n"); delay(2000); ei_printf("Sampling...\n"); // Allocate a buffer here for the values we'll read from the IMU float buffer[EI_CLASSIFIER_DSP_INPUT_FRAME_SIZE] = { 0 }; for (size_t ix = 0; ix < EI_CLASSIFIER_DSP_INPUT_FRAME_SIZE; ix += 3) { // Determine the next tick (and then sleep later) uint64_t next_tick = micros() + (EI_CLASSIFIER_INTERVAL_MS * 1000); buffer[ix] = myIMU.readFloatAccelX(); buffer[ix+1] = myIMU.readFloatAccelY(); buffer[ix+2] = myIMU.readFloatAccelZ(); for (int i = 0; i < 3; i++) { if (fabs(buffer[ix + i]) > MAX_ACCEPTED_RANGE) { buffer[ix + i] = ei_get_sign(buffer[ix + i]) * MAX_ACCEPTED_RANGE; } } buffer[ix + 0] *= CONVERT_G_TO_MS2; buffer[ix + 1] *= CONVERT_G_TO_MS2; buffer[ix + 2] *= CONVERT_G_TO_MS2; delayMicroseconds(next_tick - micros()); } // Turn the raw buffer in a signal which we can the classify signal_t signal; int err = numpy::signal_from_buffer(buffer, EI_CLASSIFIER_DSP_INPUT_FRAME_SIZE, &signal); if (err != 0) { ei_printf("Failed to create signal from buffer (%d)\n", err); return; } // Run the classifier ei_impulse_result_t result = { 0 }; err = run_classifier(&signal, &result, debug_nn); if (err != EI_IMPULSE_OK) { ei_printf("ERR: Failed to run classifier (%d)\n", err); return; } // print the predictions ei_printf("Predictions "); ei_printf("(DSP: %d ms., Classification: %d ms., Anomaly: %d ms.)", result.timing.dsp, result.timing.classification, result.timing.anomaly); ei_printf(": \n"); for (size_t ix = 0; ix < EI_CLASSIFIER_LABEL_COUNT; ix++) { ei_printf(" %s: %.5f\n", result.classification[ix].label, result.classification[ix].value); } #if EI_CLASSIFIER_HAS_ANOMALY == 1 ei_printf(" anomaly score: %.3f\n", result.anomaly); #endif if (result.classification[0].value > 0.5) { digitalWrite(RED_ledPin, LOW); digitalWrite(BLUE_ledPin, HIGH); // circle red digitalWrite(GREEN_ledPin, HIGH); u8x8.setFont(u8x8_font_amstrad_cpc_extended_r); u8x8.drawString(1,2,"Circle"); u8x8.refreshDisplay(); delay(2000); } else if (result.classification[1].value > 0.5) { digitalWrite(RED_ledPin, HIGH); //left&right blue digitalWrite(BLUE_ledPin, LOW); digitalWrite(GREEN_ledPin, HIGH); u8x8.setFont(u8x8_font_amstrad_cpc_extended_r); u8x8.drawString(2,3,"left"); u8x8.drawString(2,4,"right"); u8x8.refreshDisplay(); delay(2000); } else if (result.classification[2].value > 0.5) { digitalWrite(RED_ledPin, HIGH); digitalWrite(BLUE_ledPin, HIGH); digitalWrite(GREEN_ledPin, LOW); //up&down green u8x8.setFont(u8x8_font_amstrad_cpc_extended_r); u8x8.drawString(2,3,"up"); u8x8.drawString(2,4,"down"); u8x8.refreshDisplay(); delay(2000); } else { digitalWrite(RED_ledPin, LOW); digitalWrite(BLUE_ledPin, LOW); digitalWrite(GREEN_ledPin, LOW); //idle off LEDs off u8x8.setFont(u8x8_font_amstrad_cpc_extended_r); u8x8.drawString(2,3,"idle"); u8x8.refreshDisplay(); delay(2000); } } |
We need to add the ZIP library we’ve just downloaded from Edge Impulse to the Arduino Library, and we can now build and flash the code to the board. This will take around 5 minutes the first time, and about 2 minutes for subsequent builds.
Here’s the output from the serial console.
|
1 2 3 4 5 6 7 8 9 10 11 12 13 14 15 16 17 18 19 20 |
Starting inferencing in 2 seconds... Sampling... Predictions (DSP: 10 ms., Classification: 0 ms., Anomaly: 0 ms.): circle clockwise: 0.59337 left and right: 0.14814 up and down: 0.25850 Starting inferencing in 2 seconds... Sampling... Predictions (DSP: 10 ms., Classification: 0 ms., Anomaly: 0 ms.): circle clockwise: 0.35315 left and right: 0.30938 up and down: 0.33747 Starting inferencing in 2 seconds... Sampling... Predictions (DSP: 10 ms., Classification: 0 ms., Anomaly: 0 ms.): circle clockwise: 0.67348 left and right: 0.09551 up and down: 0.23102 |
So each time a value is over 50 it will show the corresponding text (e.g. Circle), and if none of the results goes above 50, the program simply displays “Idle”.
Here’s what it looks like on video.
The circle is recognized (even if I go in the wrong way as in the video below), but I only got “left and right” a few times, and never “up and down”. So it should take some time to have a proper demo with the important part being the data acquisition and accurate splitting to make sure all samples for a particular gesture look about the same.
I’d like to thank Seeed Studio for sending XIAO BLE (Sense) boards and Grove OLED display for testing Edge Impulse. I’d just wish they got their documentation right the first time. If you are interested in reproducing the demo above the XIAO BLE Sense board is sold for $15.99, while the OLED display goes for $5.50, and it’s optional because we can see the results in the serial terminal.

Jean-Luc started CNX Software in 2010 as a part-time endeavor, before quitting his job as a software engineering manager, and starting to write daily news, and reviews full time later in 2011.
Support CNX Software! Donate via cryptocurrencies, become a Patron on Patreon, or purchase goods on Amazon or Aliexpress





FYI the the ten (10) Thai Baht coin shown for size comparison is 26 mm (1.02 inch) in diameter. See here:
https://en.wikipedia.org/wiki/Ten-baht_coin
And just for fun, at my writing time ten (10) Thai Baht is worth $0.29 USD:
https://duckduckgo.com/?q=10+Baht+in+USD&hps=1&ia=currency
“So it should take some time to have a proper demo with the important part being the data acquisition and accurate splitting to make sure all samples for a particular gesture look about the same.” I’ve read/watched a few of these simple Edge Impulse accelerometer “demos” now, and most of them produced finicky if not outright unreliable results. I think it’s an understatement when they say training ML is hard and time consuming. I get the feeling you need lots of training data and all of that requires manual editing to provide examples that reinforce the desired outcomes. Plus I… Read more »
Hello David,
Indeed that is a fact with machine learning solutions in general, not only embedded machine learning. Collecting a good dataset is very tedious and time-consuming. We are trying to offer tools that make this process (and in general all the steps along the machine learning pipeline) smoother. Do not hesitate to reach me on Edge Impulse forum is you have any questions on how to perform better with your project, I’d be happy to help.
Regards,
Louis
How to install edge-impulse firmware in Xiao Sense?
This is explained in this article. There’s actually no Edge Impulse firmware per se. it’s just Arduino code that sends data over serial, which is then sent to the Edge Impulse cloud via a data forwarder running on the host computer.