Making a DIY Raspberry Pi camera mount with privacy mode!

XYLITOL Raspberry Pi Camera Mount

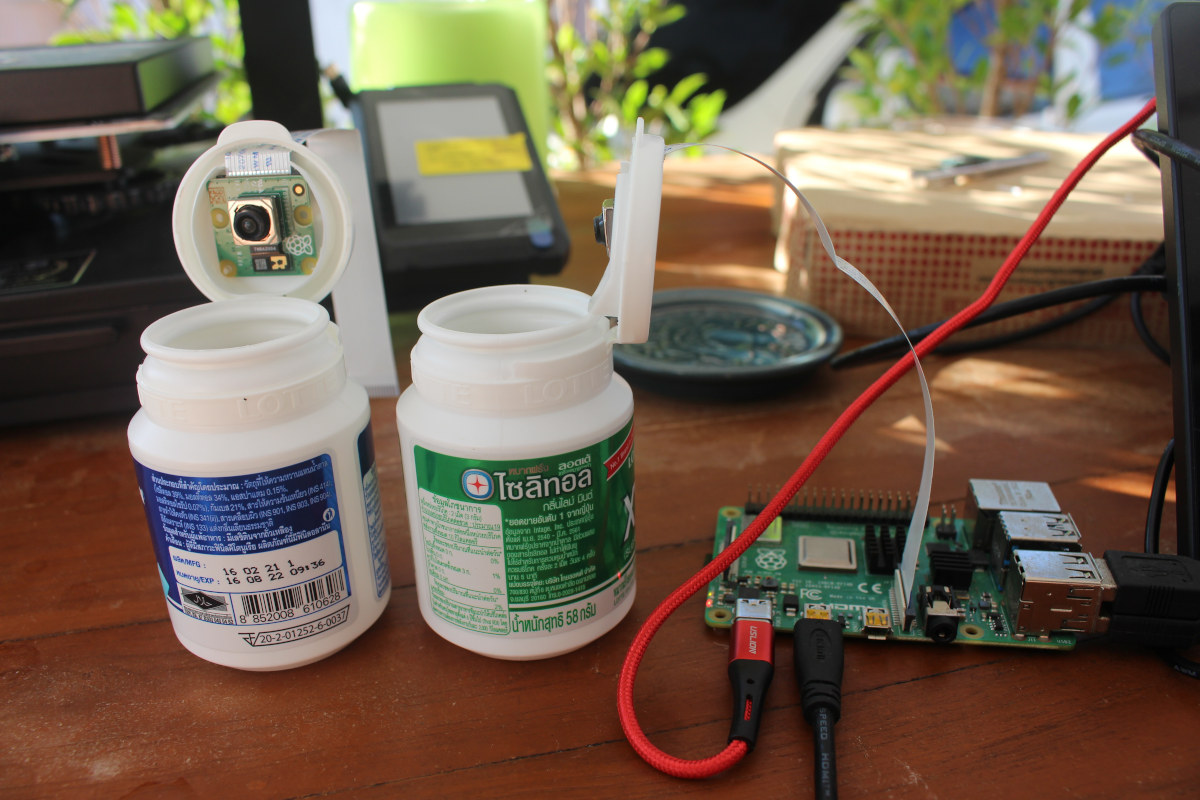
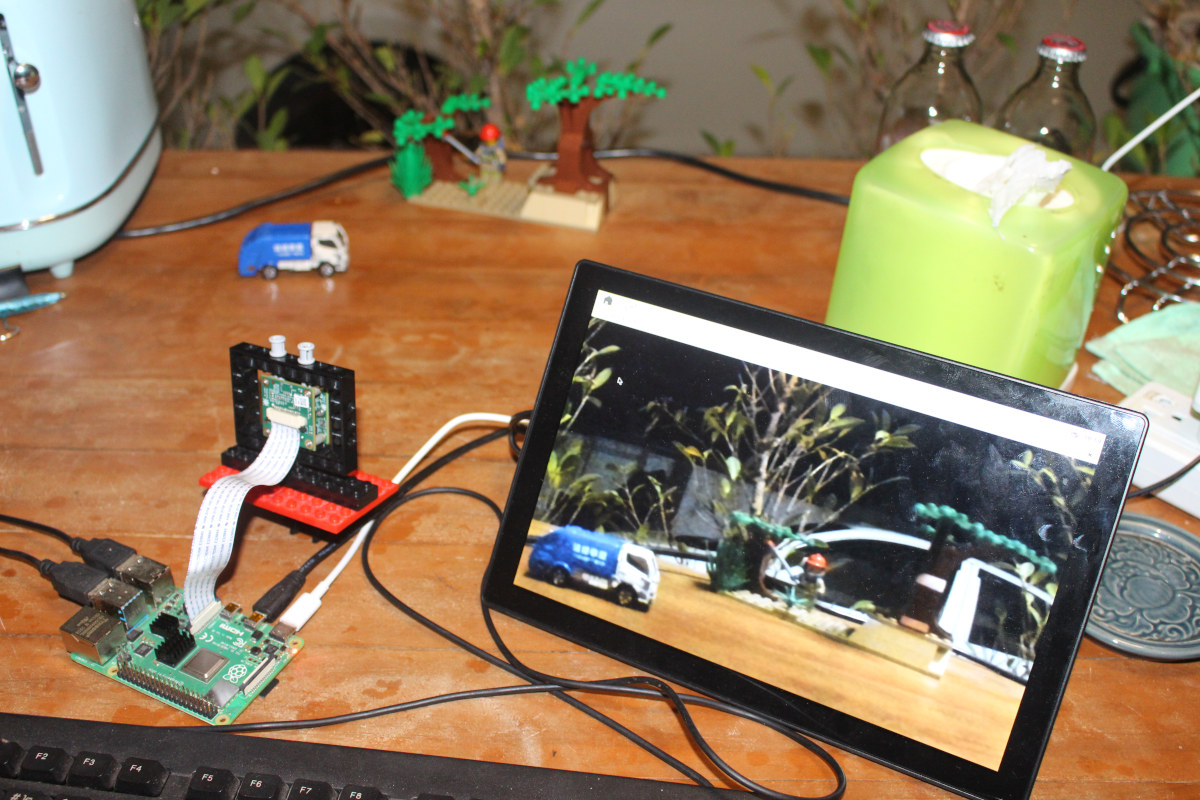
I’ve just repurposed an empty XYLITOL gum bottle into a DIY camera mount for the Raspberry Pi Camera Module 3 with privacy mode to boot… In order to avoid confusion, while Xylitol is a chemical compound, it’s also a Japanese brand of chewing gums (Lotte XYLITOL) that is sold in Thailand and other countries. I’m specifically talking about the latter in this post. Raspberry Pi Trading has just sent me a bunch of Raspberry Pi Camera Modules 3 for review, and since I don’t have any camera mount I initially thought maybe I’ll laser cut some mount or use some LEGOs as I did with the e-CAM20_CURB camera for Raspberry Pi 4. But then I saw some empty XYLITOL gum bottles, noticed the cap would open vertically, and it seemed like the modules might fit in there as well. And indeed they do with the Raspberry Pi camera modules snugged […]

Adding an external serial console port to NanoPi R6S

NanoPi R6S DIY external UART console

I had no trouble with my first experience with NanoPi R6S while installing and running the FriendlyWrt/OpenWrt 22.03 image, but that was another story when testing Ubuntu or Debian as the mini PC would not boot at all after flashing the images with eFlasher apparently successfully, but suspiciously fast (under 2 seconds). I spent nearly four hours trying the different images and then the Rockchip Windows utility, but all my attempts failed, and FriendlyElec was not overly helpful. So I decided to connect a serial console to see what was going on. The NanoPi R6S comes with a 3-pin header for the serial console, but it’s not populated. So I soldering one, but not at the top of the bottom, and instead at the bottom since it would allow me to still use the metal enclosure to cool the processor. Some readers, or at least one, often complain about the […]

Getting Started with CrowBot BOLT smart robot car

Elecrow CrowBot BOLT & Game Controller Assembled

CrowBot BOLT is a smart robot car based on an ESP32 wireless microcontroller and designed for the education market with the ability to program the robot with visual programming, Arduino, or MicroPython. Elecrow sent me a sample of the CrowBot BOLT kit for evaluation so I’ll have a look at the hardware, show how to assemble it, showcase the features of the built-in firmware, and demonstrate how to program the robot with visual programming, Arduino, and MicroPython using some of the provided code samples. CrowBot BOLT unboxing The package lists some of the highlights with 16 teaching courses, support for multiple programming platforms, scalability with Grove connectors, and the inclusion of the Joystick that’s also programmable. The CrowBot BOLT comes as a kit so there will need to be some work to do to assemble the robot, but no soldering is required (in normal cases, more on that later). The […]

Brume 2 router review with WireGuard, OpenVPN, Tor, and Adguard Home

Brume 2 review

We started the review of GL.inet GL-MT2500A security gateway, aka Brume 2, with an unboxing and teardown, and I’ve now had time to test the router in more detail so I’ll report my experience using the router with OpenVPN and WireGuard VPN, Tor, Adguard Home, and more. In a nutshell, it’s super easy to use, unless your ISP causes troubles, which it did in this case. Brume 2 connection and initial setup I connected the WAN port of the Brume 2 router to 3BB’s modem router (3BB is an ISP in Thailand), the LAN port to my laptop, and finally the USB-C power supply (power draws is 2.3 Watts at idle). Let’s now go to the dashboard using the default IP (192.168.8.1). This will take us through the configuration wizard to select the language and set up the admin password. I was then immediately greeted by an “Upgrade Reminder” and […]

Getting started with e-CAM20_CURB camera for Raspberry Pi 4

eCAM20_CURB night scene

e-con Systems e-CAM20_CURB is a 2.3 MP fixed focus global shutter color camera designed for the Raspberry Pi 4, and the company has sent us a sample for evaluation and review. We’ll start by providing specifications, before checking out the package content, connecting the camera to the Raspberry Pi 4 with a DIY LEGO mount, showing how to access the resources for the camera, and trying tools provided in the Raspberry Pi OS or Yocto Linux image. e-CAM20_CURB specifications The camera is comprised of two boards with the following specifications: eCAM217_CUMI0234_MOD full HD color camera with 4-lane MIPI CSI-2 interface ON Semiconductor AR0234CS CMOS sensor with 1/2.6″ optical form-factor Global Shutter Onboard ISPimage sensor from ON Semiconductor Uncompressed UYVY streaming HD (1280 x 720) up to 120 fps Full HD (1920 x 1080) up to 65 fps 2.3 MP (1920 x 1200) up to 60 fps External Hardware Trigger Input […]

Review of myCobot 280 Pi robotic arm with Python and visual programming

myCobot 280 Pi Conveyor Color Sorting

myCobot 280 Pi is a versatile robotic arm with a 6 degree of freedom design. It was developed by Elephant Robotics using the Raspberry Pi 4 board as the main controller. The robot is compact and delivers stable operation making it ideal for confined spaces. It can also be programmed in a variety of languages, is easy to use, and offers a lot of features. It is suitable for those who are interested in learning how to program a robotic arm controller and for engineering projects. Unboxing myCobot 280 Pi The myCobot 280 Pi arm has a working range of 280 mm, weighs 850 grams, and can handle a payload of up to 250 grams. It is powered by 6 servo motors, one for each degree of freedom, and comes with a 5×5 matrix LED display, and supports LEGO parts as well. Controlled by a Raspberry Pi 4 single board […]

Making a weather station with Maker Pi Pico Mini board and SparkFun SerLCD display

Maker Pi Pico Mini Weather Station

Cytron’s Maker Pi Pico Mini comes with a Raspberry Pi Pico or Raspberry Pi Pico W microcontroller board. It has the same features as the larger Maker Pi Pico including a GPIO LED, WS2812B Neopixel RGB LED, a passive piezo buzzer, programmable push buttons, and a reset button. I would like to thank Cytron for sending the Maker Pi Pico Mini board fitted with a Raspberry Pi Pico W as well as a character RGB LCD and a 3.7V Lithium Polymer battery. In this tutorial, we will show how to make an Internet connected weather station with the Maker Pi Pico Mini board using Arduino code and the OpenWeather API. We’ve already covered the Maker Pi Pico Mini board, so we’ll have a closer look at the accessories SparkFun SerLCD character display The SparkFun SerLCD is a 16×2 character display with a Microchip ATmega328P microcontroller that handles commands sent from […]

Using SenseCraft firmware for no-code programming on Wio Terminal

No code programming SHT40 sensor

In the conclusion of our SenseCAP K1100 Sensor Prototype kit review with LoRaWAN and Vision AI, the author suggested that it would be great if SeeedStudio could develop a new firmware that can connect without coding instead of using Arduino programming: I had to rely on my knowledge and experience with LoRaWAN to transmit data wirelessly over long distances. That’s because LoRaWAN has a more complicated connection process than Wi-Fi or Bluetooth. It would be great if Seeed Studio could develop a new firmware that can connect without any coding It did not take long, as SeeedStudio very recently released the first version of SenseCraft open source smart sensor software for no-code sense, process, and uplink that happens to be compatible with the Wio Terminal part of the SenseCAP K1100 development kit. So let’s test the new SenseCraft firmware together. SenseCraft navigation keys We can use Wio Terminal’s joystick as follows: […]

Exit mobile version