
myCobot 280 Pi is a versatile robotic arm with a 6 degree of freedom design. It was developed by Elephant Robotics using the Raspberry Pi 4 board as the main controller. The robot is compact and delivers stable operation making it ideal for confined spaces. It can also be programmed in a variety of languages, is easy to use, and offers a lot of features. It is suitable for those who are interested in learning how to program a robotic arm controller and for engineering projects.
Unboxing myCobot 280 Pi

The myCobot 280 Pi arm has a working range of 280 mm, weighs 850 grams, and can handle a payload of up to 250 grams. It is powered by 6 servo motors, one for each degree of freedom, and comes with a 5×5 matrix LED display, and supports LEGO parts as well.
 Controlled by a Raspberry Pi 4 single board computer, the MyCobot 280 can be connected to a camera for image processing applications, supports Ethernet and WiFi connectivity, features four USB ports, and can be connected to a display through the Raspberry Pi 4’s micro HDMI port. Finally, the 40-pin GPIO header is also accessible for expansion with clear markings for each pin, and the rear panel includes a power switch and a DC power barrel jack.

The MicroSD card slot is located underneath the MyCobot 280 Pi robot.

A 100-240V AC power brick with 8.4V DC output up to 5A (42 Watts) is also included in the package.

Other accessories in the myCobot kit include:
- myCobot-Flat Base
- 4x Silicon suction cups to make sure the base is firmly attached to the desk
- myCobot webcam
- myCobot Suction Pump kit
- Various connecting wires
- LEGO Connectors

How to attach the flat base plate to myCobot 280 Pi robotic arm

The assembly is straightforward. Simply insert suction cups in the mounting holes in the four corners and fasten them with the plastic screw head.

This is what it looks when done.

The provided LEGO connectors allow you to easily attach accessories to the myCobot 280 Pi robot.

Insert some LEGO connectors in the mounting plate slots as needed.

Finally, place the myCobot 280 Pi robotic arm on top of the base making sure to align it with the threads and LEGO connectors. You can now place the robot on the floor or a desk and firmly screw the suction cups in order to ensure the robot’s base does not move during operation. It’s better to place it on a smooth surface such as glass or marble.

Ubuntu operating system
myCobot 280 Pi ships with Ubuntu Linux operating system and can be programmed with myBlockly visual programming IDE or/and Python in VSCode.

Python
myCobot 280 Pi is programmable in Python which adds the ability to use the camera to detect objects and supports the OpenCV library for Artificial Intelligence, image processing, and Machine Learning.

ROS
Robot Operating System (ROS) relies on Rviz to simulate the movement of a robotic arm and control the robotic arm remotely through ROS.

Programming MyCobot 280 Pi robot with MyBlockly
MyBlockly is a visual development tool using symbols instead of commands. This unit has a group of symbols that include Logic, Loops, Math, Text, Lists, Color, Variables, Functions as well as functions to control the robotic arm and more, so there’s everything we need to easily write a program. You can click on Run in the right corner to start the program. Let’s look at some interesting commands.

Time in MyBlockly
The Sleep block allows you to add a delay in seconds.
 Raspi-GPIO
This set of blocks controls GPIOs (General Purpose Inputs/Outputs). It’s used to set any of Raspberry Pi GPIO pins to HIGH or LOW when in output mode or configure them as inputs.

ATOM IO
This set of blocks controls the 5×5 LED Matrix of the robotic arm. You can change the value of each LED’s RGB data (Red, Blue, Green) and use PWM control as well.

The color of the LEDs will change based on the data we have entered.
 Status

A set of blocks specific to the MyCobot 280 Pi robot notably to power it on or off, check the working status, and release all servos.

MDI Model and Operation
Those blocks control the degree of movement of the mechanical arm on each axis. Data can be entered simultaneously including speed control, or you use Coordination mode if you wish. This makes programming the robotic arm very easy.

JOG Model and Operation
Those blocks also control the degree of movement of the mechanical arm on each axis in separate blocks for each axis.

Running Status and Settings
Those blocks can set the speed of the mechanical arm, and query the current speed, and the min and max angles of a specific joint.

Finding the angle of the robot on each axis
We can find the angle of each axis by reading the values from the program. This useful function helps reduce the time to find the angles by clicking on the right corner.

A window will pop up. We can manually adjust the angle of the robot arm and click on the Read Angles button in the Quick Move section. The values will be automatically entered into the Set Angle block.

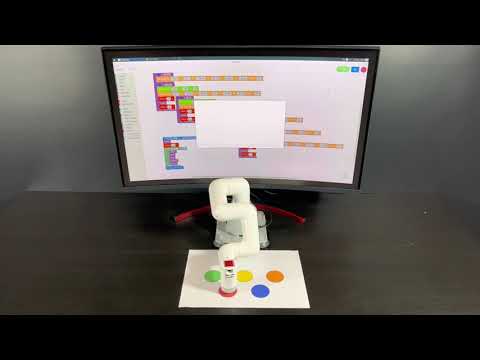
MyCobot 280 Pi Accuracy Test
We tested the movement accuracy of the myCobot 280 Pi robot and measured +/– 5% accuracy. In the test, the robot arm goes to the color on the paper while changing the LED Matrix display to match that color as you can see from the video below.
myCobot Suction Pump
A suction pump that can enhance the capabilities of the myCobot 280 Pi robotic arm by enabling the lifting and moving of objects by suction. The maximum weight of an object lifted with the myCobot Suction Pump is 250 grams.
Suction pump highlights
- Function – suck objects to lift and move them
- Maximum weight of the object to be lifted – 250 grams
- Materials – Photopolymer/nylon 7100
- Color – White
- Dimensions – 94 x 74 x 51 mm
- Weight – 220 grams

Mounting the myCobot Suction Pump to the myCobot 280 Pi
Again, we’ll use the LEGO Connectors to attach the myCobot Suction Pump.

And that’s it. The myCobot Suction Pump can be easily mounted to the myCobot 280 Pi just with LEGO Connectors.

Wiring the Suction Pump to the robotic arm
We still need to wire the suction pump to the robotic arm. This can be done by connecting four wires to the Raspberry Pi 4’s GPIO header: 5V, GND, G2 (GPIO21), G5, and (GPIO22).

We’ll use male Dupont cables plugged into the GPIO header with namely 5V, GND, G2 connected to GPIO21, and G5 to GPIO22.

Using myCobot Suction Pump with myBlockly
Let’s go to the Raspi-GPIO menu, and select the “Set Mode BCM” block to work with pins 20 and 21 as outputs (OUT) using Set pin command blocks.
Two sets of blocks are used to control the myCobot Suction Pump
- To make the suction pump work, we’ll set pin 20 and 21 to HIGH
- To stop it we’ll set both pins to LOW.
That’s all we need to enable and disable the myCobot Suction Pump.

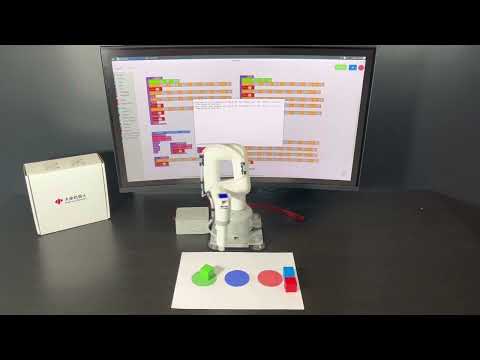
Test operation of lifting and repositioning with the suction pump
We have tested the robotic arm working together with the suction pump by moving a workpiece of a specific color to a point of the same color. We’ve noted that if the object is heavy it will take a while to suck the object, and if the object is light it will take some time to release it. But the robotic arm and suction pump can work very accurately as you can see from the test video below.
MyCobot 280 Camera
The camera is lightweight and can be easily mounted to the robotic arm in a couple of minutes. It’s basically plug-and-play and the compact design means you don’t have to worry about it taking up too much space. The USB 2.0 color camera works at up to 720p HD resolution, offers a wide-angle color, and is suitable for a range of applications such as face recognition, smart screen, smart express delivery, automatic vending machines, barcode/QR code scanning, access control, medical equipment, and so on.


Installing myCobot SuctionPump and myCobot 280 Camera to myCobot 280 Pi
We will now be connecting the MyCobot 280 Camera to the myCobot Suction Pump by first inserting LEGO Connectors into the Suction Pump…

… before inserting it into the camera to which we’ll add more LEGO connectors…

… in order to install it on the MyCobot 280 Pi robotic arm.

Perfect! It could not be easier.

Installing OpenCV and Numpy with pip
We’ll need to install libraries, namely OpenCV and Numpy, in order to run Image Processing workloads on the robot. We can install those through the Terminal in the robot’s operating system.
OpenCV is a popular library for basic image processing such as blurring, blending, enhancing image quality, increasing video quality, object recognition, detection of faces or objects in images and videos, as well as color separation which we will use in this project/review.
|
1 |
pip install opencv-python |
Numpy is a Python extension module with mathematical functions that are typically used for the manipulation of data sets (Arrays) and matrices.
|
1 |
pip install numpy |
Image Thresholding
Thresholding is one of the techniques for separating an object from a background image. This works by taking a gray image and converting it to a binary image with pixel values of 0 (black) or 255 (while) with a constant threshold used to sort each pixel of the image into black or white. I wrote a Python program in VSCode that can detect objects with 3 different colors. The next step of the program will try to find the red object first using the camera input. The following lower and upper ranges were defined for the red color: lowerR = np.array([142, 114, 181]) and upperR = np.array([194, 255, 255])

In the case of blue objects, we’ll use the following values: lowerB = np.array([83, 228, 206]) and upperB = np.array([106, 255, 255])

And finally, here are the values for green objects: lowerG = np.array([54, 82, 228]) upperG = np.array([81, 255, 255])

Thresholding sample code in Python
Two modules are imported: cv2 to manipulate images and numpy to manipulate arrays and matrices.
|
1 2 3 4 5 6 7 8 9 10 11 12 13 14 15 16 17 18 19 20 21 22 23 24 25 26 27 28 29 30 31 32 33 34 35 36 37 38 39 40 41 42 43 |
import cv2 import numpy as np def nothing(x): pass cv2.namedWindow("Tracking") cv2.createTrackbar("LH", "Tracking", 0, 255, nothing) cv2.createTrackbar("LS", "Tracking", 0, 255, nothing) cv2.createTrackbar("LV", "Tracking", 0, 255, nothing) cv2.createTrackbar("UH", "Tracking", 255, 255, nothing) cv2.createTrackbar("US", "Tracking", 255, 255, nothing) cv2.createTrackbar("UV", "Tracking", 255, 255, nothing) vs = cv2.VideoCapture(0) while True: _, frame = vs.read() hsv = cv2.cvtColor(frame, cv2.COLOR_BGR2HSV) l_h = cv2.getTrackbarPos("LH", "Tracking") l_s = cv2.getTrackbarPos("LS", "Tracking") l_v = cv2.getTrackbarPos("LV", "Tracking") u_h = cv2.getTrackbarPos("UH", "Tracking") u_s = cv2.getTrackbarPos("US", "Tracking") u_v = cv2.getTrackbarPos("UV", "Tracking") l_b = np.array([l_h, l_s, l_v]) u_b = np.array([u_h, u_s, u_v]) mask = cv2.inRange(hsv, l_b, u_b) res = cv2.bitwise_and(frame, frame, mask=mask) cv2.imshow("frame", frame) cv2.imshow("mask", mask) cv2.imshow("res", res) key = cv2.waitKey(1) if key == 27: break cv2.destroyAllWindows() |
Using myCobot 280 Pi with a conveyor belt to sort objects (Color Sorting)
We’ll make the myCobot 280 Pi robotic arm work with a conveyor belt to sort objects of different colors. The project is comprised of two parts:
- The conveyor belt relies on an Arduino board to control its motor, and a program/sketch checks the condition of the sensor to measure the stopping distance of the object according to the belt position.
- The myCobot 280 Pi detects the colors with Image Thresholding and selects and moves the Red, Blue, or Green object to a bucket of the same color using the Suction Pump. Four positions were set:
- Red box position
- Blue box position
- Green box position
- Initial position to detect colored objects in a location convenient for the myCobot 280 Pi. We can move the robot arm to that position and read the values from the Serial Monitor and put the obtained values into the program, which is a very good point to find different positions

myCobot 280 Pi Color Sorting sample code
The library MyCobot is invoked to control the robotic arm, the library RPi.GPIO is used to enable/disable the suction pump, the cv2 library is used to manipulate images, and numpy to manipulate arrays and matrices.
|
1 2 3 4 5 6 7 8 9 10 11 12 13 14 15 16 17 18 19 20 21 22 23 24 25 26 27 28 29 30 31 32 33 34 35 36 37 38 39 40 41 42 43 44 45 46 47 48 49 50 51 52 53 54 55 56 57 58 59 60 61 62 63 64 65 66 67 68 69 70 71 72 73 74 75 76 77 78 79 80 81 82 83 84 85 86 87 88 89 90 91 92 93 94 95 96 97 98 99 100 101 102 103 104 105 106 107 108 109 110 111 112 113 114 115 116 117 118 119 120 121 122 123 124 125 126 127 128 129 130 131 132 133 134 135 136 137 138 139 |
from pymycobot.mycobot import MyCobot from pymycobot import PI_BAUD, PI_PORT import RPi.GPIO as GPIO import numpy as np import time import cv2 GPIO.setmode(GPIO.BCM) GPIO.setup(20, GPIO.OUT) GPIO.setup(21, GPIO.OUT) vs = cv2.VideoCapture(0) print("Camera On: {}".format(vs.isOpened())) lR = np.array([142, 114, 181]) uR = np.array([194, 255, 255]) lG = np.array([54, 82, 228]) uG = np.array([81, 255, 255]) lB = np.array([83, 228, 206]) uB = np.array([106, 255, 255]) def pump(state): if state == 1: #On print('Pump on') GPIO.output(20, 0) GPIO.output(21, 0) elif state == 0: #Off print('Pump off') GPIO.output(20, 1) GPIO.output(21, 1) def findContour(mask): minArea = 10000 found = False x, y, w, h = 0, 0, 0, 0 contours, hierarchy = cv2.findContours(mask, cv2.RETR_TREE, cv2.CHAIN_APPROX_SIMPLE) for pic, contour in enumerate(contours): area = cv2.contourArea(contour) if area >= minArea: x, y, w, h = cv2.boundingRect(contour) found = True break return x, y, w, h, found camera = [7.82, -15.82, -110.12, 37.7, -19.59, -123.04] preTrash = [29.0, -4.21, -78.75, -1.75, -23.2, -150.46] trashAngle, comebackAngle = [], [] pickup = [ [33.92, -5.53, -117.94, 39.63, -21.79, -133.5], [32.69, -17.57, -121.46, 52.73, -20.83, -123.31] ] trashR = [-79.27, -16.25, -85.95, 16.78, -15.11, -139.83] trashG = [-37.0, -35.41, -55.01, 13.44, -15.73, -136.66] trashB = [-55.72, -17.4, -78.83, 15.55, -12.04, -134.56] comebackR = [-75.93, -17.49, -57.04, -9.58, -21.0, -136.93] comebackB = [-51.85, -17.22, -60.29, -0.26, -20.3, -136.93] comebackG = [-35.77, -31.02, -41.3, -3.69, -19.95, -164.44] mc = MyCobot("/dev/ttyAMA0", 1000000) pump(0) time.sleep(1) while True: try: mc.set_color(255, 255, 255) mc.send_angles(camera, 40) time.sleep(2) dR, dG, dB = False, False, False while True: # Clearing buffer for i in range(30): _, frame = vs.read() _, frame = vs.read() #cv2.imwrite("a.jpg", frame) hsv = cv2.cvtColor(frame, cv2.COLOR_BGR2HSV) maskR = cv2.inRange(hsv, lR, uR) maskG = cv2.inRange(hsv, lG, uG) maskB = cv2.inRange(hsv, lB, uB) xr, yr, wr, hr, dR = findContour(maskR) xg, yg, wg, hg, dG = findContour(maskG) xb, yb, wb, hb, dB = findContour(maskB) if dR: trashAngle = trashR comebackAngle = comebackR mc.set_color(255, 0, 0) print("Detected Red Block") cv2.rectangle(frame, (xr, yr), (xr+wr, yr+hr), (0, 0, 0), 2) elif dG: trashAngle = trashG comebackAngle = comebackG mc.set_color(0, 255, 0) print("Detected Green Block") cv2.rectangle(frame, (xg, yg), (xg+wg, yg+hg), (0, 0, 0), 2) elif dB: trashAngle = trashB comebackAngle = comebackB mc.set_color(0, 0, 255) print("Detected Blue Block") cv2.rectangle(frame, (xb, yb), (xb+wb, yb+hb), (0, 0, 0), 2) cv2.imshow("frame", frame) cv2.waitKey(1) if dR or dG or dB: break for angle in pickup: mc.send_angles(angle, 40) time.sleep(1.5) pump(1) time.sleep(1) mc.send_angles(preTrash, 40) time.sleep(1) mc.send_angles(trashAngle, 40) time.sleep(3) pump(0) time.sleep(3.5) mc.send_angles(comebackAngle, 40) time.sleep(1.5) except KeyboardInterrupt: break pump(0) time.sleep(1) mc.send_angles(pickup[1], 40) time.sleep(3) mc.release_all_servos() GPIO.cleanup() vs.release() cv2.destroyAllWindows() time.sleep(1) |
Watch the videos below to see myCobot 280 Pi’s color sorting in action.


I would like to thank Elephant Robotics for sending me the myCobot 280 Pi robot kit with accessories for review and play.
The myCobot 280 Pi has a lot more features. It is suitable for beginners in robotics education, and with a starting price of $799 it can be used for teaching from high school to university level. The myCobot 280 Pi robotic arm can also be a great way to learn how to use robots in industrial applications. As you’ll see from our samples above, it will very easy to write programs to read the angles of the arm, and it can also be used to study forward and inverse kinematics to control a robot.
If anyone is interested, you can learn more and/or purchase a kit in Elephant Robotics’ shop.
This article was originally published in Thai language on CNX Software Thailand and written by Kajornsak Janjam.

Jean-Luc started CNX Software in 2010 as a part-time endeavor, before quitting his job as a software engineering manager, and starting to write daily news, and reviews full time later in 2011.
Support CNX Software! Donate via cryptocurrencies, become a Patron on Patreon, or purchase goods on Amazon or Aliexpress. We also use affiliate links in articles to earn commissions if you make a purchase after clicking on those links.


This looks really awesome and fun, but the price tag is still way too high for exploration and just as a toy. At that price it’s easier to justify a DIY build.