
Cytron’s Maker Pi Pico Mini comes with a Raspberry Pi Pico or Raspberry Pi Pico W microcontroller board. It has the same features as the larger Maker Pi Pico including a GPIO LED, WS2812B Neopixel RGB LED, a passive piezo buzzer, programmable push buttons, and a reset button.
I would like to thank Cytron for sending the Maker Pi Pico Mini board fitted with a Raspberry Pi Pico W as well as a character RGB LCD and a 3.7V Lithium Polymer battery. In this tutorial, we will show how to make an Internet connected weather station with the Maker Pi Pico Mini board using Arduino code and the OpenWeather API.

We’ve already covered the Maker Pi Pico Mini board, so we’ll have a closer look at the accessories
SparkFun SerLCD character display
The SparkFun SerLCD is a 16×2 character display with a Microchip ATmega328P microcontroller that handles commands sent from a host over an I2C, SPI, or Qwicc (I2C) connection. The RGB display also supports changing the color of characters.

We’ll connect the Qwiic connector to the Maker Pi Pico W Mini’s Maker port since it’s the most convenient with the provided cable carrying both power and I2C signals.

The battery
The provided battery is a Lithium Polymer battery with a 1,300 mAh capacity and an operating voltage of 3.7V. It can be plugged into the JST connector on the Maker Pi Pico Mini board which handles charging as well through its USB port.

Adding Raspberry Pi Pico W board to the Arduino IDE
We’ll assume you have already installed the Arduino IDE. To add the board to the Arduino IDE, go to File >>> Preferences in Windows/Linux, or Arduino >>> Preferences in macOS as shown in the screenshot below.
 Enter the URL for the Raspberry Pi Pico in the Additional Board Manager URLs field:
|
1 |
https://github.com/earlephilhower/arduino-pico/releases/download/global/package_rp2040_index.json |

Now let’s go to Tools >>> Board >>> Boards Manager, search for “rp2040: and install “Raspberry Pi Pico/RP2040” support.

We can now go to Tools >>> Board >>> Raspberry Pi RP2040 Boards, and select the Raspberry Pi Pico W board.

Installing the SparkFun SerLCD library
We’ll now install the Library for the LCD. Let’s go to Sketch >>> Include Library >>> Manage Libraries as shown in the screenshot below.

We can now search for “serlcd” in the Library Manager window and install the relevant library, namely Sparkfun SerLCD Arduino Library.

We can then add the library to our project by selecting Sketch >>> Include Library >>> SparkFun SerLCD Arduino Library.

The library will show up in our code:
|
1 |
#include <SerLCD.h> |
Displaying characters on the SerLCD, changing the backlight color
The code below changes the characters and backlight color as well as the RGB LED (using the NeoPixel Library). Most specifically, the code goes through 10 colors updated every 3 seconds each.
|
1 2 3 4 5 6 7 8 9 10 11 12 13 14 15 16 17 18 19 20 21 22 23 24 25 26 27 28 29 30 31 32 33 34 35 36 37 38 39 40 41 42 43 44 45 46 47 48 49 50 51 52 53 54 55 56 57 58 59 60 61 62 63 64 65 66 67 68 69 70 71 72 73 74 75 76 77 78 79 80 81 82 83 84 85 86 87 88 89 |
#include <Wire.h> #include <SerLCD.h> //Click here to get the library: http://librarymanager/All#SparkFun_SerLCD #include <Adafruit_NeoPixel.h> #define LED_PIN 28 #define LED_COUNT 1 Adafruit_NeoPixel strip(LED_COUNT, LED_PIN, NEO_GRB + NEO_KHZ800); SerLCD lcd; // Initialize the library with default I2C address 0x72 void setup() { Wire.begin(); strip.begin(); strip.show(); strip.setBrightness(50); //change the RGB brightness between 0-255 lcd.begin(Wire); //By default .begin() will set I2C SCL to Standard Speed mode of 100kHz Wire.setClock(400000); //Optional - set I2C SCL to High Speed Mode of 400kHz } void loop() { lcd.setBacklight(0, 0, 0); //black is off lcd.clear(); //Clear the display - this moves the cursor to home position as well lcd.print("Black (off)"); strip.setPixelColor(0, strip.Color(0, 0, 0)); strip.show(); delay(3000); lcd.setBacklight(255, 0, 0); //red lcd.clear(); lcd.print("Red"); strip.setPixelColor(0, strip.Color(255, 0, 0)); strip.show(); delay(3000); lcd.setBacklight(0xFF8C00); //orange lcd.clear(); lcd.print("Orange"); strip.setPixelColor(0, strip.Color(255,127,0)); strip.show(); delay(3000); lcd.setBacklight(255, 255, 0); //yellow lcd.clear(); lcd.print("Yellow"); strip.setPixelColor(0, strip.Color(0, 255, 0)); strip.show(); delay(3000); lcd.setBacklight(0, 255, 0); //green lcd.clear(); lcd.print("Green"); strip.setPixelColor(0, strip.Color(0, 255, 0)); strip.show(); delay(3000); lcd.setBacklight(0, 0, 255); //blue lcd.clear(); lcd.print("Blue"); strip.setPixelColor(0, strip.Color(0, 0, 255)); strip.show(); delay(3000); lcd.setBacklight(0x4B0082); //indigo, a kind of dark purplish blue lcd.clear(); lcd.print("Indigo"); strip.setPixelColor(0, strip.Color(75,0,130)); strip.show(); delay(3000); lcd.setBacklight(0xA020F0); //violet lcd.clear(); lcd.print("Violet"); strip.setPixelColor(0, strip.Color(127,0,255)); strip.show(); delay(3000); lcd.setBacklight(0x808080); //grey lcd.clear(); lcd.print("Grey"); strip.setPixelColor(0, strip.Color(197, 197, 204)); strip.show(); delay(3000); lcd.setBacklight(255, 255, 255); //white lcd.clear(); lcd.print("White"); strip.setPixelColor(0, strip.Color(255, 255, 255)); strip.show(); delay(3000); } |
Everything works fine, and you can watch the video below to see the board and code in action.

Connecting Maker Pi Pico Mini to the Internet/WiFi
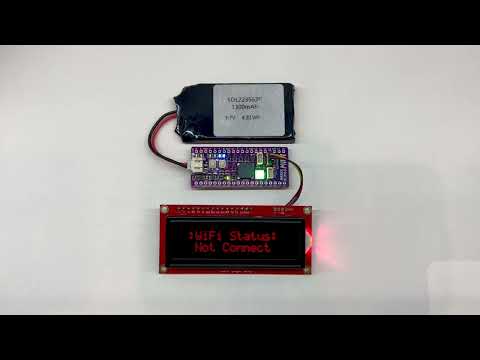
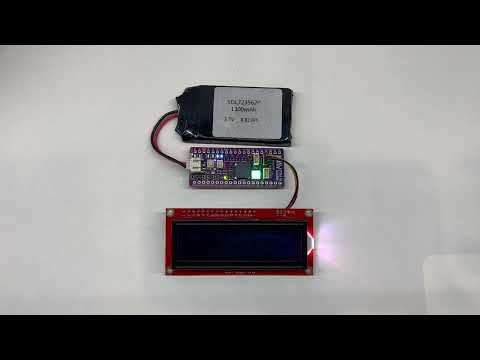
The code first tries to connect to WiFi and displays a “Not connected” status message in red, until the connection is successful, at which point the LCD backlight is switched to green with the “WiFi connected” message and the IP address. The RGB LED follows a rainbow pattern while trying to connect and turns green upon a successful connection.
|
1 2 3 4 5 6 7 8 9 10 11 12 13 14 15 16 17 18 19 20 21 22 23 24 25 26 27 28 29 30 31 32 33 34 35 36 37 38 39 40 41 42 43 44 45 46 47 48 49 50 51 52 53 54 55 56 57 58 59 |
#include <WiFi.h> #include <SerLCD.h> #include <Wire.h> #include <Adafruit_NeoPixel.h> #define LED_PIN 28 #define LED_COUNT 1 Adafruit_NeoPixel strip(LED_COUNT, LED_PIN, NEO_GRB + NEO_KHZ800); SerLCD lcd; const char* ssid = "xxxxxxxxxx"; // WiFi SSD const char* password = "xxxxx"; // Wifi password void setup() { Serial.begin(115200); strip.begin(); strip.setBrightness(50); //set RGB brightness 0-255 WiFi.mode(WIFI_STA); WiFi.begin(ssid, password); Wire.begin(); Wire.setClock(400000); Serial.println("Connecting to WIFI..."); lcd.begin(Wire); //Set up the LCD for I2C communication lcd.clear(); lcd.setContrast(5); //Set contrast. Lower to 0 for higher contrast. lcd.clear(); //Clear the display - this moves the cursor to home position as well lcd.setBacklight(255, 0, 0); lcd.clear(); while (WiFi.status() != WL_CONNECTED) { Serial.print("."); lcd.setCursor(1, 0); lcd.print(":WiFi Status:"); lcd.setCursor(2, 1); lcd.print("Not Connected"); rainbow(10); } strip.setPixelColor(0, strip.Color(0, 255, 0)); strip.show(); Serial.println(""); Serial.print("IP Address: "); Serial.println(WiFi.localIP()); lcd.setBacklight(0, 255, 0); lcd.clear(); lcd.setCursor(2, 0); lcd.print("WiFi Connect"); lcd.setCursor(1, 1); lcd.print("IP:"); lcd.setCursor(4, 1); lcd.print(WiFi.localIP()); } void loop() { } void rainbow(int wait) { for (long firstPixelHue = 0; firstPixelHue < 5 * 65536; firstPixelHue += 256) { strip.rainbow(firstPixelHue); strip.show(); // Update strip with new contents delay(wait); // Pause for a moment } } |
Check out the video below to see the result.
Maker Pi Pico Mini weather station using OpenWeather API
In this experiment, we will use HTTP GET to retrieve weather data through the openweathermap.org API. The API is available for free, but there is a limit on the number of requests, which you can read more about on the website. But the free package is enough for education and experimentation.

OpenWeatherMap is a website providing weather information, global weather forecasts, historical weather data, weather maps, and so on. It is very easy to use: just type the name of the city and country and you will get the weather information. The first step is to sign up for the service by clicking on Sign in and creating an account with a username, email address, and password.

Once this is done, log into the service, and click on My API keys.

Simply copy the API key…

… since you’ll use it in the Arduino sketch.

We’ve also set the city and country to Bangkok and TH (country code for Thailand) above, but it can be changed to any major city around the world, for example, London in the United Kingdom with My_city = “London”, my_country_code = “GB”.
Here’s the Arduino code we’ve used with the Maker Pi Pico Mini board:
|
1 2 3 4 5 6 7 8 9 10 11 12 13 14 15 16 17 18 19 20 21 22 23 24 25 26 27 28 29 30 31 32 33 34 35 36 37 38 39 40 41 42 43 44 45 46 47 48 49 50 51 52 53 54 55 56 57 58 59 60 61 62 63 64 65 66 67 68 69 70 71 72 73 74 75 76 77 78 79 80 81 82 83 84 85 86 87 88 89 90 91 92 93 94 95 96 97 98 99 100 101 102 103 104 105 106 107 108 109 110 111 112 113 114 115 116 117 118 119 120 121 122 123 124 125 126 127 128 129 130 |
#include <WiFi.h>; #include <HTTPClient.h>; #include <Arduino_JSON.h>; #include <SerLCD.h>; #include <Wire.h>; #include <Adafruit_NeoPixel.h>; #define LED_PIN 28 #define LED_COUNT 1 Adafruit_NeoPixel strip(LED_COUNT, LED_PIN, NEO_GRB + NEO_KHZ800); SerLCD lcd; const char* ssid = "xxxxxxx"; const char* password = "xxxx"; String my_Api_Key = "xxxxxxxxxxxxxx"; String my_city = "Bangkok"; //specify your city String my_country_code = "TH"; //specify your country code unsigned long last_time = 0; unsigned long timer_delay = 10000; String json_array; void setup() { Serial.begin(115200); strip.begin(); strip.show(); strip.setBrightness(50); WiFi.mode(WIFI_STA); WiFi.begin(ssid, password); Wire.begin(); Wire.setClock(400000); Serial.println("Connecting to WIFI..."); lcd.begin(Wire); //Set up the LCD for I2C communication lcd.clear(); lcd.setContrast(5); //Set contrast. Lower to 0 for higher contrast. lcd.clear(); //Clear the display - this moves the cursor to home position as well lcd.setBacklight(255, 0, 0); lcd.clear(); while (WiFi.status() != WL_CONNECTED) { Serial.print("."); lcd.setCursor(1, 0); lcd.print(":WiFi Status:"); lcd.setCursor(2, 1); lcd.print("Not Connect"); rainbow(10); } strip.setPixelColor(0, strip.Color(0, 255, 0)); strip.show(); Serial.println(""); Serial.print("IP Address: "); Serial.println(WiFi.localIP()); lcd.setBacklight(0, 255, 0); lcd.clear(); lcd.setCursor(2, 0); lcd.print("WiFi Connect"); lcd.setCursor(1, 1); lcd.print("IP:"); lcd.setCursor(4, 1); lcd.print(WiFi.localIP()); Serial.println("First set of readings will appear after 10 seconds"); delay(3000); } void loop() { if ((millis() - last_time) > timer_delay) { if (WiFi.status() == WL_CONNECTED) { String server = "http://api.openweathermap.org/data/2.5/weather?q=" + my_city + "," + my_country_code + "&APPID=" + my_Api_Key + "&units=metric"; lcd.clear(); lcd.setBacklight(255, 255, 255); json_array = GET_Request(server.c_str()); Serial.println(json_array); JSONVar my_obj = JSON.parse(json_array); if (JSON.typeof(my_obj) == "undefined") { Serial.println("Parsing input failed!"); return; } Serial.print("JSON object = "); Serial.println(my_obj); Serial.print("Temperature: "); Serial.println(my_obj["main"]["temp"]); Serial.print("Pressure: "); Serial.println(my_obj["main"]["pressure"]); Serial.print("Humidity: "); Serial.println(my_obj["main"]["humidity"]); Serial.print("Wind Speed: "); Serial.println(my_obj["wind"]["speed"]); lcd.setCursor(0, 0); lcd.print("WEATHER: BANGKOK"); lcd.setCursor(1, 1); lcd.print("T="); lcd.print(my_obj["main"]["temp"]); lcd.setCursor(7, 1); lcd.print((char)223); lcd.print("C"); lcd.setCursor(10, 1); lcd.print("H="); lcd.print(my_obj["main"]["humidity"]); lcd.print("%"); } else { Serial.println("WiFi Disconnected"); } last_time = millis(); } } String GET_Request(const char* server) { HTTPClient http; http.begin(server); int httpResponseCode = http.GET(); String payload = "{}"; if (httpResponseCode > 0) { Serial.print("HTTP Response code: "); Serial.println(httpResponseCode); payload = http.getString(); } else { Serial.print("Error code: "); Serial.println(httpResponseCode); } http.end(); return payload; } void rainbow(int wait) { for (long firstPixelHue = 0; firstPixelHue < 5 * 65536; firstPixelHue += 256) { strip.rainbow(firstPixelHue); strip.show(); // Update strip with new contents delay(wait); // Pause for a moment } } |
Watch the video embedded below displayed the weather and temperature in Bangkok from the data provided by OpenWeatherMap.
That’s it we’ve just done a battery-powered weather station based on the Maker Pi Pico Mini board and SparkFun SerLCD. You can carry it anywhere you and just need a WiFi connection with Internet connectivity.
Cytron sells the Maker Pi Pico Mini on their online store for $8.90 to $14.40 depending on options. The full kit used in this tutorial should cost around $50 with the board, display, and battery.
This tutorial was originally posted on CNX Software Thailand in Thai language.

Jean-Luc started CNX Software in 2010 as a part-time endeavor, before quitting his job as a software engineering manager, and starting to write daily news, and reviews full time later in 2011.
Support CNX Software! Donate via cryptocurrencies, become a Patron on Patreon, or purchase goods on Amazon or Aliexpress. We also use affiliate links in articles to earn commissions if you make a purchase after clicking on those links.


How is this a weather station? It doesn’t even have any sensors.. perhaps you can call it a “online weather query devce” or “IoT weather fetching device with external LCD”.. definately not ” weather station”.
Agree. And serial LCD boards are quite old technology. (I still have a Pertelian one from 10+ years ago). I would have expected a pixel based color display.
Agreed +1. Not a weather station. No sensors