
The recent post comparing the power consumption of ODROID-C1 vs Raspberry Pi boards, as made me want to give another try at power consumption measurements. Regular reader already know I made a power measurement board and cables capable of hading different connectors (micro USB, mini USB, power barrels, etc..), but eventually it failed to deliver enough current to the boards for any meaning testing. But since I now have a better power supply, and multi-meter, it was worth another try, especially since I could draw some pretty charts.
I decided to test the three most popular Chinese SoCs for mini PCs namely Amlogic S812 (4x Cortex A9), Rockchip RK3288 (4x Cortex A17), and Allwinner A80 (4x Cortex A15 + 4x Cortex A7) using respectively Eny M8S, Open Hour Chameleon, and A80 OptimusBoard. If you are paying attention, you must have noticed Allwinner A80 is not part of the title, that because the board got stuck in the animation logo drawing 1.1 to 1.3 A forever, so I don’t have any results to share for that platforms. Neverthess I still have some interesting charts for the two other platforms, but before sharing the results, let’s go through my setup and some of the issues I encountered.
Power Measurement Testbed
That’s what my setup looks like.
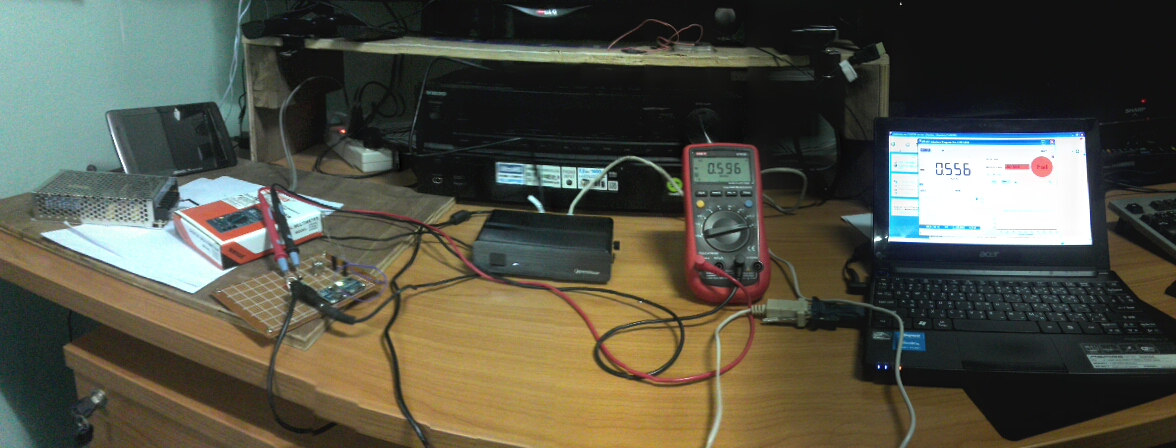
From left to right:
- 5V/8A – 12V5A Switch mode power supply (SMPS)
- DIY power measurement board and multimeter test leads
- Device under test, in this case Open Hour Chameleon
- UNI-T UT61E digital multi-meter
- Windows XP netbook with UT61E Interface Software and a USB to RS-232 dongle
Initially, I wanted to use Sigrok in Ubuntu 14.04, as it’s more convenient for me simply because I use Ubuntu on my main computer, but unfortunately there are some compatibility issues with my USB to RS232 dongle leading to the error message:
|
1 |
sr: es51922: Invalid function byte |
I bought another different looking one on Ebay, but unfortunately it came with the exact same PID and VID, leading to the same issues, and it did not even work with the multimeter in Windows… So I had to fall back to using Windows.
The first time I had the exact same problem as with my $7 multimeter with the device rebooting as soon as 400 mA was reached. The critical issue when measuring current is the impedance of the equipment of the multimeter itself, and any board or cable used for testing. Since the multimeter is in series, even adding 1 Ohm would lead to a voltage drop of 1V at 1 ampere (ohm’s law U=RxI). The multimeter itself will make the voltage drop a bit, as I understand it measures the current using a low impedance resistor, but first I checked my cables.
- Test lead pair #1 – ~0.15 to 0.30 Ohm but measurement fluctuates a lot even to pretty high values (That’s the pair included with UNI-T UT61E DMM)
- Test lead pair #2 – ~0.13 to 0.15 Ohm
- Crocodile clip cables – 0.90 Ohm
At first, I thought it would be a good idea to connect the test leads to the measurement board via crocodile clip in order to get a good connection. But I measure the impedance of two such cables in series to be 1.80 Ohm, and shorting the measurement board with two of these, could not boot the board at all due to voltage drop (1.8 * 0.4 = 0.72V).
So I got rid of those, connecting the test leads (pair #2) directly to the measurement board, and it went better, but I noticed the screen would turn off from time to time. I also decided to calibrate my SMPS to 5V (it was 5.25), and the symptoms became more frequent, so I measured the voltage right after UNI-T multimeter with my older multimeter, and noticed voltage drops of up to 0.5V at times due to the impedance introduced by the DMM and cables, which led to reboots. So I turned the voltage adjustment screw on the power supply to output 5.4V, which should be safe enough, and everything worked much better, at least with the Amlogic S812 device.
The test procedure goes as follows:
- Power the board, and wait for boot to complete
- Run Antutu benchmark
- Connect an external hard drive via a USB port
- Run XBMC/Kodi/SPMC and play a 4K H.264 videos (Chimei video).
- Go to standby
I gather the data with the windows software, and load the results into LibreOffice Calc to generate the power consumption charts with sample numbers on the X axis, and the values in Amperes on the Y-Axis. 2 samples are taken every second, so a 900 sample test duration is 450 seconds (7 minutes 30 seconds).
Eny M8S (Amlogic S812) Power Measurement
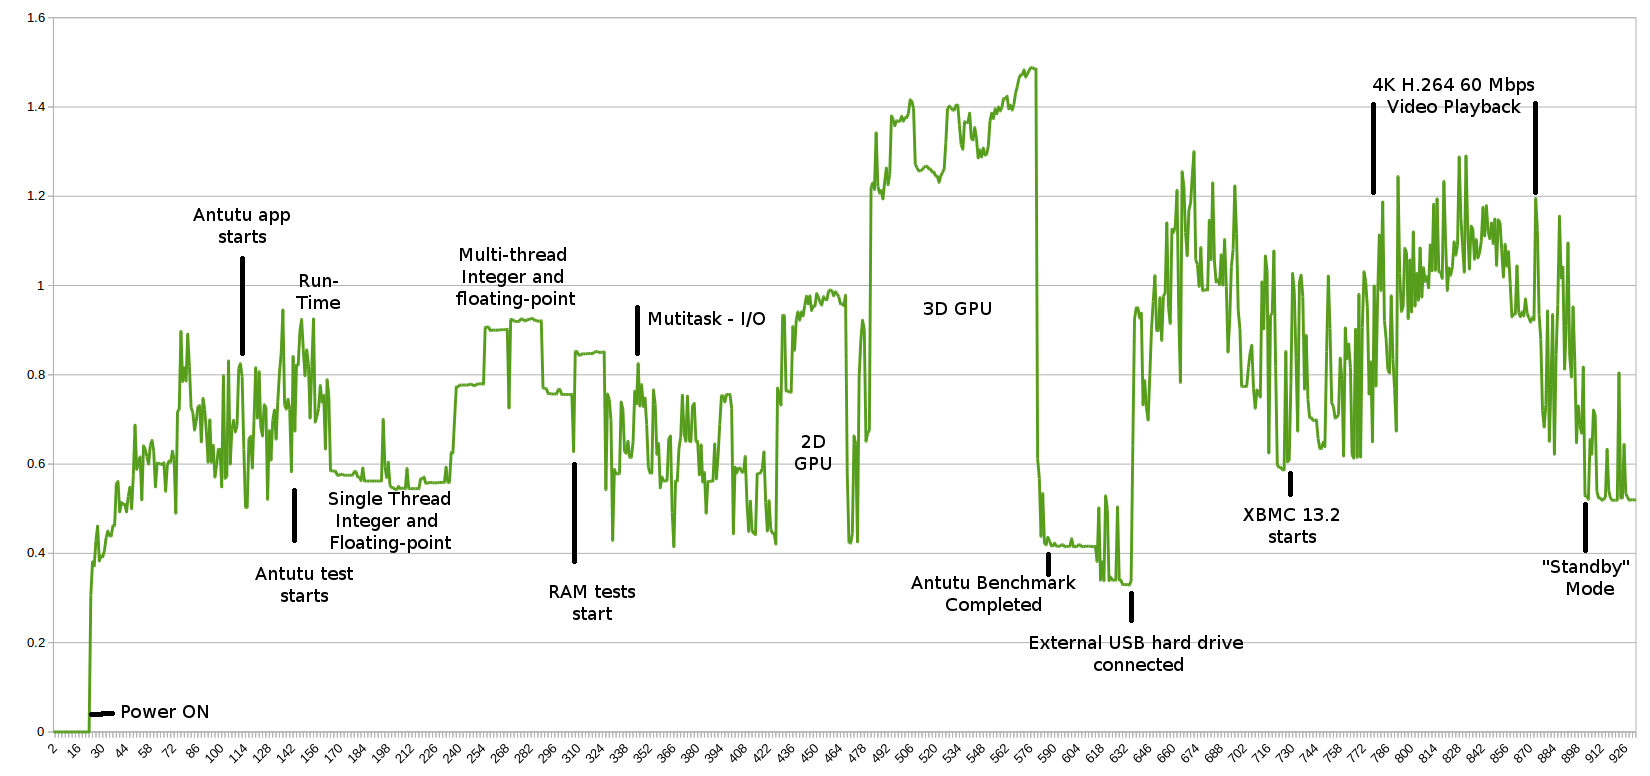
Vertical Axis: Amps; Horizontal Axis: Sample number (every 0.5 second)
The fully test went very smooth on the Amlogic platform, as I never had the screen turn off during testing. The part of Antutu that consumes the most is the 3D GPU benchmark at around 1.4A. We can see a jump of 0.5A when inserting the hard drive. XBMC consumes some power even in the UI, because it’s always refreshing the display, so the power consumption is somewhat similar to the 2D GPU benchmark in Antutu. Playing a 4K video consumes a little over 1A, and it’s normally not to demanding as it’s mostly handled by hardware. Standby mode power consumption is pretty high at about 500 mA with the hard drive connected, and still powered on in this mode.
Open Hour Chameleon (Rockchip RK3288) Power Measurement
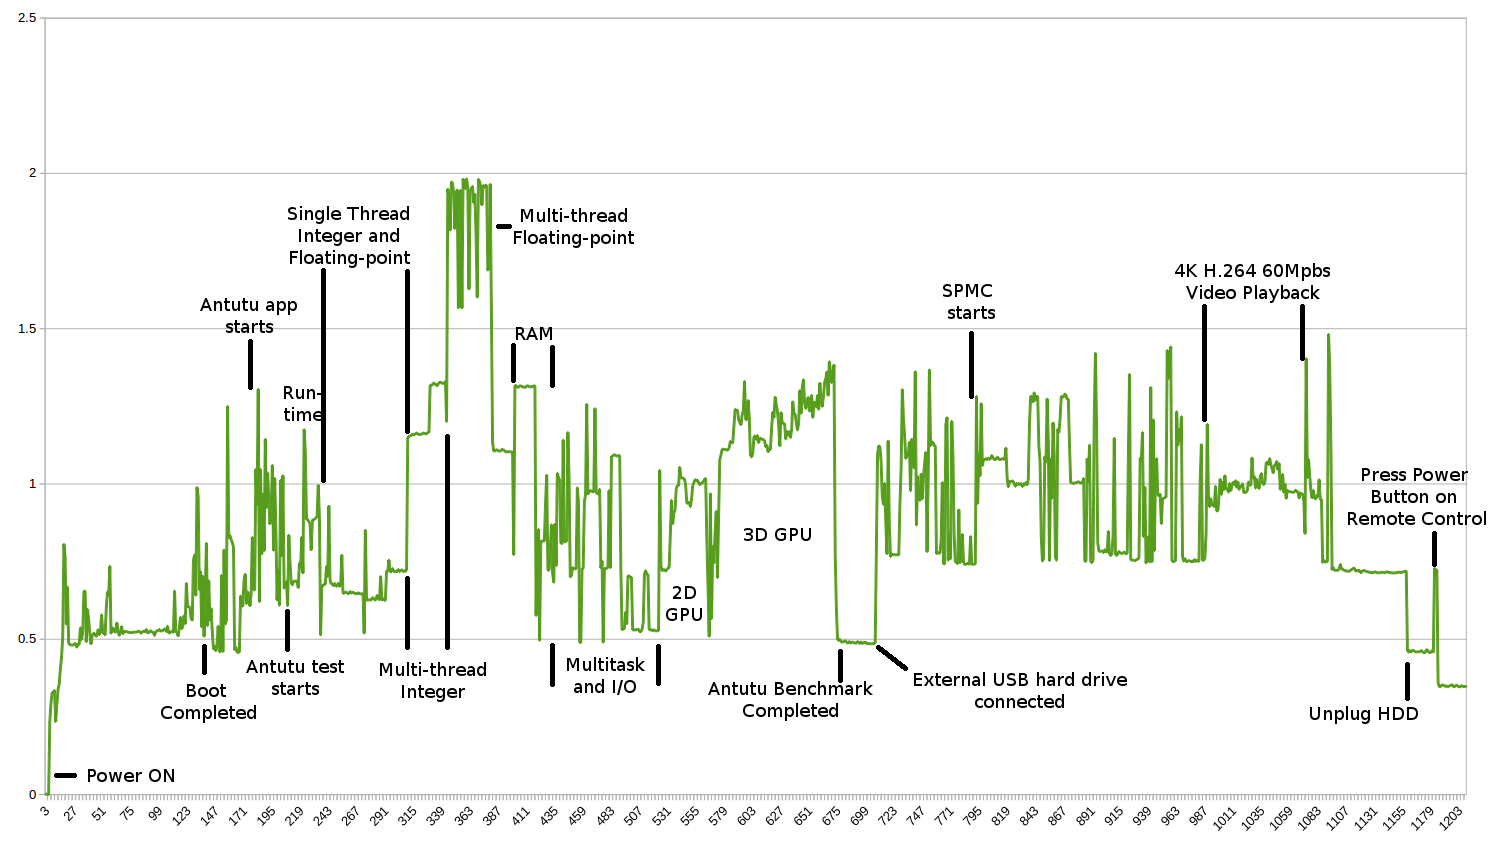
Vertical Axis: Amps; Horizontal Axis: Sample number (every 0.5 second)
I had a few more problems with Open Hour Chameleon, as the HDMI signal would turn off from time to time including during multi-threaded floating point benchmark, 3D GPU benchmark, and playing a 4K video. At the end of the video playback, I completely lost video output, and even after removing the hard drive I could not access the UI, so I just press the power button on the remote and it went into standby. The value on the chart above is about 350 mA, but had I waited a few more seconds before stopping measurements it would have dropped to 100 mA.
3D GPU is not the most power hungry task on Rockchip RK3288, as the crown goes to multi-threaded floating-point benchmark consuming close to 2A. I did not play the 4K video from the hard drive, because the screen would go black so often, so instead I played it from the network (SAMBA share), which should explain why the power consumption of this part is lower on RK3288 than on S812. Mali-T764 GPU power consumption in RK3288 also seems a bit lower compared to the one of Mali-450MP6 GPU found in Amlogic S812.
The “cut-off” current (where I lose video output) on RK3288 seemed to be around 1.3A, while I had no problem even at 1.4A on M8S, which must be because boards are different tolerances with regards to the minimum input voltage.
Since I did not play the video from the hard drive, the test are not really identical for both platforms, but for reference the average amperage on Open Hour Chameleon was 880 mA, while M8S averaged 811 mA.

Jean-Luc started CNX Software in 2010 as a part-time endeavor, before quitting his job as a software engineering manager, and starting to write daily news, and reviews full time later in 2011.
Support CNX Software! Donate via cryptocurrencies, become a Patron on Patreon, or purchase goods on Amazon or Aliexpress


Maybe using a calibrated current shunt would be better. They typically output 100mV, so for a 10A shunt you would only lose 0.1V at 10A. At the currents you are interested in, ie 2A the voltage drop would be insignificant.
@davef
I can see these are sold for $3 on Ebay: http://www.ebay.com/bhp/shunt-resistor
All are rated for 50, 100 or 500A however. Are these models any good?
I’d think this type of shunt resistor is also located inside the multi-meter, but at least it would avoid the impedance added by test leads.
second meter to monitor voltage would be nice, you could tell if your supply is the problem
you could even try to measure stuff inside those products, sounds like Rockchip has serious problems with internal supplies and is basically broken and unusable out of the box.
@rasz_pl
I used a simple multimeter for voltage, that’s how I could notice voltage drops.
However this one had no PC connection, so I can’t provide charts.
cnxsoft,
You are correct on both counts.
http://www.ebay.com/itm/1Pcs-FL-2-DC-75mV-10A-Current-Shunt-Resistor-for-Ammeter-Panel-Meter-/271646242086
And only a 75mV drop, which means you might be losing resolution at the lower current readings.
I will measure the voltage drop on my 10A range as I assumed that it was quite low, ie 100-200mV at 10A and therefore ignored it.
Sorry to hear about your usb2serial problems. You’ve got a ch340 device, the current linux driver simply ignores parity settings, but pretends to have accepted them. So it will “work fine” if you’re using a common baud rate with no parity, but will behave badly as soon as you want to communicate with a device using parity. It’s a work in progress, there’s patches available https://github.com/karlp/linux/tree/ch341-3.18.6 if you want to compile your own modules. Eventually the upstream driver will get these fixes 🙂
@Karl Palsson
Thank you! I’ve tried it in Ubuntu 14.04 + Linux 3.18 and it works.